Integrated Wireless Handset
User Guide
Publication Information
Toshiba America Information Systems, Inc.,Telecommunication Systems Division, reserves the right, without prior notice, to revise this information publication for any reason, including, but not limited to, utilization of new advances in the state of technical arts or to simply change the design of this document.
Further, Toshiba America Information Systems, Inc., Telecommunication Systems Division, also reserves the right, without prior notice, to make such changes in equipment design or components as engineering or manufacturing methods may warrant.
DKA-UG-WDTEL-VA
Toshiba America Information Systems, Inc. Telecommunication Systems Division All rights reserved. No part of this manual, covered by the copyrights hereon, may be reproduced in any form or by any means—graphic, electronic, or mechanical, including recording, taping, photocopying, or information retrieval systems—without express written permission of the publisher of this material.
Contents
Introduction
Organization... vii
Conventions ... viii
Related Documents ...x
Chapter 1 – The Grand Tour
Handset ...2Buttons ...5
Fixed ...5
Flexible ...5
Line ...5
Directory Number [DN] ...5
Primary Directory Number [PDN] ...5
Secondary Directory Number [SDN] ...6
Phantom Directory Number [PhDN] ...6
Liquid Crystal Display ...6
Volume Controls ...6
Charger Base ...7
Battery...8
Chapter 2 – Installation
Step 1: Select Location ...11Step 2: Charge Batteries for First Time ...12
Step 3: Verify Call Ringing Patterns...13
Chapter 3 - Handset Operation
Chapter 3 – Handset Operation
Powering On and Off ...15
Making Calls ... ...16
Receiving Calls ...16
Menu Options...17
Auto Answer (7 + FCN) ...18
Change Idle Message (13 + FCN) ...18
Click Volume (4 + FCN) ...19
Delete Last Number Dialed (12 + FCN) ...20
Display Contrast (8 + FCN)...20
Display Test Option (9 + FCN) ...21
Ringer Type (2 + FCN) ...21
Ringer Volume (3 + FCN)...22
Time Format (6 + FCN)...22
Using the Hookswitch...23
Adjusting Volume ...23
Mute ...24
Lock/Unlock the Dial Pad...24
Speed Dial ...25
Chapter 4 – Digital Features
Account Code Calls ...32Forced Account Codes...32
Voluntary Account Codes...32
Verified Account Codes ...33
Emergency Override of Forced Account Code Dialing ...33
Attendant Console Calling ...34
Automatic Busy Redial (ABR) ...34
Automatic Callback (ACB)...35
Automatic Hold...37
Call Forward (CF)...38
Call Forward Modes ...38
Chapter 4 - Digital Features
Call Forward–All Calls...40
Call Forward–Busy...40
Call Forward–No Answer...41
Call Forward–Busy/No Answer ...43
Call Forward–Fixed ...44
Call Forward–External...44
Call Hold ...46
Call Park Orbits...46
Call Pickup...49
Call Waiting ...52
Caller ID...52
Conference Calls ...53
Direct Inward System Access (DISA) ...53
Do Not Disturb...55
Door Lock ...55
Door Phones...55
DTMF Tones...56
ISDN Calling ...56
Message Waiting...57
Override Calls ...59
Executive Override ...60
Privacy Override ...61
Toll Restriction Override...61
Paging Announcements ...62
All Call Page...62
Release and Answer ...62
Saved Number Redial ...63
Speed Dial ...64
Tone/Pulse Dialing...66
Two CO Line Connection (Tandem) ...66
Transferring Calls ...69
Chapter 5 - Standard Features
Toshiba Voice Mail Integration ...70
Voice Mail Identification Code ...70
Message Retrieval...71
Call Forward to Voice Systems ...72
Chapter 5 – Standard Features
Account Code Calls ...76Forced Account Codes...76
Voluntary Account Codes...76
Verified Account Codes ...77
Emergency Override of Forced Account Code Dialing ...77
Attendant Console Calling ...78
Automatic Busy Redial ...78
Automatic Callback (ACB)...79
Call Forward ...80
Call Forward Modes ...81
Call Forward–All Calls...82
Call Forward–Busy...82
Call Forward–No Answer...83
Call Forward–Busy/No Answer ...84
Call Forward–External...85
Call Hold ...86
Call Park Orbits...87
Call Pickup...89
CO Line Queuing ...91
Conference Calls ...92
CO Line Connection (Tandem) ...93
Direct Inward System Access (DISA) ...93
Door Phones...96
Emergency Ringdown...96
ISDN Calling ...97
Message Waiting...97
Chapter 5 - Standard Features
Repeat Last Number Dialed...100
Speed Dial ...100
Transferring Calls ...101
Transferring with Camp-on ...101
Toshiba Voice Mail Integration ...102
Call Forward to Voice Systems ...102
Voice Mail Identification Code ...103
Message Retrieval...104
Appendix
Handset Specifications...106Troubleshooting ...107
Access Codes ...109
CO Line Access Codes ...109
Feature Codes ...110
Paging Access Codes ...112
Introduction
This guide describes the features and operation of the Strata AirLink™ Integrated Wireless handset in Strata DK systems and many non-Toshiba systems. The Strata DK systems that support the handset are:
♦ DK16e/DK16
♦ DK40i/DK40
♦ DK424/DK280 (Release 3.0 or higher)
If you have a non-Toshiba system, see your System Administrator for more information.
Organization
♦ Chapter 1 – The Grand Tour describes the features associated with the wireless handset and includes buttons and icons, Charger Base and its Light Emitting Diodes (LEDs), and tips for increasing battery life.
♦ Chapter 2 – Installation covers selecting the right location for your handset, charging the batteries, and verifying the IDs of the handset.
Conventions
€ Chapter 4 – Digital Features describes how the system features work with your
handset, such as Call Forward, Message Waiting, and Paging.
€ Chapter 5 – Standard Features describes how the system features work with your handset in the standard interface wireless system.
€ Appendix contains handset specifications, troubleshooting techniques, and feature access codes.
Conventions
Convention Description
Note
Elaborates specific items or references other
information. Within some tables, general notes apply to the entire table and numbered notes apply to specific items.
Important! Calls attention to important instructions or
information.
CAUTION!
Advises you that hardware, software applications, or data could be damaged if the instructions are not followed closely.
WARNING! Alerts you when the given task could cause personal
injury or death
[DN] Represents any Directory Number button, also known as an extension or intercom number.
[PDN] Represents any Primary Directory Number button (the extension number for the telephone).
[SDN]
Conventions
[PhDN] Represents any Phantom Directory Number button (an additional DN).
[B]
Represents the pre-programmed digital handset buttons 4~9. This is not applicable to the analog handset.
$ULDO#%ROG Represents telephone buttons.
Courier Shows a computer keyboard entry or screen display.
“Type” Indicates entry of a string of text.
“Press” Indicates entry of a single key. For example: Type prog then press Enter.
Plus (+)
Shows a multiple PC keyboard or phone button entry. Entries without spaces between them show a
simultaneous entry. Example: Esc + Enter. Entries with spaces between them show a sequential entry. Example: # +5.
Tilde (~) Means “through.” Example: 350 ~ 640 Hz frequency range.
➤ Denotes the step in a one-step procedure.
➤
Denotes a procedure.See Figure 10
Grey words within the printed text denote cross-references. In the electronic version of this document (Strata DK Library CD-ROM or FYI Internet
download), cross-references appear in blue hypertext.
Related Documents
Action/Response Table
Related Documents
Some documents listed here may appear in different versions on the CD-ROM, FYI, or in print. To compare and find the most current version, check the document title page.
You can find additional information about the Strata AirLink wireless handset and Strata DK systems in the following documents:
♦ Strata AirLink Integrated Wireless Handset Quick Reference Guide
♦ Strata DK Feature Description Manual
♦ Strata DK Installation and Maintenance Manual – Chapter 16 (Strata AirLink Systems)
For authorized users, Internet site FYI (http://fyi.tsd.toshiba.com) contains all Strata DK and Strata AirLink documentation and enables you to view, print, and download current publications.
1. Actions you perform appear in this column. They can consist of either a single step or a series of numbered steps.
The immediate response to the action performed appears in this column. Addtional notes and comments are also included.
2. When the action you perform results in a screen, menu, dialog box, etc., the example to the right displays.
27
The Grand Tour
1
Your Strata AirLink Integrated Wireless handset brings mobility and productivity to the office environment. Greater call access cuts down on “telephone tag” delays, and its compact design makes it easy to take with you.
The wireless handset provides reliability, long life, and outstanding performance. It has unsurpassed range, clarity, and fully secured communications using proprietary voice scrambling technology. It operates in the range of 1.9 GHz Unlicensed Personal Communication Service (UPCS) and represents state-of-the-art design and engineering.
It has the following features:
€ 12 handset volume adjustments (plus silent), 8 ring levels, and a lockable dial pad
€ Access to eight separate telephone systems, enabling movement from building to building, system to system
€ 70 internal Speed Dial (SD) memory locations with maximums of 8 characters for names and 30 characters for numbers, so that you can SD by name or code
If your wireless system interfaces to a Strata DK system, you can easily access many system features, such as Call Forwarding, Call Pickup, and Redial by using
)/6+ or )&1 + pre-programmed buttons 4~9.
See Chapter 3 – Handset Operation on Page 15, Chapter 4 – Digital Features on
Handset
Handset
Your wireless handset (shown at right) stores up to eight system and handset IDs that are configured by your System Administrator.
The handset has a two-line Liquid Crystal Display (LCD) that shows alphanumeric information, including the idle message, date, call duration, icons and specific call activity.
Table 1 briefly describes the functions of the LCD fields, icons, and the fixed buttons.
Idle Message Date
Time/Call Duration
Volume/Scroll Buttons
Scroll/Lock Buttons Icon Display Area
END CALL
Handset
Table 1 LCD Fields, Fixed Buttons, and Icons Descriptions
Handset Description
LCD Fields
Idle Message Area Displays an idle message.
Date Displays the current date.
Time/Call Duration Displays the call duration and current time.
Icon Display Area Displays icons that represent different battery and
handset conditions.
Fixed Buttons
3:5 Turns the power On and Off.
)/6+ Performs hookflash functions in analog systems only.
)&1
Activates the handset menu options and enables features with the use of other buttons; for example, Call Forward, Transfer, Speed Dial, and Conference.
▲ Increases listening volume and scrolls forward through
menu options.
▼ Decreases listening volume and scrolls backward
through menu options.
672 Stores Speed Dial numbers/names and the idle message.
5&/ Recalls numbers stored in memory.
$%& Toggles handset between alpha and numeric modes.
&$// Places the handset off-hook to enable calling.
(1' Places the handset on-hook and exits from )&1, 672, and $%& modes. 5&/,
&/5 Erases one or more digits in the display.
Handset
Fixed Buttons
(continued)
&Æ Scrolls forward through the Speed Dial list and locks/unlocks the dial pad.
)&1+41 Places calls on Hold.
)&1+51 Conferences or transfers calls.
)&1+61 Retrieves messages.
Icons
Indicates off-hook or ringing.
Indicates battery strength—one bar is low and four is high.
Indicates the currently configured ring volume.
ABC Indicates the alpha mode—for entering displayed letters in memory.
Indicates signal strength—one bar is low and four is high.
Indicates a message waiting.1
Indicates that your handset is forwarded.1
1. Available in Strata DK systems only.
Table 1 LCD Fields, Fixed Buttons, and Icons Descriptions (continued)
Buttons
Buttons
If your handset interfaces to the Strata DK telephone system using a digital port, the handset buttons have special capabilities as discussed in the following paragraphs. If it does not or you are interfaced to a non-Toshiba system, the handset does not have these capabilities.
Fixed
The handset buttons, 1~3, are fixed as Hold (FCN + 1), Conference/Transfer (FCN + 2), and Message Waiting (FCN + 3).
Flexible
The handset buttons, 4~9, are assigned in programming to system features by the System Administrator. The buttons can also be used as [DNs], [PhDNs], and [SDNs] or CO lines.
Line
In Strata DK systems, line buttons enable you to directly access outside Central Office (CO) lines. You can have a handset flexible button (4~9) assigned as /LQH. If your handset does not have /LQH, and you want to access outside CO lines, use the access codes listed in Table 9 on Page 109.
Directory Number [DN]
The [DN] buttons consist of [PDNs], [SDNs], and [PhDNs] that are your extension or intercom number. You can have multiple [DN] buttons on your handset, including [DNs] belonging to a secondary handset [SDNs].
Primary Directory Number [PDN]
Liquid Crystal Display
Secondary Directory Number [SDN]
The [PDN] of another extension that appears on your handset is an [SDN]. You cannot set Call Forward or a VMID code for [SDNs] on your handset.
Phantom Directory Number [PhDN]
You can have up to four [PhDNs] dedicated to a station or shared by a group of stations (for example, as a common telephone number for an entire department). You can only set the Call Forward and VMID code for [PhDNs] that are owned by your handset. You can have a separate Message Waiting button and mailbox for up to four [PhDNs] on your handset.
Liquid Crystal Display
The 18-character LCD gives you essential call information, handset status, and the current time. When you are on a call, it gives you up-to-the-minute call-duration time. All displays are updated automatically as call processing proceeds or handset status changes.
Volume Controls
Your handset has volume increase (▲) and decrease (▼) buttons for controlling the ring and button (“key click”) volume levels. See “Click Volume (4 + FCN)”on Page 19 and “Ringer Volume (3 + FCN)”on Page 22 for more information.
C F - A 2 0 1 J A N 0 1 T U E
Charger Base
Charger Base
The handset comes with a Charger Base (shown at right) that has front and rear slots.
The front slot functions as a cradle for the handset and a charger for the handset battery. It provides rapid charging only.
The rear slot is for a spare battery and automatically discharges when it detects that discharging is necessary.
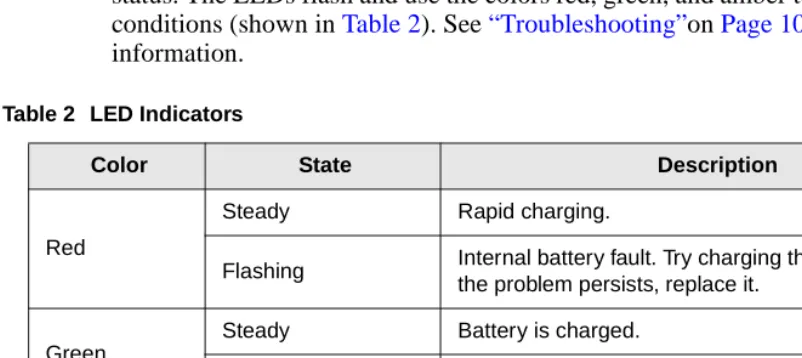
The LEDs indicate battery charging
status. The LEDs flash and use the colors red, green, and amber to indicate different conditions (shown in Table 2). See “Troubleshooting”on Page 107 for more
information.
Table 2 LED Indicators
Color State Description
Red
Steady Rapid charging.
Flashing Internal battery fault. Try charging the battery again. If the problem persists, replace it.
Green
Steady Battery is charged.
Flashing Battery is charged, but check standby/talk time.
Amber
Steady Charger is evaluating the battery status or waiting for the battery to finish charging.
Flashing Short circuit or over-discharged battery.
Amber/Green Alternate Flashing Battery is discharging.
2959
Battery
Battery
The handset uses one Nickel Metal Hydride (NiMH) battery. When fully charged it provides up to 4 hours of talk and 40 hours of standby time.
➤ ➤ ➤
➤ To charge the battery
i Return the handset to the Charger Base.
Important! The battery must charge for two continuous hours to operate properly.
➤ ➤ ➤
➤ To discharge the handset or spare battery
1. Insert the spare battery in the rear slot of the Charger Base
If the LED alternates between green and amber, leave the battery in the Charger Base to complete discharging.
After the discharge cycle completes, the LED changes to steady red which indicates rapid charging is in progress.
...or the handset with its battery in the front slot.
Battery
Removing and Re-installing the Battery
CAUTION! If you have to remove the battery, turn off the power first. This saves your menu changes and Speed Dial (SD) additions since the last time you turned on the power.
➤ ➤ ➤
➤ To remove the battery
1. Press the battery release in the direction of the arrow (shown at right).
2. Lift out the battery.
➤ ➤ ➤
➤ To re-install the battery
1. Fit the battery notches into the base of the handset (shown at right).
2. Snap the upper part of the battery into the handset.
3019
Battery Release
3020
Handset Battery
X X
X X
Handset without Battery
Installation
2
This chapter describes installation procedures and how to charge the handset batteries.
Important! The Strata AirLink Wireless System must be programmed before the handset operates.
Step 1: Select Location
1. Select a location for your handset and Charger Base. Avoid excessive heat or humidity.
2. Place the handset and charger on a desk or tabletop near a standard 120V AC outlet.
Battery
Step 2: Charge Batteries for First Time
1. Remove the handset carrying case, if it has one.
2. Make sure the power is off.
3. Insert the handset (battery in it) in the front slot of the charger (shown at upper right).
The Handset LED changes to amber and then to red, indicating rapid charging.
Note If you place a fully charged battery in the charger, it detects the full charge and cancels rapid charging. The Handset LED changes to amber, red, and then green.
4. If you have a spare battery, insert it in the rear slot of the handset charger (shown at lower right).
The Battery LED changes to amber while waiting for the handset to finish charging or alternates between green and amber, indicating discharge is in progress.
5. Remove the handset or spare battery when the LEDs change to a steady green.
The steady green LED indicates a fully charged battery. The charger switches to a “trickle charge” until you remove the handset or spare battery.
FLSH PWR FCN
STO
CALL END CLR
1 2 3
4 5 6
7 8 9
ª 0
RCL ABC
ABC DEF
MNO JKL
*
GH I
PQRS TUV # WXYZ
3911
Battery
Important! Do not use the battery before it has completed the rapid charge cycle, even if the handset battery icon displays full strength. The battery must charge for two continuous hours. Reduced talk/standby time result under these conditions.
Step 3: Verify Call Ringing Patterns
Your handset ringing pattern is set in system programming. Some systems use the internal call ring pattern for incoming outside calls – one second on, three seconds off. A distinct outside call ring pattern is available – 0.4 seconds on, 0.2 seconds off, 0.4 seconds on, three seconds off.
Step 4: Verify System/Handset IDs
Handset Operation
3
This chapter describes handset operation, including powering on and off, menu functionality, and SD. Your handset can be configured for digital or standard operation. See Chapter 4 - Digital Features and Chapter 5 - Standard Features for features specific to each handset.
Powering On and Off
i Press 3:5 (toggles on or off).
The handset beeps.
Note Strata DK system time appears shortly after the handset is first powered on.
T O S H I B A _ 1 _ D E C _ 9 8
Making Calls
Making Calls
You can make calls outside the telephone system by dialing direct or using CO Line Access Codes. See “CO Line Access Codes”on Page 109 for more information.
➤ ➤ ➤
➤ To make an internal call
Receiving Calls
i Enter a telephone number and press
&$//
If the called number is forwarded, this displays:
Then, the Call Forward destination number [210] displays.
...or press &$// first and the telephone number.
You hear dial tone and your call is connected.
i Press &$//. The call connects.
Note Auto Answer mode connects to a call without pressing &$//.
C A L L I N G 0 0 0 1 5
C A L L F O R W A R D T O
0 0 0 2 5
T A L K T O 2 1 0
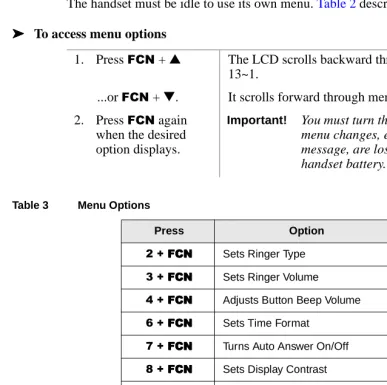
Menu Options
Menu Options
The handset must be idle to use its own menu. Table 2 describes each option.
➤ ➤ ➤
➤ To access menu options
1. Press )&1 + ▲ The LCD scrolls backward through menu options 13~1.
...or )&1 + ▼. It scrolls forward through menu options 1~13 .
2. Press )&1 again when the desired option displays.
Important! You must turn the power off first or all menu changes, except to the idle message, are lost if you remove the handset battery.
Table 3 Menu Options
Press Option
5#.#)&1)&1)&1)&1 Sets Ringer Type
6#.#)&1)&1)&1)&1 Sets Ringer Volume
7#.#)&1)&1)&1)&1 Adjusts Button Beep Volume
9#.#)&1)&1)&1)&1 Sets Time Format
:#.#)&1)&1)&1)&1 Turns Auto Answer On/Off
;#.#)&1)&1)&1)&1 Sets Display Contrast
<#.#)&1)&1)&1)&1 Tests Icon Display
44#.#)&1)&1)&1)&1 Deletes All SD Numbers
45#.#)&1)&1)&1)&1 Deletes Last Number Dialed
Menu Options
Auto Answer (
: + )&1)
Change Idle Message (
46 + )&1,Important! Do not use the full 18 characters because the date displays also.
1. Press )&1 + ▼
(seven times)
...or : + )&1.
2. Press )&1 to toggle on
Note When a call comes in, you only hear a “click,” similar to the click you hear when you press a button.
...or toggle off.
3. Press (1'. Clears the display and saves the last selected value.
1. Press )&1 + ▼ (13 times)
...or 46 + )&1.
2. Press )&1#again. The handset changes to alpha mode and displays the “ABC” icon. The current message displays.
A U T O A N S W E R
f n : 0 7
A U T O A N S R O N
f n : 0 7
A U T O A N S R O F F
f n : 0 7
C H A N G E I D L E M S G
f n : 1 3
Menu Options
Click Volume (
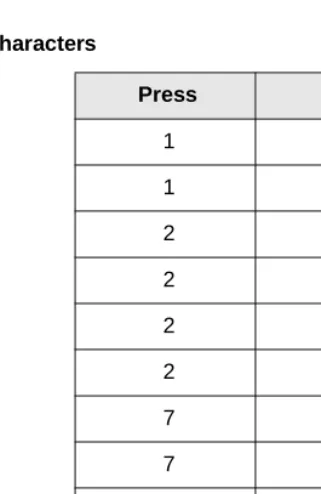
7 + )&1, 3. Press the charactersor numbers for a new message.
See Table 4 for more information.
4. Press 672 + (1'. The new idle message is stored in memory.
Table 4 Special Characters
Press Result
1 1
1 –
2 A
2 B
2 C
2 2
7 S
7 7
9 9
-
Å *&Æ space
0 zero
1. Press )&1 + ▼(four times)
...or 7 + )&1.
K E Y C L I C K V O L U M E
Menu Options
Delete Last Number Dialed (
45 + )&1)
Display Contrast (
; + )&1,2. Press )&1#again. You hear levels of beeper volume or this displays:
Note Your choices are VOL1~3 and silent.
3. Press (1'. Clears the display and saves the last selected value.
1. Press )&1 and ▼ (12 times)
...or 45 + )&1.
2. Press )&1 again.
3. Press )&1 once more to confirm
If you confirm, the Last Dialed Number (LDN) is deleted.
...or (1' to cancel. Returns you to the idle message.
4. Press (1'. Clears the display and returns you to the idle message.
1. Press )&1 + ▼
(eight times)
...or ; + )&1.
K E Y C L I C K S I L E N T
f n : 0 4
D E L L A S T # D I A L E D
f n : 1 2
P R E S S F C N T O D E L E T E f n : 1 2
D I S P L A Y C O N T R A S T
Menu Options
Display Test Option (
< + )&1,Ringer Type (
5 + )&1, 2. Press )&1 until thecontrast that you want is visible.
There are seven types of contrast available.
3. Press (1'. Clears the display and saves the last selected value.
1. Press )&1 + ▼(nine times)
...or < + )&1.
2. Press )&1 again to toggle the test on and off.
When the test is off, this displays:
When the test is on, all icons display and the
alphanumeric area fills with boxes.
3. Press (1'. Clears the display and saves the last selected value.
1. Press )&1 + ▼ (twice)
...or 5 + )&1.
2. Press )&1 again. You hear the chosen ringer type (1~8).
3. Press (1'. Clears the display and saves the last selected value. C O N T R A S T T Y P E 3
f n : 0 8
D I S P T E S T O P T I O N
f n : 0 9
P R E S S F C N F O R T E S T
f n : 0 9
R I N G T Y P E O P T I O N
Menu Options
Ringer Volume (
6 + )&1,Time Format (
9 + )&1, 1. Press )&1 + ▼(three times)
...or 6 + )&1.
2. Press )&1 again. You hear levels of ringer or this displays:
3. Press (1'. Clears the display and saves the last selected value.
1. Press )&1 + ▼(six times)
...or 9 + )&1.
2. Press )&1 again. Your format or 12H OR 24Hdisplays.
3. Press )&1 again. The values are toggled between 12Hand 24H. 4. Press (1'. Clears the display and saves the last selected value.
R I N G E R V O L U M E
f n : 0 3
R I N G E R S I L E N T
f n : 0 3
T I M E F O R M A T
Using the Hookswitch
Using the Hookswitch
Note This feature is only available to handsets that use the BSIA interface to Strata DK systems.
The ordinary telephone hookswitch is located in the handset cradle of your telephone. Your handset has a special button that acts as a hookswitch ()/6+).
➤ ➤ ➤
➤ To use the hookswitch during a call
➤ ➤ ➤
➤ To flash a CO line
Adjusting Volume
You have 12 volume settings that adjust the calling party voice level.
i Press ▲
...or ▼ until you reach the level you want.
i Press )/6+. You hear dial tone.
1. Press )/6+ + &78 You hear dial tone.
2. Press#BBBBBBB. Note The access code depends on the Centrex or PBX that you have. Check with your System Administrator.
3. Enter a Centrex or PBX feature access code or extension number.
Mute
Mute
There are two types of mute—voice and ringer. Voice mute temporarily disconnects the handset microphone and the other party cannot hear you. Ring mute temporarily disconnects the ringer during an incoming call without affecting the call.
➤ ➤ ➤
➤ To mute your voice while in conversation
i Press and hold ▼ for about one second. This displays:
➤ ➤ ➤
➤ To mute the ringer of an incoming call
i Press &/5.
➤ ➤ ➤
➤ To cancel the mute feature
i Press ▲.
Lock/Unlock the Dial Pad
You can lock/unlock the dial pad to avoid the accidental pressing of the buttons. The handset must be idle.
Note You cannot use any buttons except 3:5 when the dial pad is locked. The dial pad automatically unlocks when you receive an incoming call and then relocks again when the call ends.
➤ ➤ ➤
➤ To lock the dial pad
i Press and hold &Æ.
➤ ➤ ➤
➤ To unlock the key pad
i Press and hold &Æ ...or turn off the power.
Speed Dial
Speed Dial
Your handset stores 70 SD numbers internally—10 are dialed by pressing 1 button. You can also assign SD memory locations or names. If a number or name is longer than 18 digits, it scrolls to the next LCD line.
Important! Turn the handset power off before removing the battery or all SD numbers are lost.
➤ ➤ ➤
➤ To find the available memory locations
➤ ➤ ➤
➤ To store a SD number
1. Press#&Æ +5&/. FULL: is the number of used locations, and FREE: is the number of available locations.
2. Wait
...or press (1'.
The idle message displays.
1. Enter a telephone number and press
672.
A default SD location (10) displays.
2. Input the location that you want.
3. Press 672 again.
F U L L : 0 0 F R E E : 7 0
1 2 : 1 5
S T O R E A T M E : 1 0 ?
1 2 : 1 5
Speed Dial
➤ ➤ ➤
➤ To cancel storing a number
i Press (1'.
➤ ➤ ➤
➤ To edit stored SD numbers
➤ ➤ ➤
➤ To cancel the editing process at anytime
i Press (1'.
➤ ➤ ➤
➤ To SD using buttons 0~9
1. Enter a memory location and press
5&/
...or 5&/ + ▲, ▼,
&Æ, or
-
Å to search for the number.2. Press &/5. The number is deleted character by character.
3. Enter the new digits and press 672.
1. Press and hold 3~<. The number stored for that button dials and displays.
2. Release the button. The call connects.
0 2
E D : I T
Speed Dial
➤ ➤ ➤
➤ To SD using memory locations 10~69
➤ ➤ ➤
➤ To scroll memory locations for SD numbers
➤ ➤ ➤
➤ To program a pause
1. Dial a memory location (43~9<).
2. Press 5&/ + &$//. Note Reserve memory locations 0~69 for your most frequently called numbers.
1. Press 5&/. The name and the first nine digits of the number displays.
2. Press ▲ or ▼ to search
...or &Æ
...or
-
Å.Each SD number displays.
3. Press &$//. The displayed number rings.
1. Press and hold
-
Å.2. Enter 3a<,
-
, and &. A one-second pause is programmed.8 5 3 1 2 1 2 1 2 : 1 5
R E C A L L L O C A T I O N
1 2 : 1 5
P
Speed Dial
➤ ➤ ➤
➤ To enter a “wait”
➤ ➤ ➤
➤ To delete one stored number
1. Press &$//. You can continue dialing.
2. Press and hold &Æ.
1. Enter a memory location and press
5&/
...or 5&/ + ▲, ▼,
&Æ, or
-
Å.The handset searches memory.
2. Press &/5. You are prompted to confirm the deletion.
3. Press &/5 again The number/name is deleted.
...or (1' to cancel.
W
1 2 : 1 5
J O H N 0 1 D E L E T E ?
Speed Dial
➤ ➤ ➤
➤ To delete all numbers
To familiarize yourself with the features of your handset, you need to know how it is configured. See you System Administrator for specific information.
If you have the handset configured for digital operation, see Chapter 4 – Digital Features, beginning on Page 31. If you have the handset configured for standard operation, see Chapter 5 – Standard Features, beginning on Page 75.
1. Press )&1 + ▼ until the message at right displays
...or (in idle mode),
44 + )&1. 2. Press )&1.
3. Press )&1 again
...or (1' to cancel.
All SD numbers/names are deleted, and this displays:
4. Press (1' again to exit.
D E L A L L S P E E D D I A L
1 2 : 1 5
P R E S S F C N T O D E L
1 2 : 1 5
S P E E D D I A L D E L E T E D
Digital Features
4
This chapter describes Strata AirLink handset features when it is configured to digital ports in Strata DK16, DK16e, DK40, DK40i, DK280 (Release 3.0 and higher), and DK424 telephone systems. The handset has many of the same features as the Digital Telephone (DKT) including Account Codes, Automatic Busy Redial (ABR), and Call Forward (CF).
Each feature is programmed by your System Administrator to flexible buttons 4~9. Buttons 1~3 are fixed as Hold (FCN + 1), Conference/Transfer (FCN + 2), and Message Waiting (FCN + 3).
Account Code Calls
Account Code Calls
Account Codes are used for billing, call tracking, and line restriction applications. The codes are recorded and printed in a SMDR report.
Forced Account Codes
Forced Account Codes are set in system programming to record outgoing calls only. When they are set at your station, you are required to enter the code before dialing a telephone number.
➤ ➤ ➤
➤ To use a Forced Account Code
Voluntary Account Codes
Voluntary Account Codes are entered anytime after accessing a CO line or during a call. If you enter the code after accessing a CO line, you are reconnected to the outside caller or you hear dial tone.
If the system is also set for Verified Account Codes, you must enter that code also after entering the Voluntary Account Code. If the code is not entered, the call is not validated for the SMDR report.
An exception is the Voluntary Account Code that changes the Toll Restriction classification of your station. This code accesses telephone numbers outside your usual dialing area and must be entered prior to dialing the telephone number.
For example, if your station is restricted to local area calls, you can make out-of-state calls by using a Voluntary Account Code set in system programming.
1. Press &$//. You hear dial tone.
2. Enter a CO line Access Code.
See Table 9 on Page 109.
3. Enter the Forced Account Code.
You hear dial tone if you have entered a valid Account Code or busy tone, if invalid.
Account Code Calls
➤ ➤ ➤
➤ To use a Voluntary Account Code
Verified Account Codes
Some Strata DK systems verify the entered Forced or Voluntary Codes. These codes are called Verified Account Codes, and they are entered with the Voluntary Account Code. See your System Administrator for more information.
Emergency Override of Forced Account Code Dialing
Forced Account Codes are bypassed when emergency numbers, including 911 are dialed. See your System Administrator for these numbers:
Alarm Reset
Your Strata DK system can be connected to a facility alarm system. All telephones produce a startling tone whenever this alarm is activated.
i Press &$// + $ODUP#5HVHW#()&1 + [B]). 1. Press &$//#+
$FFRXQW#&RGH#
()&1 + [B])
You hear dial tone and the CO line is placed on hold.
Note Your conversation is not interrupted. ...or )&1 + 5 + &79#
+ Account Code
You hear dial tone. You can hear the caller, but they cannot hear you or the Account Code entry.
1) 911 2) 3)
E N T E R A C C O U N T
Attendant Console Calling
Attendant Console Calling
You can call the Attendant Console using up to three ways, depending upon system programming.
➤ ➤ ➤
➤ To call any Attendant Console
➤ ➤ ➤
➤ To call a particular console
➤ ➤ ➤
➤ To make an emergency call to a console
Automatic Busy Redial (ABR)
When an outside number is busy, you can activate ABR. Strata DK automatically redials the number at regular intervals. If the number is still busy, ABR resets and tries again.
Note This feature may not be supported by some or all of the lines in your system. See your System Administrator for more information.
ABR is not attempted while your station is busy, but continues to time-out. A P (pause) displays (shown at right) before redialing the number.
i Press &$// + 3. The call rings any Attendant Console and rotates between the consoles if there is more than one console is installed.
i Press &$// and dial the console [DN].
The call rings the console. Your System Administrator can provide the Attendant Console’s internal numbers.
i Press &$// + &733. The In-EMGR LED flashes on all consoles.
Automatic Callback (ACB)
➤ ➤ ➤
➤ To activate ABR
➤ ➤ ➤
➤ To answer an ABR call
➤ ➤ ➤
➤ To cancel ABR
i Press &$//#+ &77.
Automatic Callback (ACB)
When you reach a busy, Do Not Disturb (DND) station, or a busy line group, you can have the system automatically call you back. If you have Least Cost Routing (LCR), the system also redials the station or line group for you. If not, you must enter the station number again.
Note The access code for ACB depends on system programming. See your System Administrator for more information.
1. Press $XWR#%XV\#
5HGLDO ()&1 + [B]) ...or )&1 + 5#+ &77.
You hear confirmation tone.
2. Press (1'. Note The system redials, up to 15 times, every 30 or 60 seconds, depending on system
programming.
i Press &$// within 30 seconds when your handset rings.
ABR has already connected to the number.
Note If you do not answer within 30 seconds, you hear a muted ring for another 30 seconds, then the call disconnects.
A U T O R E D I A L S E T
Automatic Callback (ACB)
➤ ➤ ➤
➤ To set ACB
➤ ➤ ➤
➤ To answer an ACB call
➤ ➤ ➤
➤ To cancel ACB to busy or DND station
i Press $XWR#
&DOOEDFN ()&1 + [B]) + (1'.
You hear two seconds of dial tone, then busy tone.
...or 7+ (1'.
i Press &$//. Your handset rings at a fast rate. Answer within three rings or ACB is canceled.
If the ACB was set for a busy CO Line, the seized line number displays.
If you hear busy tone after answering, the called party has already received or originated another call. ACB is still activated, and you are called again when the station is available.
i Press &$//&$//&$//&$// + &76&76&76&76 +
(1' (1' (1'
(1'.
A U T O C A L L B A C K O N
1 2 : 1 5
S T 1 5 A C B 1 2 : 1 5
L I N E 4 A C B
Automatic Hold
Automatic Hold
You can place your call on hold automatically by pressing an outside line, a [DN], a [PhDN], or )&1 + 4. You can also switch between calls if your handset and the Strata DK is programmed for this feature. See your System Administrator for more information.
➤ ➤ ➤
➤ To use Automatic Hold
i While on a call, press another line, [DN] or [PhDN] to make or receive the new call. The first call is put on hold, and you are connected to the incoming call.
➤ ➤ ➤
➤ To switch between calls
➤ ➤ ➤
➤ To retrieve a held call
i Press the line, [DN], or [PhDN] + &75 ...or )&1 + [B].
1. Press the line, [DN], or [PhDN] of the held call.
You are connected to the first held call.
2. Press the line, [DN], or [PhDN] of the second held call.
You are connected to the second call and the first call is on hold again.
Call Forward (CF)
Call Forward (CF)
You can assign CF destinations for each [DN] on your handset (up to one [PDN] and four [PhDNs]). Each [DN] can be independently set for a different CF feature. CF must be set before the call is received and has priority over the Station Hunt feature.
If you set CF from a [PDN] or [PhDN]:
€ You must set the CF from your handset.
€ Your handset must be programmed as the owner of the [PDN] or [PhDN].
Note If you hear a re-order tone when following any of the CF steps, your handset is not the owner of the [PDN]/[PhDN].
If CF is set, the following calls to your station forward (except in CF–External mode):
€ Internal
€ Auto Attendant
€ CO lines calls that ring only at your station
€ Transferred CO line or station
CO lines that ring more than one station do not forward.
Call Forward Modes
You can set your handset [PDNs] or [PhDNs] for these CF modes:
€ CF–All Calls forwards all calls immediately (your handset does not ring when
called).
€ CF–Busy forwards calls immediately when your station, [PDN], or [PhDN] is
busy or in the DND mode.
Call Forward (CF)
€ CF–No Answer forwards all calls if you fail to answer within a designated time
(set by you when you enable the feature).
€ CF–Busy/No Answer forwards all calls immediately whenever you are busy, in
the DND mode, or after ringing and you do not answer the call within a designated time (set by you when you enable the feature).
€ CF–Fixed forwards all internal, private, or DID CO line calls immediately to a
station or voice mail device set in system programming. Your station does not ring when called and must be assigned with#&DOO#)RUZDUG#WR= ()&1 + [B]) in system programming.
€ CF–External forwards new incoming calls directed to your [PDN] to a
destination outside of the system. [PhDNs] assigned to your handset do not call forward to external destinations. Internal calls and transferred calls to your [PDN] also do not forward to external destinations.
Only incoming calls over CO lines dedicated to immediately ring your [PDN], the private CO /LQH ()&1 +[B]), and/or DID line, CF externally. Any of the other CF modes can be set for your [PDNs] or [PhDNs] simultaneously with CF–External.
Using Call Forward Buttons
If your digital handset has been programmed for CF buttons ()&1 + [B]), you can set the following CF features for a [PDN]: &DOO#)UZG#$OO#&DOOV, &DOO#)UZG#
%XV\, &DOO#)UZG#1R#$QVZHU, &DOO#)UZG#%XV\21$QV, &DOO#)RUZDUG#
([WHUQDO, and &DOO#)RUZDUG#WR=#(CF–Fixed feature).
Using Access Codes
Call Forward (CF)
Call Forward–All Calls
➤ ➤ ➤
➤ To cancel a CF–All Calls
i Press &$// + &DOO#)UZG#$OO#&DOOV ()&1 + [B]) ...or &$// + [PDN] + &934 + (1'.
Call Forward–Busy
1. Press &$// + &DOO#
)UZG#$OO#&DOOV#
()&1 +#[B])
...or &$// + [PDN]/ [PhDN] + &934.
You hear confirmation tone.
2. Enter the destination [DN].
3. Press &DOO#)UZG#$OO#
&DOOV#()&1 +#[B]) ...or (1'#(if access code used).
Calls are forwarded to the stored [DN], in this case
203.
1. Press &$// + &DOO#
)UZG#%XV\#+)&1 +# [B])
C A L L F O R W A R D T O
1 2 : 1 5
F O R W A R D T O 2 0 3
1 2 : 1 5
T O S H I B A 2 4 M A R 9 9
1 2 : 1 5
N O . 2 1 0 C F T O
Call Forward (CF)
➤ ➤ ➤
➤ To cancel a Call Forward—Busy
i Press &DOO#)UZG#%XV\ ()&1 +#[B]) + (1' ...or &$// + [PDN] + &934 + (1'.
Call Forward–No Answer
...or &$// + [PDN]/ [PhDN] + &935.
You hear confirmation tone.
2. Enter the destination [DN].
3. Press &DOO#)UZG#
%XV\#()&1 +#[B]) ...or (1' (if access code used).
Calls are forwarded to the stored [DN], in this case,
203.
1. Press &$// + &DOO#
)UZG#1R#$QVZHU#
()&1 +#[B])
...or &$// + [PDN]/ [PhDN] + &936.
You hear confirmation tone.
2. Enter the destination [DN].
N 0 . 2 1 0 C F T O 2 0 3
1 2 : 1 5
T O S H I B A 2 4 M A R 9 9
1 2 : 1 5
N O . 2 1 0 C F T O
1 2 : 1 5
N O . 2 1 0 C F T O 2 0 3
Call Forward (CF)
➤ ➤ ➤
➤ To cancel a CF–No Answer
i Press &DOO#)UZG#1R#$QVZHU ()&1 + [B]) + (1' ...or &$// + [PDN] + &934 + (1'.
3. Enter the time delay (3;a93) seconds.
Note Skip this step if you do not want to change the time.
The LCD displays the amount of time entered (16).
4. Press &DOO#)UZG#1R#
$QVZHU#()&1 + [B])
Calls are forwarded to the stored [DN], in the case,
203.
...or 5HGLDO#()&1 + [B]), then (1'#(if access code was used in Step 1).
Notes
♦ If the DK system is programmed for Announce Calls, the handset only rings. It does not have a speaker to announce the call.
♦ Calls do not forward unless the calling party presses 4 or 5LQJ ()&1 + [B]) to toggle the handset. It rings first, the forwards.
5. Press & + (1'. Calls are forwarded to the stored [DN], in the case,
203.
Note If the DK system is programmed for Announce Calls, the handset only rings. It does not have a speaker to announce the call.
1 6 S E C 1 2 : 1 5
T O S H I B A 2 4 M A R 9 9
1 2 : 1 5
T O S H I B A 2 4 M A R 9 9
Call Forward (CF)
Call Forward–Busy/No Answer
➤ ➤ ➤
➤ To cancel a CF–Busy/No Answer
i Press &DOO#)UZG#%XV\21$QV ()&1 + [B]) + (1' ...or &$// + [PDN] + &934 + (1'.
1. Press &$// + &DOO#
)UZG#%XV\21$QV#
()&1 + [B])
...or &$// + [PDN]/ [PhDN] + &937.
You hear confirmation tone.
2. Enter the destination [DN].
3. Enter the time delay (3;a93) seconds.
Note Skip this step, if you do not want to change the time.
The LCD displays the amount of time entered (16).
4. Press &DOO#)UZG#
%XV\21$QV#()&1 + [B])
...or 5HGLDO, then
(1' (if access code used in Step 1).
Calls are forwarded to the stored [DN]. N O . 2 1 0 C F T O
1 2 : 1 5
N O . 2 1 0 C F T O 2 0 3
1 2 : 1 5
Call Forward (CF)
Call Forward–Fixed
Call Forward–External
➤ ➤ ➤
➤ To cancel a CF–External
i Press &DOO#)UZG#([WHUQDO#()&1 + [B]) ...or &$// + &9:3 + (1'.
1. Press &$// + &DOO#
)UZG#WR=#()&1 + [B]).
All calls forward to a station [PDN] or voice mail device set in system programming.
2. Press &DOO#)UZG#WR= a second time.
Feature is canceled.
1. Store the destination number at Station SD location code 49.
Notes
♦ Only perform Step 1 the first time CF-External is set or when you change the destination. It is not necessary to store the destination each time; it remains in system memory.
♦ The LCR access code “9” cannot be used.
2. To set CF-External, press &DOO#)UZG#
([WHUQDO ()&1 +# [B])
...or the [PDN] +
&9:3.
Call Forward (CF)
➤ ➤ ➤
➤ To change a remote forwarding destination number
If Call Forward-External mode is set at your station, you can change the forwarding destination from a telephone outside of the system.
1. Call into the Strata DK system over a CO line programmed for DISA.
You hear ringback tone signal, then internal dial tone for 10 seconds. Try again if you hear busy tone.
Note See the System Administrator for DISA telephone numbers.
2. After you get dial tone, press &9:3 + your [PDN].
You hear a confirmation tone.
If a number is not dialed, the system automatically makes the DISA CO line ring as a normal incoming call. Then, if the call is not answered within 15 seconds after the ringing starts, it disconnects.
3. Enter the Remote CF–External security code.
You hear a confirmation tone. See the System Administrator for the security code that is assigned to your handset in system programming.
4. Enter the new destination.
Notes
♦ You can enter an internal number, Voice Mail number, or a CO line access code + an external telephone number.
♦ With some systems, you can dial a line group code instead of a CO line number access code. (See “CO Line Access Codes”on Page 109 for access code information.)
Call Hold
Call Hold
➤ ➤ ➤
➤ To return to the call on hold
Call Park Orbits
The Call Park feature holds calls temporarily in an orbit. Anyone can retrieve a call from the orbit using the same or a different station. There are 20 General Park Orbits for a Strata DK system and 1 Personal Park Orbit for each station.
Once you have parked a call in an orbit, you can:
€ Hang up and retrieve the parked call at a later time
€ Access a voice paging device to announce the parked call for pickup from another station
If the parked call is not retrieved within a specified time, the call rings back to your handset. If you are talking when the parked call recalls, you hear two short beeps (tones), three seconds apart.
i Press )&1 + 4. Note Caller ID displays the telephone number or calling party name if your Strata DK system has that capability.
i Press &$// + )1& + [B] of the [DN], [PhDN], or CO line that is on hold.
You are reconnected to the held call. If you do not return to the held call within a specified time, the call rings your handset.
If you are busy on another call when the held call recalls your station, you hear two tone bursts of two beeps each, three seconds apart. When you end the second call, the first call rings your station.
The call remains on hold at your station indefinitely. H O L D N O . 6 7 5 3
Call Park Orbits
You can answer the parked recall by putting the new call on hold or end the second call and answer the parked recall by hanging up. The parked call remains camped onto your handset until you respond.
➤ ➤ ➤
➤ To park a call in an orbit
1. Press 3DUN#LQ#2UELW ()&1 + [B])
You hear dial tone.
...or )&1 +#5#+
&665
2. Enter a General Orbit Number (<33~<4<)
...or a valid [PDN]
You hear a one second confirmation tone. The call is parked in an orbit, or to an assigned [PDN]. If an orbit number is busy, enter another number.
...or <<<. The system parks the call on the lowest vacant orbit number and displays it.
3. Press (1'. Once the call is parked, you can make or receive other calls.
Note If the parked call is not retrieved within a specified time, the call rings back to your handset and displays on the LCD.
E N T E R
O R B I T N O . 1 2 : 1 5
6 7 9 3 P K O R B I T 9 0 0
1 2 : 1 5
L 2 P K O R B T 9 0 0
Call Park Orbits
➤ ➤ ➤
➤ To retrieve a parked call
➤ ➤ ➤
➤ To park and page a call
1. Press &$// + 3DUN#
LQ#2UELW ()&1 + [B])
You hear dial tone.
...or &665#and enter the orbit number.
You are reconnected to the parked call.
1. Press 3DUN#DQG#
3DJH ()&1 + [B])
...or &$// + &664.
2. Enter the general orbit number (<33~<4<)
The call is parked on the lowest vacant orbit number or [PDN]. After you enter an orbit number, a short burst of dial tone prompts you to enter the Page access code.
...or a valid [PDN]
...or <<<. The system parks the call on the lowest vacant orbit number and displays it.
L 2 P K O R B I T 9 0 0
1 2 : 1 5
H O L D L N 2 E N T E R O R B #
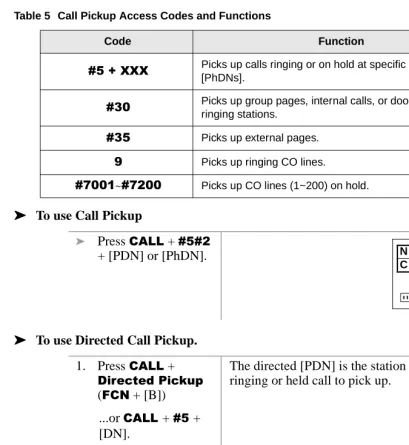
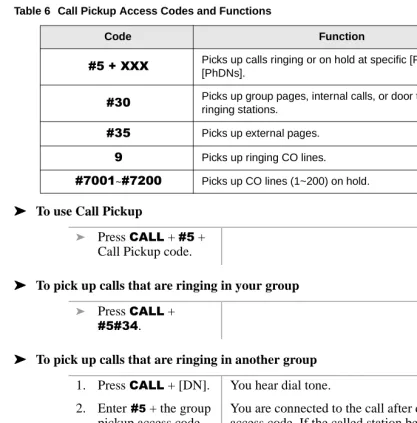
Call Pickup
Call Pickup
You can pick up a call that is ringing at another station or on hold and other types of calls with the Call Pickup feature. Table 5 describes the functions of each code.
Stations are assigned in system programming to Pickup Groups. As many as 20 groups can be enabled to easily pick up external (new or transferred) or internal calls that are ringing stations in your group or in other groups. You can belong to more than one group. See the System Administrator for group assignments.
You can pickup internal calls (station-to-station), Group Pages, and All Call Pages. If these types of calls occur at the same time, the pickup priority is station-to-station and then Page calls in the order of occurrence. In some systems this feature can be applied to pickup All Call Page exclusively.
3. Enter a [DN] or Page Group or Zone access code.
After you enter an orbit number, a short burst of dial tone prompts you to enter the Page access code.
The LCD shows the held line and its orbit number.
See Tables 11 and 12 on
Page 112.
4. Make your announcement including the orbit number.
5. Press (1'.
H O L D L N 2 9 9 9 1 2 : 1 5
H O L D L N 2 L 2 O R B 9 0 0
Call Pickup
➤ ➤ ➤
➤ To use Call Pickup
➤ ➤ ➤
➤ To use Directed Call Pickup.
Table 5 Call Pickup Access Codes and Functions
Code Function
&8#.#;;; Picks up calls ringing or on hold at specific [PDNs] or [PhDNs].
&63 Picks up group pages, internal calls, or door telephones ringing stations.
&68 Picks up external pages.
< Picks up ringing CO lines.
&:334~&:533 Picks up CO lines (1~200) on hold.
i Press &$// + &8&5 + [PDN] or [PhDN].
1. Press &$// +
'LUHFWHG#3LFNXS
()&1 + [B])
The directed [PDN] is the station that has the ringing or held call to pick up.
...or &$//#+ &8#+ [DN].
2. Dial the [PDN]. If more than one call is on hold, the call on the lowest button number is picked up first. Ringing calls are picked up over held calls as a priority.
N O . 2 0 4 2 0 0 C A L L 2 0 1
Call Pickup
➤ ➤ ➤
➤ To pick up a ringing CO line in a tenant system
➤ ➤ ➤
➤ To pick up calls that are ringing in your group
➤ ➤ ➤
➤ To pick up calls that are ringing in another group
i Press &$// +
'LUHFWHG#3LFNXS#
4~7#()&1 + [B])
You are connected to a incoming CO line call for a Tenant Group (1~4).
Notes
€ In non-tenant systems, 'LUHFWHG#3LFNXS4# picks up any ringing CO line.
€ This feature does not pickup held lines or transferred CO lines that are ringing; use Directed Call Pickup.
...or &$// +#[DN] +
&8<.
i Press &$// +
*URXS#3LFNXS
*URXS#3LFNXS
*URXS#3LFNXS
*URXS#3LFNXS
()&1)&1)&1)&1 + [B])
...or a [DN] +
&8&67 &8&67&8&67
&8&67. You are connected to the call.
1. Press &$// + [DN]. You hear dial tone.
2. Enter#&8 + the group pickup access code (&653~&66<).
You are connected to the call after dialing the group access code. If the called station belongs to more than one group, any of the Group Pickup codes associated with those groups can pick up the call.
Call Waiting
➤ ➤ ➤
➤ To pickup a page or internal call
Call Waiting
When you are talking, incoming calls are camped onto your station. You must end the conversation or transfer the call to another station to answer the camped on call.
Caller ID
Your handset can be programmed to display Caller ID names and numbers if the local telephone company has the capability. See your System Administrator for more information.
You can also toggle between the name and number by pressing )&1 + ▲ while the handset is ringing. Otherwise, the call is put on hold and recalls within the allotted time.
1. Press &$//. You hear dial tone.
2. Enter &8&63. You are connected to the caller who originated the internal or page call. The page circuit is released.
i Press )&1 + 4 The existing call is placed on hold, and the camped-on line rings your station.
...or if your handset has the Auto Hold feature, just press the assigned [DN].
You are connected to the transferred call.
Note See your System Administrator to find out if you have Auto Hold.
H O L D 6 7 5 3
Conference Calls
Conference Calls
This feature enables you to add other parties to an existing call. You can conference up to:
€ Two stations and two CO lines
€ Three stations and one CO line
€ Four stations
➤ ➤ ➤
➤ To make a conference call
Direct Inward System Access (DISA)
Outside callers with telephones that send Dual-tone Multi-frequency (DTMF) tones (pushbutton dialing) can call into the system on DISA CO lines and dial stations or outgoing CO lines without going through an attendant or operator.
1. While on a call, press
)&1 + 5.
You hear dial tone.
2. Dial a [DN] or access a CO line and dial the telephone number.
The number is not conferenced unless the user answers the call. If you receive a busy tone or no answer, press )&1 + 5 to return to the original call.
3. When the called party answers, press )&1 + 5.
All parties are conferenced. If the second call was placed on a [DN] or CO line that appears on your handset.
4. Repeat the procedure to add other CO lines or [DNs], not
Direct Inward System Access (DISA)
➤ ➤ ➤
➤ To make a direct inward station call with DISA
➤ ➤ ➤
➤ To make an outgoing call with DISA
1. From outside the system, dial the DISA CO line telephone number.
You hear a ringback tone signal, then an internal dial tone for 10 seconds.
If you do not dial within 10 seconds, the system automatically causes the DISA CO line to ring a telephone or group of telephones designated in system programming. Then, if the call is not answered within 15 seconds after the ringing starts, it disconnects.
2. When you hear dial tone, dial a [DN].
You hear ring tone. When the station answers, you are connected.
If the call is not answered after 6 rings or 24 seconds, (whichever comes first) you hear busy tone.
3. If you receive busy tone or want to dial another number while the station is still ringing, press
-
. Repeat Step 2.To call another station after completing a DISA station call, the internal party must transfer you. Station and System Page cannot be accessed on DISA calls.
1. From outside the system, press CALL + the DISA CO line telephone number.
You hear a ringback tone signal, then an internal dial tone for 10 seconds.
If you do not dial within 10 seconds, the system automatically rings the DISA CO line as a normal incoming call. Then, if the call is not answered within 15 seconds after the ringing starts, it disconnects.
2. When you hear dial tone, enter a CO line or CO line access
Do Not Disturb
Do Not Disturb
If your handset is in DND, CF–Busy, or CF–Busy/No Answer, internal, external and transferred calls do not ring on it. Calls are forwarded to Voice Mail or another station if your [PDN] or [PhDN] appears at those stations. You can make calls while in the DND mode.
Important! There is no warning tone for incoming Executive or Busy Override.
➤ ➤ ➤
➤ To activate DND
Door Lock
Your handset can have up to five Unlock Door buttons that unlock doors in your facility.
i Press &$// + 8QORFN#'RRU#()&1 + [B]). The door unlocks for three or six seconds (set in system programming).
Door Phones
You can call a door telephone and monitor the immediate area surrounding it. Only digital and electronic stations can be called by door telephone users, but you can pick up these calls when they are incoming.
...or enter a CO line or CO line access code + the DISA security code.
You hear dial tone.
Note See the System Administrator for the DISA security code number. If the correct code is not entered, the call disconnects.
i Press &$// + 'R#
1RW#'LVWXUE#()&1 + [B]).
DTMF Tones
➤ ➤ ➤
➤ To call and/or monitor a door telephone
DTMF Tones
Some devices or services require DTMF tones (
-
and &), such as a Voice Mail device or computer output service. DTMF tones are automatically enabled on stations with System Speed Dial (SSD). If you do not have SSD, you must first dial-
, & to enable these tones.This feature disables the SSD during the call, but it is restored when you complete the call or place it on hold.
i While on an outside call, press
-
+ &, then send-
and#&, DTMF tones, and 3~<.Note This procedure must be repeated on each call.
ISDN Calling
To make outgoing calls using an Integrated Services Digital Network (ISDN) trunks, you must be an ISDN subscriber and be connected to a Strata DK424 system with Release 4.0, or higher. ISDN trunks offer faster call connection setup and more connection circuits.
1. Press &$//. You hear dial tone.
2. Enter the door phone [DN].
3. If the door phone is ringing another station, press [DN] +
&8&63.
You are connected to the door phone.
Note &8&63 access is a system option that cannot
be turned on for your system.
N O . 2 0 4 D O O R P H 1 A
Message Waiting
Making an ISDN outgoing call is handled automatically with a timer or by you initiating the ISDN “Start” sequence. The method depends on system programming. See your System Administrator for more information.
➤ ➤ ➤
➤ To make an outgoing call to an ISDN trunk
Message Waiting
Your handset has a fixed Message Waiting (MW) button ()&1 + 6) to retrieve messages and a special icon (shown at right) that displays.
If you call a busy station or it does not answer, you can leave a message waiting indication at the station. The Msg LED at the called station flashes and the user can call you back by pressing 0VJ with the flashing LED.
➤ ➤ ➤
➤ To retrieve messages
1. Press &$// + ISDN trunk access code (8xx)
...or dial 9 for LCR.
2. Press 6WDUW#+)&1 + [B]).
The dialed digits are not sent until you press 6WDUW or until the timer expires.
1. When you see the MW icon displayed, press &$// + )&1 + 6.
Your message is retrieved.
Note If the MW icon continues to display, you have more messages—repeat Step 1 to retrieve them.
...or &$// + &73;.
C A L L 1 4 5 - 1 0 5
1 2 : 1 5
N O . 2 0 4 C A L L 2 0 3
Message Waiting
➤ ➤ ➤
➤ To set a MW indication at another telephone
➤ ➤ ➤
➤ To cancel the MW indication at another telephone
➤ ➤ ➤
➤ To cancel your MW icon
2. You can bypass the first message and listen to the next message by repeating Step 1.
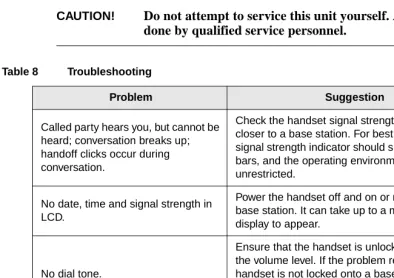
This feature is available for Strata DK40, DK280, Release 3.1 and higher, and DK424 Release 1 and and higher.
3. After receiving the message, press (1'.
1. Press &$// + an internal number.
Important! If you are calling a standard telephone, it must have a MW lamp. All Toshiba digital or electronic telephones have MW lamps.
2. Press )&1 + 6 +
(1'.
The MW lamp turns on at station 203.
i Press &$// + the called number + :: +
(1'.
The MW indication on the called station turns OFF.
i Press &$// + &73< + (1'.