GFI Product Manual
Administration & Configuration
Manual
http://www.gfi.com [email protected]
The information and content in this document is provided for informational purposes only and is provided "as is" with no warranty of any kind, either express or implied, including but not limited to the implied warranties of merchantability, fitness for a particular purpose, and non-infringement. GFI Software is not liable for any damages, including any consequential damages, of any kind that may result from the use of this document. The information is obtained from publicly available sources. Though reasonable effort has been made to ensure the accuracy of the data provided, GFI makes no claim, promise or guarantee about the completeness, accuracy, recency or adequacy of information and is not responsible for misprints, out-of-date information, or errors. GFI makes no warranty, express or implied, and assumes no legal liability or responsibility for the accuracy or completeness of any information contained in this document.
If you believe there are any factual errors in this document, please contact us and we will review your concerns as soon as practical.
All product and company names herein may be trademarks of their respective owners.
GFI FaxMaker is copyright of GFI SOFTWARE Ltd. - 1999-2011 GFI Software Ltd. All rights reserved. Document Version: FM-ACM-EN-2.00.00
Contents
1 Introduction 1
1.1 About ... 1
1.2 Conventions used in this manual ... 1
1.3 System requirements ... 1
1.4 Installing GFI FaxMaker instructions ... 1
1.5 How GFI FaxMaker works - Sending faxes ... 2
1.6 How GFI FaxMaker works - Receiving faxes ... 3
2 Using GFI FaxMaker 5 2.1 How users send faxes ... 5
2.2 How users view received faxes ... 8
2.3 Monitoring GFI FaxMaker operation ... 9
3 General configuration settings 11 3.1 Fax Lines ... 11
3.2 Licensed users ... 18
3.3 Fax administrators ... 21
3.4 Email2Fax gateway ... 22
3.5 Dialling Options ... 24
3.6 Fax archiving ... 25
3.7 Log files ... 28
3.8 HP Digital Sender integration ... 28
3.9 Storing faxes ... 30
3.10 GFI FaxMaker Licensing information ... 31
3.11 Version information ... 32
4 Configuration - Sending faxes 33 4.1 Sending options ... 33
4.2 Document Conversion ... 34
4.3 Transmission reports ... 35
4.4 Header/Footer options ... 39
4.5 Call blocking ... 40
4.6 Public contacts ... 41
4.7 Coverpages ... 43
4.8 NetPrintQueue2FAX... 51
4.9 TextAPI & XMLAPI ... 55
4.10 Billing ... 56
5 Configuration - Receiving faxes 57 5.1 Receiving Options ... 57
5.2 Fax routing ... 58
5.3 Printers ... 70
5.4 Junk Fax filter ... 71
5.5 OCR ... 72
6 SMS 73 6.1 How to send an SMS ... 73
6.2 Receiving SMS ... 74
6.3 Requirements ... 75
6.4 Configure SMS settings ... 76
7 Installing GFI FaxMaker Client 89 7.1 System requirements ... 89
7.2 Installation procedure ... 89
7.3 Unattended installation ... 92
7.4 Using GFI FaxMaker Client ... 94
8 Uninstalling GFI FaxMaker 95 9 Glossary 97 10 Troubleshooting 99 10.1 Introduction ... 99
10.2 Troubleshooting options ... 99
10.3 Common issues ... 99
10.4 Knowledge Base ... 101
10.5 Web Forum ... 102
10.6 Request technical support ... 102
10.7 Build notifications ... 102
10.8 Documentation ... 102
11 Appendix 1: Microsoft Exchange 2000/2003 Connector 103 11.1 Creating the connector automatically ... 103
11.2 Creating the connector manually ... 103
11.3 Removing the connector automatically... 106
11.4 Removing the connector manually ... 107
12 Appendix 2: Microsoft Exchange 2007/2010 Connector 109 12.1 Creating the connectors automatically ... 109
12.2 Creating the connectors manually ... 109
12.3 Removing the connectors automatically ... 110
12.4 Removing the connectors manually ... 110
List of tables
Table 1 - Real-time monitoring features 9
Table 2 - Add fax line options 12
Table 3 - Fax line device options 12
Table 4 - Fax line - Line options 13
Table 5 - Fax line advanced options 14
Table 6 - Fax line users 15
Table 7 - Manage fax modems 17
Table 8 - Advanced fax modem options 17
Table 9 - Managing licensed users and groups 18
Table 10 - Managing fax administrators 21
Table 11 - SMTP Connector options 22
Table 12 - POP3 Downloader options 23
Table 13 - Dialling options 24
Table 14 - Archiving to mailbox options 26
Table 15 - Archiving to database options 28
Table 16 - GFI FaxMaker log files 28
Table 17 - Storing faxes 30
Table 18 - Sending options 33
Table 19 - Document conversion options 34
Table 20 - Transmission reports options 36
Table 21 - Fax report templates 37
Table 22 - Fax report fields 38
Table 23 - Header and footer options 39
Table 24 - Stamping options 40
Table 25 - Coverpages 47
Table 26 - General front covernote options 49
Table 27 - Coverpage merge fields - sender‟s details 50 Table 28 - Coverpage merge fields - recipient‟s details 50
Table 29 - Coverpage merge fields 50
Table 30 - NetPrintQueue2FAX configuration options 53
Table 31 - TextAPI options 55
Table 32 - XMLAPI options 56
Table 33 - General receiving options 57
Table 34 - Fax routing methods 58
Table 35 - DTMF/DID routing options 59
Table 36 - OCR routing options 61
Table 37 - Routing rules user options 64
Table 38 - Fax routing to public folder 69
Table 39 - Printer properties 70
Table 40 - Junk fax filter options 71
Table 41 - OCR properties 72
Table 42 - GSM engines 76
Table 43 - SMS service properties 77
Table 44 - GSM mobile phone properties 79
Table 45 - In-built SMS server advanced proprties 80
Table 46 - In-built SMS server options 82
Table 47 - SMS service properties 82
Table 48 - Clickatell SMS service properties 84
Table 49 - SMS options 84
Table 50 - SMS routing properties tabs 86
Table 51 - SMS log files 87
Table 52 - Client installation - message forms options 90
Table 53 - Mail server settings 91
Table 54 - SMTP authentication options 92
Table 55 - Unattended client installation parameters 93
Table 56 - Performance options 99
Table 57 - Troubleshooting: Email2FaxGateway 100
Table 58 - Troubleshooting: Sending faxes 100
Table 59 - Troubleshooting: Receiving faxes 101
List of screenshots
Screenshot 1 - Sending a fax using the email client 5
Screenshot 2 - Printing document to fax 6
Screenshot 3 - The GFI FaxMaker Fax Message form 7
Screenshot 4 - Faxes are received in the inbox 8
Screenshot 5 - The GFI FaxMaker monitor 9
Screenshot 6 - The Line/Devices dialog 11
Screenshot 7 - Adding an ISDN channel 12
Screenshot 8 - The line options tab 13
Screenshot 9 - The advanced line/device options 14
Screenshot 10 - The users tab 15
Screenshot 11 - Line test tab 16
Screenshot 12 - Custom modem properties dialog 17
Screenshot 13 - List of GFI FaxMaker users and groups 18 Screenshot 14 - Import users from remote machine 20
Screenshot 15 - List of Fax administrators 21
Screenshot 16 - Email2Fax Gateway setup 22
Screenshot 17 - The POP3 connector 23
Screenshot 18 - Dialing options 24
Screenshot 19 - Archiving to an email archiving package 26
Screenshot 20 - Archiving properties 27
Screenshot 21 - Database configuration 27
Screenshot 22 - Configuring the Digital Sender 29
Screenshot 23 - HP Digital sender set-up 30
Screenshot 24 - Viewing current licensing information 31 Screenshot 25 - GFI FaxMaker version information 32
Screenshot 26 - Sending options 33
Screenshot 27 - Document conversion options 34
Screenshot 28 - Fax transmission report 35
Screenshot 29 - Fax transmission report options 36 Screenshot 30 - SMS transmission report options 37 Screenshot 31 - Header/Footer options for outgoing faxes 39 Screenshot 32 - Stamping options for incoming faxes 40
Screenshot 33 - Call blocking rules 41
Screenshot 34 - New call block entry 41
Screenshot 35- Public contacts node 42
Screenshot 36- Coverpage users 44
Screenshot 37- Coverpage options tab 45
Screenshot 38 - Creating a new coverpage 46
Screenshot 39 - Coverpage options 47
Screenshot 40- Front covernote users 48
Screenshot 41 - Creating a new front covernote 49
Screenshot 42 - Front covernote options 49
Screenshot 43 - A document ready to be printed to NetPrintQueue2FAX 51 Screenshot 44 - Printing a document to NetPrintQueue2FAX 52 Screenshot 45 - NetPrintQueue2FAX configuration 53
Screenshot 46 - Enforcing billing options 56
Screenshot 47 - Receiving options 57
Screenshot 48 - Creating a new DID route 59
Screenshot 49 - Creating a new MSN route 60
Screenshot 50 - OCR routing properties 61
Screenshot 51 - New search phrase - Creating a new OCR search phrase 61
Screenshot 52 - Creating a new Line route 62
Screenshot 53 - Creating a new CSID route 62
Screenshot 54 - Users to route incoming faxes to 64
Screenshot 55 - Automatically print fax 65
Screenshot 56 - Automatically backup faxes 66
Screenshot 57 - Routing properties - users that receive all incoming faxes 67 Screenshot 58 - Routing properties - specifying default fax routers 68 Screenshot 59 - Configuring the Network Share path 69
Screenshot 60 - Configuring printers 70
Screenshot 62 - OCR properties 72
Screenshot 63 - Sending SMS from email client 73
Screenshot 64 - Sending SMS from email client 74
Screenshot 65 - Received SMS viewed in email client 75 Screenshot 66 - Configuring the GFI Simple Inbuilt SMS server 77
Screenshot 67 - Inbuilt SMS server 78
Screenshot 68 - General GSM Mobile Phone Properties 79 Screenshot 69 - Advanced GSM Mobile Phone Properties 80
Screenshot 70 - List of inbuilt SMS devices 81
Screenshot 71 - In-built SMS Server Options 81
Screenshot 72 - Configuring an SMS service provider 82 Screenshot 73 - Configuring the Clickatell service 83
Screenshot 74 - SMS options 84
Screenshot 75 - Configuring SMS users 85
Screenshot 76 - SMS routing properties 86
Screenshot 77 - Choosing message form 90
Screenshot 78 - Specifying mail server 91
Screenshot 79 - Mail server authentication 92
Screenshot 80 - Specifying IP/Name of GFI FaxMaker machine 104 Screenshot 81 - Specifying FAX as an address space 105
Screenshot 82 - Specifying faxmaker.com 105
1
Introduction
1.1
About
GFI FaxMaker is a fax server that enables you to send and receive faxes and SMS using your email infrastructure. GFI FaxMaker for Exchange/SMTP integrates with Microsoft Exchange Server, Lotus Notes and with other SMTP/POP3 mail servers.
1.2
Conventions used in this manual
The following table contains a description of formatting conventions used in this manual:
CONVENTION DESCRIPTION
Additional information essential for the operation of GFI FaxMaker. Important notifications and cautions about commonly encountered issues.
► Step-by-step navigation instructions on how to access a function.
Bold text Names of controls within the user interface, such as nodes, menus and buttons. <Italic text> Parameters to replace with applicable value, such as custom paths and filenames. Text entry Indicates text values to key in, such as commands and addresses.
For any technical terms and their definitions as used in this manual, refer to the Glossary in this manual.
1.3
System requirements
For a complete list of system requirements and other installation settings, refer to the GFI FaxMaker Getting Started Guide available from:
http://www.gfi.com/faxmaker/manual
1.4
Installing GFI FaxMaker instructions
For a complete set of installation instructions and information on how to configure GFI FaxMaker for first use, refer to the GFI FaxMaker Getting Started Guide available from: http://www.gfi.com/faxmaker/manual
1.5
How GFI FaxMaker works - Sending faxes
STEP 1: VARIOUS METHODS USED TO SEND A FAX
Email: User sends fax via an email addressed to [email protected] (where 1111 is the fax number of the recipient).
GFI FaxMaker Client: User uses a GFI FaxMaker client application installed on his/her machine to send faxes.
NetPrintQueue2Fax: Users „print‟ content to send by fax to the NetPrintQueue2Fax printer driver. NetPrintQueue2Fax sends content to GFI FaxMaker for processing.
Text & XML API: Send faxes by configuring a text or XML file (API) and submit it to a central folder. GFI FaxMaker automatically picks up faxes stored within this folder.
STEP 2: MAIL SERVER ROUTES FAX TO GFI FAXMAKER
Mail server: Routes emails addressed to *@faxmaker.com to the GFI FaxMaker server.
STEP 3: GFI FAXMAKER PROCESSES FAX CONTENT
GFI FaxMaker: Processes received content and prepares it for transmission. Amongst others, GFI FaxMaker:
»
Resolves and formats the number to dial»
Converts content to fax format»
Adds any coverpages»
Adds any headers and footers»
Delivers content to fax device ready for transmissionSTEP 4: FAX TRANSMISSION
Fax Transmission: Fax device connects with recipient and transmits fax.
1.6
How GFI FaxMaker works - Receiving faxes
STEP 1: RECEIVE FAX CALL
Receive call: Sender connects to fax line and transmits fax.
Fax device: Receives fax content and forwards it to GFI FaxMaker.
STEP 2: GFI FAXMAKER PROCESSES FAX & CONTENT
GFI FaxMaker: Processes received fax. Amongst others:
»
(Optional) Blocks junk faxes.»
(Optional) Optically recognizes text in fax (OCR).»
Determines recipients according to fax routing settings.2
Using GFI FaxMaker
2.1
How users send faxes
There are various ways how users can send faxes: Via email
Printing content to GFI FaxMaker - NetPrintQueue2Fax Using the GFI FaxMaker Client application
TextAPI/XMLAPI
Via email
Screenshot 1 - Sending a fax using the email client
Licensed users can send faxes directly from their email client:
»
Address an email to [email protected], where faxnumber is replaced by the recipient‟s Fax number.»
Use the Microsoft Outlook address book for recipients that have a fax number configured.The first page of the fax contains the recipient‟s name, sender‟s name, email subject and email body. If the email includes attachments, these are included in subsequent pages of the fax.
This method is available for all email users, with no installation of other software or custom configurations required.
To use this method:
»
Configure mail servers to forward emails addressed to *@faxmaker.com,*@smsmaker.com, Fax:* and SMS:* to GFI FaxMaker. For more information, refer to the GFI FaxMaker Getting Started Guide available from:
http://www.gfi.com/faxmaker/manual
»
Add users in the Licensed Users list. For more information, refer to Licensed users chapter in this manual.Printing content to GFI FaxMaker - NetPrintQueue2Fax
Screenshot 2 - Printing document to fax
Users print content to the GFI FaxMaker printer driver - NetPrintQueue2Fax - to send faxes. Fax recipient number is keyed in within the document in a customizable format, for example Fax: 12345678.
This enables fax sending in any format that allows printing of content (without installing application on GFI FaxMaker machine).
This method also enables automatically customized fax sending to a number of recipients. For example, through Microsoft Word‟s Mail Merge feature you can send faxes to a large number of recipients.
Configure the NetPrintQueue2Fax printer driver on client machines to use this method. For more information, refer to NetPrintQueue2FAX chapter in this manual.
Using the GFI FaxMaker Client application
Screenshot 3 - The GFI FaxMaker Fax Message form
GFI FaxMaker Client application enables Fax message conversion and preview (.FAX format) directly from the clients‟ machines. It also provides an address book for fax contacts, or uses the Microsoft Outlook address book information.
Install the application on client machines to use GFI FaxMaker Client application. For more information, refer to Installing GFI FaxMaker Client chapter in this manual.
TextAPI/XMLAPI
Use XML or text files with information about the faxes to send. Store files to a central location and GFI FaxMaker automatically processes files located in this folder.
A wide range of applications can be configured to automatically create such files and automating the fax sending process.
2.2
How users view received faxes
Received faxes are forwarded to the user via email. The email will contain a fax report and the fax file included with the email as an attachment. Faxes can be attached in several formats, such as PDF.
Screenshot 4 - Faxes are received in the inbox
Configure routing options for GFI FaxMaker to route received faxes to the correct recipient. For more information, refer to Fax routing chapter in this manual.
2.3
Monitoring GFI FaxMaker operation
Screenshot 5 - The GFI FaxMaker monitor
Use the GFI FaxMaker Monitor to monitor GFI FaxMaker operation. It can be used to monitor multiple instances of GFI FaxMaker and both local and remote installations. Load GFI FaxMaker Monitor from Start ► Programs ► GFI FaxMaker ► GFI FaxMaker Monitor.
GFI FaxMaker Monitor shows status of: Table 1 - Real-time monitoring features
FEATURE DESCRIPTION
Status of fax lines & devices
Navigate to the Fax Server node. This displays the list of fax devices/lines and their status.
Other functionality:
»
Initialise - Start devices/lines that are not initialized.»
Abort - Stop a particular device/line.»
Debug - Generate a debug log of the device in the logs folder within the GFI FaxMaker installation folder.»
Change view - Change how to display list of devices/lines.»
Restart server - Restart the GFI FaxMaker Fax Server service.FEATURE DESCRIPTION
Faxes in queue Select the Queued Faxes node to show all faxes that are waiting to be sent. Other options:
»
Refresh - Refresh view of queued faxes»
Select all - Select all faxes in queue»
Grid - Show/hide grid lines»
Columns - Customize the columns to show per fax.»
Delete - Delete selected faxes from queue.»
Properties - View the properties of faxes in queue, including message date/time, sender and recipient.»
View logs - Load log file containing details about sent faxes.Status of the Message Transfer Agent
The Message Transport Agent is the transport service for SMTP, POP3 and SMS messages. Click Message Transfer Agent node to view important information and statistics about message transport.
»
Email2Fax Gateway - Shows activity of number of threads that perform POP3 down loading, fax preparation, SMTP sending etc.»
Inbound Queue - The number of faxes prepared for sending to SMTP clients.»
Inbound transfer thread - Shows activity of the process that sends faxes toSMTP clients.
»
Last file - The last file being processed.»
Outbound Queue - The number of faxes collected by the POP3 connector for queuing to fax server.»
Outbound transfer thread - Shows process activity that downloads POP3 mail from POP3 mailbox.»
Last address - Last email address or SMS number used by Message Transfer Agent.»
SMS transfer thread - Shows status of thread that prepares and transfers messages to SMS server.»
Incoming SMS transfer thread - Shows activity of incoming SMS. Click:»
Process messages - Forces the Message Transfer Agent to poll for any new fax/SMS.»
Restart - Click to restart the GFI FaxMaker Message Transfer Agent service.2.3.1
Installing GFI FaxMaker Monitor remotely
To monitor a remote fax server, install GFI FaxMaker Monitor on the remote fax server machine.
From the GFI FaxMaker installation, disable GFI FaxMaker Fax Server and select GFI FaxMaker Remote Monitor when selecting the components to install. In the next screen, specify the IP address or server name of the GFI FaxMaker server.
For more information how to run the GFI FaxMaker installation, refer to the GFI FaxMaker Getting Started Guide available from http://www.gfi.com/faxmaker/manual.
3
General configuration settings
3.1
Fax Lines
A fax line is a physical telephone line assigned to a fax device (modem or ISDN/fax card). Depending on the device type, fax devices may support multiple lines. GFI FaxMaker enables you to configure different options per fax line.
Screenshot 6 - The Line/Devices dialog
Fax lines are configurable from GFI FaxMaker Configuration ► Lines/Devices ►
Properties. For more information, refer to: Adding Fax lines to GFI FaxMaker
Editing Fax lines Deleting Fax lines
3.1.1
Adding Fax lines to GFI FaxMaker
1. Navigate to GFI FaxMaker Configuration ► Lines/Devices ► Properties and click Add….
NOTE: When adding new fax modems after installing GFI FaxMaker, click Detect in the Lines/Devices dialog to add them to the list of devices.
Screenshot 7 - Adding an ISDN channel 2. Specify the following details: Table 2 - Add fax line options
SETTING CONFIGURATION
Available fax lines Select the first available fax line number.
Device type Specify the type of fax device used.
Physical line/port Select the channel or port to configure.
Copy settings from
installed device To copy the settings of a previously configured fax line, select this option and specify the fax line to copy settings from. Click OK.
3. From the Device tab in the line properties dialog, configure: Table 3 - Fax line device options
DEVICE TYPE SETTINGS
ISDN
ISDN BRI CAPI2.0 devices ISDN PRI CAPI2.0 devices ANALOG CAPI2.0 devices Gateway devices
ISDN type - Select the ISDN device type.
MSN numbers - Enter the number to answer incoming calls for. Key in a full number entry (for example, 82733099) or a prefix number (for example, 82733 to answer all numbers in the range 82733000-8273099).
Answer All - Click to answer all incoming calls received on the ISDN channel.
Brooktrout Card type - Select the Brooktrout device type
Line capabilities - depending on the properties of your fax device, select the appropriate type, None, DTMF or DID/ISDN.
Tone dialling - If supported, select for faster dialling.
Wait for dialtone - Starts dialling only when a dial tone is established.
Rings until answer - Configure the number of rings before answering incoming calls.
GFI Fax Modem Driver Modem type - Select the fax modem type.
Advanced Modem Options - GFI FaxMaker ships with a number of pre-configured devices. Click to create new devices or manually configure device options. For more information, refer to Fax modem properties chapter in this manual.
Initialisation string - Displays the string used by the modem driver to initialize the modem.
Rings until answer - Configure the number of rings before answering incoming calls.
Tone dialling - If supported, select this option for faster dialling. If disabled, pulse dialling is used.
DEVICE TYPE SETTINGS
Check for busy tone - Checks if line is busy before sending fax.
Speaker mode - Configure speaker settings: Always Off, Until Connected
or Always On.
Speaker volume - Set the appropriate volume.
Microsoft Fax Modem Driver Type - Select the Fax type.
Rings until Answer - Configure the number of rings before answering incoming calls.
NOTE: Ensure that the Fax service is running from the Services applet.
Screenshot 8 - The line options tab
4. From the Line options tab, configure: Table 4 - Fax line - Line options
OPTION CONFIGURATION
Max. resolution Set the maximum resolution for faxes sent and received on this line.
Max. speed Set the maximum speed for faxes sent and received on this line.
Local fax ID This number is sent to recipient faxes as part of the transmission process. The fax number is usually entered here.
NOTE: Some PABX devices do not accept the local fax ID when making outbound calls. When the fax device is behind this type of PABX device, delete the Local Fax ID.
Receive incoming faxes Allow receiving faxes on this fax line.
Send outgoing faxes Allow transmission of faxes on this fax line.
Dial prefix & suffix If your lines are located behind a PBX, you can specify a dial prefix or suffix.
Do not dial prefix if fax number is
Exclude dialling of prefix when the fax number is less than or equal to a certain number of digits. This can be useful when using different providers for local, national or international faxes.
OPTION CONFIGURATION
Fax header Key in the text to show at the very top of a fax, for example the company name.
Number of retries Sets the number of times GFI FaxMaker will try to re-send a fax.
Retry delay Set a delay between retries, in seconds.
Disable use of ECM if
available By default, GFI FaxMaker automatically corrects errors caused by noise that interferes with the transmission of a fax. Select this option to disable automatic correction.
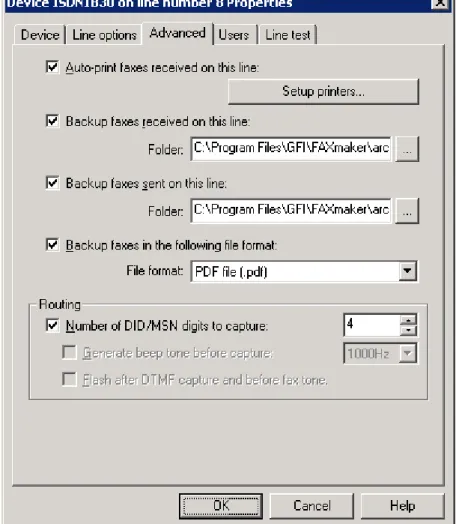
Screenshot 9 - The advanced line/device options 5. From the Advanced tab, configure: Table 5 - Fax line advanced options
OPTION CONFIGURATION
Auto-print faxes received on
this line Automatically print faxes received on this line. Click configure printing settings. Setup printers... to In the Incoming faxes auto-print setup, configure how to size faxes for printing or select Nearest size to automatically detect the appropriate size to use.
Click Print setup... to select the printer to print for that particular paper size.
Click OK.
Backup faxes received on this line
Stores a copy of all incoming faxes in a folder. Key in the folder where to store received faxes.
Backup faxes sent on this line
Stores a copy of all outgoing faxes in a folder . Key in the folder where to store received faxes.
Backup faxes in the following file format
OPTION CONFIGURATION
Number of DID digits to capture
Routes faxes to individual users based on the DID number. Set the number of digits to capture. For example, use 2 to capture from 00 to 99.
Generate beep tone before capture
Fax device gives a beep when answering a call as a signal to the user to enter the DTMF number. If available, it is recommended that this option is always selected. From the drop down list select the tone of the beep.
Flash after DTMF capture
and before fax tone Only used for Multitech modems. Select this option so that after successfully detecting a tone, the fax server goes 500ms on hook (flash).
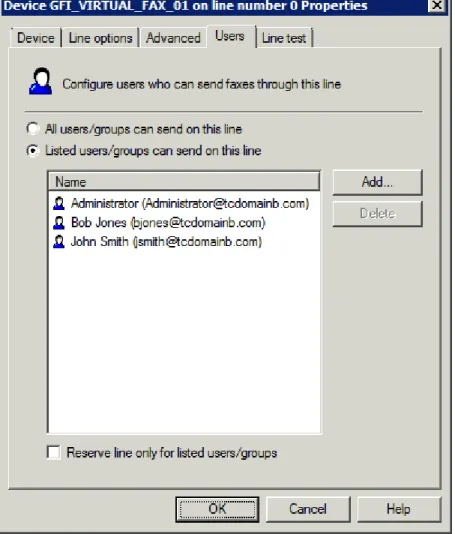
Screenshot 10 - The users tab
6. From the Users tab, select the users allowed to send faxes using this line. Configure: Table 6 - Fax line users
OPTION DESCRIPTION
All users/groups can send
on this line Allows all licensed users to send faxes on this line. Listed users/groups can
send on this line Limits the users that can send faxes on this line. Add… Specify users/groups allowed to send faxes on this line.
Delete Deletes selected users/groups from the list of allowed users.
Reserve line only for listed users/groups
Screenshot 11 - Line test tab
7. From the Line test tab, you can send a fax to test the line settings. Key in a fax number where to send the test fax in Fax number to dial and click Send test fax. Click Monitor test fax to launch the GFI FaxMaker Monitor and monitor the status of the test fax. 8. Click OK to save settings.
9. When changing settings for any lines/devices, it is necessary to restart the GFI FaxMaker Fax Server service for changes to take effect. Click Yes to restart.
3.1.2
Editing Fax lines
1. Navigate to GFI FaxMaker Configuration ► Lines/Devices ► Properties. 2. Select the device line to edit and click Properties.
3. Perform the required changes in the rule properties and click OK to save changes. 4. When changing settings for any lines/devices, it is necessary to restart the GFI FaxMaker Fax Server service for changes to take effect. Click Yes to restart.
3.1.3
Deleting Fax lines
1. Navigate to GFI FaxMaker Configuration ► Lines/Devices ► Properties. 2. Select the device line to remove and click Delete.
3. Click OK to save settings.
4. When changing settings for any lines/devices, it is necessary to restart the GFI FaxMaker Fax Server service for changes to take effect. Click Yes to restart.
3.1.4
Fax modem properties
GFI FaxMaker can send and receive faxes using a wide range of fax modems connected to the server‟s Communications ports.
To send faxes using these devices:
1. In the Lines/Devices list, add the modem as a GFI Fax Modem Driver.
2. In the device properties dialog, select the Modem type by model name and number, or select a Generic class that best matches device‟s properties.
3. Click Advanced modem options… and select: Table 7 - Manage fax modems
OPTION DESCRIPTION
New modem (current modem as template)…
Adds a new modem to modems lists. Initial properties are based on selected modem type. For information how to configure modem properties, refer to Custom Modem Properties section in this manual.
Edit modem… Loads the modem properties. For information how to configure modem properties, refer to Custom Modem Properties section in this manual.
Delete modem Removes selected modem from list.
Reset all modem drivers to default
Resets all modems properties to default. 4. Configure the other device/line options and click OK.
Custom Modem Properties
Screenshot 12 - Custom modem properties dialog
Customize the following options, based on fax modem specifications: Table 8 - Advanced fax modem options
OPTION DESCRIPTION
Modem type Key in a user friendly name for the modem type, such as the device brand, name or model number.
»
Flow control»
Fax class»
Voice chipset»
DLE codes methodOPTION DESCRIPTION
»
Thread priority»
Data initialization string»
Fax initialization string»
Voice initialization string»
Pre-command delay»
Character delayClick OK to apply settings.
3.2
Licensed users
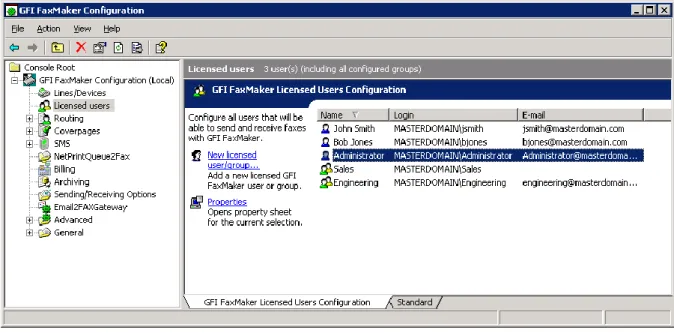
The list of users who can send or receive faxes must be configured in GFI FaxMaker.
Screenshot 13 - List of GFI FaxMaker users and groups
The list of licensed users is available from GFI FaxMaker Configuration ► Licensed Users node.
Table 9 - Managing licensed users and groups
MANAGING USERS/GROUPS DESCRIPTION
Adding users or groups Active Directory: To add users or groups click New licensed user/group.... Key in the user/group name and click OK.
No Active Directory: To add users click New licensed user/group.... Key in the user login name, Full name and E-mail address. Click Personal to enter more information. Click OK.
User/Group properties Right-click a user/group and click Properties.
NOTE: When GFI FaxMaker is not installed in an Active Directory environment, user properties are customizable. When GFI FaxMaker is installed in an Active Directory environment, user properties are imported from Active Directory.
Removing users/groups Right-click a user/group to delete and click Delete. Click OK to confirm.
NOTE: Deleted users are not recoverable and must be re-added.
NOTE: You can also create a dedicated Active Directory group (for example, GFI FaxMaker users) so that you can manage all GFI FaxMaker users directly in Active Directory.
3.2.1
Types of users
NOTE: Only applicable to the GFI FaxMaker Unlimited Users license.
Configure the types of users allowed to send/receive faxes using GFI FaxMaker. Navigate to
GFI FaxMaker Configuration ► Advanced► Miscellaneous node:
»
Allow non-AD users to send faxes - Allows all faxes/SMS to be processed by GFI FaxMaker, even if user is not in Active Directory.»
Only allow users in the Licensed user list to send faxes -allows a user to send faxes/SMS only if included in the Licensed User list.3.2.2
Importing list of users from CSV
NOTE: Only available if GFI FaxMaker is installed on a machine not connected to a domain.
GFI FaxMaker can import the list of users from a Comma Separated Values (CSV) file. This allows bulk addition of users.
Ensure that the text is formatted as follows:
"first name","last name","company","department","fax number","voice number","email address","display name","internet email address"
For example:
"Joe","Bloggs","MyCompany","Sales","+1-555-12345678","+1-555-8765432 1","[email protected]","Joe Bloggs","[email protected]"
NOTE: All fields can be left empty, except for Email address and Display name. Email address must be unique.
To import a list of users from a CSV file:
1. From GFI FaxMaker Configuration, right click Licensed users and select Import users from file….
2. Select CSV file and click Open.
3. Launch GFI FaxMaker Monitor and from Fax Server node click Restart server to restart the GFI FaxMaker Fax Server service.
3.2.3
Importing list of users from Windows
NOTE: Only available when GFI FaxMaker is installed on a machine not connected to a domain.
GFI FaxMaker can import the list of Windows users from the local or a remote machine. 1. Right-click Licensed users and select Import users….
Screenshot 14 - Import users from remote machine
2. (Optional) If importing list of Windows users from a remote machine, select Use remote server, key in server name or IP and click List users.
3. Select the users to add from the Users on server list and click Add.
4. To add a custom internal email domain, enter domain in Append domain name. 5. Click OK.
6. Launch GFI FaxMaker Monitor and from Fax Server node click Restart server to restart the GFI FaxMaker Fax Server service.
3.3
Fax administrators
Fax administrators monitor and manage the fax server. They are also emailed when certain critical conditions occur.
Screenshot 15 - List of Fax administrators
To manage the list of Fax administrator, from GFI FaxMaker Configuration navigate to
Advanced► Fax administrators.
Table 10 - Managing fax administrators
FUNCTION DESCRIPTION
Add administrators Click New….
Edit administrator properties Right-click administrator and select Properties. Remove administrators Right-click administrator and select Delete.
3.4
Email2Fax gateway
The Email2Fax gateway settings dictate how GFI FaxMaker communicates with the mail server for sending and receiving faxes.
3.4.1
Mail server settings
Configure the mail server to use when GFI FaxMaker sends emails:
1. From GFI FaxMaker Configuration, right-click Email2FaxGateway and select Properties.
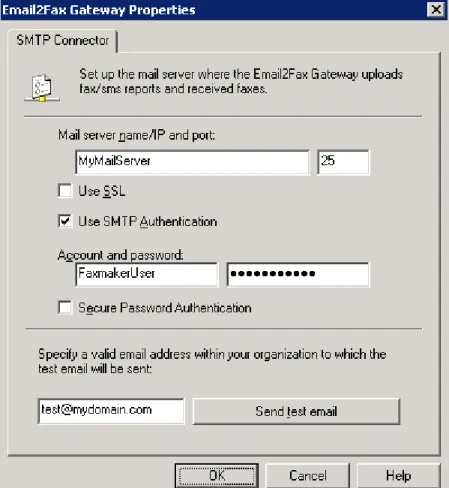
Screenshot 16 - Email2Fax Gateway setup
2. From the SMTP Connector tab, configure the following options: Table 11 - SMTP Connector options
OPTION DESCRIPTION
Mail server name/IP and port
Enter the name or IP address of the mail server and the port number.
Use SSL Instructs GFI FaxMaker to connect and communicate with the mail server using SSL.
Use SMTP Authentication Instructs GFI FaxMaker to connect to the mail server using a particular user credentials. Enter credentials in the Account and password text boxes.
Secure Password Authentication
Select this option if Secure Password Authentication is required by the mail server.
3. To ensure that GFI FaxMaker can send email through the configured mail server, enter an email address and click Send test email. Ensure that the test email is received in the mailbox. For troubleshooting Email2FaxGateway test failures, refer to Email2FaxGateway test fails chapter in this manual.
3.4.2
POP3 Downloader
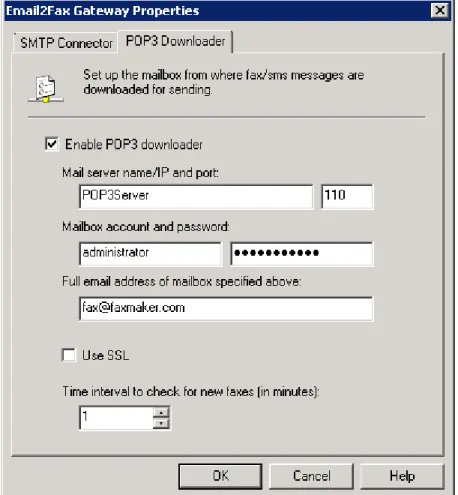
GFI FaxMaker can be configured to retrieve faxes and SMS for transmission from a POP3 mailbox. Configure the POP3 Connector to poll and download faxes from a dedicated GFI FaxMaker POP3 mailbox.
NOTE: Option not available if mail server is configured to route faxes and SMS to GFI FaxMaker.
NOTE: Ensure that POP3 mailbox is be dedicated to GFI FaxMaker. GFI FaxMaker downloads all emails contained mailbox for processing and emails are permanently deleted after download.
Configure POP3 mailbox settings:
1. From GFI FaxMaker Configuration, right-click Email2FaxGateway and select Properties.
Screenshot 17 - The POP3 connector
2. From the POP3 Downloader tab, configure the following options: Table 12 - POP3 Downloader options
OPTION DESCRIPTION
Enable POP3 downloader Enable downloading of faxes from a POP3 mailbox.
Mail server name/IP and port Enter the name or IP address of the mail server and the port number.
Mailbox account and password Key in credentials to access mailbox.
Full email address of mailbox specified above
The email address of the POP3 mailbox.
Use SSL Instructs GFI FaxMaker to connect and communicate with the mail server using SSL.
Time interval to check for new
3. Click OK.
3.5
Dialling Options
Dialling options enable you to configure area codes and other special dialing procedures. This ensures that GFI FaxMaker processes the fax number in a structured manner and dials numbers in the correct format for the phone system.
NOTE: GFI FaxMaker can only apply dialling configurations for fax numbers that are entered in the following format: +<country code> (<area code>) <fax number>. For example, +44 (0) 555 5555, +1 (151) 5555 5555, +356 2555 5555
To configure dialling options, from GFI FaxMaker Configuration right-click Advanced►
Dialling► Properties.
Screenshot 18 - Dialing options
IMPORTANT: Customize options for your country’s telephone dialling system. Failure to do so may cause fax transmission to fail.
Configure the following options: Table 13 - Dialling options
OPTION DESCRIPTION
My country code is Key in your country telephone code, excluding the international dial prefix (the dial prefix is usually defined as +). For example, for the United States the country code is 1.
Note: The dial prefix is the number that a user must dial to place an international call. The country code is the number identifying the country to call to.
My area code is Key in your area code.
International
OPTION DESCRIPTION
prefix) in front of the number. Configure the following options:
»
If dial string starts with my country code, strip it off - select this option to automatically remove the country code from the number when dialling a number containing the local country code. If numbers match this condition, a custom prefix can be added to the number.»
If dial string does not start with my country code - select this option to replace the + symbol with the international dial prefix, that is, the number required to place an international call from your country/area/telephone service provider, for example 00, 010, 0011, 011, etc...National dialling Configure dialling options when sending faxes within the same country but to a different area. GFI FaxMaker identifies a call as national when an area code is included in a number in round parenthesis, for example, (234)-56789012. Configure the following options:
»
If dial string contains my area code, strip it off - select to automatically remove area code from the number when dialling a number containing the local area code. If numbers match this condition, a custom prefix can be added to the number.»
If dial string does not contain my area code - select to add a custom prefix when dialling a national number.NOTE: The area code in the fax number must be included in round parentheses for the fax server to determine which part of the number is the area code.
Exceptions Some national dialling procedures can be more complex and some exceptions may be required, for example to handle multiple local area codes. Exceptions allow you to add a prefix and/or exclude an area code when a number matches a particular combination.
1. Click Exceptions.
2. Key in the Area code for which to apply an exception.
3. If exception is required for a particular exchange number (number right after the area code), key in the Exchange number, or key in * to apply for all numbers in that area code.
4. To add a prefix before the area code, select Dial prefix before the area code
and key in the prefix.
5. To not dial the area code, select Do not dial the area code. 6. Click Add.
7. Repeat procedure for all exceptions.
NOTE: Use commas to add a delay between numbers, if required. Each comma represents approximately a two second delay.
3.6
Fax archiving
GFI FaxMaker can archive all inbound and outbound faxes to a central location. This enables the recording all fax communications and the retrieval of old faxes.
There are 2 methods of archiving:
»
Send fax copies to an email address - copies of transmitted, received and/or failed faxes are sent via email to a central (journaling) mailbox. Faxes are then archived through an email archiving solution, such as GFI MailArchiver. For more information, refer to chapter Send fax copies to an email address in this manual.»
Archive to a database - Store all faxes in a Microsoft Access or a Microsoft SQL/MSDE database. For more information, refer to chapter Archive faxes to database in this manual.3.6.1
Send fax copies to an email address
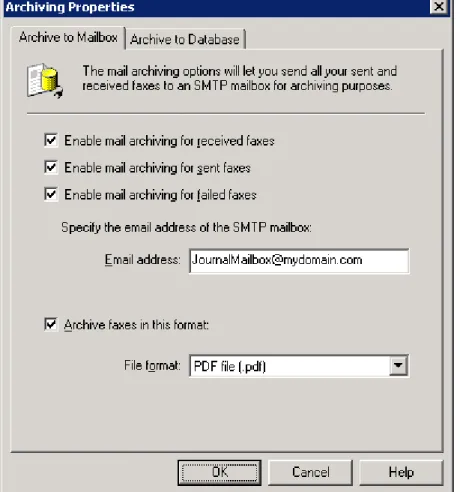
Use this option to send a copy of incoming, outgoing and/or failed faxes to an email address. This includes transmission reports and the fax as attachment.
Screenshot 19 - Archiving to an email archiving package
2. In the Archive to Mailbox tab, select the type of faxes to archive: Table 14 - Archiving to mailbox options
OPTION DESCRIPTION
Enable mail archiving for received faxes Enable received faxes archival.
Enable mail archiving for sent faxes Enable sent faxes archival
Enable mail archiving for failed faxes Enable failed faxes archival
Email address Specify the email address where to forward archived faxes. NOTE: Email address must be included in the Licensed users list of GFI FaxMaker.
Archive faxes in this format By default, GFI FaxMaker archives faxes in .fax format. To archive in a different format (for example PDF) enable and select the format.
3. Click OK.
3.6.2
Archive faxes to database
GFI FaxMaker can archive all faxes and SMS to a Microsoft Access or a Microsoft SQL/MSDE database.
Screenshot 20 - Archiving properties
2. In the Archive to Database tab, select Enable database archiving.
Screenshot 21 - Database configuration
Table 15 - Archiving to database options
OPTION DESCRIPTION
Microsoft Access database Enable archiving to a Microsoft Access database. Key in or browse to the location where to store the database file and specify the database name in .MDB format.
NOTE: A Microsoft Access database size is limited to 2 GB in size. When the database reaches 2GB, GFI FaxMaker automatically renames the old database and creates a new database.
Microsoft SQL/MSDE database Archive to a Microsoft SQL Server or MSDE database. Key in database server name/IP or select from the list of automatically detected servers. Enter credentials to connect to the database.
GFI FaxMaker automatically creates a database called GFI FaxMaker Archive dedicated for archiving of faxes.
NOTE 1: GFI FaxMaker archiving requires mixed mode authentication to be enabled on the SQL server.
NOTE 2: Some databases may have size limitations. Ensure that this limit is not exceeded.
4. Click Test to verify settings and click OK.
5. By default, GFI FaxMaker archives faxes in .fax format. To archive in a different format, for example PDF, select Archive faxes in this format and specify custom format required. 6. Click OK.
3.7
Log files
GFI FaxMaker logs all activity of incoming and outgoing faxes in two log files within the GFI FaxMaker installation folder:
Table 16 - GFI FaxMaker log files
LOG FILE DESCRIPTION
Sendlog.txt Contains a log of sent faxes in the following format:
Date,Time,SenderEmail,SenderName,BillingCode,RemoteId,RecipientName, RecipientCompany,RecipientNumber,CallDuration,PagesTransferred,Resul t,Info,Port,FilesInArchiveDir
For example:
"7/1/2011","2:16:48AM","[email protected]","John","","88888888","B ob","Company","99999999","05:30","3","SUCCESS","Fax has been sent successfully","COM2","C:\Sent\20110701_015642_00001.pdf"
Rcvlog.txt Contains a log of received faxes in the following format:
Date, Time, RemoteID, CallDuration, PagesReceived, Result, Info, Port, FileInArchiveDir, RoutedTo
For example:
"6/30/2011","8:47:01AM","+557(833)343-3948","03:30","2","SUCCESS","F ax received from +557(833)343-3948","Line0","C:\Received
Faxes\20110630_084657_00003.pdf","[email protected]"
3.8
HP Digital Sender integration
GFI FaxMaker supports HP Digital sender scanner/copier. This enables you to send faxes directly from the Digital sender device, by entering the document in the tray and dialling recipient fax number. Faxes are sent via GFI FaxMaker and the user will receive a
confirmation in his mailbox.
NOTE: For the latest list of supported HP Digital Sender devices, refer to http://kbase.gfi.com/showarticle.asp?id=KBID002468.
Screenshot 22 - Configuring the Digital Sender
1. From the HP Digital sender link applet, select Inbox tab. 2. Select Enable receive.
3. In Path to receive inbox, provide a directory where the HP Digital Sender will pick up the fax information files.
Screenshot 23 - HP Digital sender set-up
2. From the HPDS tab, select Scan folder for HPF files. Key in or browse to the directory specified in the HP Digital Sender app and select the HPFSCAN folder.
3. Click OK.
4. From the HP Digital sender JetAdmin utility, modify your HP Digital Sender to enable fax. Choose Other vendors with notification support as Network Fax Server.
3.9
Storing faxes
By default, GFI FaxMaker stores copies of fax attachments on the GFI FaxMaker server for a number of days:
»
Sent faxes - A copy is stored for 2 days.»
Failed faxes - A copy is stored for 1 week.These are stored in <GFI FaxMaker installation folder>\data\attachments folder. This allows resending of fax attachments.
To configure storage of fax attachments:
1. From GFI FaxMaker Configuration, right-click Advanced ► Miscellaneous node and select Properties.
2. From Fax server options area, configure: Table 17 - Storing faxes
OPTION DESCRIPTION
Do not store sent fax attachments for resending
Select option to not store sent fax attachments.
Do not store failed fax
attachments for resending Select option to not store failed fax attachments.
3.10
GFI FaxMaker Licensing information
To review and modify licensing details, from GFI FaxMaker Configuration, right-click General ► Licensing and select License product….
Screenshot 24 - Viewing current licensing information
Use this node to view current licensing information or to enter your License key number. Click Enter License Key to edit your license key.
3.11
Version information
To review information about your GFI FaxMaker installation, from GFI FaxMaker Configuration, right-click General ► Version information and select Properties. You can also check for newer versions of GFI FaxMaker from the GFI web site.
4
Configuration - Sending faxes
4.1
Sending options
1. From GFI FaxMaker Configuration, right-click Sending/Receiving Options and select Properties.
Screenshot 26 - Sending options
2. Select Sending tab and configure the following options: Table 18 - Sending options
OPTION DESCRIPTION
Enhance fax image when sending normal resolution faxes
Improves the quality of low-resolution faxes.
Send fax report attachments in the following format
By default GFI FaxMaker attaches incoming fax in .FAX format. Select this option to customize the attachment format, for example attach the fax in PDF format.
Automatically print outgoing faxes if successful
Automatically print all outgoing faxes that are sent successfully. Click
Setup printers... to configure printer options.
Auto print if failed Automatically print all outgoing faxes that fail. Click Setup printers...
to configure printer options.
Automatically print outgoing fax report if successful
Automatically print transmission report after successfully sending a fax. GFI FaxMaker will also print 6 fax pages on one printer page. Click
Setup printers... to configure printer options, including how many pages of the report to print.
OPTION DESCRIPTION
Auto print if failed Automatically print transmission report when an outgoing fax fails. GFI FaxMaker will also print 6 fax pages on one printer page. Click Setup printers... to configure printer options, including how many pages of the report to print.
3. Click OK.
4.2
Document Conversion
GFI FaxMaker enables users to send faxes by attaching content to an email. GFI FaxMaker automatically converts the attachment to fax. For this purpose, a built-in conversion engine is included for PDF, HTML, PNG, GIF, JPG, RTF and TXT files.
NOTE: Microsoft Office 97 or higher is required on the GFI FaxMaker server to convert Microsoft Office file formats. Microsoft Office 2007 or higher is required on the GFI FaxMaker server to convert Microsoft Office Open XML files, such as DOCX and XLSX files.
1. From GFI FaxMaker Configuration, right-click Advanced ► Document conversion and select Properties.
Screenshot 27 - Document conversion options 2. Configure the following options: Table 19 - Document conversion options
OPTION DESCRIPTION
File extension list to
ignore Enter the extensions to ignore, separated by semi-colons - ; File extension list
allowed for conversion
List of extensions that can be converted by GFI FaxMaker.
Add To add new file formats for conversion, key in the Extension to add. In
OPTION DESCRIPTION
Windows Explorer (Usually this is Print). Click Add.
NOTE: To verify whether GFI FaxMaker can convert a file extension, from Windows Explorer, right-click a file in that format and select Print. The file must print successfully.
Remove Click to delete a selected file extension. 3. Click OK.
4.3
Transmission reports
GFI FaxMaker notifies the user about the status of sent faxes/SMS by sending a
transmission report. The report contains details of the fax/SMS transmission. Optionally you can configure to include the fax content and fax body.
Screenshot 28 - Fax transmission report
4.3.1
Configuring fax transmission reports
1. From GFI FaxMaker Configuration, right-click Advanced ► Transmission reports and select Properties.
Screenshot 29 - Fax transmission report options 2. Configure the following options: Table 20 - Transmission reports options
OPTION DESCRIPTION
Report successful outgoing FAX transmissions
Send a transmission report when a fax is sent successfully.
Include attachments with success reports
Includes the transmitted fax with successful transmission reports.
Report failed outgoing FAX
transmissions Send a transmission report when a fax fails. Include attachments with
failure reports Includes the fax content with failed transmission reports.
Append original message body Include the original fax message body in the transmission report, below the report text. Using this option allows users to re-submit faxes and find sent faxes.
3. Click OK.
4.3.2
Configuring SMS transmission reports
1. From GFI FaxMaker Configuration, right-click Advanced ► Transmission reports and select Properties.
Screenshot 30 - SMS transmission report options
2. From the SMS tab, select Report successful outgoing SMS transmissions to notify a user when an SMS is sent successfully.
NOTE: A report is always sent if transmission of SMS fails. 3. Click OK.
4.3.3
Customizing transmission reports
The template of transmission reports can be customized. To do this: 1. Navigate to <GFI FaxMaker installation folder>\data\reports. 2. Open the template to edit in Notepad:
Table 21 - Fax report templates
REPORT TEMPLATE DESCRIPTION
error.fbt Transmission report for failed faxes
recv.fbt Fax report for received faxes
sent.fbt Fax report for sent faxes
smserror.fbt Transmission report for failed SMS
smsrecv.fbt Fax report for received SMS
smssent.fbt Fax report for sent SMS
NOTE: Reports starting with html prefix (for example, htmlrecv.fbt), are the equivalent reports in HTML format.
NOTE: Some fields may not be applicable for certain reports. Table 22 - Fax report fields
FIELD DESCRIPTION
<status> Transmission status <date> Transmission date <time> Transmission time
<date_time> Shows both transmission date and time <speed> Transmission speed
<connection_time> Duration of transmission <pages> Number of pages sent
<total_pages> Total number of pages requested to be sent <resolution> The fax resolution.
<remote_id> Recipient‟s line number <local_id> Local line number
<line> GFI FaxMaker line number.
<retries> Number of retries that GFI FaxMaker tried to establish connection with recipient. <description> A description of the status of fax transmission.
<dtmf_did> The DTMF/DID number.
<subject> The subject of the email requesting the fax transmission. <billing_code> The billing code.
<r_last_name> Recipient‟s last name <r_first_name> Recipient‟s first name <r_name> Recipient‟s display name <r_company> Recipient‟s company name <r_department> Recipient‟s department <r_email> Recipient‟s email address <r_fax> Recipient‟s fax number <r_voice> Recipient‟s phone number <s_last_name> Sender‟s last name <s_first_name> Sender‟s first name <s_name> Sender‟s name
<s_company> Sender‟s company name <s_department> Sender‟s department <s_email> Sender‟s email address <s_fax> Sender‟s fax number <s_voice> Sender‟s phone number
4.4
Header/Footer options
GFI FaxMaker enables you to customize the header and footer text for all outgoing and incoming faxes.
4.4.1
Outgoing faxes
1. From GFI FaxMaker Configuration, right-click Advanced ► Header/Footer/Stamping and select Properties.
Screenshot 31 - Header/Footer options for outgoing faxes 2. From the Header/Footer tab, configure: Table 23 - Header and footer options
OPTION DESCRIPTION
Formatting and alignment Configure font, font size and alignment.
NOTE: During configuration, select the header and footer fields configuring to apply different formatting.
Render this header text on all outgoing faxes
Select to add a header on all outgoing faxes. Key in the text to display.
»
Set to default - Click to reset text to default.»
Insert field... - Select custom field to add where there is the cursor.Render this footer text on all
outgoing faxes Select to add a footer to all outgoing fax. Key in the text to display.
»
Set to default - Click to reset text to default.»
Insert field... - Select custom field to add where there is the cursor.4.4.2
Incoming faxes
1. From GFI FaxMaker Configuration, right-click Advanced ► Header/Footer/Stamping and select Properties.
Screenshot 32 - Stamping options for incoming faxes 2. From the Stamping tab, configure: Table 24 - Stamping options
OPTION DESCRIPTION
Formatting and alignment Configure font, font size and alignment.
NOTE: During configuration, select the header and footer fields configuring to apply different formatting.
Render this header text on all
incoming faxes Select to add a header on all incoming faxes. Key in the text to render.
»
Set to default - Click to reset text to default.»
Insert field... - Select custom field to add where there is the cursor.Render this footer text on all
incoming faxes Select to add a footer on all incoming faxes. Key in the text to render.
»
Set to default - Click to reset text to default.»
Insert field... - Select custom field to add where there is the cursor.3. Click OK.
4.5
Call blocking
Call blocking enables you to control the fax numbers to which users can send faxes. GFI FaxMaker checks the call block rules before fax transmission to block faxes sent to numbers starting with matching entries.
For example, to block specific users from sending faxes to international numbers, add a call blocking rule to your international dial prefix (example, 00 or 011).
Screenshot 33 - Call blocking rules
1. From GFI FaxMaker Configuration, navigate to Advanced ► Call blocking node. 2. Click New….
Screenshot 34 - New call block entry
3. Key in the number to block and click OK.
4. Assign users to the configured Call block or leave empty to apply the rule to every user. 5. Click OK.
4.6
Public contacts
In GFI FaxMaker, configure Public Contacts to enable GFI FaxMaker to retrieve user information when users send faxes using the email client.
NOTE: Public Contacts may not be configured when:
»
users are not using the email client to send faxes (for example when using the GFI FaxMaker Fax Message form only), orNOTE: In a Microsoft Exchange Server environment, MAPI Client and
Collaboration Data Objects 1.2.1 is required when using Public Contacts. Install on GFI FaxMaker server, when:
»
not installing GFI FaxMaker on the Microsoft Exchange server machine»
installing on Microsoft Exchange Server 2007/2010Download from:
http://www.microsoft.com/downloads/details.aspx?FamilyID=e17e7f31-079a-43a9-bff2-0a110307611e&DisplayLang=en
To configure Public Contacts:
1. Ensure that you have a working profile, configured as the default profile, to connect to your Exchange Server.
2. From GFI FaxMaker Configuration, right-click Advanced ► Public Contacts and select Properties.
Screenshot 35- Public contacts node
3. Select Enable Exchange Public Contacts retrieval.
4. Click Add and select the public contacts list from where to retrieve company information.
5. Click Test to ensure that GFI FaxMaker can query the listed public contacts folders. 6. Click OK.
4.7
Coverpages
GFI FaxMaker enables you to include a front page to your fax content that includes custom information and design. This page is attached and sent as the first page of a fax.
There are two types of coverpages:
»
Coverpage: A page that includes fax details (such as recipient and sender‟sinformation) and the message text (email body when user sends email via email client or fax message form). For more information, refer to Coverpages chapter in this manual.
»
Front covernotes: Aimed to contain less details than a Coverpage, Front covernotes serve to add a brief message before the coverpage (similar to a „With Compliments‟ note). For more information, refer to Front covernotes chapter in this manual. Coverpages and front covernotes are customizable on a per-user or per-group basis. By default, GFI FaxMaker includes a number of built-in coverpages. To access the list of coverpages, from GFI FaxMaker Configuration navigate to Coverpages node and select Coverpages or Front Covernotes.4.7.1
Coverpages
Default coverpage
The default coverpage is the coverpage applied for all users that have no other coverpage configured. To select a different default coverpage:
1. From GFI FaxMaker Configuration navigate to Coverpages ► Coverpages. 2. Right-click the coverpage and select Set as default global coverpage.
Using a custom coverpage for a list of users
GFI FaxMaker can use different coverpages for different users or user groups. To apply a custom coverpage for a particular user or user group:
1. From GFI FaxMaker Configuration, navigate to Coverpages ► Coverpages. 2. Right-click the coverpage to a associate custom user for, and select Properties.
Screenshot 36- Coverpage users
3. From the Users tab add the users for which to apply the coverpage. 4. Click OK.
Editing built-in coverpages
1. From GFI FaxMaker Configuration navigate to Coverpages ► Coverpages. 2. Right-click the coverpage to edit and select Properties.
Screenshot 37- Coverpage options tab
3. From the Options tab, click Edit. Coverpage is loaded in text editor. 4. Edit the page as required.
NOTE: When editing coverpages, you can use fields to show custom information. For more information, refer to Supported merge-fields chapter in this manual.
5. Save and exit when complete. 6. Click OK.
Designing coverpages
Step 1: Create coverpage
You can create custom coverpages in HTML, RTF or MHT format, using custom designs, text and fields. Use your preferred editor to create the page.
NOTE: You can use fields to display useful information. For more information, refer to Supported merge-fields chapter in this manual.
NOTE: Use UTF-8 encoding for HTML coverpages.
Step 2: Add coverpage to GFI FaxMaker
Screenshot 38 - Creating a new coverpage 2. Click New….
3. Key in a Display name.
4. Click Add from file…, browse to the newly created coverpage and click Open. 5. Click OK.
6. Add any particular users to apply this coverpage for. 7. Click OK.
Previewing built-in coverpages
To preview coverpages, navigate to <GFI FaxMaker installation folder>\coverpage\. Double-click coverpage to preview in web browser (HTML or MHT format) or word editor (RTF format).
General coverpage options
1. From GFI FaxMaker Configuration, right-click Coverpages ► Coverpages and select Properties.