TMA; Reviewed:
SPOC 09/25/2009 Solution & Interoperability Test Lab Application Notes ©2009 Avaya Inc. All Rights Reserved. SonicWALL-CDP 1 of 16
Avaya Solution & Interoperability Test Lab
Application Notes for Configuring a SonicWALL
Continuous Data Protection (CDP) backup solution with
Avaya VoiceMail Pro - Issue 1.0
Abstract
These Application Notes describe a sample configuration for the SonicWALL Continuous Data Protection (CDP) backup solution with Avaya VoiceMail Pro.
Information in these Application Notes has been obtained through DevConnect compliance testing and additional technical discussions. Testing was conducted via the DevConnect Program at the Avaya Solution and Interoperability Test Lab.
TMA; Reviewed:
SPOC 09/25/2009 Solution & Interoperability Test Lab Application Notes ©2009 Avaya Inc. All Rights Reserved. SonicWALL-CDP 2 of 16
1. Introduction
These Application Notes describe a sample configuration of the SonicWALL Continuous Data Protection (CDP) backup solution with Avaya VoiceMail Pro. Compliance testing emphasis was placed on validating the SonicWALL CDP backup solutions capability of backing up and
restoring voicemail messages as well as the Avaya VoiceMail Pro configuration files. The SonicWALL CDP series has four models of varying drive capacities, CDP 100 = 500GB, CDP 210 = 1TB, CDP 5040 = 2.25TB and the CDP 6080 = 4.5TB. Being that all of the models have identical software and features, only the CDP 100 was tested and will be shown in this
document.
1.1. Interoperability Compliance Testing
This document describes the interoperability compliance testing for the SonicWALL CDP Backup solution with Avaya VoiceMail Pro.
Compliance testing included the following: Installation of CDP Server
Installation of CDP Agent Tool. Backups
Restore Serviceability
The general test approach included installing and configuration of the CDP server and client software as well as backups and restores.
1.2. Support
Technical Support: http://www.sonicwall.com/us/Support.html
2. Reference Configuration
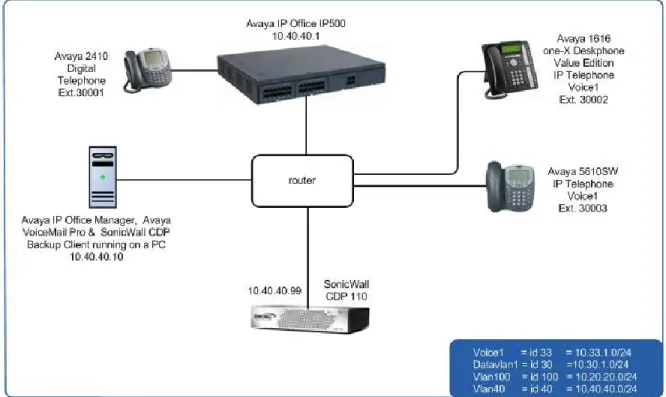
The configuration in Figure 1 shows an Avaya Telephony Infrastructure using Avaya IP Office and Avaya VoiceMail Pro integrating a SonicWALL CDP Backup solution.
TMA; Reviewed:
SPOC 09/25/2009 Solution & Interoperability Test Lab Application Notes ©2009 Avaya Inc. All Rights Reserved. SonicWALL-CDP 3 of 16
2.1. Corporate Headquarters
The Corporate Headquarters consisted of one SonicWall CDP 110, one router, one Avaya IP Office IP500, two Avaya IP Telephones, one Avaya digital phone, one PC running Avaya IP Office Manager, Avaya IP Office VoiceMail Pro and SonicWall CDP Backup Client.
TMA; Reviewed:
SPOC 09/25/2009 Solution & Interoperability Test Lab Application Notes ©2009 Avaya Inc. All Rights Reserved. SonicWALL-CDP 4 of 16
3. Equipment and Software Validated
The following equipment and software were used for the sample configuration provided:
Equipment Software/Firmware
Avaya PBX Products
Avaya IP Office IP500 4.2 (17)
Avaya IP Office Manager (running on HP Proliant Server)
6.2 (17)
Avaya Messaging (Voice Mail) Products
Avaya VoiceMail Pro 4.2 (30)
Avaya Telephony Sets
Avaya 1600 Series IP Telephones Avaya one-X Deskphone Value Edition 1.020 Avaya 5600 Series IP Telephones 8.016
Avaya 2410 Digital Telephone 5.0
SonicWALL Products
SonicWall CDP 110 5.0.3-43
SonicWall CDP backup client 5.0.0.3 MS Products PC
Microsoft Windows 2003 Server (Running Avaya IP Office Manager, Avaya VoiceMail Pro and SonicWall CDP backup client.
TMA; Reviewed:
SPOC 09/25/2009 Solution & Interoperability Test Lab Application Notes ©2009 Avaya Inc. All Rights Reserved. SonicWALL-CDP 5 of 16
4. Configure Avaya IP Office & Avaya VoiceMail Pro
No SonicWALL CDP specific configuration is required on Avaya IP Office or Avaya VoiceMail Pro to support this solution.
It is assumed that Avaya IP Office and Avaya VoiceMail Pro are already configured. Consult the Avaya IP Office and Avaya VoiceMail Pro documentation Section 8 [1] for additional configuration details.
4.1. Configure SonicWALL CDP 110 Configuration
Step Description1. Register the SonicWALL CDP with SonicWALL, Consult the SonicWALL CDP documentation Section 8 [6] for details.
TMA; Reviewed:
SPOC 09/25/2009 Solution & Interoperability Test Lab Application Notes ©2009 Avaya Inc. All Rights Reserved. SonicWALL-CDP 6 of 16
Step Description
2. Configure the SonicWALL CDP using the built-in web-based Management Tool.
Using the supplied crossover cable and the computer you are using to administer the SonicWALL CDP appliance, connect the LAN port of computer to the LAN port on the back of your SonicWALL CDP appliance.
Set the computer IP address used to manage the SonicWALL CDP appliance to have a static IP address of 192.168.168.50.
Open a Web browser on the computer you are using to administer the SonicWALL CDP appliance. Enter http://192.168.168.169 (the default IP address of the
SonicWALL CDP appliance) in the Location or Address bar. The SonicWALL CDP Web management login screen displays.
TMA; Reviewed:
SPOC 09/25/2009 Solution & Interoperability Test Lab Application Notes ©2009 Avaya Inc. All Rights Reserved. SonicWALL-CDP 7 of 16
Step Description
3. The SonicWALL CDP window appears. The following steps refer to the Configuration Tree which is in the left pane of the window.
TMA; Reviewed:
SPOC 09/25/2009 Solution & Interoperability Test Lab Application Notes ©2009 Avaya Inc. All Rights Reserved. SonicWALL-CDP 8 of 16
Step Description
4. Configure the LAN port IP Address. From the Configuration Tree, click Network
Settings, under Interfaces, click the Configure icon for eth0. The Interfaceeth0Settings dialog box will appear. Change the IP Address and Subnet Mask to reflect Figure 1 settings. Click OK to continue.
TMA; Reviewed:
SPOC 09/25/2009 Solution & Interoperability Test Lab Application Notes ©2009 Avaya Inc. All Rights Reserved. SonicWALL-CDP 9 of 16
Step Description
5. Add the default gateway for the LAN. From the Configuration Tree, click Network
Settings, under Network Routes, click the Configure icon for Default. The Default Gateway dialog box will appear. Change Default Gateway, 10.40.40.254 was used for compliance testing. Click OK tab. Click the Accept tab to continue.
TMA; Reviewed:
SPOC 09/25/2009 Solution & Interoperability Test Lab Application Notes ©2009 Avaya Inc. All Rights Reserved. SonicWALL-CDP 10 of 16
4.2. Configure SonicWALL CDP Client
1. Install the SonicWALL CDP Client software on the PC running Avaya VoiceMail Pro. Consult the SonicWALL CDP Client documentation Section 8 [6] for details.
2. This Step is used to establish a connection from the SonicWALL CDP Client and the SonicWALL CDP 110 Appliance.
Log into the Avaya VoiceMail Pro PC and select Start Programs SonicWALL
SonicWALL Continuous Data Protection SonicWALL CDP Enterprise Manager. Click the Manual Connection, enter the IP Address of the SonicWall CDP 110 as shown in Figure 1, click Connect. Enter the Administrator Password and click Login. The
Enterprise Manager window will appear (not shown). This step is now complete, click the X box to kill the window.
TMA; Reviewed:
SPOC 09/25/2009 Solution & Interoperability Test Lab Application Notes ©2009 Avaya Inc. All Rights Reserved. SonicWALL-CDP 11 of 16
3. On the PC, select Start Programs SonicWALL SonicWALL Continuous Data Protection SonicWALL CDP Agent Tool to launch the Agent Tool. The Agent Tool will appear, click Folders to continue.
TMA; Reviewed:
SPOC 09/25/2009 Solution & Interoperability Test Lab Application Notes ©2009 Avaya Inc. All Rights Reserved. SonicWALL-CDP 12 of 16
4.3. Configure SonicWALL CDP Client Backup
1. Configure the backup folder. From the Folders section of the Agent Tool window, click Add Folder. Browse for the VoiceMail Pro folder, highlight VoiceMail Pro and click OK to continue. Consult the SonicWALL CDP Client documentation Section 8 [6] for more details.
TMA; Reviewed:
SPOC 09/25/2009 Solution & Interoperability Test Lab Application Notes ©2009 Avaya Inc. All Rights Reserved. SonicWALL-CDP 13 of 16
4.4. Configure SonicWALL CDP Client Restore
Restores can be done for the entire VoiceMail Pro directory in case of a disk failure or individual mailbox and voicemail messages. The scenario for the following example is to restore an
individual voicemail message. Refer to the SonicWALL CDP Client documentation Section 8 [6] for more details of restoring directories.
*Note:
Restored files and folders for the VoiceMail Pro directory or individual user accounts must be restored to a NEW location and then moved into place. System crash may occur if the files are restored directly.
Restored individual voicemail messages are not to be restored directly to the original location and are NOT to be moved back into the original location, System crash may occur if this is done.
1. The scenario for the restore is as follows, the owner of extension 30020 deleted a voicemail message and requested it be restored. Click Folders, browse through the restore folder and highlight the file being restored, in this case it’s a wav file, click the Restore File Version link, select which version (not shown) of the file to be restored and click Restore. The Browse for folder window will appear, select where to restore the file to (*) and select OK.
TMA; Reviewed:
SPOC 09/25/2009 Solution & Interoperability Test Lab Application Notes ©2009 Avaya Inc. All Rights Reserved. SonicWALL-CDP 14 of 16
5. General Test Approach and Test Results
5.1. Test Approach
All test cases were performed manually. The general test approach entailed verifying the following list:
Installation of CDP Server Installation of CDP Agent Tool. Backups
Restores Serviceability
5.2. Test Results
The SonicWALL Continuous Data Protection (CDP) backup solution with Avaya VoiceMail Pro passed all test cases as described in Section 5.1.
6. Verification Steps
This section provides the steps for verifying The SonicWALL Continuous Data Protection (CDP) backup solution with Avaya VoiceMail Pro, the verification steps include
Installation of CDP Server
Installed the CDP Agent Tool on the PC that is running Avaya VoiceMail Pro. Backed up the Avaya VoiceMail Pro directory structure.
Restored:
1. Restored Avaya VoiceMail Pro directory structure 2. Restored individual voicemail message
Serviceability test included power cycling the SonicWall CDP 110 appliance and make sure it recovered
7. Conclusion
These Application Notes describe the configuration steps required for integrating the
SonicWALL Continuous Data Protection backup solution with Avaya VoiceMail Pro. For the configuration described in these Application Notes, the SonicWALL Continuous Data Protection solution was responsible for backing up and restoration of file/folders on Avaya VoiceMail Pro.
TMA; Reviewed:
SPOC 09/25/2009 Solution & Interoperability Test Lab Application Notes ©2009 Avaya Inc. All Rights Reserved. SonicWALL-CDP 15 of 16
8. Additional References
The documents referenced below were used for additional support and configuration information.
This section references the Avaya documentation relevant to these Application Notes. The following Avaya product documentation is available at http://support.avaya.com
[1] Avaya IP Office 4.2 Installation Manual, Document Number 15-601042
[2] Avaya IP Office 4.2 Embedded Voicemail User Guide, Document Number 15-601067
[3] Avaya IP Office 4.2 Phone Manager User Guide, Document Number 15-600988
[4] Avaya IP Office 4.2 Manager 6.2, Document # 16-601443
[5] Deskphone Value Edition 1600 Series IP Telephones Installation and Maintenance
Guide, Document # 16-601443
The SonicWALL product documentation can be found at
[6] http://www.sonicwall.com/us/support/6832.html
9. Change History
Issue Date Reason 1.0 9/25/09 Initial issue
TMA; Reviewed:
SPOC 09/25/2009 Solution & Interoperability Test Lab Application Notes ©2009 Avaya Inc. All Rights Reserved. SonicWALL-CDP 16 of 16 ©2009 Avaya Inc. All Rights Reserved.
Avaya and the Avaya Logo are trademarks of Avaya Inc. All trademarks identified by ® and ™ are registered trademarks or trademarks, respectively, of Avaya Inc. All other trademarks are the property of their respective owners. The information provided in these Application Notes is subject to change without notice. The configurations, technical data, and
recommendations provided in these Application Notes are believed to be accurate and
dependable, but are presented without express or implied warranty. Users are responsible for their application of any products specified in these Application Notes.
Please e-mail any questions or comments pertaining to these Application Notes along with the full title name and filename, located in the lower right corner, directly to the Avaya