How
to
Create
a
Basic
VPN
Connection
in
Panda
GateDefender
eSeries
Support Documentation
‘How-to’ guides for configuring VPNs with Panda GateDefender eSeries
Panda Security wants to ensure you get the most out of Panda GateDefender eSeries. For this reason, we offer you all the information you need about the characteristics and configuration of the product. Refer to http://www.pandasecurity.com and
http://www.pandasecurity.com/enterprise/support/gatedefender-performa-eseries.htm for more information.
‘How-to’ guides for Panda GateDefender eSeries
The software described in this document is delivered under the terms and conditions of the end user license agreement and can only be used after accepting the terms and conditions of said agreement.
Bothe the anti-spam and web filtering technologies in this product are provided by Commtouch.
Copyright notice
© Panda 2013. All rights reserved. Neither the documents nor the programs that you may access may be copied, reproduced, translated or transferred to any electronic or readable media without prior written permission from Panda, c/ Gran Vía, 4 48001 Bilbao (Biscay) Spain.
Registered Trademarks
Panda Security™. TruPrevent: Registered in U.S.A Patent and Trademark Office. Windows Vista and the Windows logo are trademarks or registered trademarks of Microsoft Corporation in the United States and other countries. All other product names may be registered.
Table of contents
Introduction... 3
Configuration Example ... 4
Enable the VPN Server ... 4
Create the VPN Users... 5
Create the VPN Account Details ... 6
Download the VPN Client Software ... 7
Initial VPN Client Configuration ... 7
Configure the VPN Account Settings ... 8
Connect to VPN Account... 9
Verify Connection ... 9
Table of figures
Figure 1 - Enable the VPN Server ... 4
Figure 2 - Create the VPN Users... 5
Figure 3 - Create the VPN Account Details... 6
Figure 4 - Initial VPN Client Configuration... 7
Figure 5 - Configure the VPN Account Settings ... 8
Figure 6 - Connect to VPN Account ... 9
Introduction
This document illustrates the necessary steps to configure a Roadwarrior SSL VPN (OpenVPN) tunnel between a remote user's computer and a Panda GateDefender eSeries device.
Configuration Example
The example below will be creating a remote user (roadwarrior) connection to allow communication between any external remote computer and the internal site’s Green network. This will allow the user to act as though they were locally (directly) connected to the Green network and will be able to access the same internal resources.
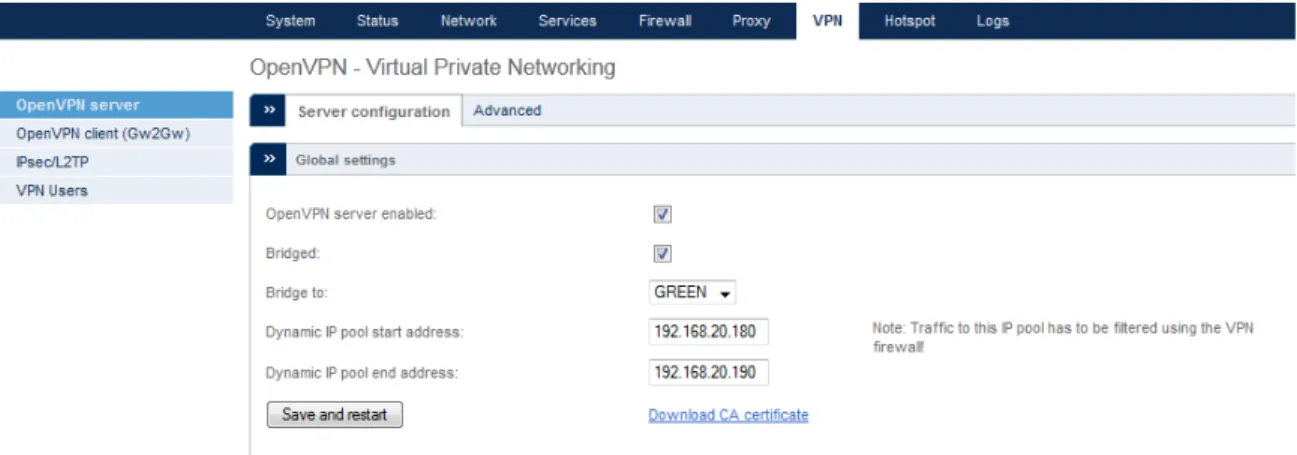
Enable the VPN Server
Figure 1 - Enable the VPN Server
1. Access the Panda GateDefender administration console and select VPN form the top menu. This will open the OpenVPN server configuration page. If it is not yet enabled, check the OpenVPN server enabled box.
2. Choose whether you want the OpenVPN server to run in bridged mode (i.e. included in the interface bridge) or you want it to run in non-bridged mode with a separate, unique VPN IP pool.
The default is to run in bridged mode to the Green zone and this is recommended for most common VPN deployments. If you choose to run in bridged mode, you may also specify which network zone you want to be bridged to the VPN interface.
3. Next, set aside a range of IP's within the bridged interface network to be used exclusively by the VPN server. Keep in mind that these IP's shouldn't be allocated anywhere else on the Panda GateDefender appliance (e.g. DHCP range, Static IP's, etc.). That is, the specified IP’s should not be assigned to any other computer in the LAN as they will be assigned to the VPN client.
4. Finally, click Save and restart to enable the VPN server.
Note: Once the server has restarted, you should see a link appear to Download CA certificate and you will need to do this before you setup the client side. Just click the link and a file download window should appear to save the file (*.pem/.cer) to your local machine. Remember where you store this file for future reference.
At this point, Panda GateDefender eSeries VPN Server section is already configured. You only need to verify that, if there is a router between the appliance and the Internet, this router is redirecting UDP port 1194 to the IP of the appliance red zone. This port can be modified in the Panda GateDefender eSeries Advanced settings and, if so, remember to apply the same modification also to the VPN client.
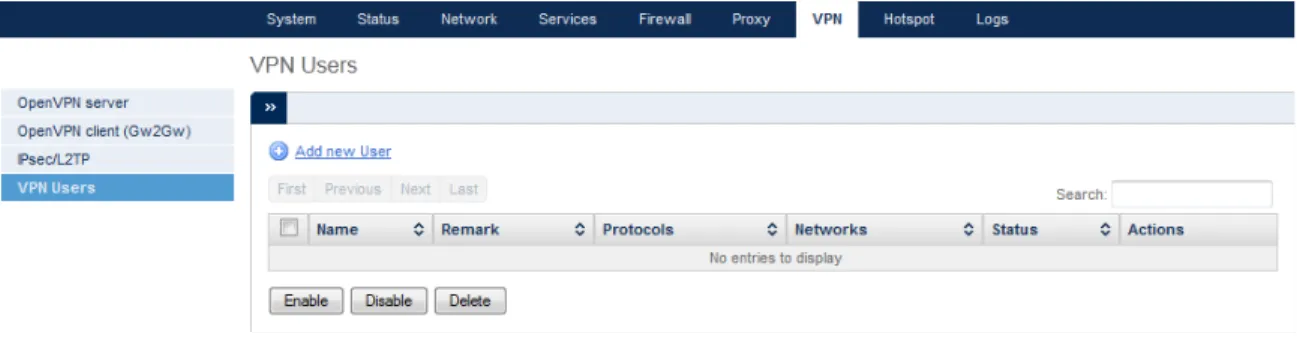
Create the VPN Users
Now you need to create a user who will have permission to access the VPN. To do so, navigate to VPN Users in the right navigation pane and click Add new User.
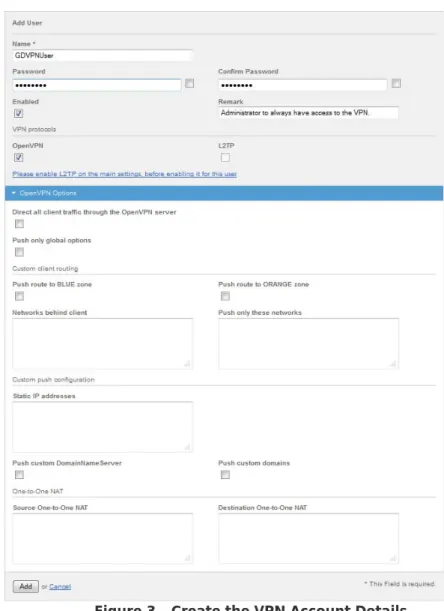
Create the VPN Account Details
Figure 3 - Create the VPN Account Details
The main data to configure for the new Roadwarrior VPN account are the Username and
Password.
Note: The Name and Password are BOTH case sensitive.
Some of the other options you can specify include the client routing options. Here you can determine specifics about routes pushed to the remote VPN device, as well as some custom push configuration options that allow you to override the settings from the global options.
Remember anything provided here will override the settings you configured for the VPN global options so only use these, if this client account requires a different configuration.
Once you've completed the necessary fields, click Add to proceed.
Download the VPN Client Software
You need to download a VPN Client Software compatible with your VPN.
Once the download is complete, you will need to distribute it to the VPN users and they should follow their standard process to install the software.
Should you require additional assistance to this respect, contact your Panda Technical Support office.
Initial VPN Client Configuration
Figure 4 - Initial VPN Client Configuration
When you open the client for the first time, you will need to configure the appropriate settings to the client in order to successfully connect. To do this, click the [+] icon to add a new VPN account profile.
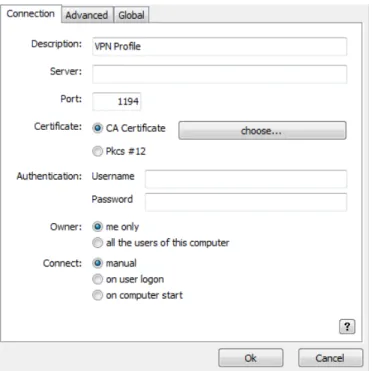
Configure the VPN Account Settings
Figure 5 - Configure the VPN Account Settings
Now, configure the VPN account information:
• Description: you can provide any brief string to identify the VPN account.
• Server: you need to specify the IP address or fully-qualified DNS name of the VPN server (e.g. vpn.example.com).
• Certificate: you must choose the server certificate file you previously downloaded (.cer or .pem).
• Authentication: you must provide the VPN account Username and Password you
completed earlier.
Warning: Unless you've made specific changes to some of the advanced VPN server settings, please do not alter the recommended default VPN settings on the client.
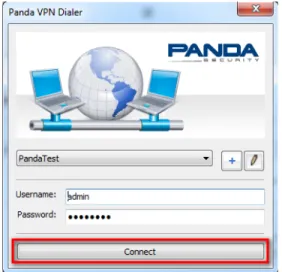
Connect to VPN Account
Figure 6 - Connect to VPN Account
Select the VPN account, and click Connect to establish your VPN connection.
Verify Connection
You should receive a message saying "Connected to <vpn server>" as this indicates a successful VPN connection. You can click the Info button to get basic statistics, or click View Log to view the full OpenVPN logs.
Figure 7 - Verify Connection
You can close the VPN manager at any point and it will remain running. You must click