S e n d d o c u m e n t c o m m e n t s t o n e x u s 7 k - d o c f e e d b a c k @ c i s c o . c o m
Americas Headquarters Cisco Systems, Inc. 170 West Tasman Drive San Jose, CA 95134-1706 USA http://www.cisco.com Tel: 408 526-4000 800 553-NETS (6387) Fax: 408 527-0883
Cisco Nexus 7000 Series NX-OS Layer 2
Switching Command Reference, Release
4.2
S e n d d o c u m e n t c o m m e n t s t o n e x u s 7 k - d o c f e e d b a c k @ c i s c o . c o m
THE SPECIFICATIONS AND INFORMATION REGARDING THE PRODUCTS IN THIS MANUAL ARE SUBJECT TO CHANGE WITHOUT NOTICE. ALL STATEMENTS, INFORMATION, AND RECOMMENDATIONS IN THIS MANUAL ARE BELIEVED TO BE ACCURATE BUT ARE PRESENTED WITHOUT WARRANTY OF ANY KIND, EXPRESS OR IMPLIED. USERS MUST TAKE FULL RESPONSIBILITY FOR THEIR APPLICATION OF ANY PRODUCTS.
THE SOFTWARE LICENSE AND LIMITED WARRANTY FOR THE ACCOMPANYING PRODUCT ARE SET FORTH IN THE INFORMATION PACKET THAT SHIPPED WITH THE PRODUCT AND ARE INCORPORATED HEREIN BY THIS REFERENCE. IF YOU ARE UNABLE TO LOCATE THE SOFTWARE LICENSE OR LIMITED WARRANTY, CONTACT YOUR CISCO REPRESENTATIVE FOR A COPY.
The Cisco implementation of TCP header compression is an adaptation of a program developed by the University of California, Berkeley (UCB) as part of UCB’s public domain version of the UNIX operating system. All rights reserved. Copyright © 1981, Regents of the University of California.
NOTWITHSTANDING ANY OTHER WARRANTY HEREIN, ALL DOCUMENT FILES AND SOFTWARE OF THESE SUPPLIERS ARE PROVIDED “AS IS” WITH ALL FAULTS. CISCO AND THE ABOVE-NAMED SUPPLIERS DISCLAIM ALL WARRANTIES, EXPRESSED OR IMPLIED, INCLUDING, WITHOUT
LIMITATION, THOSE OF MERCHANTABILITY, FITNESS FOR A PARTICULAR PURPOSE AND NONINFRINGEMENT OR ARISING FROM A COURSE OF DEALING, USAGE, OR TRADE PRACTICE.
IN NO EVENT SHALL CISCO OR ITS SUPPLIERS BE LIABLE FOR ANY INDIRECT, SPECIAL, CONSEQUENTIAL, OR INCIDENTAL DAMAGES, INCLUDING, WITHOUT LIMITATION, LOST PROFITS OR LOSS OR DAMAGE TO DATA ARISING OUT OF THE USE OR INABILITY TO USE THIS MANUAL, EVEN IF CISCO OR ITS SUPPLIERS HAVE BEEN ADVISED OF THE POSSIBILITY OF SUCH DAMAGES.
CCDE, CCENT, CCSI, Cisco Eos, Cisco HealthPresence, Cisco IronPort, the Cisco logo, Cisco Lumin, Cisco Nexus, Cisco Nurse Connect, Cisco Pulse, Cisco StackPower, Cisco StadiumVision, Cisco TelePresence, Cisco Unified Computing System, Cisco WebEx, DCE, Flip Channels, Flip for Good, Flip Mino, Flipshare (Design), Flip Ultra, Flip Video, Flip Video (Design), Instant Broadband, and Welcome to the Human Network are trademarks; Changing the Way We Work, Live, Play, and Learn, Cisco Capital, Cisco Capital (Design), Cisco:Financed (Stylized), Cisco Store, and Flip Gift Card are service marks; and Access Registrar, Aironet, AllTouch, AsyncOS, Bringing the Meeting To You, Catalyst, CCDA, CCDP, CCIE, CCIP, CCNA, CCNP, CCSP, CCVP, Cisco, the Cisco Certified Internetwork Expert logo, Cisco IOS, Cisco Press, Cisco Systems, Cisco Systems Capital, the Cisco Systems logo, Cisco Unity, Collaboration Without Limitation, Continuum, EtherFast, EtherSwitch, Event Center, Explorer, Fast Step, Follow Me Browsing, FormShare, GainMaker, GigaDrive, HomeLink, iLYNX, Internet Quotient, IOS, iPhone, iQuick Study, IronPort, the IronPort logo, Laser Link, LightStream, Linksys, MediaTone, MeetingPlace, MeetingPlace Chime Sound, MGX, Networkers, Networking Academy, Network Registrar, PCNow, PIX, PowerKEY, PowerPanels, PowerTV, PowerTV (Design), PowerVu, Prisma, ProConnect, ROSA, ScriptShare, SenderBase, SMARTnet, Spectrum Expert, StackWise, The Fastest Way to Increase Your Internet Quotient, TransPath, WebEx, and the WebEx logo are registered trademarks of Cisco Systems, Inc. and/or its affiliates in the United States and certain other countries.
All other trademarks mentioned in this document or website are the property of their respective owners. The use of the word partner does not imply a partnership relationship between Cisco and any other company. (0908R)
Any Internet Protocol (IP) addresses used in this document are not intended to be actual addresses. Any examples, command display output, and figures included in the document are shown for illustrative purposes only. Any use of actual IP addresses in illustrative content is unintentional and coincidental.
Cisco Nexus 7000 Series NX-OS Layer 2 Switching Command Reference, Release 4.2 © 2008-2009 Cisco Systems, Inc. All rights reserved.
S e n d d o c u m e n t c o m m e n t s t o n e x u s 7 k - d o c f e e d b a c k @ c i s c o . c o m
C O N T E N T S
New and Changed Information
1vii
Preface
ix
Audience
ixOrganization
ixDocument Conventions
ixRelated Documentation
xCisco NX-OS Layer 2 Commands
L2-1
clear mac address-table dynamic
L2-2clear spanning-tree counters
L2-4clear spanning-tree detected-protocol
L2-5clear vlan counters
L2-7feature private-vlan
L2-8feature vtp
L2-10instance vlan
L2-11mac-address
L2-13mac address-table aging-time
L2-15mac address-table static
L2-17media ethernet
L2-19name (VLAN configuration)
L2-20name (mst configuration)
L2-21private-vlan
L2-23private-vlan association
L2-25private-vlan mapping
L2-27private-vlan synchronize
L2-29revision
L2-31show forwarding consistency l2
L2-32show hardware mac address-table
L2-34show interface mac-address
L2-37show interface private-vlan mapping
L2-39S e n d d o c u m e n t c o m m e n t s t o n e x u s 7 k - d o c f e e d b a c k @ c i s c o . c o m
Contents
show interface vlan counters
L2-44show mac address-table
L2-47show mac address-table aging-time
L2-50show running-config spanning-tree
L2-51show running-config vlan
L2-53show running-config vtp
L2-54show spanning-tree
L2-55show spanning-tree active
L2-60show spanning-tree bridge
L2-63show spanning-tree brief
L2-65show spanning-tree detail
L2-67show spanning-tree interface
L2-69show spanning-tree mst
L2-72show spanning-tree root
L2-75show spanning-tree summary
L2-77show spanning-tree vlan
L2-79show startup-config vlan
L2-82show startup-config vtp
L2-83show vlan
L2-84show vlan counters
L2-87show vlan dot1q tag native
L2-89show vlan id
L2-90show vlan private-vlan
L2-92show vtp status
L2-94shutdown (VLAN configuration)
L2-96spanning-tree bpdufilter
L2-98spanning-tree bpduguard
L2-100spanning-tree bridge assurance
L2-102spanning-tree cost
L2-104spanning-tree guard
L2-106spanning-tree link-type
L2-107spanning-tree loopguard default
L2-108spanning-tree mode
L2-109spanning-tree mst configuration
L2-111spanning-tree mst cost
L2-113S e n d d o c u m e n t c o m m e n t s t o n e x u s 7 k - d o c f e e d b a c k @ c i s c o . c o m
Contentsspanning-tree mst forward-time
L2-115spanning-tree mst hello-time
L2-116spanning-tree mst max-age
L2-117spanning-tree mst max-hops
L2-118spanning-tree mst port-priority
L2-119spanning-tree mst pre-standard
L2-120spanning-tree mst priority
L2-121spanning-tree mst root
L2-122spanning-tree mst simulate pvst
L2-124spanning-tree mst simulate pvst global
L2-126spanning-tree pathcost method
L2-128spanning-tree port type edge
L2-130spanning-tree port type edge bpdufilter default
L2-132spanning-tree port type edge bpduguard default
L2-134spanning-tree port type edge default
L2-136spanning-tree port type network
L2-138spanning-tree port type network default
L2-140spanning-tree port-priority
L2-142spanning-tree vlan
L2-144state
L2-146switchport mode private-vlan host
L2-147switchport mode private-vlan promiscuous
L2-149switchport private-vlan host-association
L2-151vlan (global configuration mode)
L2-153vtp domain
L2-155vtp mode transparent
L2-156vtp version
L2-157S e n d d o c u m e n t c o m m e n t s t o n e x u s 7 k - d o c f e e d b a c k @ c i s c o . c o m
S e n d d o c u m e n t c o m m e n t s t o n e x u s 7 k - d o c f e e d b a c k @ c i s c o . c o m
New and Changed Information
This chapter provides release-specific information for each new and changed feature in the Cisco Nexus 7000 Series NX-OS Layer 2 Switching Command Reference, Release 4.2. The latest version of this document is available at the following Cisco website:
http://www.cisco.com/en/US/docs/switches/datacenter/sw/4_1/nx-os/layer2/command/reference/l2_cm d_ref.html
To check for additional information about Cisco NX-OS Release 4.2, see the Cisco Nexus 7000 Series NX-OS Release Notes, Release 4.2 available at the following Cisco website:
http://www.cisco.com/en/US/docs/switches/datacenter/sw/4_1/nx-os/release/notes/41_nx-os_release_n ote.html
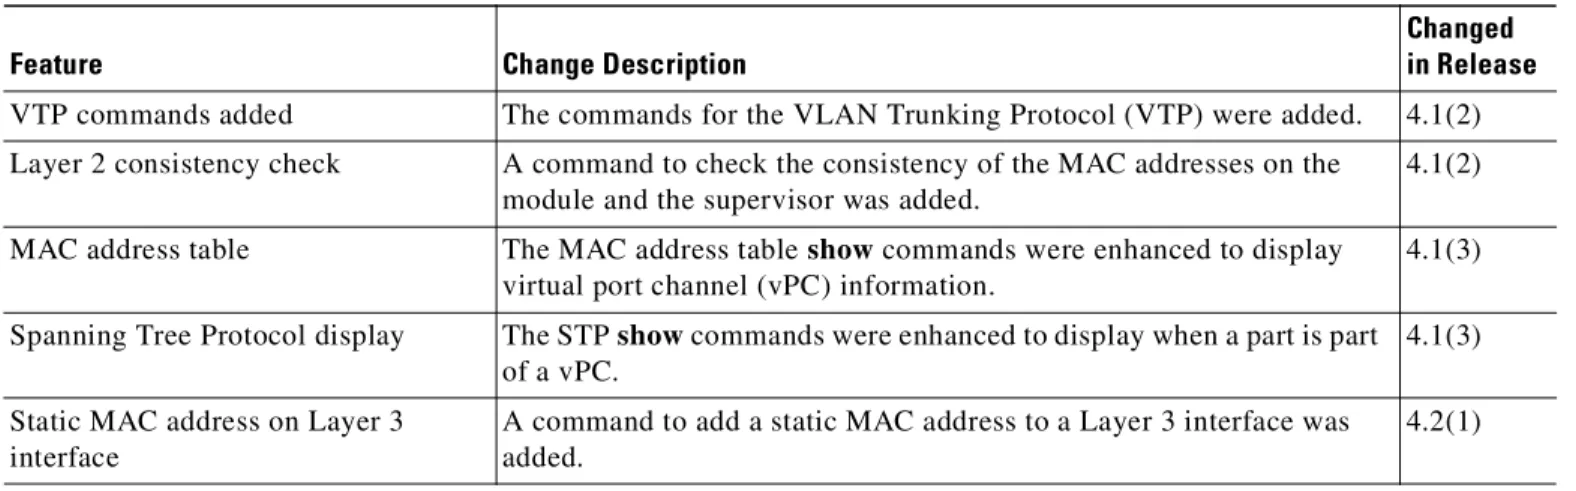
Table 1 summarizes the new and changed features for the Cisco Nexus 7000 Series NX-OS Layer 2 Switching Command Reference, Release 4.2.
Table 1 New and Changed Information for Release 4.2
Feature Change Description
Changed in Release
VTP commands added The commands for the VLAN Trunking Protocol (VTP) were added. 4.1(2) Layer 2 consistency check A command to check the consistency of the MAC addresses on the
module and the supervisor was added.
4.1(2) MAC address table The MAC address table show commands were enhanced to display
virtual port channel (vPC) information.
4.1(3) Spanning Tree Protocol display The STP show commands were enhanced to display when a part is part
of a vPC.
4.1(3) Static MAC address on Layer 3
interface
A command to add a static MAC address to a Layer 3 interface was added.
S e n d d o c u m e n t c o m m e n t s t o n e x u s 7 k - d o c f e e d b a c k @ c i s c o . c o m
S e n d d o c u m e n t c o m m e n t s t o n e x u s 7 k - d o c f e e d b a c k @ c i s c o . c o m
Preface
This preface describes the audience, organization, and conventions of the Cisco Nexus 7000 Series NX-OS Layer 2 Switching Command Reference, Release 4.2. It also provides information on how to obtain related documentation.
This chapter includes the following sections: • Audience, page ix
• Organization, page ix
• Document Conventions, page ix
• Related Documentation, page x
• Obtaining Documentation and Submitting a Service Request, page xi
Audience
This publication is for experienced users who configure and maintain NX-OS devices.
Organization
This reference is organized as follows:
Document Conventions
Command descriptions use these conventions:
Chapter and Title Description
Chapter 1, “Cisco NX-OS Layer 2 Commands” Describes the Cisco NX-OS Layer 2 commands.
Convention Description
boldface font Commands and keywords are in boldface.
italic font Arguments for which you supply values are in italics. [ ] Elements in square brackets are optional.
S e n d d o c u m e n t c o m m e n t s t o n e x u s 7 k - d o c f e e d b a c k @ c i s c o . c o m
Preface
Screen examples use these conventions:
This document uses the following conventions:
Note Means reader take note. Notes contain helpful suggestions or references to material not covered in the manual.
Caution Means reader be careful. In this situation, you might do something that could result in equipment damage or loss of data.
Tip Means the following information will help you solve a problem.
Related Documentation
Cisco NX-OS includes the following documents:
Release Notes
Cisco Nexus 7000 Series NX-OS Release Notes, Release 4.2 NX-OS Configuration Guides
Cisco Nexus 7000 Series NX-OS Getting Started with Virtual Device Contexts, Release 4.2 Cisco Nexus 7000 Series NX-OS Fundamentals Configuration Guide, Release 4.2
Cisco Nexus 7000 Series NX-OS Interfaces Configuration Guide, Release 4.2
Cisco Nexus 7000 Series NX-OS Layer 2 Switching Configuration Guide, Release 4.2 Cisco Nexus 7000 Series NX-OS Quality of Service Configuration Guide, Release 4.2
[ x | y | z ] Optional alternative keywords are grouped in brackets and separated by vertical bars.
string A nonquoted set of characters. Do not use quotation marks around the string or the string will include the quotation marks.
screen font Terminal sessions and information that the switch displays are in screen font. boldface screen
font
Information you must enter is in boldface screen font.
italic screen font Arguments for which you supply values are in italic screen font.
< > Nonprinting characters, such as passwords, are in angle brackets. [ ] Default responses to system prompts are in square brackets.
!, # An exclamation point (!) or a pound sign (#) at the beginning of a line of code indicates a comment line.
S e n d d o c u m e n t c o m m e n t s t o n e x u s 7 k - d o c f e e d b a c k @ c i s c o . c o m
Preface
Cisco Nexus 7000 Series NX-OS Unicast Routing Configuration Guide, Release 4.2 Cisco Nexus 7000 Series NX-OS Multicast Routing Configuration Guide, Release 4.2 Cisco Nexus 7000 Series NX-OS Security Configuration Guide, Release 4.2
Cisco Nexus 7000 Series NX-OS Virtual Device Context Configuration Guide, Release 4.2 Cisco Nexus 7000 Series NX-OS Software Upgrade and Downgrade Guide, Release 4.2 Cisco Nexus 7000 Series NX-OS Licensing Guide, Release 4.2
Cisco Nexus 7000 Series NX-OS High Availability and Redundancy Guide, Release 4.2 Cisco Nexus 7000 Series NX-OS System Management Configuration Guide, Release 4.2 Cisco Nexus 7000 Series NX-OS XML Management Interface User Guide, Release 4.2 Cisco NX-OS System Messages Reference
Cisco Nexus 7000 Series NX-OS MIB Quick Reference NX-OS Command References
Cisco Nexus 7000 Series NX-OS Command Reference Master Index, Release 4.2 Cisco Nexus 7000 Series NX-OS Fundamentals Command Reference, Release 4.2 Cisco Nexus 7000 Series NX-OS Interfaces Command Reference, Release 4.2
Cisco Nexus 7000 Series NX-OS Layer 2 Switching Command Reference, Release 4.2 Cisco Nexus 7000 Series NX-OS Quality of Service Command Reference, Release 4.2 Cisco Nexus 7000 Series NX-OS Unicast Routing Command Reference, Release 4.2 Cisco Nexus 7000 Series NX-OS Multicast Routing Command Reference, Release 4.2 Cisco Nexus 7000 Series NX-OS Security Command Reference, Release 4.2
Cisco Nexus 7000 Series NX-OS Virtual Device Context Command Reference, Release 4.2 Cisco Nexus 7000 Series NX-OS System Management Command Reference, Release 4.2 Other Software Document
Cisco Nexus 7000 Series NX-OS Troubleshooting Guide, Release 4.x Obtaining Documentation and Submitting a Service Request
For information on obtaining documentation, submitting a service request, and gathering additional information, see the monthly What’s New in Cisco Product Documentation, which also lists all new and revised Cisco technical documentation, at:
http://www.cisco.com/en/US/docs/general/whatsnew/whatsnew.html
Subscribe to the What’s New in Cisco Product Documentation as a Really Simple Syndication (RSS) feed and set content to be delivered directly to your desktop using a reader application. The RSS feeds are a free service and Cisco currently supports RSS version 2.0.
S e n d d o c u m e n t c o m m e n t s t o n e x u s 7 k - d o c f e e d b a c k @ c i s c o . c o m
S e n d d o c u m e n t c o m m e n t s t o n e x u s 7 k - d o c f e e d b a c k @ c i s c o . c o m
Cisco NX-OS Layer 2 Commands
S e n d d o c u m e n t c o m m e n t s t o n e x u s 7 k - d o c f e e d b a c k @ c i s c o . c o m
Cisco NX-OS Layer 2 Commands clear mac address-table dynamic
clear mac address-table dynamic
To clear the dynamic address entries from the MAC address table in Layer 2, use the clear mac address-table dynamic command.
clear mac address-table dynamic [[address mac_addr][vlan vlan_id][interface {type slot/port | port-channel number}]
Syntax Description
Defaults None
Command Modes Any command mode
Supported User Roles network-admin vdc-admin
Command History
Usage Guidelines Use the clear mac address-table dynamic command with no arguments to remove all dynamic entries from the table.
To clear static MAC addresses from the table, use the no mac address-table static command in configuration mode.
If the clear mac address-table dynamic command is entered with no options, all dynamic addresses are removed. If you specify an address but do not specify an interface, the address is deleted from all interfaces. If you specify an interface but do not specify an address, the device removes all addresses on the specified interfaces.
This command does not require a license.
Examples This example shows how to clear all the dynamic Layer 2 entries from the MAC address table: switch(config)# clear mac address-table dynamic
address mac_addr
(Optional) Specifies the MAC address to remove from the table. Use the format XXXX.XXXX.XXXX.
vlan vlan_id (Optional) Specifies the VLAN from which the MAC address should be removed from the table. The range of valid values is from 1 to 4094.
interface {type slot/port | port-channel number}]
(Optional) Specifies the interface. Use either the type of interface, the slot number, and the port number, or the port-channel number.
Release Modification
S e n d d o c u m e n t c o m m e n t s t o n e x u s 7 k - d o c f e e d b a c k @ c i s c o . c o m
Cisco NX-OS Layer 2 Commands
clear mac address-table dynamic
switch(config) #
This example shows how to clear all the dynamic Layer 2 entries from the MAC address table for VLAN 20 on port 2/20:
switch(config)# clear mac address-table dynamic vlan 20 interface ethernet 2/20 switch(config)#
Related Commands Command Description
show mac address-table
S e n d d o c u m e n t c o m m e n t s t o n e x u s 7 k - d o c f e e d b a c k @ c i s c o . c o m
Cisco NX-OS Layer 2 Commands clear spanning-tree counters
clear spanning-tree counters
To clear the counters for the Spanning Tree Protocol (STP), use the clear spanning-tree counters
command.
clear spanning-tree counters [vlan vlan-id][interface {ethernet {interface-num}| port-channel {channel-num}}]
Syntax Description
Defaults None
Command Modes Any command mode
Supported User Roles network-admin vdc-admin
Command History
Usage Guidelines You can clear all the STP counters on the entire device, per VLAN, or per interface. This command does not require a license.
Examples This example shows how to clear the STP counters for VLAN 5: switch# clear spanning-tree counters vlan 5
Related Commands
vlan vlan-id (Optional) Specifies the VLAN. The range is from 1 to 4094.
interface (Optional) Specifies the interface type. ethernet
interface-num
Module and port number. port-channel
channel-num
Port-channel number.
Release Modification
4.0 This command was introduced.
Command Description
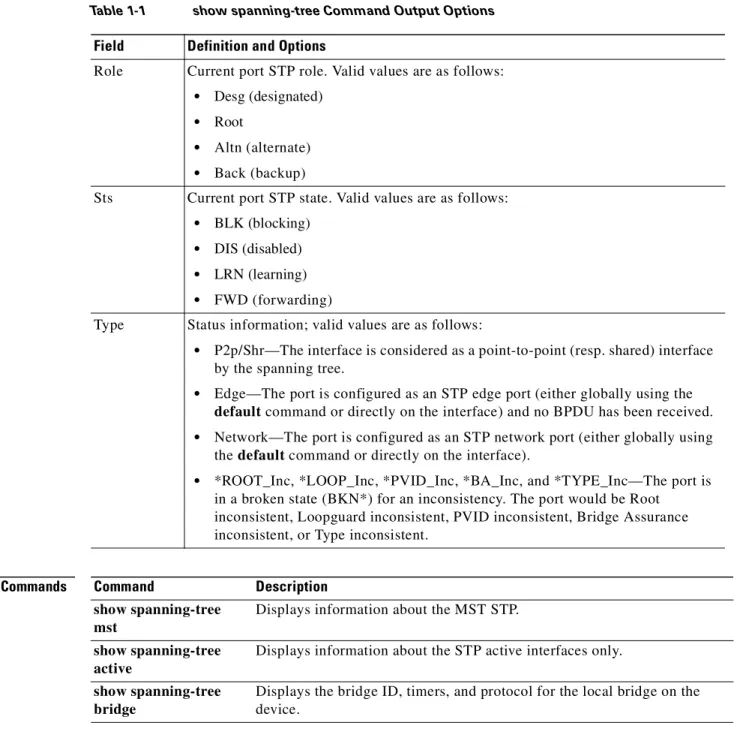
show spanning-tree Displays information about the spanning tree state.
show spanning-tree mst
S e n d d o c u m e n t c o m m e n t s t o n e x u s 7 k - d o c f e e d b a c k @ c i s c o . c o m
Cisco NX-OS Layer 2 Commands
clear spanning-tree detected-protocol
clear spanning-tree detected-protocol
To restart the protocol migration, use the clear spanning-tree detected-protocol command.
clear spanning-tree detected-protocol [interface {ethernet {interface-num}| port-channel {channel-num}}]
Syntax Description
Defaults None
Command Modes Any command mode
Supported User Roles network-admin vdc-admin
Command History
Usage Guidelines Rapid per VLAN Spanning Tree Plus (Rapid PVST+) and Multiple Spanning Tree (MST) have built-in compatibility mechanisms that allow them to interact properly with other versions of IEEE spanning tree or other regions. For example, a bridge running Rapid PVST+ can send 802.1D bridge protocol data units (BPDUs) on one of its ports when it is connected to a legacy bridge. An MST bridge can detect that a port is at the boundary of a region when it receives a legacy BPDU or an MST BPDU that is associated with a different region.
These mechanisms are not always able to revert to the most efficient mode. For example, a Rapid PVST+ bridge that is designated for a legacy 802.1D bridge stays in 802.1D mode even after the legacy bridge has been removed from the link. Similarly, an MST port assumes that it is a boundary port when the bridges to which it is connected have joined the same region.
To force the MST port to renegotiate with the neighbors, enter the clear spanning-tree detected-protocol command.
If you enter the clear spanning-tree detected-protocol command with no arguments, the command is applied to every port of the device.
This command does not require a license.
interface (Optional) Specifies the interface type. ethernet
interface-num
Module and port number. port-channel
channel-num
Port-channel number.
Release Modification
S e n d d o c u m e n t c o m m e n t s t o n e x u s 7 k - d o c f e e d b a c k @ c i s c o . c o m
Cisco NX-OS Layer 2 Commands clear spanning-tree detected-protocol
Examples This example shows how to restart the protocol migration on a specific interface: switch# clear spanning-tree detected-protocol interface gigabitethernet5/8
Related Commands Command Description
show spanning-tree Displays information about the spanning tree state.
show spanning-tree mst
S e n d d o c u m e n t c o m m e n t s t o n e x u s 7 k - d o c f e e d b a c k @ c i s c o . c o m
Cisco NX-OS Layer 2 Commands
clear vlan counters
clear vlan counters
To clear the counters for a specified VLAN or all VLANs, use the clear vlan counters command.
clear vlan [id {vlan-id}] counters
Syntax Description
Defaults None
Command Modes Any command mode
Supported User Roles network-admin vdc-admin
Command History
Usage Guidelines If you do not specify a VLAN ID, the system clears the counters for all the VLANs, including private VLANs.
This command does not require a license.
Examples This example shows how to clear the counters for VLAN 50: switch# clear vlan 50 counters
Related Commands
id (Optional) VLAN ID you want to clear. Valid values are from 1 to 4096.
vlan-id VLAN that you want to clear.
Release Modification
4.0 This command was introduced.
Command Description
show vlan counters Displays information on statistics for all VLANs or the specified VLAN.
show interface counters
S e n d d o c u m e n t c o m m e n t s t o n e x u s 7 k - d o c f e e d b a c k @ c i s c o . c o m
Cisco NX-OS Layer 2 Commands feature private-vlan
feature private-vlan
To enable private VLANs, use the feature private-vlan command. To return to the default settings, use the no form of this command.
feature private-vlan no feature private-vlan
Syntax Description This command has no arguments or keywords.17
Defaults Disabled
Command Modes Global configuration
Supported User Roles network-admin vdc-admin
Command History
Usage Guidelines You must use this command to enable private VLAN functionality. You must enable private VLANs before the private VLANs are visible to the user. When private VLANs are disabled, all of the configuration on the feature is removed from the interfaces.
You cannot apply the no feature private-vlan command if the device has any operational ports in private VLAN mode. You must shut down all operational ports in private VLAN mode before you use the no feature private-vlan command. After you shut down the interfaces and enter the no feature
private-vlan command, these port return to the default mode. This command does not require a license.
Examples This example shows how to enable private VLAN functionality on the device: switch(config)# feature private-vlan
switch(config)#
Related Commands
Release Modification
S e n d d o c u m e n t c o m m e n t s t o n e x u s 7 k - d o c f e e d b a c k @ c i s c o . c o m
Cisco NX-OS Layer 2 Commands
feature private-vlan
Command Description
show feature Displays whether the feature is enabled or disabled.
show vlan private-vlan Displays information on private VLANs. If the feature is not enabled, this command returns an error.
S e n d d o c u m e n t c o m m e n t s t o n e x u s 7 k - d o c f e e d b a c k @ c i s c o . c o m
Cisco NX-OS Layer 2 Commands feature vtp
feature vtp
To enable VTPs, use the feature vtp command. To return to the default setting, use the no form of this command.
feature vtp no feature vtp
Syntax Description This command has no arguments or keywords.
Defaults Disabled
Command Modes Global configuration
Supported User Roles network-admin vdc-admin
Command History
Usage Guidelines You must use this command to enable private VTP functionality. You must enable private VTP before you can configure or use any of the functionality.
Note When you disable the VTP feature, all of the VTP configurations are lost. This command does not require a license.
Examples This example shows how to enable VTP functionality on the device: switch(config)# feature vtp
switch(config)#
Related Commands
Release Modification
4.1(2) This command was introduced.
Command Description
S e n d d o c u m e n t c o m m e n t s t o n e x u s 7 k - d o c f e e d b a c k @ c i s c o . c o m
Cisco NX-OS Layer 2 Commands
instance vlan
instance vlan
To map a VLAN or a set of VLANs to a Multiple Spanning Tree instance (MSTI), use the instance vlan
command. To delete the instance and return the VLANs to the default instance (CIST), use the no form of this command.
instance instance-idvlan vlan-id no instance instance-idvlan vlan-id
Syntax Description5
Defaults No VLANs are mapped to any MST instance (all VLANs are mapped to the CIST instance).
Command Modes mst configuration submode
Supported User Roles network-admin vdc-admin
Command History
Usage Guidelines The vlans vlan-range is entered as a single value or a range.
You cannot map VLANs 3968 to 4047 or 4094 to an MST instance. These VLANs are reserved for internal use by the device.
The mapping is incremental, not absolute. When you enter a range of VLANs, this range is added to or removed from the existing instances.
Any unmapped VLAN is mapped to the CIST instance.
Caution When you change the VLAN-to-MSTI mapping, the system restarts MST. This command does not require a license.
Examples This example shows how to map a range of VLANs to MSTI 4: switch(config)# spanning-tree mst configuration
instance-id Instances to which the specified VLANs are mapped; the range of valid values is from 0 to 4094.
vlan-id Number of the VLANs that you are mapping to the specified MSTI; the range of valid values is from 1 to 4094.
Release Modification
S e n d d o c u m e n t c o m m e n t s t o n e x u s 7 k - d o c f e e d b a c k @ c i s c o . c o m
Cisco NX-OS Layer 2 Commands instance vlan
switch(config-mst)# instance 4 vlan 100-200 switch(config-mst)#
Related Commands Command Description
show spanning-tree mst configuration
Displays information about the MST protocol.
spanning-tree mst configuration
S e n d d o c u m e n t c o m m e n t s t o n e x u s 7 k - d o c f e e d b a c k @ c i s c o . c o m
Cisco NX-OS Layer 2 Commands
mac-address
mac-address
To configure a static MAC address for a Layer 3 interface, use the mac address command. To return to the default settings, use the no form of this command.
mac-address mac-address no mac-address mac-address
Syntax Description
Defaults VDC MAC address
Command Modes Interface configuration
Supported User Roles network-admin vdc-admin
Command History
Usage Guidelines You can specify a MAC address for all Layer 3 interfaces: • Layer 3 interfaces
• Layer 3 port channels • Layer 3 subinterfaces • VLAN network interface
You cannot configure static MAC addresses on tunnel interfaces.
You cannot use this command on Layer 2 interfaces or individual members of a port channel.
See the Cisco Nexus 7000 Series NX-OS Interfaces Command Reference, Release 4.2 for information on configuring Layer 3 interfaces.
You cannot configure a static group MAC address to these interfaces. This command does not require a license.
Examples This example shows how to configure a static MAC address on a Layer 3 interface: switch(config)# interface ethernet 7/3
switch(config-1f)# mac-address 02c4.1e42.a3b2
mac-address MAC address for the Layer 3 interface. Use the format XXXX.XXXX.XXXX.
Release Modification
S e n d d o c u m e n t c o m m e n t s t o n e x u s 7 k - d o c f e e d b a c k @ c i s c o . c o m
Cisco NX-OS Layer 2 Commands mac-address
Related Commands Command Description
show interface interface
Displays information about the interface.
S e n d d o c u m e n t c o m m e n t s t o n e x u s 7 k - d o c f e e d b a c k @ c i s c o . c o m
Cisco NX-OS Layer 2 Commands
mac address-table aging-time
mac address-table aging-time
To configure the aging time for entries in the Layer 2 table, use the mac address-table aging-time
command. To return to the default settings, use the no form of this command.
mac address-table aging-time seconds [vlan vlan_id]
no mac address-table aging-time [vlan vlan_id]
Syntax Description
Defaults 1800 seconds
Command Modes Global configuration
Supported User Roles network-admin vdc-admin
Command History
Usage Guidelines Enter 0 seconds to disable the aging process.
The age value may be rounded off to the nearest multiple of 5 seconds. If the system rounds the value to a different value from that specified by the user (from the rounding process), the system returns an informational message.
When you use this command in the global configuration mode, the age values of all VLANs for which a configuration has not been specified are modified and those VLANs with specifically modified aging times are not modified. When you use the no form of this command without the VLAN parameter, only those VLANs that have not been specifically configured for the aging time reset to the default value. Those VLANs with specifically modified aging times are not modified.
When you use this command and specify a VLAN, the aging time for only the specified VLAN is modified. When you use the no form of this command and specify a VLAN, the aging time for the VLAN is returned to the current global configuration for the aging time, which may or may not be the default value of 300 seconds depending if the global configuration of the device for aging time has been changed.
Aging time is counted from the last time that the switch detected the MAC address. This command does not require a license.
seconds Aging time for MAC table entries for Layer 2. The range is from 120 to 918000 seconds. The default is 1800 seconds. Entering 0 disables the aging time.
vlan vlan_id (Optional) Specifies the VLAN to apply the changed aging time.
Release Modification
S e n d d o c u m e n t c o m m e n t s t o n e x u s 7 k - d o c f e e d b a c k @ c i s c o . c o m
Cisco NX-OS Layer 2 Commands mac address-table aging-time
Examples This example shows how to change the length of time an entry remains in the MAC address table to 500 seconds for the entire device:
switch(config)# mac address-table aging-time 500 switch(config)#
Related Commands Command Description
show mac address-table
Displays information about the MAC address table.
clear mac address-table aging-time
S e n d d o c u m e n t c o m m e n t s t o n e x u s 7 k - d o c f e e d b a c k @ c i s c o . c o m
Cisco NX-OS Layer 2 Commands
mac address-table static
mac address-table static
To configure a static entry for the Layer 2 MAC address table, use the mac address-table static
command. To delete the static entry, use the no form of this command.
mac address-table staticmac-address vlan vlan-id {[drop | interface {type slot/port | port-channel number]}
no mac address-table static {address mac_addr}{vlan vlan_id}
Syntax Description
Defaults None
Command Modes Global configuration
Supported User Roles network-admin vdc-admin
Command History
Usage Guidelines You cannot apply the mac address-table staticmac-addressvlanvlan-iddrop command to a multicast MAC address.
The output interface specified cannot be a VLAN interface or a Switched Virtual Interface (SVI). Use the no form to remove entries that are profiled by the combination of specified entry information. This command does not require a license.
mac-address Specifies the MAC address to add to the table. Use the format XXXX.XXXX.XXXX.
vlan vlan-id Specifies the VLAN to apply static MAC address; valid values are from 1 to 4094.
drop Drops all traffic that is received from and going to the configured MAC address in the specified VLAN.
type slot/port (Optional) Specifies the interface. Use the type of interface, the slot number, and the port number.
port-channel number
(Optional) Specifies the interface. Use the port-channel number.
Release Modification
S e n d d o c u m e n t c o m m e n t s t o n e x u s 7 k - d o c f e e d b a c k @ c i s c o . c o m
Cisco NX-OS Layer 2 Commands mac address-table static
Examples This example shows how to add a static entry to the MAC address table:
switch(config)# mac address-table static 0050.3e8d.6400 vlan 3 interface ethernet 2/1 switch(config)#
Related Commands Command Description
show mac address-table
S e n d d o c u m e n t c o m m e n t s t o n e x u s 7 k - d o c f e e d b a c k @ c i s c o . c o m
Cisco NX-OS Layer 2 Commands
media ethernet
media ethernet
Note You can have only Ethernet VLANs on the DC-OS. Although the mediaethernet command appears on the device, it does not apply to any configuration.
To set the media type for a VLAN to Ethernet, use the media ethernet command. Use the no form of this command to return to the default value.
media ethernet nomedia
Syntax Description This command has no arguments or keywords.
Defaults Ethernet is the only media type supported.
Command Modes VLAN configuration submode
Supported User Roles network-admin vdc-admin
Usage Guidelines The media ethernet command is not supported in 4.0. This command does not require a license.
Examples This example shows how to set the media type to Ethernet for VLAN 2: switch(config)# vlan 2
switch(config-vlan)# media ethernet switch(config-mst)#
Related Commands Command Description
S e n d d o c u m e n t c o m m e n t s t o n e x u s 7 k - d o c f e e d b a c k @ c i s c o . c o m
Cisco NX-OS Layer 2 Commands name (VLAN configuration)
name (VLAN configuration)
To set the name for a VLAN, use the name command. To remove the user-configured name from a VLAN, use the no form of this command.
name vlan-name noname
Syntax Description
Defaults The vlan-name argumentis VLANxxxx where xxxx represent four numeric digits (including leading zeroes) equal to the VLAN ID number.
Command Modes VLAN configuration submode
Supported User Roles network-admin vdc-admin
Command History
Usage Guidelines The name must be unique within the VDC, and the same name can be reused in a separate VDC. You cannot change the name for the default VLAN, VLAN 1, or for the internally allocated VLANs. This command does not require a license.
Examples This example shows how to name VLAN 2: switch(config)# vlan 2
switch(config-vlan)# name accounting switch(config-mst)#
Related Commands
vlan-name Name of the VLAN; you can use up to 32 alphanumeric, case-sensitive characters.
Note The name must be unique within each VDC.
Release Modification
4.0 This command was introduced.
Command Description
S e n d d o c u m e n t c o m m e n t s t o n e x u s 7 k - d o c f e e d b a c k @ c i s c o . c o m
Cisco NX-OS Layer 2 Commands
name (mst configuration)
name (mst configuration)
To set the name of a Multiple Spanning Tree (MST) region, use the name command. To return to the default name, use the no form of this command.
name name no name name
Syntax Description
Defaults None
Command Modes mst configuration submode
Supported User Roles network-admin vdc-admin
Command History
Usage Guidelines Two or more devices with the same VLAN mapping and configuration version number are considered to be in different MST regions if the region names are different.
Caution Be careful when using the name command to set the name of an MST region. If you make a mistake, you can put the device in a different region. The configuration name is a case-sensitive parameter. This command does not require a license.
Examples This example shows how to name a region:
switch(config)# spanning-tree mst configuration switch(config-mst)# name accounting
switch(config-mst)#
name Name to assign to the MST region. It can be any string with a maximum length of 32 alphanumeric characters.
Release Modification
S e n d d o c u m e n t c o m m e n t s t o n e x u s 7 k - d o c f e e d b a c k @ c i s c o . c o m
Cisco NX-OS Layer 2 Commands name (mst configuration)
Related Commands Command Description
show spanning-tree mst configuration
Displays information about the MST protocol.
spanning-tree mst configuration
S e n d d o c u m e n t c o m m e n t s t o n e x u s 7 k - d o c f e e d b a c k @ c i s c o . c o m
Cisco NX-OS Layer 2 Commands
private-vlan
private-vlan
To configure private VLANs, use the private-vlan command. To return the specified VLAN(s) to normal VLAN mode, use the no form of this command.
private-vlan {isolated | community | primary}
no private-vlan {isolated | community | primary}
Syntax Description
Defaults None
Command Modes VLAN configuration submode
Supported User Roles network-admin vdc-admin
Command History
Usage Guidelines You must enable private VLANs by using the feature private-vlan command before you can configure private VLANs. The commands for configuring private VLANs are not visible until you enable private VLANs.
Note Before you configure a VLAN as a secondary VLAN, either community or isolated, you must shut down the VLAN interface, or Switched Virtual Interface (SVI), for that VLAN.
If you delete either the primary or secondary VLAN, the ports that are associated with the VLAN become inactive. When you enter the no private-vlan command, the VLAN returns to the normal VLAN mode. All primary and secondary associations on that VLAN are suspended, but the interfaces remain in private VLAN mode. However, when you reconvert the specified VLAN to private VLAN mode, the original associations are reinstated.
If you enter the no vlan command for the primary VLAN, all private VLAN associations with that VLAN are lost. However, if you enter the no vlan command for a secondary VLAN, the private VLAN associations with that VLAN are suspended and return when you recreate the specified VLAN and configure it as the previous secondary VLAN.
You cannot configure VLAN1 or the internally allocated VLANs as private VLANs.
isolated Designates the VLAN as an isolated secondary VLAN.
community Designates the VLAN as a community secondary VLAN.
primary Designates the VLAN as the primary VLAN.
Release Modification
S e n d d o c u m e n t c o m m e n t s t o n e x u s 7 k - d o c f e e d b a c k @ c i s c o . c o m
Cisco NX-OS Layer 2 Commands private-vlan
A private VLAN is a set of private ports that are characterized by using a common set of VLAN number pairs. Each pair is made up of at least two special unidirectional VLANs and is used by isolated ports and/or by a community of ports to communicate with routers.
An isolated VLAN is a VLAN that is used by isolated ports to communicate with promiscuous ports. An isolated VLAN’s traffic is blocked on all other private ports in the same VLAN. Its traffic can only be received by standard trunking ports and promiscuous ports that are assigned to the corresponding primary VLAN.
A promiscuous port is defined as a private port that is assigned to a primary VLAN.
A community VLAN is defined as the VLAN that carries the traffic among community ports and from community ports to the promiscuous ports on the corresponding primary VLAN.
A primary VLAN is defined as the VLAN that is used to convey the traffic from the routers to customer end stations on private ports.
Multiple community and isolated VLANs are allowed. If you enter a range of primary VLANs, the system uses the first number in the range for the association.
Examples This example shows how to remove a private VLAN relationship from the primary VLAN. The associated secondary VLANs are not deleted.
switch(config-vlan)# no private-vlan association switch(config-vlan)#
Related Commands Command Description
show vlan Displays information about VLANs.
show vlan private-vlan [type]
S e n d d o c u m e n t c o m m e n t s t o n e x u s 7 k - d o c f e e d b a c k @ c i s c o . c o m
Cisco NX-OS Layer 2 Commands
private-vlan association
private-vlan association
To configure the association between a primary VLAN and a secondary VLAN on a private VLAN, use the private-vlan association command. To remove the association, use the no form of this command.
private-vlan association {[add] secondary-vlan-list | removesecondary-vlan-list}
no private-vlan association
Syntax Description
Defaults None
Command Modes VLAN configuration submode
Supported User Roles network-admin vdc-admin
Command History
Usage Guidelines You must enable private VLANs by using the feature private-vlan command before you can configure private VLANs. The commands for configuring private VLANs are not visible until you enable private VLANs.
Note Before you configure a VLAN as a secondary VLAN, either community or isolated, you must shut down the VLAN interface, or switched virtual interface (SVI), for that VLAN.
If you delete either the primary or secondary VLAN, the ports that are associated with the VLAN become inactive. When you enter the no private-vlan command, the VLAN returns to the normal VLAN mode. All primary and secondary associations on that VLAN are suspended, but the interfaces remain in private VLAN mode. However, when you reconvert the specified VLAN to private VLAN mode, the original associations are reinstated.
If you enter the no vlan command for the primary VLAN, all private VLAN associations with that VLAN are lost. However, if you enter the no vlan command for a secondary VLAN, the private VLAN associations with that VLAN are suspended and return when you recreate the specified VLAN and configure it as the previous secondary VLAN.
add Associates a secondary VLAN to a primary VLAN. secondary-vlan-list Number of the secondary VLAN.
remove Clears the association between a secondary VLAN and a primary VLAN.
Release Modification
S e n d d o c u m e n t c o m m e n t s t o n e x u s 7 k - d o c f e e d b a c k @ c i s c o . c o m
Cisco NX-OS Layer 2 Commands private-vlan association
The secondary-vlan-list argument cannot contain spaces. It can contain multiple comma-separated items. Each item can be a single secondary VLAN ID or a hyphenated range of secondary VLAN IDs. The secondary-vlan-list parameter can contain multiple secondary VLAN IDs.
A private VLAN is a set of private ports that are characterized by using a common set of VLAN number pairs. Each pair is made up of at least two special unidirectional VLANs and is used by isolated ports and/or by a community of ports to communicate with routers.
Multiple community and isolated VLANs are allowed. If you enter a range of primary VLANs, the system uses the first number in the range for the association.
Isolated and community VLANs can only be associated with one primary VLAN. You cannot configure a VLAN that is already associated to a primary VLAN as a primary VLAN.
See the Cisco DC-OS Layer 2 Switching Configuration Guide for additional configuration guidelines. This command does not require a license.
Examples This example shows how to create a private VLAN relationship between the primary VLAN 14, the isolated VLAN 19, and the community VLANs 20 and 21:
switch(config)# vlan 19
switch(config-vlan)# private-vlan isolated switch(config)# vlan 20
switch(config-vlan)# private-vlan community switch(config)# vlan 21
switch(config-vlan)# private-vlan community switch(config)# vlan 14
switch(config-vlan)# private-vlan primary
switch(config-vlan)# private-vlan association 19-21
This example shows how to remove isolated VLAN 18 and community VLAN 20 from the private VLAN association:
switch(config)# vlan 14
switch(config-vlan)# private-vlan association remove 18,20 switch(config-vlan)#
Related Commands Command Description
show vlan Displays information about VLANs.
show vlan private-vlan [type]
S e n d d o c u m e n t c o m m e n t s t o n e x u s 7 k - d o c f e e d b a c k @ c i s c o . c o m
Cisco NX-OS Layer 2 Commands
private-vlan mapping
private-vlan mapping
To create a mapping between the primary and the secondary VLANs so that both VLANs share the same Layer 3 VLAN interface, or switched virtual interface (SVI), use the private-vlanmapping command under the SVI. To remove all private VLAN mappings from the Layer 3 VLAN interface, use the no form of this command.
private-vlan mapping {[add] secondary-vlan-list | removesecondary-vlan-list}
no private-vlan mapping
Syntax Description
Defaults None
Command Modes Interface configuration
Supported User Roles network-admin vdc-admin
Command History
Usage Guidelines You must enable private VLANs by using the feature private-vlan command before you can configure private VLANs. The commands for configuring private VLANs are not visible until you enable private VLANs.
The private-vlan mapping command is valid in the interface configuration mode of the primary VLAN. The secondary-vlan-list argument cannot contain spaces. It can contain multiple comma-separated items. Each item can be a single secondary VLAN ID or a hyphenated range of secondary VLAN IDs.
Note You must enable VLAN interfaces, or SVIs, before you can configure the SVI. Use the feature interface-vlan command to enable VLAN interfaces.
See the Cisco NX-OS Interfaces Configuration Guide for information on creating and configuring VLAN interfaces.
Traffic that is received on the secondary VLAN is routed by the SVI of the primary VLAN.
add Maps the secondary VLAN to the primary VLAN.
secondary-vlan-list VLAN ID of the secondary VLANs to map to the primary VLAN.
remove Removes the mapping between the secondary VLAN and the primary VLAN.
Release Modification
S e n d d o c u m e n t c o m m e n t s t o n e x u s 7 k - d o c f e e d b a c k @ c i s c o . c o m
Cisco NX-OS Layer 2 Commands private-vlan mapping
When you configure VLANs as secondary private VLANs, the SVIs of those existing VLANs do not function and are considered as down after you enter this command.
You can map a secondary VLAN to only one primary SVI. If you configure the primary VLAN as a secondary VLAN, all the mappings that are specified in this command are suspended.
You must first associate all secondary VLANs with the primary VLAN using the private-vlan command. If you configure a mapping between two VLANs that do not have a valid Layer 2 association, the mapping configuration does not take effect.
See the private-vlan command for more information about primary and secondary VLANs. This command does not require a license.
Examples This example shows how to map the interface of VLAN 20 to the Layer 3 VLAN interface, or SVI, of VLAN 18:
switch(config)# interface vlan 18
switch(config-if)# private-vlan mapping 20 switch(config-if)#
This example shows how to permit routing of secondary VLAN-ingress traffic from private VLANs 303 through 307, 309, and 440:
switch# configure terminal
switch(config)# interface vlan 202
switch(config-if)# private-vlan mapping add 303-307,309,440 switch(config-if)# end
This example shows how to remove all private VLAN mappings from the SVI of VLAN 19: switch(config)# interface vlan 19
switch(config-if)# no private-vlan mapping switch(config-if)#
Related Commands Command Description
show interface private-vlan mapping
Displays information on secondary private VLAN mapping to VLAN interface.
S e n d d o c u m e n t c o m m e n t s t o n e x u s 7 k - d o c f e e d b a c k @ c i s c o . c o m
Cisco NX-OS Layer 2 Commands
private-vlan synchronize
private-vlan synchronize
To map the secondary VLANs to the same MST instance as the primary VLAN, use the private-vlan synchronize command.
private-vlan synchronize
Syntax Description This command has no keywords or arguments.
Defaults This command has no default settings.
Command Modes mst configuration submode
Supported User Roles network-admin vdc-admin
Command History
Usage Guidelines If you do not map secondary VLANs to the same MST instance as the associated primary VLAN when you exit the MST configuration submode, the device displays a warning message that lists the secondary VLANs that are not mapped to the same instance as the associated VLAN. The private-vlan
synchronize command automatically maps all secondary VLANs to the same instance as the associated primary VLANs.
This command does not require a license.
Examples This example assumes that a primary VLAN 2 and a secondary VLAN 3 are associated to VLAN 2, and that all VLANs are mapped to the CIST instance 1. This example also shows the output if you try to change the mapping for the primary VLAN 2 only:
switch(config)# spanning-tree mst configuration switch(config-mst)# instance 1 vlan 2
switch(config-mst)# exit
These secondary vlans are not mapped to the same instance as their primary: -> 3
This example shows how to initialize PVLAN synchronization: switch(config-mst)# private-vlan synchronize
switch(config-mst)#
Release Modification
S e n d d o c u m e n t c o m m e n t s t o n e x u s 7 k - d o c f e e d b a c k @ c i s c o . c o m
Cisco NX-OS Layer 2 Commands private-vlan synchronize
Related Commands Command Description
show spanning-tree mst configuration
Displays information about the MST protocol.
spanning-tree mst configuration
S e n d d o c u m e n t c o m m e n t s t o n e x u s 7 k - d o c f e e d b a c k @ c i s c o . c o m
Cisco NX-OS Layer 2 Commands
revision
revision
To set the revision number for the Multiple Spanning Tree (MST) region configuration, use the revision
command. To return to the default settings, use the no form of this command.
revision version no revision version
Syntax Description
Defaults 0
Command Modes mst configuration submode
Supported User Roles network-admin vdc-admin
Command History
Usage Guidelines Two or more devices with the same VLAN mapping and name are considered to be in different MST regions if the configuration revision numbers are different.
Caution Be careful when using the revision command to set the revision number of the MST region configuration because a mistake can put the device in a different region.
This command does not require a license.
Examples This example shows how to set the revision number of the MST region configuration: switch(config)# spanning-tree mst configuration
switch(config-mst)# revision 5 switch(config-mst)#
Related Commands
version Revision number for the MST region configuration; the range of valid values is from 0 to 65535.
Release Modification
4.0 This command was introduced.
Command Description
show spanning-tree mst
S e n d d o c u m e n t c o m m e n t s t o n e x u s 7 k - d o c f e e d b a c k @ c i s c o . c o m
Cisco NX-OS Layer 2 Commands show forwarding consistency l2
show forwarding consistency l2
To display information about discrepant, missing, or extra MAC addresses between the supervisor and the module, use the show forwarding consistency l2 command.
show forwarding consistency l2 {module}
Syntax Description
Defaults None
Command Modes Any command mode.
Supported User Roles network-admin vdc-admin
Command History
Usage Guidelines Optimally, all the MAC address tables on each module exactly match the MAC address table on the supervisor.
This command does not require a license.
Examples This example shows how to display hardware information about all the MAC addresses VLAN 1 on module 2:
switch# show forwarding consistency l2 9
Legend: * - primary entry, G - Gateway MAC, (R) - Routed MAC age - seconds since last seen Missing entries in the MAC Table
VLAN MAC Address Type age Secure NTFY Ports
---+---+---+---+---+---+---G - 0018.bad7.e115 static - False False sup-eth1(R)
* 1 0001.1234.5600 static - False False Eth9/25G 2 0018.bad7.e115 static - False False sup-eth1(R)G 3 0018.bad7.e115 static - False False sup-eth1(R) Extra and Discrepant entries in the MAC Table
VLAN MAC Address Type age Secure NTFY Ports ---+---+---+---+---+---+---G - 0018.bad7.dc15 static - False False sup-eth1(R) * 1 0001.1234.5601 static - False False Eth9/25
Related Commands
module Specifies the module number that you are comparing with the supervisor MAC address table.
Release Modification
S e n d d o c u m e n t c o m m e n t s t o n e x u s 7 k - d o c f e e d b a c k @ c i s c o . c o m
Cisco NX-OS Layer 2 Commands
show forwarding consistency l2
Command Description
show mac address-table
S e n d d o c u m e n t c o m m e n t s t o n e x u s 7 k - d o c f e e d b a c k @ c i s c o . c o m
Cisco NX-OS Layer 2 Commands show hardware mac address-table
show hardware mac address-table
To display information about the hardware MAC addresses, use the show hardware mac address-table
command.
show hardware mac address table {module}
[address {mac-address} {[interface {ethernetslot/port |port-channelchannel-number}] [vlan vlan-id]]
[dynamic [address {mac-address}] [interface {ethernetslot/port |port-channel channel-number}] [vlan vlan-id]]
[interface {ethernetslot/port |port-channelchannel-number}] [address {mac-address}] [vlan vlan-id]]
[static [address {mac-address}] [interface {ethernetslot/port |port-channelchannel-number}] [vlan vlan-id]]
[vlan {vlan-id} [address mac-address] [interface {ethernetslot/port |port-channel channel-number}]
Syntax Description
Defaults None
Command Modes Any command mode.
Supported User Roles network-admin vdc-admin
Command History
module Specifies the module number.
address
{mac-address}
(Optional) Specifies the MAC address in the format of X.X.X, XX-XX-XX-XX-XX-XX, XX:XX:XX:XX:XX:XX,
XXXX.XXXX.XXXX.
ethernet {slot/port | port-channel number}]
(Optional) Specifies the interface. Use either ethernet with the slot number and the port number, or the port-channel number.
vlan{vlan-id} (Optional) Specifies the VLAN number.
dynamic (Optional) Specifies dynamic entries only.
static (Optional) Specifies static entries only.
Release Modification
S e n d d o c u m e n t c o m m e n t s t o n e x u s 7 k - d o c f e e d b a c k @ c i s c o . c o m
Cisco NX-OS Layer 2 Commands
show hardware mac address-table
Usage Guidelines The fields are as follows:
• Valid—Entry is valid in hardware. • PI—Primary entry.
• BD—bridge domain. • MAC—MAC address.
• Index—Destination index; identifies the port on which MAC was learned.
• Static—Statically configured entry.Hardware will not modify this entry. This entry will not be aged by the line card process.
• SW—3-bit software value associated with this entry.
• Modified—MAC entry was modified by hardware since last notification. This is set when index value changes.
• Age byte—Age timer value when last packet arrived with this entry’s MAC as source MAC. • Tmr sel—Age timer used for updating the age for this entry. Based on aging value configured for
the VLAN, one of the four timers will be used for updating the age. • GM—Specifies gateway MAC or not.
• Secure—Secured MAC.
• TRAP—When this bit is set, the system drops any packet received with this source MAC as this entry’s MAC.
• NTFY—Notify. When Secured and Notify bits are both set, the system redirects packets to the supervisor when hardware updates the index value.
• RM—Router MAC.
• RMA—Router MAC active.
Note The RM and RMA fields are not supported on the Nexus 7000.
• Capture—When this bit is set, any packet sent to this destination will be copied by setting CAP1 bit. • Fld—Flood bit. When this bit is set, any packet sent to this destination MAC will cause the flood bit
to be set in the result.
• Always learn—Always learn. When this bit is set, the hardware modifies the index value irrespective of whether this entry is marked static or not.
This command does not require a license.
Examples This example shows how to display hardware information about all the MAC addresses VLAN 1 on module 2:
switch# show hardware mac address-table 2 vlan 1
Valid| PI| BD | MAC | Index |Stat| SW| Modi| Age| Tmr| GM| Sec| TR | NT | RM | RMA | Cap|Fld| Always | | | | | ic| | fied|Byte| Sel| |ure| AP | FY | | |TURE| | Learn 1 0 1 0100.0cff.fffe 0x00421 1 1 0 152 0 0 0 0 0 0 0 1 0 0
S e n d d o c u m e n t c o m m e n t s t o n e x u s 7 k - d o c f e e d b a c k @ c i s c o . c o m
Cisco NX-OS Layer 2 Commands show hardware mac address-table
Related Commands Command Description
show mac address-table
S e n d d o c u m e n t c o m m e n t s t o n e x u s 7 k - d o c f e e d b a c k @ c i s c o . c o m
Cisco NX-OS Layer 2 Commands
show interface mac-address
show interface mac-address
To display information about the MAC address and the burned-in MAC address, use the show interface mac-address command.
show interface [type slot/port] mac-address
Syntax Description
Defaults None
Command Modes Any command mode.
Supported User Roles network-admin vdc-admin
Command History
Usage Guidelines If you do not specify the interface, the system displays all the MAC addresses. This command displays both the burned-in MAC address and the configured MAC address.
This command does not require a license.
Examples This example shows how to display information about all the MAC addresses for the device: switch# show interface mac-address
---Interface Mac-Address Burn-in Mac-Address
---mgmt0 0019.076c.1a78 0019.076c.1a78 Ethernet2/1 0000.0000.0000 0019.076c.4dac Ethernet2/2 0000.0000.0000 0019.076c.4dad Ethernet2/3 0000.0000.0000 0019.076c.4dae Ethernet2/4 0000.0000.0000 0019.076c.4daf Ethernet2/5 0000.0000.0000 0019.076c.4db0 Ethernet2/6 0000.0000.0000 0019.076c.4db1 Ethernet2/7 0000.0000.0000 0019.076c.4db2 Ethernet2/8 0000.0000.0000 0019.076c.4db3 Ethernet2/9 0000.0000.0000 0019.076c.4db4 Ethernet2/10 0000.0000.0000 0019.076c.4db5 Ethernet2/11 0000.0000.0000 0019.076c.4db6 Ethernet2/12 0000.0000.0000 0019.076c.4db7 Ethernet2/13 0000.0000.0000 0019.076c.4db8
type slot/port (Optional) Type of interface, slot number, and port number.
Release Modification