BMO HARRIS ONLINE BANKING
SMFOR SMALL BUSINESS
Enhanced Reporting
User Guide
TABLE OF CONTENTS
WELCOME...4
Who should use this guide...4
What it covers ...4
Organization...4
What the symbols mean ...4
Where to get help...5
GETTING STARTED ...6
Enhanced Reporting Product Overview...6
Where to go from here ...6
USING THE STANDARD REPORTS ...7
Current Day Reports ...8
CURRENT DAY SUMMARY ...9
CURRENT DAY DETAIL ...9
CURRENT DAY COMBINATION ...10
ACH SUMMARY ...10
ACH DETAIL ...10
Prior Day Reports...10
PRIOR DAY SUMMARY...10
PRIOR DAY DETAIL ...11
PRIOR DAY COMBINATION...11
PRIOR DAY DETAIL NO CHECK ...11
PAID CHECK...11
3
RUN A CUSTOMIZED REPORT...12
USING THE INFORMATION CONSOLE...13
Viewing a report ...13
PAGE SELECTION CONTROLS ...13
TABLE OF CONTENTS...14
MAGNIFIER ...16
Searching a report ...16
USING THE SEARCH PANE ...17
SEARCH FOR ITEMS IN A REPORT ...20
NAVIGATE TO ITEMS IN A REPORT ...22
Printing a report ...26
DOWNLOADING A REPORT...27
CUSTOMIZING REPORTS ...29
About custom reports and report types...29
Creating Custom Reports ...30
CUSTOMIZE A SUMMARY REPORT...30
CUSTOMIZE A DETAIL REPORT ...33
Managing Custom Reports ...37
MODIFY A CUSTOM REPORT...37
DELETE A CUSTOM REPORT...41
APPENDIX A: ENTRY FIELD HELP ...42
Customize Standard Report/Customized Report...42
REPORT INFORMATION PANEL...42
APPENDIX B: BAI II CODES USED IN REPORTS ...47
WELCOME
Who should use this guide
BMO Harris Online BankingSMfor Small Business Enhanced Reporting User Guideis for small business customers who use the Enhanced Reporting option in their Cash Flow Management operations
What it covers
The Enhanced Reporting User Guidecovers reporting functions and procedures of interest to operational users — i.e., those who create reports. It does not cover administrative procedures, such as managing Enhanced Reporting entitlements. Those topics are covered in the BMO Harris Online Bankingfor Small Business Company System Administrator Guide.
Organization
The first chapter, Getting Started, gives you an overview of the Enhanced Reporting function available to BMO Harris Online Banking Customers. The next chapters — Using the Standard Reports, Using The Information Console and Customizing Reports— go into greater detail on how to use each piece. They begin with a general discussion of the topic, followed by step-by-step instructions for performing each task. The rest of the guide contains help and reference material.
What the symbols mean
To help you quickly see which procedures and sections of the Enhanced Reporting User Guidepertain to you, we use symbols to identify when a particular version of the product or an optional product or feature is being discussed.
Multi-user version of BMO Harris Online Banking for Small Business
Automated Clearing House Option — Add-on product for making electronic payments and collections via the ACH network
If you see one of these symbols next to a chapter title or subheading, it means everything in that chapter or section pertains to that particular product or feature.
If you see one of these symbols next to a procedure, it means you can’t perform the procedure unless this product or feature is installed.
5
Where to get help
Help in this document is provided in Appendix A: Entry Field Help. This section describes all the entry fields used on the Enhanced Reporting pages and where you will find them; it also includes guidelines for filling them out correctly.
If you need help while using BMO Harris Online Banking for Small Business, click Help at the top of any screen or contact BMO Harris Online Services. (Look for the We’re Here to Help panel):
GETTING STARTED
In this chapter, we give you an overview of the BMO Harris Online Banking for Small Business Enhanced Reporting option.
Enhanced Reporting Product Overview
The Enhanced Reporting option provides a set of standard current-day and prior-day reports that you can customize and save for your own use, or share with others at your company. You can search on any data field, define custom filters, view summary and transaction detail across multiple accounts, and download the results to several formats, including Microsoft® Excel® and Adobe PDF®.
Where to go from here
The Enhanced Reporting User Guide is a reference book designed to serve a variety of customers. It’s not necessary to read it cover-to-over. You can go to just the topics that interest you, and follow the links if you need more information. Here are some suggestions on where to look first:
If you plan on running reports, look at Using the Standard Reports section to get an overview of what the reports are and how to run them. Then read Using the Information Console. That chapter talks about the report viewer and the different features it has for navigating, searching, printing and downloading reports. If you’re going to customize reports, read Using the Standard Reports first to understand the base reports you’ll be modifying. Then read Customizing Reports.
7
USING THE STANDARD REPORTS
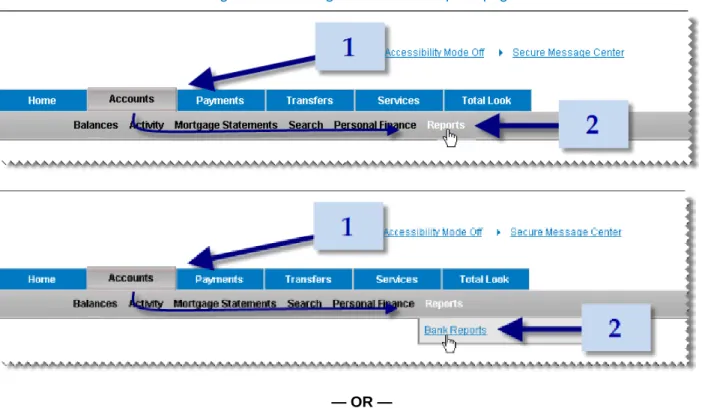
The Enhanced Reporting option comes with a set of standard reports. You can run these reports as they are, or you can modify and save them as custom reports. Both standard and custom reports are located on the Bank Reports page (Figure 1):
To go to the Bank Reports page: 1. Go to the Accounts tab.
2. On the Accounts menu, choose Reports — OR — Reports » Bank Reports. Figure 2: How to go to the Bank Reports page
— OR —
TIP: To save time, do not click the Accounts tab, just point to it, then move the pointer down to the Accounts menu and click Reports.
Standard reports comprise several current day and prior day reports. These may include special option reports that come with add-on options such as ACH payments. The special reports appear on the list only if your company has signed up for the option.
For information about the individual reports, see the Current Day and Prior Day reports sections below. For instructions on running a standard report, see Running Reports.
Current Day Reports
Current day reports are based on daily transactions that have not yet been posted to accounts. The basic current day reports package includes Current Day Summary, Current Day Detail and Current Day
Combination.
9 CURRENT DAY SUMMARY
Report Type: Current Day Summary
The Current Day Summary report displays all unposted summary account activity for all accounts for the current business day. The following fields are displayed for each account:
Ledger Date – ledger date for the reported balance Currency – nationality of the monetary unit in the account Bank Name – name of the bank where the account is set up
Bank Identifier – bank identifier of the bank where the account is set up Account Name – nickname of the account
Account Number – number of the account
Product – e.g., Premier Business Checking, Basic Business Checking.
The accounts are ordered first by bank, second by currency and third by account number. CURRENT DAY DETAIL
Report Type: Current Day Detail
The Current Day Detail report displays all unposted account activity for all accounts for the current business day. The following fields are displayed for each account:
Ledger Date – ledger date for the reported balance Currency – nationality of the monetary unit in the account Bank Name – name of the bank where the account is set up
Bank Identifier – bank identifier of the bank where the account is set up Account Name – nickname of the account
Account Number – number of the account
Product – e.g., Premier Business Checking, Basic Business Checking.
The accounts are ordered first by bank, second by currency and third by account number.
Within accounts, activity is grouped by credits and debits. Additional reference fields are provided per debit and credit.
CURRENT DAY COMBINATION Report Type: Current Day Detail
The Current Day Combination report combines the Current Day Summary and Current Day Detail reports. Summary and detail sections are displayed together for each account.
ACH SUMMARY
Report Type: Current Day Summary
This report requires the ACH payment option The ACH Summary report displays unposted, ACH-related summary account activity for all accounts for the current business day. The information displayed is the same as the Current Day Summary report.
ACH DETAIL
Report Type: Current Day Detail
This report requires the ACH payment option. The ACH Detail report displays unposted, ACH-related account activity for all accounts for the current business day. The information displayed is the same as the Current Day Detail report.
Prior Day Reports
Prior day reports are based on posted transactions. The standard reports cover only the prior business day, but you can customize these reports to cover historical data for any period through the last 18 months. Reports include: Prior Day Summary, Prior Day Detail, Prior Day Combination, Prior Day Detail No Check and Paid Check.
PRIOR DAY SUMMARY
Report Type: Prior Day Summary
The Prior Day Summary report displays all posted summary account activity for all accounts as of the business day prior to today. The following fields are displayed for each account:
Ledger Date – ledger date for the reported balance Currency – nationality of the monetary unit in the account Bank Name – name of the bank where the account is set up
Bank Identifier – bank identifier of the bank where the account is set up Account Name – nickname of the account
11
Product – e.g., Premier Business Checking, Basic Business Checking.
The accounts are ordered first by bank, second by currency and third by account number. PRIOR DAY DETAIL
Report Type: Prior Day Detail
The Prior Day Detail report displays all posted detail account activity for all accounts as of the business day prior to today. The following fields are displayed for each account:
Ledger Date – ledger date for the reported balance Currency – nationality of the monetary unit in the account Bank Name – name of the bank where the account is set up
Bank Identifier – bank identifier of the bank where the account is set up Account Name – nickname of the account
Account Number – number of the account
Product – e.g., Premier Business Checking, Basic Business Checking.
The accounts are ordered first by bank, second by currency and third by account number.
Within accounts, activity is grouped by credits and debits. Additional reference fields are provided per debit and credit.
PRIOR DAY COMBINATION Report Type: Prior Day Detail
The Prior Day Combination report combines the Prior Day Summary and Prior Day Detail reports. Summary and detail sections are displayed together for each account.
PRIOR DAY DETAIL NO CHECK Report Type: Prior Day Detail
The Prior Day Detail – No Check report displays the same information included in the Prior Day Detail report, excluding paid check activity (BAI Code 475).
PAID CHECK
Report Type: Prior Day Detail
The Paid Check report displays posted account activity for paid checks only (BAI Code 475). It displays the same information as Prior Day Detail, except only debit information is listed within account.
Running Reports
RUN A STANDARD REPORT To run a standard report:
1. Go to the Bank Reports Page (Figure 1). (On the Accounts menu, choose Reports.) 2. On the Standard Bank Reports panel, find the report you want and click View.
In a few seconds, the Information Console will appear with your report. See Using The Information Console for more information.
RUN A CUSTOMIZED REPORT To run a custom report:
1. Go to the Bank Reports Page (Figure 1). (On the Accounts menu, choose Reports.) 2. On the Custom Bank Reports panel, find the report you want and click View.
In a few seconds, the Information Console will appear with your report. See Using the Information Console for more information.
13
USING THE INFORMATION CONSOLE
Clicking View on the Bank Reports page launches the report in a separate viewer called the Information Console. You can use the Information Console Toolbar (Figure 3) to view, search, print and download the report.
Figure 3: Information Console Toolbar
If you need assistance while using the Console, click Help on the right hand side of the toolbar.
Viewing a report
The Information Console Toolbar has several options for navigating and viewing the report. They include: Page Selection Controls, Table of Contents and Magnifier. You can also use the Search feature to go to specific points in the report.
PAGE SELECTION CONTROLS
To page through the report sequentially, click Next or Prev.
To jump to a specific page, click First, Last, or enter a page number at Page and click Go to.
TABLE OF CONTENTS
Most reports have a hierarchical structure. You can use the Table of Contents to view it and jump to items listed in the hierarchy.
To open the Table of Contents, click TOC on the Information Console Toolbar.
This opens the Table of Contents pane in a separate frame to the left of the report. It shows the highest levels in the hierarchy.
To drill down to lower levels, move the cursor to the blue triangle before the entry. If there are levels below it, the triangle flips down and turns red as the cursor approaches it. Click to expand the list to the next level.
15
You can continue to expand the hierarchy to the level you want. When a level is expanded, the blue triangle points down.
Click to roll up the list and hide the items below it.
MAGNIFIER
Sometimes you can make a report easier to read by zooming in or out to different magnifications. The Information Console Magnifier lets you adjust a report’s magnification from 25 percent to 400 percent.
To change the report’s magnification, select a percentage from the magnifier dropdown list on the Information Console toolbar.
Searching a report
The Information Console Search feature lets you search for specific items in a report. With the Search feature you can
17 Save the search conditions
Download the search results to a file
Instructions for doing these tasks are given in the sections below. USING THE SEARCH PANE
To access the Search feature, click Search on the Information Console Toolbar.
On the Search pane, you can specify conditions for a new search or retrieve conditions from a saved search. New search conditions are specified on the Search pane.
To start a new search, select one or more fields from the report, and specify the values to look for in each field.
19
Fields that can be added show “Searchable!” when you hover the cursor over them.
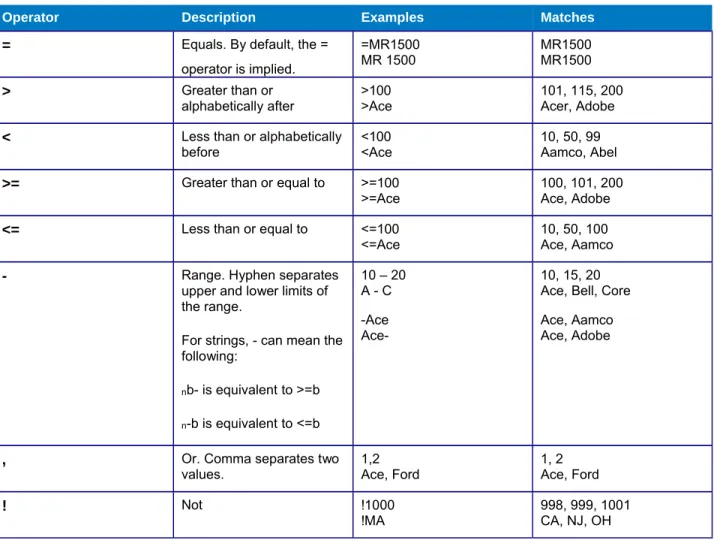
You specify conditions by typing them in the Value box for the field. You may enter literal values or you may use wildcards and search operators. (See Table 1 for a complete list of search operators.)
The example above specifies that Amount must be greater than 10,000 and Memo must contain the characters’ “roof.” (Search is not case sensitive.) If you specify conditions for more than one field, the combined conditions for all of the fields must be met (i.e., they are joined by a logical AND).
When you have finished entering conditions, click Search Now. The results of your search are displayed in the Search pane.
Clicking the link takes you to the page where the matching item is located.
SEARCH FOR ITEMS IN A REPORT New Search
To search for items in a report (new search):
This procedure assumes you are viewing a report in the Information Console. 1. If the Search pane is not visible, click Search on the Console Toolbar.
21
3. On the Search pane, under Value, enter your selection criteria for each field.
4. You may enter literal values, wildcards (*) or search operators. (See Table 1 for a complete list of valid search operators.)
5. If you don’t want a field displayed in the results, unselect it under Display. 6. Click Search Now.
7. Matching items will be displayed in the Search pane.
Table 1: Information Console Search Operators
Operator Description Examples Matches
= Equals. By default, the = operator is implied. =MR1500 MR 1500 MR1500 MR1500 > Greater than or alphabetically after >100 >Ace 101, 115, 200 Acer, Adobe
< Less than or alphabetically before
<100 <Ace
10, 50, 99 Aamco, Abel
>= Greater than or equal to >=100 >=Ace
100, 101, 200 Ace, Adobe
<= Less than or equal to <=100
<=Ace
10, 50, 100 Ace, Aamco
- Range. Hyphen separates upper and lower limits of the range.
For strings, - can mean the following: nb- is equivalent to >=b n-b is equivalent to <=b 10 – 20 A - C -Ace Ace-10, 15, 20 Ace, Bell, Core Ace, Aamco Ace, Adobe
, Or. Comma separates two
values. 1,2 Ace, Ford
1, 2 Ace, Ford ! Not !1000 !MA 998, 999, 1001 CA, NJ, OH
(c) Copyright Actuate Corporation 2009
Saved Search
To search for items in a report (saved search):
1. If the Search pane is not visible, click Search on the Information Console Toolbar. 2. On the Search pane, select a saved search from the dropdown list.
You search will be displayed on the Search pane.
3. Click Search Now.
Itemsmeeting your conditions will be listed on the Search pane.
NAVIGATE TO ITEMS IN A REPORT
To navigate to items in a report using Search:
23
2. When the results appear on the Search pane, click the link for the item you want to go to.
The report page where the item is located will be displayed. SAVE THE SEARCH CONDITIONS To save Search conditions for later use:
This procedure assumes you are viewing a report in the Information Console. 1. Execute a search. (See Search for items in a report.)
3. When the entry form appears, at Search Name, enter a descriptive name for the search.
25
The saved search is now available on the dropdown list.
DOWNLOAD THE SEARCH RESULTS TO A FILE 1. Execute a search. (See Search for items in a report.)
3. Click Go.
4. When the File Download window appears, click Save and follow the instructions on the screen. 5. When the download completes, click Close.
Printing a report
To print a report:
This procedure assumes you are viewing a report in the Information Console. 1. On the information Console Toolbar, click Print.
27
DOWNLOADING A REPORT
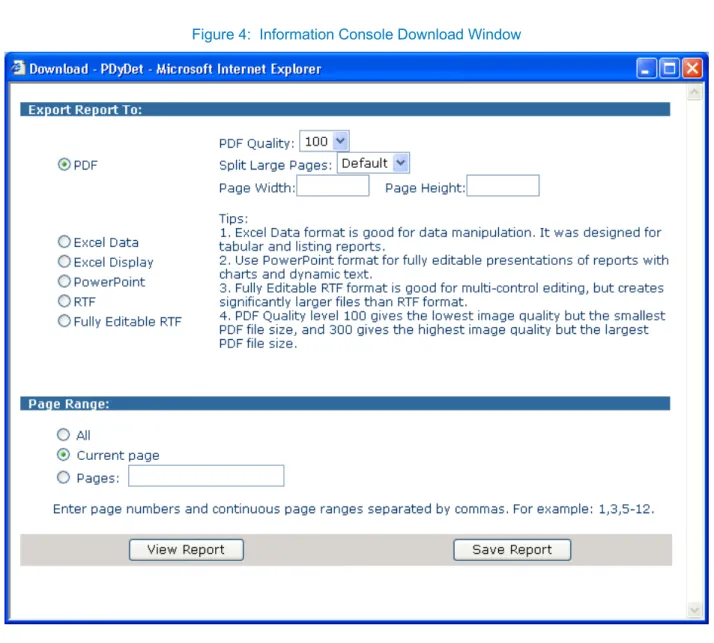
Figure 4: Information Console Download Window
To download a report:
This procedure assumes you are viewing a report in the Information Console. 1. On the Information Console Toolbar, click Download.
The Download window will appear (Figure 4).
2. Under Export Report to, select a file format. (See Information Console Help for a description of file formats.)
3. Under Page Range, select one of the following options: All — download the entire report.
Current Page — download only the page currently displayed. Pages — download the specified pages.
4. If you select this option, enter the page numbers in the text box. 5. Click Save Report.
6. When the File Download window appears, click Save and follow the instructions on the screen. 7. When the download completes, click Close.
29
CUSTOMIZING REPORTS
You can customize standard reports to suit specific needs. For example, you may want to see a wider date range in the Prior Day Summary report or track specific transactions in the Current Day Detail report. You may create custom reports for your own private use or share them with others in your company.
This chapter talks about how to create and manage custom reports. For instructions on running a custom report, see Running Reports.
About custom reports and report types
When you customize a standard report, you don’t actually modify the standard report itself; you define new selection criteria for it and save this filter under a new name on the Custom Bank Reports panel. There you can view, modify or delete it. (Note: You can’t modify or delete standard bank reports.)
The report format remains the same, but whenever you run a custom report, the data normally used for the standard report is searched using your criteria instead. Current day data is searched for current day reports, summary data is searched for summary reports, etc. That’s why it’s important to choose the right report to customize.
The data that is searched is not one large mass of transactions. To save time, Enhanced Reporting works with four separate sets, and a standard report generally uses just one:
Current Day Summary Current Day Detail
Prior Day (Historical) Summary Prior Day (Historical) Detail
Knowing which set a standard bank report uses will help you understand what to expect when you’re customizing the report. You can find out which set it uses by looking at the report type.
The report type is usually easy to guess from the report’s name (e.g., Prior Day Detail), but if you’re unsure, you can check the Report Information panel of the Customize Standard Report Page or the Customized Report Page:
You can also find the report type in this document, under the listing for the specific report.
Another reason to be aware of the report type is that the same forms are used to specify selection criteria for both current day and prior day reports, so it’s up to you enter appropriate criteria ( i.e., you wouldn’t specify last month’s data for a current day report). Instructions for entering selection criteria are given in the next section.
Creating Custom Reports
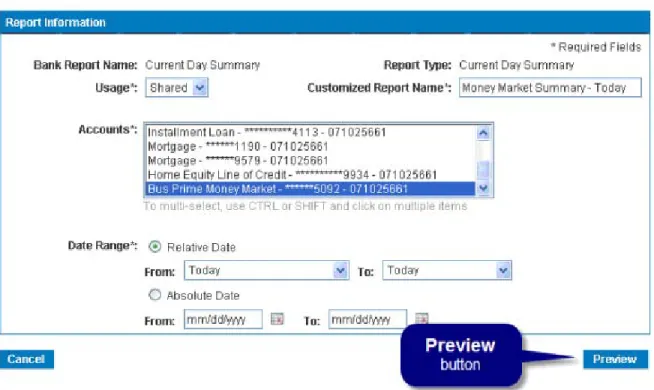
Creating a custom report essentially means defining new selection criteria for a standard report. (See About custom reports and report types.) After choosing a standard report to customize, enter your selection criteria on the Customize Standard Report page. Basically, two forms of this page are used to create custom reports, one for summary reports (Figure 5) and one for detail reports (Figure 6). (Exceptions are noted below.)
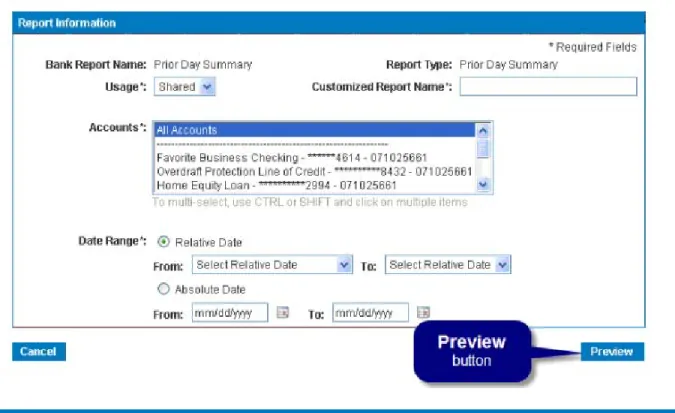
CUSTOMIZE A SUMMARY REPORT
Clicking the Customize link for a summary-level standard report (e.g., “Prior Day Summary”), displays the
summary version of the Customize Standard Report page (Figure 5).
31 To customize a standard report (summary-level):
1. Go to the Bank Reports Page. (On the Accounts menu, choose Reports.) 2. On the Standard Bank Reports panel, find the report you want to customize.
Under Action, click Customize.
The Customize Standard Bank Report page will appear (Figure 5). (See Report Information Panel Help for descriptions of the items on the page or click the field name (in blue) in the instructions below.)
3. At Usage, select one of the following choices from the dropdown list:
◌ Shared — allow other users to use this report.
◌ Private — allow no one else to use this report.
4. At Customized Report Name, enter a name for the report.
6. At Date Range, select how to calculate the date range used in the report. Relative Date — use a period relative to the date the report is run. Absolute Date — use a period between specific dates.
33
7. If you selected “Relative Date,” select relative starting and ending dates from the From and To dropdown lists under Relative Date.
8. If you selected “Absolute Date,” enter starting and ending dates in the From and To boxes under Absolute Date.(Click atthe end of the field to select a date from the calendar.)
9. Click Preview.
10. When the preview window appears, review your entries. If you want to make changes, click Edit.
If you want to run the report immediately after saving it, click Submit and View Report. If you want to save the report for later use, click Submit.
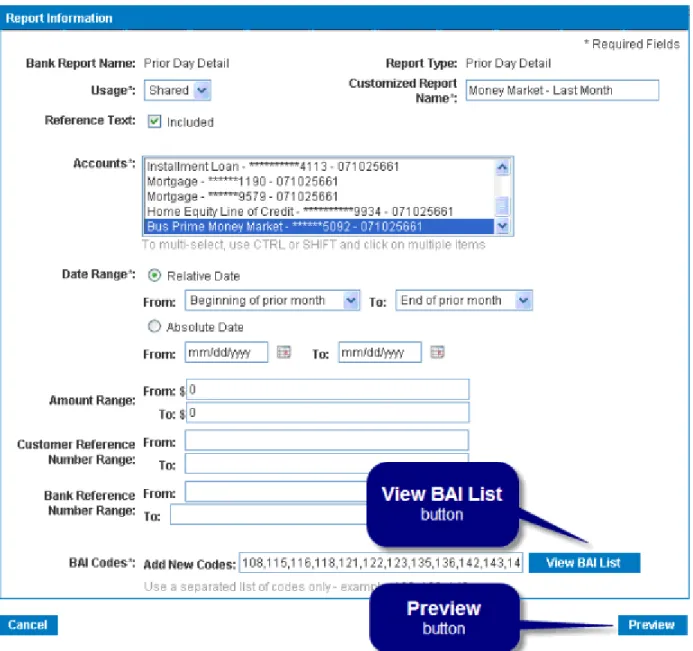
CUSTOMIZE A DETAIL REPORT
Clicking the Customize link for a detail-level standard report (e.g., “Current Day Detail”), displays the detail
version of the Customize Standard Report page (Figure 6).
To customize a standard report (detail-level):
1. Go to the Bank Reports Page. (On the Accounts menu, choose Reports.) 2. On the Standard Bank Reports panel, find the report you want to customize.
Under Action, click Customize.
The Customize Standard Bank Report page will appear (Figure 6). (See Report Information Panel Help for descriptions of the items on the page or click the field name (in blue) in the instructions below.)
3. At Usage, select one of the following choices from the dropdown list: Shared — allow other users to use this report.
35
4. At Customized Report Name, enter a name for the report.
5. If you want to exclude transaction memos or addenda from the report, unselect Reference Text. 6. At Accounts, select one or more accounts to include in the report.
7. At Date Range, select how to calculate the date range used in the report. Relative Date — use a period relative to the date the report is run. Absolute Date — use a period between specific dates.
8. If you selected “Relative Date,” select relative starting and ending dates from the From and To dropdown lists under Relative Date.
9. If you selected “Absolute Date,” enter starting and ending dates in the From and To boxes under Absolute Date.(Click at the right of the field to select a date from the calendar.)
10. If you want to specify a range of dollar amounts, enter it at Amount Range.
11. If you want to specify a range of check numbers or a customer reference number, enter it at Customer Reference Number Range.
12. If you want to specify a range of bank reference numbers, enter it at Bank Reference Number Range.
37
13. (Not available on all reports) At BAI Codes, enter the detail BAI code(s) of one or more transaction types to include in the report (e.g., “595” for “ATM debits”) or click View BAI List to select them. (See Report Information Panel Help.)
14. Click Preview.
15. When the preview window appears, review your entries. If you want to make changes, click Edit.
If you want to run the report immediately after saving it, click Submit and View Report. If you want to save the report for later use, click Submit.
Managing Custom Reports
This section covers how to modify and delete custom reports. MODIFY A CUSTOM REPORT
Custom reports are modified on the Customized Report page. Again, a different form is used for summary (Figure 7) and detail (Figure 8) reports.
39
Figure 8: Customized Report Page (Detail Form)
To modify a custom report:
1. Go to the Bank Reports Page. (On the Accounts menu, choose Reports.)
The Customized Report page will appear. (Figure 7 for Summary reports; Figure 8 for Details reports.)
3. Edit the items you want to change. You can modify the following items on both summary and detail reports:
– Customized Report Name – Usage
– Accounts – Date Range
On Details reports you can also modify the following items:
– Reference Text – Amount Range
– Customer Reference Number Range – Bank Reference Number Range
On non-specialized Detail reports, you can modify:
– BAI Codes
(See Report Information Panel Help or click one of the items above for more information.)
4. 4. Click Preview.
5. 5. When the preview window appears, review your entries.
If you want to make changes, click Edit.
41 DELETE A CUSTOM REPORT
To delete a custom report:
1. Go to the Bank Reports Page. (On the Accounts menu, choose Reports.)
2. On the Custom Bank Reports panel, find the report you want to delete. Under Action, click Delete.
APPENDIX A: ENTRY FIELD HELP
Customize Standard Report/Customized Report
REPORT INFORMATION PANEL
This panel appears on both the Customize Standard Report page and on the Customized Report page. The items that appear vary depending on Report Type. Variations are noted in the table below.
Description/(Comments) Required Default Value Valid Entries/Choices Examples
Bank Report Name (Not editable)
The standard bank report being customized. (This is the title that appears on the report.)
N/A N/A N/A “Prior Day Summary”
Report Type (not editable) The class of report.
(Report Type determines which data set is searched. Four data sets are used: Current Day–Summary; Current Day–Detail; Prior Day–Summary; Prior Day–Detail. The Current Day data sets include transactions that have not yet been posted to accounts. The Prior Day data sets include posted transactions that were posted within the last 18 months.)
N/A N/A N/A “Prior Day Detail”
(This means the Prior Day– Detail data set is used in the custom report.)
Usage A dropdown list specifying whether the report
may be shared with other users.
(If you choose “Shared” the report is listed on the Custom Report list and is available to all
Yes Shared Select one from the dropdown list:
– Shared
Description/(Comments) Required Default Value Valid Entries/Choices Examples
Customized Report Name
The name of the custom report.
(This name appears only on the Custom Report list. The standard report name appears
Yes (None) Enter any text, 32 characters
maximum.
“Money Market – Prior Month Detail”
Reference Text (Appears only for Detail reports)
A checkbox indicating whether to include additional reference information, such as transaction memos, addenda or special instructions.
No Yes (checked) Yes (checked) – include references
No (unchecked) – do not include references
Accounts List of bank accounts to include in the report. (You can select multiple accounts, by holding
Yes “All Accounts” Select one or more accounts from
the list.
Date Range Option button specifying whether to use relative or absolute dates in the report. (If you select “Relative Date” transaction dates will be selected relative to the date you run the report (e.g., last week).)
Works with the From [relative date] To [relative date] fields or with the From [date] To [date] fields, depending on whether you selected “Relative Date” or “Absolute Date”, respectively.
Yes “Relative Date” Select one from the dropdown list: ○Relative Date
○Absolute Date
If you select “Relative Date,” you must select dates in the From
[relative date] To [relative date]
dropdown lists.
If you select “Absolute Date,” you must enter dates in the From
[date] To [date] fields.
Description/(Comments) Required Default Value Valid Entries/Choices Examples
From [relative date] To [relative date]
(Used only if “Relative Date” is selected in
Date Range.)
The period covered in the report, relative to the date on which the report is run.
Yes, only if “Relative Date” is selected in Date Range.
(none) Select a date from dropdown lists:
From: Beginning of current month
Beginning of current week Beginning of prior month Beginning of prior week Today
Prior Business Day
To: End of prior month End of prior week
If you select “Prior Business Day” for both From and To, and the report is run on Tuesday, Feb. 1, “Today” = Feb. 1, and Monday, Jan. 31 becomes the prior business day. The report will include specified
transactions dated Jan. 31.
From [date] To
[date]
(Used only if “Absolute Date” is selected in
Date Range.)
The time period covered in the report.
Yes, only if “Absolute Date” is selected in Date Range.
(none) Enter a date in each of the date
fields.
Click to select a date, or enter the date using the format: MM/DD/YYYY.
Fromdate must be <=Todate
From: 01/01/2010 To: 12/31/2010
Amount Range From
(Appears only in Detail reports)
Lower limit in the range of amounts to search for.
Used together with Amount Range To
(If zeros are left in bothFromandTofields all
No 0 Enter a dollar amount to a
maximum of 50 characters. Amounts must be in a valid dollar format e.g., #,###.## (no $ sign)
“0.50” “5,000” “5,000.00” Not allowed: “$50” (uses $ sign); Amount Range To
(Appears only in Detail reports)
Upper limit in the range of amounts to search for.
Used together with Amount Range From
(If zeros are left in bothFromandTofields all
No 0 Enter a dollar amount to a
maximum of 50 characters. Amounts must be in a valid dollar format e.g., #,###.## (no $ sign) and must be greater than or equal to the value in Amount From.
“0.50” “5,000” “5,000.00”
Not allowed: “$50” (uses $ sign);
Description/(Comments) Required Default Value Valid Entries/Choices Examples
Customer
Reference Number Range
From
(Appears only in Detail reports)
Either the lower limit in the range of Customer Reference numbers to search for, or a single non-numeric customer reference number. Used together with Customer Reference Number Range To when a numeric value is entered.
(Customer Reference Numbers are typically check numbers, but they are also used in non- check transactions. In that case the customer reference “number” may not be numeric. The Customer Reference Number is called the
No (none) Enter a number or a reference ID,
50 characters maximum.
If a range is entered (i.e., a value is entered in Customer Reference Number Range To), the value must be a number (no commas or other special characters allowed)
“12345” (check number) “10SUD000008488” (ACH number) Customer Reference Number Range To
(Appears only in Detail reports) Upper limit in the range of Customer Reference numbers to search for.
Used together with Customer Reference Number Range From. only if a number is entered there.
(Customer Reference Numbers are typically check numbers, but they are also used in non- check transactions. In that case the customer reference “number” may not be numeric.
Th C t R f N b i ll d th
No (none) Enter a number to a maximum of
50 characters. (no commas or special characters)
The number must be greater than or equal to the value in Customer Reference Number Range From.
“12345” (check number)
Not allowed:
“10SUD000008488”
(non-numeric values are not allowed in a range)
Description/(Comments) Required Default Value Valid Entries/Choices Examples
Bank Reference Number Range From
(Appears only in Detail reports) Lower limit in the range of FI (Financial Institution) Reference numbers to search for. Used together with Bank Reference Number Range To.
(Bank Reference Numbers are internal numbers used by the bank to track the transaction
No (none) Enter a number to a maximum of
50 characters. (no commas or special characters) “12345” (check number) “10SUD000008488” (ACH number) Bank Reference Number Range To
(Appears only in Detail reports) Upper limit in the range of FI (Financial Institution) Reference numbers to search for. Used together with Bank Reference Number Range From. only if a number is entered
there.
(Bank Reference Numbers are internal numbers used by the bank to track the
No (none) Enter a number to a maximum of
50 characters. (no commas or special characters)
The number must be greater than or equal to the value in Customer Reference Number Range From.
“20101101000007”
BAI Codes (Appears only in Detail reports that are not
based on specific BAI codes)
The transaction codes representing the types of transactions to include in the report (e.g., 475 = Paid checks).
(BAI codes are industry standard banking codes representing specific transaction types.
Yes (none) Enter one or more valid detail BAI
II transaction codes, separated by commas, or click
(View BAI List) and submit selected codes from the list.
“595” (ATM Debit)
“409” (Any type of Debit) “108” (Any type of Credit) “108,409” (any credits or debits) Not allowed:
“140” (Total Bank Card Deposits) Summary transaction codes are
47
APPENDIX B: BAI II CODES USED IN REPORTS
Report Title Prior Day or
Current
Summary Code Data Detail Code Data
Prior Day Summary Prior Day Yes
All reported BAI summary codes are reflected
No
Prior Day Detail Prior Day No Yes
All reported BAI detail codes are reflected
Prior Day Detail – No Check Prior Day No Yes
All reported BAI detail codes are reflected, except for 475 (check paid)
Prior Day Combination Prior Day Yes
All reported BAI summary codes are reflected
Yes
All reported BAI detail codes are reflected
Current Day Summary Current Day Yes
All reported BAI summary codes are reflected
No
Current Day Detail Current Day No Yes
All reported BAI detail codes are reflected
Current Day Detail – New Items
Current Day No Yes
All reported BAI detail codes are reflected
Current Day Combination Current Day Yes
All reported BAI summary codes are reflected
Yes
All reported BAI detail codes are reflected
Paid Check Prior Day No Yes
BAI detail code 475
ACH Detail Current Day No Yes
All reported ACH-related BAI detail codes: 142 145 165 166 168 169
Report Title Prior Day or Current
Summary Code Data Detail Code Data
ACH Summary Current Day Yes
All reported ACH-related BAI summary codes: 140 160 No Controlled Disbursement Summary
Current Day Yes
All reported controlled disbursement related BAI summary codes:
280 580 583 584
No
Controlled Disbursement Current Day No Yes
BAI detail code 581 Pay Through Draft Summary Current Day Yes
BAI summary code 430
No Pay Through Draft Detail Current Day No Yes
BAI detail code 435 Lockbox Summary Current Day Yes
All reported Lockbox related BAI summary codes:
No
Lockbox Detail Current Day No Yes
All reported Lockbox related BAI detail codes:
115 Wire Summary Current Day Yes
All reported Wire related BAI summary codes:
No
Wire Detail Current Day No Yes
All reported Wire related BAI detail codes:
APPENDIX C: QUICK LINKS TO PROCEDURES
To go to the Bank Reports page: ... 6
To run a standard report:... 11
To run a custom report: ... 11
To search for items in a report (new search): ... 19
To search for items in a report (saved search): ... 20
To navigate to items in a report using Search: ... 21
To save Search conditions for later use: ... 22
To print report:... 25
To download a report: ... 26
To customize a standard report (summary-level): ... 30
To customize a standard report (detail-level): ... 34
To modify a custom report:... 41
To delete a custom report: ... 42
BMO Harris BankSM is a trade name used by BMO Harris N.A.. Member FDIC. Other trademarks are the properties of their respective owners