Doors.NET installation and controller configuration is a three step process. Each of these steps has its own document, with controller configuration broken into separate documents per hardware type.
• software installation – DoorsNET_Software_Installation.pdf (p/n 01565-001 – this document)
• license manager and gateway configuration – License_Manager_and_Gateway_Configuration.pdf (p/n: 01565-002) • controller configuration
- Basic_PXL_Configuration_In_DoorsNET.pdf (p/n: 01238-001) - Basic_NXT_Configuration_In_DoorsNET.pdf (p/n: 01238-002)
- Basic_Mercury-Powered_NXT_Configuration_In_DoorsNET.pdf (p/n: 01238-003)
This document describes the standard software installation process for Doors.NET software.
NOTE: PXL-based sites with the following types of controllers are NOT supported in Doors.NET at this time:
• Entraguard telephone entry controllers (including mixed PXL and Entraguard sites) • PXL-510 controllers for alarm panel control
• LC-502/-508 controllers for elevator control • PXL-500G controllers for gate control
• PXL-250 controllers (this product line is obsolete)
1.0
Recommended PC Configuration
This section provides recommended PC hardware requirements to ensure acceptable software system operation in typical access control applications using Doors.NET software. Access control applications with large numbers of controllers and/or cardholders should consider upgrading from the minimum recommendation. Operating System compatibility is listed in the next section.
NOTE: PC capability, cost, and accessibility is constantly changing. This document provides Keri's recommendations, but is subject to change as PC hardware changes.
1.1
Standard Hardware Requirements
• Ethernet Adapter • DVD Drive
• Keyboard, Mouse, Display • USB Port(s)
1.2
Server PC or Combined Server/Client PC Requirements
• Microprocessor - Intel Core2 Duo, 2.4 GHz or greater, 8 MB cache or greater • Memory - 4 GB or greater
• Hard Drive - 500 GB or greater
• Video - either on-board or plug-in card that supports a minimum resolution of 1280x1024 or greater
- a full EVR client (a licensed option) requires a video card with 64 MB or greater of RAM
1.3
Client Only PC Requirements
• Microprocessor - Intel Pentium, Dual-Core, 2.4 GHz or greater, 2 MB cache or greater • Memory - 2 GB or greater
• Hard Drive - 160 GB or greater
• Video - either on-board or plug-in card that supports a minimum resolution of 1280x1024 or greater
2.0
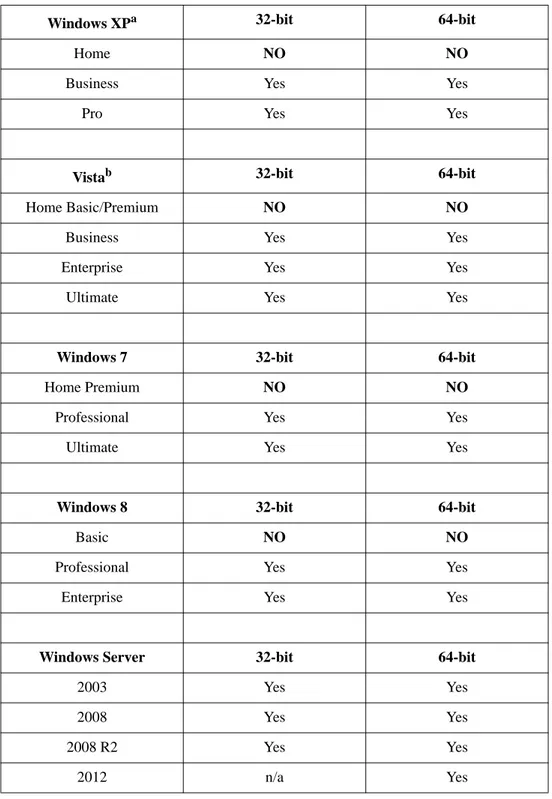
Operating System Compatibility Table
This section provides Doors.NET operating system compatibility information. Operating Systems not listed in this table are NOT supported by Doors.NET software.
Table 1: Doors.NET / Operating System Compatibility Windows XPa
a. Requires Service Pack 3 installation.
32-bit 64-bit
Home NO NO
Business Yes Yes
Pro Yes Yes
Vistab
b. Requires Service Pack 1 installation.
32-bit 64-bit
Home Basic/Premium NO NO
Business Yes Yes
Enterprise Yes Yes
Ultimate Yes Yes
Windows 7 32-bit 64-bit
Home Premium NO NO
Professional Yes Yes
Ultimate Yes Yes
Windows 8 32-bit 64-bit
Basic NO NO
Professional Yes Yes
Enterprise Yes Yes
Windows Server 32-bit 64-bit
2003 Yes Yes
2008 Yes Yes
2008 R2 Yes Yes
Two Critical Notes Regarding Operating Systems:
1. To ensure proper Doors.NET operation the PC’s operating system and .NET platform must be up to date with ALL
Microsoft service packs and security updates. Windows Update may need to be run multiple times to ensure all updates are applied before installing Doors.NET. PCs that are not up to date prior to beginning the installation process will require additional software installation time.
2. If you are installing Doors.NET on a Windows Server operating system (2003, 2008, or 2012) it is strongly advised
that you have an IT person that is a Microsoft Certified Professional present during the install of Doors.NET. Windows Server operating systems have unique requirements that certified IT professionals are trained to handle.
3.0
Installation via DVD
Installation via DVD is the quickest way to perform an installation as all possible installation files are on the DVD. Insert the Doors.NET Software Installation DVD and the AutoRun program begins.
NOTE: Navigate to the DVD's root directory and run theautorun.exe program if this menu does not appear.
• Click the Keri Logo to open your web browser and visit the kerisys.com web site.
• Click View Release Notes to view a Readme.txt file with information on this software release. • Click Install Software to install Doors.NET.
• Click Installation Document Set to open an Explorer window with a set of documents covering basic installation. • Click Technical Documentation to open an Explorer window with technical documentation.
• Click Marketing Documentation to open an Explorer window with marketing documentation. • Click View Training Video to open an Explorer window of Windows media video files. • Click Exit AutoRun to close the AutoRun window.
4.0
Installation via WebInstaller
If you do not have a Doors.NET DVD the WebInstaller links directly to an online version of the installation program. This is a slower process as files are downloaded from the Keri web server on an as-needed basis. Supporting documentation is available for download from the Keri web site.
Contact your Inside Sales Representative to be given access to the download link. Download and run the WebInstaller program to start the Software Installation. Any supporting files required to complete the installation are downloaded from the Keri web site as needed. Hence, installation via WebInstaller is a much more time consuming process than installation via DVD as this process is based on your Internet connection speed and reliability. A high-speed Internet connection is recommended when using the WebInstaller.
5.0
Software Installation
1. If you are upgrading an existing installation the installer program first reviews the firmware revisions for the hardware in the program database and notifies you of any required firmware updates. Click START to begin the software installation. A new installation skips this step.
2. Once started, the installer performs a quick installation file verification and prepares the file set for installation.
3. The Welcome Window appears when it is ready to begin the installation.
5. Click NEXT to continue to the License Agreement.
NOTE: You must accept the terms of the License Agreement to install this software.
Keri recommends reading through the License Agreement in its entirety before accepting the terms.
6. Click the check-box to accept the License Agreement. 7. Click NEXT to enter Customer Registration information.
9. Click NEXT for Hardware Selection.
10. Click the radio button corresponding to the controller type being used in the system. - Keri NXT for standard NXT controllers.
- Keri NXT (Mercury Powered) and MSC for either NXT controllers using Mercury firmware or for Mercury hardware controllers.
- Keri PXL for PXL controllers.
12. Click the Radio Button corresponding to your Type of Installation.
- A Full Installation installs all software components for a standard installation onto the PC. - A Basic Installation installs only the user client onto the computer.
- A Basic Installation with Hardware Driver installs the user client and the relevant hardware gateway onto the computer.
Use this option if your user client is on a different subnet than the PC with the full installation. - A Custom Install allows you to select additional applications to be installed.
This can include optional licensed applications beyond those included in the standard installation package. 13. Click NEXT to verify the installation parameters.
14. Review this list carefully as it explicitly states what will and will not be installed on your PC. - A list of items to be installed is displayed in GREEN.
- A list of items that will not be installed is displayed in RED.
If this list is not correct, click BACK and review the Type of Installation options. 15. Click the check box to confirm the installation parameters are correct.
16. Click NEXT to select the Destination Folder. This is the folder into which the Doors.NET software is installed.
17. The default destination folder is listed in the destination folder field. Keri recommends using this folder for the software installation. If a different destination folder is desired than the default, you may use the Explorer window to locate the desired folder. Once located, double-click on the folder name to enter the folder name into the destination field.
18. Click NEXT to select the types of program shortcuts to be installed on the computer.
20. Use the check boxes to select any combination of: - Desktop icon
- Start Menu folder - Quick Launch Toolbar
21. Click NEXT to install the Doors.NET database.
22. The installer lists if it detects an SQL Server is available on the host PC. There are three options based on what the installer finds:
- Install the Database on this computer - this is the default option. If the Installer detects an existing SQL applica-tion, its revision is listed. If there isn't an SQL Server available on the PC, then Microsoft's SQL Server Express® (a free SQL server package) will be installed and then the database will be installed.
- Scan the Network for Existing SQL Servers - allows the installer to search all accessible network folders for an SQL application and installs the database on that network folder. Using this option requires that the network folder always be available for the PC/Doors.NET program.
- Install the Application Server only - requires a Manual database installation. This option is recommended only for installers who are very familiar with SQL.
NOTE: SQL management tools are automatically installed with Windows operating systems prior to Windows 8. With Windows 8 they must be installed separately. If you are installing on Windows 8 an additional tick-box appears, “Install SQL Management Tools” (highlighted in red in the above graphic - you will not see this tick-box in non Windows 8 operating systems). Keri recommends checking this tick-box and installing the SQL Management Tools. This allows you to detach, relocate, and attach Doors.NET databases.
24. A progress bar keeps you informed on the installation process. There are several steps during the installation process where there may be a delay of several minutes. Please be patient as the software installs.
25. If you are upgrading the software from a previous revision the existing system database may need to be upgraded as well. If so, the database upgrade program will automatically run once software installation is complete. A new software installation will not perform this step.
26. The installation process is complete once the software is installed, and a new database is created or an existing database is upgraded.
27. Click FINISH to close the Installation Window.
28. If you opted for a desktop icon, the shortcut icon is placed on your desktop.
The software is now installed and ready for licensing and gateway configuration.
Refer to the License_Manager_and_Gateway_Configuration.pdf (p/n: 01565-002) document for instructions on licensing and gateway configuration.
6.0
Contact Keri Systems
End of document.
Keri USA Keri UK, Ireland, Europe
2305 Bering Drive San Jose, CA 95131
Unit 17
Park Farm Industrial Estate Ermine Street
Buntingford Herts SG9 9AZ UK Telephone: (800) 260-5265
(408) 435-8400
Telephone: + 44 (0) 1763 273 243
Fax: (408) 577-1792 Fax:+ 44 (0) 1763 274 106 Web: www.kerisys.com Web:www.kerisystems.co.uk E-mail: [email protected]