User Manual
Version 1.0.0.0
Table of Contents
1 Introduction ··················································································· 3
2 Installing MySMS Software ····························································· 4
3 Managing MySMS ············································································ 9
3.1 Accessing MySMS ··· 9
3.2 Multi-User Accounts ··· 10
3.3 Managing MySMS ··· 10
3.3.1 Manager Login ··· 10
3.3.2 Device Manage ··· 10
3.3.3 User Manage ··· 13
3.3.4 System Logs ··· 15
3.3.5 Password Settings ··· 16
4 Using MySMS ················································································ 17
4.1 User Login ··· 17
4.2 SIM Card Status ··· 17
4.3 Contacts Management ··· 18
4.3.1 Contact List ··· 18
4.3.2 Contact Group ··· 20
4.4 Send SMS ··· 22
4.4.1 Send Personalized SMS ··· 22
4.4.2 Send Fixed SMS ··· 25
4.4.3 Send Scheduled SMS ··· 28
4.4.4 Send Template SMS ··· 31
4.5 Outbox ··· 34
4.6 Inbox ··· 35
4.7 System Logs ··· 36
1 Introduction
The potential of interacting people with SMS is huge. Positioned to respond to this trend, MySMS enables users of NeoGate TG VoIP GSM Gateway to send SMS on the free Web messaging platform. Without any complex integration, any Web browser could be exploited to take advantage of Web SMS sending and receiving. Secure, reliable, and fast SMS delivery ensures enterprises have the best SMS solution.
Figure 1-1 MySMS Application
Features
● 2-way SMS ● Inbox & Outbox ● Bulk SMS
● Scheduled SMS sending ● SMS Delivery Result ● SMS Template ● Custom SMS ● Fixed SMS
● Contact Management ● SIM Card Status
● Admin and User Account ● System Logs
2 Installing MySMS Software
MySMS is built on Tomcat and MySQL. The port used for Tomcat is 8080 and 3306 for MySQL. Please check if these two ports are used for other procedures before installing MySMS. If the ports are already being used, please close the related programs and then start to install MySMS.
It is easy to get start with MySMS. All you need to do is downloading MySMS software to one computer and access MySMS using a browser. Before installing the software, please make sure that your computer meets the following requirements.
Operating System: Windows XP, Windows 7, Windows 8
Disk Space: 400MB of free space is required
Web Browser: Firefox, Chrome, IE (Version 9 or higher)
Follow these step-by-step instructions to install MySMS Step1. Go to Yeastar website to download MySMS installation file. Click the link to download:
http://www.yeastar.com/download/MySMS/setup.exe
Step2. Save MySMS installation file and double click it to install MySMS on your computer.
Step3. Select the language, and click OK.
Figure 2-2 Select the Language
Step4. Click Next to continue to install MySMS.
Figure 2-3 MyPBX Setup Wizard
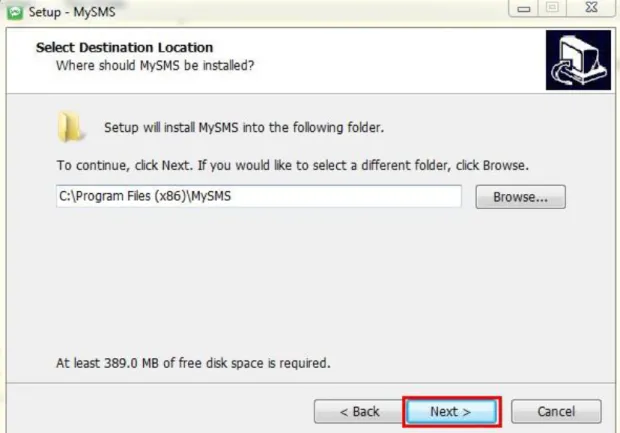
Step5. Select the destination where you want to install MySMS, then click
Figure 2-4 Select Destination Location
Step6. Select Start Menu Folder, then click Next.
Step7. Select Additional Tasks, then click Next.
If you don’t want to create a Quick Launch icon, uncheck the Create a Quick Launch icon boxbefore you click Next.
Figure 2-6 Select Additional Tasks
Step8. Click Install to continue with the installation.
Step9. Please wait while Setup installs MySMS on your computer.
Figure 2-8 Installing
Step10. The installation is done. Click Finish to exit Setup.
3 Managing MySMS
3.1 Accessing MySMS
Once the installation is done, MySMS will automatically start on the local server, bringing you to the MySMS local website using the default web browser. The MySMS local host ishttp://localhost:8080/smscenter.
Figure 3-1 MySMS Local Host
You can use another MySMS URL to access MySMS:
http://the local server IP address:8080/smscenter
In this guide, the local IP address is 192.168.3.29, so you need to point the browser to the URL: http://192.168.3.29:8080/smscenter.
This URL can be applied to other computers in the same local network to access MySMS.
Note:
You MUST keep the PC (where MySMS software is installed) running, or you cannot access MySMS.
3.2 Multi-User Accounts
As you can see on the MySMS logon page, there are two user types.
● User allows a user to send SMS messages and check the received SMS
messages with a selected NeoGate TG device.
● Manager allows the administrator to manage the integration between MySMS and NeoGate TG devices, manage user sub-accounts and view system logs.
3.3 Managing MySMS
3.3.1 Manager Login
To use MySMS, you should first log in MySMS Manager Account to manage devices and users.
Username: admin
Password: admin (default)
Figure 3-3 Manager Login
3.3.2 Device Manage
On this page, you can add devices to connect with MySMS software via API. In this guide, we show you how to integrate one NeoGate TG1600 device to MySMS.
NeoGate TG1600 IP address: 192.168.3.184.
Important:
Before connecting NeoGate TG1600 device to MySMS, please make sure that the API Settings on NeoGate TG1600 Web Interface are configured correctly.
Figure 3-4 NeoGate TG API Settings
Enable API: Checked //Enable API, the default API port is 5038
User Name: mysms // Enter the user name according to your preference
Password: mysmspass //Enter the password according to your preference
Permitted 'IP address/Subnet mask': 192.168.3.0/255.255.255.0
// Only the input IP address range can connect this device via API
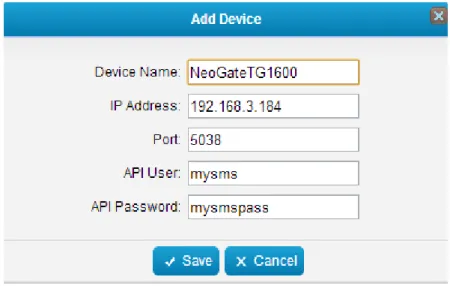
Add Device
1. Click the button to connect one device to MySMS. 2. In the popup window, fill in the details of NeoGate TG1600.
Device Name: NeoGateTG1600 //Give a name for the device which you want to connect with MySMS
IP Address: 192.168.3.184 //The IP address of the NeoGate TG1600
Port: 5038 //The API port, the default is 5038
API User: mysms // The User Name set on NeoGate TG1600 API Settings page
API Password: mysmspass //The password set on NeoGate TG1600 API Settings page
3. Click the button and check the Connect state.
Figure 3-6 Device Status
Connect State
Connect: the device and MySMS are connected successfully.
Disconnect: the device is not connected to MySMS.
Remove Device
1. Select devices, and click the button to remove the devices from MySMS.
2. Click OK to remove devices; click Cancel to keep the devices.
Figure 3-7 Remove Device
Connect / Disconnect
1. Click to disconnect TG1600 and MySMS.
Figure 3-8 Disconnect Device
Figure 3-9 Connect Device
Search Device
If there are many devices added on MySMS, you can find the desired device quickly with the search function on MySMS.
The device can be searched by “Device Name”, “IP Address”, “Port”, “API User”, and “API Password”.
Figure 3-10 Search Device
3.3.3 User Manage
Add User
1. Click to add one user. 2. Set the User Name and password.
Figure 3-11 Add User
3. Click Save to save the settings, then you will see the password is protected as it cannot be seen after created.
Figure 3-12 User Status
User Authority
A user can use MySMS with multiple NeoGate TG devices if the devices are added on MySMS.
Figure 3-13 Edit User
2. Choose which devices can be used by the user, then click Save.
Figure 3-14 User Authority
Remove User
1. Select the desired users, and click the button to remove the users from MySMS.
2. Click OK to remove the users; click Cancel to keep the users.
Figure 3-15 Remove User
Initial Password
If the password for a user is forgotten, it can be reset to “123456”. 1. Select the user, and click to reset the password.
Figure 3-16 Initial Password
3. Click OK to use the initial password “123456”.
Figure 3-17 Initial Password Successfully
4. Click Cancel to keep the old password.
Search Users
If there are many users added on MySMS, you can find the desired user quickly with the search function on MySMS.
The user can be searched by “Username” and “Created Time”.
Figure 3-18 Search Users
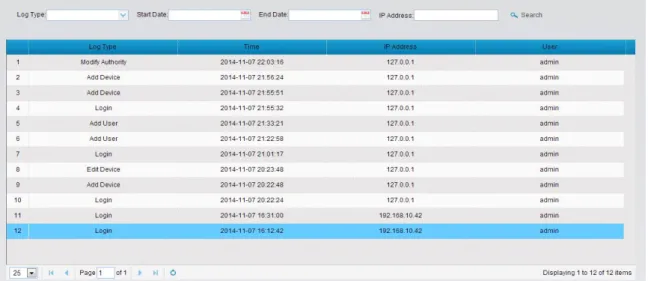
3.3.4 System Logs
The system logs can be viewed and searched by the administrator on this page.
3.3.5 Password Settings
Click to change the password of admin account.
Enter the old password and set a new password, click Save, then log in admin account using new password.
4 Using MySMS
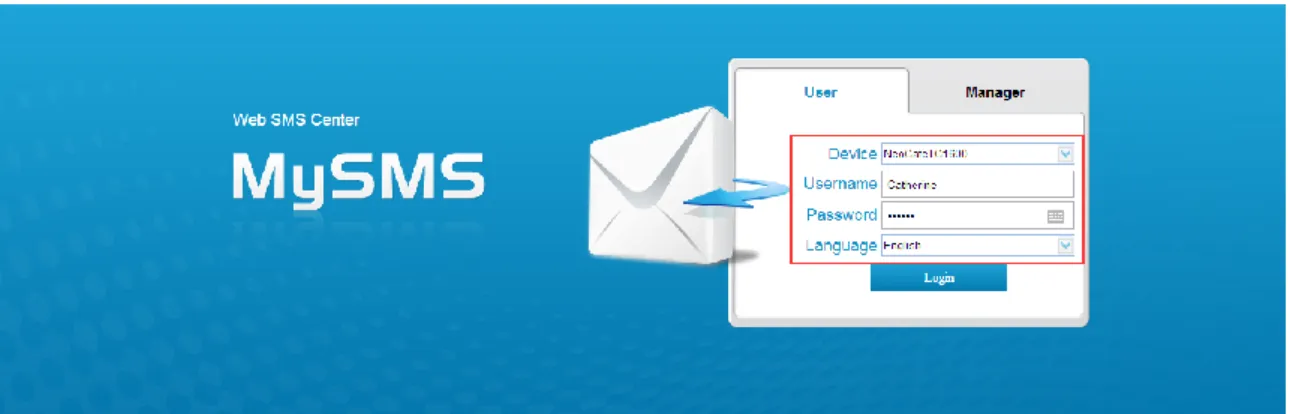
4.1 User Login
To use MySMS, you need to log in MySMS with the user account, which is created by the admin account. Here we use the account “Catherine”, which was created in the Chapter 3.3.2 User Manage.
Figure 4-1 User Login
Device: Select the device “NeoGateTG1600”, which is authorized to user “Catherine”
Username: Catherine
Password: catherine1600
After login, you can use MySMS to send SMS messages through the NeoGate TG1600 and check the received SMS messages on MySMS.
4.2 SIM Card Status
Before using MySMS to send and receive SMS messages, you need to check which SIM cards are available. You can view the status for all the SIM cards which are installed on NeoGate TG device. Click the SIM Card Status option on the left-hand navigation bar, you can see all the SIM cards’ status listed on the page.
Figure 4-2 SIM Card Status
State Description
Ready The SIM card is idle
Failed There is no SIM card inserted
Busy The SIM card is being used
Signal Description
No signal Poor Average Good Excellent
4.3 Contacts Management
A contact list allows you to target and text contacts with common interests. Once you have all your contacts created on MySMS, you can send SMS messages to a single contact or a group or all contacts by directly selecting rather than typing in the numbers manually each time.
4.3.1 Contact List
Click the Contact List option on the left-hand navigation bar, you can manage the contacts on the page.
Figure 4-3 Contacts List
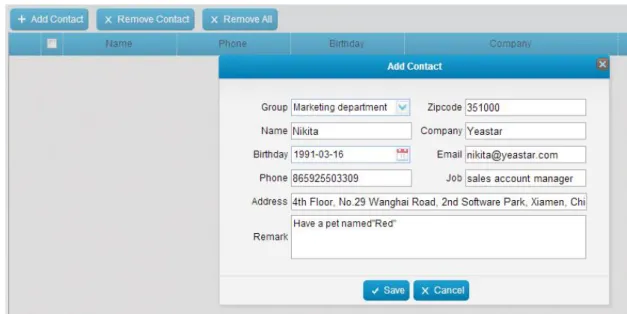
Add Contact
1. Click Add Contact button to create an individual contact.
2. Enter the name, phone number and other information in the pop-up window.
Figure 4-4 Add Contact
*The Name and Phone fields are required.
3. Click Save, then the contact is successfully created.
Remove Contact
1. Select the desired contacts and then click Remove Contact. 2. Click OK to remove the contacts.
Figure 4-5 Remove Contacts
Remove All
1. Click Remove All.
2. Click Ok to clear the contact list. 3. Click Cancel to keep all the contacts.
Figure 4-6 Remove All
Search Contact
You can search the contact by “Name” and “Phone”.
Figure 4-7 Search Contact
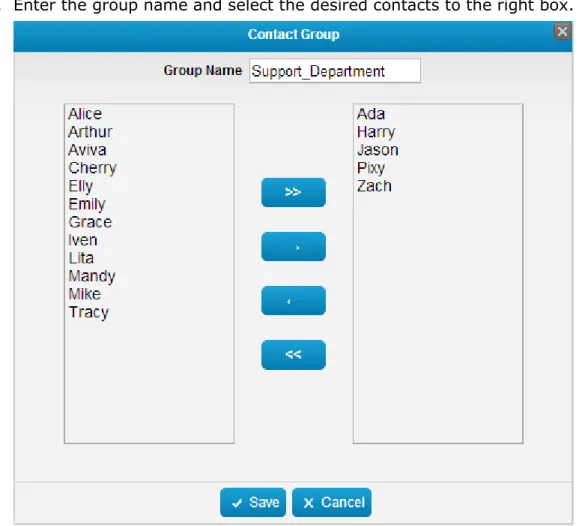
4.3.2 Contact Group
Contacts created in the Contact List can be divided into groups. It makes sending SMS messages to multiple contacts more efficiently by focusing on one group at a time.
Figure 4-8 Contact Group
Add Group
1. Click Add Group button to create a new group.
2. Enter the group name and select the desired contacts to the right box.
3. Click Save to save the contact group.
Remove Group
1. Select the desired group and click Remove Group. 2. Click Ok to remove the group.
3. Click Cancel to keep the group.
Figure 4-10 Remove Group
Search Group
The contact groups can be searched by “Group Name”.
Figure 4-11 Search Group
4.4 Send SMS
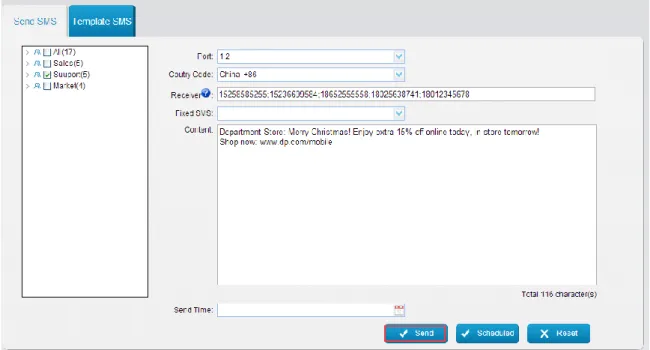
4.4.1 Send Personalized SMS
In this section, we guide you how to send an SMS text message to the contacts by typing the message contents into MySMS.
Step1. Click the Send SMS option on the left-hand navigation bar, you will see the following screen.
Figure 4-12 Send SMS
Step2. Select the available SIM card from the Port Field.
Figure 4-13 Select Port
Step3. Configure the Country Code according to your situation.
Figure 4-14 Country Code
Step4. Enter the intended receiver’s mobile phone number in the Receiver
Figure 4-15 Enter Phone Number
You can also pick the mobile numbers from the Contact list.
Figure 4-16 Select Contacts from Contact List
If you want to send the SMS message to a group, please select the desired group from the left box.
Figure 4-17 Select Contacts from Contact Group
Figure 4-18 Type Contents
Step6. Click the Send button to send the composed message to the desired mobile numbers.
Figure 4-19 Send SMS
4.4.2 Send Fixed SMS
A Fixed SMS is a ready-made SMS message that is used to make sending text messages that have the same content easier. Usually, we create fixed SMS messages that are used frequently.
Step1. Click Add SMS.
Figure 4-20 Add Fixed SMS
Step3. Click the Send SMS option on the left-hand navigation bar, you will see the following screen.
Figure 4-21 Send SMS
Step4. Select the available SIM card from the Port Field.
Step5. Configure the Country Code according to your situation.
Figure 4-23 Country Code
Step6. Enter the intended receiver’s mobile phone number in the Receiver
field. You can enter multiple mobile phone numbers separated by semicolon.
Figure 4-24 Enter Phone Number
You can also pick the mobile numbers from the Contact list.
Figure 4-25 Select Contacts from Contact List
If you want to send the SMS message to a group, please select the desired group from the left box.
Figure 4-26 Select Contacts from Contact Group
Step7. Select the Fixed SMS.
Figure 4-27 Select a Fixed SMS
Step6. Click the Send button to send the fixed SMS message to the desired mobile numbers.
Figure 4-28 Send Fixed SMS
4.4.3 Send Scheduled SMS
Step1. Click the Send SMS option on the left-hand navigation bar, you will see the following screen.
Figure 4-29 Send SMS
Step2. Select the available SIM card from the Port Field.
Figure 4-30 Select Port
Step3. Configure the Country Code according to your situation.
Figure 4-31 Country Code
Step4. Enter the intended receiver’s mobile phone number in the Receiver
Figure 4-32 Enter Phone Numbers
You can also pick the mobile numbers from the Contact list.
Figure 4-33 Select Contacts from Contact List
If you want to send the SMS message to a group, please select the desired group from the left box.
Figure 4-34 Select Contacts from Contact Group
Figure 4-35 Edit Content
Step6. Select the date and time for the scheduled message to be delivered. Use the calendar to specify the time and date that you want the message to be sent, and then click OK.
Figure 4-36 Select the Date and Time
Step7. Click the Scheduled button, the system will prompt you “Scheduled Successfully”.
4.4.4 Send Template SMS
MySMS allows you to send personalized SMS messages using the data directly from the Microsoft Excel file. It offers a great amount of ease and convenience. You can send bulk, but personalized SMS messages.
Step1. Add an SMS template. Click the SMS Template option on the left-hand navigation then click the button Add Template.
Figure 4-37 Add SMS Template
Step2. Fill in the content and match characters.
Figure 4-38 Edit SMS Template
Figure 4-39 Send Template SMS
Step4. Select the port and template.
Step5. Import the excel data file and define where does the data start.
Step6. Fill in the match characters.
For example, the data in the excel file is showing as below.
Data starts from Row 3 Column 2, so you should set the Date Start Position on MySMS: 3 Row 2 Column.
Figure 4-40 Excel Data
Step7. Before sending the SMS messages, you can click Preview to check if the messages are correct or not.
Figure 4-41 Preview Template SMS Messages
Step8. After the confirmation, click Send to send the message.
4.5 Outbox
You can view SMS history and delivery state in the Outbox.
The SMS messages can be searched by “Receiver”, “Content”, “Port” ,”Time” and “State”.
4.6 Inbox
You can view all the replies to the message that have been sent in the Inbox.
Figure 4-43 Inbox
Click a specific SMS message, you can reply the message. After typing the contents, click Reply button to reply.
4.7 System Logs
The system logs can be viewed and searched by the user on this page.
Figure 4-45 System Logs
4.8 Password Settings
Click to change the password of user account.
Enter the old password and set a new password, click Save, then log in admin account using new password.
Figure 4-46 Password Settings