1
important resource when some or all of your data is hosted in a server database and Access is often used to create a front-end for SQL Server. This can be done in a number of ways:
Creating an Access Data Project: An Access Data Project uses the familiar Access database tools to create and work with data held on SQL Server. It allows you to benefit from SQL Server’s processing power whilst retaining the familiar and user-friendly Access interface.
Upsizing an Access Database: If you already have a database built in Access you can use the
Upsizing Wizard to convert it to a database in SQL Server. The Access database becomes an Access Data Project when the wizard migrates the data and queries to the server whilst preserving the modified forms and reports in Access. You continue using the database much as before.
Linking Tables: This is the simplest way of accessing data on SQL Server. A link is created directly to one or more tables residing in a server database using ODBC (Open Database Connectivity). Thereafter the linked tables appear in the Access Database Window and can be treated as if they were located in Access. Unlike an Access Data Project this method does not benefit from the increased processing power of the server as the data is processed locally. This document describes how to link tables in a SQL Server database to an Access database.
Creating a New Data Source (DSN) File
You can work from an existing Access database or create a new one. Switch to the Tables section of the Database Window then go to File > Get External Data > Link Tables. This opens the Link
dialog which is similar to the familiar File Open dialog. If you were linking to another type of data source such as another Access database, an Excel workbook or a text file you would locate it from here, but you need to connect to the server database so the procedure is slightly different.
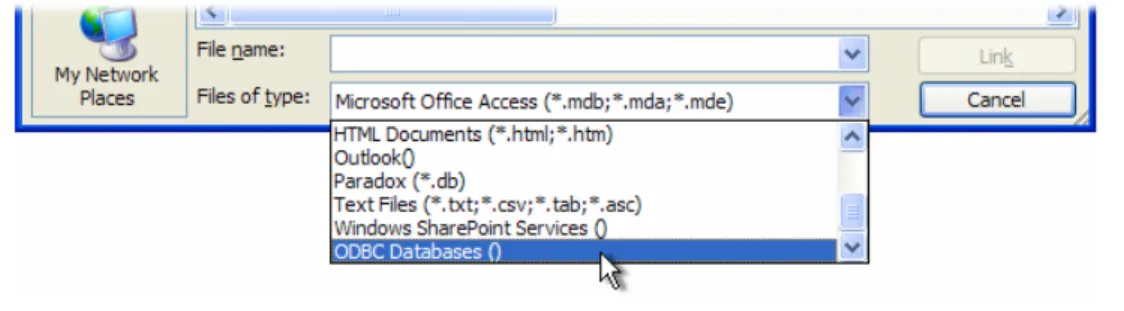
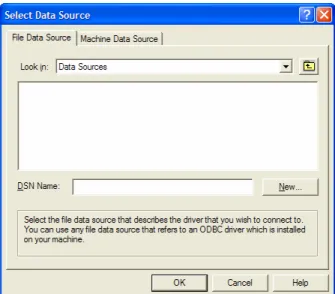
Go to the Files of type list at the bottom of the dialog box and choose ODBC Databases () (Fig. 1). This opens the Select Data Source dialog box (Fig. 2).
Fig. 1 Choose to link to an ODBC Database.
The dialog box displays DSN files. These files hold a description of a data source with all the information needed to locate and connect to it (known as the connection string). If you have already created one or more data sources they will probably be displayed here. The default location displayed is the Data Sources folder on your computer (usually C:\Program Files\Common
Files\ODBC\Data Sources) but since a DSN file is merely the connection instructions and not the data source itself you can keep it anywhere you like.
Fig. 2 The Select Data Source dialog box.
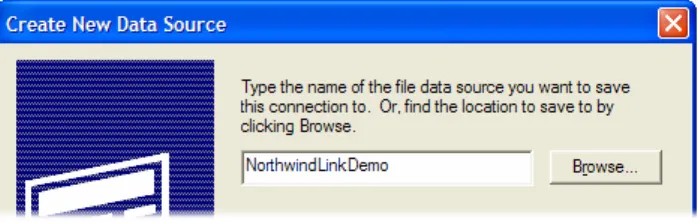
Since you are creating a link for the first time you will have to make a new DSN file. Click the button marked New to open the Create New Data Source dialog box then scroll down the list of drivers and select SQL Server (Fig. 3).
Fig. 3 Select the SQL Server driver.
If you know the name of the database (not the server name) to which you want to link you can specify it now by clicking the Advanced button on the Create New Data Source dialog box to open the Advanced File DSN Creation Settings dialog box. This already contains the first part of the connection string. Underneath it type DATABASE=<DatabaseName> replacing <DatabaseName> with the name of your chosen database (Fig. 4). In this example I am connecting to a table in the
3
Fig. 6 A summary of the connection information is displayed.
At this point a new dialog box will open allowing you to specify more information about the link (Fig. 7). If you wish you can enter a description of the data source. Now open the list of available servers. There will be a short pause while the program searches for available servers (there may be several) before displaying a list of their names. Servers installed on the computer you are working on are also referred to as (local). Choose the server on which your target database is located and click Next.
Fig. 7 Enter a description of the data source and choose a server.
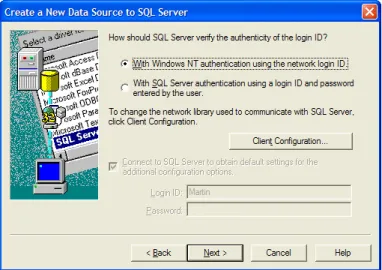
In the next window you can specify how to log on to the server. You might need to seek advice from your SQL Server administrator before completing this stage. Server databases usually require a Login ID and password before you are granted access to their data. In this example (Fig. 8) I am choosing Windows NT authentication which uses my existing Windows login to log me on to the server. If your server requires a separate login you should choose the SQL Server authentication
option. You can then optionally enter the required Login ID and password. If you don’t enter them here the driver will prompt you for them each time it connects to the server.
Fig. 8 Specify how you want to log on to the server.
Click Next. Since the server can host many different databases it is a good idea to specify at this stage which one you want to connect to. Place a tick in the box marked Change the default database to: and choose the name of your target database from the list (Fig. 9). Then click Next.
Fig. 9 Specify the name of the database to connect to.
The final window contains advanced options that I won’t get involved with here. Click Finish. Access displays a summary window with the option to test the connection (Fig. 10). To do this click
5
Fig. 12 The new data source is now listed.
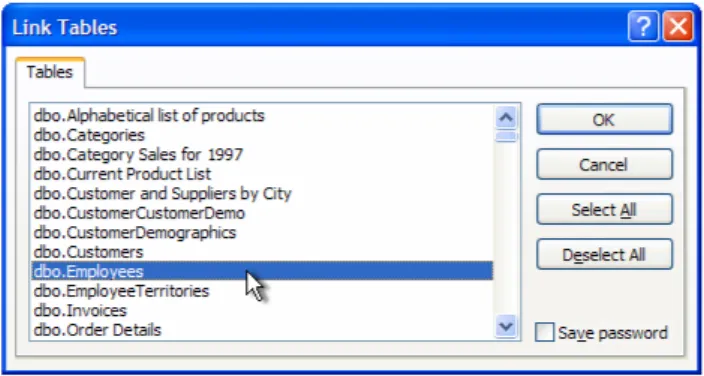
Select the data source name then click OK. Now the driver will connect to the data source and retrieve a list of tables in the server database. Access displays this list in the Link Tables dialog (Fig. 13). Select the table you wish to link to (to save repeating the process you can select multiple tables if you wish) then click OK.
Fig. 13 Access displays a list of tables from the server database.
You new link is now displayed in the Tables section of the Access Database Window (Fig. 14) and can be treated like any other table. You can view and query its data (Fig. 15), build forms and reports based on it and enter or edit records (subject to any permissions set on the server).
Fig. 14 The link to the table is shown in the Access Database Window.