Pulse Secure Client
Administration Guide
Product Release 5.1
Document Revision 1.0
Published: 2015-03-19
2700 Zanker Road, Suite 200 San Jose, CA 95134 http://www.pulsesecure.net
© 2015 by Pulse Secure, LLC. All rights reserved
Pulse Secure and the Pulse Secure logo are trademarks of Pulse Secure, LLC in the United States. All other trademarks, service marks, registered trademarks, or registered service marks are the property of their respective owners.
Pulse Secure, LLC assumes no responsibility for any inaccuracies in this document. Pulse Secure, LLC reserves the right to change, modify, transfer, or otherwise revise this publication without notice.
Pulse Secure Client Administration Guide
The information in this document is current as of the date on the title page. END USER LICENSE AGREEMENT
The Pulse Secure product that is the subject of this technical documentation consists of (or is intended for use with) Pulse Secure software. Use of such software is subject to the terms and conditions of the End User License Agreement (“EULA”) posted at http://www.pulsesecure.net/support/eula.
Table of Contents
List of Tables ... viii
About This Guide ...ix
Objectives ... ix
Audience ... ix
Document Conventions ... ix
Related Documentation ... ix
Requesting Technical Support ... x
Self-Help Online Tools and Resources ... x
Opening a Case with PSGSC ... x
PART 1 Pulse Secure Client ... 1
CHAPTER 1 Pulse Secure Client Overview ... 2
Introducing Pulse Secure Client ... 2
Pulse Secure Client for Windows ... 2
Pulse Secure Client for Mac OS X ... 4
User Experience ... 5
Location Awareness ... 5
Session Migration ... 6
Centralized Pulse Configuration Management ... 6
Smart Connections - List of URLs ... 7
Security Certificates ... 7
Compliance and Remediation ... 7
Two Factor Authentication ... 8
Captive Portal Detection ... 8
Pulse Collaboration Suite Integration ... 9
Sign In Notifications ... 9
Automatic Software Updates ... 9
Pulse Secure Client Customization and Rebranding ... 9
Pulse Secure Client Configuration Overview ... 10
Pulse Secure Client Status Icons ... 11
Installation Requirements ... 12
Pulse Secure Client Error Messages Overview ... 12
Accessing Pulse Secure Client Error Messages on Mac OS X Endpoints ... 13
Pulse Secure Client Log Files ... 14
Deleting the Pulse Secure Client Log Files ... 16
Migrating From Odyssey Access Client to Pulse Secure Client ... 16
Migrating From Network Connect to Pulse Secure Client ... 18
Predictable Pulse Server Hostname Resolution with IPv6 ... 19
CHAPTER 2 Configuring Pulse Policy Secure ...20
Before You Begin ... 21
Pulse Policy Secure Overview ... 21
Pulse Policy Secure and Pulse Connect Secure Deployment Options ... 22
Configuring a Role for Pulse Policy Secure ... 23
Client Connection Set Options for Pulse Policy Secure ... 26
Pulse Secure Connection Set Options ... 26
UAC 802.1X Connection Type Options ... 28
Trusted Server List (for UAC 802.1X Connection) ... 28
Connect Secure or Policy Secure (L3) Connection Type Options ... 29
SRX (for Dynamic VPN) Connection Type Options ... 31
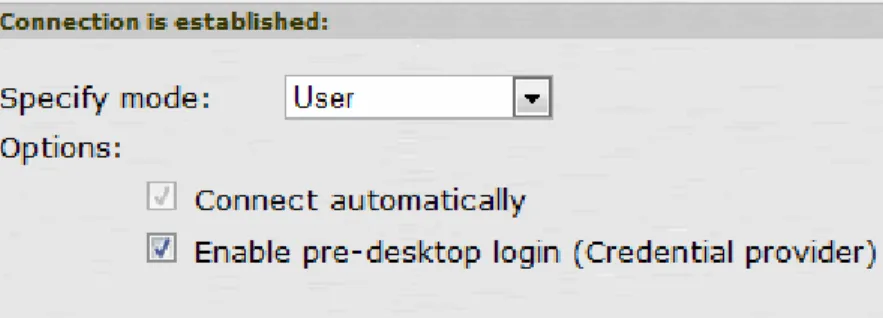
Pulse Connection is Established Options ... 31
Pulse Connection is Established Examples ... 32
Location Awareness Rules ... 34
Machine Connection Preferences ... 34
User Connection Preferences ... 35
Creating a Client Connection Set for Pulse Policy Secure ... 36
Pulse Secure FIPS Mode Overview for Pulse Policy Secure ... 39
Windows Endpoint Requirements ... 40
Configuration Overview ... 40
Securing the Connection State on the Pulse Secure Client ... 41
Machine Authentication for Pulse Policy Secure Overview ... 42
Configuring Machine-Only Machine Authentication for a Pulse Secure Connection ... 43
Configuring User-After-Desktop Machine Authentication for a Pulse Secure Connection ... 44
Preferred Realm and Role for Pulse Secure Client Machine Authentication ... 45
Remote Desktop Protocol Compatibility with Pulse Secure 802.1X Machine Authentication Connection ... 48
Credential Provider Authentication for Pulse Policy Secure Overview ... 49
Configuring User-at-Credprov Credential Provider Authentication for a Pulse Secure Connection ... 51
Configuring Machine-Then-User-at-Credprov Credential Provider Authentication for a Pulse Secure Connection ... 53
Configuring a Pulse Credential Provider Connection for Password or Smart Card Login ... 54
Machine and User Authentication Through a Pulse Connection for Pulse Policy Secure ... 57
Configuring Location Awareness Rules for Pulse Secure Client ... 58
Pulse Policy Secure Component Set Options ... 61
Creating a Client Component Set for Pulse Policy Secure ... 61
Endpoint Security Monitoring and Management for Pulse Policy Secure... 62
Remediation Options ... 64
Issuing a Remediation Message with Pulse Policy Secure ... 65
Using SMS/SCCM Remediation with Pulse Policy Secure ... 66
Patch Management Info Monitoring and Patch Deployment ... 67
Configuration and Migration Options for Deprecated Custom: Patch Assessment Rules ... 67
Using a System Management Server... 68
Pushing Pulse Secure Client Configurations Between Pulse Servers of the Same Type ... 69
Enabling or Disabling Automatic Upgrades of the Pulse Secure Client ... 70
Upgrading Pulse Secure Client ... 71
Using Device Certificates ... 72
Understanding Device Certificates ... 72
Understanding Self-Signed Certificates ... 73
Importing a Device Certificate and Private Key ... 73
Creating a Certificate Signing Request ... 74
Importing a Signed Certificate Created from a CSR ... 75
Understanding Intermediate Certificates ... 75
Importing Intermediate CA Certificates ... 76
Importing a Renewed Certificate That Uses the Existing Private Key ... 76
Downloading a Device Certificate ... 76
Using Device Certificates with Virtual Ports ... 77
CHAPTER 3 Configuring Pulse Connect Secure ...79
Pulse Connect Secure Overview ... 80
Pulse Secure Client and IVS ... 81
About Sign-In Notifications ... 82
Configuring and Implementing Sign-in Notifications ... 82
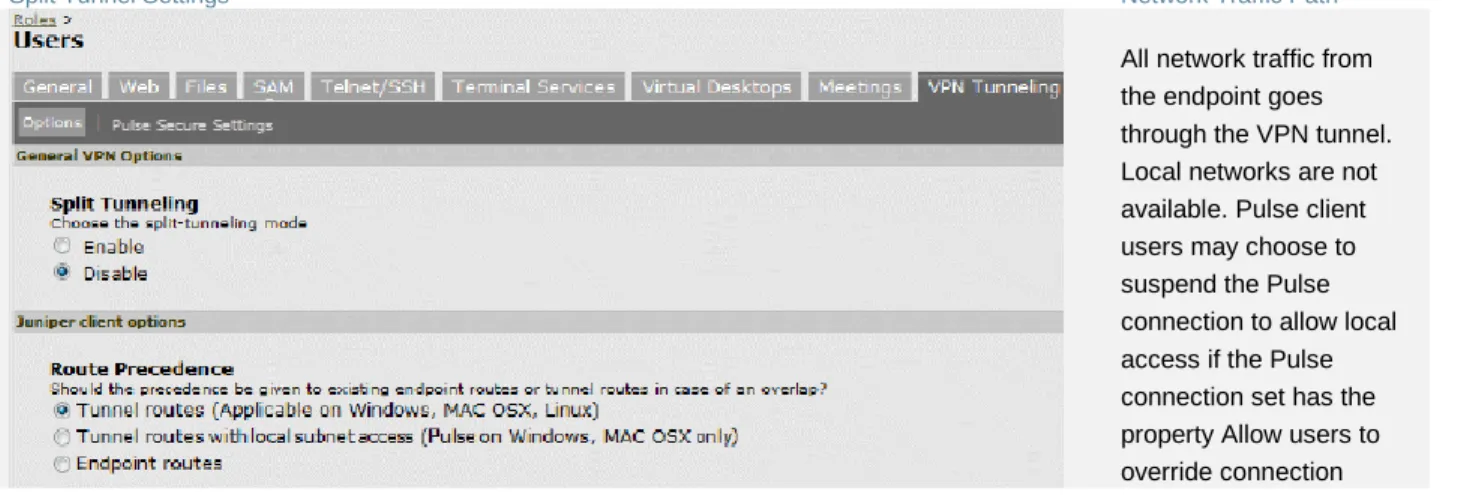
Pulse Connect Secure Split Tunneling Overview... 84
Split Tunneling Disabled ... 85
Split Tunneling Enabled ... 86
Pulse Split Tunneling Summary ... 86
Split Tunneling Notes ... 88
Configuring a Role for Pulse Connect Secure ... 88
Configuring General Role Options for Pulse Connect Secure ... 89
Configuring Role Options for Pulse Connect Secure ... 91
Configuring Role Options for Host Checker for Pulse Connect Secure ... 94
Machine Authentication for Pulse Connect Secure Overview ... 94
Credential Provider Authentication for Pulse Connect Secure Overview ... 95
Configuring User-at-Credprov Credential Provider Authentication for a Pulse Secure Connection ... 96
Configuring Machine-Then-User-at-Credprov Credential Provider Authentication for a Pulse Secure Connection ... 98
Machine and User Authentication Through a Pulse Connection for Pulse Connect Secure... 99
Configuring Pulse Secure client for Secure Application Manager ... 100
Pulse Connection Set Options for Pulse Connect Secure ... 106
Pulse Secure Connection Set Options ... 106
Policy Secure 802.1X Connection Type Options ... 108
Trusted Server List (for Policy Secure 802.1X Connection) ... 108
Connect Secure or Policy Secure (L3) Connection Type Options ... 109
SRX (for Dynamic VPN) Connection Type Options ... 110
Pulse Connection is Established Options ... 111
Pulse Connection is Established Examples ... 111
Location Awareness Rules ... 113
Machine Connection Preferences ... 114
User Connection Preferences ... 114
Securing the Connection State on the Pulse Secure Client ... 115
Creating a Client Connection Set for Pulse Connect Secure ... 116
Pulse Secure Client FIPS Mode for Pulse Connect Secure Overview ... 117
Endpoint Requirements ... 118
Configuration Overview ... 118
Configuring Location Awareness Rules for Pulse Secure Client ... 119
Component Set Options for Pulse Connect Secure ... 122
Creating a Client Component Set for Pulse Connect Secure ... 122
Endpoint Security Monitoring and Management for Pulse Connect Secure ... 123
Remediation Options ... 124
Issuing a Remediation Message with Pulse Connect Secure ... 126
Using SMS/SCCM Remediation with Pulse Connect Secure ... 126
Pushing Pulse Configurations Between Pulse Servers of the Same Type ... 127
Enabling or Disabling Automatic Upgrades of the Pulse Secure Client ... 129
Upgrading Pulse Secure Client ... 129
Pulse Collaboration Suite Overview ... 131
Task Summary: Configuring Pulse Collaboration Suite on Pulse Connect Secure ... 131
Configuring Pulse Connections to Support Meetings ... 132
Scheduling Meetings Through the Pulse Connect Secure User Web Portal ... 132
Scheduling Meetings Through Microsoft Outlook ... 133
CHAPTER 4 Configuring Pulse Secure Client on SRX Series Gateways ... 135
Pulse Secure Client and SRX Series Gateways ... 135
CHAPTER 5 Session Migration ... 138
Understanding Session Migration ... 138
Session Migration Overview ... 138
Session Migration and Session Timeout ... 140
How Session Migration Works ... 140
Session Migration and Session Lifetime ... 140
Session Migration and Load Balancers ... 140
Authentication Server Support ... 141
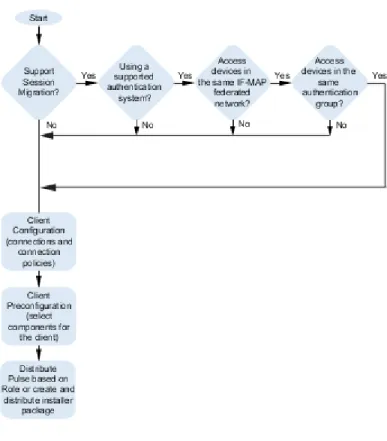
Task Summary: Configuring Session Migration ... 141
Configuring Session Migration for the Pulse Client ... 142
Configuring an IF-MAP Federated Network for Session Migration ... 142
CHAPTER 6 Deploying Pulse Secure Client... 145
Pulse Secure Client Installation Overview ... 145
Adding a Pulse Configuration to a New Pulse Installation ... 147
Installing Pulse Secure Client from the Web ... 151
Launching Pulse Secure Client from the Pulse Server Web Portal ... 152
Usage Notes ... 152
Installing the Pulse Secure Client on Windows Endpoints Using a Preconfiguration File ... 153
Installing the Pulse Client Using Advanced Command-Line Options ... 154
Examples ... 154
Repairing a Pulse Installation on a Windows Endpoint ... 155
Installing the Pulse Secure Client on OS X Endpoints Using a Preconfiguration File ... 155
Installing the Pulse Client on OS X Endpoints Using Command-Line Options ... 156
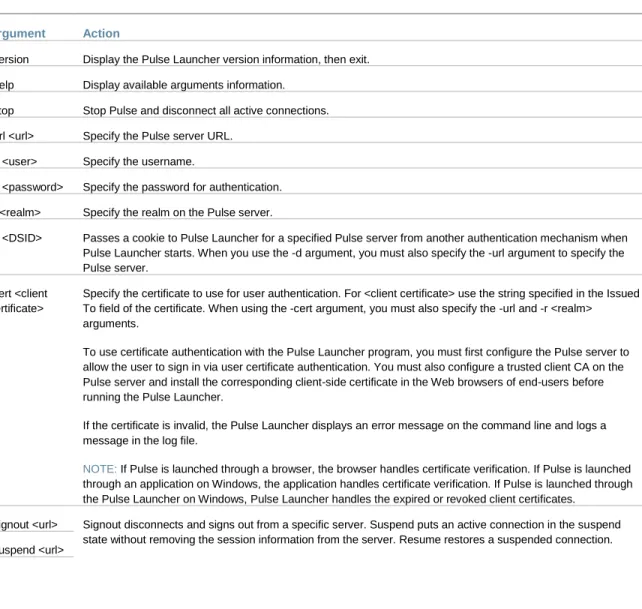
Pulse Secure Command-line Launcher ... 156
Using jamCommand to Import Pulse Secure Connections ... 159
jamCommand Reference ... 160
CHAPTER 7 Customizing the Pulse Secure Desktop Client ... 162
Customizing Pulse Secure Client Overview ... 162
BrandPackager Usage Notes... 163
BrandPackager Workflow ... 164
Setting Up the Pulse Secure Client Customization Environment ... 165
Initializing the Pulse Secure Client Customization Environment ... 165
Importing an Existing Customized Pulse Secure Client Package ... 167
Editing Pulse Secure Client User Interface Labels ... 168
Editing Pulse Secure Client Messages ... 171
Adding Custom Graphics to Pulse Secure Client... 172
Customizing Pulse Secure Client for Apple OS X Online Help ... 174
Validating Customizations to the Pulse Secure Client ... 175
Building the New Pulse Secure Client Package... 175
Testing the Pulse Secure Client Package... 176
Installing or Upgrading Pulse for Windows with a Branding Package ... 176
Installing or Upgrading Pulse for Apple OS X with a Branding Package ... 177
Installing a Branding Package Only ... 178
PART 2 Pulse Secure Client Compatibility ... 180
CHAPTER 8 Client Software Feature Comparison ... 181
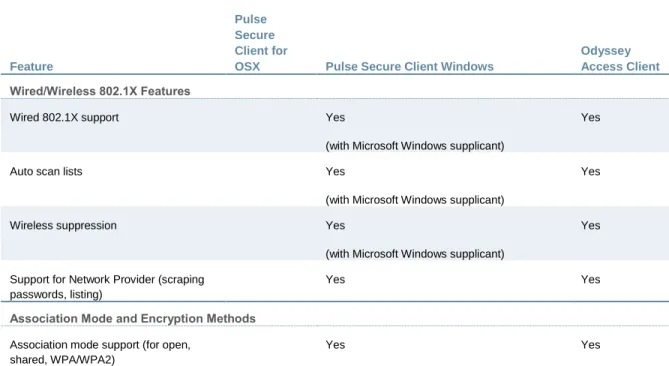
Comparing Odyssey Access Client and Pulse Secure Client ... 181
Comparing Network Connect and Pulse Secure Client ... 184
PART 3 Pulse Secure Client for Mobile Devices ... 188
CHAPTER 9 Pulse Secure Client for Mobile Devices and Pulse Mobile Security Suite ... 189
Pulse Secure Client for Mobile Devices Overview ... 189
Pulse Secure Client Mobile Security Gateway ... 190
Pulse Secure mobile Clients and User Agent Strings ... 190
CHAPTER 10 Pulse Secure Client for Apple iOS ... 193
Pulse Secure Client for Apple iOS Overview ... 193
Before You Begin ... 195
Configuring a Role and Realm for Pulse Secure Client for Apple iOS ... 196
Allowing Pulse Secure Client for iOS Users to Save Webmail Password ... 199
Host Checker for Pulse iOS Clients ... 199
Configuring Host Checker for Pulse Secure iOS Clients ... 200
Implementing Host Checker Policies for Pulse Secure Client for iOS Devices ... 202
Installing the Pulse Secure Client for Apple iOS App ... 203
Using iPhone Configuration Utility Profiles for Pulse Secure Client for iOS ... 204
Collecting Log Files from Pulse Secure Client for iOS ... 205
Launching the Pulse Secure Client for iOS App with a Command ... 205
Pulse Secure Client for iOS Error Message Reference ... 207
Configuring Secure Mail ... 208
Enabling Secure Mail at the Role Level ... 208
Defining the Secure Mail Resource Profile ... 209
Obtaining an S/MIME Certificate ... 210
Configuring an Authorization-Only Policy for ActiveSync ... 211
CHAPTER 11 Pulse Secure Client for Google Android ... 213
Pulse Secure Client for Android Overview ... 213
Configuring a Role and Realm for Pulse for Android ... 214
Application Acceleration on Pulse Secure Client Mobile VPN Connections ... 216
Configuring Application Acceleration for Pulse Mobile VPN Connections ... 217
Allowing Pulse Secure Client for Android Users to Save Webmail Password ... 218
Host Checker for Pulse Android Clients ... 218
Configuring Host Checker for Pulse Secure Client Android Clients ... 219
Implementing Host Checker Policies for Pulse Secure Client for Android Clients ... 221
Pulse Secure Client for Android Error Message Reference ... 222
Introduction to the Android Client API ... 224
API Access Requirement ... 224
Package Name ... 224
AIDL File ... 224
Service intent filter action name... 225
JSON String Format for createConnection ... 225
Single Username/Password Authentication ... 225
Certificate Authentication... 225
Username/Password and Certificate Authentication ... 226
Dual Username/Password Authentication ... 227
XML Command Format for doCommand (Deprecated) ... 227
Return Codes for doCommand ... 228
API Functions ... 229
getVersion() ... 229
createConnection(String jsonProfile) ... 229
removeConnection(String profileName) ... 230
getConnection(String profileName) ... 230
startConnection(String profileName) ... 231
stopConnection(String profileName) ... 231
getState(String profileName) ... 231
getErrorString(String profileName) ... 232
doCommand(String commandXML) ... 232
addVPNConnection ... 233
checkVPNConnection ... 234
updateVPNConnection ... 235
deleteVPNConnection ... 236
addToKeyStore ... 236
Launching the Pulse Secure Client for Android App through a Browser Link ... 237
CHAPTER 12 Pulse Secure Client for Nokia Symbian Devices ... 239
Pulse Secure Client for Symbian Overview ... 239
Configuring Pulse Connect Secure for Pulse Secure Client on Symbian Devices ... 239
CHAPTER 13 Pulse Secure Client for Windows Phone ... 242
Pulse Secure Client for Windows Phone Overview ... 242
Pulse Secure Client for Windows Phone Supported Platforms ... 243
Pulse Secure Client for Windows Phone Supported Features ... 243
Pulse Secure Client for Windows Phone Limitations ... 244
Configuring Pulse Connect Secure for Pulse Secure Client for Windows Phone VPN Connections ... 244
Configuring a Pulse Secure Connection for Windows Phone – Manual Configuration ... 246
Host Checker for Pulse Secure Client for Windows Phone ... 248
Configuring Host Checker for Pulse Secure Client for Windows Phone ... 249
Implementing Host Checker Policies for Pulse Secure Client for Windows Phone ... 249
PART 4 Windows In-Box Pulse Secure Client ... 251
CHAPTER 14 Windows Pro and Windows RT In-Box Pulse Secure Client ... 252
Microsoft Windows In-Box Pulse Secure Client Overview ... 252
Microsoft Windows In-Box Pulse Secure Client Supported Platforms ... 253
Microsoft Windows In-Box Pulse Secure Client Supported Features ... 253
Microsoft Windows In-Box Pulse Secure Client Limitations ... 254
Microsoft Windows In-Box Pulse Secure Client User Interface ... 255
Windows PowerShell Script Examples for Microsoft Windows In-Box Pulse Secure Client ... 260
Host Checker for Windows In-Box Pulse Secure Client Overview ... 263
Configuring Host Checker for Windows In-Box Pulse Secure Client ... 264
Implementing Host Checker Policies for Windows In-Box Pulse Secure Client ... 265
Host Checker Statement of Health for Pulse Connect Secure Overview ... 266
Configuring a Statement of Health Host Checker Policy for Pulse Connect Secure ... 267
Enabling Statement of Health on the Windows Endpoint for the Windows In-Box Pulse Secure Client ... 268
Viewing Windows In-Box Pulse Secure Client Log Messages ... 268
PART 5 Index ... 270
PART 5 Index ... 271
Symbols ... 271
A ... 271
B ... 271
C ... 271
E ... 272
F ... 273
G ... 273
H ... 273
I ... 273
J ... 274
K ... 274
L ... 274
M ... 274
N ... 274
O ... 275
P ... 275
R ... 275
S ... 276
T ... 277
U ... 277
V ... 277
List of Tables
Table1:Notice Icons ... ix
Table2:Pulse Secure Documentation ... x
Table3:Pulse for Windows Connection Status ... 3
Table4:Pulse Icon States (Windows Tray and OS X Menu Bar) ... 12
Table5:Pulse Secure client Event Log Messages ... 14
Table6:Configuration Options for Credential Provider Login ... 57
Table7:Split Tunneling Options Summary ... 86
Table8:Pulse/SAM Client Version Summary ... 101
Table9:Pulse Launcher Arguments ... 157
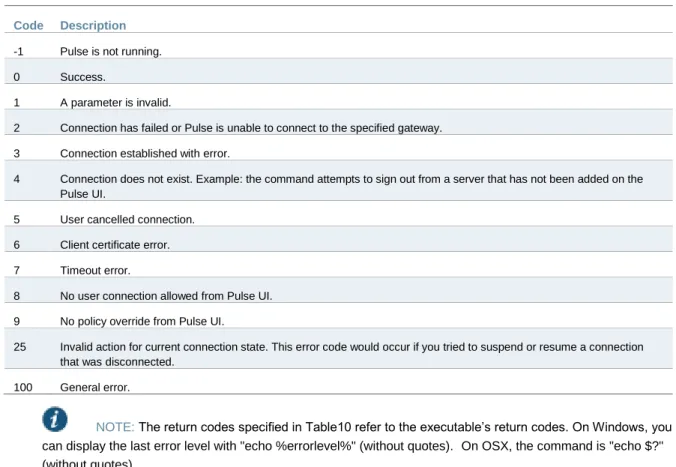
Table10:Pulse Launcher Return Codes... 158
Table11:Odyssey Access client and Pulse Secure client Feature Comparison ... 181
Table12:Network Connect and Pulse Secure client Feature Comparison ... 184
Table13:Pulse Split Tunneling ... 186
Table14:User Agent String Client Type Pairings for Mobile Devices ... 191
Table15: Pulse Secure Client for iOS Error Messages ... 207
Table16:Pulse Secure Client for Android Error Messages ... 222
Table17:Return Codes for doCommand ... 228
About This Guide
Objectives
Audience
Document Conventions
Related Documentation
Requesting Technical Support
Objectives
The Pulse Secure Client Administration Guide describes Pulse and includes procedures for network administrators who are responsible for setting up and maintaining network access using Pulse Secure client software.
Audience
The Pulse Secure Client Administration Guide is for network administrators who are responsible for setting up and maintaining network access using Pulse Secure client software. This guide describes the procedures for configuring Pulse Secure as the access client.
Document Conventions
Table 1 defines notice icons used in this guide.
Table1: Notice Icons
Icon Meaning Description
Informational note Indicates important features or instructions.
Caution Indicates a situation that might result in loss of data or hardware damage.
Related Documentation
Table2: Pulse Secure Documentation
Title Description
Pulse Secure for Mobile Devices
Describes the Pulse Mobile Security Suite and includes procedures for network administrators who are responsible for setting up and managing security on mobile devices.
Pulse Connect Secure Describes how to configure and maintain Pulse Connect Secure. Pulse Policy Secure Describes how to configure and maintain Pulse Policy Secure. SRX Series Services
Gateways
Describes how to use and configure SRX Series Gateways running Junos OS.
Requesting Technical Support
Technical product support is available through the Pulse Secure Global Support Center (PSGSC). If you have a support contract, then file a ticket with PSGSC.
Product warranties—For product warranty information, visit http://www.pulsesecure.net
Self-Help Online Tools and Resources
For quick and easy problem resolution, Pulse Secure, LLC has designed an online self-service portal called the Customer Support Center (CSC) that provides you with the following features:
Find CSC offerings: http://www.pulsesecure.net/support
Search for known bugs: http://www.pulsesecure.net/support
Find product documentation: http://www.juniper.net/techpubs/
Find solutions and answer questions using our Knowledge Base: http://www.pulsesecure.net/support
Download the latest versions of software and review release notes: http://www.pulsesecure.net/support
Search technical bulletins for relevant hardware and software notifications: http://www.pulsesecure.net/support
Open a case online in the CSC Case Management tool: http://www.pulsesecure.net/support To verify service entitlement by product serial number, use our Serial Number Entitlement (SNE) Tool: http://www.pulsesecure.net/support
Opening a Case with PSGSC
You can open a case with PSGSC on the Web or by telephone.
Use the Case Management tool in the PSGSC at http://www.pulsesecure.net/support.
Call 1-888-314-5822
(
toll-free in the USA, Canada, and Mexico).For international or direct-dial options in countries without toll-free numbers, see http://www.pulsesecure.net/support.
PART 1 Pulse Secure Client
Pulse Secure Client Overview
Configuring Pulse Policy Secure
Configuring Pulse Connect Secure
Configuring Pulse Secure Client on SRX Series Gateways
Session Migration
Deploying Pulse Secure Client Software
CHAPTER 1 Pulse Secure Client
Overview
Introducing Pulse Secure Client
Pulse Secure Client Configuration Overview
Pulse Secure Client Status Icons
Installation Requirements
Pulse Secure Client Error Messages Overview
Accessing Pulse Secure Client Error Messages on Mac OS X Endpoints
Pulse Secure Client Log Files
Deleting the Pulse Secure Client Log Files
Migrating From Odyssey Access Client to Pulse Secure Client
Migrating From Network Connect to Pulse Secure Client
Predictable Pulse Server Hostname Resolution with IPv6
Introducing Pulse Secure Client
Pulse Secure client is an extensible multiservice network client that supports integrated connectivity and secure location-aware network access. Pulse Secure client simplifies the user experience by letting the network administrator configure, deploy, and control the Pulse client software and the Pulse connection configurations that reside on the endpoint.
Pulse Secure comprises client and server software. The client enables secure authenticated network connections to protected resources and services over local and wide area networks. The Pulse Secure client software can connect with Pulse Connect Secure to provide remote access to enterprise and service provider networks. Pulse also delivers secure, identity-enabled network access control (NAC) for LAN-based network and application access when it is deployed with Pulse Policy Secure. Pulse also integrates with Pulse Collaboration Suite for online meeting services.
Users of mobile devices (smart phones and tablets) can install the Pulse mobile device app from the respective app stores for secure connectivity to Pulse Connect Secure. Mobile device users can also enable an optional security component, the Pulse Mobile Security Suite. Windows 8.1 (Pro and RT) introduced a Pulse Secure VPN client as part of the operating system.
Pulse Secure Client for Windows
The Pulse Secure client for Windows user interface (see Figure 1) lists the deployed Pulse connections. Each connection is a set of properties that enables network access through a
specific Pulse server. The user can expand a connection to see more details about the connection.
Figure1: Pulse Secure client for Windows client Interface
Pulse Secure client also displays a system tray icon that provides connection status, and can allow the user to connect and disconnect and enables quick access to the program interface. One tray icon provides status for all active connections.
Typically, the network administrator defines and deploys the Pulse connections but you can also enable users to define, edit, and remove their own connections.
Table 3 lists the Pulse connection status icons:
Table3: Pulse for Windows Connection Status
Connected.
Connecting.
Connected with limitations
Connection attempt failed.
Connected to the local network but no Internet access available.
Pulse Secure client supports the Federal Information Processing Standard (FIPS), which defines secure communication practices for the U.S. government. If FIPS is enabled on the endpoint, FIPS On appears near the bottom the Pulse window.
Pulse Secure Client for Mac OS X
Pulse supports Apple computers running Mac OS X. You deploy Pulse to Mac endpoints the same way you deploy the Windows client. Figure 2 shows the Pulse for Mac client interface.
Figure2: Pulse Secure client for Mac client Interface
Pulse for Mac endpoints supports the following:
Connections to Pulse Policy Secure
Connections to Pulse Connect Secure
Pulse clients connect to the Pulse Connect Secure in SSL fallback mode.
Connections to Juniper Networks SRX Series gateways.
Mac OS X endpoints can connect to SRX Branch series SRX100-SRX650 gateways that are running Junos OS Release 10.x or later, and that have dynamic VPN access enabled and configured. SRX gateways do not support deployment of the Pulse Secure client.
Requires Pulse Secure client for Mac 5.0R3 or later and OS X 10.8 or later.
Pulse Secure for Mac clients connect to the gateway as an IPsec IKEv1 VPN connection.
Pulse Dynamic VPN functionality is compatible with SRX-Branch (SRX100-SRX650) devices only. SRX Data Center (SRX1400-SRX5800 – also called SRX HE or High End) devices do not support Pulse Dynamic VPN from either Windows or Mac clients.
On Mac OS X clients, Pulse IPsec connections to SRX are unable to use the DNS IP address supplied by the SRX.
Host Checker
Host Checker for Mac OS X supports the following rules and remediation actions:
Port
Process
File
Custom IMC
Enable Custom Instructions
Kill Processes
Delete Files
Send reason strings
User Experience
From the user perspective, Pulse Secure client presents a clean, uncomplicated interface. The user can enter credentials, select a realm, save settings, and accept or reject the server certificate. When you configure the client, you can specify whether to permit end users to modify settings, such as by adding connections.
NOTE: If your Pulse environment uses Security Assertion Markup Language (SAML) for a Single Sign-on (SSO) authentication environment, the Pulse user sees a credential dialog box that is served (HTTPS) from the Pulse server instead of the local Pulse client credential dialog box. The sign-in page is defined as part of the sign-in policy on the Pulse server and the Pulse client embeds the sign-in page within a Pulse client dialog box.
The client displays the connection status until the connection is made. If a connection fails as a result of the endpoint failing a Host Checker policy, Host Checker reason strings and
remediation options appear.
Location Awareness
The location awareness feature enables you to define connections that are activated automatically based on the location of the endpoint. Pulse determines the location of the endpoint by evaluating rules that you define. For example, you can define rules to enable Pulse Secure client to automatically establish a secure tunnel to the corporate network through Pulse Connect Secure when the user is at home, and to establish a Pulse Policy Secure connection when the user is in the office and connected to the corporate network over the LAN. Pulse does not re-establish a VPN tunnel when the endpoint re-enters the trusted/corporate network. Location awareness rules are based on the client’s IP address and network interface information. Split tunneling must be enabled for location awareness.
Session Migration
If you configure your access environment to support the Pulse Secure client session migration feature, users can log in once through a Pulse server on the network, and then securely access additional Pulse servers without needing reauthentication. For example, a user can connect from home through Pulse Connect Secure, and then arrive at work and connect through Pulse Policy Secure without having to log in again. Session migration also enables users to access different resources within the network without repeatedly providing credentials. IF-MAP Federation is required to enable session migration for users.
Centralized Pulse Configuration Management
Centralized configuration management is a key feature of Pulse Secure client. Pulse connection sets (the configurations that define how and when a Pulse client connects), are
bound to a particular Pulse server. The binding server is the one that provides the initial Pulse configuration to the Pulse client. For example, if you create a Pulse connection set on ServerA, and then distribute those connections to endpoints, those clients are bound to ServerA. A bound client is managed by its particular Pulse server. The Pulse administrator defines the Pulse Secure client connections and software components that are installed on the endpoint. When the Pulse client connects to the Pulse server that is managing it, the server automatically provisions configuration and software component updates. The administrator can permit the user to add, remove, and modify connections. The administrator can also allow dynamic connections (connections that are added by Pulse servers when the user logs into the server using a browser). A dynamic connection enables a bound client to add connections from Pulse servers other than the one the client is bound to. Dynamic connections are created as manual rather than automatic connections, which means that they are run only when the user initiates the connection or the user browses to a Pulse server and launches Pulse from the server’s Web interface. Dynamic connections create the connection with the minimum configuration required to make the connection, which means that the URL used to install or launch Pulse from the Pulse server’s Web interface is used as the Connection URL and connection name. Binding Pulse Secure clients to a particular server ensures that the client does not receive different configurations when it accesses other Pulse servers. A bound endpoint receives connection set options and connections from its binding server, but it can have its Pulse client software upgraded from any Pulse server that has the automatic upgrade option enabled. (SRX gateways do not support Pulse software updates.)
NOTE: A Pulse Secure client can be bound to only one Pulse server connection set at a time. The Pulse Secure client can receive updates and changes to that bound connection set from other Pulse servers only if the connection set is exported from the Pulse server and then imported to another Pulse server.
A Pulse client does not need to be bound to a Pulse server. An unbound client is managed by its user. If the Pulse Secure client software is installed without any connections, the user must add connections manually. Dynamic connections can be added by visiting the Web portals of Pulse servers. An unbound client does not accept configuration updates from any Pulse server. “Adding a Pulse Configuration to a New Pulse Installation” explains the binding process in more detail.
Smart Connections - List of URLs
Each Pulse connection that connects to Pulse Policy Secure or Pulse Connect Secure can be configured with a list of Pulse servers. The Pulse client attempts to connect to each of the servers in the URL list until it succeeds. You can choose different modes to control the behavior of a Pulse connection that is starting from a disconnected state, start at the top of the list, start with the most recently connected URL, or choose randomly. The random option helps distribute the connection load across different Pulse servers. If a Pulse connection that is already established gets disconnected, for example, the wireless connection is interrupted, Pulse always tries to connect to the most recently connected URL. If that connection fails, then Pulse uses the server list. The Pulse user can also choose a connection from the list as shown in Figure 3.
Figure3: Pulse for Windows client with a List of Connection URLs
Security Certificates
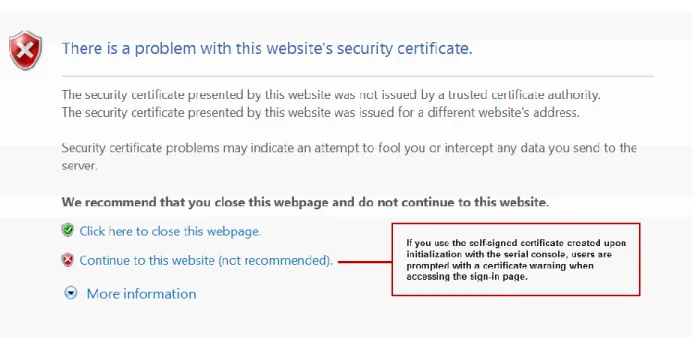
Users cannot add CA servers or manage the server list. The Pulse client handles certificates in the same way that a browser handles certificates. If the Pulse dynamic certificate trust option is enabled for a connection, the user can accept or reject the certificate that is presented if it is not from a CA that is defined in the endpoint’s certificate store.
Compliance and Remediation
Pulse supports the Host Checker application to assess endpoint health and update critical software. Host Checker is a client-side agent that is based on Trusted Network Connect standards. You configure rules in Host Checker policies for Pulse Connect Secure and Pulse Policy Secure to specify the minimum criteria for the security compliance of endpoints that are allowed to enter the network. Endpoints that fail can be connected through a remediation role that provides limited access.
Host Checker can be deployed from a Pulse server to Pulse clients on Windows and Mac OS X endpoints. It will be downloaded and run when a browser is used on a Windows or Mac OS X endpoint to connect to the Pulse server Web portal. You can use Host Checker policies at the realm or role level.
Host Checker for mobile clients (iOS, Android, and Windows Phone) is included as part of the Pulse app. Host Checker runs on the mobile client if Host Checker policies are configured and enabled on the server.
NOTE: Checker is not supported in the use case where the user employs a browser on the mobile device to connect to the Pulse server Web portal.
For Windows and OS X clients, you can use Host Checker to perform the following:
Virus signature monitoring
You can configure Host Checker to monitor and verify that the virus signatures, operating systems, and software versions installed on client computers are up to date. You can configure automatic remediation for those endpoints that do not meet the specified criteria.
Patch management information monitoring and patch deployment
You can configure Host Checker policies that check for Windows endpoints’ operating system service pack, software version, or desktop application patch version compliance.
Patch verification remediation options
Pulse and Host Checker support endpoint remediation through Microsoft System
Management Server or Microsoft System Center Configuration Manager (SMS/SCCM). With SMS/SCCM, Pulse triggers a preinstalled SMS/SCCM client to get patches from a pre-configured server.
Endpoint configuration
You can configure custom rules to allow Host Checker to check for third-party applications, files, process, ports, registry keys, and custom DLLs.
Pulse mobile clients support a set of Host Checker functions that vary from one OS to the next. For complete information on Host Checker for mobile clients, see “Implementing Host Checker Policies for Pulse Secure Client for iOS Devices”, “Implementing Host Checker Policies for Pulse Secure Client for Android Clients”, and “Host Checker for Pulse Secure Client for Windows Phone”.
Two Factor Authentication
Pulse supports RSA SecurID authentication through soft token, hard token, and smart card authenticators. The SecurID software (RSA client 4.1 and later) must already be installed on the client machine.
Captive Portal Detection
Public WiFi locations often deploy a captive portal that requires the user to enter authentication information or to accept terms of service before network access is granted. Pulse detects the presence of captive portals and does not initiate a connection to a Pulse Connect Secure or
Policy Secure server until internet access is granted. Pulse displays appropriate status information to enable the user to establish the portal and network connections. Captive portal detection notes:
Captive portal detection is supported on Pulse for Windows and Pulse for Mac. Captive portal detection is not supported on Windows In-Box Pulse Secure client or Pulse Secure client for mobile devices.
If Pulse connects through a proxy, the detection algorithm is disabled, and Pulse indicates a failed connection attempt to the user.
SRX connections do not support captive portal detection.
Pulse Collaboration Suite Integration
Pulse Collaboration Suite is accessible through the Pulse interface on Windows, Mac OS X, Android, and iOS. (Android clients must be R4.0 or later. iOS clients must be R3.2 or later.) Pulse Collaboration Suite enables users to schedule and attend secure online meetings. In meetings, users can share their desktops and applications with one another over a secure connection. Meeting attendees can collaborate by enabling remote control of their desktops and through text chatting.
Sign In Notifications
The notifications feature on Pulse Connect Secure and Pulse Policy Secure allows the network administrator to display notifications to Pulse client users prior to the user logging in and after the user has already logged in. For example, you could display a legal statement or a message stating who is allowed to connect to the server before you display the Pulse credentials dialog. After the user has connected, you could display a message that notifies the user of scheduled network or server maintenance or of an upcoming company meeting.
Automatic Software Updates
After you deploy Pulse Secure client software to endpoints, software updates occur automatically. If you upgrade the Pulse Secure client configuration on the server, updated software components are pushed to a client the next time it connects. You can disable this automatic upgrade feature.
NOTE: The automatic update feature is supported on Pulse Connect Secure and Pulse Policy Secure servers only. SRX gateways do not support automatic Pulse software updates.
NOTE: If you configure Pulse Secure client to make 802.1X-based connections, a reboot might be required on Windows endpoints.
Pulse Secure Client Customization and Rebranding
The Pulse Secure client customization tool (BrandPackager) enables you to customize the appearance of the Pulse Secure Windows and Apple OS X clients. You can add your own identity graphic to the Pulse splash screen, to the program interface, and to Windows credential
provider tiles. Figure 4 shows graphic customizations applied to the Pulse for Windows client. You can also customize error and informational message text, the text that appears in dialog boxes and on buttons, and make limited changes to Pulse online Help. For example, you might want to add your help desk phone number to Pulse error messages and the Pulse online Help. BrandPackager is available for download from juniper.net.
Figure4: Pulse Secure Client Interface and Splash Screen with Branding Graphics
Related Documentation
Pulse Secure Client Status Icons
Pulse Secure Client for Mobile Devices Overview
Customizing Pulse Secure Client Overview
Pulse Secure Client Configuration Overview
You configure the Pulse Secure client settings on the Pulse server so that when users request authentication, they are assigned a role based on the role mappings and optional security profile that you create. Access to specific resources is permitted only for users and devices that provide the proper credentials for the realm, that are associated with the appropriate roles, and whose endpoints meet security restrictions. If a user attempts to connect to the network from an endpoint that does not comply with the security restrictions you have defined, the user cannot access the realm or role.
As you plan your Pulse configuration, be sure you know how you want to deploy Pulse Secure client. You can use one or more of the following Pulse Secure client deployment options:
Use the defaults or make changes to the Pulse Secure client default component set and default connection set, and then download and distribute Pulse by having users log in to the gateway’s user Web portal and be assigned to a role. After the installation is complete, users have all the connections they need to access network resources.
Create connections that an endpoint needs for connectivity and services, download the Pulse settings file (.jnprpreconfig), download default Pulse .msi installation program, and then run the .msi installation program by using an msiexec command with the settings file as an option. You can use the msiexec command to deploy Pulse using a standard software distribution process, such as SMS/SCCM.
Distribute Pulse Secure client with no preconfiguration. You can download the default Junos Pulse installation file (Mac or Win) from the device, and then distribute the file to endpoints using your organization’s standard software distribution methods. Because the installer does not contain preconfigured connections, users must define network connections manually. Or you can create dynamic connections on each access gateway. These connections are automatically downloaded to the installed Pulse client when users provide their login credentials to the gateway’s user Web portal.
The following tasks summarize how to configure Pulse Secure client on the device:
Create and assign user roles to control who can access different resources and applications on the network. If you are converting your access environment from agentless or a VPN Tunneling environment, you should create new roles that are specific for Pulse Secure client.
Define security restrictions for endpoints with Host Checker policies.
Define user realms to establish authentication domains. If you are converting your access environment from agentless or a NC environment, typically you can use your existing realms.
Associate the roles with appropriate realms to define your access control hierarchy using role mapping.
Define Pulse Secure client component sets, connection sets, and connections.
Deploy Pulse Secure client to endpoints. Related Documentation
Introducing Pulse Secure Client
Client Connection Set Options for Pulse Policy Secure
Creating a Client Connection Set for Pulse Connect Secure
Creating a Client Component Set for Pulse Connect Secure
Configuring a Role for Pulse Connect Secure
Pulse Secure Client Status Icons
The Pulse Secure client interface (Windows and OS X) displays a system tray icon (Windows) or a menu bar icon (OS X) that indicates connection status, provides access to menu items that let the user connect and disconnect from networks and meetings, and enables quick access to
the program interface. Only one icon is visible even when there are multiple connections. One icon provides the status for all connections by indicating the most important connection state information. Table 4
Table4: Pulse Icon States (Windows Tray and OS X Menu Bar)
Connecting. A connection stays in this state until it fails or succeeds.
The user has suspended the connection.
Connected with issues. For example, Host Checker found an issue that must be fixed before full access is available.
Connection failed.
Connected.
Connected to the local network but no Internet access available. Public WiFi locations often deploy a captive portal that requires the user to enter authentication information or to accept terms of service before network access is granted. Pulse detects the presence of captive portals and does not initiate a connection to a Pulse server until internet access is granted.
Related Documentation
Installation Requirements
Introducing Pulse Secure Client
Installation Requirements
For detailed information about supported platforms and installation requirements, see the Pulse Secure Supported Platforms Guide, which is available at http://www.pulsesecure.net/support. Related Documentation
Introducing Pulse Secure Client
Pulse Secure Client for Mobile Devices Overview
Pulse Secure Client Error Messages Overview
Pulse Secure client error and warning messages reside in message catalog files on the endpoint. Each message includes a short description that states the problem and a long description that provides more details and suggests actions the user can take to resolve the issue.
You can edit Pulse messages by using the optional Pulse branding tool, BrandPackager. See “Editing Pulse Secure Client Messages” for more information.
All message catalog files are localized. The filename indicates the language. For example, MessageCatalogConnMgr_EN.txt is the English-language version of the file. The following filename conventions indicate the language:
DE—German
ES—Spanish
FR—French IT—Italian
JA—Japanese
KO—Korean
PL—Polish
ZH—Chinese (Traditional) ZH-CN—Chinese (Simplified) Related Documentation
Introducing Pulse Secure Client
Customizing Pulse Secure Client Overview
Accessing Pulse Secure Client Error Messages on Mac OS X Endpoints
Pulse Secure client error and warning messages reside in message catalog files on the OS X endpoint. Each message includes a short description that states the problem and a long description that provides more details and suggests actions to resolve the issue.
You can edit Pulse messages by using the optional Pulse branding tool, BrandPackager. See “Editing Pulse Secure Client Messages” for more information.
All message catalog files are localized. The filename indicates the language. For example, MessageCatalogPulseUI_EN.txt is the English-language version of the file. The following filename conventions indicate the language:
DE—German EN—English ES—Spanish
FR—French
IT—Italian JA—Japanese KO—Korean
PL—Polish
ZH—Chinese (Traditional) ZH-CN—Chinese (Simplified)
To view Pulse catalog files on Mac OS X endpoint, use Finder to display the package contents of the Pulse application.
Related Documentation
Introducing Pulse Secure Client
Customizing Pulse Secure Client Overview
Pulse Secure Client Log Files
The Pulse Secure client writes information to Pulse log files on Windows and Apple OS X endpoints. If you need to investigate a problem with Pulse connectivity on a Pulse client endpoint, you can instruct the user to save the client logs and e-mail them to you.
The user saves logging information by opening Pulse and then clicking File > Logs > Save As. All relevant log files are added to a single file, LogsAndDiagnostics.zip. The user saves the .zip file and then makes it available to you.
Pulse maintains its own log files on all supported platforms. On Windows clients, the Pulse client also logs its major operational events into Windows Event Log. Network administrators can review the Pulse event log to help troubleshoot problems. Table 5 lists the Pulse messages that can appear in the Windows event log.
To view the Pulse messages:
1.
Open the Windows Event Viewer.2.
Click Applications and Services > Pulse Secure > Operational.Table5: Pulse Secure client Event Log Messages
ID Level Message Description
600 error The connection <ID> failed authentication: Error <ID>. 802.1X EAP authentication failure. 601 informational User has canceled authentication of the connection
<ID>.
The user canceled 802.1X EAP authentication.
602 error Failure writing wireless LAN profile for connection <ID> Error <ID>: Reason <ID>: Profile: <ID>.
A failure occurred while a wireless LAN profile was being created or modified.
603 error Failure writing wireless LAN profile for connection <ID> Error <ID>.
A failure occurred while a wireless LAN profile was being deleted.
604 error Failure writing wired LAN profile for connection <ID> Error <ID>: Profile: <ID>.
A failure occurred while a wired LAN profile was being created or modified.
605 error Failure writing wired LAN profile for connection <ID> Error <ID>.
A failure while a wired LAN profile was being deleted.
500 informational Pulse servicing has completed successfully. All components are up to date.
Pulse servicing was successful.
501 informational Pulse servicing has completed successfully. All components are up to date.
Servicing was requested but all components were up to date.
502 error Pulse servicing has failed. Failure summary: Pulse servicing failed.
100 informational User requested connection <ID> to start. The user initiated a connect request. 101 informational User requested connection <ID> to stop. The user initiated a disconnect request. 102 informational Connection <ID> is starting because its policy
requirements have been met. Connection Policy: <ID>.
A connection was started because of a policy evaluation.
103 informational Connection <ID>) is stopping because of its policy requirements. Connection Policy: <ID>.
A connection was stopped because of a policy evaluation.
104 informational Connection <ID> is stopping because of transition to context <ID>.
The machine-to-user connection was disconnected to transition to another identity. 105 informational Connection <ID> is starting because of transition to
context <ID>.
The machine-to-user connection was connected as part of the transition to another identity.
106 informational Connection <ID> is disconnected due to computer suspend.
The connection to Pulse Connect Secure was disconnected because the computer is being suspended.
107 informational Connection <ID> is disconnected due to login error. A credential provider connection was disconnected because of a login error. 108 informational Connection <ID> is disconnected because it was
modified.
A connection was disconnected because it was modified.
109 informational User requested connection <ID> to suspend. The user initiated a suspend request. 110 informational User requested connection <ID> to resume. The user initiated a resume request. 1 informational The Pulse Secure service version <ID> has successfully
started.
The Pulse service started.
2 informational The Pulse Secure service has stopped. The Pulse service stopped. 200 error No connections matching URL <ID> were found in
Pulse database. Request to start a connection from the browser has failed.
Pulse failed to resume a connection from the browser.
400 error The host check for connection <ID> has failed. Failed policies: <ID>.
Host Checker failed one or more policies.
300 informational The connection <ID> was established successfully through web-proxy <ID>.
Pulse established a connection to Pulse Connect Secure or Pulse Policy Secure through a Web proxy.
301 informational The connection <ID> was established successfully to address <ID>.
Pulse established a direct (nonproxy) connection to Pulse Connect Secure or Pulse Policy Secure.
302 informational The connection <ID> was disconnected. The Pulse connection was disconnected from the Pulse server.
303 error The connection <ID> encountered an error: <ID> Peer address: <ID>.
A connection encountered an error.
304 error The connection <ID> was disconnected due to change in routing table. Interface address changed from <ID> to <ID>.
Pulse detected a change in the route to the Pulse server.
305 informational VPN tunnel transport for connection <ID> switched from ESP to SSL mode due to missing ESP heartbeat.
ESP to SSL fallback occurred because of missing ESP heartbeats.
306 informational VPN tunnel for connection <ID> is switched to ESP mode.
Tunnel transport switched to ESP mode.
307 error The connection <ID> encountered an error: System error: <ID> Peer address: <ID>.
The Pulse connection failed because of a system error.
308 error The server disconnected connection <ID> Reason <ID>: Peer address: <ID>.
The server disconnected a connection.
Deleting the Pulse Secure Client Log Files
Deleting the Pulse Secure Client Log Files
NOTE: Pulse Secure, LLC recommends that you do not delete Pulse client log files. The Pulse client controls log file size automatically. When a current log file reaches 10MB, a new one is created and the oldest log file is deleted. If you need to delete Pulse client log files, do not delete the file without first moving it to the Recycle Bin or renaming it.
To safely delete Pulse client log files on a Windows endpoint:
1.
Use a command line or Windows Explorer to locate and delete debuglog.log and, optionally, debuglog.log.old. When prompted if you want to move the file to the Recycle Bin, answer Yes. Do not press Shift+Delete, which permanently deletes a file without moving it to the Recycle bin.The file location varies depending on which version of Windows the endpoint is running. For example, the following path is valid for a Windows 7 Enterprise 64-bit endpoint:
C:\Users\Public\Juniper Networks\Logging.
2.
Empty the Recycle Bin.Alternatively, you could first rename debuglog.log and then delete it. After you delete the log file, the Pulse client creates a new one. However, that operation might take some time depending on the activities of the Pulse client.
Related Documentation
Pulse Secure Client Error Messages Overview
Migrating From Odyssey Access Client to Pulse Secure Client
Odyssey Access Client® (OAC) is 802.1X network access client software that supports the Extensible Authentication Protocol (EAP) for secure wireless LAN access. Together with an 802.1X-compatible authentication server, OAC secures WLAN communications. OAC also serves as a client for enterprises that are deploying identity-based (wired 802.1X) networking. OAC provides wireless access to enterprise networks, home Wi-Fi networks, and public hotspots.
Pulse Secure client an extensible multiservice network client that supports integrated
connectivity and secure location-aware network access. Pulse Secure client simplifies the user experience by letting the network administrator configure, deploy, and control the Pulse client software and the Pulse connection configurations that reside on the endpoint. Pulse can provide 802.1X authentication and Layer 3 access services.
Like OAC, Pulse client software is bundled with Pulse Policy Secure software. However, there are significant differences between OAC and Pulse and you should be aware of these differences when you plan a migration from OAC to Pulse. The following list includes planning considerations and best-practices for a migration project. See the related topics list for details about the Pulse configuration tasks.
The 802.1X communication protocol that you use with OAC might need to be changed to support Pulse. OAC supports the full range of 802.1X protocols; Pulse supports only EAP-TTLS/EAP-JUAC. See “Comparing Odyssey Access Client and Pulse Secure Client”, which lists the 802.1X protocols supported by OAC and Pulse.
One common migration practice is to create new sign-in policies, user realms, and user roles for Pulse Secure client, and then control the cut-over to Pulse by enabling Pulse sign-in policies and disabling OAC sign-in policies. The new policies, realms, and roles can be clones of the existing OAC policies, realms, and roles as a starting point. However, Pulse has more robust connection decision capabilities so you will probably want to edit your Pulse roles to take advantage of the Pulse capabilities. For example, you can replace both OAC and Network Connect with Pulse and use one client for authenticated LAN access and secure SSL VPN access. Location awareness rules allow Pulse to detect the network environment and choose a network connection based on current location.
How many OAC configuration do you use? You need a pulse configuration for each of the OAC configurations you currently use. A Pulse access configuration is called a connection. It comprises properties that define how, when, and where a connection is established with a Pulse gateway. When you create the Pulse connections that you distribute to Pulse clients, you configure how the connection can be established. Pulse connections support machine authentication and credential provider authentication. Figure 5 shows a Pulse Windows client that includes multiple connections.
Figure5: Pulse Secure Client Interface (Windows Version)
Odyssey Access Client is a wireless supplicant. Pulse, by design, is not a wireless
supplicant. Pulse uses the underlying wireless supplicant on the endpoint, which is typically provided by the endpoint’s OS X or Windows operating system. When you migrate to Pulse
and uninstall OAC, you remove the OAC wireless supplicant and the endpoint falls back to using wireless connectivity provided by the OS. You define 802.1X authentication
connections for the Pulse client to enable authenticated 802.1X connectivity in the enterprise network. Any custom network configurations that users added to their local OAC
configuration are lost when OAC is removed. For example, if a user added connection information to connect to a home wireless network, the user will need to redefine that connection in the endpoint’s wireless supplicant. A best practice is to mention this needed configuration to users as part of the Pulse roll-out. In OAC, network auto-scan lists are defined on the client. With Pulse, you can define an auto-scan list as part of an 802.1X connection that is pushed to the Pulse client.
Do you use wireless suppression in your OAC environment? Wireless suppression disables wireless connections as long as the client has a wired network connection. You enable wireless suppression as part of a Pulse connection set. Pulse connection set properties define the decision process that Pulse uses to establish network connections.
If you are using OAC FIPS Edition, you need to deploy Pulse 5.0 or later to support the same level of FIPS compliance that is supported by OAC.
Do you allow users to modify configuration settings after you deploy them in your OAC environment? When you create a Pulse connection, you can define whether users can override the connection decision that has been defined by the Pulse administrator as part of the Pulse connection. You can also disable the user’s ability to create new connections. Connections created by users are manual connections, that is, the connection is not tried unless the user opens Pulse and selects it.
Do you allow OAC users to add, remove, or modify trusted servers and certificates? Pulse does not expose this functionality to users. Pulse handles certificates in the same fashion as a browser. When you define a Pulse connection you can allow users to choose to accept an unverified certificate, which allows users to connect to servers that use a self-signed certificate.
Related Documentation
Comparing Odyssey Access Client and Pulse Secure Client
Client Connection Set Options for Pulse Policy Secure
Machine Authentication for Pulse Policy Secure Overview
Configuring Location Awareness Rules for Pulse Secure Client
Machine and User Authentication Through a Pulse Connection for Pulse Policy Secure
Remote Desktop Protocol Compatibility with Pulse Secure 802.1X Machine Authentication Connection
Pulse Secure Client Installation Overview
Migrating From Network Connect to Pulse Secure Client
Pulse Secure client and Network Connect (NC) can run at the same time on an endpoint.
NOTE: The Pulse installation program checks for NC. If the installation program finds NC Release 6.3 or later, the Pulse installation proceeds. If NC is not at least
Release 6.3, the program displays a message telling the user to upgrade NC. For detailed information about supported platforms and installation requirements, see the Pulse Secure Supported Platforms Guide, which is available at
http://www.pulsesecure.net/support
On endpoints that connect to Pulse Connect Secure, if Pulse is running on the Windows main desktop, you cannot launch Pulse within Secure Virtual Workspace (SVW). SVW is not supported with Pulse.
NOTE: SVW is not supported by Pulse Policy Secure 5.1 and later and Pulse Connect Secure 8.1 and later. If a Pulse server has SVW policies configured, those policies are removed during the upgrade.
Related Documentation
Comparing Odyssey Access Client and Pulse Secure Client
Comparing Network Connect and Pulse Secure Client
Predictable Pulse Server Hostname Resolution with IPv6
When connecting to a Pulse Secure client server, the Pulse client uses the services of the endpoint operating system to resolve the hostname to an IP address. If a Pulse server hostname resolves to both IPv4 and IPv6 addresses, an IPv4 or an IPv6 address is presented to Pulse as the preferred IP address. The behavior depends on the operating system and how it is configured. For example, Windows 7 adheres to IETF standards that define how to establish the default address selection for IPv6. MAC OS 10.6 does not support that standard.
Additionally, Windows 7 default settings can be changed by netsh commands so RFC compliance can be modified on the endpoint. For these and other reasons, it is difficult to predict which Pulse server IP address would get resolved to on a given client machine. For predictable hostname resolution, we recommend that you use different Pulse server hostnames for IPv6 and IPv4 addresses. For example, configure myserver1.mycompany.com for IPv4 addresses and myserver1-v6.mycompany.com for IPv6 addresses. The Pulse server administrator can publish myserver1-v6.mycompany.com to the Pulse users who are expected to connect over IPv6, and others will continue using myserver1.mycompany.com.
Related Documentation
CHAPTER 2 Configuring Pulse Policy
Secure
Before You Begin
Pulse Policy Secure Overview
Pulse Policy Secure and Pulse Connect Secure Deployment Options
SRX Series Gateway Deployment Options
Configuring a Role for Pulse Policy Secure
Client Connection Set Options for Pulse Policy Secure
Creating a Client Connection Set for Pulse Policy Secure
Pulse Secure client FIPS Mode Overview for Pulse Policy Secure
Securing the Connection State on the Pulse Secure Client
Machine Authentication for Pulse Policy Secure Overview
Configuring Machine-Only Machine Authentication for a Pulse Secure Client Connection
Configuring User-After-Desktop Machine Authentication for a Pulse Secure Client Connection
Preferred Realm and Role for Pulse Secure Client Machine Authentication
Remote Desktop Protocol Compatibility with Pulse Secure 802.1X Machine Authentication Connection
Credential Provider Authentication for Pulse Policy Secure Overview
Configuring User-at-Credprov Credential Provider Authentication for a Pulse Secure Client Connection
Configuring Machine-Then-User-at-Credprov Credential Provider Authentication for a Pulse Secure Client Connection
Configuring a Pulse Credential Provider Connection for Password or Smart Card Login
Machine and User Authentication Through a Pulse Connection for Pulse Policy Secure
Configuring Location Awareness Rules for Pulse Secure Client
Pulse Policy Secure Component Set Options
Creating a Client Component Set for Pulse Policy Secure
Endpoint Security Monitoring and Management for Pulse Policy Secure
Issuing a Remediation Message with Pulse Policy Secure
Using SMS/SCCM Remediation with Pulse Policy Secure
Patch Management Info Monitoring and Patch Deployment
Enabling or Disabling Automatic Upgrades of the Pulse Secure Client
Upgrading Pulse Secure Client Software
Using Device Certificates
Before You Begin
Before you begin configuring Pulse Secure client, be sure you have already configured your device network settings. Also be sure that you have defined the authentication settings, including the authentication servers and sign-in settings. Authentication Host Checker settings can directly affect a Junos Pulse installation because you can define the conditions that an endpoint must meet to be allowed access to protected resources.
Related Documentation
Introducing Pulse Secure Client
Specifying Host Checker Access Restrictions
Pulse Policy Secure Overview
To enable Pulse clients to connect to Pulse Policy Secure, you configure the service so that when users request authentication, they are assigned a role based on the role mappings and optional security profile that you create. Access to specific resources is permitted only for users and devices that provide the proper credentials for the realm, that are associated with the appropriate roles, and whose endpoints meet security restrictions. If a user attempts to connect to the network from an endpoint that does not comply with the security restrictions you have defined, the user cannot access the realm or role.
As you plan your Pulse configuration, be sure you know how you want to deploy Pulse. You can use one or more of the following Pulse Secure client deployment options:
Use the defaults or make changes to the Pulse Secure default component set and default connection set, and then download and distribute Pulse by having users log in to the Pulse server’s user Web portal. After the installation is complete, users have all the connections they need to access network resources.
Create the connections that an endpoint needs for connectivity and services, download the settings file (.jnprpreconfig), and download default Pulse installation program. For Windows endpoints you run the Pulse installation program by using an msiexec command with the settings file as an option. For OS X endpoints, you run the default installer and then import the .jnprpreconfig file using a separate command.
Distribute Pulse Secure with no preconfiguration. You can download the default Junos Pulse installation file, and then distribute the file to endpoints using your organization’s standard software distribution methods. Because the installer does not contain preconfigured connections, users must define network connections manually. Users can also automatically download a Pulse server’s dynamic connection by browsing to and logging into the Pulse Server’s Web portal. Dynamic connections are created as manual rather than automatic connections, which means that they are run only when the user initiates the connection or the user browses to a Pulse Server and launches Pulse from the server’s Web interface.