SECURE
EXCHANGE
SERVER
INSTALLATION
Installation Guide... 1
Introduction to Secure Exchange Software (SES) ...2
About this guide ...3
Intended audience ...3 Guide organization ...3 Architecture overview ...4 Configuration requirements ...4 Prerequisites ...5 Assumptions ...5 Installation Process ...6 System requirements ...6 Pre-Installation steps ...7
Step 1: Obtain, install, and maintain SES hardware ...7
Step 2: Apply for access to payer organizations ...8
Step 3: Enable firewall for trading partner communication Installation Steps ...9
Step 1: Install the SES Hardware (FT, IN or EL) ...9
Step 2: Assemble the SES network information (FT, IN or EL) ...10
Step 3: Download and run the ABILITY setup wizard ...10
Step 4: Beginning the server installation ...11
A. Contact ABILITY for product configuration ...18
B. Add the server name to your DNS ...18
Step 5: Configure the local file server as a data repository (FT only) ...19
Step 6: Remote configuration activities (FT only) ...20
A. Collect configuration Information ...20
B. Conduct Remote Configuration Activities ...20
Step 7: Workflow setup (Optional) (FT only) ...21
Step 8: Set up shortcut folders for end users (Optional) (FT only) ...21
Step 9: Communicate configuration changes to DDE or PPTN users (IN only) ...21
Step 10: NPI validation process (EL only) ...21
Getting Assistance ...22
Appendix A Hardware Requirements for Secure Exchange Software ...23
Required hardware ...24
Appendix B Software Requirements for Mainframe Access ...27
Software requirements ...28
Appendix C Trading Partner Port Assignments...31
Port assignments ...32
HPES Data Center (formerly EDS) - Port 2129 ...32
CDS Data Center - Port 2156 ...33
Section 1011 – Port 2113 ...34
Abstracts for Kansas - Port 2117 ...35
Appendix D HTTPS Configuration...37
Configuring HTTPS real-time connections ...38
Purpose ...38 Overview of HTTPS process ...38 HTTPS request details ...39 Parameters ...39 Headers ...39 Body ...39 Example ...40 HTTPS response details ...41 References ...42
Appendix E ABILITY TN3270 Emulator Setup (IN Only)...43
ABILITY emulator configuration ...44
Step 1: Install the ABILITY TN3270 Emulator ...44
Step 2: Configuring the Interactive Service Connection ...46
Step 3: Setting Up Additional Interactive Service Connections ...47
Step 4: Configuring Connections on Multiple Computers ...48
Appendix F Frequently Asked Questions ...51
Frequently asked questions ...52
1. Who supports the software and hardware collectively referred to as the “ABILITY server”? ...52
2. What operating system serves as the core of the SES product? ...52
3. Can I run other software on this server? ...52
4. How is the SES product installed on the server hardware? ...52
5. How is remote access to the SES product achieved? What changes are required to the customer firewall to enable this access? ...53
6. What is the recommended location in my network for the Secure... Exchange Server? ...53
10. When do I receive my digital certificate? How do I install the certificate
on the ABILITY server? ...55
11. Do we get an account on the Secure Exchange Server? What if I need to shut it down? ...55
12. Is there desktop software required for the Secure Exchange Server? If so, who is responsible for supporting it? ...55
13. When are software updates applied to the Secure Exchange Server? Are we notified when an update will be performed? How does this affect produc-tion availability of the Secure Exchange Server? ...55
14. Does the server have a database? ...56
15. What customer data is stored on the server? ...56
16. How will ABILITY contact us if issues are detected? ...56
17. Do you run virus checking on your servers? ...56
18. Can I install my Openview/Compaq/IBM/other monitoring agent on this server? ...57
19. What do I do if I experience a drive failure or other complete outage with my server? ...57
20. Who do I contact for more information? ...57
21. How does ABILITY assure the availability of their services? ...57
22. Is the ABILITY SES software supported in a VMware environment? ...58
Introduction to Secure Exchange Software
(SES)
ABILITY offers a suite of complementary software products that facilitate the secure exchange of information between desktop, Web-based portal, and server-based users or applications. The ABILITY® Secure Exchange Software (SES) product accommodates information exchange in the form of file transfer (FT) such as healthcare claims, interactive data transport (IN) such as telnet access to a mainframe system for an eligibility check and Medicare eligibility inquiry (EL), connectivity to HETS (HIPAA Eligibility Transaction System). These three features collectively give the SES user the ability to send sensitive or confidential information from any location - on the Internet or over other networks - to another in a private and encrypted fashion.
In terms of products, Secure Exchange Software provides a way to establish a server connection for CHOICE Medicare Claims, CHOICE Medicare Eligibility, and IVANS NOW.
NOTE: The maximum file size of a file you can send is 250MB.
The SES product is used within the healthcare industry to ensure the secure exchange of protected information, such as patient data and insurance claims and is also used within the financial services arena. Through communication with local file server environments such as FTP, SFTP, and SMB, the SES creates a streamlined process for moving data without compromising data security. The software supports the use of both automated workflow using scripts and drag-and-drop functionality by individual users.
Additionally, it provides the ability to secure interactive communications for DDE (Direct Data Entry), real time eligibility or other streaming traffic. Eligibility data comes from an HTTPS connection to HETS.
This Installation Guide details the installation and configuration processes for ABILITY’s SES product. Also provided are guidelines for its use and
About this guide
Intended audience
This Secure Exchange Server Installation Guide is intended for network and/or system administrators who are familiar with internetworking concepts and the network topology and protocols SES connects with.
Guide organization
This guide has the following sections:
•
“Architecture overview” on page 4 - The architecture and flow of information through the configurations is described. The prerequisite skills for installing the SES product and the assumptions regarding the installation environment are also enumerated.•
“Installation Process” on page 6 - Required pre-installation activities as well as the installation and configuration steps themselves are listed.•
“Getting Assistance” on page 22 - Information for contacting ABILITYCustomer Service resources before, during, and after the installation process is supplied.
•
“Required Hardware” on page 24 - This appendix details the hardware required to support the operation of the Secure Exchange Software for small to medium as well as large operating loads. Generalrecommendations are also made for environmental considerations such as network connectivity, backup power support and firewall installation.
•
“Software requirements” on page 28 - Appendix B provides a list ofABILITY supported 3270 emulation packages needed to establish connectivity between an SES IN user and a mainframe system, as well as general terminal emulator configuration information
•
“Port assignments” on page 32 - Appendix C shows the four ports that are available for interactive connectivity.•
“Configuring HTTPS real-time connections” on page 38 - Appendix D shows how to set up data transfers to and from an ABILITY Secure Exchange Software server using HTTPS for real-time connections.•
“ABILITY emulator configuration” on page 44 - Appendix E providesinstructions for setting up your emulator to access the ABILITY Secure Exchange Software server using the ABILITY TN3270 Emulator.
•
“Frequently asked questions” on page 52 - Appendix F provides brief answers to frequently asked questions.Architecture overview
Configuration requirements
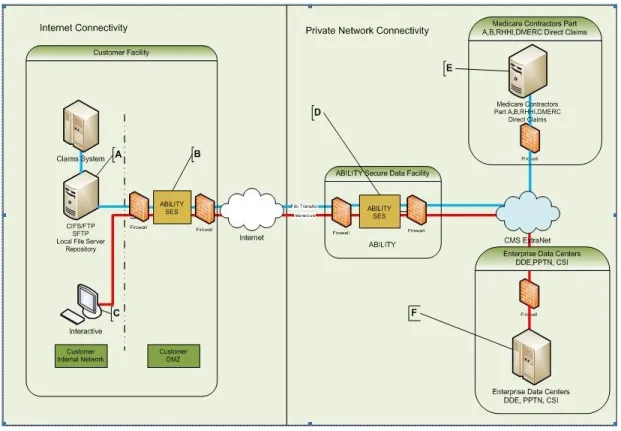
To support the installation of the ABILITY SES, a number of hardware and software elements must be assembled, installed and configured as illustrated in Figure 1.
FIGURE 1. Firewall Configuration Requirements for Initial SES Setup The configuration depicted represents a typical SES FT and IN Trading Partner installations and allows information to flow as follows:
2. The Customer Facility’s Secure Exchange Server (B) encrypts a file or interactive data for delivery to the ABILITY Secure Data Facility (D) and sets up an encrypted channel over the Internet to the SES ABILITY Secure Data Facility (D).
3. From the ABILITY Secure Data Facility (D), an encrypted connection is made to the application (F) or the file is routed properly through the designated Medicare Contractor (E).
Each Trading Partner SES is remotely monitored by software operating in ABILITY’s co-location facility and is managed by ABILITY Customer Service personnel. All SES services use ABILITY issued and managed digital
certificates for authentication and encryption, providing a high-level of security throughout the transfer process.
Prerequisites
Before you install the SES product, the following prerequisite conditions must be met:
•
The Secure Exchange Software is purchased and received.•
The required hardware is purchased and operational.•
All networking components are in place for proper communications between required systems. This includes an Internet connection, domain name service, firewall port configuration, Web and email servers, etc.Assumptions
This guide is written with the following assumptions:
•
The user has familiarity with their organization’s LAN architecture including DMZ, internal network, VLANs, switches, hubs, firewalls, etc.•
The user is able to make or request changes to the organization’sfirewall configuration to allow communications between the SES, internal users, and external Trading Partners.
•
The user has access to IT support personnel, such as a UNIX, Linux, Microsoft or Network Administrator, for the duration of the installation to ensure that any technical difficulties encountered can be diagnosed and corrected.Installation Process
System requirements
The minimum hardware requirements for the installation, configuration, and use of the Secure Exchange Software product are detailed in “Hardware Requirements for Secure Exchange Software” on page 23.
Software Requirements: No third-party software is required for the installation or operation of the SES product. All necessary software components, such as the operating system and support tools, are available using an Internet download installer program.
For access to a Trading Partner’s mainframe system, 3270 session emulation software is required. Appendix B provides a list of 3270 emulation packages which may be used with the ABILITY SES product.
Network Requirements: You need the following network components and configuration for the successful installation and implementation of the Secure Exchange Software product:
•
A capable firewall system installed between the Secure Exchange Server and the Internet.•
A persistent public IP address (the same address for both inbound and outbound) is required for communication to and from the central systems that ABILITY uses.•
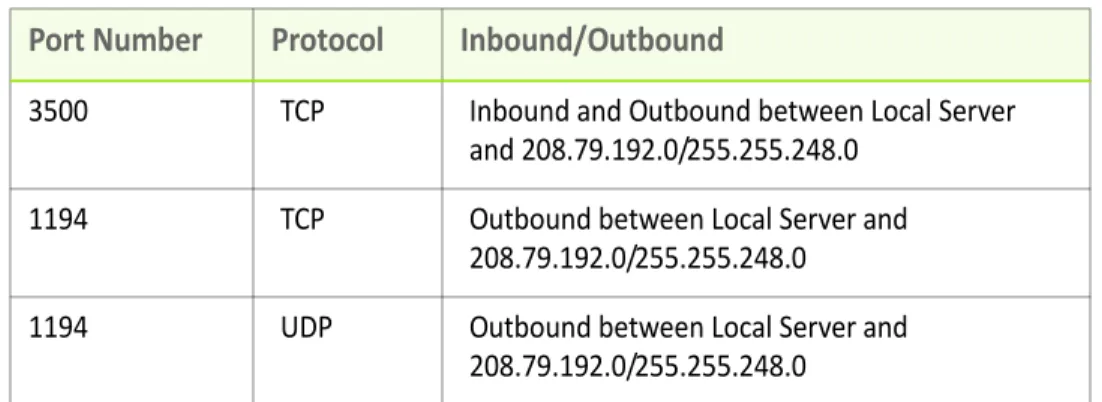
The firewall system must set up to facilitate the configuration, monitoring, and backup of the SES itself. The firewall setup requirements are detailed in Table 1.TABLE 1. Firewall Configuration Requirements for Initial SES Setup
Port
Number
Protocol
Inbound/Outbound
3500 TCP Inbound and Outbound between Local Server and 208.79.192.0/255.255.248.0
1194 TCP Outbound between Local Server and 208.79.192.0/255.255.248.0
•
For interactive data exchange via DDE or PPTN, a firewall port accommodates inbound and outbound data transfer to ABILITY’s network subnet of 208.79.192.0/255.255.248.0. The port to connect to using the terminal emulator is identified in Appendix C and is specific to the data transfer destination and service (DDE or PPTN) and the state where the sending trading partner resides.•
The network connection to the firewall or router from SES is 100-baseT Ethernet.•
An Uninterruptible Power Supply (UPS) system capable of providing one (1) hour or longer of operations upon general power failure is installed and operational.•
We recommend a rack-mounted environment to ensure the system is undisturbed, and the wiring is protected.Pre-Installation steps
Complete the following steps before the installation of Secure Exchange Software.
Step 1: Obtain, install, and maintain SES hardware
1 Obtain the SES HardwareThe ABILITY SES software is approved to run on a variety of x86-based systems, such as Dell and HP. Specific system recommendations are detailed in Appendix A, Hardware Requirements.
When ordering the hardware for an SES installation, do not order operating system software such as Windows or Linux to accompany the hardware. The ABILITY software is delivered with a customized version of Linux. Any operating system or other software resident on the designated hardware prior to the ABILITY installation is overwritten.
2 Server Installation
ABILITY strongly recommends the SES product is installed in a physical environment accessible only to technical and management staff. An Uninterruptible Power Supply (UPS) should be installed to ensure SES availability in the event of a power outage. Install all servers behind the customer firewall to ensure secure operations.
Infrastructure components required to support the installed solution, including but not limited to routers, switches, hubs, and Internet connections, are the direct responsibility of the customer. ABILITY monitors the installed system for availability but cannot assume responsibility for outages associated with internal infrastructure components.
3 Server Maintenance
As the owner of the hardware designated for SES use, you are responsible for administering and maintaining any associated service contracts. ABILITY recommends the purchase of a level of hardware maintenance that meets business objectives for system availability. In the event of a system outage, ABILITY provides notification of the issue encountered with the server. You are responsible for enlisting the hardware vendor to address the issue.
Step 2: Apply for access to payer organizations
4 Submit required enrollment formsMedicare contractors and other payer organizations require the submission of enrollment forms before the electronic exchange of information with a provider. Information on the specific enrollment process is available on the individual payer or contractor’s website. ABILITY encourages the provider to submit the forms in a timely manner to avoid delays in receiving a login from the payer. 5 Receive access credentials
Upon payer acceptance of enrollment information, a user ID and password for access to the payer/contractor’s organization is issued.
For interactive (DDE) access to the contractor, a separate user ID and
password are required for each individual accessing the Medicare mainframe. Each user is responsible for maintaining their password.
For batch (file transfer only) access to the payer/contractor, the user receives login information from the payer/contractor organization, typically by fax. The provider’s ABILITY software is configured with the provider login and password by ABILITY personnel and stored in an encrypted state in the provider’s account. The provider accesses their account by use of their ABILITY software. The ABILITY software handles routine password updates automatically for the provider. Access to provider-specific files is controlled by the use of the ABILITY digital certificate. ABILITY personnel do not access the provider login or files except at the express request of the provider to help in troubleshooting issues.
Use your ABILITY software exclusively for this access as attempts to login with other software can cause the login to be suspended!
A fax copy of the login information should then be forwarded to ABILITY Customer Service 888.460.4310.
Step 3: Enable firewall for trading partner communication
You must configure your firewall to enable secure communications between an Secure Exchange Server and ABILITY’s network. ABILITY technical staff also needs access to facilitate remote configuration, maintenance and monitoring of the SES.Configure inbound and outbound firewall access for specified services to and from the installed SES. The address of the installed server is assigned by your network administrator. The ports in the following table (Table 2) are the firewall configuration requirements for an SES setup.
TABLE 2. Firewall Configuration Requirements for Initial SES Setup
Port
Number
Protocol
Inbound/Outbound
3500 TCP Inbound and Outbound between Local Server and
208.79.192.0/255.255.248.0
1194 TCP Outbound between Local Server and
208.79.192.0/255.255.248.0 1194 UDP Outbound between Local Server and
208.79.192.0/255.255.248.0
Installation Steps
To install the Secure Exchange Software product, follow these steps. An identifier is included with each step title to indicate whether the action is required to enable file transfer (FT only), interactive data transfer (IN only), eligibility (EL only) or any combination of these (FT, IN or EL).
Step 1: Install the SES hardware (FT, IN or EL)
Install the SES hardware (“the server”) into a rack, and power up the unit. The server may be allowed to run for a few days to provide a “burn in” period. This period ensures all hardware components are operational before installing the SES software.
ABILITY's software supports the use of only one network interface (NIC). If your server has more than one NIC, you must go into the server's system BIOS and disable all but one NIC.
Step 2: Assemble the SES network information (FT, IN or EL)
Prepare for the SES installation by assembling the following network information for the server (Table 3):•
IP Address (1)•
Subnet Mask•
Default GatewayTABLE 3. SES Network Information
Port
Number
Protocol
Inbound/Outbound
3500 TCP Inbound and Outbound between Local Server
and 208.79.192.0/255.255.248.0 1194 TCP Outbound between Local Server and
208.79.192.0/255.255.248.0
1194 UDP Outbound between Local Server and
208.79.192.0/255.255.248.0
Step 3: Download and run the ABILITY setup wizard
The Setup Wizard is a utility downloaded from ABILITY and run on a Windows computer. A link to it was sent to you in the same email that contained your Digital Certificate.
The Wizard asks for your digital certificate, and uses that to create a custom ISO file.
FIGURE 2. Running the Setup Wizard
Burn the ISO file onto a CD (your CD burning software must support ISO files which are handled differently than regular files when creating CDs). Then use the CD to boot your server. Installation starts automatically.
Step 4: Beginning the server installation
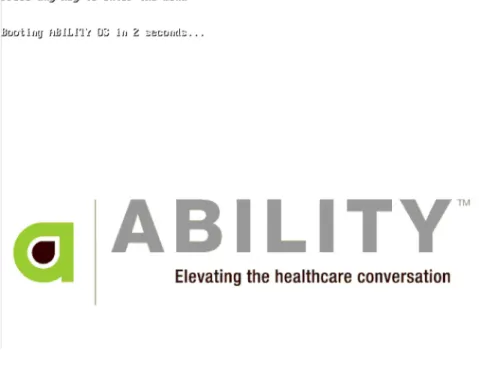
Boot the server from the CD created above. The ABILITY splash screen (Figure 3) appears. Installation begins automatically after ten seconds.
FIGURE 3. ABILITY Splash Screen
The Installer (Figure 4) gives you an overview of the steps it will carry out.
FIGURE 4. Initial Installer Screen
FIGURE 5. Network Setting Configuration
The Installer uses those settings to bring up the server's network interface (Figure 6).
FIGURE 6. Network Information
The Installer tests your firewall ports to make sure the server can communicate with ABILITY's network. All tests MUST pass before installation can continue.
If any network tests fail, a red ERROR is shown. Check your firewall settings for the port and the protocol of the failed test. When you correct it, press any key to re-run the network tests (Figure 7).
FIGURE 7. Network Test
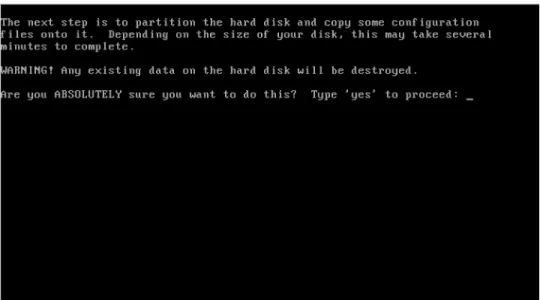
The Installer partitions and formats the server’s hard disk (Figure 8). This irrevocably deletes any existing files on the disk.
You must type yes to the question in order to continue. Any other response causes the installer to reboot the server.
FIGURE 8. Partition and Format Hard Disk Screenshot
Depending on the speed of the disk, formatting takes approximately seven minutes per 100GB of disk. The altroot and slash partitions are the largest and take the longest (Figure 9).
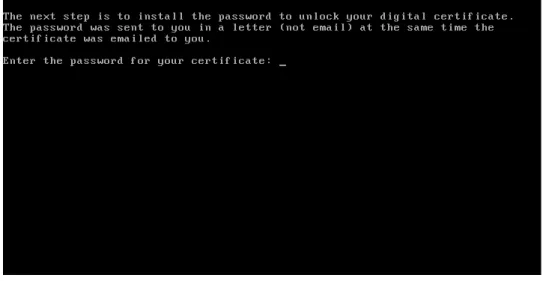
The Installer asks for the password of your digital certificate and verifies it (Figure 10). If the wrong password is entered, you will be prompted to try again. Installation cannot continue without the correct password.
FIGURE 10. Digital Certificate Password
The Installer synchronizes the server with ABILITY’s servers. This takes 20 to 80 minutes depending on the speed of your Internet connection. The Installer announces when the installation is complete.
The server reboots and displays the ABILITY boot splash screen. The server will automatically boot after five seconds. It is not necessary to enter the menu (Figure 11).
FIGURE 11. ABILITY Splash Screen
When the server has finished booting up, it displays an information screen showing the server’s IP address and a reminder of which firewall ports must be open (Figure 12).
FIGURE 12. Information Screen
A. Contact ABILITY for product configuration
Contact ABILITY Customer Service at 888.460.4310 to report the completion of your SES product installation. A Product Support Engineer will then remotely configure the SES software to finish the product installation.
B. Add the server name to your DNS
Add the SES to the local DNS configuration to allow the server to be accessed remotely by name. The name of the server is provided by the ABILITY Product Support Engineer during the configuration process. There are many different server names. For example:
ses001.yourdomainname
(ses002, ses003 and so on for additional servers) OR
Step 5: Configure the local file server as a data repository (FT
only)
To enable data communication for file transfer, configure a local file server to act as the data repository for files to be sent to and received from Trading Partners. The SES supports Windows servers through the use of the CIFS protocol and Windows, Unix, and other servers through FTP (File Transfer Protocol) and SFTP (Secure File Transfer Protocol).
Create a login account for the SES product on the local CIFS or FTP file server by executing the following steps:
A. CIFS
1) Create a “share” named /SES on a Microsoft Windows file server. Set permissions to allow users or processes to move or copy files to the share location.
2 Create a user account named ses001 for the SES product. 3) Create the account at the local machine level, not in the
domain/directory.
4) Grant full control access on both the share level and the file level for the SES share.
5) Disable interactive logons for the account.
6) Include comments with the account to identify it as a service account for the purpose of enabling communication to and from the SES. 7) Communicate the ses001 password and the server’s IP address and
name to the ABILITY Product Support Engineer during the configuration process.
B. FTP or SFTP
8) Create a user account named ses001 for the SES product.
9) Grant full control access for the account to the directory assigned to it. The ABILITY Product Support Engineer creates the folder structure for each Trading Partner configuration.
10) Include comments with the account to identify it as a service account for the purpose of enabling communication to and from the SES. 11) Communicate the ses001 password and the server’s IP address and
name to the ABILITY Product Support Engineer during the configuration process.
Using the created account, the SES product checks for files to move to Trading Partners or to deposit files from them.
Step 6: Remote configuration activities (FT only)
A. Collect configuration information
Provide the following local file server configuration information to ABILITY Installation Support by calling 888.460.4310.
The following is an example of local file server configuration information compiled for a typical SES configuration (Table 4).
TABLE 4. Local File Server Configuration
Parameter
Configuration
Type (FTP, SFTP or SMB) FTP Name abcd.healthcareclinic.com IP Address 192.168.1.54 Login ses001 Password SES99cdDirectory or Share n/a
Additional Parameters Set transfer = passive
B. Conduct Remote Configuration Activities
Based on the information provided in the SES Configuration Information Addendum, the Product Support Engineer brings the SES connections to production readiness by remotely configuring a directory structure or “folder” on the local file server for each Trading Partner.
The folders are used as repositories for files sent to and received from Trading Partners. An example of the initial folder structure created on the local file server for the exchange of data between it and a Trading Partner identified as CAF is:
/CAF01
File D
The SES product automatically scans the “to” folder for files to move to Trading Partners. Specifically, when the SES receives confirmation from the remote CAF SES that Files A and B are received, the files are deleted from the local file server directory. Any files received from CAF are placed in the “from” folder.
Step 7: Workflow setup (Optional) (FT only)
To automate the movement of files to and from the folder locations to be accessed by the SES, create scripts or scheduled jobs.
Step 8: Set up shortcut folders for end users (Optional) (FT
only)
To simplify the process of placing files in the “to” and “from” directories of the local file server, set up shortcuts to the folders on the end user’s desktop. This allows the user to easily drag and drop files into the folders.
Step 9: Communicate configuration changes to DDE or PPTN
users (IN only)
If the SES is installed to enable DDE access, you must make configuration changes to the DDE or PPTN users’ TN3270 software or browser URLs. Required changes are identified by the ABILITY Product Support Engineer during the configuration process.
Step 10: NPI validation process (EL only)
A valid, active NPI (National Provider Identifier) is required to submit Medicare Eligibility requests to HETS. Your NPIs must be validated before you can begin using eligibility services through the ABILITY Secure Exchange Server.
ABILITY must obtain the NPI numbers you will be using for Medicare Eligibility. Send an e-mail to [email protected] with your Customer ID and all of the NPIs you wish to use for checking Medicare Eligibility. Your Customer ID is on your invoice or on your welcome letter.
To add additional NPIs to an existing connection, contact ABILITY Customer Service by sending an email to [email protected] or by calling 888.460.4310.
Getting Assistance
To request help during the SES installation process, contact ABILITY Customer Service at 888.460.4310 or send an email to [email protected]. An ABILITY Product Support Engineer can be scheduled to provide assistance via phone.
For ongoing support of the SES product, after the implementation had been completed, contact ABILITY Customer Service at 888.460.4310. To notify our Technical Support group of scheduled outages, changes to connectivity or other planned items, send an email to [email protected].
When planning a change that may affect communication with Trading Partners, notify ABILITY immediately. Failure to coordinate a network or system change with ABILITY may result in an unnecessary, temporary disruption of service. ABILITY’s customer service representatives are available to assist you from 7 A.M. to 6 P.M. Central Time, Monday through Friday.
When you contact us, have your Customer ID ready, which you can find on your invoice or on your welcome letter.
Appendix A
Hardware Requirements for
Secure Exchange Software
Required Hardware
The ABILITY Secure Exchange Software (SES) platform runs on a custom GNU/Linux distribution, which is supported on hardware certified for Red Hat Enterprise Linux versions 5 through 5.6.
Choosing Hardware
Red Hat maintains a certified hardware list at https://hardware.redhat.com/RHEL5.
To ensure that the hardware will work properly with the ABILITY operating system, make sure that the version number in the '32-bit' column shows one of 5, 5.1, 5.2, 5.3, 5.4, 5.5, or 5.6. If there is a small red superscript number at the end of the version number, it means there are some caveats to that specific hardware's certification. These notes can be viewed by clicking the version number and scrolling to the "Additional Certification Notes" section. At this time the ABILITY operating system does not support loading additional third-party drivers
Recommended Minimum Specifications
•
1 GB RAM•
Two 36 GB or larger disks in a RAID 1 configurationNotes
•
If you purchase a server with more than one NIC, you will need to disable all but one of them through the server's BIOS (Basic Input Output System) prior to installing the ABILITY operating system.•
It is not necessary to purchase an operating system (OS) for the server.•
One gigabyte of RAM has proven to be sufficient for almost all serverconfigurations using the SES product. Very large facilities or server configurations that incorporate many distinct products may require additional RAM.
•
The ABILITY operating system can be installed in a virtual environment, but ABILITY does not offer support for the virtual installation process.Additional Recommendations
•
It is strongly recommended that your hardware purchase include some level of support from your hardware vendor in the event of hardware failure.•
A hardware RAID (Redundant Array of Independent Disks) isrecommended to increase availability of the server in the event of a disk failure.
•
Install a capable firewall system between the server and the Internet.•
Have the speed of the network connection to the firewall or router be100BASE-T Ethernet or faster.
•
A UPS system capable of providing 1 hour or longer of operations upon general power failure.•
A rack-mounted environment is desirable to ensure the system is undisturbed and the wiring is protected.•
If installing into a virtual environment, it is strongly recommended that the virtual hard disk be set to a static size, rather than dynamic.Appendix B
Software Requirements for
Mainframe Access
Software requirements
Claim submittals and remittals, claim status, and eligibility checks are made on a regular basis between the federal Medicare system and healthcare
professionals. This exchange of patient information can be performed manually or more efficiently through a software user interface that ensures secure, encrypted access to Medicare’s Direct Data Entry (DDE) services. ABILITY’s Secure Exchange Software provides this access capability.
Medicare’s DDE service uses IBM’s 3270 protocol to facilitate communication between a healthcare professional’s desktop computer and Medicare’s mainframe claims processing system. To access the DDE service, 3270 terminal emulation software must be installed on the desktop of the DDE user. ABILITY offers a no-cost TN3270 Emulator software package that is
compatible with the Secure Exchange Software. There are also five other 3270 terminal emulation packages that are compatible, each available from third party vendors or as freely available software.
NOTE: To ensure proper screen display, all PPTN users must configure their terminals to run as IBM-3278-4, also known as Model 4 (43x80).
General Terminal Emulator
To configure a terminal emulator
1 Configure the Session as an IBM 3270 Terminal session.
2 Configure the Host to the internal DNS or IP entry for the customer's VSI server.
3 Configure the Port to the port the user needs to connect on.
4 CDS Data Center Connections (only); Turn off 3270E support (rfc 1647 http://tools.ietf.org/html/rfc1647).
Appendix C
Port assignments
To determine which ports to open for inbound traffic to SES Interactive, consult the ABILITY Interactive connectivity screens in this appendix. The four ports shown in this appendix are the default ports for each of the data centers available through SES Interactive. This appendix also contains a screen that should appear to you after a successful installation.
HPES Data Center (formerly EDS) - Port 2129
The following figure (Figure 13) shows the screen shot for the HPES Data Center.
CDS Data Center - Port 2156
The following figure (Figure 14) shows the screen shot for the CDS Data Center. .
Section 1011 – Port 2113
The following figure (Figure 15) shows the screen shot for Section 1011. .
Abstracts for Kansas - Port 2117
The following figure (Figure 16) shows the screen shot for the Kansas abstract.
Appendix D
Configuring HTTPS real-time connections
Purpose
This document provides detailed configuration information to set up data transfers to and from a ABILITY® Secure Exchange Software (SES) server using HTTPS for real-time connections.
The HTTPS protocol provides a convenient, secure method to transfer data to and from the ABILITY server for real-time data transfers, where the response from the remote trading partner is typically expected to be returned in 60 seconds or less. The standard transaction supported through this method is 270/271 (eligibility) transactions. The specific EDI requirements of a connection are detailed in Companion Guide documentation available from the Trading Partner.
Overview of HTTPS process
HTTPS-based submission for real-time services uses the ABILITY Secure Exchange Server as a synchronous data flow. The inquiry is sent in an HTTPS post request to the Secure Exchange Server. The response to the inquiry is returned in the body of the HTTPS response.
For example, consider Trading Partner A who wants to submit a 270 eligibility request to Trading Partner B.
1 The customer initiates an HTTPS post request to submit the 270 to their Secure Exchange Server, holding the connection open to wait for the response.
2 Trading the customers’s Secure Exchange Server securely submits the 270 to HETS for processing.
3 HETS processes the 270 and returns a response file, either a 271 or a file indicating an error condition.
4 This file is sent back to the customer’s Secure Exchange Server. 5 The customer’s Secure Exchange Server returns the file as the HTTPS
HTTPS request details
Parameters
The following parameters (Table 5) are required: TABLE 5. Parameters Table
Parameter
Name
Parameter
Value
username ABILITY assigned username password ABILITY assigned password connection ABILITY assigned connection
name
These parameters are placed in the query string of the HTTPS Request URI using “application/x-www-form-urlencoded” encoding rules. These rules specify how to encode spaces, quotes, and other so called characters that can also be commands, or “unsafe” characters. The only place this is relevant is for characters in the password; otherwise the other parameters do not contain unsafe characters.
Headers
The only required header is Content-Length. It must contain the number of bytes in the request body. The Secure Exchange Server does not make any assumptions about the content type such as binary or ASCII text, so it works to exchange any type of file between trading partners as long as the trading partners know what content type to expect.
Body
The body of the request only contains the content of the file being sent to the remote trading partner.
Example
In this example the Secure Exchange Server has a DNS name of sese-ft.cme.com. The client software would establish an SSL connection to host sese-ft.cme.com on port 4090 and send the following HTTP request:
POST /ses/upload?username=john&password=8f3$2s& service=SYNC_HETS HTTP/1.1 Host: sese-ft.acme.com ... <other headers> Content-Type: application/octet-stream Content-Length: 500
<500 bytes of file content >
The portions of the request in bold are required. The Request Line is the first 2 bold lines and is actually a single line that had to be continued to fit in this document. In addition, the blank line after the Content-Length header is required by the HTTP specification.
Clients connecting to an SES using HTTPS must write software or use a tool that can establish an SSL connection and generate an HTTP POST request that conforms to ABILITY’s specification.
HTTPS is the HTTP protocol over SSL (secure sockets layer). SSL provides authentication and encryption for TCP/IP connections.
Authentication is provided by using digital certificates. When the SSL connection is initiated by a client the server sends its certificate to the client and the client must then verify that the certificate is issued by a trusted Certificate Authority (CA).
This is the same process that a web browser performs when visiting a “secure” web site.
Always use port 4090 when connecting to a Secure Exchange Server. Once the SSL connection is established any data passed between the client and the server is encrypted. In the case of HTTPS, the data is HTTP requests and responses. The Secure Exchange Server expects several parameters and the file content itself to be encoded in the HTTP POST request in a specific way. ABILITY highly recommends using a library or tool in the programming language of your choice that assists in the creation of HTTP requests. In
HTTPS response details
After sending the HTTPS request the corresponding response sent back from the Secure Exchange Server will contain the information that is received from the remote trading partner. Specifically, the response file is the only thing in the HTTPS response body.
References
HTTP 1.1 Specification - http://www.w3.org/Protocols/rfc2616/rfc2616.html
Appendix E
ABILITY TN3270 Emulator Setup
(IN Only)
ABILITY emulator configuration
Step 1: Install the ABILITY TN3270 Emulator
1 Download the ABILITY TN3270 Emulator from here:http://tn3270.visionshareinc.com/visionshare-Desktop/launch.htm 2 Click on the Install button on the Install page (Figure 17).
3 Click on the Install button on the Application Install page (Figure 18).
FIGURE 18. Application Install Page
4 The rest of the install happens automatically.
• Logs and setting files are written to the following location: %APPDATA%\VisionShare”
• If you have Windows Vista or any later version of Windows, the emulator installs to the following location:
%USERPROFILE%\Appdata\Local\Apps\2.0
• iIf you have Windows XP, the emulator installs to the following location: %USERPROFILE%\Local Settings\Apps\2.0
NOTE: The Local Settings Folder is a hidden Folder, so you will need to display hidden Folders if you want to navigate to it.
Step 2: Configuring the Interactive Service Connection
5 The first time the ABILITY TN3270 Emulation software is used withABILITY SES Interactive, you will need to configure a New Connection on the New Connection Page (Figure 19).
FIGURE 19. New Connection Page
6 Enter a connection name in the Profile Name field. This is a free form field. Enter what will be meaningful to you. Typical examples are DDE for Jurisdication 1, Noridian FISS ND, etc.
7 Enter the IP address or DNS name for your ABILITY Server in Host name field.
8 Enter the port of the desired service in the Port field (3500 is the default and will need to be changed). The port to connect to via the terminal emulator is identified in Appendix C and is specific to the data transfer destination and service (DDE or PPTN) and the state where the sending trading partner resides.
Step 3: Setting Up Additional Interactive Service
Connections
11 Click the Edit Menu and choose Connection Settings. The Manage Connections page appears (Figure 20).
FIGURE 20. Manage Connections Page
12 Click the New Connection button in the lower left corner of the window. You will see the same window from the beginning of “Step 2:
Configuring the Interactive Service Connection.”. Follow the steps in this section.
Step 4: Configuring Connections on Multiple Computers
The easiest way to configure the connection settings on any computer
once you have created your connections the first time is to export the
connections to a file, and then from each computer import the
connection file. Complete the following instructions:
13 Click the Connect Menu and choose Export Connection Settings (Figure 21).
FIGURE 21. Export Connection Settings
14 On the Save As page (Figure 22) choose a location on your Network to save the file. Click Save.
15 From the Computer where you need to import the Connection Settings, click the Connect menu and choose Import Connection Settings (Figure 23). Navigate to the Network location where you saved the exported connection settings. Select the file.
Appendix F
Frequently asked questions
1. Who supports the software and hardware collectively
referred to as the “ABILITY
®
server”?
ABILITY server-based product Secure Exchange Software (“SES”) executes on hardware supplied by the SES customer. The customer is responsible for administering and maintaining service contracts for the hardware. ABILITY recommends the purchase of a level of hardware maintenance that meets business objectives for system availability. The customer is responsible for enlisting the hardware vendor, if necessary.
2. What operating system serves as the core of the SES
product?
The SES operating system is based on CentOS Linux and runs with a current kernel which is patched for known vulnerabilities. Only packages pertinent to the services and functions of the SES are included. Customers should not purchase an operating system when they purchase their server hardware.
3. Can I run other software on this server?
No. The ABILITY Secure Exchange Software (SES) requires a dedicated hardware instance.
4. How is the SES product installed on the server
hardware?
Following a customer’s purchase of the ABILITY solution, an email, containing the digital certificate link to the ABILITY software and the Installation Guide, is sent to the customer. As directed by the Installation Guide, the customer initiates the SES installation by downloading the Setup Wizard to create an ISO file, burning the ISO to a CD and then booting the server from CD. The
5. How is remote access to the SES product achieved?
What changes are required to the customer firewall to
enable this access?
Access to the ABILITY SES is achieved through secured ports enabled on the customer’s firewall. ABILITY monitoring of a customer’s SES instance is done remotely using port 1194 via TCP, the ABILITY secured network. All file transfers to and from the SES are done via port 3500 using client and server certificate authenticated tunnels.
Firewall requirements are summarized in Table 6.
Table 6: Firewall Requirements
6. What is the recommended location in my network for
the Secure Exchange Server?
ABILITY recommends that the server running the SES product be installed on the customer’s DMZ subnet.
Trading
Partner/
Service
Port
Number
Protocol
Traffic
Direction,
IP
Addresses
and
Subnet
Mask
ABILITY Interactive and Real
Time Data Transfer
3500 TCP Inbound and Outbound
between Local Server and
208.79.192.0/255.255.248.0 ABILITY Monitoring 1194 TCP Outbound between Local
Server and
208.79.192.0/255.255.248.0 ABILITY Monitoriing 1194 UPD Outbound between Local
Server and
7. What types of access are required for my network
devices to and from the Secure Exchange Server?
For interactive services, user desktops require access to the Secure Exchange Server on an ABILITY assigned port in the 2000 range. For file transfer services, the Secure Exchange Server requires a user account on a customer designated server that acts as a file repository for files sent to and received from external Trading Partners. The customer file server may reside in either the DMZ or the internal LAN and is accessed via FTP or SMB protocols.
8. What types of access are enabled for payer
connectivity?
ABILITY has enabled connectivity to payers using a variety of methods. For Medicare Fiscal Intermediaries and Carriers, connectivity is established via FTP, Sterling Connect:Direct, and FTPS across SNA or TCP/IP all using the AGNS cloud. Providers perceive no difference in the connectivity method to different payers on their end.
9. What is the purpose of the Identity Verification Form?
The ABILITY SES product uses digital certificates to ensure the security of information exchanged electronically between users or applications. The Identity Verification Form developed and the procedures practiced by ABILITY in support of digital certificate creation are an important element of this security. As the issuer of the digital certificate, ABILITY must verify the identity of either the individual or the organization using the SES product. All processes that ABILITY employs in identifying the individuals and/or organizations that receive digital certificates are designed to meet the requirements of the federal Department of Defense for Class 3 assurance, which is the minimum level required to do business with the federal government.10. When do I receive my digital certificate? How do I
install the certificate on the ABILITY server?
Upon ABILITY receipt of the original Identity Verification Forms, a unique digital certificate is issued to encrypt and decrypt all communication conducted between the customer server and its Trading Partners. The digital certificate is installed is emailed to you. The password for unlocking the digital certificate during installation is sent to you in a letter (not email).
11. Do we get an account on the Secure Exchange
Server? What if I need to shut it down?
No customer access to the Secure Exchange Server is permitted. The ability to perform a server shutdown by pressing the CTRL+ALT+DEL keys
simultaneously can be enabled upon customer request. Alternatively, the customer may call ABILITY Customer Service at 888.460.4310 and request the Secure Exchange Server be shut down.
12. Is there desktop software required for the Secure
Exchange Server? If so, who is responsible for
supporting it?
The Secure Exchange Server operation does not require the use of desktop software.
13. When are software updates applied to the Secure
Exchange Server? Are we notified when an update will be
performed? How does this affect production availability
of the Secure Exchange Server?
The Secure Exchange Server software is completely maintained by ABILITY’s Technical Support staff. Software updates are made to improve the reliability, maintainability or capability of the product. All software updates are tested extensively prior to applying to customer production servers. If an update affects availability of a production service for the customer, notification is given and the change is scheduled to meet customer availability. An exception to this
policy is only made in the event that a security exploit is discovered that would require immediate action. In this case, the customer is notified, but the production service may be interrupted while the update is applied.
14. Does the server have a database?
An integrated relational database is built into the SES product offering. The database is used for logs, system operations and configuration information. Database maintenance is scheduled as a routine administrative task on the Secure Exchange Server.
15. What customer data is stored on the server?
No customer data is permanently stored on the ABILITY server. Data is received and routed through the server but is never permanently stored on the system.16. How will ABILITY contact us if issues are detected?
ABILITY collects contact information for a minimum of two technical resources within the customer organization. The customer resources are notified via phone and/or email.17. Do you run virus checking on your servers?
Given that the ABILITY implementation is very tightly controlled, the addition of anti-virus software would not add to the security of the server. All traffic that enters an ABILITY system comes from trusted and authenticated sources. Files and data sessions are encrypted and are not parsed in a way that executables have an opportunity to run on the system. Therefore, the threats that make a typical PC vulnerable (for example, processing email attachments from unknown sources) do not have an opportunity to exploit an ABILITY system. Additionally, the Secure Exchange Server is built upon a reduced Linux installation. Only the packages required to authenticate and perform encryption are present. The Secure Exchange Server does not have mail
Finally, access to a Secure Exchange Server is strictly controlled, and there are no users present on the server that could accidentally or deliberately introduce malicious code.
18. Can I install my Openview/Compaq/IBM/other
monitoring agent on this server?
No third-party applications are approved for use on the ABILITY Secure Exchange Server.
19. What do I do if I experience a drive failure or other
complete outage with my server?
All configuration information and transaction logs are automatically backed up to servers maintained in the ABILITY Secure Data Facility. In the event of a complete outage, the customer would need to procure additional hardware and re-install the SES software. The Secure Exchange Server configurations and logs can be reloaded remotely by ABILITY technical staff. The entire process can be accomplished in less than a day. If higher availability is a customer requirement, ABILITY supports a fail-over server configuration that provides redundancy as well as high availability.
20. Who do I contact for more information?
To request help during the installation process, contact ABILITY Customer Service at [email protected] or 888.460.4310. An ABILITY Product Support Engineer can be scheduled to provide assistance by phone. Once installation is complete, ABILITY Customer Service resources are available for ongoing support by calling 888.460.4310 or email
21. How does ABILITY ensure the availability of their
services?
ABILITY production systems are maintained in a commercial-grade facility with generator back-up to avoid outages in the event of a power failure. All systems are monitored on a 24 X 7 basis and ABILITY maintains back-up hardware to replace critical systems in the event of an outage. Service outages are
occasionally experienced on Contractor-maintained systems (i.e., the data center systems). ABILITY cannot ensure the availability of Trading Partner systems.
22. Is the ABILITY SES software supported in a VMware
environment?
If your organization is familiar with VMWare and experienced in running and maintaining a virtualized system, the ABILITY software can be installed in this environment. The system configuration should be essentially the same as above except that the disk could be the default disk size (pre-allocated). ABILITY does not offer support for VMWare but we fully support our product on it.
Index Symbols /SES 19 Numerics 100-baseT Ethernet 7 3270 26
3270 session emulation software 6
A
ABILITY Installation Support 22
ABILITY setup wizard 10 access credentials 8
access to payer organizations 8
Architecture overview 4 C CAF 20 Certified Systems 24 configuration Information 20 Configuration requirements 4 D data repository 19
DDE (Direct Data Entry) 2 Default Gateway 10 Digital Certificate 10
E
Enable firewall for trading partner communication 9
F
file transfer (FT) 2
Firewall Configuration Requirements 6
FTP 2
H
HETS (HIPAA Eligibility Transaction System) 2
HTTPS protocol 36 HTTPS Real-Time Connections 36 I IBM-3278-4 26 IBM-3278-4-E 44 IP Address (1) 10 M
Medicare eligibility inquiry (EL) 2
N
P port 4090 38 R red ERROR 14 S server name 18 SMB 2
SSL (secure sockets layer) 38 Subnet Mask 10
synchronous data flow 36 System requirements 6 T telnet 2 TN3270 Emulator 26, 42 Trading 29 U