http://www.trendmicro.com/download
Trend Micro, the Trend Micro t-ball logo, InterScan, and Trend Micro Control Manager are trademarks or registered trademarks of Trend Micro, Incorporated. All other product or company names may be trademarks or registered trademarks of their owners. Copyright © 2003-2009 Trend Micro, Incorporated. All rights reserved.
Document Part No. MSEM74175/90727 Release Date: November 2009
Detailed information about how to use specific features within the software are available in the online help file and the online Knowledge Base at Trend Micro’s Web site. Trend Micro is always seeking to improve its documentation. Your feedback is always welcome. Please evaluate this documentation on the following site:
Contents
Preface
Audience ...xii InterScan Messaging Security Suite Documentation ...xii Document Conventions ...xiii
Chapter 1: Getting Started
Opening the IMSS Web Management Console ... 1-2 Using the Online Help ... 1-3 Viewing the Web Management Console Using Secure Socket Layer ... 1-3 Tools for Creating the SSL Certificate ... 1-3 Creating an SSL Certificate ... 1-4 Performing Basic Configuration with the Configuration Wizard ... 1-5 Accessing the Configuration Wizard ... 1-5 Changing the Management Console Password ... 1-14 Updating Scan Engine and Pattern Files ... 1-15 Specifying an Update Source ... 1-16 Performing a Manual Update ... 1-18 Rolling Back a Component Update ... 1-19 Configuring Scheduled Update ... 1-19 IMSS Services ... 1-21 Starting or Stopping Services ... 1-22 Opening the End-User Quarantine Console ... 1-23 Logon Name Format ... 1-23
Chapter 2: Configuring IMSS Settings
IP Filtering Service ...2-2 Using Email Reputation ...2-2 Using the SPS Activation Code ...2-2 Using the Email Reputation Management Console ...2-3 Configuring IP Filtering ...2-7 Step 1: Enabling Email Reputation and IP Profiler ...2-7 Step 2: Adding IP Addresses to the Approved List ...2-9 Step 3: Adding IP Addresses to the Blocked List ...2-9 Step 4: Enabling IP Profiler Rules ...2-10 Step 5: Configuring Email Reputation ...2-15 Displaying Suspicious IP Addresses and Domains ...2-18 Scanning SMTP Messages ...2-19 Configuring SMTP Routing ...2-19 Configuring SMTP Settings ...2-19 Configuring Connections Settings ...2-20 Configuring Message Rule Settings ...2-23 About Domain-Based Delivery ...2-26 Configuring Delivery Settings ...2-26 About Transport Layer Security ...2-32 IMSS Support of Transport Layer Security ...2-33 Configuring Transport Layer Security Settings ...2-34
Configuring Transport Layer Security Settings for
Messages Entering IMSS ...2-34 Adding Trusted CA Certificates for Messages
Entering IMSS ...2-37 Configuring Transport Layer Security Settings for
Messages Exiting IMSS ...2-38 Adding Trusted CA Certificates for Messages
Exiting IMSS ...2-40 Scanning POP3 Messages ...2-41 Understanding POP3 Scanning ...2-41 Requirements ...2-42 Enabling POP3 Scanning ...2-42 Configuring POP3 Settings ...2-44
Chapter 3: Managing Policies
Managing Policies ... 3-2 How the Policy Manager Works ... 3-2 Configuring Policy Objects ... 3-4 Understanding Address Groups ... 3-6 Creating Address Groups ... 3-7 Editing or Deleting an Address Group ... 3-11 Exporting an Address Group ... 3-13 Using BATV Keys ... 3-14 Adding BATV Keys ... 3-15 Viewing BATV Keys ... 3-17 Using the Keyword & Expression List ... 3-17 Configuring an Expression ... 3-18 Using the Notifications List ... 3-21 Adding or Modifying a Policy Notification ... 3-22 Using Stamps ... 3-25 Creating Stamps ... 3-25 Using the DKIM Approved List ... 3-27 Using the Web Reputation Approved List ... 3-29 Adding to the Web Reputation Approved List ... 3-29 Configuring Internal Addresses ... 3-31 Searching for an LDAP User or Group ... 3-33 Adding Policies ... 3-35 Specifying a Route ... 3-36 Configuring the Route ... 3-41 Configuring Exceptions for Routes ... 3-42 Specifying Scanning Conditions ... 3-43 Selecting Scanning Conditions for Spam ... 3-49 Configuring Approved and Blocked Sender Lists ... 3-50 Configuring Spam Text Exemption Rules ... 3-51 Configuring Web Reputation Settings ... 3-52 Selecting Scanning Conditions for Attachments ... 3-53 Selecting Scanning Conditions for Message Size ... 3-55 Selecting Scanning Conditions for Message Content ... 3-56
Specifying "Other" Scanning Conditions ...3-56 Selecting Scanning Conditions for Number of Recipients ...3-57 Setting Scanning Conditions for Message Arrival Time ...3-57 Specifying Actions ...3-58 Creating a Tag Subject ...3-66 Finalizing a Policy ...3-66 Modifying Existing Policies ...3-68
Using the Domain List for the Global DKIM
Enforcement Rule ...3-69 Using the Domain and Email Exclusion List for
the Global BATV Rule ...3-70 Policy Example 1 ...3-72 Policy Example 2 ...3-75 Using the Asterisk Wildcard ...3-79 Setting Scan Exceptions ...3-80 Configuring Exceptions for Security Settings Violations ...3-81 Setting Scan Actions for Security Setting Violations ...3-82 Setting Scan Actions for Malformed Messages
Scanning Exceptions ...3-83
Chapter 4: Backing Up, Restoring, and Replicating Settings
Importing/Exporting Settings ...4-2 Backing Up IMSS ...4-3 Restoring IMSS ...4-5 Replicating Settings ...4-10 Enabling Control Manager Agent ...4-11 Replicating Settings from Control Manager ...4-12
Chapter 5: Monitoring the Network
Monitoring Your Network ... 5-2 Viewing Statistics Summary ... 5-2 Viewing System Summary ... 5-3 Interpreting the Statistics ... 5-4 Performance Overview ... 5-5 Scan Performance ... 5-5 IP Filtering Performance ... 5-6 Generating Reports ... 5-8 Types of Report Content ... 5-8 Managing One-time Reports ... 5-9 Adding One-time Reports ... 5-10 Using Scheduled Reports ... 5-13 Configuring Scheduled Reports ... 5-14 Logs ... 5-17 Configuring Log Settings ... 5-17 Querying Logs ... 5-19 Mail Areas and Queues ... 5-25 Configuring Quarantine and Archive Settings ... 5-25 Managing Quarantine Areas ... 5-26 Managing Archive Areas ... 5-29 Querying Messages ... 5-31 Viewing a Quarantined Message ... 5-35 Viewing Archived Messages ... 5-36 Viewing Deferred Messages ... 5-37 Configuring User Quarantine Access ... 5-38 Adding/Removing an EUQ Database ... 5-40 Adding an EUQ Database ... 5-40 Removing an EUQ Database ... 5-42 Command-line Options for euqtrans Tool ... 5-42 Event Notifications ... 5-43 Configuring Delivery Settings ... 5-44 Configuring Event Criteria and Notification Message ... 5-47 Configuring Web EUQ Digest Settings ... 5-48 Editing Notifications ... 5-49
Chapter 6: Using End-User Quarantine
About EUQ ...6-2 Step 1: Configuring and Enabling LDAP ...6-2 Step 2: Enabling EUQ ...6-5 Step 3: Starting the EUQ Service ...6-6 Step 4: Enabling End-User Access ...6-6 Step 5: Opening the End-User Quarantine Console ...6-9 Logon Name Format ...6-9 Disabling EUQ ...6-10
Chapter 7: Performing Administrative Tasks
Managing Administrator Accounts ...7-2 Adding Administrator Accounts ...7-2 Editing or Deleting Administrator Accounts ...7-5 Configuring Connection Settings ...7-6 Configuring LDAP Settings ...7-7 Configuring POP3 Settings ...7-9 Configuring Database Settings ...7-11 Configuring TMCM Settings ...7-12 Managing Product Licenses ...7-13 Viewing Your Product Licenses ...7-14 Renewing or Activating a License ...7-14 Activating Products ...7-16
Chapter 8: Troubleshooting, FAQ, and Support Information
Troubleshooting ... 8-2IMSS Ports ... 8-10 Frequently Asked Questions ... 8-14 Mail Transfer Agent ... 8-14 SMTP Settings ... 8-17 IMSS Components ... 8-17 Email Reputation ... 8-19 IP Profiler ... 8-19 Quarantine and Archive ... 8-20 End-User Quarantine ... 8-21 Spam Protection Service ... 8-23 ActiveUpdate ... 8-23 Others ... 8-24 Using the Knowledge Base ... 8-31 Contacting Support ... 8-32 TrendLabs ... 8-33 Security Information Center ... 8-33 Staying Up-to-Date ... 8-34 Sending Suspicious Files to Trend Micro ... 8-34
Appendix A: Default Directory Locations
Default Mail Queues ... A-2 eManager, Virus and Program Logs ... A-3 Temporary Folder ... A-4 Notification Pickup Folder ... A-4
Index
Preface
Welcome to the Trend Micro™ InterScan™ Messaging Security Suite 7.1 Administrator’s Guide. This manual contains information on InterScan Messaging Security Suite (IMSS) features, system requirements, as well as instructions on configuring IMSS settings. Refer to the IMSS 7.1 Installation Guide for information on how to install and upgrade IMSS.
Topics include:
• Audience on page xii
• InterScan Messaging Security Suite Documentation on page xii • Document Conventions on page xiii
Audience
The InterScan Messaging Security Suite documentation is written for IT administrators in medium and large enterprises. The documentation assumes that the reader has in-depth knowledge of email messaging networks, including details related to the following:
• SMTP and POP3 protocols
• Message transfer agents (MTAs), such as Postfix or Microsoft™ Exchange
• LDAP
• Database management
The documentation does not assume the reader has any knowledge of antivirus or anti-spam technology.
InterScan Messaging Security Suite
Documentation
The InterScan Messaging Security Suite (IMSS) documentation consists of the following:
• Installation Guide: Contains introductions to IMSS features, system requirements, and provides instructions on how to deploy and upgrade IMSS in various network environments.
• Administrator’s Guide: Helps you get IMSS up and running with post-installation instructions on how to configure and administer IMSS.
• Online Help: Provides detailed instructions on each field and how to configure all features through the user interface. To access the online help, open the Web management console, then click the help icon ( ).
• Readme Files: Contain late-breaking product information that might not be found in the other documentation. Topics include a description of features, installation tips, known issues, and product release history.
The Installation Guide, Administrator’s Guide and readme files are available at: http://www.trendmicro.com/download
Document Conventions
To help you locate and interpret information easily, the IMSS documentation uses the following conventions.
CONVENTION DESCRIPTION
ALL CAPITALS Acronyms, abbreviations, and names of certain com-mands and keys on the keyboard
Bold Menus and menu commands, command buttons,
tabs, options, and other user interface items
Italics References to other documentation
Monospace Examples, sample command lines, program code, Web URL, file name, and program output
Note:
Configuration notes
Tip:
Recommendations
WARNING!
Reminders on actions or configurations that must be avoided
Getting Started
This chapter explains how to log on to the Web management console and provides instructions on what to do immediately after installation to get IMSS 7.1 up and running.
Topics include:
• Opening the IMSS Web Management Console on page 1-2
• Viewing the Web Management Console Using Secure Socket Layer on page 1-3 • Performing Basic Configuration with the Configuration Wizard on page 1-5 • Changing the Management Console Password on page 1-14
• Updating Scan Engine and Pattern Files on page 1-15 • IMSS Services on page 1-21
Opening the IMSS Web Management Console
You can view the IMSS management console using a Web browser from the server where you installed the program, or remotely across the network.To view the console in a browser, type the following URL: • https://<target server IP address>:8445
An alternative to using the IP address is to use the target server’s fully qualified domain name (FQDN).
The default logon credentials are as follows: • Administrator user name: admin
• Password: imss7.1
Type the logon credentials to open the management console and click Log On.
Note: If you are using Internet Explorer 7.0 to access the Web management console, Internet Explorer will block the access and display a popup dialog box indicating that the certificate was issued from a different Web address. Add the Web management console IP address to your Trusted sites list (Internet Options > Security in Internet Explorer) or ignore the message and click Continue to this Web site to proceed.
Tip: To prevent unauthorized access to the Web management console, Trend Micro recommends changing the password regularly.
Using the Online Help
The IMSS Web management console comes with an Online Help that provides a description of each field on the user interface.
To access page-specific Online Help from the IMSS Web management console, click the Help icon located at the top right corner of the page.
To access the table of contents for the Online Help, click the Help icon next to the
Log Off hyperlink on the right of the page header.
FIGURE1-1. Table of Contents Access for Online Help
Viewing the Web Management Console Using
Secure Socket Layer
The IMSS Web management console supports encrypted communication, using SSL. After installing IMSS, SSL communication should work because the installation contains a default certificate. Trend Micro suggests creating your own certificate to increase security.
If you want to use your own certificate, replace the following: %IMSS_HOME%\UI\tomcat\sslkey\.keystore
Tools for Creating the SSL Certificate
On the Windows platform, some command line tools such as openssl are not installed by default. You may need to download and install these tools.
The 'keytool' command utility is shipped with Java Runtime, which is available at
%IMSS_HOME%\ui\JavaJRE\bin.
Creating an SSL Certificate
Do the following:1. Create the Tomcat SSL certificate for the IMSS Web management console, as follows:
$IMSS_HOME/UI/javaJRE/bin/keytool -genkey -alias tomcat -keyalg RSA -sigalg SHA1withRSA -keystore
$IMSS_HOME/UI/tomcat/sslkey/.keystore -validity 3652
For more details on SSL configuration in Tomcat, visit: http://tomcat.apache.org/tomcat-5.5-doc/ssl-howto.html
2. Create the Apache SSL certificate for the EUQ Web management console, as follows:
a. Generate a Private Key and Certificate Signing Request (CSR):
openssl req -new > new.cert.csr
b. Remove pass-phrase from the key:
openssl rsa -in privkey.pem -out new.cert.key
c. Generate a Self-Signed Certificate:
openssl x509 -in new.cert.csr -out new.cert.cert -req -signkey new.cert.key -days 3652 -sha1
d. Copy the certificate and key to the Apache path:
copy new.cert.cert
%IMSS_HOME%\UI\apache\conf\ssl.crt\server.crt copy new.cert.key
Performing Basic Configuration with the
Configuration Wizard
IMSS provides a configuration wizard to help you configure the basic settings required to get IMSS up and running.
The configuration wizard guides you through the steps to configure the following settings:
Step 1: Configuring SMTP Routing Step 2: Configuring Notification Settings Step 3: Configuring the Update Source Step 4: Configuring LDAP Settings Step 5: Configuring Internal Addresses
Step 6: Configuring Control Manager Server Settings Step 7: Configuring Product Settings
Step 8: Verifying Settings Summary
Accessing the Configuration Wizard
Access the wizard using one of the following methods:• Log on to the Web management console and make sure the Open Configuration Wizard is selected on the logon screen, and then log on. The wizard opens. • If you are already logged on to the Web management console, choose
Administration > IMSS Configuration > Configuration Wizard. The wizard opens in a new window.
Step 1: Configuring SMTP Routing
1. Click Next. The SMTP Routingscreen appears.
Step 2: Configuring Notification Settings
1. Click Next. The Notification Settings screen appears.
2. Configure the following notification settings, which IMSS will use for all default system and policy event notifications:
• Email Settings: Type the sender and receiver addresses, the name of the server that IMSS delivers mail to, the SMTP server port, the language character set, and any additional headers or footers to add to the message.
• SNMP Trap: If you have an SNMP server on your network, type the server name and the community name.
Step 3: Configuring the Update Source
1. Click Next. The Update Source screen appears.
2. Configure the following update settings, which will determine from where IMSS will receive its component updates and through which proxy (if any) IMSS needs to connect to access the Internet:
• Source: Click Trend Micro ActiveUpdate server to receive updates directly from Trend Micro. Alternatively, click Other Internet source and type the URL of the update source that will check the Trend Micro ActiveUpdate server for updates. You can specify an update source of your choice or type the URL of your Control Manager server, if applicable.
• Proxy Settings: Select the Use a proxy server for updates to patterns, engines, licenses, and for Web Reputation queries. check box and configure the proxy type, server name, port, user name, and passwords.
Step 4: Configuring LDAP Settings
Note: Specify LDAP settings only if you will use LDAP for user-group definition, administrator privileges, or Web quarantine authentication. You must enable LDAP to use End-User Quarantine.
2. Complete the following to enable LDAP settings:
a. For LDAP server type, select one of the following: • Microsoft Active Directory
• Domino
• Sun iPlanet Directory
b. To enable one or both LDAP servers, select the check boxes next to Enable LDAP 1 or Enable LDAP 2.
c. Type the names of the LDAP servers and the port numbers they listen on.
d. Under LDAP cache expiration for policy services and EUQ services, type a number that represents the time to live next to the Time to Live in minutes
field.
e. Under LDAP admin, type the administrator account, its corresponding password, and the base-distinguished name. See Table 1-1 for a guide on what to specify for the LDAP admin settings.
TABLE 1-1. LDAP admin settings
LDAP SERVER
LDAP ADMIN
ACCOUNT
(EXAMPLES)
BASE
DISTINGUISHED
NAME
(EXAMPLES)
AUTHENTICATION METHOD Active Directory™ • Without Kerberos: user1@imsste st.com (UPN) or imsstest\user1 • With Kerberos: user1@imsste st.com dc=imsstest, dc=com • Simple • Advanced (with Kerberos) Lotus Domino™
user1/imsstest Not applicable Simple Sun™ iPlanet Directory uid=user1, ou=people, dc=imsstest, dc=com dc=imsstest, dc=com Simple
f. For Authentication method, click Simple or Advanced authentication. For Active Directory advanced authentication, configure the Kerberos
authentication default realm, Default domain, KDC and admin server, and KDC port number.
Step 5: Configuring Internal Addresses
1. Click Next. The Internal Addresses screen appears.
IMSS uses the internal addresses to determine whether a policy or an event is inbound or outbound.
• If you are configuring a rule for outgoing messages, the internal address list applies to the senders.
• If you are configuring a rule for incoming messages, the internal address list applies to the recipients.
2. To define internal domains and user groups, do one of the following:
• Select Enter domain from the drop-down list, type the domain in the text box, and then click >>.
• Select Search for LDAP groups from the drop-down list. A screen for selecting the LDAP groups appears. Type an LDAP group name to search in the text box and click Search. The search result appears in the list box. To add it to the Selected list, click >>.
• Click the Import button to import a text file containing a list of predefined domains.
Note: IMSS can only import a domain list from a text file (.txt). Ensure that the text file contains only one domain per line. You can also use wildcard characters to specify the domain. For example, *.com or *.example.com.
Step 6: Configuring Control Manager Server Settings
1. Click Next. The TMCM Server Settings screen appears.
a. Select Enable TMCM Agent (installed with IMSS by default).
b. Next to Server, type the TMCM IP address or FQDN.
c. Next to Communication protocol, select HTTP or HTTPS and type the corresponding port number. The default port number for HTTP access is 80, and the default port number for HTTPS is 443.
d. Under Web server authentication, type the user name and password for the Web server if it requires authentication.
e. If a proxy server is between IMSS and Control Manager, select Enable proxy.
f. Type the proxy server port number, user name, and password. Step 7: Configuring Product Settings
1. Click Next. The Product Settings screen appears. Activate the Antivirus and Content Filter to enable scanning and security updates. To obtain an Activation Code, register the product online using the supplied Registration Key.
2. Type the Activation Codes for the products you want to activate. If you do not have an Activation Code, click Register Online and follow the directions at the Trend Micro Registration Web site.
Step 8: Verifying Settings Summary
1. Click Next. A Settings Summary screen appears.
2. If your settings are correct, click Finish.
To modify any of your settings, click Back and keep moving through the screens until your settings are complete.
Changing the Management Console Password
Trend Micro recommends periodically changing the password you use to access the Web management console.A valid password can contain letters, numbers and the following characters: `~!@#$%^&*()[]{}+-|:'<>?/,.= _.
To change the management console password:
1. Choose Administration > Password.
2. Type the current password, the new password, and the new password confirmation. The password must be between 4 and 32 alphanumeric characters.
WARNING! If you are still using the default password, Trend Micro strongly recom-mends that you change the password immediately.
Updating Scan Engine and Pattern Files
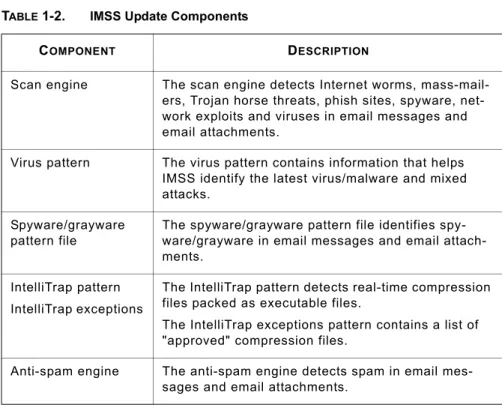
To ensure that your network is constantly protected against the latest malware, ensure that you update IMSS components such as the scan engine and virus pattern files on a regular basis. You can choose to perform a manual or scheduled update of the components.
Table 1-2 provides a list of all IMSS update components. TABLE 1-2. IMSS Update Components
COMPONENT DESCRIPTION
Scan engine The scan engine detects Internet worms, mass-mail-ers, Trojan horse threats, phish sites, spyware, net-work exploits and viruses in email messages and email attachments.
Virus pattern The virus pattern contains information that helps IMSS identify the latest virus/malware and mixed attacks.
Spyware/grayware pattern file
The spyware/grayware pattern file identifies spy-ware/grayware in email messages and email attach-ments.
IntelliTrap pattern IntelliTrap exceptions
The IntelliTrap pattern detects real-time compression files packed as executable files.
The IntelliTrap exceptions pattern contains a list of "approved" compression files.
Anti-spam engine The anti-spam engine detects spam in email mes-sages and email attachments.
Specifying an Update Source
Before you can update the IMSS scan engine and pattern files, specify the update source. By default, IMSS downloads components from the Trend Micro ActiveUpdate server, which is the source for up-to-date components. However, if you are using Trend Micro Control Manager to manage IMSS, you can update the components from the Control Manager server.
If you did not specify the update source when configuring IMSS using the Configuration Wizard, provide the update source and/or any proxy settings.
To specify an update source:
1. Choose Administration > Updates from the menu. The Updates screen appears.
2. Click the Source tab.
Spam pattern The spam pattern helps IMSS identify the latest spam in email messages and email attachments.
URL filtering engine The URL filtering engine facilitates communication between IMSS and the Trend Micro URL Filtering Service. The URL Filtering Service is a system that rates URLs and provides rating information to IMSS. Program file The IMSS program provides the actual protection
from security risks. TABLE 1-2. IMSS Update Components (Continued)
3. Under Source, select one of the following:
• Trend Micro ActiveUpdate server: The default source for up-to-date components.
• Other Internet source: Type the URL or IP address of the Control Manager server or other update source.
4. If the connection to ActiveUpdate, Product Registration Server, and Web
reputation servers must pass through a proxy server, select Use a proxy server for updates to patterns, engines, licenses, and for Web Reputation queries. and configure the following:
• Proxy type: Select HTTP, SOCKS4, or SOCKS5.
• Proxy server: Type the host name or IP address of the proxy server. • Port: Type the port the proxy server uses to connect to the Internet. • User name: Type the user name you need for administrative access to the
proxy server.
• Password: Type the corresponding password.
5. Click Save.
Performing a Manual Update
Perform a manual update of IMSS components under the following circumstances: • If you have just installed or upgraded IMSS.
• If you suspect that your network’s security is compromised by new malware and would like to update the components immediately.
To perform a manual update:
1. Click Summary from the menu. The Summary screen appears with the System tab selected by default.
2. Under Components, verify the version numbers of the antivirus, anti-spyware, and anti-spam components that IMSS uses to protect your network.
3. To update all components, select the first check box on the column header next to the Name field. To update specific component(s), select the check box next to the desired component.
4. Click Update.
Rolling Back a Component Update
If you encounter any system issues after updating IMSS components, you can roll back to the previous version.
To roll back a component update:
1. Choose Summary from the menu. The Summary screen appears with the System tab selected by default.
2. To roll back all components to the previous versions, select the first check box on the column header next to the Name field. To roll back specific component(s), select the check box next to the desired component.
3. Click the Rollback button.
Configuring Scheduled Update
If you are unable to regularly download antivirus and anti-spam components, your network will be at risk from Internet threats. To automate the update process, configure an update schedule. If your network has limited Internet bandwidth, schedule updates during off-peak hours.
To configure a scheduled update:
1. Click Administration > Updates from the menu. The Updates screen appears with the Schedule tab selected by default.
2. Select the Enable scheduled update check box.
3. Under Update Component, select the components to update. Trend Micro recommends updating all components.
4. Under Update Schedule, select the update frequency:
• Minute intervals: Updates every { } minutes per hour. Select the minute interval. For example, if you select 15, the update is triggered four times an hour: at 00, 15, 30, 45 minutes. If you select 30, the update will be triggered twice an hour: at 00 and 30 minutes.
• Hourly at minute: Updates every hour at { } minutes. Select the number of minutes after the hour. For example, if you select 15, the update is triggered at 15 minutes after the hour, every hour.
• Weekly at day and time: Updates once a week at the specified day and time. Select a day of the week and the time of day.
5. Click Save.
IMSS Services
The scanner and policy services must be started to start protecting your network using IMSS. You can, however, choose whether to install or start the EUQ service.
• Scanner Services: Performs scanning of SMTP/POP3 traffic.
• Policy Services: Acts as a remote store of rules for the scanner services to enhance rule lookups.
• EUQ Services: Hosts a Web-based console to enable end users to view, delete and release spam messages addressed to them.
Starting or Stopping Services
After you have successfully installed IMSS and configured the various settings, start the services to begin scanning for malware and other threats. You may need to stop IMSS services prior to performing an upgrade or backup function.
To start or stop IMSS services:
1. Choose Summary from the menu. The Summary screen appears with the default System tab selected.
2. Under the Managed Server Settings section, click the Start or Stop button for the service(s) that you would like to start or stop.
Opening the End-User Quarantine Console
Before you can access the End-User Quarantine (EUQ) Web management console, ensure that you have done the following:1. Configured the LDAP settings. See Step 4: Configuring LDAP Settings on page 1-9.
2. Enabled User Quarantine Access. See Configuring User Quarantine Access on page 5-38.
You can view the EUQ Web management console from the computer where the program was installed or remotely across the network.
To view the console from another computer on the network, type the following URLs in an Internet browser:
• Primary EUQ service:https://<target server IP address>:8447 • Secondary EUQ service:https://<target server IP address>:8446
WARNING! To successfully access all Web management consoles on secondary EUQ services, synchronize the system time of all EUQ services on your net-work.
An alternative to using the IP address is to use the target server’s fully qualified domain name (FQDN).
Logon Name Format
The format of the user logon name for accessing the EUQ Web management console depends on the LDAP server type you have selected when configuring LDAP settings. The following are examples of the logon name format for the three (3) types of supported LDAP servers:
• Microsoft Active Directory
• Without Kerberos: user1@imsstest.com (UPN) or imsstest\user1 • With Kerberos: user1@imsstest.com
• Lotus Domino: user1/imsstest
Configuring IMSS Settings
This chapter provides general descriptions on the various configuration tasks that you need to perform to get IMSS up and running. For further details, refer to the Online Help accessible from the Web management console.
• IP Filtering Service on page 2-2 • Scanning SMTP Messages on page 2-19 • About Domain-Based Delivery on page 2-26 • About Transport Layer Security on page 2-32 • Scanning POP3 Messages on page 2-41
IP Filtering Service
The IP Filtering service has two individual components: Email reputation and IP Profiler.
• Email reputation filters spam senders at the connection layer.
• IP Profiler helps protect the mail server from attacks with smart profiles from the Intrusion Detection Service (IDS).
Tip: Trend Micro recommends deploying IP Filtering as the first line of defense in your messaging infrastructure.
Although most email messaging systems have a multi-layer structure that often includes some pre-existing IP blocking, spam filtering, and virus filtering, Trend Micro recommends completely removing other IP blocking techniques from the messaging environment. IP Filtering should act as the precursor to any application filtering you might use.
Using Email Reputation
Trend Micro maintains a list of IP addresses belonging to known spam senders in a central database. Email Reputation filters spam by blocking the IP addresses stored in this database.
Using the SPS Activation Code
IP Filtering Service, which includes Email reputation and IP Profiler, uses the same license as Spam Prevention Solution (SPS). If you purchase the full SPS service package, you will receive a Registration Key that will allow you to create a customer account with Trend Micro. Upon completion of the registration process, you will receive your Activation Code.
The Activation Code enables you to access the level of services according to your registration. When you activate SPS, the licensing information for IP Filtering will then appear.
Using the Email Reputation Management Console
Log on to the Email reputation management console to access global spam information, view reports, create or manage Email reputation settings, and perform administrative tasks.
This section includes basic instructions for using the Email reputation console. For detailed instructions on configuring the settings for each screen, see the Email reputation console Online Help. Click the help icon in the upper right corner of any help screen to access the Online Help.
To open the Email reputation management console:
1. Open a Web browser and type the following address: https://tmspn.securecloud.com/
2. Log on using your Email reputation user name and password. The Smart Protection Network portal opens with the Email tab selected and the General screen displaying.
3. Select Global Spam Statistics from the menu. The Global Spam Statistics screen appears.
The Global Spam Statistics screen ranks ISPs based on the amount of spam they receive. The ISP Spam list displays the total spam volume from the top 100 ISPs for a specific week. The networks that are producing the most spam are ranked at the top. The ranking of the ISPs changes on a daily basis. The ISP Spam list displays the following:
TABLE 2-1. ISP Spam List
COLUMN DESCRIPTION
Rank This Week Displays the global rank for this week in terms of total spam volume.
Rank Last Week Displays the global rank for the previous week in terms of total spam volume.
4. Click News. The News screen appears.
The News screen displays breaking news about new spam and new features available for Email reputation. Click the following tabs for information:
• Spam News: Providesa brief overview and discussion of current spamming tactics and the implications for organizations. It also describes how new tactics are deployed, how they evade Trend Micro systems, and what Trend Micro is doing to respond to these new threats.
• Release News: Provides a brief overview of new features available in Email reputation
5. To view reports that summarize the activity between the MTA and the Email reputation database servers, do the following:
a. Select Report from the menu. A sub-menu appears.
ASN The Autonomous System Number (ASN) is a globally unique identifier for a group of IP networks having a single, clearly defined routing policy that is run by one or more network operators.
ISP Name The registered name for a particular ASN. Some ISPs may have multiple ASNs and therefore appear more than once in the table.
Spam Volume (24 hours)
The estimated total spam that has been sent during the previous 24 hours. This total is updated every hour.
Botnet Activity An indication of how active botnets are for your email servers. Botnets are groups of infected computers that are controlled by a spammer from a central loca-tion and are the largest source of spam on the Inter-net today. This number indicates the percentage change in the number of bots from the previous hour. To see botnet activity, you must add your email serv-ers to the Valid Mail Servserv-ers list.
TABLE 2-1. ISP Spam List (Continued)
b. Click one of the following:
6. To manage protection provided by Email reputation settings:
a. Select Policy from the menu. A sub-menu appears. TABLE 2-2. Report Types
REPORT DESCRIPTION
Percentage Que-ries
The report shows the percentage of queries that returned an IP address match, which indicates that a sender trying to establish a connection with your email server is a known spammer. The reports are based on connections, not individual spam mes-sages.
Queries per Hour The report shows how many times your email server queried the reputation database.
Queries per Day The report shows how many times per day your email server queried the reputation database.
Botnet Report The report provides a quick summary of the last seven days of spam activity originating from the serv-ers that you listed as valid mail servserv-ers. If there was any spam activity in the last seven days for any of the IP addresses that you specified, a red robot icon appears.
b. Click one of the following:
7. To change your password or Activation Code or to add your mail servers to Email reputation, choose Administration from the menu.
TABLE 2-3. Policy Settings
POLICY DESCRIPTION
Settings Configure the Approved and Blocked senders lists. You can define your lists by individual IP address and CIDR by Country, or by ISP.
• Approved Sender: Allows messages from the approved senders to bypass IP-level filtering. The Approved Sender lists are not applied to your MTA, but you can set up additional approved or blocked senders lists or do additional filtering at your MTA.
• Blocked Sender: Instructs Email reputation to always block email messages from certain countries, ISPs, and IP addresses.
New ISP Request Trend Micro welcomes suggestions from customers regarding other Internet Service Providers (ISPs) to be added to the service.
Provide as much information about an ISP as you can. This helps Trend Micro add the ISP to the ser-vice.
Reputation Set-tings
Configure Email reputation Standard and Advanced settings.
Standard customers will see only the Enable Stan-dard Settings section.
Advanced customers will see both the Dynamic Set-tings and the Enable Standard SetSet-tings sections.
Configuring IP Filtering
To configure IP Filtering, perform the following steps:
Step 1: Enabling Email Reputation and IP Profiler on page 2-7 Step 2: Adding IP Addresses to the Approved List on page 2-9 Step 3: Adding IP Addresses to the Blocked List on page 2-9 Step 4: Enabling IP Profiler Rules on page 2-10
Step 5: Configuring Email Reputation on page 2-15
Step 1: Enabling Email Reputation and IP Profiler
Enable Email reputation and IP Profiler to begin IP Filtering protection. You can enable both or one type of protection.
To enable Email reputation and IP Profiler:
1. Choose IP Filtering > Overview from the menu. The IP Filtering Overview screen appears.
2. Select the Enable IP Filtering check box.This will select both the Email reputation and IP Profiler check boxes.
3. Clear the Email reputation or IP Profiler check boxif you do not require them.
4. Click Save.
Note: If you decide to disable IP filtering subsequently, uninstall Email Reputation and IP Profiler manually. Disabling IP filtering from the Web management console only unregisters IP Profiler from IMSS but does not stop Email Reputation and IP Profiler from running.
Step 2: Adding IP Addresses to the Approved List
IMSS does not filter IP addresses or domains that appear in the Approved List. To add an IP address to the Approved List:1. Choose IP Filtering > Approved List from the menu. The Approved List screen appears.
2. Click Add. The Add IP/Domain to Approved List screen appears.
3. Select the Enable check box.
4. Type the domain or IP address that you would like to add to the Approved List.
5. Click Save. The domain or IP address appears in the Approved List.
Step 3: Adding IP Addresses to the Blocked List
To add an IP address to the Blocked List:
1. Choose IP Filtering > Blocked List from the menu. The Blocked List screen appears.
2. Click Add. The Add IP/Domain to Blocked List screen appears.
3. Select the Enable check box.
4. Type the domain or IP address.
5. Select Block temporarily or Block permanently.
6. Click Save. The domain or IP address is added to the blocked list.
Step 4: Enabling IP Profiler Rules
Rules are set to monitor the behavior of all IP addresses and block them according to the threshold setting. Rules can be set for the following:
• Spam
• DHS attacks • Bounced mail
WARNING! Before enabling IP Profiler Rules, add all of your email servers’ IP addresses (that send outgoing email messages to IMSS) to the IP Filter-ing Approved List. To configure the IP FilterFilter-ing Approved List, see Step 2: Adding IP Addresses to the Approved List on page 2-9.
To specify IP Filtering spam settings:
1. Choose IP Filtering > Rules from the menu. The Rules screen appears with 4 tabs, one for each type of threat.
2. Click the Spam tab. The Spam screen appears.
3. Select the Enable check box to enable blocking of spam.
4. Specify a value for the following:
• Duration to monitor: The number of hours that IMSS monitors email traffic to see if the percentage of spam email messages exceeds the threshold you set. • Rate (%): Type the maximum number of allowable email messages with spam
threats.
• Total mails: Type the total number of spam email messages out of which the threshold percentage is calculated.
Consider the following example.
During each one-hour period that spam blocking is active, IMSS starts blocking IP addresses when more than 20% of the messages it receives contain spam and the total number of messages exceeds 100.
5. Next to Triggering action, select one of the following:
• Block temporarily: Block email messages from the IP address and allow the upstream MTA to try again.
• Block permanently: Never allow another email message from the IP address and do not allow the upstream MTA to try again.
6. Click Save.
To specify IP Filtering virus settings:
1. Choose IP Filtering > Rules from the menu. The Rules screen appears with 4 tabs, one for each type of threat.
2. Click the Virus tab. The Virus screen appears.
3. Select the Enable check box to enable blocking of viruses.
4. Configure the following:
• Duration to monitor: The number of hours that IMSS monitors email traffic to see if the percentage of email messages with viruses exceeds the threshold you set.
• Rate (%): Type the maximum number of allowable email messages with viruses (the numerator).
• Total mails: Type the total number of infected email messages out of which the threshold percentage is calculated (the denominator).
Consider the following example.
During each one-hour period that virus blocking is active, IMSS starts blocking IP addresses when more than 20% of the messages it receives contain viruses and the total number of messages exceeds 100.
5. Next to Triggering action, select one of the following:
• Block temporarily: Block email messages from the IP address and allow the upstream MTA to try again.
• Block permanently: Never allow another email message from the IP address and do not allow the upstream MTA to try again.
6. Click Save.
To specify IP Filtering Directory Harvest Attack (DHA) settings:
1. Choose IP Filtering > Rules from the menu. The Rules screen appears with 4 tabs, one for each type of threat.
2. Click the DHA Attack tab. The DHA Attack screen appears.
3. Select the Enable check box to enable blocking of directory harvest attacks.
4. Configure the following:
• Duration to monitor: The number of hours that IMSS monitors email traffic to see if the percentage of email messages signaling a DHA attack exceeds the threshold you set.
• Rate (%): Type the maximum number of allowable email messages with DHA threats (the numerator).
• Total mails: Type the total number of DHA email messages out of which the threshold percentage is calculated (the denominator).
• Sent to more than: Type the maximum number of recipients allowed for the threshold value.
• Non-existing recipients exceeds: Type the maximum number of non-existent recipients allowed for the threshold value. DHA attacks often include randomly generated email addresses in the receiver list.
Note: The LDAP service must be running to determine non-existing recipients. Consider the following example.
Duration to monitor: 1 hour at a rate of 20 out of 100 sent to more than 10 recipients when the number of non-existing recipients exceeds 5.
During each one-hour period that DHA blocking is active, IMSS starts blocking IP addresses when it receives more than 20% of the messages that were sent to more than 10 recipients (with more than five of the recipients not in your organization) and the total number of messages exceeds 100.
5. Next to Triggering action, select one of the following:
• Block temporarily: Block email messages from the IP address and allow the upstream MTA to try again.
• Block permanently: Never allow another email message from the IP address and do not allow the upstream MTA to try again.
6. Click Save.
To specify IP Filtering Bounced Mail settings:
1. Choose IP Filtering > Rules from the menu. The Rules screen appears with 4 tabs, one for each type of threat.
3. Select the Enable check box to enable blocking of bounced mail.
4. Configure the following:
• Duration to monitor: The number of hours that IMSS monitors email traffic to see if the percentage of email messages signaling bounced mail exceeds the threshold you set.
• Rate (%): Type the maximum number of allowable email messages signaling bounced mail (the numerator).
• Total mails: Type the total number of bounced email messages out of which the threshold percentage is calculated (the denominator).
Consider the following example.
Duration to monitor: 1 hour at a rate of 20 out of 100
During each one-hour period that blocking for bounced mail is active, IMSS starts blocking IP addresses when more than 20% of the messages it receives are bounced messages and the total number of messages exceeds 100.
Note: The LDAP service must be running to check bounced mail.
5. Next to Triggering action, select one of the following:
• Block temporarily: Block email messages from the IP address and allow the upstream MTA to try again.
• Block permanently: Never allow another email message from the IP address and do not allow the upstream MTA to try again.
6. Click Save.
Step 5: Configuring Email Reputation
Email reputation verifies IP addresses of incoming email messages using the Trend Micro Email Reputation database.
To configure Email Reputation:
1. Choose IP Filtering > Email Reputation from the menu. The Email Reputation screen appears.
2. Select the EnableEmail Reputation check box.
3. Click a radio button next to one of the following, depending on your level of service, and configure the settings:
Standard:
• Default intelligent action: Email reputation permanently denies connection (550) for RBL+ matches.
• Connection closed with no returning code: Blocks all connections without providing an associated error code.
• Connection rejected with:
• SMTP error code: Blocks any connections that have a certain SMTP code. Type an SMTP code.
• SMTP error string: Type the message associated with the SMTP error code.
• Delay connection by: Delays all connections by the specified time in seconds. • Pass and log only: Allows and records all connections.
Advanced:
• Default intelligent action: Email reputation permanently denies connection (550) for RBL+ matches and temporarily denies connection (450) for Zombie matches.
• Connection closed with no returning code: Blocks all connections without providing an associated error code.
• Connection rejected with:
• SMTP error code: Blocks any connections that have a certain SMTP code. Type an SMTP code.
• SMTP error string: Type the message associated with the SMTP error code.
Note: The above SMTP error code and error string will be sent to the upstream MTA that will then take the necessary preconfigured actions, such as recording the error code and error string in a log file.
• Delay connection by: Delays all connections by the specified time in seconds. • Pass and log only: Allows and records all connections.
Displaying Suspicious IP Addresses and Domains
IMSS creates log entries of the IP addresses or domains that have sent email messages violating scanning conditions, but are still not blocked because the total number of messages did not exceed the threshold you set for the given time period.
To display suspicious IP addresses and domains:
1. Click IP Filtering > Suspicious IP/Domain.
2. Choose from any of the following conditions:
• Next to Type, select the check boxes next to the type of threat that the IP filter detected.
• Next to Dates, select the date-time range within which IMSS blocked the sender.
• If you know a specific IP address to query, type it next to IP.
• To display the corresponding domain names of the IP addresses, select the
Show Domain names check box.
• Next to Logs per page, select the number of log entries to display on the screen at a time.
3. Click Display Log.
4. Perform any of the additional actions:
• To block an IP address temporarily, select the corresponding check box in the list, then click Block Temporarily.
• To block an IP address permanently, select the corresponding check box in the list, then click Block Permanently.
• To change the number of items that appears in the list at a time, select a new display value from the drop down box on the top of the table.
Scanning SMTP Messages
IMSS comes bundled with its own Message Transfer Agent (MTA). If you have deployed multiple scanner services, you can manage the SMTP routing settings for the scanner services centrally. From the IMSS Web management console, configure the SMTP settings and apply the same settings to all scanners.
Configuring SMTP Routing
Configuring SMTP routing involves the following steps: Step 1. Configuring SMTP Settings on page 2-19 Step 2. Configuring Connections Settings on page 2-20 Step 3. Configuring Message Rule Settings on page 2-23 Step 4. Configuring Delivery Settings on page 2-26
Configuring SMTP Settings
Use the SMTP screen to configure SMTP settings for the MTA, such as the SMTP greeting message and the location of the mail processing queue, where IMSS saves messages before it scans and delivers them.
To specify the SMTP settings:
1. Click Administration > IMSS Configuration > SMTP Routing. The SMTP Routing screen appears.
2. Specify the domain name for the SMTP server in the SMTP server domain field.
3. Specify SMTP server Greeting Message (displays when a session is created).
4. Specify the Mail Processing Queue Path.
5. Click Save.
Configuring Connections Settings
To specify the Connections settings:
1. Choose Administration > IMSS Configuration > SMTP Routing from the menu.
2. Click the Connections tab. The Connections screen appears.
3. Specify the SMTP Interface settings:
• IP address: Select the interface that will connect with your SMTP server. • 127.0.0.1: The SMTP server will only listen to the IP address on the local
• All interfaces: If there are multiple IP addresses on the computer, the SMTP server will listen to any of the IP addresses available.
• Port: Type the listening port of the SMTP server.
• Disconnect after { } minutes of inactivity: Type a timeout value.
• Simultaneous connections: Click No limit or Allow up to { } connections
and type the maximum number of connections.
4. Specify the Connection Control settings:
• Accept all, except the following list: Configure the "deny list" using the following:
• Single computer: Type an IP address, and then click >> to add it to the list.
• Group of computers: Type a subnet address and mask, and then click >>
to add the group to the list.
• Import from file: Click to import a "deny list" from a file. The following shows sample content of an IP list text file:
192.168.1.1
192.168.2.0:255.255.255.0 192.168.3.1:255.255.255.128 192.168.4.100
192.168.5.32:255.255.255.192
• Deny all, except the following list: Configure the "permit list" using the following.
• Single computer: Type an IP address, and then click >> to add it to the list.
• Group of computers: Type a subnet address and mask, and then click >>
to add the group to the list.
• Import from file: Click to import a "permit list" from a file. The following shows sample content of an IP list text file:
192.168.1.1
192.168.3.1:255.255.255.128 192.168.4.100
5. Click Save.
Configuring Message Rule Settings
To set limits on the email messages that IMSS can handle and to control email relay, configure all settings on the Messages Rules screen.
Email Relay
To prevent spammers from using the IMSS MTA as a relay for spam, configure relay control by adding the mail domains on your network to the Relay Domains list. When IMSS receives an email message, it looks at the final destination of the email and compares it to this list. IMSS discards the message under the following circumstances: • The destination domain is not in this list
• The parent domain of the destination domain is not in this list • The host is not on the Permitted Senders of Relayed Mail list
Relay domain settings are different from Domain-based delivery settings. For an explanation, see About Domain-Based Delivery on page 2-26.
To specify the message rules:
1. Choose Administration > IMSS Configuration > SMTP Routing from the menu.
3. Specify the Message Limits settings:
• Maximum message size: Type the number of megabytes.
• Maximum data size per connection: Type the maximum data for each connection.
• Maximum messages per connection: Type the maximum number of messages for each connection.
• Maximum number of recipients: Type the number of recipients from 0 to 99999.
4. Select the check box under LDAP Look Up to check recipients on the LDAP server, if desired.
5. Select the check box under Reverse DNS Look Up to perform a check on the domain name associated with an incoming IP address, if desired.
6. Specify the Relay Domains. IMSS relays the messages to the listed domains.
Tip: When importing, import both the exact domain and all sub-domains for best results.
The following shows sample content of a domain list text file: • domain.com: Imports the exact domain
• *.domain.com: Imports all sub-domains • domain.org: Imports the exact domain
Note: The import file must be a text file containing one domain per line. You can use wildcards when specifying the domain.
7. Specify the Permitted Senders of Relayed Mail.
8. Click Save.
Tip: For security reasons, Trend Micro recommends that you avoid open relay when configuring the message rule settings. For more information on how to avoid open relay, refer to the Online Help and the FAQ section in this manual.
About Domain-Based Delivery
IMSS maintains a routing table based on the domain names of recipient email addresses. IMSS then uses this routing table to route emails (with matching recipient email addresses) to specified SMTP servers using domain-based delivery. Messages destined to all other domains will be routed based on the records in the Domain Name Server (DNS).
Relay Domains and Domain-Based Delivery
The domains you configure for relay domain settings (for SMTP Message Rules) are different from the domains you configure for domain-based delivery settings (for Domain-Based Delivery).
Relay domains: IMSS relays email messages that are sent only to the relay domains. For example, if the relay domains list includes only one domain, "domain.com", IMSS will relay only email messages that are sent to "domain.com".
Domain-based delivery domains: IMSS delivers email based on domain-based delivery. For example, if the delivery domains include "domain.com" and the associated SMTP server 10.10.10.10 on port 25, all email messages sent to "domain.com" will be delivered to the SMTP server 10.10.10.10 using port 25.
Configuring Delivery Settings
Specify settings for the next stage of delivery. IMSS checks the recipient mail domain and sends the mail to the next SMTP host for the matched domain.
To specify the delivery settings:
1. Choose Administration > IMSS Configuration > SMTP Routing from the menu.
3. Click Add under Domain-Based Delivery Settings. The Add Domain screen appears.
4. Specify the domain to add in the Domain field.
5. Select one of the following:
• Outgoing server address: Provide an IP address and port number for the outgoing message server and click >>.
• DNS server address: Provide an IP address for the DNS server and click >>. If the field is left blank, the system default DNS server is used.
6. Click OK.
7. Specify the settings for Delivery Retry Attempts to define the number of times and the interval at which IMSS will retry the delivery.
8. Specify the Hop Limit to determine the maximum number of times IMSS will pass undeliverable messages around the servers before aborting delivery.
9. Specify the Masquerade Domain that will overwrite the senders’ real domain names for outgoing messages.
10. Select the check box under Disable "Received" header if you do not want IMSS to insert the "Received:" header when processing messages.
11. Click Save.
Valid XML file content with the required details for a domain:
<?xml version="1.0" encoding="UTF-8"?>
<IMSS_DBD>
<!--This section defines version and platform information for IMSS from which this Domain-based Delivery file exported.
Do NOT edit this section. This section is used for version checking during imports.
-->
<key section="MetaInfo">
<value name="version">7.1</value> <value name="build">0000</value> <value name="platform">Win32</value> </key>
<!--This section defines the relay methods if either of the following conditions are satisfied:
1. Cannot find an exact match
2. The Domain-based relay methods list is empty.
The syntax is same as that used for domain-based relays. -->
<key section="DefaultRelay">
<value name="UseMethod">1</value> <value name="SmartHostCount">1</value> <value
name="SmartHost0">user.client.domain.example.com:25</value> </key>
<!--This section defines domain-based relay settings for specific domains.
Each key defines one domain relay with its name in the "domain" property.
IMSS supports two relay methods: Smart host and DNS query:
1. UseMethod=0: DNS query method (default value) 2. UseMethod=1: Smart host method
IMSS supports multiple options for each kind of relay method, for example:
UseMethod=1 SmartHostCount=2
SmartHost0=<ip_of_downstream_mta0>:25 SmartHost1=<ip_of_downstream_mta1>:25 or
UseMethod=0 DNSServerCount=2
DNSServer0=<ip_of_dns_server0> DNSServer1=<ip_of_dns_server1>
(DNS query allows blank lists. If DNSServerCount=0, MTAs will use the system default DNS server)
Syntax for SmartHost should use the following formats: hostname_or_ip:port:auth:username:password
- hostname_or_ip : Host name or IP address (only IPv4 addresses or names are supported).
- port : Host port. The default value is 25. - auth : Authentication is required.
- 1: MTA will try authentication
A user name and password might be required. The default value is 0.
- username : User name used for authentication. The default value is a blank user name.
- password : Password used for authentication.
Use the IMSS 'password' utility to generate the password.
Syntax for DNS Servers should use the following format: hostname_or_ip
- hostname_or_ip : The IP address or host name of the DNS server (only IPv4 addresses or names are supported).
-->
<key domain="example.com">
<value name="UseMethod">1</value> <value name="SmartHostCount">1</value> <value
name="SmartHost0">user.client.domain.example.com:25</value> </key>
About Transport Layer Security
In IMSS, Transport Layer Security (TLS) provides a secure communication channel between servers over the Internet, ensuring the privacy and integrity of the data during transmission.
Two servers (Server A and Server B) establish a TLS connection through a handshaking procedure as described below:
1. The handshake begins when Server B requests a secure connection with Server A by sending a list of ciphers.
2. Server A then selects one cipher presented by Server B and replies with its digital certificate that may have been signed by a Certificate Authority (CA).
3. Server B verifies Server A's identity with the trusted CA certificate. If the verification fails, Server B may choose to stop the TLS handshake.
4. Upon verifying Server A’s identity, Server B proceeds to generate the session keys by encrypting a message using a public key.
5. This message can only be decrypted using the corresponding private key. Server B’s identity is thus authenticated when Server A is able to decrypt the message successfully using the private key.
6. The handshake completes and the secure connection is established after the servers have created the material required for encryption and decryption.
IMSS applies TLS on traffic entering IMSS and traffic exiting IMSS, not on incoming or outgoing message traffic.
IMSS Support of Transport Layer Security
IMSS supports the following for TLS communication: TABLE 2-4. IMSS Support of TLSSUPPORTED OBJECT FORMAT
Trusted CA certifi-cates
Distinguished Encoding Rules (DER) .cer
Privacy Enhanced Mail (PEM) .crt
Public Key Cryptography Standards (PKCS) #7 .p7b
Note: IMSS supports the Transport Layer Security protocols: TLS 1.0 and SSL 3.0.
Separate certificate and private key (Pvk)
Single certificate (DER, PEM) • .cer
• .crt
• .pem
Pvk file (PEM) .pem
Certificate chain (PEM) .pem
Certificate and Pvk
in same file Single certificate and Pvk in PEM format .pem Single certificate and Pvk in PKCS #12 format • .pfx
• .p12
Certificate chain and Pvk in PEM format .pem
Certificate chain and Pvk in PKCS #12 format • .pfx
Configuring Transport Layer Security Settings
Check the following before you configure a TLS connection in IMSS: • Obtain a digital certificate:You may obtain a digital certificate through one of the following methods: • Generate the certificate and public/private key pairs using some certificate
generator or key generator tools, then request a certificate authority to sign the certificate.
• Apply for the certificate and public/private key pairs from a certificate authority.
• Ensure that the certificate format is valid:
• Ensure that the signed certificate contains both the private key and certificate information.
Configuring Transport Layer Security Settings for Messages
Entering IMSS
IMSS applies TLS to messages that enter and exit the server where IMSS is installed. Message traffic can enter IMSS from two directions:
• Message traffic from the Internet that is to be delivered to your clients. Note: IMSS supports RSA and DSA private keys.
IMSS supports MD5 and SHA1 signature algorithms.
IMSS does not support SHA2 (including SHA256, SHA384, SHA512). TABLE 2-4. IMSS Support of TLS (Continued)