©1988 AT&T
©1985, 1986 Systems Strategies Inc. All Rights Reserved
Printed in USA NOTICE
The information in this document is subject to change without notice. AT&T assumes no responsibility for any errors that may appear in this document.
DEC is a registered trademark of Digital Equipment Corporation. IBM and SNA are registered trademarks of International Business Machines Corporation.
1
2
3
4
Table of Contents
Introduction
Overview 3278/9 Features
The 3278/9 Terminal Emulator
Using the AT&T 3287 Printer Emulator
3278 and 3279 Key Functions
Introduction
Communication-Specific Keys Printer-Specific Keys
Termination Keys Status Line Keys Local Keys
Multi-Session Keys
Screen Display
Introduction
Application Program Area
Operator Information Area (Status Line)
Using the 3278/9 Terminal Emulator
Configuring Your Environment Session States
Invoking the Terminal Emulator
Table of Contents
5
A
B
c
Starting a 3278/9 Session
Using the Terminal Function Selection
Menu
Introduction
Power On aNew Session Display All Current Sessions Select a Session
Power Off a Specific Session Power Off All Sessions
Sa~ple Host Application Session
Documentation
Documentation
Ordering AT&T Documentation
Error Codes
Error Codes
Key Sequences
Key Sequences for Standard ASCII Terminals Key Sequences for AT&T 4410 and Teletype 5410
Terminals
Key Sequences for AT&T 4418 and Teletype 5418 Terminals
Key Sequences for AT&T 4425 and Teletype 5425 Terminals
Key Sequences for AT&T 605 Business
Communications Terminal with 102-Key Keyboard Key Sequences for AT&T 610, 615, 620, and 630
Terminals with 98-Key Keyboard
Ii USER'S GUIDE
D
The
te3279 Command
The te3279 Command
Index
Table
of
Contents0-1
Table of Contents
List of Figures
Figure 3-1: Status Line Messages 3-6
Figure C-1: AT&T 3278/9 Key Sequences For Standard ASCII
Terminals (using KY.std). C-2
Figure C-2: AT&T 3278/9 Key Sequences for AT&T 4410 and
Teletype 5410 Terminals C-4
Figure C-3: AT&T 3278/9 Key Sequences for AT&T 4418 and
Teletype 5418 Terminals C-6
Figure C-4: AT&T 3278/9 Key Sequences for AT&T 4425 and
Teletype 5425 Terminals c-s
Figure C-S: AT&T 3278/9 Key Sequences for AT&T 605 Business Communications Terminal with 102-Key
Key-board C-10
Figure C-6: AT&T 3278/9 Key Sequences for AT&T 610, 615, 620
1
Introduction
Overview
1-13278/9 Features
1-2The 3278/9 Terminal Emulator
1-3Overview
The AT&T 3270 Emulator+ is a networking software product that supports interactive communication between your 3B Computer and a host system. The AT&T 3270 Emulator+ software performs the functions of the following IBM devices:
II IBM 3274 Control Unit (BSC/3270 and SNA/3270). Commands sup-ported include:
o Copy (BSC only) o Erase All Unprotected o Erase / Write
o Erase/Write Alternate o Read Buffer
o Read Modified o Read Modified All
o Write
• IBM 3278 Display Station, Models 2 and 5
II IBM 3279 Display Station, Model 2
Your System Administrator handles the operations of the 3274 Controller emulation and the 3287 Printer emulation for your 3B Computer. For more information, refer to the AT&T 3270 Emulator+ System Administrator's Guide,
3278/9
Features
The AT&T 3270 Emulator+ software that allows you to use your termi-nal as an IBM 3278/9 Display Station is called the 3278/9 Termitermi-nal Emula-tor. The emulator allows communication between your terminal and a host computer, and it allows you to use all the features and programs available to the user of a 3278/9 Display Station. Using the AT&T 3278/9 Terminal Emulator you may: '
• Log on to IBM mainframe applications such as TSO, IMS, and CICS. • Send a copy of a screen display (local screen print) to a 3B Computer
file or pipe it to a process, such as the printer spooler, lp.
• Direct host application program output to a UNIX system printer queue, file, or process.
The 3278/9 Terminal Emulator supports all the features of the 3278 Display Station (Models 2 and 5) and the 3279 Display Station (Model 2), including:
• Base color (white, blue, green, and red) • Extended color (turquoise, pink, and yellow)
• Extended highlighting (blink, underscore, and reverse video)
• 132 column mode (Model 5)
In addition to these standard features, the 3278/9 Terminal Emulator offers the following enhancements:
• Multi-session capability - up to 4 independent sessions can be esta-blished with one or more hosts from a single terminal.
• All 3278/9 Terminal Emulator session management functions may be invoked from a user-friendly Terminal Function Selection Menu as well as from the sessions themselves.
The 3278/9 Terminal Emulator
The primary functions of the 3278/9 Terminal Emulator are to:
• Update the screen buffer and screen display based on application pro-gram data received from the host
• Process and display your keystrokes
• Format the screen buffer to be sent to the host
• Send a copy of the screen to a local printer or disk file when you press the Terminal Emulator's PRINT key.
The 3270 Emulator+ software is designed to work with many different types of terminals. For each terminal supported there is a keyboard map-ping file and a screen control file that tell the 3278/9 Terminal Emulator how that particular terminal's keyboard and screen capabilities are to be translated to the 327819 functions. Because this configuration information is in a file, it is not fixed and can be adjusted to suit your needs. If after using the emulator for awhile, you feel that the keyboard and screen functions could be used more efficiently in a different configuration, you should ask your System Administrator to customize your keyboard andlor screen accordingly. Note that some of the 3278/9 features, such as extended highlighting and color, can only be emulated if your terminal physically supports them.
Customized files for the following terminal types are provided by the AT&T 3270 Emulator+:
• AT&T 4410, 4418, 4425, 605, 610, 615, 620 and 630 • Teletype 5410, 5418, 5425
The 3278/9 Terminal Emulator
1-4
Note that:
• The AT&T 4418 and the Teletype 5418 keyboard layouts are the same as that of an IBM 3278.
• The AT&T 4425 and the Teletype 5425 screen and keyboard files support 132 column mode (Model 5).
• The Tektronix 4105A screen and keyboard files support all features except 132 column mode (e.g. base and extended highlighting). • The AT&T 620 and 630 Terminals do not support extended attributes. • The AT&T 630 Terminal does not support bold (different character
intensities).
If your terminal is not listed above, ask your System Administrator to create the customized files needed for your terminal type.
Using the AT&T 3287 Printer Emulator
Your System Administrator handles the operation of the AT&T 3287 Printer Emulator; before you can use it, your System Administrator must start the Printer Emulator process. The AT&T 3287 Printer Emulator allows you to use a host application print command or utility to direct output or . files to a UNIX system file or to a process such as the printer spooler, lp.
2
3278 and 3279
Key
Functions
Introduction
Communication-Specific Keys
ATTN CLEAR CURSR SEL ENTER
PROGRAM ACCESS (P A) KEYS PROGRAM FUNCTION (PF) KEYS SYS_REQ (SNA only)
TEST_REQ (BSC only)
Printer-Specific Keys
DEV_CNCL IDENT PRINT
Termination Keys
EXIT SHELL
Status Line Keys
3278 and 3279 Key Functions
-Local Keys
ALLCAP ALT_CR BAKTAB BLINK BS CAN CLICK DEL DUP E_EOF E_INPUT FM HOME INS NEWL NULLEND NUM_OV REDRAW RESET TABUP_A, DOWN_A, RIGHT_A, LEFT_A, RDUB, LDUB
COLOR TOP/BOTTOM
Multi-Session Keys
CTRLNEXTS PREYS
II USER'S GUIDE
Introduction
For descriptive purposes, the keys on a 3278 or 3279 Display Station keyboard can be categorized as follows:
• communication-specific keys • printer-specific keys
• termination keys • status line keys • local keys
• multi-session keys
IBM 3278/9 Display Stations have a number of keys that are not found on the ASCII terminals used with the 3B Computer. These keys are imple-mented on your terminal using special key combinations that simulate the IBM key functions. The following pages discuss each of these key functions as well as the multi-session keys used with the 3278/9 Terminal Emulator. Because many of the features described in this section are specific to a 3278/9 Display Station, and have special characteristics when they are used in a 3270 environment, you may wish to familiarize yourself with a real IBM 3278 or 3279 terminal. For more information about the IBM 3278 or 3279 Display Station, see the list of publications in Appendix A.
Communication-Specific Keys
The following key capabilities are used to communicate with the host system. During communication with the host, your terminal is locked and the system message WAIT appears in the Operator Information Area of your screen. (The Operator Information Area is described in Chapter 3, Screen Display.)
ATTN
Use ATTN when you want to communicate with the application pro-gram to request permission to transmit data. ATTN requests that the appli-cation program stop transmitting and unlock the terminal keyboard. The emulator key sequence functions only during an AT&T 3270 Emulator+ session between the terminal and the application program. When you use ATTN, the screen is cleared.
CLEAR
Use CLEAR to clear the screen and "home" the cursor (Le. position it at the top, left-hand corner of the screen). In SNA mode, the CLEAR key is active in sessions with the network control program or with the application program. In BSC mode, CLEAR is active only when the terminal is
unlocked.
CURSR SEL
CURSR_SEL is active only on fields that have been defined as detectable by a light-pen.
• If the information at the current cursor position is part of a light-pen detectable Selection field, using CURSR_SEL in that field will toggle the designator character for that field between "selected" (» and "not selected" (?). Then, pressing ENTER sends the contents of all
modified fields, including the light-pen detectable fields, to the host. The light-pen detectable fields that have been selected are considered modified fields since selecting such a field sets the modified data tag (MDT).
Communication-Specific Keys
• If the information at the current cursor position is part of a light-pen detectable Attention field, using CURSR_SEL immediately sends only the addresses of all modified fields to the host.
ENTER
Use ENTER to send the unprotected information on the screen to the host application program.
PROGRAM ACCESS (PA) KEYS
Use Program Access keys (PAl - PA3) to send specific messages to the application program. In the AT&T 3270 Emulator+, these keys are active only during a session with the application program.
PROGRAM FUNCTION (PF) KEYS
When you use a Program Function key (PFl - PF24), the information on the screen is sent to the host application program. The function performed by each key is specific to the application. In SNA mode, these keys are active only during a session with the application program. In BSC mode, they are active only when the terminal is unlocked.
SYS_REQ (SNA only)
Communication-Specific Keys
TEST_REQ (BSC only)
If you are having difficulty with your terminal, use TEST_REQ to send a test message to the host indicating a possible terminal failure condition.
Printer-Specific Keys
These key capabilities are used to make local printer assignments.
DEV CNCL
The DEV _CNCL key may be defined; however, its function is not
supported. .
IDENT
Use IDENT to change local printer assignments. IDENT allows you to direct the output from a PRINT key operation to the pathname of a disk file or physical printer, or to filter the output through a UNIX system command. IDENT can also be used to disable the PRINT key. When you use IDENT, you are prompted for the print mode number. If you don't know the number, press RETURN to display this menu:
Screen Print M::.lde Meml
o Disable Screen Print 1 write to File 2 Pipe to Camand 9 No chaD3'e
Screen print m:xle is 1, File: /tmp/lu6
Please select print mode:
Printer-Specific Keys
• If you select print mode 1, you are prompted for a pathname identi-fying a disk file. If the specified file cannot be opened or written to during execution of a print request, the appropriate operating system error code is displayed on the screen. (Press RETURN to continue.) • If you select print mode 2, you are prompted for a command line.
For example, lusr/bin/ip would specify the printer spooler, Ip. The command sort> Itmp/foo is an example of re-directing to a file through a filter. If the specified command line is invalid, or an error occurs while executing it, the operating system error message is displayed on the screen. (Press RETURN to continue.)
• If you select print mode 9, the print mode will remain unchanged.
When you use PRINT, the information on the screen is copied to the local printer that was assigned using IDENT or that was assigned explicitly or by default when the Terminal Emulator was invoked. This means that IDENT need not be used for PRINT to work.
If a print fails, the print mode will be set to O. To reset the print mode, use the IDENT key as described above.
Termination Keys
Use these key capabilities to exit from or suspend the Terminal Emula-tor.
EXIT
EXIT is equivalent to the ON /OFF switch on the 3278/9 Display Station. This function ends the Terminal Emulator session and returns you to the Terminal Function Selection Menu. The emulated terminal session is then considered powered-off by the controller.
EXIT does not send a power-off signal to the host. Do not use this function alone as an exit vehicle from your host application. You should log off or sign off to end a session before exiting the Terminal Emulator.
SHELL
Use SHELL to escape to the UNIX operating system. Note that while you are escaped to the shell updates to all of your sessions will continue. When you use SHELL, you will see an exclamation point (!) at the bot-tom of your screen, signifying that you can execute a single UNIX system shell command. After the command has executed, you will see the message
Hit Reblrn to continue. At this point you may leave the UNIX system by pressing RETURN, or you may execute another single UNIX system com-mand by entering! followed by the UNIX system comcom-mand. (Note, how-ever, that the environment established by one SHELL-invoked UNIX system command will not survive for a second SHELL-invoked UNIX system com-mand, since a separate shell is invoked each time.)
Status Line Keys
The 3278/9 Operator Information Area (described in Chapter 3, Screen Display) is displayed on your terminal as a status line. The following key capabilities change the mode of the status line or assign the status line to a specific line number.
STAT
Use STAT to toggle the modes of the status line display. The AT&T 3270 Emulator+ software supports three modes of status line display:
• Always display the status line, even if it covers up information on the screen.
• Never display the status line.
• Only display the status line when an error has occurred or the status line shows lNHIBIT or IDCKED.
The status line mode is initially set to "Always display."
STMV
When the emulated terminal does not have a permanent status line, use STMV to establish the line on which the cursor is currently positioned as the status line. This function is not needed and not allowed on any termi-nal, such as the AT&T 4425, which handles the twenty-fifth line differently from the rest of the screen.
Local Keys
The following data entry key functions are executed without interacting with the host.
ALLCAP
To toggle 'the alphabetic character display between normal and all uppercase, use ALL CAP .
When this key toggles to uppercase state, lowercase characters may still be entered from the keyboard or received from the host. (This key affects only the display, not the data.) These lowercase characters remain in the screen buffer as lowercase but are displayed as uppercase. If you want to show the change on the current display, use ALL CAP followed by REDRAW. Resist the temptation to use the Caps_Lock key on your key-board for this function. Doing so will disable emulator commands that require lowercase letters in their key sequences. (For example, if you use ESCxx for the EXIT key, ESCXX will not work.)
ALT CR
Use ALT_CR to toggle the cursor between an underlined and a rectangular block display (if supported by your terminal).
BAKTAB
When the cursor is located anywhere in an unprotected data field other than the first character position, use BAKTAB to move the cursor to the beginning of the field. When the cursor is anywhere else, this key moves the cursor back to the beginning of the previous unprotected data field.
Local Keys
BLINK
Use BLINK to toggle the cursor between a blinking and a nonblinking display (if supported by your terminal).
BS
BS performs the same function as LEFT_A. Both move the cursor one position to the left.
CAN
Use CAN to cancel a partially entered multi-key sequence. For example, in the sequence Esc, Ctrl-z, if you have entered only the Esc key, CAN will cancel the Esc.
CLICK
Use CLICK to toggle the keyclick on and off (if supported by your ter-minal). While the terminal is unlocked, the keyclick remains in the state to which it was last set. When the terminal is locked, the keyclick operates in the opposite state.
DEL
Use DEL to delete the character at the current cursor position when the cursor is in an unprotected field. DEL causes all characters in the field to the right of the cursor and up to the end of the current field to be shifted left one position. The rightmost character in the field is replaced by a null character.
Local Keys
DUP
When you use DUP in an unprotected data field, a special character displays, and the cursor moves to the first character of the next unprotected field. While the significance of this key is application-dependent, entry of the DUP code into the display buffer normally tells the application program th'at it should duplicate the operation for the rest of the current field. If you use DUP when the cursor is at a field attribute character or in a pro-tected field, the keyboard locks, and the cursor does not move.
When DUP is used on the IBM 3278/9 Display Station, the special char-acter is displayed as an asterisk with an overscore. On emulated terminals, the special character is chosen from the target terminal's graphics character set during customization.
E EOF
When the cursor is in an unprotected data field, use E_EOF to clear all characters from the cursor position to the end of the field to null characters. E_EOF does not affect the position of the cursor.
If you use E_EOF while the cursor is positioned at an attribute character or within a protected field, the keyboard locks, nothing is cleared, and the cursor does not move. If the screen is unformatted, all characters from the current cursor location to the last character position on the bottom line are erased.
E INPUT
When you are working with a formatted. screen, use E_INPUT to clear all unprotected fields to null characters and position the cursor at the first unprotected character position on the screen.
Local Keys
In an unformatted screen, E_INPUT clears the entire screen to nulls and "homes" the cursor.
FM
When you use FM, you add a special character to the contents of the display buffer for your terminal. This character is significant to the host application program. Like DUP, the significance of FM is application-dependent. However, when the contents of the display buffer are
unformatted, FM typically indicates end-of-field to the application program. When the buffer contents are formatted, FM normally denotes end-of-sub-field.
If you use FM when the cursor is positioned at a field attribute character or in a protected field, the keyboard locks and the cursor does not move.
When FM is used on the IBM 3278/9 Display Station, the special charac-ter is displayed as a semicolon with an overscore. On emulated charac-terminals, the special character is chosen from the target terminal's graphics character set during customization.
HOME
Use HOME to position the cursor at the first unprotected character posi-tion of the screen.
If the screen is entirely protected or entirely unprotected, this key posi-tions the cursor at the top left-hand corner of the screen.
INS
Use INS to place the keyboard into insert mode. When you use INS, the Operator Information Area of the screen signals this state by displaying "INSERT." (Note that with terminals displaying row and column informa-tion on the bottom right of the screen, such as the Teletype 5425, the INSERT message may not be visible.) When the keyboard is in insert mode and you enter an alphanumeric character at the cursor position, all charac-ters to the right of the cursor and up to the next null character will shift one space to the right.
Local Keys
INS locks the keyboard when:
• an insertion causes the field to overflow
• an insertion is attempted at a field attribute character • an insertion is attempted in a protected field.
When the terminal is in insert mode, RESET or any key sequence that starts host communication returns the keyboard to normal mode.
NEWL
Use NEWL to move the cursor to the first unprotected character location of the next line.
If the entire screen is protected, this key positions the cursor at the top left-hand corner of the screen. If the screen is unformatted, this key posi-tions the cursor at the beginning of the next line.
NULLEND
Use NULLEND to erase all trailing blanks in the field where the cursor is positioned and enter insert mode. The cursor may be in any position within the field. If the cursor is at an attribute character or within a pro-tected field when you use NULLEND, the terminal is locked and nothing is erased.
NUM OV
Use NUM_OV to enter a non-numeric character into a numeric field. This key is effective only for the next character entered.
REDRAW
Local Keys
RESET
Use RESET to unlock your keyboard following an illegal keyboard operation. RESET clears any error messages from the status line. This key is inactive while the terminal is communicating with the host system, and during execution of a print request, PRINT.
TAB
Use TAB to move the cursor to the first character of the next unpro-tected data field. If the screen is entirely protected or entirely unprotected, the cursor moves to the top left-hand corner of the screen.
UP_A, DOWN_A, RIGHT_A, LEFT_A, RDUB, LDUB
Use these key functions to move the cursor up, down, right, left, two locations right, and two locations left, respectively. The cursor will move to the appropriate character position regardless of field attributes that might block data entry into the field.
COLOR
This key toggles between color and monochrome if the terminal sup-ports color. Otherwise, this key is ignored.
TOP/BOTTOM
For terminals using 132 column mode (Model 5), these keys are used to display the top or bottom part of the screen when the number of lines of the display is greater than the number of lines on the physical terminal used for emulation. (The full size of the display is 132 columns x 27 rows.) These keys result in scrolling when size mismatch exists (Le., the number of lines on the physical terminal is less than the number of lines on the logical display). Otherwise, these keys are ignored.
Multi-Session Keys
CTRL
This key function transfers control to the 3278/9 Terminal Emulator, which displays the Terminal Function Selection Menu. (This is not the same as the control key on ,your terminal.)
NEXTS
This key function transfers keyboard and screen control to the session sequentially following the current session. If you have no other active ses-sions, you will be returned to the Terminal Function Selection Menu. The functionality of this key is equivalent to the n option on the Terminal Function Selection Menu.
PREYS
3
Screen
Display
Introduction
3-1Application Program Area
3-2Introduction
Application Program Area
The application program area is where your program input and output are displayed. The appearance of this area will vary with the application program.
Operator Information Area (Status Line)
The Operator Information Area displays in symbols, words, and numerals the status of the terminal, the attached devices, and communica-tion with the host system. On the IBM 3278/9 Display Stacommunica-tion, it is located on the twenty-fifth line of the screen.
Because not all terminals used with the 3B Computer have an address-able twenty-fifth line, and because not all have the same graphics capabili-ties as an IBM 3278 or 3279 Display Station, the Terminal Emulator cannot mimic the appearance of the Operator Information Area. Instead, the Operator Information Area is implemented by the Terminal Emulator as a status line on your screen. (Your System Administrator can customize the location at which the status line appears on your display. Refer to the
AT&T 3270 Emulator+ System Administrator's Guide for more information on how the Operator Information Area is implemented.)
The status line displays a set of natural language messages that
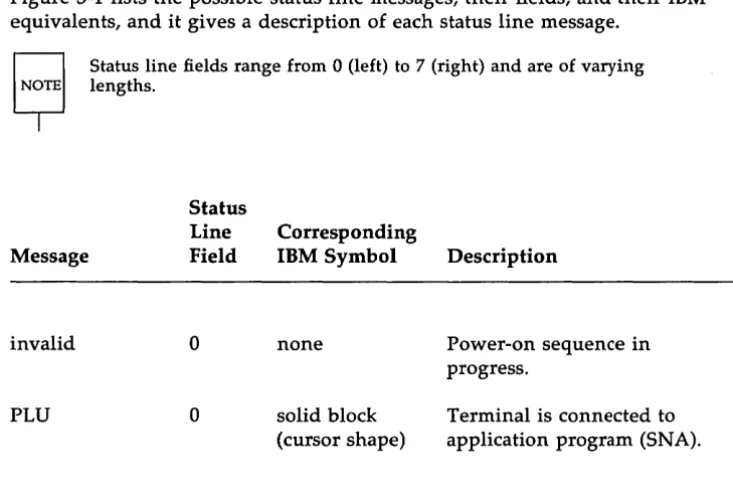
[image:39.453.53.420.285.530.2]correspond to the Operator Information Area symbols, words, and numerals. Figure 3-1 lists the possible status line messages, their fields, and their IBM equivalents, and it gives a description of each status line message.
Message
invalid
PLU
Status line fields range from 0 (left) to 7 (right) and are of varying lengths. Status Line Field 0 0 Corresponding
IBM Symbol Description
none Power-on sequence in
progress.
Operator Information Area (Status Line)
Corresponding Message
Status Line
Field IBM Symbol Description
SSCP 0 stick figure Terminal is connected to
the system services control point (SNA).
BSC 0 solid block Using BSC Controller
(cursor shape)
INACTIVE 0 none The controller is
waiting for host connection.
UNOWNED 0 '?' enclosed in Terminal is connected to
block the controller
process but not to
the applic~tion program (PLU), or network control
program (SSCP).
WAIT 1 'X' and clock Communication with
host is in progress.
INHIBIT 2 'X' Keyboard is locked.
WHAT? 3 'X?
+'
Terminal will not acceptthis operation. Press RESET and try the operation again.
SYSTEM 3 'X SYSTEM' Keyboard is disabled by
the host. Wait for host to re-enable or press RESET to restore keyboard.
Message
NOT HERE
TOO MUCH
NUMERIC
WHAT
BAD KEY TRANSLATION PRINT IN PROGRESS PRINT FAILED NO BLANKS TO CLEAR Status Line Field 3 3 3 3 3 3 3 3
Operator Information Area (Status Line)
Corresponding
IBM Symbol Description
'X
<-',
Operator action was stick figure, performed in wrong'>'
location. Press RESET.'X', Operator entry exceeded
stick figure, field length. Press
'>',
RESET.'X', Non-numeric data was
stick figure, entered in a numeric 'NUM' field. Press RESET.
'X-£, Requested operation is not available. Press RESET.
'X-S' The terminal emulation
process does not recognize this entry. Press RESET to continue.
Printing is in progress
Printing failed. Press RESET.
Operator Information Area (Status Line)
Corresponding Message
Status Line
Field IBM Symbol Description
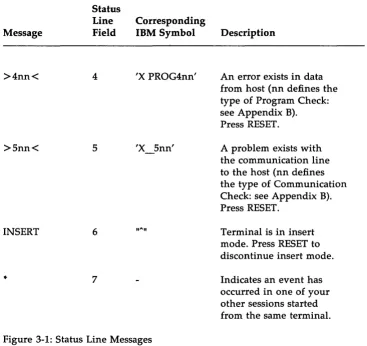
>4nn< 4 'X PROG4nn' An error exists in data from host (nn defines the type of Program Check: see Appendix B). Press RESET.
>Snn< 5 'X Snn' A problem exists with the communication line to the host (nn defines the type of Communication Check: see Appendix B). Press RESET.
INSERT 6 IIAII
Terminal is in insert mode. Press RESET to discontinue insert mode.
7 Indicates an event has
[image:42.451.32.399.68.414.2]occurred in one of your other sessions started from the same terminal.
Figure 3-1: Status Line Messages
4
Using the 3278/9 Terminal Emulator
Configuring Your Environment
4-1Session States
4-2Invoking the Terminal Emulator
4-4Configuring Your Environment
Before you can use the 3278/9 Terminal Emulator, your environment must be properly configured. In particular, the following environment vari-ables should be set and exported; P3274, D3274, SC3279, KY3279, TM3279, and PF3274. In addition, your PATH variable must include the 3270 Emula-tor+ runtime directory.
Session States
When the AT&T 3270 Emulator+ software is in use, a 3278/9 emulated session is in one of two conditions:
Powered-off
Powered-on
The session within the Terminal Emulator is not running, and therefore is not in communi-cation with the controller process. (The 3278/9 Terminal Emulator can be running with no sessions powered on.)
A session within the Terminal Emulator is running and is connected to the controller process.
A powered-on session may be in any of the following states:
Inactive
Invalid
Unowned
SSCP-LV session (SNA only)
LV-LU session (SNA only)
Locked
Unlocked
Session States
The controller process is not communicating with the host. (Indicated by INtCrIVE on the screen.)
This is a temporary 3270 Emulator+ state that is present only when first starting the 3278/9 Terminal Emulator. (Indicated by invalid on the screen.)
The terminal process is communicating with the controller, but it is not communicating with a host. The SYS _ REQ emulator key can be used to change to an SSCP state from an unowned state. (Indicated by ~ on the screen.)
The terminal logical unit (LV) is connected to and can communicate with the control pro-gram SSCP. Once this connection has been made, an LV-LV session can be established. (Indicated by SSCP on the screen.)
The terminal secondary logical unit (SLU) is connected to the application program primary logical unit (PLV) and can communicate with the application. The SYS _ REQ emulator key can be used to return to an SSCP state from an LV-LV session. (Indicated by PLU on the screen.)
The keyboard is disabled when an error con-dition exists or when it is explicitly locked by the host. (Indicated by INHIBIT or KEYOOA'EID
LOCKED on the screen.)
Invoking the Terminal Emulator
To invoke the 3278/9 Terminal Emulator from your terminal, use the following command format:
te3279 [-e]
This is an abbreviated command format. The -e option provides extended attribute processing, namely, extended color and extended highlighting. If your environment has been set up properly, you should not have to specify any other options. Consult your System Administrator to obtain the exact options you need to invoke te3279.
Appendix D contains a complete list of options to the te3279 command.
Starting a 3278/9 Session
To access a host using the AT&T 3270 Emulator+: Step 1. Step 2. Step 3. Step 4. Step 5. Step 6. Step 7. Step 8. Step 9.
Turn on your terminal. Log in to the UNIX system.
Ask your System Administrator to start the Controller and Printer Emulators. Before starting the emulators, the System Administrator sets your environment variables. (The System Administrator may edit your .profile so that they are automati-cally set up when you log in.)
Check to see that your terminal environment has been properly set by typing env and pressing RETURN. (Please contact your System Administrator if the list of environment variables that appears on the screen is not the same as the list supplied by your System Administrator.)
Type te3279 and press RETURN. If the System Administrator has initialized your environment properly, options are not required unless you will be using the extended attribute functions (-e option). If options are required, the exact te3279 command can be supplied by your System Administrator.
Once you have executed te3279, the AT&T 3278/9 Terminal Emu-lator banner will be displayed. Press RETURN; your first session will be established immediately.
Log in to your host application program. (If you are not familiar with your host application, ask your System Administrator for the correct procedure.)
Use the key sequences listed for your terminal type to emulate each of the 3278/9 key functions. (Appendix C contains a com-plete list of the 3278/9 key sequences for each supported termi-nal type.)
Starting a 3278/9 Session
session (up to four host sessions may be established) or execute any of the other Menu functions.
Chapter 5, Using the Terminal Function Selection Menu, describes each of the menu functions in detail.
5
Using the Terminal Function
Selec-tion Menu
Introduction
Power On a New Session
Display All Current Sessions
Select a Session
Power Off a Specific Session
Power Off All Sessions
Sample Host Application Session
5-1
5-2
5-4
5-6
5-7
5-8
Introduction
This section describes how to use each of the functions listed in the Ter-minal Function Selection Menu. Once you have started the TerTer-minal Emu-lator, use your CTRL key sequence (normally ESC f d) to display the Termi-nal Function Selection Menu.
Tenninal Function Selection Menu
c Display all current sessions a Power on a new session d Power off a specific session s Select a specific session n Select the next session p Select the previrus session
e Execute shell. ccmnand
i Printer assignment (IDEN!' key)
x Exit the process (power off all sessions)
Return to current session
Please select function:
The ten functions listed in the menu allow you to:
• add, select and delete sessions • toggle from one session to another • escape to the shell and assign printers • list all powered-on sessions
• exit the process
Power On a New Session
Tenn:inal Function Selection Menu
c Display all current sessions a Power on a new session d Power off a specific session s Select a specific session
n Select the next session p Select the previous session
e Execute shell oc:mtaIld
i Printer assigmnent (IDENl' key)
x Exit the process (power off all sessions)
RetUI:n to current session
Please select function: a
To establish a new session with a host, enter a. You will be prompted to enter the following information:
Far new session, please enter
. Controller pipe :Dane (Default: nnmm)
LU Part (Default: An;y)
If your environment is properly set, you can simply hit RETURN after each of these prompts.
Power On a New Session
The Cantroller pipe name specifies the path to the controller. Each controller has its own pipe name. If you need to specify this option, your System Administrator will provide you with the exact pipe name(s) you should use. (The default is the value of your P3274 variable.)
Display All Current Sessions
Terminal Function Selection Menu
c Display all current sessions a Power on a new session
d Power off a specific session s select a specific session
n select the next session
p select the previous session
e Execute shell oc:moand
i Printer assigmnent (IDEN1' key)
x Exit the process (p::JWer off all sessions) Return to current session
Please select function: c
To display all the sessions that you currently have established with the host, enter c. The following screen will be displayed.
session Controller LU Event Cur
No. Name Port CMner Occurred ses
---
---/t:np/P3274.2 0 ESC *
2 /t:np/P3274.4 3 FLU x
[Hit return to continue.]
Display All Current Sessions
Session No. Lists your active session numbers (1-4).
Controller Name This is the pipe to the controller you are using.
W Port This is the LU port number you are connected to.
Otmer Specifies the terminal state.
Event Occurred An "x" in this field indicates that an event
has occurred in the session since you were last there.
Select a Session
Tenninal FIlnCti.on Selection Menu
c Display all current sessions a Power on a new session d Power off a specific session s Select a specific session
n Select the next session
p Select the previous session
e Execute shell c:x:mtmld
i Printer assigmnent (IDENl' key)
x Exit the process (p::JWer off all sessions) Return to current session
Please select function: s
To toggle to another active session, enter s. The system will prompt you to enter the session number.
Please select session 1-4, or 0 for nenu:
The Select the next session and Select the previous session functions allow you to toggle forward or back one session. Enter. (a period) to return to your current session.
Power Off a Specific Session
Tenninal FUnction selection Menu
c Display all current sessions a Power on a new session
d Power off a specific session s select a specific session
n select the next session p select the previous session e EXecute shell ccmnand
i Printer assigmelt (IDmr key)
x Ex:i. t the process (power off all sessions)
Return to current session
Please select function: d
To power off a specific session, enter d. The system will prompt you as follows:
Please select session 1-4, or 0 for merm:
When the session has been ended, the following message is flashed:
TERMINAL SFSSICN TERMINATED
and the Terminal Function Selection Menu is displayed.
Power Off All Sessions
When you are finished using the emulator and are ready to return to the UNIX operating system, execute the following steps:
Step 1. Exit your host application(s).
Step 2.
You should always log off from you host application(s) before you exit the emulator. If you are not familiar with the applica-tion program, ask your System Administrator for the correct pro-cedure.
When the Terminal Function Selection Menu is displayed, enter x to exit the emulator. This ends all terminal sessions and returns you to the UNIX operating system.
TeDn:inal. Function Selection Menu
c Display all current sessions a Pc:Mer on a new session d Pc:Mer off a specific session s Select a specific session n Select the next session
p Select the previous session e Execute shell oc::moam
i Printer assigrmelt (IDENl' key)
x Exit the process (power off all sessions)
Retu%n to current session
Please select function: x
For each session that was powered on, the system will respond with the fol-lowing message:
TERMINAL SESSlOO' TERMINATED
Power Off All Sessions
After all sessions have been powered off, the system will respond with
TE3279 Process EKiting. Then your UNIX system prompt will be displayed. When the UNIX system prompt appears, proceed to your next task.
Sample Host Application Session
The sample session that follows shows how to use the emulator for a simple data entry session. While your particular application will differ from this example, procedures for starting and ending the session and for using many of the emulator keys are the same for all application programs.
The sample session shows what you need to do to: • Start the 3278/9 Terminal Emulator.
• Log in to your host application. • Enter sample data.
• Print a screen of data using the local print facility.
• Exit the host application program. • Exit from the 3278/9 Terminal Emulator.
Each step will be explained in, detail.
Step 1.
Step 2.
Step 3.
Step 4.
Turn on your terminal. Notice that your UNIX system message appears and prompts you to log in.
Log in to the UNIX operating system by typing your account name and password at the system prompts.
If you have typed in the correct information for your account, the system messages of the day and standard UNIX system prompt ($) will appear.
Type te3279 and press RETURN to start the terminal emulator.
In this example, the System Administrator for the host has set up the application program to begin whenever a particular user starts the terminal emulator. On your system a similar screen may appear to prompt for the specific application program you want to access.
Step 5.
Sample Host Application Session
r.o yt:U want to:
( 1) generate a bill
(2) generate a paycheck
(3) generate a report
Select 1, 2, or 3:
Select menu option 2 to generate a paycheck.
Press 2 and RETURN.
Sample Host Application Sessiori
Step 6.
Step 7.
5-12
Type of Transaction: PAYOIEX:l<
Ehployee Nalre:
First Initial: Middle Initial:
Last Nalre:
Social security Number: ___ - __ - ___ _
Hours Worked: ___ • __ regular ___ __ overt:ilne
Complete the screen by entering data in each field and pressing Ctrl-i (TAB) to move the cursor to the next field. If you make a mistake, delete characters using the DEL key.
Suppose you need an item of data to complete the screen (for instance, a Social Security Number) and the data are contained in a file under the UNIX operating system. Using ESC-s (SHELL), you can easily look at the file. The SHELL key temporarily suspends the terminal emulation process and allows you to access the UNIX operating system. You may enter one UNIX system command and then return automatically to the emulator.
Type ESC-s. The screen clears and the! prompt is displayed.
If you need to use more than one UNIX system command, you may create a shell by typing sh and pressing RETURN at the! prompt. Creating a shell allows you to enter more than one command. Use Ctrl-d or exit RETURN to exit the shell and return to the emulator.
Step 8.
Step 9.
Sample Host Application Session
When the ! prompt is displayed, look up the information you need in the UNIX system file, using regular UNIX system com-mands such as cat.
$ cat employee • list
NAME
Jcmes, P. Kane, A. Lester, C. A. Snith, J. A. 'lb::mas, D.
Soc. Security #
123-45-6789 037-42-5678 078-23-8765 033-36-7102 231-00-6789 Payoode 850 100 400 250 900
Press RETURN to return to the emulator when the UNIX system command execution ends. The screen on which you were work-ing will reappear.
~ of Transacticn:
Employee Name:
First Initial: J. Middle Initial: A.
Last Name: Snith
Social Security NuIIber: 033-36-7102
Sample Host Application Session
Step 10. Print the information on your screen by typing ESC-p (PRINT). The local PRINT key will copy the screen to the output area assigned by the IDENT key. (Your System Administrator will define a default assignment for you.)
Step 11. Process the information by pressing RETURN. While the host is processing the program, the status message WAIT is displayed. Step 12. Exit your host application. Ask your System Administrator how
to exit the host application if you are not familiar with the specific procedure for this application program. For TSO, enter logoff. For CICS, enter CSSF.
Step 13. At the Terminal Function Selection Menu, enter x to power off your session and exit from the 3278/9 Terminal Emulator. Do not exit the emulator by turning off your terminal. The controller will not be notified that your terminal has been powered off and may attempt to send important data to your terminal. Data that are sent to a powered-off terminal will be lost.
Step 14. When the UNIX system prompt is displayed, you may proceed to your next task or log off.
A
Documentation
Documentation
AT&T 3270 Emulator+ 3B ComputersUNIX System V
IBM 3270 and SNA Documentation
Ordering AT&T Documentation
A-1 A-1 A-1 A-1 A-1
Documentation
AT&T 3270 Emulator+
• AT&T 3270 Emulator+ User's and System Administrator's Guides (select
code 308-400)
• AT&T 3270 Emulator+ HLLAPI Programmer's Guide (select code 308-332) • AT&T 3270 Emulator+ Product Overview (select code 308-001)
• AT&T 3270 Emulator+ 3B2 Release Notes (select code 308-002)
• AT&T 3270 Emulator+ 3B5/ 3B 15/3B4000 Release Notes (select code
308-335)
38 Computers
• AT&T ~B2/300 Computer Owner/Operator Manual (select code 305-301) • AT&T 3B5/300 User Guide and Essential Utilities (select code 305-302)
UNIX System V
Documents describing UNIX System V are available from the Customer Information Center (s~e "Ordering AT&T Documentation" below).
IBM 3270 and SNA Documentation
The following IBM publications are relevant:
• An Introduction to the IBM 3270 Information Display System (GA27-2739). • IBM 3274 Control Unit Planning, Setup, and Customizing Guide
Documentation
• IBM 3270 Information Display System, 3274 Control Unit Description and Programmer's Guide (GA23-0061)
• Systems Network Architecture Concepts and Products (GC30-3072).
• Systems Network Architecture Technical Overview (GC30-3073).
• Systems Network Architecture Reference Summary (GA27-3136).
• IBM Systems Network Architecture Format and Protocol Reference Manual
(SC30-3112).
Ordering AT&T Documentation
AT &T documentation may be ordered by calling the AT&T Customer Information Center (CIC) at:
1-800-432-6600 (toll free within the continental United States) or by writing to:
AT&T Customer Information Center Customer Service Representative P.O. Box 19901
B
Error Codes
Error Codes
~rogram Check - SNA/3270
Communication Check - SDLC Errors Program Check - BSC/3270
Communication Check - BSC Errors
8-1 8-2 8-3
8-4
Error Codes
Error Codes
Program Check - SNA/3270
401 unknown data stream command 402 invalid buffer address in data stream
403 data follows 1-byte commands in data stream 404 data stream ends in order-pending state 411 Request/Response Unit (RU) too long (LU.T1) 413 function not supported
420 exception response request received when definite response only was specificed by BIND
421 definite-response request received when exception response only was specified by BIND
422 NO response not allowed 423 format indicator not allowed 430 sequence number error 431 chaining error
432 bracket error 433 data traffic inactive 434 direction error
443 read command must have Change Direction, not End Bracket
445 Activate Logical Unit (ACTLU) request does not apply to cold activation or Error Recovery Procedure (ERP) 450 BIND profile error
451 BIND primary protocol error 452 BIND secondary protocol error 453 BIND common protocol error
45~ BIND screen size error 455 BIND LU profile error 456 BIND LU1 error
457 BIND cryptography specified 462 data stream error detected by LU.T1 470 unknown data byte X'OO' - X'3F' or X'FF' 498 negative response received
499 exception request received
Communication Check - SOLC Errors
501 Data Set Ready (DSR) lost 502 Clear To Send (CTS) lost
504 Normal Disconnect Mode (NDM)
505 NDM
510 Physical Unit (PU) is not active
518 segmentation error (internal Deactivate Physical Unit (DACTPU»
519 received frame too long 520 timeout (no frames) 521 timeout (no flags)
525 20 Exchange Identification (XID) commands received in a row
528 Frame Reject Response (FRMR) sent; Frame Reject Mode (FRM) entered (internal DACTPU)
529 modem acting up (internal DACTPU) 530 clocking or CTS list (internal DACTPU)
Error Codes
Program Check - BSC/3270
401 unknown datCil stream command 402 invalid buffer address in data stream
403 data follows I-byte commands in data stream 404 data stream ends in order-pending state 405 invalid copy command was received 406 invalid command sequence received 408 line buffer overflow
480 user request lost due to host SELECT
481 user request lost due to host SELECT with bad command 482 host SELECT received with response to user request 483 host SELECT with bad command received with response
to user request
Communication Check - BSC Errors
530 clocking or CTS lost (internal DACTPU) 531 CU has sent a NAK
532 approximately 20 seconds have elapsed without detecting SYN characters on the line
533 the CU did not receive ETX or ETB with the last block of text transmitted by the host
534 the CU did not receive a response to its last block sent, and has sent ENQ 15 times
535 the CU received 15 consecutive NAKs
536 the CU received 15 consecutive ACKOs instead of ACKls or vice versa
C
Key Sequences
Key Sequences for Standard ASCII
Terminals
C-1Key Sequences for AT&T 4410 and
Teletype 5410 Terminals
C-3Key Sequences for AT&T 4418 and
Teletype 5418 Terminals
C-5Key Sequences for AT&T 4425 and
Teletype 5425 Terminals
C-7Key Sequences for AT&T 605 Business
Communications Terminal with 102-Key
Keyboard
C-gKey Sequences for AT&T 610, 615,
620, and 630 Terminals with 98-Key
Key Sequences for Standard ASCII Terminals
The AT&T 4415 and 5420, and the Tektronix 4105 terminals use these key sequences. Certain key functions, such as COLR, are ignored if the terminal does not support them. Note that any terminal can use KY.std.
3278/9 Key Standard ASCII Terminal
Function Key Sequence
ALLCAP <ESC> m
ALT_CR <ESC> n
ATTN <ESC> a <RETURN>
BAKTAB <CTRL> e
BLINK <ESC> b I
BOT <ESC> bot
BS <CTRL> h
CAN <CTRL> x
CENT
CLEAR <ESC> z
CLICK <ESC> k
COLR <ESC> elr
CTRL <ESC> fd
CURSR_SEL <ESC> c <RETURN>
DEL <DEL>
DEV_CNCL <ESC> d
DOWN_A <CTRL> v
DUP <CTRL> d
E_EOF <ESC> e f
E_INPUT <ESC> e i
ENTER <RETURN>
ENTER1 <RETURN>
EXIT <ESC> x x
FM <CTRL> k
HOME <CTRL> 0
IDENT <ESC> i
INS <CTRL> u
LDUB <CTRL> r
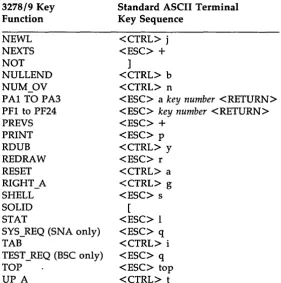
Standard ASCII Terminals 3278/9 Key Function NEWL NEXTS NOT NULLEND NUM_OV PAl TO PA3 PFI to PF24 PREYS PRINT RDUB REDRAW RESET RIGHT_A SHELL SOLID STAT
SYS_REQ (SNA only) TAB
TEST_REQ (BSC only) TOP
UP_A
Standard ASCII Terminal Key Sequence
<CTRL> j <ESC>
+
]
<CTRL> b <CTRL> n
<ESC> a key number <RETURN>
<ESC> key number <RETURN>
<ESC>
+
<ESC> p <CTRL> y <ESC> r <CTRL> a <CTRL> g <ESC> s [image:84.453.73.355.68.351.2][ <ESC> I <ESC> q <CTRL> i <ESC> q <ESC> top <CTRL> t
Figure C-l: AT&T 3278/9 Key Sequences For Standard ASCII Terminals (using KY.std).
Key Sequences for AT&T 4410 and Teletype
5410 Terminals
3278/9 Key Function
ALLCAP ALT CR ATTN BAKTAB BS CAN CENT CLEAR CLICK CTRL CURSR_SEL DEL DEV_CNCL DOWN_A DUP E_EOF E_INPUT ENTER ENTERl EXIT FM HOME IDENT INS LDUB LEFT A NEWL NEXTS NOT NULLEND NUM_OV
AT&T 4410 and Teletype 5410 Key Sequence
<ESC> m <ESC> n
<ESC> a <RETURN>
<DOWN DIAGONAL ARROW> <CTRL> "h
<CTRL> x
<ESC> z
<ESC> k <ESC> f d
<ESC> c <RETURN> <:DEL>
<ESC> d
<DOWN ARROW> <CTRL> d
<ESC> e f <ESC> e i
<RETURN> <RETURN> <ESC> x x <CTRL> k
<UP DIAGONAL ARROW> <ESC> i
<CTRL> u
<CTRL> r
<LEFT ARROW> <CTRL> j <ESC> >
]
AT&T 4410 and Teletype 5410 Terminals
-3278/9 Key Function
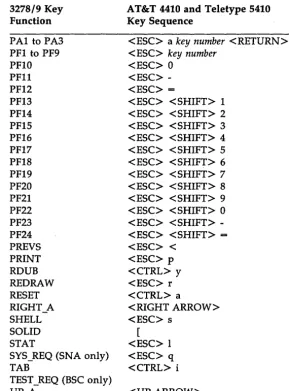
PAl to PA3 PF1 to PF9 PF10 PF11 PF12 PF13 PF14 PF15 PF16 PF17 PF18 PF19 PF20 PF21 PF22 PF23 PF24 PREYS PRINT RDUB REDRAW RESET RIGHT A SHELL SOLID STAT
SYS_REQ (SNA only) TAB
TEST_REQ (BSC only) UP_A
AT&T 4410 and Teletype 5410 Key Sequence
<ESC> a key number < RETURN> < ESC> key number
<ESC> 0 <ESC> -<ESC> ==
<ESC> <SHIFT> 1 <ESC> <SHIFT> 2 <ESC> <SHIFT> 3 <ESC> <SHIFT> 4 <ESC> <SHIFT> 5 <ESC> <SHIFT> 6 <ESC> <SHIFT> 7 <ESC> <SHIFT> 8 <ESC> <SHIFT> 9 <ESC> <SHIFT> 0 <ESC> <SHIFT> -<ESC> <SHIFT> ==
<ESC> < <ESC> p <CTRL> y <ESC> r <CTRL> a
<RIGHT ARROW> <ESC> s
[ <ESC> I <ESC> q <CTRL> i
[image:86.457.67.356.64.455.2]<UPARROW>
Figure C-2: AT&T 3278/9 Key Sequences for AT&T 4410 and Teletype 5410 Terminals
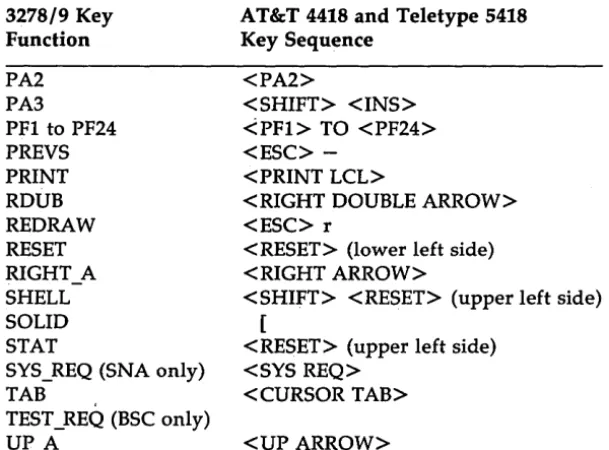
Key Sequences for AT&T 4418 and Teletype
5418 Terminals
3278/9 Key Function ALL CAP ATTN BAKTAB BANG BS CAN CENT CLEAR CTRL CURSR_SEL DEL
DEV CNCL DOWN A DUP E_EOF EINPUT ENTER ENTERl EXIT FM HOME IDENT INS LDUB LEFT_A NEWL NEXTS NOT NULLEND NUM_OV PAl
AT&T 4418 and Teletype 5418 Key Sequence
<ALT CSR> <ATTN> <BACK TAB>
<BACK SPACE> <CTRL> x
<CLEAR> <ESC> f d <CSR SEL> <DEL> <DEV CNCL> <DOWN ARROW> <DUP> <ERASE EOF> <ERASE INPUT>
<ENTER> (lower right side) <ENTER> (upper left side) <ESC> x x
<FIELD MARK> <HOME> <IDENT> <INS>
<LEFT DOUBLE ARROW> <LEFT ARROW>
<NEW LINE> <ESC>
+
]
AT&T 4418 and Teletype 5418 Terminals
3278/9 Key Function
PA2 PA3
PFI to PF24 PREYS PRINT RDUB REDRAW RESET RIGHT A SHELL SOLID STAT
SYS_REQ (SNA only)
TAB ,
TEST_REQ (BSC only) UP_A
AT&T 4418 and Teletype 5418 Key Sequence
<PA2>
<SHIFT> <INS> <PF1> TO <PF24> <ESC>
-<PRINT LCL>
<RIGHT DOUBLE ARROW> <ESC> r
<RESET> (lower left side) <RIGHT ARROW>
<SHIFT> <RESET> (upper left side) [
<RESET> (upper left side) <SYS REQ>
<CURSOR TAB>
[image:88.457.62.367.69.294.2]<UPARROW>
Figure C-3: AT&T 3278/9 Key Sequences for AT&T 4418 and Teletype 5418 Terminals
C-6
On these terminals no key is marked ESC or CTRL. For ESC, hold ALT and press [. For CTRL use the key immediately to the left of the space bar.
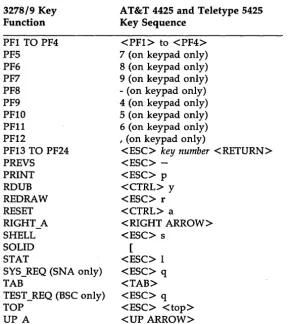
Key Sequences for AT&T 4425 and Teletype
5425 Terminals
3278/9 Key Function ALLCAP ATTN BAKTAB BOT BS CAN CENT CLEAR CTRL CURSR_SEL DEL DEV_CNCL DOWN_A DUP E EOF E_INPUT ENTER ENTERl EXIT FM HOME IDENT INS LDUB LEFT A NEWL NEXTS NOT NULLEND NUM_OV PAl TO PA3
AT&T 4425 and Teletype 5425 Key Sequence
<ESC> m
<ESC> a <RETURN> <SHIFT> <TAB> <ESC> <btm> <BACK SPACE> <CTRL> x
<CLEAR> <ESC> f d
<ESC> c <RETURN> <DEL>
<ESC> d
<DOWN ARROW> <CTRL> d
<CLEAR LINE> <DELETE LINE> <RETURN>
<ENTER> (on keypad) <ESC> x x
<CTRL> k <HOME> <ESC> i
<INSERT CHAR> <CTRL> r
<LEFT ARROW> <CTRL> j <ESC>
+
]
<INSERT LINE> <CTRL> n
AT&T 4425 and Teletype 5425 Terminals
-3278/9 Key Function
PFI TO PF4 PF5 PF6 PF7 PF8 PF9 PFIO PFll PF12
PF13 TO PF24 PREYS PRINT RDUB REDRAW RESET RIGHT_A SHELL SOLID STAT
SYS_REQ (SNA only) TAB
TEST_REQ (BSC only) TOP
UP A
AT&T 4425 and Teletype 5425 Key Sequence
<PFl> to <PF4> 7 (on keypad only) 8 (on keypad only) 9 (on keypad only) - (on keypad only) 4 (on keypad only) 5 (on keypad only) 6 (on keypad only) , (on keypad only)
<ESC> key number < RETURN> <ESC>
-<ESC> p <CTRL> y <ESC> r
<CTRL> a
<RIGHT ARROW> <ESC> s
[image:90.456.70.361.67.392.2][ <ESC> I <ESC> q <TAB> <ESC> q <ESC> <top> <UPARROW>
Figure C-4: AT&T 3278/9 Key Sequences for AT&T 4425 and Teletype 5425 Terminals
Key Sequences for AT&T 605 Business
Com-munications Terminal with 102-Key
Key-board
3278/9 Key Function ALLCAP ATTN BAKTAB BOT BS CAN CENT CLEAR CTRL CURSR_SEL DEL DEV_CNCL DOWN_A DUP E_EOF EINPUT ENTER ENTER! EXIT FM HOME IDENT INS LDUB LEFT_A NEWL NEXTS NOT NULLENDAT&T 605 Terminal Key Sequence
<ESC> m
<ESC> a <RETURN> <SHIFT> <TAB> <ESC> bot
<BACK SPACE> <CTRL> x
<SHIFT> <CLEAR> <ESC> f d
<ESC> c <RETURN> <CTRL> <DEL> <ESC> d
<DOWN ARROW> <CTRL> d
<ESC> e f
<SHIFT> <DELETE LINE> <RETURN>
<RETURN> <ESC> x x
<CTRL> k
<CLEAR> <HOME> <ESC> i
<INSERT LINE> <CTRL> r <LEFT ARROW> <CTRL> j <ESC>
+
]
AT&T 605 Business Communications Terminal
3278/9 Key Function
NUM_OV PAl TO PA3 PFl TO PF24 PREYS PRINT RDUB REDRAW RESET RIGHT_A SHELL SOLID STAT
SYS_REQ (SNA only) TAB
TEST_REQ (BSC only) TOP
UP_A
AT&T 605 Terminal Key Sequence
<CTRL> n
<ESC> a key number <RETURN> <ESC> key number <RETURN> <ESC>
-<ESC> p <CTRL> y <ESC> r <ESC> c
<RIGHT ARROW> <ESC> s
[image:92.456.72.359.68.306.2][ <ESC> I <ESC> q <TAB> <ESC> q <ESC> top <UPARROW>
Figure C-S: AT&T 3278/9 Key Sequences for AT&T 605 Business Communi-cations Terminal with l02-Key Keyboard
Key Sequences for AT&T 610, 615, 620, and
630 Terminals with 98-Key Keyboard
3278/9 Key Function ALLCAP ATTN BAKTAB BOT BS CAN CENT CLEAR CTRL CURSR_SEL DEL DEV_CNCL DOWN_A DUP E EOF E_INPUT ENTER ENTERl EXIT FM HOME IDENT INS LDUB LEFT A NEWL NEXTS NOT NULLEND NUM_OV PAl TO PA3
AT&T 610, 615, 620 and 630 Terminals Key Sequence
<ESC> m
<ESC> a <RETURN> <SHIFT> <TAB> <ESC> bot <BACK SPACE> <CTRL> x
<CLEAR> <ESC> f d
<ESC> c <RETURN> <DEL>
<ESC> d
<DOWN ARROW> <CTRL> d
<ESC> e f <ESC> e i
<RETURN> <RETURN> <ESC> x x
<CTRL> k <HOME> <ESC> i
<CTRL> u <CTRL> r <LEFT ARROW> <CTRL> j <ESC>
+
]
<CTRL> b <CTRL> n
AT&T 610, 615, 620, and 630 Terminals
-3278/9 Key Function
PFI TO PF24 PREYS PRINT RDUB REDRAW RESET RIGHT A SHELL SOLID STAT
SYS_REQ (SNA only) TAB
TEST_REQ (BSC only) TOP
UP_A
AT&T 610, 615, 620 and 630 Terminals Key Sequence
<ESC> key number <RETURN> <ESC>
-<ESC> p <CTRL> y <ESC> r <ESC> c
<RIGHT ARROW> <ESC> s
[image:94.456.59.366.69.286.2][ <ESC> I <ESC> q <TAB> <ESC> q <ESC> top <UPARROW>
Figure C-6: AT&T 3278/9 Key Sequences for AT&T 610, 615, 620 and 630 Terminals with 98-Key Keyboard
D
The
te3279 Command
The
te3279
Command
The command to invoke the 3278/9 Terminal Emulator from your termi-nal is:
te3279 [-t termno] [-s screenJile] [-k keyJile] [-p pipe]
[-£ printeryath] [-M msgfile] [-m model] [-e]
Except for the -e option, if your environment has been set up properly, you should not have to specify any of these options. The -e option provides extended attribute support, namely, extended highlighting and extended color support.
The following list describes each of the options in detail:
-t termno
-s screen Jile
-k keyJile
-p pipe
where termno specifies acceptable terminal (LU) numbers. The controller selects a terminal number from those specified. The valid range of terminal numbers is 0-31. The user may specify a list of numbers (such as 1,5,7), a range of numbers (such as 10-15), or a combination (such as 1,5,7,10-15). The default environment variable is D3274, and the default value is the range 0-31.
where screenJile is the name of the screen control object file to be used for this terminal. If this option is omitted, the SC3279 environment variable is used to obtain the name of the file.
where keyJile is the name of the keyboard mapping object file to be used for this terminal. If this option is omitted, the KY3279 environment variable is u