Software Developer’s Kit and
Open Server™
15.7
Copyright © 2012 by Sybase, Inc. All rights reserved.
This publication pertains to Sybase software and to any subsequent release until otherwise indicated in new editions or technical notes. Information in this document is subject to change without notice. The software described herein is furnished under a license agreement, and it may be used or copied only in accordance with the terms of that agreement.
Upgrades are provided only at regularly scheduled software release dates. No part of this publication may be reproduced, transmitted, or translated in any form or by any means, electronic, mechanical, manual, optical, or otherwise, without the prior written permission of Sybase, Inc.
Sybase trademarks can be viewed at the Sybase trademarks page at http://www.sybase.com/detail?id=1011207. Sybase and the marks listed are trademarks of Sybase, Inc. ® indicates registration in the United States of America.
SAP and other SAP products and services mentioned herein as well as their respective logos are trademarks or registered trademarks of SAP AG in Germany and in several other countries all over the world.
Java and all Java-based marks are trademarks or registered trademarks of Oracle and/or its affiliates in the U.S. and other countries. Unicode and the Unicode Logo are registered trademarks of Unicode, Inc.
All other company and product names mentioned may be trademarks of the respective companies with which they are associated. Use, duplication, or disclosure by the government is subject to the restrictions set forth in subparagraph (c)(1)(ii) of DFARS 52.227-7013 for the DOD and as set forth in FAR 52.227-19(a)-(d) for civilian agencies.
About This Book ... v
CHAPTER 1 Before You Begin ... 1
SDK and Open Server components ... 1
SDK components ... 1
Open Server components ... 5
System requirements for the SDK and Open Server ... 8
Hardware and software requirements ... 8
Required utility... 10
Disk space requirements ... 10
Preinstallation instructions ... 11
Preinstallation instructions for Linux on POWER 32-bit and 64-bit 12 Preinstallation instructions on Linux ... 13
CHAPTER 2 Installing the SDK and Open Server... 15
Using SDK or Open Server installer... 15
Installing on a remote machine ... 16
Installing SDK or Open Server ... 17
Installing SDK or Open Server 15.7 into version 15.5 directory 17 Mount the CD ... 18
Installing in GUI mode ... 18
Installing in console mode ... 21
Installing using a response file ... 22
Uninstalling the SDK or Open Server... 23
Uninstallation procedures ... 24
Downgrading SDK or Open Server ... 25
Command line options ... 26
CHAPTER 3 Postinstallation Tasks ... 27
Setting environment variables ... 27
Running sample scripts ... 28
Modifying interfaces file entries ... 30
jConnect for JDBC postinstallation tasks ... 30
Setting JDBC_HOME ... 30
Setting the CLASSPATH... 31
Installing stored procedures ... 31
Reviewing the installation contents ... 33
Testing the jConnect installation ... 34
Upgrading jConnect... 36
Audience This book is for system administrators or the persons responsible for installing the Software Developer’s Kit (SDK) or Open Server™.
How to use this book This book contains these chapters:
• Chapter 1, “Before You Begin,” contains preinstallation information and tasks.
• Chapter 2, “Installing the SDK and Open Server,” describes how to install the SDK and Open Server.
• Chapter 3, “Postinstallation Tasks,” provides information about the tasks you must perform after installing the component software for the SDK and Open Server.
Related documents You can see these books for more information:
• The Open Server and SDK New Features for Windows, Linux, and
UNIX, which describes new features available for Open Server and
the Software Developer’s Kit. This document is revised to include new features as they become available.
• The Open Server Release Bulletin for your platform contains important last-minute information about Open Server.
• The Software Developer’s Kit Release Bulletin for your platform contains important last-minute information about Open Client™ and SDK.
• The jConnect™ for JDBC™ Release Bulletin contains important last-minute information about jConnect.
• The Open Client™ and Open Server Configuration Guide for your platform contains information about configuring your system to run Open Client and Open Server.
• The Open Client Client-Library/C Programmers Guide contains information on how to design and implement Client-Library applications.
• The Open Client Client-Library/C Reference Manual contains reference information for Open Client Client-Library™.
• The Open Server Server-Library/C Reference Manual contains reference information for Open Server Server-Library.
• The Open Client and Open Server Common Libraries Reference Manual contains reference information for CS-Library, which is a collection of utility routines that are useful in both Client-Library and Server-Library applications.
• The Open Server DB-Library/C Reference Manual contains reference information for the C version of Open Client DB-Library™.
• The Open Client and Open Server Programmers Supplement for your platform contains platform-specific information for programmers using Open Client and Open Server. This document includes information about: • Compiling and linking an application
• The sample programs that are included with Open Client and Open Server
• Routines that have platform-specific behaviors
• The Installation and Release Bulletin Sybase® SDK DB-Library Kerberos
Authentication Option contains information about installing and enabling
the MIT Kerberos security mechanism to be used on Library. DB-Library only supports network authentication and mutual authentication in the Kerberos security mechanism.
• The Open Client Client-Library Migration Guide contains information on how to migrate Open Client™ DB-Library™ applications to Open Client Client-Library
• The Open Client and Open Server International Developers Guide provides information about creating internationalized and localized applications.
• The Open Client Embedded SQL™/C Programmers Guide explains how to use Embedded SQL and the Embedded SQL precompiler with C applications.
• The Open Client Embedded SQL™/COBOL Programmers Guide explains how to use Embedded SQL and the Embedded SQL precompiler with COBOL applications.
• The jConnect for JDBC Programmers Reference describes the jConnect for JDBC product and explains how to access data stored in relational database management systems.
• The Adaptive Server Enterprise ODBC Driver by Sybase® Users Guide for Microsoft Windows and UNIX, provides information on how to access data from Adaptive Server on Microsoft Windows and UNIX platforms, using the Open Database Connectivity (ODBC) Driver.
• The Adaptive Server Enterprise Database Driver for Perl Programmers
Guide provides information for Perl developers to connect to an Adaptive
Server database and query or change information using a Perl script. • The Adaptive Server Enterprise extension module for PHP Programmers
Guide provides information for PHP developers to execute queries against
an Adaptive Server database.
• The Adaptive Server Enterprise extension module for Python
Programmers Guide provides information about Sybase-specific Python
interface that can be used to execute queries against an Adaptive Server database.
Other sources of information
Use the Sybase Getting Started CD and the Sybase Product Documentation Web site to learn more about your product:
• The Getting Started CD contains release bulletins and installation guides in PDF format. It is included with your software. To read or print documents on the Getting Started CD, you need Adobe Acrobat Reader, which you can download at no charge from the Adobe Web site using a link provided on the CD.
• The Sybase Product Documentation Web site is accessible using a standard Web browser. In addition to product documentation, you will find links to EBFs/Maintenance, Technical Documents, Case Management, Solved Cases, newsgroups, and the Sybase Developer Network. To access the Sybase Product Documentation Web site, go to Product Documentation at http://www.sybase.com/support/manuals/.
Sybase certifications on the Web
Technical documentation at the Sybase Web site is updated frequently.
❖ Finding the latest information on product certifications
1 Point your Web browser to Technical Documents at http://www.sybase.com/support/techdocs/.
2 Click Partner Certification Report.
3 In the Partner Certification Report filter select a product, platform, and timeframe and then click Go.
❖ Finding the latest information on component certifications
1 Point your Web browser to Availability and Certification Reports at http://certification.sybase.com/.
2 Either select the product family and product under Search by Base Product; or select the platform and product under Search by Platform. 3 Select Search to display the availability and certification report for the
selection.
❖ Creating a personalized view of the Sybase Web site (including support pages)
Set up a MySybase profile. MySybase is a free service that allows you to create a personalized view of Sybase Web pages.
1 Point your Web browser to Technical Documents at http://www.sybase.com/support/techdocs/.
2 Click MySybase and create a MySybase profile.
Sybase EBFs and software
maintenance
❖ Finding the latest information on EBFs and software maintenance
1 Point your Web browser to the Sybase Support Page at http://www.sybase.com/support.
2 Select EBFs/Maintenance. If prompted, enter your MySybase user name and password.
3 Select a product.
4 Specify a time frame and click Go. A list of EBF/Maintenance releases is displayed.
Padlock icons indicate that you do not have download authorization for certain EBF/Maintenance releases because you are not registered as a Technical Support Contact. If you have not registered, but have valid information provided by your Sybase representative or through your support contract, click Edit Roles to add the “Technical Support Contact” role to your MySybase profile.
5 Click the Info icon to display the EBF/Maintenance report, or click the product description to download the software.
Conventions Table 1: Syntax conventions
Accessibility
features This document is available in an HTML version that is specialized for accessibility. You can navigate the HTML with an adaptive technology such as
a screen reader, or view it with a screen enlarger.
Open Client and Open Server documentation has been tested for compliance with U.S. government Section 508 Accessibility requirements. Documents that comply with Section 508 generally also meet non-U.S. accessibility guidelines, such as the World Wide Web Consortium (W3C) guidelines for Web sites.
Note You might need to configure your accessibility tool for optimal use. Some screen readers pronounce text based on its case; for example, they pronounce ALL UPPERCASE TEXT as initials, and MixedCase Text as words. You might find it helpful to configure your tool to announce syntax conventions. Consult the documentation for your tool.
For information about how Sybase supports accessibility, see Sybase Accessibility at http://www.sybase.com/accessibility. The Sybase Accessibility site includes links to information on Section 508 and W3C standards.
If you need help Each Sybase installation that has purchased a support contract has one or more designated people who are authorized to contact Sybase Technical Support. If you cannot resolve a problem using the documentation or online help, please have the designated person contact Sybase Technical Support or the Sybase subsidiary in your area.
Key Definition
command Command names, command option names, utility names, utility flags, and other keywords are in sans serif font.
variable Variables, or words that stand for values that you fill in, are in italics.
{ } Curly braces indicate that you choose at least one of the enclosed options. Do not include braces in the command.
[ ] Brackets mean choosing one or more of the enclosed items is optional. Do not include braces in the command.
( ) Parentheses are to be typed as part of the command.
| The vertical bar means you can select only one of the options shown.
, The comma means you can choose as many of the options shown as you like, separating your choices with commas to be typed as part of the command.
This chapter provides information about system requirements and the tasks you must complete before you install Software Developer’s Kit (SDK) and Open Server.
SDK and Open Server components
This section summarizes the components in the SDK and Open Server products.
SDK components
SDK is a set of libraries and utilities that you can use to develop client applications and includes these components:
• Open Client – a set of APIs used to develop and deploy C-language applications that access Adaptive Server data. Included on the installation medium are:
• Drivers for integrating Client-Library and Open Server applications with directory and security services • Sample programs for Client-Library and DB-Library™
• Open Client Embedded SQL™/C – the precompiler that allows you to embed Transact-SQL® statements into C-language applications. The installation medium also includes sample programs for Embedded SQL/C.
Topic Page
SDK and Open Server components 1 System requirements for the SDK and Open Server 8 Preinstallation instructions 11
• Open Client Embedded SQL/COBOL – the precompiler that allows you to embed Transact-SQL statements into COBOL-language applications. The installation medium also includes sample programs for Embedded SQL/COBOL.
Note Embedded SQL/COBOL is available on all platforms except Linux on POWER 32-bit.
• Language modules – provide system messages and datetime formats to help you localize your applications. Default installation includes these character sets:
ASCII, for use with unspecified 8-bit data (ascii_8)
BIG 5, Traditional Chinese with Hong Kong Supplementary Character Set (big5hk)
BIG 5, Traditional Chinese (big5) Microsoft Windows Code Page 1250, 1251, 1252, 1253, 1254, 1255, 1256, 1257, 1258, 866 (cp1250, cp1251, cp1252, cp1253, cp1254, cp1255, cp1256, cp1257, cp1258, cp866) IBM Code Page 852, 855, 857, 860,
864, 869, 874, 950 (cp852, cp855, cp857, cp860, cp864, cp869, cp874, cp950)
Variant of Code Page 850 (cp858), IBM Code Page 932 for X0201 and JIS-X0208 (cp932)
Code Page 437, 850 (cp437, cp850)
CP936, Simplified Chinese (cp936) PC (MS) Korean (cp949) DEC Kanji Code for JIS-X0208
(deckanji)
Extended UNIX Code for CNS-11643 (euccns)
Extended UNIX Code for GB2312-80 (eucgb)
Extended UNIX Code for JIS-X0201 and JIS-X0208 (eucjis)
Extended UNIX Code for KSC-5601 (eucksc)
P.R.C standard GB 18030-2000 (gb18030)
HP Greek (greek8) ISO_8859-15 Latin9, Western Europe (iso15)
ISO_8859-2 Latin2, Eastern Europe (iso88592)
ISO_8859-5 Cyrillic (iso88595) ISO_8859-6 Arabic, ASMO-708
(iso88596)
ISO_8859-7 Greek, ELOT_928 (iso88597)
ISO_8859-8 Hebrew (iso88598) ISO_8859-9 Latin5, Turkish (iso88599) ISO 8859-1 (iso_1) KOI-8 Cyrillic 8-bit (koi8)
Kazakhstan, Cyrillic (kz1048) Macintosh Western European locales (mac)
Additional language modules: • Chinese • French • German • Japanese • Korean • Polish • Portuguese • Spanish • Thai
Note SDK and Open Server support the same character sets as Adaptive Server.
• Adaptive Server® Enterprise ODBC Driver by Sybase, version 15.7.
Note Adaptive Server ODBC Driver is available only on HP-UX Itanium 64-bit, Solaris SPARC 64-bit, Solaris x86-64 64-bit, IBM AIX 64-bit, Linux x86 32-bit, Linux x86-64 64-bit, and Linux on POWER 64-bit.
• jConnect for JDBC – the JAVA implementation of the Java JDBC standard, which provides Java developers with native database access in multitier and heterogeneous environments. For jConnect hardware and software requirements and installation instructions, see the jConnect for
JDBC Installation Guide.
Macintosh Cyrillic (mac_cyr) Macintosh, Eastern European (mac_ee) Macintosh with EURO support for
Western European locales (mac_euro)
Macintosh, Greek (macgrk2)
Macintosh, Turkish (macturk) Hewlett-Packard Roman 8 and Roman 9 (roman8, roman9)
IBM/Microsoft Code for JIS-X0201 and JIS-X0208 (sjis)
Thailand Industrial Standard (tis620) HP Turkish, 8-bit (turkish8) Unicode 3.1 UTF-8 encoding (utf8)
• Extended Architecture (XA) Interface Library for Adaptive Server Distributed Data Manager. Also included are sample programs for XA.
Note XA is available on all platforms except Linux x86 32-bit, Linux on POWER 32-bit and 64-bit, and HP-UX Itanium 32-bit.
• Adaptive Server Enterprise extension module for Python scripting language allows Python developers to execute T-SQL queries against Adaptive Server. See the Adaptive Server Enterprise Extension Module for
Python Programmers Guide for more details. The installation media
includes samples.
• Adaptive Server Enterprise extension module for PHP scripting language allows PHP developers to execute T-SQL queries against Adaptive Server. See the Adaptive Server Enterprise Extension Module for PHP
Programmers Guide for more details. The installation media includes
samples.
• Adaptive Server Enterprise database driver for Perl allows Perl developers to execute T-SQL queries against Adaptive Server. See the
Adaptive Server Enterprise Database Driver for PERL Programmers Guide for more details. The installation media includes samples.
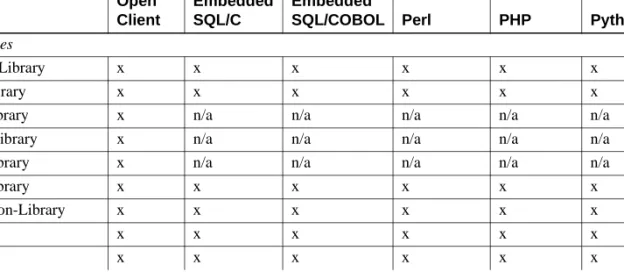
Table 1-1 lists the libraries and utilities that are included with the SDK.
Note For jConnect 7.07 libraries and utilities, see the jConnect for JDBC
Installation Guide version 7.07.
Table 1-1: SDK libraries and utilities for UNIX platforms
SDK Open Client Embedded SQL/C Embedded
SQL/COBOL Perl PHP Python
Libraries
Client-Library x x x x x x
CS-Library x x x x x x
DB-Library x n/a n/a n/a n/a n/a Bulk-Library x n/a n/a n/a n/a n/a XA-Library x n/a n/a n/a n/a n/a
Net-Library x x x x x x
Common-Library x x x x x x
LDAP x x x x x x
Open Server components
Open Server is a set of APIs and supporting tools that you can use to create custom servers to respond to client requests submitted through Open Client or jConnect routines. Open Server includes the following components:
• Open Server – a set of APIs and supporting tools. Included on the installation medium are:
• Drivers for integrating Client-Library and Open Server applications with directory and security services
• Sample programs for Server-Library and Client-Library • Open Client – a set of APIs used to develop and deploy C-language
applications that access Adaptive Server data. Included on the installation medium are:
• Drivers for integrating Client-Library and Open Server applications with directory and security services
Kerberos x x x x x x
DBAPI n/a n/a n/a x x x
intllib x x x x x x
Utilities
bcp, defncopy, dscp,
dsedit, isql, certauth,
certpk12, certreq,
extractjava, installjava,
pwdcrypt
x n/a n/a n/a n/a n/a
cpre n/a x n/a n/a n/a n/a
cpre64 (non-reentrant version),
cpre_r64 (reentrant version)
n/a x n/a n/a n/a n/a
cobpre n/a n/a x n/a n/a n/a
cobpre64 (non-reentrant version),
cobpre_r64 (reentrant version)
n/a n/a x n/a n/a n/a
LEGEND: x = available; n/a = not available on this component.
SDK Open Client Embedded SQL/C Embedded
• Sample programs for Library and DB-Library to Client-Library Migration
• Language modules – provide system messages and datetime formats to help you localize your applications. Default installation includes some of these character sets:
ASCII, for use with unspecified 8-bit data (ascii_8)
BIG 5, Traditional Chinese with Hong Kong Supplementary Character Set (big5hk)
BIG 5, Traditional Chinese (big5) Microsoft Windows Code Page 1250, 1251, 1252, 1253, 1254, 1255, 1256, 1257, 1258, 866 (cp1250, cp1251, cp1252, cp1253, cp1254, cp1255, cp1256, cp1257, cp1258, cp866) IBM Code Page 437, 850, 852, 855,
857, 860, 864, 869, 874, 950 (cp437, cp850, cp852, cp855, cp857, cp860, cp864, cp869, cp874, cp950)
Variant of Code Page 850 (cp858), IBM Code Page 932 for X0201 and JIS-X0208 (cp932)
Code Page 437, 850 (cp437, cp850)
CP936, Simplified Chinese (cp936) PC (MS) Korean (cp949) DEC Kanji Code for JIS-X0208
(deckanji)
Extended UNIX Code for CNS-11643 (euccns)
Extended UNIX Code for GB2312-80 (eucgb)
Extended UNIX Code for JIS-X0201 and JIS-X0208 (eucjis)
Extended UNIX Code for KSC-5601 (eucksc)
P.R.C standard GB 18030-2000 (gb18030)
HP Greek (greek8) ISO_8859-15 Latin9, Western Europe (iso15)
ISO_8859-2 Latin2, Eastern Europe (iso88592)
ISO_8859-5 Cyrillic (iso88595) ISO_8859-6 Arabic, ASMO-708
(iso88596)
ISO_8859-7 Greek, ELOT_928 (iso88597)
ISO_8859-8 Hebrew (iso88598) ISO_8859-9 Latin5, Turkish (iso88599) ISO 8859-1 (iso_1) KOI-8 Cyrillic 8-bit (koi8)
Kazakhstan, Cyrillic (kz1048) Macintosh Western European locales (mac)
Macintosh Cyrillic (mac_cyr) Macintosh, Eastern European (mac_ee) Macintosh with EURO support for
Western European locales (mac_euro)
Macintosh, Greek (macgrk2)
Macintosh, Turkish (macturk) Hewlett-Packard Roman 8 and Roman 9 (roman8, roman9)
Additional language modules: • Chinese • French • German • Japanese • Korean • Polish • Portuguese • Spanish • Thai
Table 1-2 lists the libraries and utilities that are installed with Open Server.
IBM/Microsoft Code for JIS-X0201 and JIS-X0208 (sjis)
Thailand Industrial Standard (tis620) HP Turkish, 8-bit (turkish8) Unicode 3.1 UTF-8 encoding (utf8)
Table 1-2: Open Server libraries and utilities
System requirements for the SDK and Open Server
This section contains the following information: • Hardware and software requirements • Disk space requirements
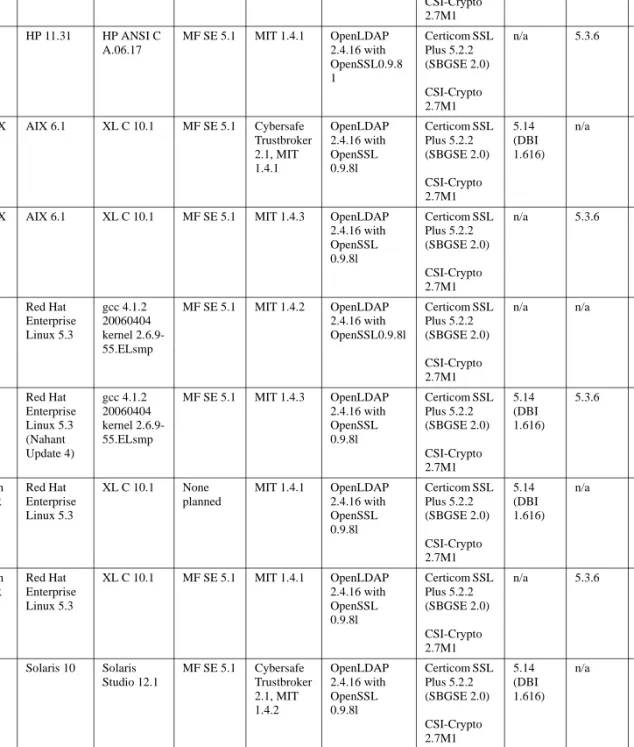
Hardware and software requirements
Table 1-3 lists the platforms, compilers, and third-party products Open Server and SDK products are built and tested on.
The supported protocol for Open Server and SDK is TCP/IP.
Libraries • Server-Library • Client-Library • CS-Library • Net-Library • Bulk-Library • Common-Library • LDAP • SSL • Kerberos Utilities • bcp • defncopy • dsedit • dscp • isql • certauth • certpk12 • certreq • pwdcrypt
Table 1-3: Open Server and SDK platform compatibility matrix Platform Operating system level C and C++ compilers COBOL compiler Kerberos version Lightweight Directory Access (LDAP) Secure Sockets Layer (SSL) Perl version PHP version Python version HP-UX Itanium 32-bit HP 11.31 HP ANSI C A.06.17 MF SE 5.1 MIT 1.4.1 OpenLDAP 2.4.16 with OpenSSL 0.9.8l Certicom SSL Plus 5.2.2 (SBGSE 2.0) CSI-Crypto 2.7M1 5.14 (DBI 1.616) n/a n/a HP-UX Itanium 64-bit HP 11.31 HP ANSI C A.06.17 MF SE 5.1 MIT 1.4.1 OpenLDAP 2.4.16 with OpenSSL0.9.8 1 Certicom SSL Plus 5.2.2 (SBGSE 2.0) CSI-Crypto 2.7M1 n/a 5.3.6 2.6, 2.7, and 3.1 (DBAPI 2.0) IBM AIX 32-bit AIX 6.1 XL C 10.1 MF SE 5.1 Cybersafe Trustbroker 2.1, MIT 1.4.1 OpenLDAP 2.4.16 with OpenSSL 0.9.8l Certicom SSL Plus 5.2.2 (SBGSE 2.0) CSI-Crypto 2.7M1 5.14 (DBI 1.616) n/a n/a IBM AIX 64-bit
AIX 6.1 XL C 10.1 MF SE 5.1 MIT 1.4.3 OpenLDAP 2.4.16 with OpenSSL 0.9.8l Certicom SSL Plus 5.2.2 (SBGSE 2.0) CSI-Crypto 2.7M1 n/a 5.3.6 2.6, 2.7, and 3.1 (DBAPI 2.0) Linux x86 32-bit Red Hat Enterprise Linux 5.3 gcc 4.1.2 20060404 kernel 2.6.9-55.ELsmp MF SE 5.1 MIT 1.4.2 OpenLDAP 2.4.16 with OpenSSL0.9.8l Certicom SSL Plus 5.2.2 (SBGSE 2.0) CSI-Crypto 2.7M1
n/a n/a n/a
Linux x86-64 64-bit Red Hat Enterprise Linux 5.3 (Nahant Update 4) gcc 4.1.2 20060404 kernel 2.6.9-55.ELsmp MF SE 5.1 MIT 1.4.3 OpenLDAP 2.4.16 with OpenSSL 0.9.8l Certicom SSL Plus 5.2.2 (SBGSE 2.0) CSI-Crypto 2.7M1 5.14 (DBI 1.616) 5.3.6 2.6, 2.7, and 3.1 (DBAPI 2.0) Linux on POWER 32-bit Red Hat Enterprise Linux 5.3 XL C 10.1 None planned MIT 1.4.1 OpenLDAP 2.4.16 with OpenSSL 0.9.8l Certicom SSL Plus 5.2.2 (SBGSE 2.0) CSI-Crypto 2.7M1 5.14 (DBI 1.616) n/a n/a Linux on POWER 64-bit Red Hat Enterprise Linux 5.3 XL C 10.1 MF SE 5.1 MIT 1.4.1 OpenLDAP 2.4.16 with OpenSSL 0.9.8l Certicom SSL Plus 5.2.2 (SBGSE 2.0) CSI-Crypto 2.7M1 n/a 5.3.6 2.6, 2.7, and 3.1 (DBAPI 2.0) Solaris SPARC 32-bit Solaris 10 Solaris Studio 12.1 MF SE 5.1 Cybersafe Trustbroker 2.1, MIT 1.4.2 OpenLDAP 2.4.16 with OpenSSL 0.9.8l Certicom SSL Plus 5.2.2 (SBGSE 2.0) CSI-Crypto 2.7M1 5.14 (DBI 1.616) n/a n/a
Note For the required patches that must be installed before installation, check the relevant release bulletin for UNIX platforms. Contact Sybase Technical Support for the appropriate platform for the latest patches available. For the most current certified platforms, see “Sybase certifications on the Web” on page vii.
Required utility
The Open Server installer requires gzip. Ensure that the path to gzip is set in the $PATH environment variable.
Disk space requirements
The required installation disk space for each platform varies from 255MB to 665MB, and depends on:
• Product installed – SDK or Open Server • Architecture – 32-bit or 64-bit
Solaris SPARC 64-bit Solaris 10, patch level 144488-17 or later, patch level 119963-24 or later for SUNWlibC Solaris Studio 12.1 MF SE 5.1 Cybersafe Trustbroker 2.1, MIT 1.4.2 OpenLDAP 2.4.16 with OpenSSL 0.9.8l Certicom SSL Plus 5.2.2 (SBGSE 2.0) CSI-Crypto 2.7M1 n/a 5.3.6 2.6, 2.7, and 3.1 (DBAPI 2.0) Solaris x86 32-bit Solaris 10 Solaris Studio 12.1 MF SE 5.1 MIT 1.4.2 OpenLDAP 2.4.16 with OpenSSL 0.9.8l Certicom SSL Plus 5.2.2 (SBGSE 2.0) CSI-Crypto 2.7M1 5.14 (DBI 1.616) n/a n/a Solaris x86-64 64-bit Solaris 10 Solaris Studio 12.1 MF SE 5.1 MIT 1.4.2 OpenLDAP 2.4.16 with OpenSSL 0.9.8l Certicom SSL Plus 5.2.2 (SBGSE 2.0) CSI-Crypto 2.7M1 n/a 5.3.6 2.6, 2.7, and 3.1 (DBAPI 2.0)
LEGEND: n/a = script is not available or does not work with SDK on that platform.
Platform Operating system level C and C++ compilers COBOL compiler Kerberos version Lightweight Directory Access (LDAP) Secure Sockets Layer (SSL) Perl version PHP version Python version
• Platform – IBM AIX 32-bit and 64-bit, HP-UX Itanium 32-bit and 64-bit, Linux x86 32-bit, Linux x86-64 bit, Linux on POWER 32-bit and 64-bit, Solaris x86 3264-bit, Solaris x86-64 64-64-bit, and Solaris SPARC 32-bit and 64-bit.
• Type of installation – typical, full, or custom
Disk space required for installation
To ensure that there is sufficient disk space for the installation, a
Pre-Installation Summary window displays every component that is to be installed and the total disk space required for all selected components. If you continue without sufficient disk space, a warning appears displaying the space-required, and the space-available information in the target directory. The warning also displays the minimum space that you need to free up to proceed with the installation, otherwise, you can cancel the installation.
jConnect requirements
You can install jConnect as a separate product. It requires approximately 15MB for jConnect 7.07.
Preinstallation instructions
The following tasks describe how to prepare for installing the SDK or Open Server products.
Note The instructions in this document do not apply to installing the SDK included in the Adaptive Server Enterprise Suite. Those instructions are in the
Adaptive Server Enterprise Installation Guide.
❖ Preparing for installation
1 Read the SDK Release Bulletin or the Open Server Release Bulletin for
UNIX platforms for the latest information about the products you are
installing.
The latest release bulletins are available on the Sybase Product Documentation Web site at http://www.sybase.com/support/techdocs.
2 Create a “sybase” account on your system to perform all installation tasks. The system administrator usually sets up this account, as doing so requires “administrator” privileges.
3 Log in to the machine as the “sybase” user.
Maintain consistent ownership and privileges for all files and directories. A single user—the Sybase system administrator with read, write, and
execute permissions—should perform all unload, installation, upgrade, and setup tasks.
Warning! Be sure your permissions have been set before starting the installation. The installer does not check for permissions. If you do not have the permission, the installer logs exceptions and “Permission denied” error in the log file.
The “sybase” user must have read/write/execute privileges from the top (or root) of the disk partition or operating system directory down to the specific physical device or operating system files.
4 Identify or create a directory location for the Sybase installation directory, where you are going to unload the SDK and Open Server products. 5 Verify that the location for the Sybase installation has sufficient space to
unload the software. See “System requirements for the SDK and Open Server” on page 8.
The installation program automatically sets most of the environment variables. You must set others using the SYBASE.csh or SYBASE.sh scripts file located in
$SYBASE. You must also source this environment file before using the product.
When you have reviewed and verified the installation requirements and completed the preinstallation tasks, you are ready to install the SDK and Open Server.
Preinstallation instructions for Linux on POWER 32-bit and 64-bit
Open Server is compiled and linked with IBM XL C version 10.1. Before you install Open Server, install the runtime libraries for the IBM XL C compiler. Otherwise, you will receive an installation error.
Before installing the runtime libraries, verify that IBM XL C runtime packages were installed previously by issuing:
If the command returns “vacpp.rte-10.1.0-0”, it indicates that IBM XL C runtime packages were installed previously, and you may proceed with the installation of Open Server.
If the message is “package vacpp.rte-10.1.0-0 is not installed”, download the IBM XL C version 10.1 runtime executables from the IBM Web site at https://www-304.ibm.com/support/docview.wss?uid=swg24021253.
Follow the instructions on the Web page to download and install the packages. Be sure to select the installation package for Red Hat 5.3 operating systems from the download table. When installation of IBM XL C version 10.1 runtime libraries is complete, you may proceed with the installation of Open Server.
Preinstallation instructions on Linux
Some of the utilities are built with X/Motif. Make sure you have these packages installed in your system.
• openmotif-2.3.1-2.el5 • libXp-1.0.0-8.1.el5 • libXt-1.0.2-3.1.fc6 • libXtst-1.0.1-3.1 • libXmu-1.0.2-5 • libXext-1.0.1-2.1 • libSM-1.0.1-3.1 • libICE-1.0.1-2.1 • libX11-1.0.3-9.el5
Server
This chapter describes how to install, uninstall, and downgrade using the SDK and Open Server installer and the command line commands.
Using SDK or Open Server installer
This section describes how to use the installer to install SDK or Open Server components. These procedures assume that:
• The target computer meets the requirements outlined in “System requirements for the SDK and Open Server” on page 8.
• You have completed the list of tasks for SDK and Open Server in “Preinstallation instructions” on page 11.
The installation program creates the target directory (if necessary) and unloads all the selected components into that directory.
The options for installing Sybase components from the distribution media using the installation program:
1 GUI mode – install the components using the SDK or Open Server installer interface.
2 Console mode – install components in a command line environment.
Topic Page
Using SDK or Open Server installer 15 Installing SDK or Open Server 17 Uninstalling the SDK or Open Server 23 Downgrading SDK or Open Server 25 Command line options 26
3 Response file – record or create a response file. Using a response file, you can install SDK or Open Server in silent mode. Silent installation lets you install the product without any interaction required on your part. This is convenient if you are performing identical installation on multiple machines.
Each of these options is described in the following sections.
Note If you encounter problems during installation, check the installation log file to see a record of the installation process. The file is located in
$SYBASE/log/<product_name>.log, where $SYBASE is the SDK or Open
Server installation directory.
Installing on a remote machine
To install on a remote machine from the local machine, you must set
permission on the local machine for the remote machine to display the installer windows on the local machine.
❖ Granting permission for a remote machine to run the SDK or Open Server installer in GUI mode
1 At the UNIX prompt of your local machine, enter:
xhost +remote_machine
where remote_machine is the machine on which you are running the installer.
2 On the remote machine where you are installing the software, verify that the DISPLAY environment variable is set to the local machine where you are viewing the installer windows and output. If the installer cannot find your DISPLAY variable, you cannot run the GUI.
• For C shell:
setenv DISPLAY host_name:0.0
• For Bourne shell:
where host_name is the name of the local (display) machine.
Note For remote installations, you must be able to rsh into the machine on which you are installing the software. If you cannot do this, add the installation host to your .rhosts file.
Installing SDK or Open Server
Although you can verify product installation at the end of this process, you must also perform additional configuration procedures before you can use the products. See “Configuring the components” on page 30.
Note SDK or Open Server binaries like isql and bcp share the same name between the 32-bit and 64-bit products. Installing Adaptive Server, SDK, or Open Server 64-bit products with other Sybase 32-bit products in the same Sybase installation overwrites the 32-bit binaries, and may cause issues with the peaceful coexistence of multiple products.
Beginning with Adaptive Server 15.0.2 and SDK or Open Server 15.0 ESD #9, 64-bit binaries have been replaced with 32-bit binaries on all 64-bit UNIX platforms to retain the peaceful coexistence of multiple products in the same Sybase installation.
Installing SDK or Open Server 15.7 into version 15.5 directory
SDK or Open Server 15.7 is a shelf replacement for the 15.5 version so when you install SDK or Open Server 15.7 in to an existing SDK or Open Server 15.5 directory, the 15.7 files overwrite the 15.5 files. No other migration procedures are required.
Mount the CD
Insert the SDK or Open Server CD in the CD drive, and if necessary, mount the CD. To install both products, repeat this procedure using the appropriate CD, after you install the first product.
Note The location of the mount command is site-specific and may differ from the instructions shown here. If you cannot mount the CD drive using the path shown, check your operating system documentation or contact your system administrator.
• For HP HP-UX:
Log out, log in as “root,” and mount the CD using:
mount -F cdfs -o ro,rr /device_name /cdrom
Then, log out and log in again as “sybase.” • For IBM AIX:
Log in as “sybase,” and mount the CD:
/usr/sbin/mount -v cdrfs -r device_name /cdrom
where:
• device_name is the CD drive device name.
• /cdrom is the name of the directory where the CD is to be mounted.
• For Solaris platforms:
The operating system automatically mounts the CD. Log in as “sybase.” If you receive CD-reading errors, check your operating system kernel to make sure the ISO 9660 option is turned on. On Solaris, the CD drive device name is /cdrom/cdromx, where x is the number of the CD device. • For Linux platforms:
The operating system automatically mounts the CD.
Installing in GUI mode
❖ Installing in GUI mode
1 Verify that the drive on which you will install the products has enough disk space for the products being installed, and at least 10MB extra disk space for the installation program. The program frees this space after the installation is complete.
If the installer does not have sufficient temporary space to run, set the environment variable IATEMPDIR to tmp_dir before running the installer again, where tmp_dir is the temporary directory to which the installation program writes the temporary installation files.
Note When specifying the tmp_dir, include the full path.
2 At the UNIX prompt, start the installer. • For IBM AIX, Linux, and Solaris:
cd /cdrom/cdromn/pathname ./setup.bin
• For HP HP-UX:
cd /cdrom/pathname ./setup.bin
where:
• cdrom/cdromn is the directory (mount-point) you specified when
mounting the CD drive. For example, on Solaris the mount-point can be cdrom/cdrom0.
• setup.bin is the executable file name to install SDK and Open
Server products.
This unloads the components in GUI mode. 3 In the Introduction window, click Next.
4 Read the License and Copyright Agreement. Select the geographic location from where you are installing, to display the agreement appropriate to your region. Select “I agree to the terms of the Sybase license for the install location specified.” and click Next.
You must agree to the license and copyright agreement before you can continue.
5 In the Choose Install Folder window, click Next to accept the default directory for the installation, or click Choose to browse through the directory and select a location for the installation. One of these occurs:
• If the installation directory you chose does not exist, the installer prompts:
The directory <directory_name> does not exist. Do you want to create it?
Click Yes.
• If the installation directory exists, the installer prompts:
Warning: You have chosen to install into an existing directory. If you proceed with this installation, any older versions of the products you choose to install that are detected in this directory will be replaced.
If you continue and the older products were not installed with SDK or Open Server installer (for example, if you installed a version of Adaptive Server earlier than 15.7), the installer overwrites the common files.
If you are prompted to overwrite any files, click Yes only if the version of the new file is later than the one the installer is attempting to overwrite.
6 Select the type of installation:
• Typical (default) – installs the SDK or Open Server components considered to be useful for most customers. In this type of installation, only the U.S. English language module and its supported character sets are installed.
The components to be installed and the total disk space required appear before the installation executes. These components are described in “SDK and Open Server components” on page 1. • Full – installs every SDK or Open Server component, including all the
supported language modules.
The components to be installed and the total disk space required appear before the installation executes. For a list of language modules you can install, see “SDK and Open Server components” on page 1.
• Custom – allows you to select the components for SDK or Open Server to install. When you select Custom install, the next window displayed is the Choose Install Set window, which allows you to select the components you want to install.
Note Some components are automatically installed if they are required to run other selected components.
After you have selected the installation type, click Next.
The Pre-Installation Summary window displays the product features or components to be installed and the total disk space required for all the selected features.
7 Verify that you have selected the correct type of installation, and that you have enough disk space to complete the process. Click Install.
The installation program unloads all the components from the CD and displays a progress indicator.
Note Starting with version 15.7 ESD#3, you can choose to skip installation of sample files, documentation files, and debug files. By default, these files are installed when you install Open Server and SDK. To skip installation of these files, use the -DPRODUCTION_INSTALL=TRUE installer command-line argument when installing in GUI mode.
Installing in console mode
To run the installation program without the GUI, launch the installer in console mode. If the installer launches automatically, click Cancel to cancel the GUI installation, then launch the setup program from a terminal or console.
❖ Installing in console mode
The steps for installing components in console mode are the same as those described in “Installing in GUI mode” on page 18, except that you need to run the installation program from the command line using the setup.bin -i console
command, and you enter text to select the installation options. 1 At the command line, enter:
./setup.bin -i console
2 The flow of the installation is identical to a GUI installation, except that the display is written to a terminal window and responses are entered using the keyboard. Follow the remaining prompts to install either the SDK or Open Server software.
For a complete list of command line options, see “Command line options” on page 26.
Note Starting with version 15.7 ESD#3, you can choose to skip installation of sample files, documentation files, and debug files. By default, these files are installed when you install Open Server and SDK. To skip installation of these files, use the -DPRODUCTION_INSTALL=TRUE installer command-line argument when installing in console mode.
Installing using a response file
To perform silent installation or “unattended install”, run the installer and provide a response file that contains your preferred installation configuration.
Creating a response file
To create a response file when installing in GUI mode or console mode, specify the -r command line argument. The -r argument records your responses to the installation wizard’s prompts and creates a response file when the installation wizard exits. The response file is a text file that you can edit to change any responses before you use it in any subsequent installations.
On the command line, enter:
./setup.bin -r responseFileName
The responseFileName is the file name you choose for the response file. When specifying the response file name, include its full path. For example:
/home/sybase/SDK/ResponseFile.txt
Note The directory path specified must already exist.
The response file is created in the specified location once installation is completed.
Installing in silent mode
A silent or unattended installation requires no user interaction, and all installation configuration information is taken from the response file. This is useful when you want multiple identical installations or a fully automated installation process.
To install in silent mode, run:
./setup.bin -f responseFileName -i silent -DAGREE_TO_SYBASE_LICENSE=true
where responseFileName is the absolute path of the file name containing the installation options you chose. The -D option specifies that you agree with the Sybase License Agreement text.
Except for the absence of the GUI screens, all actions of the installer are the same, and the result of an installation in silent mode is exactly the same as one done in GUI mode with the same responses.
Note You must agree to the Sybase License Agreement when installing in silent mode. You can either:
• Include the option -DAGREE_TO_SYBASE_LICENSE=true in the command
line argument.
• Edit the response file to include the property
AGREE_TO_SYBASE_LICENSE=true
Note Starting with version 15.7 ESD#3, you can choose to skip installation of sample files, documentation files, and debug files. By default, these files are installed when you install Open Server and SDK. To skip installation of these files, use the -DPRODUCTION_INSTALL=TRUE installer command-line argument or use the PRODUCTION_INSTALL=TRUE property in the response file when installing in silent mode.
Uninstalling the SDK or Open Server
The SDK or Open Server installer includes an uninstall feature that removes the Sybase components you have installed.
Before uninstalling, consider:
• If two or more Sybase products install the shared components in the same directory, the uninstaller does not remove the shared component until all the Sybase products are uninstalled.
Warning! Do not uninstall Open Server and SDK products from a directory that contains other Sybase products that have been installed using an installation program other than the SDK or Open Server installer. By doing so, you may remove the components shared by Sybase products and affect their operation.
• The uninstall feature removes only those files that were loaded from the installation CD. Some Sybase files, such as log and configuration files, are left intact for administrative purposes. If all products are uninstalled from the directory and you do not need the remaining configuration files, you can manually delete the directory.
Uninstallation procedures
You can invoke the uninstall procedure using either GUI or the console method. Before uninstalling Sybase software, shut down all processes and applications that use the software or components that are going to be uninstalled.
❖ Uninstalling in GUI mode
1 From the command line, enter: • For SDK:
$SYBASE/sybuninstall/SDKSuite/uninstall
• For Open Server:
$SYBASE/sybuninstall/OpenServerSuite/uninstall
2 Click Next.
The Uninstall Options window appears. 3 Select one of:
• Complete Uninstall – completely remove all features and components of SDK or Open Server. The files and folders created after the installation are not affected.
• Uninstall Specific Features – allows you to uninstall specific features of SDK or Open Server.
If you select this option, the Choose Product Features window appears and you can select the features to uninstall.
4 Click Next. The Uninstall Complete window appears, listing the items that cannot be removed.
Note If there are no other products installed in the directory and it contains files that were not installed by the installer, a window appears asking if you want to delete these files.
5 Click Done.
❖ Uninstalling in console mode
1 Go to the $SYBASE directory, and at the command prompt, enter one of the following commands:
• For SDK:
$SYBASE/sybuninstall/SDKSuite/uninstall -i console
• For Open Server:
$SYBASE/sybuninstall/OpenServerSuite/uninstall -i console
The uninstall program starts.
2 The flow of the uninstall program is identical to a regular GUI uninstall, except that the display is written to a terminal window and responses are entered using the keyboard. Follow the remaining prompts to uninstall either Software Developer’s Kit or Open Server software.
For a complete list of command line options, see “Command line options” on page 26.
Downgrading SDK or Open Server
To downgrade SDK or Open Server 15.7 to an earlier version:
1 Uninstall version 15.7. You cannot install the earlier software version into an existing version 15.7 directory.
2 Install the earlier software version. The earlier software version does not contain ESDs, so you must install them separately.
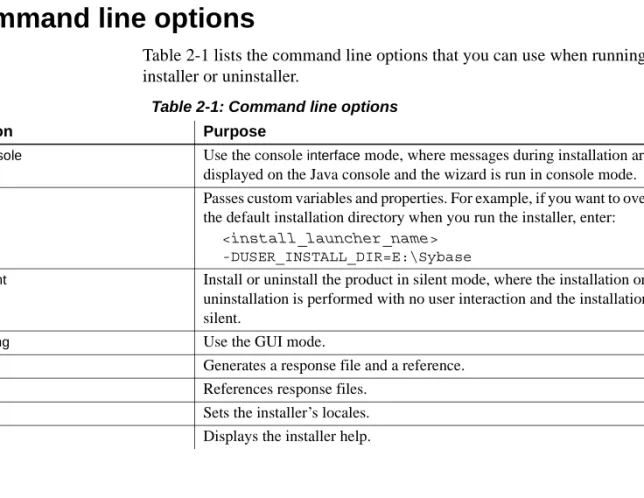
Command line options
Table 2-1 lists the command line options that you can use when running an installer or uninstaller.
Table 2-1: Command line options
Option Purpose
-i console Use the console interface mode, where messages during installation are displayed on the Java console and the wizard is run in console mode.
-D Passes custom variables and properties. For example, if you want to override the default installation directory when you run the installer, enter:
<install_launcher_name> -DUSER_INSTALL_DIR=E:\Sybase
-i silent Install or uninstall the product in silent mode, where the installation or uninstallation is performed with no user interaction and the installation is silent.
-i swing Use the GUI mode.
-r Generates a response file and a reference.
-f References response files.
-l Sets the installer’s locales.
This chapter describes the tasks you must perform after installation.
Setting environment variables
The installation program automatically sets most of the environment variables it needs, such as PATH, as part of the unloading process. It also unloads .sh and .csh files, which contain the environment variables you must set manually before you can configure and successfully run Open Client and Open Server components.
Bourne and C shell files The installer unloads Bourne shell and C shell files containing environment variables in:
• $SYBASE/SYBASE.sh
• $SYBASE/SYBASE.csh
To set the environment variables, either:
• Modify the component’s RUN environment using the environment variable values from the shell files, or,
• Update the component’s RUN environment immediately before invoking the component, as described below.
❖ Updating the RUN environment immediately
1 In a Bourne shell, enter:
cd $SYBASE . SYBASE.sh
Topic Page
Setting environment variables 27 Running sample scripts 28 Configuring the components 30 jConnect for JDBC postinstallation tasks 30
2 In a C shell, enter:
cd $SYBASE
source SYBASE.csh
Running sample scripts
After installation, run these samples scripts.
❖ Adaptive Server Enterprise extension module for Python
1 Locate Python samples in $SYBASE/$SYBASE_OCS/samples/python directory.
2 Verify that Adaptive Server is up and running.
3 Make sure that the PYTHONPATH environment variable or the Python variable sys.path is set to one of the following directories ((these are the default directories where the different versions of the Adaptive Server Python extension module are installed):
Table 3-1: PYTHONPATH Settings
4 Run the sample:
python test.py
See the Adaptive Server Enterprise Extension Module for Python
Programmers Guide for more details.
❖ Adaptive Server Enterprise extension module for PHP
1 Locate PHP samples in $SYBASE/$SYBASE_OCS/samples/php directory. 2 Verify that Adaptive Server is up and running.
3 Generate a sample php.ini file with:
$SYBASE/$SYBASE_OCS/config/generate_php_ini.sh in the $SYBASE/$SYBASE_OCS/config directory.
4 Make sure these environment variables are set: • SYBASE
Python Version Default Installation Path
2.6, 2.7 $SYBASE/$SYBASE_OCS/python/python26_64r/lib
• SYBASE_OCS
• LD_LIBRARY_PATH – specifies the $SYBASE/$SYBASE_OCS/lib directory.
5 Run the sample:
php -c $SYBASE/$SYBASE_OCS/config firstapp.php
or, execute this to obtain a list of loaded extensions:
php -c $SYBASE/$SYBASE_OCS/config -m
See the Adaptive Server Enterprise Extension Module for PHP Programmers
Guide for more details.
❖ Adaptive Server Enterprise database driver for Perl
1 Locate Perl samples in $SYBASE/$SYBASE_OCS/samples/perl directory. 2 Verify that Adaptive Server is up and running.
3 Make sure that the PERL5LIB environment variable is set to: • On Linux x86-64 64-bit drivers specify the
$SYBASE/$SYBASE_OCS/perl/sybaseperl_64r/lib/lib: \
$SYBASE/$SYBASE_OCS/perl/sybaseperl_64r/lib/arch directory
• On Solaris x86 32-bit and Solaris SPARC 32-bit drivers specify the
$SYBASE/$SYBASE_OCS/perl/sybaseperl_32/lib/lib: \
$SYBASE/$SYBASE_OCS/perl/sybaseperl_32/lib/arch directory.
• On IBM AIX 32-bit, HP-UX Itanium 32-bit, and Linux on POWER 32-bit drivers specify the
$SYBASE/$SYBASE_OCS/perl/sybaseperl_32r/lib/lib: \
$SYBASE/$SYBASE_OCS/perl/sybaseperl_32r/lib/arch directory.
4 Run the sample:
perl firstapp.pl
See the Adaptive Server Enterprise Database Driver for PERL Programmers
Configuring the components
Configure each Open Client and Open Server component following the instructions in the Open Client and Open Server Configuration Guide for
UNIX platforms.
To configure and use the Adaptive Server extension module for Python, see the
Adaptive Server Enterprise Extension Module for Python Programmers Guide.
To configure and use the Adaptive Server extension module for PHP, see the
Adaptive Server Enterprise Extension Module for PHP Programmers Guide.
To configure and use the Adaptive Server database driver for Perl, see the
Adaptive Server Enterprise Database Driver for PERL Programmers Guide.
For jConnect for JDBC 7.07, see “jConnect for JDBC postinstallation tasks”.
Modifying interfaces file entries
Use the command line utility dscp or the X-Windows graphical tool dsedit to modify master and query server entries in the interfaces file and for the directory services you are using. For information about dscp or dsedit, see the
Open Client and Open Server Configuration Guide for UNIX platforms.
jConnect for JDBC postinstallation tasks
jConnect for JDBC 7.07 has these postinstallation tasks.
Setting JDBC_HOME
JDBC_HOME represents the directory in which you install jConnect. For example:
If your installation directory is /opt/sybase, set the JDBC_HOME to:
Setting the CLASSPATH
CLASSPATH is the location of the jConnect runtime classes and the jar files for Java 6 or later. This section describes what you need in your CLASSPATH depending on which versions of Java and jConnect you are using.
Using jConnect 7.07
with Java 6 or later To use jConnect 7.07 with Java 6 or later, add the following path to the CLASSPATH environment variable:
$JDBC_HOME/classes/jconn4.jar
Running samples or
TDS-tunnelling servlet To run the samples or the TDS-tunnelling servlet, add the following to the CLASSPATH environment variable:
$JDBC_HOME/classes/jconn4.jar:$JDBC_HOME/classes
Note Sybase requires that you run Java 6 or later with jConnect 7.07.
In addition, the CLASSPATH should include the location of any application classes you have defined.
CLASSPATH restriction using Firefox
If you use Firefox, some restrictions may apply to the way you set your CLASSPATH environment variable.
The Java VM security manager will not allow a version of jConnect installed in your local file system to create a connection to a server, even if the server is your local system. This can create a problem if you use Firefox to run an applet that uses jConnect.
When Firefox needs to load jConnect to create a connection to a server, it looks for a CLASSPATH defined in its environment to find the jConnect classes. If it finds a CLASSPATH that you have defined to point to your local jConnect installation, it loads jConnect directly from the local file system—rather than from the server—and tries to create a connection. This generates a security error and the connection fails.
Do not set the CLASSPATH to the local jConnect directory if you are using Firefox to run jConnect applets.
Installing stored procedures
For jConnect to function properly, you must install stored procedures and tables on the Adaptive Server Enterprise or Adaptive Server® Anywhere database to which your application will be connecting. jConnect provides the these scripts to install the required stored procedures and tables:
• sql_server.sql – installs stored procedures on Adaptive Server earlier than
version 12.0.
• sql_server12.sql – installs stored procedures on Adaptive Server 12.0.x.
• sql_server12.5.sql – installs stored procedures on Adaptive Server 12.5.x.
• sql_server15.0.sql – installs stored procedures on Adaptive Server 15.0.x
through 15.5.x.
• sql_server15.7.sql – installs stored procedures on Adaptive Server 15.7 or
later.
• sql_asa.sql – installs stored procedures on SQL Anywhere® 9.x.
• sql_asa10.sql – installs stored procedures on SQL Anywhere 10.x.
• sql_asa11.sql – installs stored procedures on SQL Anywhere 11.x.
Note If you use Adaptive Server 12.5.3 or later, or Adaptive Server Anywhere 9.0.2 or later, the scripts come pre-installed on the server. You need to install these scripts only if you have a later version of the driver than the one that shipped with Adaptive Server. In addition, for backward compatibility,
sql_server.sql and sql_server12.sql are included on Adaptive Server 11.9.2 and
12.0 respectively, although these versions are no longer supported.
❖ Running stored-procedure installation scripts
1 Verify that your JAVA_HOME, JDBC_HOME, and CLASSPATH environment variables are set.
2 Use the IsqlApp sample application. For more information on IsqlApp, see “Installing stored procedures on an Adaptive Server database”.
❖ Installing stored procedures on an Adaptive Server database
• Go to the $JDBC_HOME/classes directory and enter: • For Adaptive Server version 15.x:
java IsqlApp -U sa -P password -S jdbc:sybase:
Tds:[hostname]:[port] -I $JDBC_HOME/sp/sql_server15.0.sql -c go
• For Adaptive Server version 12.5.x:
java IsqlApp -U sa -P password -S jdbc:sybase:
❖ Installing stored procedures on a SQL Anywhere or Adaptive Server Anywhere database
• Go to the $JDBC_HOME/classes directory and enter:
java IsqlApp -U dba -P password -S jdbc:sybase:
Tds:[hostname]:[port] -I $JDBC_HOME/sp/sql_asa.sql -c go
Reviewing the installation contents
After completing the jConnect installation, review the contents listed in this section.
Packages
For jConnect version 7.07, the following packages are found inside
jconn4.jar file for the release build, and jconn4d.jar file for the debug build:
• com.sybase.jdbc4.jdbc
• com.sybase.jdbc4.tds
• com.sybase.jdbc4.timedio
• com.sybase.jdbc4.utils
• com.sybase.jdbcx
The jConnect driver, com.sybase.jdbc4.jdbc.SybDriver, is located in the
com.sybase.jdbc4.jdbc package.
Directories and files
Table 3-2 lists the contents of the jconnect7_0 directory.
Table 3-2: Directories and files in the jconnect7_0 directory
Name Type Description
classes Subdirectory Contains the following jConnect 7.0 components: • jconn4.jar file that contains jConnect 7.0 classes
• sample2 subdirectory with jConnect 7.0 class files for sample applets and applications
• gateway2 subdirectory for compiled TDS-tunnelling servlet
devclasses Subdirectory Contains the jconn4d.jar file that contains the same jConnect 7.0 components as jconn4.jar, but debug mode is turned on.
JDBC samples and specifications
You can find JDBC samples and specifications in the jConnect for JDBC
Programmers Reference.
Testing the jConnect installation
After jConnect is installed, run the Version program to test the installation.
Note The Version program connects to a demonstration database that Sybase has made available on the Internet. You must have Internet access to run the
Version program successfully, or explicitly run it with [-U username] [-P password] [-S servername] commands to point it to your database.
❖ Testing the installation
1 From a UNIX or Linux prompt, change to the JDBC_HOME directory. 2 Verify that your CLASSPATH variable is set for running the sample
programs (see “Setting the CLASSPATH” on page 31 for details) and enter the following text:
docs Subdirectory Contains the:
• en subdirectory, which contains the English javadoc documentation
• en/progref subdirectory, which contains the jConnect for JDBC
Programmers Reference in HTML and PDF format
• en/installdocs subdirectory, which contains the jConnect for
JDBC Installation Guide in HTML and PDF format gateway2 Subdirectory Contains source code for the TDS-tunnelling servlet.
sample2 Subdirectory Contains source code for sample Java applications.
sp Subdirectory Contains isql scripts that install stored procedures for function escapes and DatabaseMetaData methods on a database server. See “Installing stored procedures” on page 31 for a list of scripts available.
tools Subdirectory Contains a perl script (decode-tli) that UNIX or Linux users can apply to parse an interfaces file into a readable format.
netimpct.gif Graphic file Contains a jConnect graphic.
index.html HTML file Contains links to jConnect documentation and jConnect samples.
java sample2.SybSample Version
A SybSample window appears. At the top of the window, the Running Sybase Sample text box displays the source code for Version as the program runs. The middle text box (Sample Output) should display version information. For example:
Using JDBC driver version 7.0 jConnect (TM) for JDBC(TM)/7.0...
3 The output could be one of the following:
• If the previous message appears in the Sample Output text box, you have successfully installed jConnect.
• If you get the previous message but the source code for Version does not appear in the Running Sybase Sample text box, and the Status text box at the bottom of the window shows the following message, it means that you have successfully installed jConnect but probably did not enter the command to run the Version program from the sample2 directory under JDBC_HOME:
java.io.FileNotFoundException: Version.java
• If the SybSample window does not appear and you get the following error message, check your CLASSPATH to verify that it is set correctly:
Can’t find class sample2.SybSample
• If the SybSample window does not come up, and you get one of the following error messages, make sure that your path includes the bin subdirectory of your JDK home directory:
“Name specified is not recognized as an internal or external command”
“Bad command or file name”
4 When you have verified that your installation was successful, click Close to exit the SybSample window.
Verifying the jConnect version
Go to the $JDBC_HOME/classes directory and enter:
java -jar jconn4.jar
This command prints a version string like the following:
26666)/P/EBF19485/JDK 1.6.0/jdbcmain/Wed Aug 31 03:14:04 PDT 2011
Here, the version number is 7.07. The 5-digit number following the letters "EBF" indicates the exact version of jConnect. This number increases as subsequent EBFs are released.
Sybase recommends that you check the Sybase download Web site periodically for updated versions of jConnect and download the latest version.
This section describes how you can check the exact build version of your jConnect installation.
Upgrading jConnect
See “Migrating jConnect Applications” in the jConnect for JDBC
A
Adaptive Server Anywhere
installing stored procedures for metadata 33 Adaptive Server Enterprise
installing stored procedures for metadata 32 audience v
B
Bourne shell 16
updating the RUN environment 27 browser
Firefox restrictions on CLASSPATH 31
C
C shell
updating the RUN environment 28 CLASSPATH environment variable 31
Firefox restrictions on 31 command line options 26 console installation mode 15, 21
D
DatabaseMetaData methods stored procedures for 31 DISPLAY environment variable 16 downgrading
SDK or Open Server 25 drivers
SDK component 5 dscp utility
modifying interface file entries 30 dsedit utility
modifying interface file entries 30
E
environment variables DISPLAY 16 LD_LIBRARY_PATH 29 PERL5LIB 29 PYTHONPATH 28 SYBASE 28 SYBASE_OCS 29 environment variables, settingCLASSPATH 31 JDBC_HOME 30
F
Firefox restrictions on CLASSPATH 31G
GUI installation mode 15, 17
H
hardware and software requirements 8
I
installation console mode 15, 21 contents 33 description 15 GUI mode 15, 17, 18 log.txt 16 remote 17installation types custom 20 full 20 typical 20 installing response file 22 stored procedures 31 installing jConnect
testing the installation 34
J
jConnect
installation contents 33 JDBC 2.0 samples 34
JDBC_HOME environment variable 30
L
language modules SDK component 2 sizes 10
LD_LIBRARY_PATH environment variable 29
log.txt for installation 16
M
metadata, stored procedures for 31 modifying interface file entries
dscp 30 dsedit 30
mount commands by platform 18 HP-UX 18 IBM 18 Linux 18 Solaris 18
O
Open Client component of SDK 5 Open Server environment variables 27 overwritingduplicate components warning 20
P
PERL5LIB environment variable 29 platform
mount commands 18 postinstallation tasks 27
setting environment variables 27 product components 5
PYTHONPATH environment variable 28
R
related documents v remote installation 17 requirements
hardware and software 8 response file installation mode 22 rsh remote installation 17
S
sample programs SDK component 6 samples JDBC 2.0 34 scripting languagesdatabase driver for Perl 4, 29 PHP 4 Python 4, 28 samples 28 scripts SDK component 6 SDK environment variables 27 setting environment variables
Open Server 27 SDK 27 sizes
language module 10 Software Developer’s Kit (SDK)
drivers 5
language module component 2 Open Client component 5 sample programs 6 SQL Anywhere
installing stored procedures for metadata 33 stored procedures
required for metadata 31
SQL Anywhere or Adaptive Server Anywhere 33 summary of product components 5
Sybase account creating 12
SYBASE environment variable 28 SYBASE_OCS environment variable 29
T
testing
for a jConnect version 34
for a successful jConnect installation 34 troubleshooting log.txt 16
U
uninstalling console mode 25 GUI mode 24updating the RUN environment Bourne shell 27 C shell 28 utility dscp 30 dsedit 30 gzip 10
V
verifying the jConnect version 35 version program
testing for successful jConnect installation 34
W
warnings