-- ---- - -- - - -- - - ---~ ---....,....--~-,---,-....-~---
L
Customer Satisfaction
Limitation on Warranties
and Liability
Copyright
Product Revisions
Warning
If you discover physical defects in the manuals distributed with an Apple product or in the media on which a software product is distributed, Apple will replace the documentation or media at no charge to you during the 90-day period after you purchased the product. In addition, if Apple releases a corrective update to a software product during the 90-day period after you purchased the software, Apple will replace the applicable diskettes and documentation with the revised version at no charge to you during the six months after the date of purchase.
In some countries the replacement period may be different; check with your authorized Apple dealer. Return any item to be replaced with proof of purchase to Apple or an authorized Apple dealer.
Even though Apple has tested the software described in this manual and reviewed its contents, neither Apple nor its software suppliers make any warranty or representation, either express or implied, with respect to this manual or to the software described in this manual, their quality, performance, merchantability, or fitness for any particular purpose. As a result, this software and manual are sold "as is," and you the purchaser are assuming the entire risk as to their quality and performance. In no event will Apple or its software suppliers be liable for direct, indirect, incidental, or consequential damages resulting from any defect in the software or manual, even if they have been advised of the possibility of such damages. In particular, they shall have no liability for any
programs or data stored in or used with Apple products, including the costs of recovering or reproducing these programs or data. Some states do not allow the exclusion or limitation of implied warranties or liability for incidental or consequential damages, so the above limitation or exclusion may not apply to you.
This manual and the software (computer programs) described in it are copyrighted by Apple or by Apple's software suppliers, with all rights reserved. Under the copyright laws, this manual or the programs may not be copied, in whole or part, without the written consent of Apple, except in the normal use of the software or to make a backup copy. This exception does not allow copies to be made for others, whether or not sold, but all of the material purchased (with all backup copies) may be sold, given or loaned to another person. Under the law, copying includes translating into another language. You may use the software on any computer owned by you but extra copies cannot be made for this purpose. For some products, a multi-use license may be purchased to allow the software to be used on more than one computer owned by the purchaser, including a shared-disk system. (Contact your authorized Apple dealer for information on multi-use licenses.)
Apple cannot guarantee that you will receive notice of a revision to the software described in this manual, even if you have returned a registration card received with the product. You should periodically check with your authorized Apple Dealer.
© 1984 Apple Computer, Inc. 20525 Mariani Avenue Cupertino, California 95014
Apple and the Apple logo are registered trademarks of Apple Computer, Inc. Simultaneously published in the U.S.A. and Canada. All rights reserved.
This epuipment generates, uses and can radiate radio frequency energy and if not installed and used in accordance with the instructions manual, may cause interference to radio communications. It has been tested and found to comply with the limits for a Class A computing device pursuant to Subpart J of Part 15 of FCC Rules, which are designed to provide reasonable protection against such interference when operated in a commercial environment. Operation of this equipment in a residential area is likely to cause Interference in which case the user at his own expense will be required to take whatever measures may be required to correct the interference.
~
~
,
~ I1
~
~ '
~
~
~ I
~
L
~ ..l
12
Contents
Table of
Contents,
Part I
Figures and Tables
vii
About this Manual
ix
I
I
I I
ix What's Inside
x
What To ReadI
I I
xi Further Information xi Optional Publications
r
xii Aids to UnderstandingI
[
Getting Acquainted
1
I
I
1 1~[
~
I J
1 What the AppleLine Does 2 Names of Parts
3 On-Off Switch
3 Indicator Lights
l
4 ConnectorsI
L
Installing Your AppleLine
5
I
5 Choosing the Appleline Location
6 Installing the AppleLine Near Your Apple 7 Installing the Appleline Away From Your Apple
l
I
I I
[
I
8 Configuring the IBM System
8 Completing the Hook-Up
9 The Power Connection
10 The IBM Connection
10 The Apple Connection
l
~
I I[
-·
~
L
I~
~
Table of Contents •D
Passwords and Communication
Parameters
11
12 The Appleline Supervisor Program12 Using the Supervisor Program 13 Displaying the Appleline's Settings
~
13 Modifying the AppleLine's Settings14 Changing Passwords
14 Exiting the Supervisor Program 15 Passwords
15 Default Passwords
16 Password Formation Rules 16 Locking the Supervisor 16 Unlocking the Supervisor
17 Communication Parameters ~,
17 Terminal Type
18 Baud Rate ~l
18 Parity
~
19 Autobaud Option19 Speed Indicator Option
~
19 Modem Type20 Automatic Logoff
~
Testing and Maintenance
21
~
21 Internal Tests ~
~
21 Loop-Back Test22 Automatic Self-Test
22 Character Generation Test
~
23 Maintenance
23 Cleaning
~
Using Your AppleLine
25
~
25 Logging On
26 Logan Procedures in General 26 Appleline Logan Procedures
C1
r
27 Using Your Apple Like an IBM Terminal27 Special IBM Keys
~
28 Other Keys and Functions
28 Logging Ott
!I
29 Appleline Logoff Procedure
~
~
~
•
Table of Contents ~ I[
-
-I
I
Part II for Apple Ill
I
II
Apple Ill Supplement,
35
I
Introduction to Part II
f
l
I 36 The Materials You Need
I
ICompleting Your Installation
37
~
I 37 Configuring Your ACCESS Program
I
38 Completing the Hook-UpI 39 Direct Connection
I
39 Modem ConnectionI 41 Entering Passwords and Communication Parameters
I
41 The Autobaud MessageUsing Your Apple Ill
45
45 Terminal Controls
46 The Apple Monitor Display
46 The Apple Ill Keyboard
48 Recording Information From a Mainframe
Part II for the Lisa Computer
Lisa Computer Supplement,
53
I
Introduction to Part II
I
54 The Materials You NeedCompleting Your Installation
55
55 Configuring Your Lisa Terminal Program
56 Completing the Hook-Up
56 Direct Connection
58 Modem Connection
59 Entering Passwords and Communication Parameters
59 The Autobaud Message
Using Your Lisa
63
63 Terminal Controls
64 The Lisa Screen Display
64 The Lisa Keyboard
J
·
~
66 Copying and Pasting Information
L
~
Table of ContentsPart II for the Macintosh Computer
Macintosh Reference Information
67
. . . , . . . . . , . . . ,
Appendixes
69
Technical Specifications
71
~
Connecting Cables
73 Standard Cabling73
[:_ I
•
74 A Custom Cable
~
!
Glossary
75
~
Index
80
~
I
II
II
I[
I
r
II
I
r
Ir
,
~
I
I
I r
I
II
I r!
~
~
~
!
~
r
~
·
~
List of Figures and Tables
Part I
Chapter 1 Getting Acquainted
2 Figure 1-1 Things You'll Need
3 Figure 1-2 Appleline, Front View. 4 Figure 1-3 Appleline, Rear View.
Chapter 2 Installing Your Appleline
6 Figure 2-1 Appleline Near Apple Computer.
7 Figure 2-2 Appleline Remote From Apple Using Telephone Lines
7 Figure 2-3 Appleline Remote From Apple Using Line Drivers 9 Figure 2-4 Appleline Installation.
Chapter 3 Passwords and Communication Parameters
11 Table 3-1 Supervisor Menu
13 Table 3-2 Default Supervisor Settings.
Figures and Tables •
-i
•
Part II for Apple Ill
Chapter 1 Completing Your Installation
39 Figure 1-1 Direct Connection
40 Figure 1-2 Modem Connection
Chapter 2 Using Your Apple Ill
47 Table 2-1 Apple Ill Keyboard Equivalents for IBM 3278-2 Functions
Part II for the Lisa Computer
Chapter 1 Completing Your Installation
57 Figure 1-1 Direct Connection
~
·
l
~ I~
!
@
1
58 Figure 1-2 Modem Connection ~
Chapter 2 Using Your Lisa ~
65 Table 2-1 Lisa Keyboard Equivalents for IBM 3278-2 Functions ~ 1
Appendix A Technical Specifications
72 Table A-1 Apple Interface Pin Designations
Appendix B Connecting Cables
74 Table B-1 Connecting Cable Wiring List
~
~
[
·
~
[
·
~
I I
[
t
~
~
[
l
~
I I
I
IJ
•
Preface
About This Manual
The AppleLine '" Owner's Manual is really three books in one,
separated by cardboard dividers. This front section is the first one you should read. It tells you what your Appleline does, and how to
install, test, and operate it.
The second and third sections comprise Part II of this manual, and describe how to marry the Appieline to your specific Apple computer model. You will need to refer to the appropriate Part II when you reach the last stages of installing your Appleline, before you begin operation.
If your computer is a Macintosh: Part II of this manual is included in the
Mac Terminal manual.
Whats
Inside
This manual is designed to put the facts you need at your fingertips, where you can find them easily. Here is a summary of its contents:
• Chapter 1, Getting Acquainted, explains what your Appleline
does. It also contains pictures of the unit with its parts labeled, and describes your Appleline's controls and indicator lights.
• Chapter 2, Installing Your Appleline, tells you how to find a suitable location for your Appleline and how to start hooking it up. The last part of the hook-up procedure is covered in Part II of this
manual.
• Chapter 3, Passwords and Communication Parameters, describes how you get your Appleline ready to work for you by sending it certain information from your Apple keyboard.
• Chapter 4, Testing and Maintenance, specifies tests that you can perform to verify that your Appleline is working correctly, and tells
you how to keep it that way .
~
What's Inside •-~
--~---~~~~~~~~~~~~~~~~~~~~-!
Contents of Part II
•
• Chapter 5, Using Your Appleline, explains how to operate the
unit from the keyboard of your Apple computer. Additional
information is included in Part II.
• Part II for the Apple Ill is a continuation of Part I of the Appleline
User's Manual written specifically for Apple Ill computer users.
• Part II for the Lisa Computer is a continuation of Part I of the Appleline User's Manual written specifically for Lisa computer users.
• Appendix A, Specifications, is written for technical specialists who need a summary of the Appleline's electronic and physical characteristics.
• Appendix B, Connecting Cables, specifies the kinds of cables you need to hook up your Appleline.
• A Glossary is included at the end, so you can quickly look up any
words that are not familiar to you.
What
To
Read
You should read Chapters 1 and 2 in Part I first, to become familiar with your Appleline and learn how to hook it up to the IBM computing system. Following that you should read the Part II that applies to your
Apple computer. Part II tells you the following:
• How to hook your Appleline up to your computer, completing its installation.
• How to set up your communications program to work with the
Appleline.
• How to use the keyboard and controls of your computer to produce the same results as if it were an IBM 3278-2 terminal.
• How to save the information that you receive from the IBM mainframe .
Preface: About This Manual
II I - I
~
i!1
I!
1
~
-~
~
~
'1_
~
~
,
I
I
I Ill
r
I rtt
[
1 rn
r
I
r
I lR
f
~
r
I
r
I l
r
I [
I
I
f
I l
r
I [
I
I l
l
I lr
I . II [
t
I l
[
I l
[
·
~
1
~
You may not need to read all of this manual. For some tasks you can skip certain parts. Here is a chart that shows which chapters pertain to each activity:
Task
Installing your Appleline Using your Appleline Changing passwords Testing your installation
Further Information
Part I 1 2
• •
•
Paricll 3 4 5 1 2
• •
•
•
•
•
•
This manual is written with the assumption that you are already familiar with operating your Apple computer. If this is not the case, you should read your Apple's Owner's Guide before proceeding.
•
Other publications that may help you work with your Appleline are
these:
• The user's guide for the terminal program you are using: Apple Access 3270 User's Manual, Lisa Terminal manual, or
Mac Terminal manual
• Apple Modem 30011200 User's Manual
• 3278 Display Station Operator's Guide (IBM No. GA27-2890) • An Introduction to the IBM 3270 Information Display System
(IBM No. GA27-2739)
Optional Publications
• IBM 3270 Information Display System 3274 Control Unit Description and Programmers Guide (IBM No. GA23-0061)
• IBM 3270 Information Display System Data Stream Programmer's Reference (IBM No. GA23-0059)
• IBM 3270 Information Display System Configurator
(IBM No. GA27-2849)
• IBM 3270 Information Display System Character Set Reference
(IBM No. GA27-2837)
• IBM 3270 Information Display System Library User's Guide
(IBM No. GA23-0061)
i
~
Further Information •_
-Aids to Understanding
If you don't understand a technical term in the manual, look it up in the
Glossary found in the back of this manual. Definitions for most such items can be found in the marginal notes, the Glossary, or both. In addition, watch for these visual aids:
Gray Boxes: Gray boxes contain incidental information that you may find useful.
.6.
WarningWarning boxes caution you about things that might hurt you or your Apple
equipment or software.
• Screen boxes represent inforr;iation as it 1,1ill
aPPear on Your computer's disPlaY screen.
Captions, definitions, and other short
items appear in marginal notes like this.
•
Preface: About This Manual~
~
!
~
e
~
~
~
.
~
~
~
Ii!:
~
~
I!!
'
~
,
~
r
~
I
!!
_
I
~
·
~
j
~
l
Il
I[
r[
rr
Ir
Ir
Ir
Ir
-I
I
I I
I
Ir
~
I
·
~
I
I I[
·
~
[
I IChapter 1
Getting Acquainted
This chapter introduces you to the Appleline. It tells you what it does and helps you find its controls and indicator lights.
What the AppleLine Does
You are already familiar with using your Apple system as a personal computer. By adding the Appleline, you give your Apple a new capability: you can now use it to communicate with an IBM mainframe computer.
When you tell it to do so, the Appleline makes your Applescreen and keyboard act like an IBM 3278-2 Terminal configured with a 75 or 87 keyboard, connected to an IBM 327 4/3276 Control Unit. Thi~ gives you the freedom to choose among these basic functions:
• You can still use your Apple as a personal computer, with all its present capabilities.
The Appleline lets your Apple talk to IBM • At any time you can switch to using your Apple as if it were a
3278-2 terminal; it will be able to communicate with an IBM mainframe computer.
Asynchronous: Having a variable time
interval between character~. A mode of
data transmission which provides
framing information on a
character-by-character basis.
Modem: Short for "modu
lator-demodulator"; a device that allows computing equipment to exchange data
over telephone lines.
• With the proper software, you can transfer data between your Apple personal computer and an IBM mainframe computer.
This flexibility adds new power to your Apple computing tools. At the office, for example, you can switch back and forth between personal computer applications and IBM jobs. At home, you can use your Apple computer to communicate remotely, over telephone lines and a pair of asynchronous modems, with an IBM mainframe at your office.
You get all the convenience of Apple computing combined with the power of a large mainframe system.
--- ---
E
J
Inventory of equipment
Figure 1-1. Things You'll Need
Names of Parts
In addition to your Appleline and an Apple computer, you'll need the
items listed below and shown in Figure 1-1 . • Communications software (not supplied)
• Interface cable (not supplied, see Appendix B)
• Wall-mounting transformer unit and mounting screw
• Gender changer connector
• Loop-back connector
• Small flat-blade screwdriver (not supplied)
A p p l e l i n e
-Wall-Mounting Transformer and
Mounting Screw ..
-Gender Changer Connector (Typical) ' ~ ~
Loop-Back Connector ' - - - --~
L__
.
These pieces of equipment are described in the rest of this manual. If
[image:16.554.39.477.228.501.2]any items are missing, contact your Apple dealer.
Figure 1-2 shows you a front view of the Appleline unit; Figure 1-3
shows you a rear view. The parts you need to know about are
labeled.
Chapter 1 : Getting Acquaintec..
~
~
.
~
.
~
.
~
~
I!!
~
~
~
~
~
~
~
I!:
~·
~
~
..
~J
II
~I
I
!!j!
I..,)
i;;::,L U
II
~u
~
-
!
I
Iii:-
I
...:.:, I
1
11
I J
I
I
l
II
I I
I
II
I
I
I I
I
I II
II
I lr
I I'
~
I
I
l
II
·
~
[
i
i
~
~
r
Figure 1-2. Apple Line, Front View.
On-off Switch---~~~"'---~
...
-Green Light---+-='"--""=::::---·-'-:;;;;-~·
-
=
-
-
-
---
,-1
'//
YeRed llow Light-
Lighhtt=========
~
=
===~=~~~~~~~~
~j
Here is a short description of the parts labeled in Figures 1-2 and 1-3.
O
n-
O
f
f S
wi
tch
The on-off switch controls all power to the unit. If it is switched off you cannot use your Appleline but you can continue to use your Apple computer. It is off when the end marked "O" is pressed in; it is
on when the end marked "1" is pressed in. When it is on, you will hear a low hum from your Appleline's cooling fan.
In
dica
tor Light
s
Three colored lights become visible, when they are lit, on the front of the Appleline. When they are dark they are hidden behind the front panel strip. They tell you when certain events are occurring.
The green light blinks when your Appleline is switched on and working properly. This tells you that its internal circuits are OK
The yellow light tells you the communication status of your
Appleline. When you call it up, the yellow light blinks once a second; when a good connection is established, it glows steadily.
The red light tells you if something is wrong. It blinks once if there is a temporary communication problem. It will glow steadily if there is an equipment failure.
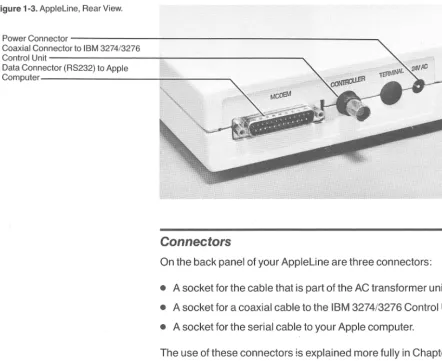
Figure 1-3. Appleline, Rear View.
Power C o n n e c t o r - - - -- - - -Coaxial Connector to IBM 3274/3276
Control Unit---i---~
Data Connector (RS232) to Apple
Computer---==----~
Connectors
On the back panel of your Appleline are three connectors:
• A socket for the cable that is part of the AC transformer unit.
• A socket for a coaxial cable to the IBM 3274/3276 Control Unit.
• A socket for the serial cable to your Apple computer.
The use of these connectors is explained more fully in Chapter 2.
•
Chapter 1 : Getting Acquainted~
~
~
(~
I ,
:e
~I
~ I~
I
~
~
~
~
[
Installation steps
'
:
i!j
Chapter2
Installing Your AppleLine
This chapter tells you how to install your Appleline and connect it to an IBM 3274 Control Unit or 3276 Display Station/Control Unit.
Part 11, located near the back of this manual, tells you how to hook up and use your Appleline with your specific model of Apple computer. Installing your Appleline requires these basic procedures:
• Choosing a location for your Appleline and planning its communication links with your Apple and with the IBM 3274 Control Unit or 3276 Display Station/Control Unit.
• If necessary, configuring the IBM system to accept a 3278-2 type terminal with either a 75 or 87 keyboard.
• Connecting your Appleline to power, to the IBM equipment, and to your Apple computer.
Choosing the AppleLine Location
The Appleline unit is normally connected both to your Apple
computer and to an IBM Model 3274 Control Unit (with a Type A Terminal Adapter) or 3276 Display Station/Control Unit (or
equivalent), which is part of an IBM mainframe system. In planning its installation, you must usually choose one of two options:
• Place the Appleline next to your Apple computer and connect it to the IBM Control Unit by a coaxial cable; or
• Place the Appleline at a location that is distant from your Apple
computer but convenient to the IBM Control Unit. In this case your
Apple and the Appleline must communicate over a telephone circuit, using a pair of asynchronous modems.
By The Way: Apple makes both 300 baud and 1200 baud modems which
are asynchronous and will work perfectly in this capacity.
Choosing the Appleline Location •
Location factors
[image:20.554.58.465.361.497.2]BNC Connector: A special type of circular plug with a twist-on bayonet shell, used with coaxial cable.
Figure 2-1. Appleline Near Apple Computer.
The unit must be located in a clean, indoor environment, and have a source of AC power nearby. It is designed to rest on a flat horizontal surface. Do not place it on a carpet or other uneven surface that might impede the flow of air through the louvers on the bottom of its case.
This section describes the two types of hook-up that result when the
~I
Appleline unit is installed next to your Apple and when it is installed
[
J!}
away from your Apple.
Installing the AppleLine Near Your Apple
~; Your Appleline connects to your Apple computer with a cable (or two [~cables end to end) having a maximum total length of 5 meters (16 ~
feet). If necessary, you can plug the Gender Changer included in your ~ 1
Appleline package into the Appleline to convert its connector from
I
pin-type to socket-type. For connecting cable requirements and a list ~ 1of standard Apple cables you can use, see Appendix B.
The IBM 3274 Control Unit is housed in a cabinet; the IBM 3276 Display Station/Control Unit is a desk-top terminal. Either one connects to the Appleline unit with a coaxial cable terminating in a
BNC
connector.
This cable may be up to 1,500 meters (4,920 feet) long. A typical hook-up is diagrammed in Figure 2-1.~ I
~ I
3274/3276 Control Unit _ _ _ _ _ _ ___.,.._ ~ I
r
Connecting Cable (see Appendix B)
To Apple Computer ---,~~
If you are installing your Appleline at the office, you may already have a coaxial cable connection from the IBM computer center right at your desk. If not, check with your mainframe service
representative or data processing specialist for the best way to acquire such a connection.
Chapter 2: Installing Your Apple line
~ I
I
~ I
_
1
!. I
I
!~
I
I
I
I
I
]
I
[image:21.554.140.496.192.325.2]I
Figure 2-2. Appleline Remote From Apple Using Telephone Lines
Installing the AppleLine Away From Your Apple
If your Appleline and your Apple computer must be more than 5 meters away from each other (in order for the Appleline to reach the IBM Control Unit), then they cannot be connected with ordinary cable. They must communicate by means of telephone lines and a pair of asynchronous modems, like the Apple Modems, (diagrammed in Figure 2-2) or a pair of line drivers (short haul modems) as
diagrammed in Figure 2-3.
Appleline Apple Modem
3274/3276 Coiltrol Unit
Figure 2-3. Appleline Remote From Apple Using Line Drivers
To Apple Computer
Apple Modem
For instructions on hooking up and operating Apple Modems, consult
the Apple Modem 30011200 User's Manual.
Apple line Line Driver
3274/3276 Control Unit
Communications Line
r
j
~
Choosing the Appleline Location•
[image:21.554.108.477.442.568.2]--Procedures at the IBM end
Summary of hook-up steps
•
Configuring the IBM System
If your AppleLine is replacing a working 3278-2 terminal installation configured with a 75 or 87 keyboard, the IBM system should not require reprogramming to accept it. After installing the AppleLine, you can use the same routines and passwords on your Apple as you previously used on the 3278-2 terminal.
If your AppleLine constitutes a new terminal for the IBM system, you should talk to the personnel in charge of the IBM equipment. Explain that your AppleLine emulates a 3278 Display Unit, Model 2. The host computer personnel may need to reconfigure the IBM Network Control Program (NCP) to add your equipment. After the host has been reconfigured, the host computer personnel will assign you a user ID and password for entry into the IBM system, and will explain any special operating procedures you need to know in order to use it.
At this time you can also describe how you plan to install your AppleLine, and discuss any problems about coaxial cables or telephone lines with the appropriate people.
Completing the Hook-Up
Before trying to hook up your AppleLine or turn it on, you should have completed the procedures described in the previous parts of this chapter:
• Deciding on a location for your AppleLine and acquiring all the necessary communication facilities.
• If necessary, working with the IBM computer personnel to configure the mainframe to accept your AppleLine.
When these tasks are finished, you are ready to complete the hook-up. It consists of three steps:
1. Connecting your AppleLine to power.
2. Connecting your AppleLine to the IBM Control Unit. 3. Connecting the AppleLine to your Apple computer.
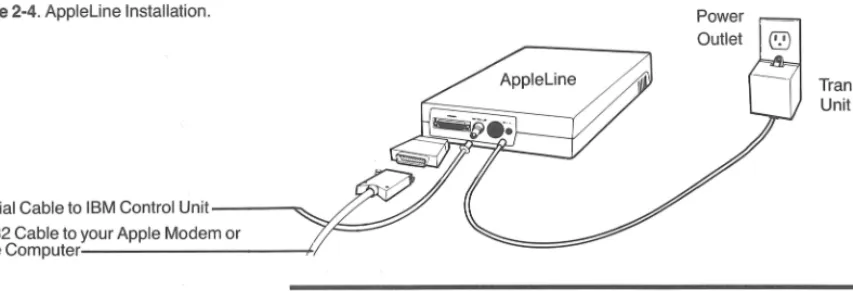
Steps 1 and 2 are described below. Step 3 is described in Part II of
this manual. Figure 2-4 is a block diagram of how the parts of your
AppleLine installation should be arranged .
l
I
l
I I
[
I 1[
I I
[
r
~
I ~
r
I !
r
I ~
I
I II
·
~
I
I 1
r
·
~
r
~
l
·
~
[
I[
I[
~
1
~
I [image:23.554.43.470.54.199.2]I -
I lFigure 2-4. Appleline Installation.
Transformer Unit
Coaxial Cable to IBM Control Unit---~
RS232 Cable to your Apple Modem or
"'Y.""--::::::;..---Apple Computer---~1
Installing the transformer
The
Power Connection
Your Appleline operates on 24 volts AC, which is provided by a separate plug-in transformer. The transformer unit is a small cubical box included in your Appleline package, with a six-foot wire that connects it to the Appleline. It has two flat prongs that plug into a standard AC outlet.
..A..
WarningBefore plugging in the transformer to AC power, verify that its input rating is the same as your local power. Its input voltage and frequency are listed to the left of its plug-in pins. For use in North America, this should read "120 VAC 60 HZ."
Follow this procedure to hook your Appleline up to AC power:
1. Turn its switch OFF ("O" end in, "1" end out).
2. Plug the end of the wire from the transformer unit into the socket marked "24V AC" on the back panel of your Appleline.
3. Find a convenient wall outlet within six feet of your Appleline. 4. Remove the center screw that holds the cover plate on the outlet.
Do not remove the cover plate.
5. Plug the prongs on the transformer unit into the outlet. If the outlet is a double one, plug the transformer unit into the lower socket so that the body of the transformer hangs below the outlet.
6. Insert the screw that came with the transformer unit through its mounting ear and into the hole in the center of the outlet's cover plate. Run the screw down firmly but not too tightly.
When your Appleline is switched off, the transformer will continue to
consume a small amount of power- about as much as an electric clock. When your Appleline is switched on, it consumes a maximum of 50 watts of power.
-Hooking up to the coaxial cable
Ii
•
The IBM Connection
Your Appleline communicates with the IBM 3274 (with a Type A Terminal Adapter) or 3276 Display Station/Control Unit by means of a coaxial cable (similar to that used in cable television systems). The coaxial cable terminates in a BNC connector, which plugs directly onto the back of your AppleLine unit.
.A.
WarningIf such a cable and connector is not already supplied to your Appleline's
location, ask a mainframe computer technician to install one. Unless you are
experienced in mainframe computer installations do not try to rig it up yourself.
To hook your Appleline up to the IBM coaxial cable, plug the BNC connector on the end of the cable onto the connector marked
CONTROLLER on the back panel of your Appleline. See Figure 2-3. Align the two slots with the side pins, push the connector down, and
secure it by twisting it one-quarter turn clockwise.
The Apple Connection
Instructions for hooking your Appleline up to your Apple computer
are given in Part II of this manual, Chapter 1. Read that chapter now, and complete its instructions before proceeding further.
Reminder: There are two Part II sections at the back of this manual
-one for Apple 111 users and one for Lisa computer users. Read only the section which pertains to your computer. If your computer is a Macintosh, Part 11 of this manual is included in the Mac Terminal manual.
Chapter 2: Installing Your Apple line
~
l
~
!
I
~
r
~ I
~
I
~
~
~
I
~
r
~
r
I
~ Il
I
~
t
l
I~
!
l
' II
I
I
I
I
I
~
_l
I
J Il
II
Il
I
I
I ~
I
~
I LT
Table 3-1. Supervisor Menu
Nonvolatile Memory: A type of memory that will retain information even when the power is switched off.
Chapter3
Passwords and
Communication
Parameters
This chapter tells you how to enter certain information into your Appleline's memory, using its built in supervisor program, so that it knows how to recognize you and communicate with your Apple computer. Before following the instructions in this chapter, you must have completed the following:
• Installed your Appleline and connected it to the IBM Control Unit, as described in Chapter 2.
• Connected your Appleline to your Apple computer, as described in Part II, Chapter 1.
• Followed the procedure given in Part II, Chapter 1, for gaining access to your Appleline's supervisor program for the first time.
At this point your Apple computer's monitor screen should be displaying the supervisor menu shown in Table 3-1.
A- Display terminal type and modem settings B- Modify terminal type and modem settings C- Change USER or SUPERVISOR passwords D-Logoff and hang up modem
E- Logoff and return to logon screen
If you are installing your Appleline, your final task is to use the
supervisor program to tell your Appleline how you want it to behave. The Appleline supervisor program helps you by asking you a series of questions. You type replies on your Apple keyboard; it stores the
replies in your Appleline's nonvolatile memory. This stored
information is of two kinds:
[
~~~~~~~~~~~~~~~~~~~~~~~~~~~~----:~~~~~~~~~~~~~~~~f'IP'"'::_.,
Password: A string of characters you
must type on your keyboard before the Appleline will respond to your commands.
Communication Parameters: Information that tells your Appleline how to talk to your Apple.
What the Appleline supervisor program does
• Passwords that allow your Appleline to recognize you, while prohibiting others from using your Appleline to communicate with
the IBM Control Unit. ·
• A set of communication parameters that tells your Appleline exactly how you want it to communicate with your Apple.
Other Passwords and Communication Parameters: This chapter discusses only the ways that your Appleline and your Apple computer communicate with each other. A complete Appleline installation involves other systems, including data transmission facilities and the mainframe computing system, each of which may have its own passwords and parameters. For information about these other systems, consult the appropriate computer operators or instruction manuals.
I
!]
II
~
-
i
~I
I
~
~
i[
~
i~
~
r~
The AppleLine Supervisor Program
~~The supervisor program is built into your Appleline; you don't need to ~ load it from a disk. It has these functions to help you store password
and parameter information in your Appleline's memory: ~
• It tells you what communication parameters are currently stored. ~
• It helps you change them and store the new version.
• It allows you to create new passwords.
Using the Supervisor Program
The first time you gain access to your Appleline's supervisor program you must follow the special procedure given in Part II, Chapter 1, sending the autobaud message and the default supervisor password APPLES.
After the first time you gain access to the supervisor program by following the normal log-on procedure described in Chapter 5, using the new supervisor password that you assigned the first time.
Either way- the first time or later times -your Appleline begins its supervisor program by displaying the menu shown in Table 3-1 .
Underneath this menu, Appleline displays the message
~ ..
• Your selection [logoff and return to logon
screen]:
Choosing a supervisor task
•
Notice that it has already picked one possible choice - logoff and return to logon screen. If you want to do this, just press (RETURN). Otherwise, type the letter that is displayed in front of the choice you want. For example, if you want to modify the terminal type or modem settings, press@ (RETURN l on your Apple keyboard .
I II
I I
I I~
I I
Table 3-2. Default Supervisor Settings.
The specific jobs you can do with your Appleline's supervisor program are described below.
Displaying the AppleLine's Settings
From the supervisor menu, when you press
0
(RETURN) to Dis P 1 a Yterr11inal tYPe and r110der11 settin9s, yourAppleline displays a list of its communication parameter settings. The first time you use the supervisor program, these will be the default values shown in Table 3-2. Later, they will be whatever values you have created bv usina the supervisor's "Modifv settinas" command.
Current terminal type is "VT100".
Current BAUD RATE is "9600".
Current data PARITY is "Even". AUTOBAUD is "Enabled".
SPEED INDICATOR is "Disabled".
Current MODEM type is "Local connect". Current AUTO LOGOFF is "Disabled".
Modifying the AppleLine's Settings
From the supervisor menu, when you press@ (RETURN) to Modi f Y
terr11inal tYPe and 111oder11 settin9s yourAppleline starts running through the settings of all its communication parameters. For each one, it asks you whether or not you want to change the existing value. For an explanation of all these parameters and a discussion of your possible choices of settings, see the section
"Communication Parameters" later in this chapter.
Wherever Appleline asks you
• Is this correct?[YJ
you can press (RETURN) to retain the existing setting. If you want to
change the setting, follow this procedure:
1. Type@:) (RETURN) for "No." Appleline responds by displaying a list
of all your possible choices.
2. Type the letter that appears to the left of the choice you want, followed by (RETURN).
3. Appleline responds by changing the setting and asking you if the new value is correct.
4. Press (RETURN) to accept the new setting. If you made a mistake,
press@:) (RETURN) to make another choice.
~
--~~-Saving new passwords and
communication parameters
•
Changing Passwords
From the supervisor menu, when you press@] (RETURN) to Ch an 9e
USER or SUPERt.JISOR Pass1A1ords yourApplelineresponds
by giving you an opportunity to change its passwords. In each case, it will ask you for a new password and then repeat what you have typed to make sure that it is correct. For the rules governing password creation and use, see the section "Passwords" later in this chapter.
If you forget a password: Once you have entered a password into your Appleline's memory, there is no way to make your Appleline tell you what it is. If you forget a password you can either use the supervisor program to enter a new one, or you can force your Appleline to return to its default password settings by the procedure described below under "Unlocking
the Supervisor."
Exiting
the Supervisor Program
From the supervisor menu, when you press either@) (RETURN I to
Lo9off and han9 UP f!1odef!1 or@(RETURNlto Lo9off and return to lo9on screen yourApplelinerespondsby quitting the supervisor program. At this time it asks you if you want to save the current values of its passwords and communication
parameters (including any changes you have just made). If you want your Apple line to use these values henceforth, press
0
and (RETURN I for yes. If you press@ and (RETURN I for no, your Apple line will forget any changes you made to its passwords or communication parameters during your current session with the supervisor program.If after typing
0
and pressing (RETURN I to save the changes, theAppleline responds by displaying the following message:
• ** Non-1.10latile r11er11orY has failed.**
** Parar11eters r11a~' not be correct. **
Try saving the changes again. To do this press@ and (RETURN) for no, when you are asked if you really want to leave the supervisor program. Appleline will return to the supervisor menu. Try the procedure again. If the error message is displayed again, your Appleline needs service. Contact your Apple dealer for assistance. If you typed@] (RETURN) as your selection from the supervisor menu, your Appleline completes the session by terminating communication
with your Apple computer. If you typed@ (RETURN l, it returns to the beginning of the log-on procedure .
Chapter 3: Passwords and Communication Parameters
~
I1
·
~ I
r
~I
~
t!:
I
~
~
~
l
~
~
~
~
~ I
-I!
Rules for using passwords
I II.
I
In either case, your Appleline first asks you if you really want to
leave the supervisor program. Type (RETURN) to say yes. If you press
@~for no, Appleline will return to the supervisor menu.
Passwords
The Appleline memory holds one supervisor password and four
user passwords. These passwords control the user's access to the Appleline according to the following rules:
• An operator who knows the supervisor password can use your
Appleline's supervisor program, and hence can change any of the supervisor or user passwords and modify the Apple line's
settings.
• An qperator who knows any one of the user passwords but does
not know the supervisor password can use your Appleline to communicate with the IBM mainframe, but cannot change the passwords or modify the Appleline's settings.
• An operator who does not know any of the passwords cannot use
your Appleline at all.
Default Passwords
The first time you use your Appleline, it recognizes the supervisor password
APPLES
and these four user passwords:APPLE1
APPLE2
APPLE:J
APPLEL!
Because these codes are the same for every Appleline
manufactured, you will normally want to use the supervisor program
to change the passwords .
• Warning
Since an operator can gain access to the Appleline by entering either the supervisor password or any one of the four user passwords, you must
change them all to achieve security.
Passwords •
-[
--~~~~~~~~~~~~~~~~~~~~~~~~~~~~~~~~~~~~~~~~~~~---1•_.,_,
Making the supervisor program inaccessible
If you forget your passwords, return your Apple line to its default settings.
•
Password Formation Rules
An Appleline password may be a real word, someone's name, a number, or a meaningless string of characters. However, it must obey these rules:
• It must be at least 3 characters long and not more than 8.
• It may contain any combination of upper or lower case letters, numerals, and punctuation marks.
• It may not contain any control characters ((TAB), (EscAPEJ, etc.)
• If the supervisor password is the same as any of the user passwords, the supervisor becomes inaccessible; see below, "Locking the Supervisor."
Here are some examples of valid passwords:
Dept275 (A21xm3$!
MARSON 0510414
#32 Sesame
Note: When interpreting a password, Appleline does not distinguish between capital and lower case letters. For example, it treats "Sesame"
and "SESAME" as identical.
Locking the Supervisor
In certain circumstances you may wish to make the supervisor program inaccessible. To do this, just change the supervisor
password so that it is identical to one of the user passwords. Because Appleline looks first for a user password when you log on, it will never recognize the combination you type as the supervisor password.
Unlocking the Supervisor
OCf
l
I
[
~
-
l
~
'
l
~
~
If the Appleline's supervisor program becomes inaccessible, either because you have locked it as just described or because you have
forgotten the supervisor password, you can unlock it. Here is what to
~
-do:
1. Turn your Appleline's power switch OFF.
2. Unplug the cable that goes to your Apple computer or modem. 3. Insert in its place the loopback plug that is included in your
Appleline package .
•
I
I Ir.I
I l!TI
Il
I
r
II
Ir
II
I
I
I
I
I
I
I[
I I
I
I I
The settings you can choose
•
4. Turn the power switch ON. Wait until your Appleline's yellow
light starts blinking.
5. Remove the loopback plug (with the power still on).
6. Wait five seconds. Turn the power switch OFF.
7. Reconnect the cable that goes to your Apple computer or modem.
8. Turn the power switch back ON.
9. Perform the entire procedure listed in Part II, Chapter 1 of this
manual under "Entering Passwords and Communication Parameters."
Note: To prevent unauthorized persons from performing this procedure, keep your loopback plug in a secure place.
The forgoing procedure changes the supervisor password back to APPLES and the four user passwords back to APPLE 1 through
APPLE LI. It also resets all the communication parameters to their
default values. These settings are listed in Table 3-2. This is why you
need to complete this routine by entering new passwords and communication parameters, as if you were setting up your Appleline for the first time.
Communication Parameters
Your Appleline is capable of communicating with your Apple
computer in a variety of ways. You can change its behavior by changing its communication parameters, using the supervisor
program as explained earlier. Your choices are described in the rest
of this section.
Terminal Type
This entry tells your Appleline what type of equipment you have. You
have these choices:
A - LisaTerrriinal
·5 - Mac Te rr11inal
C - Access 3270
D - l.JT100
Type the appropriate letter for the communication program you are
using, followed by (RETURN).
Usual baud rate is 9600 for a direct connection
•
Baud Rate
This entry tells your Appleline the speed at which it must
communicate with your Apple. The speed is measured in baud, or
bits per second. Your choices are these:
A - 45.5
B -
50c -
75D - 110
E - 134. 5
F - 150 G - 300 H - 600 I - 1200
J - 1800
K - 2000 L - 2400
M -
4800N - 8600
0 - 18,ZK
A speed of 9600 baud is the normal setting for this parameter when a
direct (local) connection is used (press@ (RETURN l). However, you may
need to set it to a slower rate if your Appleline communicates with your Apple through a modem that cannot handle 9600 baud (the
most common speeds are 1200 or 300 baud). In any event, it should
be the same as the transmission speed you specified when you
configured the communication program in your Apple computer (see
Part II of this manual, Chapter 1 ).
Parity
The parity setting activates an automatic error-checking routine,
designed to detect mistakes in data transmission. If such a mistake
occurs, the Appleline rejects the faulty part of the message and
blinks its red light (see Chapter 1, "Indicator Lights"). There are
several ways to check parity:
• A - Odd
B - Et.1en C - Marf'. D - SPace
E - None
Usual parity setting: even If you set your Appleline to one of the first four choices, you must make sure that your Apple is configured the same way (see Part II
•
of this manual, Chapter 1 ). The most common choice is even
parity. If you set it to the last choice (no parity) your Appleline will
communicate with your Apple regardless, but will not check for parity
errors .
Chapter 3: Passwords and Communication Parameters
II
[
I[
Autobaud Option
Your Appleline's
autobaud
feature allows it to detect the rate at which your Apple or Apple Modem is actually transmitting data, and set its internal baud rate to the same figure. You can have it either way:• A - Disabled B - Enabled,
Autobaud usually disabled If your Appleline's autobaud feature is enabled, then the first message you send it from your Apple must begin with the character or characters given in Part II of this manual, "The Autobaud
Message." The Appleline uses this message to determine the
incoming transmission rate. It can accept any rate from 45.5 to 19200 baud. In an installation where your Appleline is always connected to the same Apple computer, it maybe more convenient to set them both to the same baud rate and disable the autobaud feature.
Speed Indicator Option
Some makes of modem have a feature by which they automatically
set the baud rate of the Apple line to 1200 baud. This is called the
speed indicator.
You tell your Appleline whether or not it is communicating with such a modem by this choice:• A - Disabled
B - Enabled.
Speed indicator usually disabled
•
With an Apple Modem, choose A; with other modems, choose A or B; with a direct connection or lease line, choose C.
The Apple Modem 300/1200 does not use this feature; if your Appleline uses one you should select0 (RETURN).
Modem Type
Some modems (including the Apple Modem 300/1200) automatically answer when called; others require that the operator manually answer the phone. Your Appleline finds out what type of
communication link exists between it and your Apple computer, by giving you this choice:
A - Auto-ans1.1e r B - Manual-answer C - Local connect.
If your Apple computer and your Appleline are hooked directly by a connecting cable, choose Local Connect (@J (RETURN)). If they
communicate through an Apple Modem 300/1200, or another
modem with the automatic answering feature, choose Auto-answer
•
Set automatic logoff to suit your operating habits
•
(0 (RETURN l). If they communicate through a modem that you control
manually, choose Manual-answer (@(RETURN)).
Automatic Logoff
Sometimes if you are busy you may forget to log off your Appleline when you are through using it, needlessly tying up the
communication channel. To help you avoid this problem, the
Appleline has an automatic logofffeature. You can choose how many minutes of inactivity it will tolerate before automatically
terminating communication with your Apple:
A - Disabled
B 10 111i nut es
c
- 20 D - 30E - 40
F - 50
G - 60
H - 70
I - 80
~' - 80
K - 100
L - 110
M - 120
This time period starts whenever you stop using your Apple keyboard, and begins again if you touch any key. If you have set a time limit, your Apple will beep every 5 minutes to remind you that
your Appleline is still logged on.
-r ..,-:
I
([!
I~
!
~
!
I
[~ I
I
r
~
i
r
e:
r
:~ I -~
.~
~
~L
~L
I
During the logon procedure, your Appleline sets the automatic logoff
~
time to 1 minute. If you do not finish logging on in this time, it starts the..:;-logon procedure again from the beginning.
c
I I
I -··
I
II
I r
I
I r
I
I ,[r
I '[I
I I[I
II
I r
I -
I llI
I ,IJ
I
-I J[
·
~
!
~
I
I I~
I
I flI
• Ill
Kinds of built-in tests
How to do the loop-back test
Chapter4
Testing and Maintenance
This chapter describes Appleline's internal diagnostic tests, by
which you can detect potential problems with the unit. At the end, it contains a brief section on maintenance.
External Tests: IBM systems can be programmed to perform certain
tests on Model 3278-2 Display Stations, a description of which is beyond the scope of this manual. The Appleline is designed to respond to these
tests as if it and its attached Apple computer were such a Display Station.
Internal Tests
Your Appleline contains built-in circuits and programs that perform three different tests:
• The loop-back test.
• The automatic self-test.
• The character generation test.
Loop-Back Test
This is one test that you can perform without connecting your Appleline to either your Apple or the IBM system. It verifies that the
major memory, processing, and data transmission circuits in your Appleline are working. Do this:
1. Turn your Appleline's power switch OFF. 2. Unplug its connection to your Apple computer.
3. Replace the plug that went to your Apple with the loop-back plug
that's included in your Appleline package.
4. Turn the power switch ON.
5. Your Appleline's yellow light should blink slowly to indicate that it is OK
Internal Tests •
-The foregoing procedure changes the supervisor password back to
APPLES and the four user passwords back to APPLE 1 through
APPLE 4. It also resets all the communication parameters to their
default values. These settings are listed in Table 3-2. This is why you need to complete this routine by entering new passwords and communication parameters, as if you were setting up your Appleline for the first time.
Automatic Self-Test
As long as it is connected to your Apple and its power is turned on, your Appleline automatically and repeatedly performs a test of its circuits and memory. It signals that everything is OK by blinking its green light once a second.
Character Generation Test
When your Apple computer is hooked up to your Appleline, you can perform its character generation test. Here's how to do it:
How to do the character generation test 1. Log onto your Appleline, using the user password. See Chapter 5
for log-on instructions.
2. Press~ followed by (coNrnoLJ-[D on your Apple keyboard. (Refer to the reference card in the back of this manual for help in locating these keys.) Your Appleline will respond by sending repeated lines of alphabets, as shown below.
• 0123a5G788: i< =: ?@ABCDEFGHIJKLMNOPORSTLJl,IW){'IZU J _ abcdef 9h i jf: 111mo P9 rs tu111,1X}'{ } "
123456788: i< = }?@ABCDEFGH!JKLMNOPQRSTUl,IWXYZU i ··· _ ab cd ef 9h i jf\ l illl"IDP9rst1.1111,1xy{ }"?
23456788: ; < = )?@ABCDEFGHI JKLMNOPQRSTUl,IW){'/Z[; i ··· _ abed e f 9h i jf\ 111m DP9 rs tu111m{ } "?@
3456788: ; = :?@ABCDEFGHIJKLMNOPQRSTLJl,IW){'/Z[ / J · _ abcde f 9h i jf\ 111mop9rst1.1111,1x)'{ } "?@A
456789: i<: )?@ABCDEFGH DP9 rs t f.11)1,IXY{ n@AB
56788: ;::}?@ABCDEFGHI Press RETURN to leal!e test Pattern Prnt1.11J1,1xl'{ }"?@ABC
6788: i< = ?@ABCDEFGHIJ rn t1.1111,1xy{ } "?@ABCD
789: ;
<:
)?@ABCDEFGHIJKLMNOPQRSTLJl,IW):'!Z[n ··· -
abed e f 9h i j I: 11111"tO P9 rs tu111m'{ }"?@ABCOE88: i< = : ?@ABCOEFGH I JKLMNOPQRSTUl,ll~):YZ[; i ··· _ ab cdef 9h i jf\ 11lll"IOP9rst1.1V1A1x )'{ } '?@ABCDEF
9: i< = :?@ABCOEFGHIJKLMNOPQRSTLJl,IW)('t'Z[! J' _ abc def 9h i ji: 1111nop9 rs tu1J1A1X)'{ }"?@ABCDEFG
: i<= }?@ABCDEFGHIJKLMNOPQRSTLJl,IW){'t'Z[; i · _ abcdef 9hi jl: 111moP9 rst1.11.11,1xl'{ n@ABCOEFGH
3. When you are finished testing, press (RETURN I.
This test verifies that your Appleline is communicating correctly with your Apple.
II
Chapter4: Testing and Maintenance~
l
~
-
1
I
1
I L
1
~ I
I
~ l
~
I
I ~
I
!!
r
I 1;
[
I ~
~
I ~
[
Keep your Apple Line away from steam
and chemical fumes.
----·---=====~-Maintenance
Your Appleline is designed to be inherently trouble-free. Since it is controlled entirely by signals from your Apple keyboard, there is no need to open the case for maintenance.
Your Appleline's plastic case protects it adequately from dust and foreign objects, but has little effect against liquids and vapors.
Spilling any liquid inside the Appleline, or exposing it to aerosols or chemical fumes, including steam from a coffee maker, can ruin it.
Cleaning
To clean the outside of your Appleline, just wipe it with a dry cloth. For stubborn fingerprints, wring a damp cloth dry and add a drop of liquid soap to the cloth. Avoid the vent holes as you wipe it clean .
... Warning
Never use household cleansers, ammonia, or solvents such as cleaning fluid on your Appleline - they can deteriorate the plastic cover.
l
~
~ -
~
Maintenance •-~
+
:~
1
[!
!1
·
~
t
~
'
~T I
~
·
~
1
J
I
I
I
1
Ij
I
-
l
Ir
r a
[
I n
r
Ir
I
r
~
r
~
r
~
I
I
'
~
I
I
~
1
[
I
~
~
[
1. I
Chapters
Using Your AppleLine
You control your Appleline entirely from your Apple keyboard. You type certain commands and it replies with questions or helpful messages. This chapter tells you what to type on your keyboard and how to interpret the messages that the Appleline places on your monitor screen.
The On-Off Switch. You can either leave your Appleline switched on all the time, or turn it on only when you want to use it. Just make sure that it is on all the time you are controlling it from your keyboard.
Logging On
Logging on refers to the process of establishing communication between your Apple keyboard and a separate device. Before you establish communication with the IBM computer, you may have to log onto several different devices:
1. Access your Appleline through one of the following means:
• If your Apple computer communicates with the Appleline through a modem, you may have to perform a "call up" procedure as described in your modem's manual.
• If you are reaching your Appleline and the IBM installation through a public data transmission network, you may have to perform a "call up" procedure using your modem and then log onto the network as described in its user's manual.
• If your Apple computer is connected to the Appleline by means of a direct connection, skip to step 2.
2. When you reach your Appleline, with or without the preceding step, log onto it using one of the user passwords.
3. After your Appleline connects you to the IBM system, you usually need to log onto it, as advised by your host computer's personnel, before the IBM mainframe will give you access to its programs, files, etc.
Different logon procedures
How to log on
Logging onto your Appleline
These logon procedures are normally different and usually require
you to type different identifications and passwords. The logon
procedure for your Appleline is covered in this chapter; for the logon procedures for other devices, including the IBM mainframe, consult the appropriate instruction manuals or the host computer's
personnel.
Logan Procedures In General
The purpose of a logon procedure is to allow you to start up a piece of remote equipment, while at the same time preventing unauthorized persons from doing the same thing. It usually involves a sequence of
steps such as the following:
1. You begin the process by starting up a communications program
(Access 3270, Lisa Terminal, MacTerminal, or VT100 Emulation) on your Apple computer. This tells the remote device that you want to talk to it.
2. The device responds by displaying a message on your monitor
screen. It identifies itself and asks you to send a user identification word and/or a password. (For a discussion of passwords, see Chapter 3).
3. You type the required words on your keyboard.
4. After verifying your identification and password, the device displays a new message indicating that it is now ready.
AppleLine Logan Procedure
If you have used your Appleline's supervisor program, as described
in Chapter 3, then you are already familiar with Appleline's logon
procedure. Just follow the same steps but enter the user password
instead of the supervisor password.
If you have not worked with the Appleline before, and want to use it
to communicate with a mainframe computer, follow this procedure to
get started:
1. Start up your Apple computer's communication program. If you are
not sure how to do this, consult its user's manual.
2. If your computer is connected to the Appleline through a pair of modems and telephone lines, follow the procedure to call it up.
Chapter 5: Using Your Apple line
~
l
I
i
~
L
~ [
!!
I
~
t
!J
~
l:i
1
I I
I
I I
I
I
I
I
I
u r
I
~ r
I
u rI
I f
a
r
~
~
,~
I~I
II
I •I
i~
I~I
~ ~~
~
l
-I ~.
I
3. As soon as you establish communication with the Appleline (which may require that you type the Autobaud message), it
responds by displaying an identification heading on your monitor
screen, followed by the line
• Press RETURN to begin logon se9uence
4. Press (RETURN). The Appleline replies by asking you for your user password:
• Enter Pass1,.10 rd:
Your Apple acts like a 3278-2 terminal
5. Type your user password. Normally this will be a special sequence of characters, previously entered into the Appleline memory by means of the supervisor program (see Chapter 3). If no special
password has been established, type APPLE1.
6. When the Appleline recognizes your password, the screen will go blank and then a new message will appear on it, transmitted from
the IBM mainframe. You are now ready to log onto the IBM
system.
7. If the Appleline does not recognize your password, it will ask you to enter it again. After three attempts, the Appleline will ignore
further password attempts for 20 seconds.
Using Your Apple Like an IBM Terminal
After you have successfully logged onto the Appleline, it will put you in communication with the IBM system. Now you can start using your
Apple keyboard and monitor screen as if they were the keyboard and screen of an IBM Model 3278-2 terminal. The Operator Information Area, by which the IBM system informs you of its status, will appear as the bottom line on your (24 line by 80 column) Apple screen. (To see the the twenty fifth line of the IBM 25 line by 80 column display, press the (ESCAPE) key twice.)
Special IBM Keys
The Model 3278-2 terminal has keys with special labels on them
("ATTN," "SYS REQ," etc.) which do not exist on your Apple
keyboard. However, all their functions are still available. To achieve
the same result with your Apple as you would by pressing these keys
on a 3278-2 terminal, you use a combination of keystrokes. These
combinations are listed in Part II of this manual, Chapter 2. This
information is also shown pictorially on a removable reference card at the back of this manual.
For Information about the meaning and use of all the special keys on the
IBM 3278-2 terminal, see the IBM 3278 Display Station Operator's Guide.
Further information in Part II