LPI Linux Certification in a Nutshell, 2nd Edition
By Jeff Dean, Bruno Gomes Pessanha, Nicolai Langfeldt, Steven Pritchard, James Stanger
... Publisher: O'Reilly
Pub Date: July 2006
Print ISBN-10: 0-596-00528-8 Print ISBN-13: 978-0-59-600528-3 Pages: 978
LPI Linux Certification in a Nutshell,
Second Edition is an invaluable resource for determining what you need to practice to pass the Linux Professional Institute exams. This book will help
you determine when you're ready to take the exams, which are technically challenging and designed to reflect the skills that administrators need
in real working environments.
As more corporations adopt Linux as the networking backbone for their IT systems, the demand for certified technicians will become
even greater. Passing the LPI exams will broaden your career options because the LPIC
is the most widely known and respected Linux certification program in the
world. Linux Journal recognized the LPI as the best Training and
Certification Program. The exams were developed by the Linux Professional Institute,
an international, volunteer-driven organization with affiliates in a dozen countries.
The core LPI exams cover two levels. Level 1 tests a basic knowledge of Linux installation, configuration, and command-line
skills. Level 2 goes into much more depth regarding system troubleshooting and
network services such as email and the Web. The second edition of LPI Linux
Certification in a Nutshell is a thoroughly researched
reference to these exams. The book is divided into four parts, one for each of the
LPI exams. Each part features not only a summary of the core skills you need, but sample exercises and test questions, along with helpful hints to let
you focus your energies.
Major topics include:
GNU and Unix commands
Linux installation and package management
Devices, filesystems, and kernel configuration
Text editing, processing, and printing
The X Window System
Networking fundamentals and troubleshooting
DNS, DHCP, file sharing, and other networking infrastructure
Email, FTP, and Web services
Praise for the first edition:
"Although O'Reilly's Nutshell series are intended as 'Desktop Reference' manuals, I have to recommend this one as a good all-round read; not only as a primer for LPI certification, but as an excellent introductory text on GNU/Linux. In all, this is a valuable addition to
O'Reilly's already packed stable of Linux titles and I look forward to more from the author."
LPI Linux Certification in a Nutshell, 2nd Edition
By Jeff Dean, Bruno Gomes Pessanha, Nicolai Langfeldt, Steven Pritchard, James Stanger
... Publisher: O'Reilly
Pub Date: July 2006
Print ISBN-10: 0-596-00528-8 Print ISBN-13: 978-0-59-600528-3 Pages: 978
Table of Contents | Index
Copyright
Preface
Part I: General Linux Exam 101
Chapter 1. LPI Exams
Section 1.1. Exam 101 Overview
Chapter 2. Exam 101 Study Guide
Section 2.1. Exam Preparation
Chapter 2. Hardware and Architecture (Topic 1.101)
Section 3.1. Objective 1: Configure Fundamental BIOS Settings
Section 3.2. Objective 3: Configure Modems and Sound Cards
Section 3.3. Objective 4: Set Up Non-IDE Devices
Section 3.4. Objective 5: Set Up Different PC Expansion Cards
Section 3.5. Objective 6: Configure Communications Devices
Section 3.6. Objective 7: Configure USB Devices
Chapter 4. Linux Installation and Package Management (Topic 1.102)
Section 4.1. Objective 1: Design a Hard Disk Layout
Section 4.2. Objective 2: Install a Boot Manager
Section 4.3. Objective 3: Make and Install Programs from Source
Section 4.4. Objective 4: Manage Shared Libraries
Section 4.5. Objective 5: Use Debian Package Management
Section 4.6. Objective 6: Use Red Hat Package Manager (RPM)
Chapter 5. GNU and Unix Commands (Topic 1.103)
Section 5.1. Objective 1: Work on the Command Line
Section 5.2. Objective 2: Process Text Streams Using Filters
Section 5.4. Objective 3: Perform Basic File Management
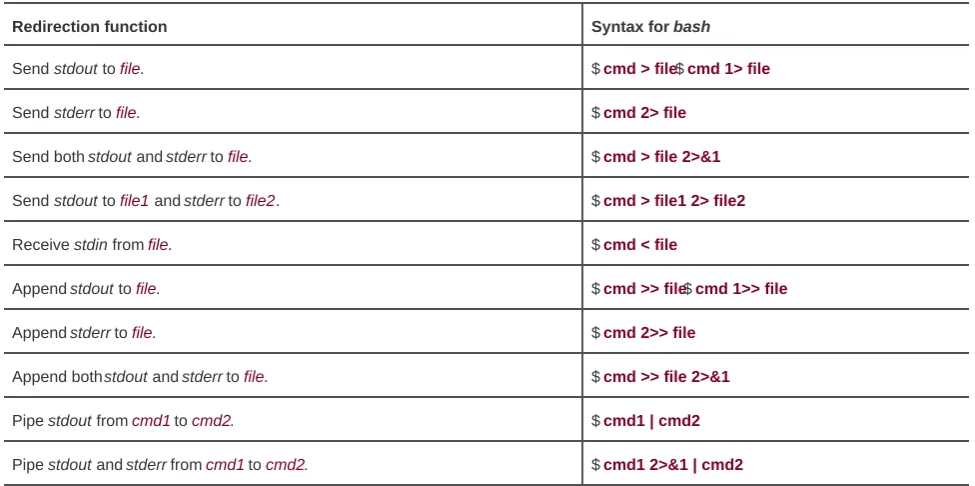
Section 5.5. Objective 4: Use Streams, Pipes, and Redirects
Section 5.6. Objective 5: Create, Monitor, and Kill Processes
Section 5.7. Objective 6: Modify Process Execution Priorities
Section 5.8. Objective 7: Search Text Files Using Regular Expressions
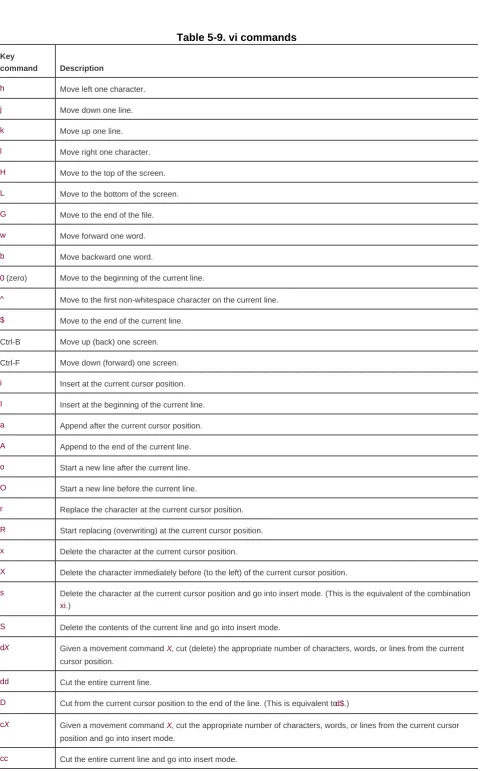
Section 5.9. Objective 8: Perform Basic File Editing Operations Using vi
Chapter 6. Devices, Linux Filesystems, and the Filesystem Hierarchy Standard (Topic 1.104)
Section 6.1. Objective 1: Create Partitions and Filesystems
Section 6.2. Objective 2: Maintain the Integrity of Filesystems
Section 6.3. Objective 3: Control Filesystem Mounting and Unmounting
Section 6.4. Objective 4: Set and View Disk Quotas
Section 6.5. Objective 5: Use File Permissions to Control Access to Files
Section 6.6. Setting Up a Workgroup Directory
Section 6.8. Objective 7: Create and Change Hard and Symbolic Links
Section 6.9. Objective 8: Find System Files and Place Files in the Correct Location
Chapter 7. The X Window System (Topic 1.1.10)
Section 7.1. An Overview of X
Section 7.2. Objective 1: Install and Configure X11
Section 7.3. Objective 2: Set Up a Display Manager
Section 7.4. Objective 4: Install and Customize a Window Manager Environment
Chapter 8. Exam 101 Review Questions and Exercises
Section 8.1. Hardware and Architecture (Topic 1.101)
Section 8.2. Linux Installation and Package Management (Topic 1.102)
Section 8.3. GNU and Unix Commands (Topic 1.103)
Section 8.4. Devices, Linux Filesystems, and the Filesystem Hierarchy Standard (Topic 1.104)
Section 8.5. The X Window System (Topic 1.110)
Chapter 9. Exam 101 Practice Test
Section 9.1. Questions
Section 9.2. Answers
Chapter 10. Exam 101 Highlighter's Index
Section 10.1. Hardware and Architecture
Section 10.2. Linux Installation and Package Management
Section 10.3. GNU and Unix Commands
Section 10.4. Devices, Linux Filesystems, and the Filesystem Hierarchy Standard
Section 10.5. The X Window System
Part II: General Linux Exam 102
Chapter 11. Exam 102 Overview
Chapter 12. Exam 102 Study Guide
Section 12.1. Exam Preparation
Chapter 13. Kernel (Topic 1.105)
Section 13.1. Objective 1: Manage/Query Kernel and Kernel Modules at Runtime
Section 13.2. Objective 2: Reconfigure, Build, and Install a Custom Kernel and Kernel Modules
Chapter 14. Boot, Initialization, Shutdown, and Runlevels (Topic 1.106)
Section 14.1. Objective 1: Boot the System
Section 14.2. Objective 2: Change Runlevels and Shut Down or Reboot System
Chapter 15. Printing (Topic 1.107)
Section 15.1. An Overview of Printing
Section 15.2. Objective 2: Manage Printers and Print Queues
Section 15.3. Objective 3: Print Files
Section 15.4. Objective 4: Install and Configure Local and Remote Printers
Chapter 16. Documentation (Topic 1.108)
Section 16.1. Objective 1: Use and Manage Local System Documentation
Section 16.2. Objective 2: Find Linux Documentation on the Internet
Section 16.3. Objective 5: Notify Users on System-related Issues
Chapter 17. Shells, Scripting, Programming, and Compiling (Topic 1.109)
Section 17.1. Objective 1: Customize and Use the Shell Environment
Section 17.2. Objective 2: Customize or Write Simple Scripts
Chapter 18. Administrative Tasks (Topic 1.111)
Section 18.1. Objective 1: Manage Users and Group Accounts and Related System Files
Section 18.2. Objective 2: Tune the User Environment and System Environment Variables
Section 18.3. Objective 3: Configure and Use System Log Files to Meet Administrative and Security Needs
Section 18.4. Objective 4: Automate System Administration Tasks by Scheduling Jobs to Run in the Future
Section 18.5. Objective 5: Maintain an Effective Data Backup Strategy
Section 18.6. Objective 6: Maintain System Time
Section 19.1. Objective 1: Fundamentals of TCP/IP
Section 19.2. Objective 3: TCP/IP Configuration and Troubleshooting
Section 19.3. Objective 4: Configure Linux as a PPP Client
Chapter 20. Networking Services (Topic 1.113)
Section 20.1. Objective 1: Configure and Manage inetd, xinetd, and Related Services
Section 20.2. Objective 2: Operate and Perform Basic Configuration of Mail Transfer Agent (MTA)
Section 20.3. Objective 3: Operate and Perform Basic Configuration of Apache
Section 20.4. Objective 4: Properly Manage the NFS and Samba Daemons
Section 20.5. Objective 5: Set Up and Configure Basic DNS Services
Section 20.6. Objective 7: Set Up Secure Shell (OpenSSH)
Chapter 21. Security (Topic 1.114)
Section 21.1. Objective 1: Perform Security Administration Tasks
Section 21.2. Objective 2: Set Up Host Security
Section 21.3. Objective 3: Set Up User-level Security
Chapter 22. Exam 102 Review Questions and Exercises
Section 22.1. Kernel (Topic 1.105)
Section 22.2. Boot, Initialization, Shutdown, and Runlevels (Topic 1.106)
Section 22.3. Printing (Topic 1.107)
Section 22.4. Documentation (Topic 1.108)
Section 22.5. Shells, Scripting, Programming, and Compiling (Topic 1.109)
Section 22.6. Administrative Tasks (Topic 1.111)
Section 22.7. Networking Fundamentals (Topic 1.112)
Section 22.8. Networking Services (Topic 1.113)
Section 22.9. Security (Topic 1.114)
Chapter 23. Exam 102 Practice Test
Section 23.1. Questions
Section 23.2. Answers
Chapter 24. Exam 102 Highlighter's Index
Section 24.1. Kernel (Topic 1.105)
Section 24.2. Boot, Initialization, Shutdown, and Runlevels (Topic 1.106)
Section 24.3. Printing (Topic 1.107)
Section 24.4. Documentation (Topic 1.108)
Section 24.5. Shells, Scripting, Programming, and Compiling
Section 24.6. Administrative Tasks (Topic 1.111)
Section 24.7. Networking Fundamentals (Topic 1.112)
Section 24.8. Networking Services (Topic 1.113)
Section 24.9. Security (Topic 1.114)
Part III: General Linux Exam 201
Chapter 25. Linux Kernel
Section 25.1. Objective 1: Kernel Components
Section 25.2. Objective 2: Compiling a Kernel
Section 25.3. Objective 3: Patching a Kernel
Section 25.4. Objective 4: Customizing a Kernel
Chapter 26. System Startup
Section 26.1. Objective 1: Customizing System Startup and Boot Processes
Section 26.2. Objective 2: System Recovery
Chapter 27. Filesystem
Section 27.1. Objective 1: Operating the Linux Filesystem
Section 27.2. Objective 2: Maintaining a Linux Filesystem
Section 27.3. Objective 3: Creating and Configuring Filesystem Options
Chapter 28. Hardware (Topic 2.204)
Section 28.2. Objective 2: Adding New Hardware
Section 28.3. Objective 3: Software and Kernel Configuration
Section 28.4. Objective 4: Configuring PCMCIA Devices
Chapter 29. File and Service Sharing (Topic 2.209)
Section 29.1. Objective 1: Configuring a Samba Server
Section 29.2. Objective 2: Configuring an NFS Server
Chapter 30. System Maintenance (Topic 2.211)
Section 30.1. Objective 1: System Logging
Section 30.2. Objective 2: Packaging Software
Section 30.3. Objective 3: Backup Operations
Chapter 31. System Customization and Automation (Topic 2.213)
Section 31.1. Objective 1: Automating Tasks Using Scripts
Chapter 32. Troubleshooting (Topic 2.214)
Section 32.1. Objective 1: Creating Recovery Disks
Section 32.2. Objective 2: Identifying Boot Stages
Section 32.3. Objective 3: Troubleshooting Boot Loaders
Section 32.4. Objective 4: General Troubleshooting
Section 32.5. Objective 5: Troubleshooting System Resources
Section 32.6. Objective 6: Troubleshooting Environment Configurations
Chapter 33. LPI Exam 201 Review Questions and Exercises
Section 33.1. Linux Kernel (Topic 2.201)
Section 33.2. System Startup (Topic 2.202)
Section 33.3. Filesystem (Topic 2.203)
Section 33.4. Hardware (Topic 2.204)
Section 33.5. File and Service Sharing (Topic 2.209)
Section 33.6. System Maintenance (Topic 2.211)
Section 33.7. System Customization and Automation (Topic 2.213)
Section 33.8. Troubleshooting (Topic 2.214)
Chapter 34. Exam 201 Practice Test
Section 34.1. Questions
Section 34.2. Answers
Part IV: General Linux Exam 202
Chapter 35. Networking Configuration (Topic 2.205)
Section 35.1. Objective 1: Basic Networking Configuration
Section 35.2. Objective 2: Advanced Network Configuration and Troubleshooting
Chapter 36. Mail and News (Topic 2.206)
Section 36.1. Objective 2: Using Sendmail
Section 36.2. Objective 3: Managing Mail Traffic
Section 36.3. Objective 1: Configuring Mailing Lists
Section 36.4. Objective 4: Serving News
Section 36.5. Conclusion
Chapter 37. DNS (Topic 2.207)
Section 37.1. Objective 1: Basic DNS Server Configuration
Section 37.2. Objective 2: Create and Maintain DNS Zones
Section 37.3. Objective 3: Securing a DNS Server
Chapter 38. Web Services (Apache and Squid, Topic 2.208)
Section 38.1. Installing Apache
Section 38.2. Configuring Apache
Section 38.3. Squid: History and Overview
Section 38.4. Squid Authentication
Section 38.5. Squid as Web Accelerator
Section 39.1. Objective 1: DHCP Configuration
Section 39.2. Objective 2: NIS Configuration
Section 39.3. Objective 3: LDAP Configuration
Section 39.4. Objective 4: PAM Authentication
Chapter 40. System Security (Topic 2.212)
Section 40.1. Objective 2: Configuring a Router
Section 40.2. Objective 3: Securing FTP Servers
Section 40.3. Objective 4: Secure Shell (SSH)
Section 40.4. Objective 5: TCP Wrappers
Section 40.5. Objective 6: Security Tasks
Chapter 41. Network Troubleshooting (Topic 214)
Section 41.1. Network Troubleshooting Essentials
Section 41.2. Common Troubleshooting Commands
Section 41.3. Hardware Problems
Section 41.4. Network Device Configuration Files
Section 41.5. DNS Errors
Section 41.6. Determining the Cause of Inaccessible Services
Section 41.7. Conclusion
Chapter 42. Exam 202 Review Questions and Exercises
Section 42.1. Networking Configuration (Topic 2.205)
Section 42.2. Mail and News (Topic 2.206)
Section 42.3. DNS (Topic 2.207)
Section 42.4. Web Services (Topic 2.208)
Section 42.5. Answers
Section 42.6. Network Client Management (Topic 2.210)
Section 42.7. System Security (Topic 2.212)
Section 42.8. Network Troubleshooting (Topic 2.214)
Chapter 43. Exam 202 Practice Test
Section 43.1. Questions
Section 43.2. Answers
About the Authors
Colophon
LPI Linux Certification in a Nutshell, Second Edition
by Steven Pritchard, Bruno Gomes Pessanha, Nicolai Langfeldt, James Stanger, and Jeff Dean
Copyright © 2006 O'Reilly Media, Inc. All rights reserved.
Printed in the United States of America.
Published by O'Reilly Media, Inc., 1005 Gravenstein Highway North, Sebastopol, CA 95472.
O'Reilly books may be purchased for educational, business, or sales promotional use. Online editions are also available for most titles (safari.oreilly.com). For more information, contact our corporate/institutional sales department: (800) 998-9938 or [email protected].
Editor: Tim O'Reilly
Developmental Editor: Andy Oram
Production Editor: Philip Dangler
Copyeditor: Norma Emory
Indexer: Ellen Troutman
Cover Designer: Karen Montgomery
Interior Designer: David Futato
Illustrators: Robert Romano and Jessamyn Read
Printing History:
June 2001: First Edition.
July 2006: Second Edition.
Nutshell Handbook, the Nutshell Handbook logo, and the O'Reilly logo are registered trademarks of O'Reilly Media, Inc. The In a Nutshell series designations, LPI Linux Certification in a Nutshell, the image of a bull, and related trade dress are trademarks of O'Reilly Media, Inc.
Many of the designations used by manufacturers and sellers to distinguish their products are claimed as trademarks. Where those designations appear in this book, and O'Reilly Media, Inc. was aware of a trademark claim, the designations have been printed in caps or initial caps.
While every precaution has been taken in the preparation of this book, the publisher and authors assume no responsibility for errors or omissions, or for damages resulting from the use of the information contained herein.
ISBN: 0-596-00528-8
Preface
Certification of professionals is a time-honored tradition in many fields, including medicine and law. As small computer systems and networks proliferated over the last decade, Novell and Microsoft produced extremely popular technical certification products for their respective operating system and network technologies. These two programs are often cited as having popularized a certification market for products that had previously been highly specialized and relatively rare. These programs have become so popular that a huge training and preparation industry has formed to service a constant stream of new certification candidates.
Certification programs, offered by vendors such as Sun and Hewlett-Packard, have existed in the Unix world for some time. However, since Solaris and HP-UX aren't commodity products, those programs don't draw the crowds that the PC platform does. Linux, however, is different. Linux is both a commodity operating system and is PC- based, and its popularity continues to grow at a rapid pace. As Linux deployment increases, so too does the demand for qualified and certified Linux system administrators.
A number of programs such as the Linux Professional Institute (LPI), the Red Hat Certified Engineer (RHCE) program, and CompTIA's Linux+ have formed over the last few years to service this new market. Each of these programs seek to provide objective measurements of a Linux administrator's skills, but they approach the problem in different ways.
The RHCE program requires that candidates pass multiple exam modules, including two hands-on and one written, whose goals are to certify individuals to use their brand of products. The Linux+ program requires a single exam and is focused at entry-level candidates with six months' experience. LPI's program is a job-based certification and currently consists of two levels that focus on two-year (Level 1) and four-year (Level 2) experienced candidates.
The Linux Professional Institute
The Linux Professional Institute (http://www.lpi.org) is a nonprofit organization formed with the single goal of providing a standard for vendor-neutral certification. This goal is being achieved by certifying Linux administrators through a modified open source development process. LPI seeks input from the public for its exam Objectives and questions, and anyone is welcome to participate. It has both paid and volunteer staff and receives funding from some major names in the computer industry. The result is a vendor-neutral, publicly developed program that is offered at a reasonable price.
LPI currently organizes its Linux Professional Institute Certification (LPIC) series in two levels: LPIC Levels 1 and 2. Each level consists of two exams that are priced at about U.S. $100 each (prices vary by continent). This book covers the LPIC Level 1 Exams 101 and 102 in Parts I and II, while LPIC Level 2 Exams, 201 and 202 are covered in Parts III and IV.
LPI is in the process of building a third level of exams, which will focus on specialty fields. It is also working with other organizations to start building certification modules based on the LPI standard.
Level 1 is aimed at junior to midlevel Linux administrators with about two years of practical system administration experience. The Level 1 candidate should be comfortable with Linux at the command line as well as capable of performing simple tasks, including system installation and troubleshooting. Level 1 certification is required prior to obtaining Level 2 certification status.
Level 2 is for senior Linux system administrators and team leaders. A Level 2 administrator is likely to have four or more years of practical administration experience. Beyond the ability to work effectively with native tools on standard Linux distributions, Level 2 covers customizing all aspects of your Linux systems, from the kernel to its filesystems, as well as implementing a number of network
applications for Linux servers. At a glance, Level 2 Objectives may appear to overlap several areas of content with Level 1; however, the depth and expertise level required is much higher. Often, a Level 2 candidate is expected to be the individual that a Level 1 candidate would refer to for higher-level projects or problems within a production environment.
Level 2 certification will be required prior to obtaining the future Level 3 certification status.
your convenience printed at the beginning of each chapter within this book. Each Objective set forth by LPI is assigned a numeric weight, which acts as an indicator of the importance of the Objective. Weights run between 1 and 8, with higher numbers indicating more importance. An Objective carrying a weight of 1 can be considered relatively unimportant and isn't likely to be covered in much depth on the exam. Objectives with larger weights are sure to be covered on the exam, so you should study these closely. The weights of the Objectives are provided at the beginning of each chapter.
Audience for This Book
The primary audience for this book is, of course, candidates seeking the LPIC certification. These may range from administrators of other operating systems looking for a Linux certification to complement an MSCE certification to Unix administrators wary of a growing pool of Linux-certified job applicants. In any case, this book will help you with the specific information you require to be successful with both the Level 1 and Level 2 Exams. Don't be fooled, however, as book study will not be enough to pass your exams. Remember, practice makes perfect!
Due to the breadth of knowledge required by the LPI Objectives and the book's one-to-one coverage, it also makes an excellent reference for skills and methods required for the day-to-day use of Linux. If you have a basic working understanding of Linux administration, the material in this book will help fill gaps in your knowledge while at the same time preparing you for the LPI Exams, should you choose to take them.
This book should also prove to be a valuable introduction for new Linux users and administrators looking for a broad, detailed
introduction to Linux. Part of the LPI exam-creation process includes a survey of Linux professionals in the field. The survey results drive much of the content found on the exams. Therefore, unlike general-purpose introductory Linux books, all of the information in this book applies directly to running Linux in the real world.
Organization
This book is designed to exactly follow the Topics and Objectives established by LPI for Levels 1 and 2. That means that the presentation doesn't look like any other Linux book you've read. Instead, you can directly track the LPI Objectives and easily measure your progress as you prepare.
The book is presented in four parts. Part I covers Exam 101 and Part II covers Exam 102. New for the second edition, we have added Parts III and IV to cover Exams 201 and 202 for LPI's Level 2 Exams. Each part contains chapters dedicated to the LPI Topics, and each of those sections contains information on all of the Objectives set forth for the Topic. In addition, each part contains a practice exam (with answers), review questions and exercises, and a handy highlighter's index that can help you review important details.
Book Chapters
Each part of this book contains some combination of the following materials:
Exam overview
Study guide
This chapter offers a few tips to prepare for the LPI Exams and introduces the Objectives contained in the Topic chapters that follow.
Topic chapters
A separate chapter covers each of the Topic areas on the exam. These chapters provide background information and in-depth coverage for each Objective, with On the Exam tips dispersed throughout.
Review questions and exercises
This chapter reinforces important study areas with review questions. The purpose of this section is to provide you with a series of exercises that can be used on a running Linux system to give you valuable hands-on experience before you take the exams.
Practice test
The practice test is designed to be similar in format and content to the actual LPI Exams. You should be able to attain at least an 80% score on the sample test before attempting the live exam.
Highlighter's index
This unique chapter contains highlights and important facts culled from the Topic chapters. You can use this as review and reference material prior to taking the actual exams. This chapter was omitted from parts II and IV due to the variety and complexity of topics disscussed in those sections.
There is also a glossary at the back of the book, which you can use to help familiarize yourself with different Linux-related terms.
Conventions Used in This Book
This book follows certain typographical conventions:
Italic
Italic is used to indicate URLs, filenames, directories, commands, options, system components (such as usernames), and to highlight comments in examples.
Constant Width
Constant Width Bold
Used in examples and tables to show commands or other text that should be typed literally by the user.
Constant Width Italic
Used to show arguments and variables that should be replaced with user-supplied values.
#, $
Used in some examples as the root shell prompt (#) and as the user prompt ($) under the Bourne or Bash shell.
On the Exam
Provides information about areas you should focus on when studying for the exam.
Tip:
Indicates a tip, suggestion, or general note.
Warning:
Indicates a warning or caution.
A final word about syntax: in many cases, the space between an option and its argument can be omitted. In other cases, the spacing (or lack of spacing) must be followed strictly. For example, -wn (no intervening space) might be interpreted differently from -w n. It's important to notice the spacing used in option syntax.
Using Code Examples
This book is here to help you get your job done. In general, you may use the code in this book in your programs and documentation. You do not need to contact us for permission unless you're reproducing a significant portion of the code. For example, writing a program that uses several chunks of code from this book does not require permission. Selling or distributing a CD-ROM of examples from O'Reilly books does require permission. Answering a question by citing this book and quoting example code does not require permission. Incorporating a significant amount of example code from this book into your product's documentation does require permission.
We appreciate, but do not require, attribution. An attribution usually includes the title, author, publisher, and ISBN. For example: "LPI Linux Certification in a Nutshell by Steven Pritchard et al. Copyright 2006 O'Reilly Media, Inc., 0-596-00528-8."
Safari Enabled
When you see a Safari® Enabled icon on the cover of your favorite technology book, that means the book is available online through the O'Reilly Network Safari Bookshelf. Safari offers a solution that's better than e-books. It's a virtual library that lets you easily search thousands of top tech books, cut and paste code samples, download chapters, and find quick answers when you need the most accurate, current information. Try it free at http://safari.oreilly.com.
How to Contact Us
We have tested and verified the information in this book to the best of our ability, but you may find that features have changed (or even that we have made mistakes!). As a reader of this book and as an LPI examinee, you can help us to improve future editions. Please let us know about any errors you find, as well as your suggestions for future editions, by writing to:
O'Reilly Media, Inc.
1005 Gravenstein Highway North Sebastopol, CA 95472
800-998-9938 (in the U.S. or Canada) 707-829-0515 (international/local) 707-829-0104 (fax)
There is a web page for this book where you can find errata, examples, and any additional information. You can access this page at: http://www.oreilly.com/catalog/lpicertnut2
To comment or ask technical questions about this book, email: [email protected]
For more information about our books, conferences, Resource Centers, and the O'Reilly Network, see our web site: http://www.oreilly.com
If you have taken one or all of the LPIC Exams after preparing with this book and find that parts of this book could better address your exam experience, we'd like to hear about it. Of course, you are under obligation to LPI not to disclose specific exam details, but comments regarding the coverage of the LPI Objectives, level of detail, and relevance to the exam will be most helpful. We take your comments seriously and will do whatever we can to make this book as useful as it can be.
Acknowledgments
The size and complexity of the LPI tests required the collaboration of numerous authors and reviewers to get this edition done. Material
was contributed by Bj rn Ruberg (Sendmail, DNS, networking, printing), Adam Haeder (file and service sharing, web services), and Faber Fedor (troubleshooting).
For the second edition, we thank reviewers Keith Burgess, Donald L. Corbet, Chander Kant, and Rick Rezinas.
Part I: General Linux Exam 101
Part I covers the Topics and Objectives for the LPI's General Linux Certification for Exam 101 and includes the following sections:
Chapter 1, LPI Exams
Chapter 2, Exam 101 Study Guide
Chapter 3, Hardware and Architecture (Topic 1.101)
Chapter 4, Linux Installation and Package Management (Topic 1.102)
Chapter 5, GNU and Unix Commands (Topic 1.103)
Chapter 6, Devices, Linux Filesystems, and the Filesystem Hierarchy Standard (Topic 1.104)
Chapter 7, The X Window System (Topic 1.1.10)
Chapter 8, Exam 101 Review Questions and Exercises
Chapter 9, Exam 101 Practice Test
Chapter 1. LPI Exams
LPI offers its exams through Pearson VUE (http://www.vue.com), Thomson Prometric (http://www.prometric.com), and at on-site locations at special Linux events, such as tradeshows. Before registering for any of these testing methods, you need to obtain an LPI ID number by registering directly with LPI. To obtain your LPI ID, visit http://www.lpi.org/en/register.html. Once you've received your LPI ID, you may continue your registration by registering with a testing center or special event. You can link to any of these registration options through LPI's registration web site.
In testing centers, the exams are delivered using a PC-based automated examination program. As of this writing, the exams are available in both English and Japanese. Exam questions are presented in multiple-choice single-answer, multiple-choice
multiple-answer, and fill-in-the-blank styles. However, the majority of the questions on the exams are multiple-choice single-answer.
1.1. Exam 101 Overview
LPI Exam 101 is one of two exams required for the LPIC Level 1 certification. In total, 14 major Topic areas are specified for Level 1; this exam tests your knowledge on 5 of them.
Exam Topics are numbered using a level.topic notation (e.g., 1.101, 1.102, 1.113). In LPI's early stages of development, Topics were assigned to exams based on a different scheme than we see today. When the scheme changed, the Topics were redistributed to Exams 101 and 102, but the pairing of Topic numbers to exams was dropped. As a result, LPI has 1.x and 2.x Topics in both Level 1 Exams. In the 2002 revision of the Objectives , LPI decided to reformat the numbering scheme to be more scalable for its multiple levels of certifications. Therefore, the exams now use an x.y.z numbering scheme where x equals the LPIC level (e.g., 1 or 2), y equals the Objective Topic (e.g., 101, 102, 201, 202, etc.) which are unique to all levels of LPI exams, and z equals the Objective number within the Topic area (e.g., 1, 2, 3, 4, and so on).
The Level 1 Topics are distributed between the two exams to create tests of similar length and difficulty without subject matter overlap. As a result, there's no requirement for or advantage to taking them in sequence.
Each Topic contains a series of Objectives covering specific areas of expertise. Each of these Objectives is assigned a numeric weight, which acts as an indicator of the importance of the Objective. Weights typically run between 1 and 8, with higher numbers indicating more importance. An Objective carrying a weight of 1 can be considered relatively unimportant and isn't likely to be covered in much depth on the exam. Objectives with larger weights are sure to be covered more heavily on the exam, so you should study these Topics closely. The weights of the Objectives are provided at the beginning of each Topic section.
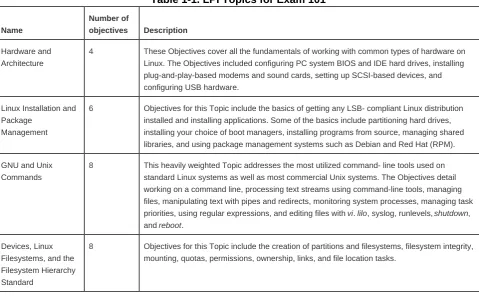
[image:18.595.59.539.497.793.2]The Topics for Exam 101 are listed in Table 1-1.
Table 1-1. LPI Topics for Exam 101
Name
Number of
objectives Description Hardware and
Architecture
4 These Objectives cover all the fundamentals of working with common types of hardware on Linux. The Objectives included configuring PC system BIOS and IDE hard drives, installing plug-and-play-based modems and sound cards, setting up SCSI-based devices, and configuring USB hardware.
Linux Installation and Package
Management
6 Objectives for this Topic include the basics of getting any LSB- compliant Linux distribution installed and installing applications. Some of the basics include partitioning hard drives, installing your choice of boot managers, installing programs from source, managing shared libraries, and using package management systems such as Debian and Red Hat (RPM).
GNU and Unix Commands
8 This heavily weighted Topic addresses the most utilized command- line tools used on standard Linux systems as well as most commercial Unix systems. The Objectives detail working on a command line, processing text streams using command-line tools, managing files, manipulating text with pipes and redirects, monitoring system processes, managing task priorities, using regular expressions, and editing files with vi. lilo, syslog, runlevels, shutdown, and reboot.
Devices, Linux Filesystems, and the Filesystem Hierarchy Standard
Name
Number of
objectives Description The X Window
System
3 The X-based Objectives cover only subjects that every Level 1 sysadmin are expected to encounter. Some of these tasks include installing and configuring XFree86, setting up a display manager such as XDM, GDM, or KDM, and installing and customizing Window Manager Environments.
As you can see from Table 1-1, the Topic numbers assigned by the LPI are not necessarily sequential. This is due to various
modifications made by the LPI to its exam program as it developed. The Topic numbers serve only as reference and are not used on the exam.
Exam 101 lasts a maximum of 90 minutes and contains approximately 65 questions. The exam is administered using a custom application on a PC in a private room with no notes or other reference material. The majority of the exam is made up of multiple-choice single-answer questions. These questions have only one correct answer and are answered using radio buttons. Some of them present a scenario needing administrative action. Others seek appropriate commands for a particular task or proof of understanding of a particular concept.
About 10 percent of the exam questions are multiple-choice multiple-answer questions, which are answered using checkboxes. These questions specify that they have multiple correct responses, each of which must be checked to get the item correct. There is no partial credit for partially answered items. This is probably the most difficult question style because the multiple answers increase the likelihood of mistakes. But they also are a good test of your knowledge of Unix commands, since an incorrect response on any one of the possible answers causes you to miss the entire question.
The exam also has fill-in-the-blank questions. These questions provide a one-line text area input box for you to fill in your answer. These questions check your knowledge of concepts such as important files and commands, plus common facts that you are expected to be aware of. The second release of the LPI Level 1 exams included more of these types of items since the psychometric evaluation LPI uses for exam development determined that the fill-in-the-blank type of questions were the best indicators for truly competant
Chapter 2. Exam 101 Study Guide
2.1. Exam Preparation
LPI Exam 101 is thorough, but you should find it fairly straightforward if you have a solid foundation in Linux concepts. You won't come across questions that intend to trick you, and you're unlikely to find ambiguous questions.
Exam 101 mainly tests your knowledge of facts, including commands and their common options, important file locations, configuration syntax, and common procedures. Your recollection of these details, regardless of your level of Linux administration experience, will directly influence your results.
For clarity, the material in the following sections is presented in the same order as the LPI Topics and Objectives. However, you may choose to study the Topics in any order you wish. To assist you with your preparation, Tables 2-1 through 2-5 list the Topics and Objectives found on Exam 101. Objectives within each Topic occupy rows of the corresponding table, including the Objective's number, description, and weight. The LPI assigns a weight for each Objective to indicate the relative importance of that Objective on the exam on a scale of 1 to 8. We recommend that you use the weights to prioritize what you decide to study in preparation for the exams. After you complete your study of each Objective, simply check it off here to measure and organize your progress.
Table 2-1. Hardware and architecture (Topic 1.101)
Objective Weight Description
1 1 Configure Fundamental BIOS Settings
3 1 Configure Modem and Sound Cards
4 1 Set Up Non-IDE Devices
5 3 Set Up Different PC Expansion Cards
6 1 Configure Communication Devices
7 1 Configure USB Devices
Table 2-2. Linux installation and package management (Topic 1.102)
Objective Weight Description
1 5 Design Hard Disk Layout
2 1 Install a Boot Manager
3 5 Make and Install Programs from Source
4 3 Manage Shared Libraries
5 8 Use Debian Package Management
Table 2-3. GNU and Unix commands (Topic 1.103)
Objective Weight Description
1 5 Work on the Command Line
2 6 Process Text Streams Using Filters
3 5 Perform Basic File Management
4 5 Using Streams, Pipes, and Redirects
5 5 Create, Monitor, and Kill Processes
6 3 Modify Process Execution Priorities
7 3 Search Text Files Using Regular Expressions
[image:23.595.55.539.374.564.2]8 1 Perform Basic File Editing Operations Using vi
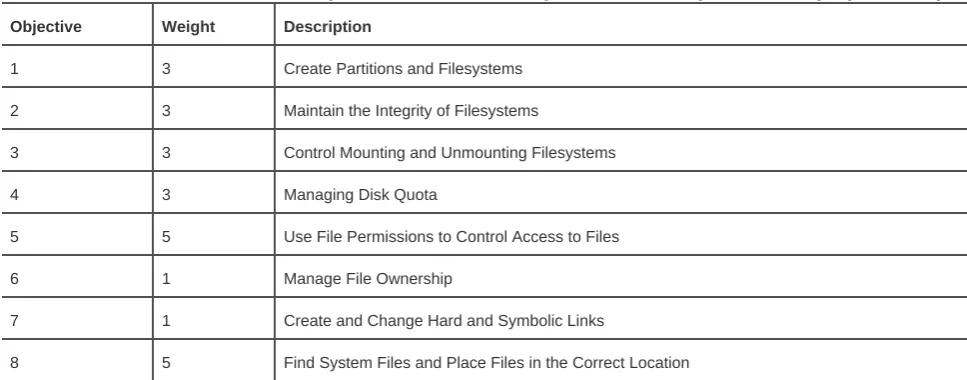
Table 2-4. Devices, Linux filesystems, and the Filesystem Hierarchy Standard (Topic 1.104)
Objective Weight Description
1 3 Create Partitions and Filesystems
2 3 Maintain the Integrity of Filesystems
3 3 Control Mounting and Unmounting Filesystems
4 3 Managing Disk Quota
5 5 Use File Permissions to Control Access to Files
6 1 Manage File Ownership
7 1 Create and Change Hard and Symbolic Links
8 5 Find System Files and Place Files in the Correct Location
Table 2-5. The X Window System (Topic 1.110)
Objective Weight Description
1 5 Install and Configure X11
2 3 Set Up a Display Manager
Chapter 2. Hardware and Architecture (Topic 1.101)
This Topic requires general knowledge of fundamental PC architecture facts that you must know before attempting any operating system installation. It includes these Objectives:
Objective 1: Configure Fundamental BIOS Settings
This Objective states that candidates should be able to configure fundamental system hardware by making the correct settings in the system BIOS. This Objective includes a proper understanding of BIOS configuration issues such as the use of LBA on integrated device electronics (IDE) hard disks larger than 1024 cylinders, enabling or disabling integrated peripherals, and configuring systems with (or without) external peripherals such as keyboards. It also includes the correct setting for IRQs, DMAs, and I/O addresses for all BIOS administrated ports and settings for error handling. Weight: 1.
Objective 3: Configure Modem and Sound Cards
An LPI 101 Candidate must ensure devices meet compatibility requirements (particularly that the modem is not a winmodem). The candidate should also verify that both the modem and sound card are using unique and correct IRQs, DMAs, and I/O addresses; if the sound card is plug-and-play (PnP), install and run sndconfig and isapnp; configure the modem for outbound PPP, SLIP, and CSLIP connections; and set the serial port speeds. Weight: 1.
Objective 4: Set Up Non-IDE Devices
This Objective states that the candidate should be able to configure SCSI (pronounced "scuzzy") devices using the SCSI BIOS as well as the necessary Linux tools. He should also be able to differentiate between the various types of SCSI. This Objective includes manipulating the SCSI BIOS to detect used and available SCSI IDs and setting the correct ID number for different devices, especially the boot device. It also includes managing the settings in the computer's BIOS to determine the desired boot sequence if both SCSI and IDE drives are used. Weight: 1.
Objective 5: Set Up Different PC Expansion Cards
This Objective states that a candidate should be able to configure various cards for the various expansion slots. She should know the differences between ISA and PCI cards with respect to configuration issues. This Objective includes the correct settings of IRQs, DMAs, and I/O ports of the cards, especially to avoid conflicts between devices. It also includes using isapnp if the card is an ISA PnP device. Weight: 3.
Objective 6: Configure Communication Devices
Objective 7: Configure USB Devices
3.1. Objective 1: Configure Fundamental BIOS Settings
Setting up a PC for Linux (or any other operating system) requires some familiarity with the devices installed in the system and their configuration. Items to be aware of include modems, serial and parallel ports, network adapters, SCSI adapters, hard drives, USB controllers, and sound cards. Many of these devices, particularly older ones, require manual configuration of some kind to avoid conflicting resources. The rest of the configuration for the system hardware is done in the PC's firmware, or Basic Input/Output System (BIOS).
3.1.1. BIOS
The firmware located in a PC, commonly called the BIOS, is responsible for bringing all of the system hardware to a state at which it is ready to boot an operating system. Systems vary, but this process usually includes system initialization, the testing of memory and other devices, and ultimately locating an operating system from among several storage devices. In addition, the BIOS provides a low-level system configuration interface, allowing the user to choose such things as boot devices and resource assignments. Quite a few BIOS firmware vendors provide customized versions of their products for various PC system architectures. Exams do require an
understanding of the basics. For example, a laptop BIOS may differ significantly from a desktop system of similar capability from the same manufacturer. Due to these variations, it's impossible to test specifics, but the LPIC Level 1 exams do require an understanding of the basics
At boot time, most PCs display a method of entering the BIOS configuration utility, usually by entering a specific keystroke during startup. Once the utility is started, a menu-based screen in which system settings can be configured appears. Depending on the BIOS vendor, these will include settings for disks, memory behavior, on-board ports (such as serial and parallel ports), the clock, as well as many others.
3.1.1.1. Date and time
One of the basic functions of the BIOS is to manage the on-board hardware clock. This clock is initially set in the BIOS configuration by entering the date and time in the appropriate fields. Once set, the internal clock keeps track of time and makes the time available to the operating system. The operating system can also set the hardware clock, which is often useful if an accurate external time reference, such as an NTPD server (see Chapter 18), is available on the network while the system is running.
Another fundamental configuration item required in BIOS settings is the selection of storage devices. Modern PCs can contain a variety of removable and fixed media, including floppy disks, hard disks, CD-ROMs, CD-RWs, DVD-ROMs, and Zip and/or Jaz drives. Newer systems are able to detect and properly configure much of this hardware automatically. However, older BIOS versions require manual configuration. This may include the selection of floppy disk sizes and disk drive parameters.
Most PCs have at least three bootable media types: an internal hard disk (IDE or SCSI, or perhaps both), a CD-ROM drive (again IDE or SCSI), and a floppy disk. After initialization, the BIOS seeks an operating system (or an operating system loader, such as the Linux Loader [LILO]) on one or more of these media. By default, many BIOS configurations enable booting from the floppy or CD-ROM first, then the hard disk, but the order is configurable in the BIOS settings.
In addition to these default media types, many server motherboard BIOS (as well as high-end system motherboards) support booting from a network device such as a NIC with a bootable ROM. This is often used when booting diskless workstations such as Linux-based terminals.
On the Exam
You should be familiar with the general configuration requirements and layout of the BIOS configuration screens for a typical PC.
3.1.2. Resource Assignments
Some of the details in the BIOS configuration pertain to the internal resources of the PC architecture, including selections for interrupts (also called IRQs), I/O addresses, and Direct Memory Access (DMA) channels. Interrupts are electrical signals sent to the PC's microprocessor, instructing it to stop its current activity and respond to an asynchronous event (a keystroke, for example). Modern devices in PCs often share interrupts, but older hardware requires manual verification that interrupt settings are unique to avoid conflicts with other devices.
I/O addresses are locations in the microprocessor's memory map (a list of defined memory addresses) reserved for input/output devices such as network interfaces. The microprocessor can write to the devices in the same way it writes to memory, which simplifies the device interface. If multiple devices inadvertently share the same I/O address, the system might behave oddly or crash.
DMA allows some devices to work directly with memory through a DMA channel, freeing the microprocessor for other tasks. Without DMA, data must be read from I/O ports for a device and stored in memory, all by the microprocessor. A device that has DMA capabilities has direct access to memory and writes its own data there when the microprocessor is busy with computation. This can improve performance.
Table 3-1. Common device settings
Device I/O address IRQ DMA
ttyS0 (COM1) 3f8 4
NA[a]
ttyS1 (COM2) 2f8 3 NA
ttyS2 (COM3) 3e8 4 NA
ttyS3 (COM4) 2e8 3 NA
lp0 (LPT1) 378-37f 7 NA
lp1 (LPT2)[b] 278-27f 5 NA
fd0, fd1 (floppies 1 and 2) 3f0-3f7 6 2
fd2, fd3 (floppies 3 and 4) 370-377 10 3
[a]
[b]
[a]
NA: not applicable.
[b] lp1 uses IRQ 5. Some older PC audio devices commonly use this interrupt, which could be a problem if two
parallel ports are required.
Most PCs don't contain all of these devices. For example, a typical configuration includes two serial ports, ttyS0 and ttyS1. These two ports can be used to attach external modems or terminals and occupy interrupts 4 and 3, respectively. For systems with additional serial ports installed, ttyS0 and ttyS2 share interrupt 4, and ttyS1 and ttyS3 share interrupt 3. However, the system design does not allow these ports to concurrently share the interrupt and exchange serial data. Otherwise, communications would fail if both ports from either pair were used together.
On the Exam
You don't have to memorize all the possible device settings for the PC architecture, but you should be ready to answer specific questions regarding some of the more common ones, such as interrupt settings for serial and parallel ports. You should also be able to identify conflicting I/O and IRQ assignments given a scenario.
3.1.3. 1024-Cylinder Limit
With most PC operating systems, data loaded by the BIOS to boot the operating system is found at the beginning of the disk in the Master Boot Record (MBR). Windows users rarely have to think about the MBR because there is no alternate location for the boot record. With Linux, however, the user can place the boot loader (LILO or GRUB) into either the MBR or the root partition. This flexibility can lead to a problem for the BIOS and boot loader, and it can cause a failure at boot time. The failure can occur because the BIOS must load the boot loader into memory and start it, but the BIOS can't always access portions of the disk beyond the 1024th cylinder. If the BIOS can't read all of the boot loader, the boot fails. Also, older versions of LILO must have a kernel image located within the first 1024 cylinders for similar reasons. These limitations aren't significant, but do require planning during the partitioning of disks at installation time. This Topic is discussed further in Objective 2 of Chapter 14.
On the Exam
3.2. Objective 3: Configure Modems and Sound Cards
Modems and sound cards, while non-essential, are two of the most common pieces of hardware installed in a Linux system;
unfortunately, they are also two of the most problematic to configure. This Objective covers the tasks required to complete modem and sound card configuration.
3.2.1. Modems
A modem (a word derived from modulate and demodulate) is that familiar device that modulates a digital signal into an analog signal for transmitting information via telephone lines. A modem on the other end of the connection demodulates the signal back into its digital form. Modems can also add digital compression and error correction capabilities to increase speed and reliability.
3.2.1.1. Modem types
Modems are serial devices, where data enters and exits one bit at a time. Traditionally, modems were external devices attached via cable to industry standard RS-232 serial ports, such as those still found on most PCs. This arrangement continues to work well, because the data rates of telephone connections are still below the maximum rate of the serial ports. As a result, external devices yield solid performance. Internal modems (ISA or PCI bus cards that reside inside a PC) were developed to reduce costs associated with external modems (namely, the case, power supply, and shipping charges) and offer the same functionality as an external modem.
Most internal modems present themselves to the PC as a standard serial port. In a typical PC with the first two serial ports built in (/dev/ttyS0 and /dev/ttyS1), an internal modem will appear as the third port (/dev/ttys2). This means that from a programming point of view, internal modems are indistinguishable from external modems. While there is some variation in modem configuration across manufacturers, the differences are small, and most serial-port-style modems will work with Linux. One exception is a modem designed specifically to work with the Windows operating system. These so-called winmodems rely on the CPU and a special software driver to handle some of the communications processing, and thus lack the full hardware capabilities of standard modems. As such, winmodems are not compatible with Linux unless a Linux-specific driver is available. Information on such support is available from
http://www.linmodems.org.
3.2.1.2. Modem hardware resources
3.2.2. Sound Devices
Nearly every laptop and desktop PC shipped today includes a sound device. Fortunately, Linux sound drivers are available for most sound chipsets, including the old industry standard chipset defined by Creative Labs with its SoundBlaster series. Today's PC is typically built with AC97 chipset sound devices built in or include a PCI device with similar chipset. For cards that don't work with the native kernel modules, you may have to use a tool such as sndconfig or for more ancient ISA hardware, isapnp. In either case, part of the configuration for a sound card involves correctly specifying the sound card's resources to the sound driver.
On the Exam
Be aware that the sound driver is a kernel module that has its settings stored in /etc/modules.conf.
Syntax
sndconfig [options]
Description
sndconfig is a text-based tool used to configure a sound card for your Linux kernel. When executed, it will probe your system for PnP-based devices. If none are found, you are probed to select your card and appropriate I/O settings. If you must use this tool, be careful. It is your responsibility to ensure you don't have conflicting devices since sndconfig won't detect the problem.
Frequently used options
--help
Prints help information and exits.
--noprobe
Tells sndconfig not to probe for PnP devices.
--noautoconfig
Syntax
isapnp [options] conffile
Description
The isapnp tool is used to configure ISA-based PnP devices. The configuration file (conffile) can be either a text file or a hyphen (-), which indicates the configuration file should be read from STDIN.
Frequently used options
-h
Prints help information and exits.
-v
3.3. Objective 4: Set Up Non-IDE Devices
3.3.1. SCSI
SCSI is an interface for streaming devices and block storage devices such as tape drives, hard disks, CD-ROMs, and other peripheral instruments. SCSI is the standard interface on server-style PCs, Unix workstations, and many older Apple models (mostly 604 and earlier systems). Desktop PCs and newer Apple systems (G3 and above) usually opt for the IDE (ATA)-style disk interfaces because they are less expensive. The advantage that SCSI has over IDE is that it offers much more flexibility and expandability, as well as faster throughput.
SCSI defines a bus to which multiple devices are connected. The medium is a high-quality cable or a series of cables connected to daisy-chained devices in series. One of the devices in the chain is the SCSI controller, which is the host interface to the other connected SCSI devices. The controller and each of the other devices on the bus is assigned a permanent SCSI address, also known as the SCSI ID, which defines each SCSI device uniquely on the bus. The controller can access devices individually by using the unique SCSI address to access a specific device.
3.3.1.1. SCSI types
The world of SCSI can be a little confusing, despite the standards set by ANSI. The original SCSI-1 interface is a 5 MBps 8-bit interface. It uses a 50-pin Centronics connector, similar to but larger than those found on most printers. This interface is still in popular use today, although the connector is usually replaced by a 50-pin Micro-D connector. (This connector is similar to the DB-25 used for serial ports but has a much higher pin density.) As performance demands have escalated, manufacturers have begun offering enhanced products with faster data transfer rates. Current interfaces include:
SCSI-1
The original: 8-bit, 5 MBps Centronics 50-pin connector.
SCSI-2
8-bit, 5 MBps Micro-D 50-pin connector. Interchangeable with SCSI-1. This interface is still adequate for low-end to midrange tape drives but is too slow for current technology disks.
Wide SCSI
Fast SCSI
8-bit, 10 MBps, Micro-D 50-pin connector. Higher throughput is obtained by doubling the original clock rate.
Fast Wide SCSI
16-bit, 20 MBps, Micro-D 68-pin connector. This interface combines both the higher clock rate and the wider bus.
Ultra SCSI
8-bit, 20 MBps, Micro-D 50-pin connector. Additional changes to clocking yield still better performance.
Ultra Wide SCSI (also known as SCSI-3)
16-bit, 40 MBps.
Ultra2
8-bit, 40 MBps.
Wide Ultra2
16-bit, 80 MBps.
Recent developments have yielded additional SCSI interface types with up to 160 MBps throughput, and efforts continue to keep SCSI competitive with other technologies. As performance increases, however, constraints on cabling and connectors become more significant. Such constraints are a major factor in deploying large SCSI-based systems. Also, with the variety of connectors, cables, and transfer rates available in the SCSI standards, it's important to plan carefully. The other inhibiting factor, at least on the consumer level, is that SCSI hard drives tend to cost two to three times the amount of similar-sized IDE drives.
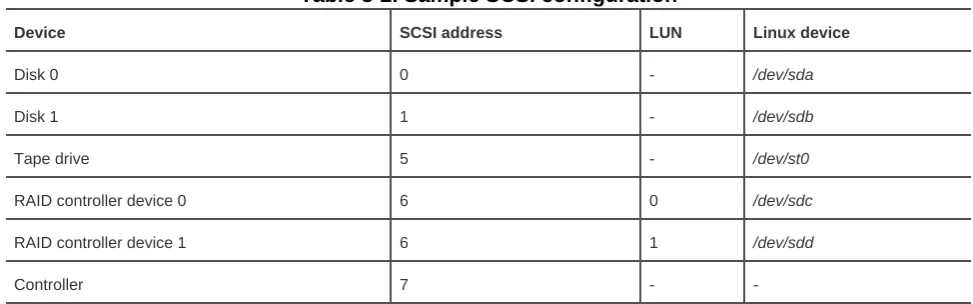
3.3.2. SCSI IDs
Each device on a SCSI bus, including the controller, has an address based on a binary reading of the address lines. The 8-bit SCSI
buses have three address lines and thus will accommodate 23=8 devices, including the controller. For the 16-bit buses, there are four
address lines resulting in a possible 24=16 devices. This results in a maximum of 7 and 15 devices, respectively. These addresses can be configured using jumpers (typical for disk drives) or switches. SCSI addresses run from 0 to 7 for 8-bit buses and from 0 to 15 for 16-bit buses. It is customary for the controller to occupy address 7 for both bus widths. Disks and other devices must be assigned a unique address on the bus, and they must be provided with proper termination, which is discussed later in this section.
Some SCSI devices, such as RAID controllers, appear to the SCSI controller as a disk drive with a single SCSI address. For the controller to access multiple logical devices using a single SCSI address, an accompanying logical unit number (LUN), is reported to the controller. Single disks and tape drives usually only report LUN zero, but sometimes they report the same on all LUNs, and this must be coped with.
3.3.2.2. Linux SCSI disk device files
On Linux systems, IDE disk devices are known as /dev/hda, /dev/hdb, /dev/hdc, and /dev/hdd. For SCSI, a similar pattern emerges, with /dev/sda, /dev/sdb, and so on. The first partition on disk /dev/sda will be /dev/sda1but remember that the partition number has nothing to do with the SCSI ID. Instead, the letter names of the Linux SCSI devices start with sda and proceed across all SCSI IDs and LUNs. The numbers are sequentially assigned to partitions on a single ID/LUN combination.
[image:36.595.53.540.363.515.2]For example, a SCSI-2 bus with two disks, a tape drive, a RAID controller with two LUNs, and the SCSI controller might be assigned addresses as shown in Table 3-2.
Table 3-2. Sample SCSI configuration
Device SCSI address LUN Linux device
Disk 0 0 - /dev/sda
Disk 1 1 - /dev/sdb
Tape drive 5 - /dev/st0
RAID controller device 0 6 0 /dev/sdc
RAID controller device 1 6 1 /dev/sdd
Controller 7 -
-If a disk on the SCSI bus is to be bootable, you may need to configure the SCSI controller 's BIOS with the disk's address. By default, address 0 is expected to be a bootable disk.
3.3.2.3. Termination
Another facet of SCSI that can be confusing is termination . A SCSI bus can be considered a cable with devices connected along its length, but not at the ends. Instead of devices, the ends of the SCSI bus have terminators, which are simple electrical devices that condition the signal and reduce electrical noise on the bus. Termination can be particularly problematic if you attempt to mix 8- and 16-bit devices on a single bus and use an 8-bit terminator, leaving half of the 16-bit SCSI bus unterminated.
while an external terminator or a disk's internal terminator is used on the other end. Whichever type of terminator is being used, you must be sure that exactly one terminator is placed at each end of the SCSI bus (for a total of exactly two terminators), otherwise the bus may fail.
3.3.2.4. SCSI controllers on PCs
Most PCs don't come with integrated SCSI controllers, but a number of add-on cards are available. SCSI controllers have their own firmware installed along with an accompanying BIOS, which has its own configuration menus. If you're using SCSI on a PC, it's important to be able to manipulate these settings appropriately.
Like the BIOS, a SCSI controller BIOS usually has a keyboard combination, announced at boot time, to enter the setup utility. Once the utility is launched, you can control a number of aspects of the controller, including:
Controller SCSI address
The default controller address is usually 7, but you may use any address.
Default boot device
Typically this is set to address 0 for a hard disk.
Onboard termination
Depending on how a controller is utilized (internal or external bus, or both) you may elect to turn on the controller's terminator.
SCSI bus speed
Most SCSI adapters that are capable of higher speeds (Ultra SCSI, for example) can be manually set to lower speeds to accommodate older devices or longer cable lengths.
On the Exam
3.4. Objective 5: Set Up Different PC Expansion Cards
As described in Objective 1, when you add hardware to a PC you must accommodate the resource requirements of all installed devices. Your requirements will depend on the type of card, such as whether it is Industry Standard Architecture (ISA) or PCI. This Objective covers the technical details you are required to understand when configuring these types of devices.
3.4.1. Plug and Play
Older hardware, particularly ISA bus hardware, requires manual configuration. Exam 102 requires familiarity with these configuration problems.
Generally speaking, we may think about device configuration methodologies from one of three general eras:
Jumper era
This hardware was constructed in such a way that settings were controlled by changing the position of shorting jumpers on terminal strips. This method is inconvenient in that it requires internal access to the PC as well as available documentation on the jumper locations. On the other hand, it is a hardware-only solution, and the settings are obvious to the observer. Many such devices are still in service on older PCs.
Nonvolatile era
These more recent hardware designs abandoned jumpers in favor of settings that, while still manually set, are stored in a nonvolatile memory space. This design eliminated the physical access problem with jumpered hardware, but introduced a requirement that custom configuration programs be written, supported, and provided to consumers by hardware vendors. This software was almost always based on MS-DOS. Using these configuration tools to program a card for use under Linux may require a working MS-DOS machine to provide initial configuration.
Modern era
Most recent cards work with the PCI bus to automatically configure themselves. The settings are done during system initialization, prior to loading the operating system. This automation eliminates manual configuration and frees the user from worrying about device conflicts.
To configure an older device, you may need to set jumpers or possibly run MS-DOS and a proprietary configuration utility. More often than not, factory default settings can be used with the Linux networking drivers. However, once manual configuration is accomplished, you'll need to be sure that you don't have conflicts with IRQs, I/O addresses, and possibly DMA channel assignments.
When adding new hardware to an existing Linux system, you may wish to verify which resources the existing devices are using. The /proc filesystem, the kernel's status repository, contains this information. The proc files, interrupts, dma, and ioports, show how system resources are currently utilized. (These files may not show devices unless their device files/drivers are open/active. This may make the problem harder to find if you're experiencing resource conflicts.) The following is an example of /proc/interrupts from a dual-CPU system with an Adaptec dual-AIC7895 SCSI controller:
# cat /proc/interrupts CPU0 CPU1
0: 98663989 0 XT-PIC timer 1: 34698 34858 IO-APIC-edge keyboard 2: 0 0 XT-PIC cascade
5: 7141 7908 IO-APIC-edge MS Sound System 6: 6 7 IO-APIC-edge floppy
8: 18098274 18140354 IO-APIC-edge rtc 10: 3234867 3237313 IO-APIC-level aic7xxx, eth0 11: 36 35 IO-APIC-level aic7xxx
12: 233140 216205 IO-APIC-edge PS/2 Mouse 13: 1 0 XT-PIC fpu
15: 44118 43935 IO-APIC-edge ide1 NMI: 0
ERR: 0
In this example, you can see that interrupt 5 is used for the sound system, so it isn't available for a second parallel port. The two SCSI controllers are using interrupts 10 and 11, respectively, while the Ethernet controller shares interrupt 10. You may also notice that only one of the two standard IDE interfaces is enabled in the system BIOS, freeing interrupt 14 use for another device.
Here are the /proc/dma and /proc/ioports files from the same system:
# cat /proc/dma 0: MS Sound System 1: MS Sound System 2: floppy
4: cascade
# cat /proc/ioports 0000-001f : dma1 0020-003f : pic1 0040-005f : timer 0060-006f : keyboard 0070-007f : rtc
0080-008f : dma page reg 00a0-00bf : pic2
00c0-00df : dma2 00f0-00ff : fpu 0170-0177 : ide1 02f8-02ff : serial(auto) 0370-0371 : OPL3-SAx 0376-0376 : ide1 0388-0389 : mpu401 03c0-03df : vga+ 03f0-03f5 : floppy 03f7-03f7 : floppy DIR 03f8-03ff : serial(auto) 0530-0533 : WSS config 0534-0537 : MS Sound System e800-e8be : aic7xxx
ffa0-ffa7 : ide0 ffa8-ffaf : ide1
On the Exam
3.5. Objective 6: Configure Communications Devices
3.6. Objective 7: Configure USB Devices
Universal Serial Bus (USB) is a type of interface used to connect various types of peripherals, ranging from keyboards and mice, to hard drives, scanners, digital cameras, and printers. The USB Objective covers the general architecture of USB, USB modules, and
configuring USB devices .
3.6.1. USB Topology
USB devices are attached to a host in a tree through some number of hub devices. The lsusb command can be used to see how devices are physically attached to a Linux system.
# lsusb -t Bus# 4
'-Dev# 1 Vendor 0x0000 Product 0x0000 Bus# 3
'-Dev# 1 Vendor 0x0000 Product 0x0000 |-Dev# 2 Vendor 0x046d Product 0xc501 '-Dev# 3 Vendor 0x0781 Product 0x0002 Bus# 2
'-Dev# 1 Vendor 0x0000 Product 0x0000 |-Dev# 2 Vendor 0x0451 Product 0x2036 | |-Dev# 5 Vendor 0x04b8 Product 0x0005 | '-Dev# 6 Vendor 0x04b8 Product 0x0602 '-Dev# 3 Vendor 0x0451 Product 0x2046 '-Dev# 4 Vendor 0x056a Product 0x0011 Bus# 1
'-Dev# 1 Vendor 0x0000 Product 0x0000
3.6.2. USB Controllers
There are three types of USB host controllers :
Open Host Controller Interface (OHCI)
Universal Host Controller Interface (UHCI)
Enhanced Host Controller Interface (EHCI)
controller, as well as USB 2.0 devices, hubs, and cables. A USB 2.0 device attached to a USB 1.1 hub will only be able to run at USB 1.1 speeds.
3.6.3. USB Devices
There are several classes of USB devices , including the following:
Human Interface Device (HID)
Input devices (mice, keyboards, etc.)
Communications device
Modems
Mass storage device
Disk devices, flash readers, etc.
Audio
Sound devices
IrDA
Infrared devices
Printer
Printers and USB-to-parallel cables
3.6.4. USB Drivers
USB support was added to the Linux kernel in the 2.3.x development kernel series, then back-ported to 2.2.x, minus support for USB mass storage devices (due to SCSI changes in 2.3.x). The back-port was included in the 2.2.18 kernel release.
Tip:
There is no kernel USB support in 2.0.x and earlier.
Host controller drivers
The USB host controller drivers include usb-ohci.o (OHCI driver), usb-uhci.o (UHCI driver), uhci.o (old "alternate" UHCI