VMware vSphere Big Data Extensions
Administrator's and User's Guide
vSphere Big Data Extensions 2.3
This document supports the version of each product listed and
supports all subsequent versions until the document is
replaced by a new edition. To check for more recent editions
of this document, see
http://www.vmware.com/support/pubs
.
You can find the most up-to-date technical documentation on the VMware Web site at:
http://www.vmware.com/support/
The VMware Web site also provides the latest product updates.
If you have comments about this documentation, submit your feedback to:
Copyright © 2013 – 2015 VMware, Inc. All rights reserved. Copyright and trademark information. This work is licensed under a Creative Commons Attribution-NoDerivs 3.0 United States License (http://creativecommons.org/licenses/by-nd/3.0/us/legalcode).
VMware, Inc.
3401 Hillview Ave. Palo Alto, CA 94304 www.vmware.com
Contents
About This Book 7
1
About VMware vSphere Big Data Extensions 9
Getting Started with Big Data Extensions 9Big Data Extensions and Project Serengeti 10 About Big Data Extensions Architecture 11 About Application Managers 12
2
Installing Big Data Extensions 17
System Requirements for Big Data Extensions 17 Unicode UTF-8 and Special Character Support 20 The Customer Experience Improvement Program 21
Deploy the Big Data Extensions vApp in the vSphere Web Client 22 Install RPMs in the Serengeti Management Server Yum Repository 25 Install the Big Data Extensions Plug-In 26
Configure vCenter Single Sign-On Settings for the Serengeti Management Server 28 Connect to a Serengeti Management Server 28
Install the Serengeti Remote Command-Line Interface Client 29 Access the Serengeti CLI By Using the Remote CLI Client 30
3
Upgrading Big Data Extensions 33
Prepare to Upgrade Big Data Extensions 33Upgrade the Big Data Extensions Virtual Appliance 34 Upgrade the Big Data Extensions Plug-in 35
Upgrade Big Data Extensions Clusters Using the Serengeti Command-Line Interface 36 Upgrade the Serengeti CLI 36
Add a Remote Syslog Server 37
4
Managing Application Managers 39
Add an Application Manager by Using the vSphere Web Client 39 Modify an Application Manager by Using the Web Client 40 Delete an Application Manager by Using the vSphere Web Client 40 View Application Managers and Distributions by Using the Web Client 40 View Roles for Application Manager and Distribution by Using the Web Client 40
5
Managing Hadoop Distributions 43
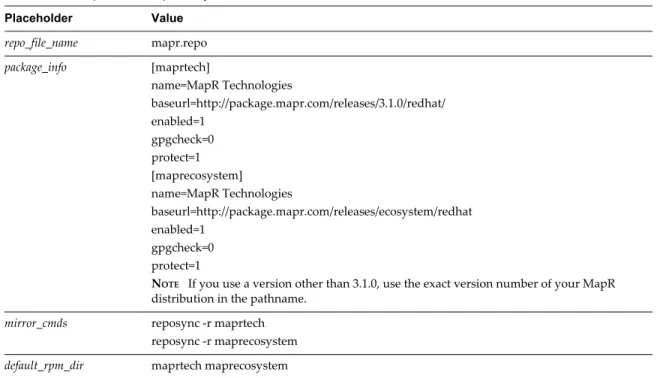
Hadoop Distribution Deployment Types 43Configure a Tarball-Deployed Hadoop Distribution by Using the Serengeti Command-Line Interface 44
6
Managing Node Templates 63
Maintain a Customized Hadoop Template Virtual Machine 63
Create a Node Template Virtual Machine using RHEL Server 6.7 and VMware Tools 64 Support for Multiple Virtual Machine Templates 68
7
Managing the Big Data Extensions Environment 69
Add Specific User Names to Connect to the Serengeti Management Server 69 Change the Password for the Serengeti Management Server 70
Create a User Name and Password for the Serengeti Command-Line Interface 71 Authorize and Audit Commands Run as the Root User 72
Specify a Group of Users in Active Directory or LDAP to Use a Hadoop Cluster 72 Stop and Start Serengeti Services 73
Ports Used for Communication between Big Data Extensions and the vCenter Server 73 Verify the Operational Status of the Big Data Extensions Environment 75
Enter Maintenance Mode to Perform Backup and Restore with the Serengeti Command-Line Interface Client 83
Backup and Restore the Big Data Extensions Environment 84
8
Managing vSphere Resources for Clusters 87
Add a Resource Pool with the Serengeti Command-Line Interface 87 Remove a Resource Pool with the Serengeti Command-Line Interface 88 Update Resource Pools with the Serengeti Command-Line Interface 88 Add a Datastore in the vSphere Web Client 89
Remove a Datastore in the vSphere Web Client 90
Update Datastores with the Serengeti Command-Line Interface 90 Add a Paravirtual SCSI Controller for System and Swap Disks 91 Add a Network in the vSphere Web Client 92
Modify the DNS Type in the vSphere Web Client 93
Reconfigure a Static IP Network in the vSphere Web Client 93 Remove a Network in the vSphere Web Client 94
9
Creating Hadoop and HBase Clusters 95
About Hadoop and HBase Cluster Deployment Types 97
Hadoop Distributions Supporting MapReduce v1 and MapReduce v2 (YARN) 97 About Cluster Topology 98
About HBase Database Access 98
Create a Big Data Cluster in the vSphere Web Client 99 Create an HBase Only Cluster in Big Data Extensions 102
Create a Cluster with an Application Manager by Using the vSphere Web Client 104
Create a Compute-Only Cluster with a Third Party Application Manager by Using vSphere Web Client 105
Create a Compute Workers Only Cluster by Using the vSphere Web Client 105
10
Managing Hadoop and HBase Clusters 107
Stop and Start a Cluster in the vSphere Web Client 107 Delete a Cluster in the vSphere Web Client 108Scale a Cluster in or out by using the vSphere Web Client 108 Scale CPU and RAM in the vSphere Web Client 109
Use Disk I/O Shares to Prioritize Cluster Virtual Machines in the vSphere Web Client 110 About vSphere High Availability and vSphere Fault Tolerance 110
Change the User Password on All of the Nodes of a Cluster 111 Reconfigure a Cluster with the Serengeti Command-Line Interface 111 Configure the Number of Data Disks Per Node Group 113
Recover from Disk Failure with the Serengeti Command-Line Interface Client 115 Log in to Hadoop Nodes with the Serengeti Command-Line Interface Client 115
11
Monitoring the Big Data Extensions Environment 117
Enable the Big Data Extensions Data Collector 117Disable the Big Data Extensions Data Collector 118
View Serengeti Management Server Initialization Status 118 View Provisioned Clusters in the vSphere Web Client 119 View Cluster Information in the vSphere Web Client 120 Monitor the HDFS Status in the vSphere Web Client 121 Monitor MapReduce Status in the vSphere Web Client 121 Monitor HBase Status in the vSphere Web Client 122
12
Accessing Hive Data with JDBC or ODBC 123
Configure Hive to Work with JDBC 123Configure Hive to Work with ODBC 125
13
Big Data Extensions Security Reference 127
Services, Network Ports, and External Interfaces 127 Big Data Extensions Configuration Files 129Big Data Extensions Public Key, Certificate, and Keystore 130 Big Data Extensions Log Files 130
Big Data Extensions User Accounts 131 Security Updates and Patches 131
14
Troubleshooting 133
Log Files for Troubleshooting 134 Configure Serengeti Logging Levels 134 Collect Log Files for Troubleshooting 135 Troubleshooting Cluster Creation Failures 136
Big Data Extensions Virtual Appliance Upgrade Fails 142
Upgrade Cluster Error When Using Cluster Created in Earlier Version of Big Data Extensions 143 Unable to Connect the Big Data Extensions Plug-In to the Serengeti Server 143
vCenter Server Connections Fail to Log In 144
Management Server Cannot Connect to vCenter Server 144
SSL Certificate Error When Connecting to Non-Serengeti Server with the vSphere Console 145 Cannot Restart or Reconfigure a Cluster For Which the Time Is Not Synchronized 145
Cannot Restart or Reconfigure a Cluster After Changing Its Distribution 146 Virtual Machine Cannot Get IP Address and Command Fails 146
Cannot Change the Serengeti Server IP Address From the vSphere Web Client 147
A New Plug-In Instance with the Same or Earlier Version Number as a Previous Plug-In Instance Does Not Load 147
Host Name and FQDN Do Not Match for Serengeti Management Server 148
Serengeti Operations Fail After You Rename a Resource in vSphere 149
Big Data Extensions Server Does Not Accept Resource Names With Two or More Contiguous White Spaces 149
Non-ASCII characters are not displayed correctly 149
MapReduce Job Fails to Run and Does Not Appear In the Job History 149
Cannot Submit MapReduce Jobs for Compute-Only Clusters with External Isilon HDFS 150 MapReduce Job Stops Responding on a PHD or CDH4 YARN Cluster 151
Cannot Download the Package When Using Downloadonly Plugin 151 Cannot Find Packages When You Use Yum Search 151
Remove the HBase Rootdir in HDFS Before You Delete the HBase Only Cluster 151
Index 153
About This Book
VMware vSphere Big Data Extensions Administrator's and User's Guide describes how to install VMware vSphere Big Data Extensions™ within your vSphere environment, and how to manage and monitor Hadoop and HBase clusters using the Big Data Extensions plug-in for vSphere Web Client.
VMware vSphere Big Data Extensions Administrator's and User's Guide also describes how to perform Hadoop and HBase operations using the VMware Serengeti™ Command-Line Interface Client, which provides a greater degree of control for certain system management and big data cluster creation tasks.
Intended Audience
This guide is for system administrators and developers who want to use Big Data Extensions to deploy and manage Hadoop clusters. To successfully work with Big Data Extensions, you should be familiar with VMware® vSphere® and Hadoop and HBase deployment and operation.
VMware Technical Publications Glossary
VMware Technical Publications provides a glossary of terms that might be unfamiliar to you. For definitions of terms as they are used in VMware technical documentation, go to
About VMware vSphere Big Data
Extensions
1
VMware vSphere Big Data Extensions lets you deploy and centrally operate big data clusters running on VMware vSphere. Big Data Extensions simplifies the Hadoop and HBase deployment and provisioning process, and gives you a real time view of the running services and the status of their virtual hosts. It provides a central place from which to manage and monitor your big data cluster, and incorporates a full range of tools to help you optimize cluster performance and utilization.
This chapter includes the following topics:
n “Getting Started with Big Data Extensions,” on page 9 n “Big Data Extensions and Project Serengeti,” on page 10 n “About Big Data Extensions Architecture,” on page 11 n “About Application Managers,” on page 12
Getting Started with Big Data Extensions
Big Data Extensions lets you deploy big data clusters. The tasks in this section describe how to set up VMware vSphere® for use with Big Data Extensions, deploy the Big Data Extensions vApp, access the VMware vCenter Server® and command-line interface (CLI) administrative consoles, and configure a Hadoop distribution for use with Big Data Extensions.
Prerequisites
n Understand what Project Serengeti® and Big Data Extensions is so that you know how they fit into your big data workflow and vSphere environment.
n Verify that the Big Data Extensions features that you want to use, such as compute-only or data-compute separated, are supported by Big Data Extensions for the Hadoop distribution that you want to use.
n Understand which features are supported by your Hadoop distribution. Procedure
1 Do one of the following.
n Install Big Data Extensions for the first time. Review the system requirements, install vSphere, and install the Big Data Extensions components: Big Data Extensions vApp, Big Data Extensions plug-in for vCenter Server, and Serengeti CLI Client.
2 (Optional) Install and configure a distribution other than Apache Bigtop for use with Big Data Extensions.
Apache Bigtop is included in the Serengeti Management Server, but you can use any Hadoop distribution that Big Data Extensions supports.
What to do next
After you have successfully installed and configured your Big Data Extensions environment, you can perform the following additional tasks.
n Stop and start the Serengeti services, create user accounts, manage passwords, and log in to cluster nodes to perform troubleshooting.
n Manage the vSphere resource pools, datastores, and networks that you use to create Hadoop and HBase clusters.
n Create, provision, and manage big data clusters.
n Monitor the status of the clusters that you create, including their datastores, networks, and resource pools, through the vSphere Web Client and the Serengeti Command-Line Interface.
n On your Big Data clusters, run HDFS commands, Hive and Pig scripts , and MapReduce jobs, and access Hive data.
n If you encounter any problems when using Big Data Extensions, see Chapter 14, “Troubleshooting,” on page 133.
Big Data Extensions and Project Serengeti
Big Data Extensions runs on top of Project Serengeti, the open source project initiated by VMware to automate the deployment and management of Hadoop and HBase clusters on virtual environments such as vSphere.
Big Data Extensions and Project Serengeti provide the following components.
Project Serengeti An open source project initiated by VMware, Project Serengeti lets users deploy and manage big data clusters in a vCenter Server managed
environment. The major components are the Serengeti Management Server, which provides cluster provisioning, software configuration, and
management services; and a command-line interface. Project Serengeti is made available under the Apache 2.0 license, under which anyone can modify and redistribute Project Serengeti according to the terms of the license.
Serengeti Management Server
Provides the framework and services to run Big Data clusters on vSphere. The Serengeti Management Server performs resource management, policy-based virtual machine placement, cluster provisioning, software
Serengeti Command-Line Interface Client
The command-line interface (CLI) client provides a comprehensive set of tools and utilities with which to monitor and manage your Big Data deployment. If you are using the open source version of Serengeti without Big Data Extensions, the CLI is the only interface through which you can perform administrative tasks. For more information about the CLI, see the VMware vSphere Big Data Extensions Command-Line Interface Guide.
Big Data Extensions The commercial version of the open source Project Serengeti from VMware, Big Data Extensions, is delivered as a vCenter Server Appliance.
Big Data Extensions includes all the Project Serengeti functions and the following additional features and components.
n Enterprise level support from VMware.
n Bigtop distribution from the Apache community.
NOTE VMware provides the Hadoop distribution as a convenience but does not provide enterprise-level support. The Apache Bigtop
distribution is supported by the open source community.
n The Big Data Extensions plug-in, a graphical user interface integrated with vSphere Web Client. This plug-in lets you perform common Hadoop infrastructure and cluster management administrative tasks.
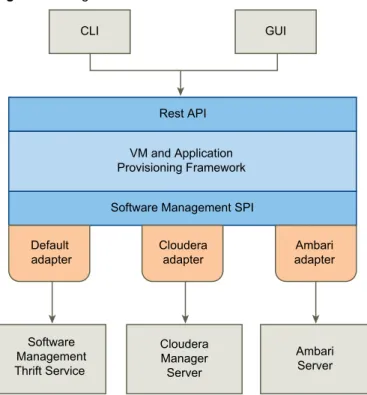
About Big Data Extensions Architecture
The Serengeti Management Server and Hadoop Template virtual machine work together to configure and provision big data clusters.
Figure 1‑1. Big Data Extensions Architecture
CLI GUI
Rest API VM and Application Provisioning Framework Software Management SPI Default adapter Cloudera adapter Ambari adapter Software Management Thrift Service Cloudera Manager Server Ambari Server
Big Data Extensions performs the following steps to deploy a big data cluster.
1 The Serengeti Management Server searches for ESXi hosts with sufficient resources to operate the cluster based on the configuration settings that you specify, and then selects the ESXi hosts on which to place Hadoop virtual machines.
2 The Serengeti Management Server sends a request to the vCenter Server to clone and configure virtual machines to use with the big data cluster.
3 The Serengeti Management Server configures the operating system and network parameters for the new virtual machines.
4 Each virtual machine downloads the Hadoop software packages and installs them by applying the distribution and installation information from the Serengeti Management Server.
5 The Serengeti Management Server configures the Hadoop parameters for the new virtual machines based on the cluster configuration settings that you specify.
6 The Hadoop services are started on the new virtual machines, at which point you have a running cluster based on your configuration settings.
About Application Managers
You can use Cloudera Manager, Apache Ambari, and the default application manager to provision and manage clusters with VMware vSphere Big Data Extensions.
After you add a new Cloudera Manager or Ambari application manager to Big Data Extensions, you can redirect your software management tasks, including monitoring and managing clusters, to that application manager.
You can use an application manager to perform the following tasks:
n List all available vendor instances, supported distributions, and configurations or roles for a specific application manager and distribution.
n Create clusters.
n Monitor and manage services from the application manager console.
Check the documentation for your application manager for tool-specific requirements.
Restrictions
The following restrictions apply to Cloudera Manager and Ambari application managers: n To add an application manager with HTTPS, use the FQDN instead of the URL.
n You cannot rename a cluster that was created with a Cloudera Manager or Ambari application manager.
n You cannot change services for a big data cluster from Big Data Extensions if the cluster was created with Ambari or Cloudera Manager application manager.
n To change services, configurations, or both, you must make the changes from the application manager on the nodes.
If you install new services, Big Data Extensions starts and stops the new services together with old services.
n If you use an application manager to change services and big data cluster configurations, those changes cannot be synced from Big Data Extensions. The nodes that you create with Big Data Extensions do not contain the new services or configurations.
Services and Operations Supported by the Application Managers
If you use Cloudera Manager or Apache Ambari with Big Data Extensions, there are several additional services that are available for your use.
Supported Application Managers and Distributions
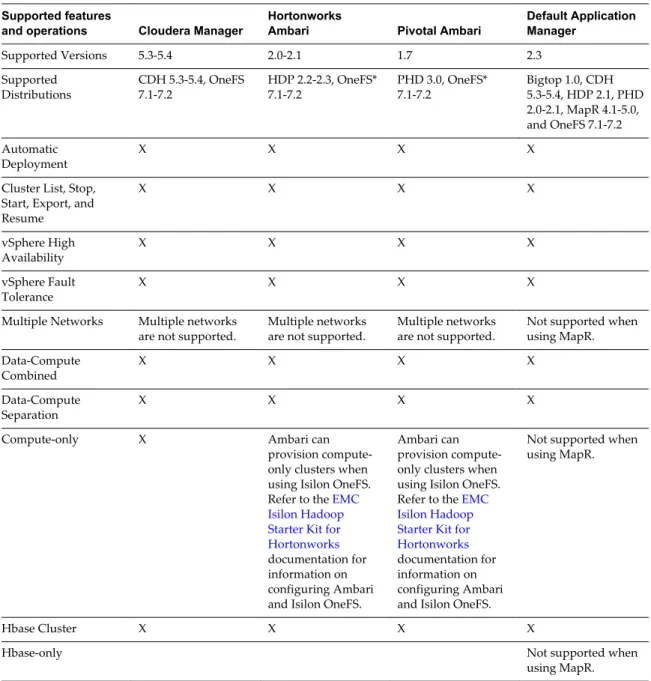
Big Data Extensions supports certain application managers and Hadoop distributions. In some cases not all features and operations are supported by certain versions of application mangers. The table below indicates which features are available when using the listed application mangers.
Table 1‑1. Supported application managers and Hadoop distributions Supported features
and operations Cloudera Manager
Hortonworks
Ambari Pivotal Ambari
Default Application Manager
Supported Versions 5.3-5.4 2.0-2.1 1.7 2.3 Supported
Distributions CDH 5.3-5.4, OneFS7.1-7.2 HDP 2.2-2.3, OneFS*7.1-7.2 PHD 3.0, OneFS*7.1-7.2 Bigtop 1.0, CDH5.3-5.4, HDP 2.1, PHD 2.0-2.1, MapR 4.1-5.0, and OneFS 7.1-7.2 Automatic
Deployment X X X X
Cluster List, Stop, Start, Export, and Resume X X X X vSphere High Availability X X X X vSphere Fault Tolerance X X X X
Multiple Networks Multiple networks
are not supported. Multiple networksare not supported. Multiple networksare not supported. Not supported whenusing MapR. Data-Compute
Combined X X X X
Data-Compute
Separation X X X X
Compute-only X Ambari can provision compute-only clusters when using Isilon OneFS. Refer to the EMC Isilon Hadoop Starter Kit for Hortonworks
documentation for information on configuring Ambari and Isilon OneFS.
Ambari can provision compute-only clusters when using Isilon OneFS. Refer to the EMC Isilon Hadoop Starter Kit for Hortonworks
documentation for information on configuring Ambari and Isilon OneFS.
Not supported when using MapR.
Hbase Cluster X X X X
Hbase-only Not supported when using MapR.
Table 1‑1. Supported application managers and Hadoop distributions (Continued) Supported features
and operations Cloudera Manager
Hortonworks
Ambari Pivotal Ambari
Default Application Manager
Hadoop
Topology/HVE X X X Topology is notsupported when using MapR.
HVE is only
supported when using PHD.
Hadoop Configuration Supported through the Web interface of the application manager.
Supported through the Web interface of the application manager.
Supported through the Web interface of the application manager.
Not supported when using MapR. Hadoop Ecosystem
Components Full stack throughCloudera Manager. Full stack throughAmbari Full stack throughAmbari.. Pig, Hive, Hive Server,and Zookeeper.
Support for Hadoop Distributions in Isilon OneFS
If you wish to use Isilon OneFS, first verify if your Hadoop distribution is compatible with OneFS. See
Supported Hadoop Distributions in OneFS on the EMC Website.
NOTE Big Data Extensions does not natively support the provisioning of compute-only clusters with Ambari Manager. However Ambari can provision compute-only clusters when using Isilon OneFS. Refer to the EMC Isilon Hadoop Starter Kit for Hortonworks documentation for information on configuring Ambari and Isilon OneFS.
Services Supported on Cloudera Manager and Ambari
Table 1‑2. Services supported on Cloudera Manager and AmbariService Name Cloudera Manager 5.3, 5.4 Ambari 1.6, 1.7
Falcon X Flume X X Ganglia X HBase X X HCatalog X HDFS X X Hive X X Hue X X Impala X MapReduce X X Nagios X Oozie X X Pig X Sentry Solr X Spark X Sqoop X X Storm X
Table 1‑2. Services supported on Cloudera Manager and Ambari (Continued)
Service Name Cloudera Manager 5.3, 5.4 Ambari 1.6, 1.7
TEZ X
WebHCAT X
YARN X X
Zookeeper X X
About Service Level vSphere High Availability for Ambari
Ambari supports NameNode HA, however, you must configure NameNode HA for use with your Hadoop deployment. See NameNode High Availability for Hadoop in the Hortonworks documentation.
About Service Level vSphere High Availability for Cloudera
The Cloudera distributions offer the following support for Service Level vSphere HA.n Cloudera using MapReduce v1 provides service level vSphere HA support for JobTracker. n Cloudera provides its own service level HA support for NameNode through HDFS2.
For information about how to use an application manager with the CLI, see the VMware vSphere Big Data Extensions Command-Line Interface Guide.
Installing Big Data Extensions
2
To install Big Data Extensions so that you can create and provision big data clusters, you must install the Big Data Extensions components in the order described.
What to do next
If you want to create clusters on any Hadoop distribution other than Apache Bigtop, which is included in theSerengeti Management Server, install and configure the distribution for use with Big Data Extensions. This chapter includes the following topics:
n “System Requirements for Big Data Extensions,” on page 17 n “Unicode UTF-8 and Special Character Support,” on page 20 n “The Customer Experience Improvement Program,” on page 21
n “Deploy the Big Data Extensions vApp in the vSphere Web Client,” on page 22 n “Install RPMs in the Serengeti Management Server Yum Repository,” on page 25 n “Install the Big Data Extensions Plug-In,” on page 26
n “Configure vCenter Single Sign-On Settings for the Serengeti Management Server,” on page 28 n “Connect to a Serengeti Management Server,” on page 28
n “Install the Serengeti Remote Command-Line Interface Client,” on page 29 n “Access the Serengeti CLI By Using the Remote CLI Client,” on page 30
System Requirements for Big Data Extensions
Before you begin the Big Data Extensions deployment tasks, your system must meet all of the prerequisites for vSphere, clusters, networks, storage, hardware, and licensing.
Big Data Extensions requires that you install and configure vSphere and that your environment meets minimum resource requirements. Make sure that you have licenses for the VMware components of your deployment.
vSphere Requirements Before you install Big Data Extensions, set up the following VMware products.
n When you install Big Data Extensions on vSphere 5.5 or later, use VMware® vCenter™ Single Sign-On to provide user authentication. When logging in to vSphere 5.5 or later you pass authentication to the vCenter Single Sign-On server, which you can configure with multiple identity sources such as Active Directory and OpenLDAP. On successful authentication, your user name and password is exchanged for a security token that is used to access vSphere components such as Big Data Extensions.
n If your vCenter Server uses a FQDN, ensure you configure it correctly when you install vCenter Server.
n Configure all ESXi hosts to use the same Network Time Protocol (NTP) server.
n On each ESXi host, add the NTP server to the host configuration, and from the host configuration's Startup Policy list, select Start and stop with host. The NTP daemon ensures that time-dependent processes occur in sync across hosts.
Cluster Settings Configure your cluster with the following settings.
n Enable vSphere HA and VMware vSphere® Distributed Resource Scheduler™.
n Enable Host Monitoring.
n Enable admission control and set the policy you want. The default policy is to tolerate one host failure.
n Set the virtual machine restart priority to high.
n Set the virtual machine monitoring to virtual machine and application monitoring.
n Set the monitoring sensitivity to high. n Enable vMotion and Fault Tolerance logging.
n All hosts in the cluster have Hardware VT enabled in the BIOS. n The Management Network VMkernel Port has vMotion and Fault
Tolerance logging enabled.
Network Settings Big Data Extensions can deploy clusters on a single network or use multiple networks. The environment determines how port groups that are attached to NICs are configured and which network backs each port group.
You can use either a vSwitch or vSphere Distributed Switch (vDS) to provide the port group backing a Serengeti cluster. vDS acts as a single virtual switch across all attached hosts while a vSwitch is per-host and requires the port group to be configured manually.
When you configure your networks to use with Big Data Extensions, verify that the following ports are open as listening ports.
n Ports 8080 and 8443 are used by the Big Data Extensions plug-in user interface and the Serengeti Command-Line Interface Client.
n Port 5480 is used by vCenter Single Sign-On for monitoring and management.
n To prevent having to open a network firewall port to access Hadoop services, log into the Hadoop client node, and from that node you can access your cluster.
n To connect to the internet (for example, to create an internal yum repository from which to install Hadoop distributions), you may use a proxy.
n To enable communications, be sure that firewalls and web filters do not block the Serengeti Management Server or other Serengeti nodes. Direct Attached Storage Attach and configure direct attached storage on the physical controller to
present each disk separately to the operating system. This configuration is commonly described as Just A Bunch Of Disks (JBOD). Create VMFS datastores on direct attached storage using the following disk drive recommendations.
n 8-12 disk drives per host. The more disk drives per host, the better the performance.
n 1-1.5 disk drives per processor core. n 7,200 RPM disk Serial ATA disk drives. Do not use
Big Data Extensions in conjunction with vSphere Storage DRS
Big Data Extensions places virtual machines on hosts according to available resources, Hadoop best practices, and user defined placement policies prior to creating virtual machines. For this reason, you should not deploy Big Data Extensions on vSphere environments in combination with Storage DRS. Storage DRS continuously balances storage space usage and storage I/O load to meet application service levels in specific environments. If Storage DRS is used with Big Data Extensions, it will disrupt the placement policies of your Big Data cluster virtual machines.
Migrating virtual machines in vCenter Server may disrupt the virtual machine placement policy
Big Data Extensions places virtual machines based on available resources, Hadoop best practices, and user defined placement policies that you specify. For this reason, DRS is disabled on all the virtual machines created within the Big Data Extensions environment. While this prevents virtual machines from being automatically migrated by vSphere, it does not prevent you from inadvertently moving virtual machines using the vCenter Server user interface. This may break the Big Data Extensions defined placement policy. For example, this may disrupt the number of instances per host and group associations.
Resource Requirements for the vSphere
Management Server and Templates
n Resource pool with at least 27.5GB RAM.
n 40GB or more (recommended) disk space for the management server and Hadoop template virtual disks.
Resource Requirements
for the Hadoop Cluster n Datastore free space is not less than the total size needed by the Hadoopcluster, plus swap disks for each Hadoop node that is equal to the memory size requested.
n Network configured across all relevant ESXi hosts, and has connectivity with the network in use by the management server.
n vSphere HA is enabled for the master node if vSphere HA protection is needed. To use vSphere HA or vSphere FT to protect the Hadoop master node, you must use shared storage.
Hardware Requirements for the vSphere and Big Data Extensions Environment
Host hardware is listed in the VMware Compatibility Guide. To run at optimal performance, install your vSphere and Big Data Extensions environment on the following hardware.
n Dual Quad-core CPUs or greater that have Hyper-Threading enabled. If you can estimate your computing workload, consider using a more powerful CPU.
n Use High Availability (HA) and dual power supplies for the master node's host machine.
n 4-8 GBs of memory for each processor core, with 6% overhead for virtualization.
n Use a 1GB Ethernet interface or greater to provide adequate network bandwidth.
Tested Host and Virtual Machine Support
The maximum host and virtual machine support that has been confirmed to successfully run with Big Data Extensions is 256 physical hosts running a total of 512 virtual machines.
vSphere Licensing You must use a vSphere Enterprise license or above to use VMware vSphere HA and vSphere DRS.
Unicode UTF-8 and Special Character Support
Big Data Extensions supports internationalization (I18N) level 3. However, there are resources you specify that do not provide UTF-8 support. You can use only ASCII attribute names consisting of alphanumeric characters and underscores (_) for these resources.
Big Data Extensions Supports Unicode UTF-8
vCenter Server resources you specify using both the CLI and vSphere Web Client can be expressed with underscore (_), hyphen (-), blank spaces, and all letters and numbers from any language. For example, you can specify resources such as datastores labeled using non-English characters.
When using a Linux operating system, you should configure the system for use with UTF-8 encoding specific to your locale. For example, to use U.S. English, specify the following locale encoding: en_US.UTF-8. See your vendor's documentation for information on configuring UTF-8 encoding for your Linux
environment.
Special Character Support
The following vCenter Server resources can have a period (.) in their name, letting you select them using both the CLI and vSphere Web Client.
n portgroup name n cluster name n resource pool name n datastore name
Resources Excluded From Unicode UTF-8 Support
The Serengeti cluster specification file, manifest file, and topology racks-hosts mapping file do not provide UTF-8 support. When you create these files to define the nodes and resources for use by the cluster, use only ASCII attribute names consisting of alphanumeric characters and underscores (_).
The following resource names are excluded from UTF-8 support: n cluster name
n nodeGroup name
n node name
n virtual machine name
The following attributes in the Serengeti cluster specification file are excluded from UTF-8 support: n distro name n role n cluster configuration n storage type n haFlag n instanceType n groupAssociationsType
The rack name in the topology racks-hosts mapping file, and the placementPolicies field of the Serengeti cluster specification file is also excluded from UTF-8 support.
The Customer Experience Improvement Program
You can configure Big Data Extensions to collect data to help improve your user experience with VMware products. The following section contains important information about the VMware Customer Experience Improvement Program.
The goal of the Customer Experience Improvement Program is to quickly identify and address problems that might be affecting your experience. If you choose to participate in the Customer Experience
Improvement Program,Big Data Extensions will regularly send anonymous data to VMware. You can use this data for product development and troubleshooting purposes.
Before collecting the data, VMware makes anonymous all fields that contain information that is specific to your organization. VMware sanitizes fields by generating a hash of the actual value. When a hash value is collected, VMware cannot identify the actual value but can detect changes in the value when you change your environment.
Categories of Information in Collected Data
When you choose to participate in VMware’s Customer Experience Improvement Program (CEIP), VMware will receive the following categories of data:
Configuration Data Data about how you have configured VMware products and information related to your IT environment. Examples of Configuration Data include: version information for VMware products; details of the hardware and software running in your environment; product configuration settings, and information about your networking environment. Configuration Data may include hashed versions of your device IDs and MAC and Internet Protocol Addresses.
Feature Usage Data Data about how you use VMware products and services. Examples of Feature Usage Data include: details about which product features are used; metrics of user interface activity; and details about your API calls.
Performance Data Data about the performance of VMware products and services. Examples of Performance Data include metrics of the performance and scale of VMware products and services; response times for User Interfaces, and details about your API calls.
Enabling and Disabling Data Collection
By default, enrollment in the Customer Experience Improvement Program is enabled during installation. You have the option of disabling this service during installation. You can discontinue participation in the Customer Experience Improvement Program at any time, and stop sending data to VMware. See“Disable the Big Data Extensions Data Collector,” on page 118.
If you have any questions or concerns regarding the Customer Experience Improvement Program for Log Insight, contact [email protected].
Deploy the Big Data Extensions vApp in the vSphere Web Client
Deploying the Big Data Extensions vApp is the first step in getting your cluster up and running with Big Data Extensions.
Prerequisites
n Install and configure vSphere.
n Configure all ESXi hosts to use the same NTP server.
n On each ESXi host, add the NTP server to the host configuration, and from the host configuration's Startup Policy list, select Start and stop with host. The NTP daemon ensures that time-dependent processes occur in sync across hosts.
n When installing Big Data Extensions on vSphere 5.5 or later, use vCenter Single Sign-On to provide user authentication.
n Verify that you have one vSphere Enterprise license for each host on which you deploy virtual Hadoop nodes. You manage your vSphere licenses in the vSphere Web Client or in vCenter Server.
n Install the Client Integration plug-in for the vSphere Web Client. This plug-in enables OVF deployment on your local file system.
NOTE Depending on the security settings of your browser, you might have to approve the plug-in when you use it the first time.
n Download the Big Data Extensions OVA from the VMware download site.
n Verify that you have at least 40GB disk space available for the OVA. You need additional resources for the Hadoop cluster.
n Ensure that you know the vCenter Single Sign-On Look-up Service URL for your vCenter Single Sign-On service.
If you are installing Big Data Extensions on vSphere 5.5 or later, ensure that your environment includes vCenter Single Sign-On. Use vCenter Single Sign-On to provide user authentication on vSphere 5.5 or later.
n Review the Customer Experience Improvement Program description, and determine if you wish to collect data and send it to VMware help improve your user experience using Big Data Extensions. See
“The Customer Experience Improvement Program,” on page 21. Procedure
1 In the vSphere Web Client, select a select a top level resource pool, then select Actions > Deploy OVF Template.
Select a top-level resource pool. Child resource pools are not supported by Big Data Extensions even though you can select a child resource pool. If you select a child resource pool, you will not be able to create Big Data clusters with Big Data Extensions.
2 Choose the location where the Big Data Extensions OVA resides and click Next.
Option Description
Deploy from File Browse your file system for an OVF or OVA template.
Deploy from URL Type a URL to an OVF or OVA template located on the internet. For example: http://vmware.com/VMTN/appliance.ovf.
3 View the OVF Template Details page and click Next. 4 Accept the license agreement and click Next.
5 Specify a name for the vApp, select a target datacenter for the OVA, and click Next.
The only valid characters for Big Data Extensions vApp names are alphanumeric and underscores. The vApp name must be < 60 characters. When you choose the vApp name, also consider how you will name your clusters. Together the vApp and cluster names must be < 80 characters.
6 Select shared storage for the OVA and click Next.
If shared storage is not available, local storage is acceptable.
7 For each network specified in the OVF template, select a network in the Destination Networks column in your infrastructure to set up the network mapping.
The first network lets the Management Server communicate with your Hadoop cluster. The second network lets the Management Server communicate with vCenter Server. If your vCenter Server deployment does not use IPv6, you can specify the same IPv4 destination network for use by both source networks.
8 Configure the network settings for your environment, and click Next.
a Enter the network settings that let the Management Server communicate with your Hadoop cluster.
Use a static IPv4 (IP) network. An IPv4 address is four numbers separated by dots as in aaa.bbb.ccc.ddd, where each number ranges from 0 to 255. You must enter a netmask, such as 255.255.255.0, and a gateway address, such as 192.168.1.253.
If the vCenter Server or any ESXi host or Hadoop distribution repository is resolved using a fully qualified domain name (FQDN), you must enter a DNS address. Enter the DNS server IP address as DNS Server 1. If there is a secondary DNS server, enter its IP address as DNS Server 2. NOTE You cannot use a shared IP pool with Big Data Extensions.
b (Optional) If you are using IPv6 between the Management Server and vCenter Server, select the Enable Ipv6 Connection checkbox.
Enter the IPv6 address, or FQDN, of the vCenter Server. The IPv6 address size is 128 bits. The preferred IPv6 address representation is: xxxx:xxxx:xxxx:xxxx:xxxx:xxxx:xxxx:xxxx where each x is a hexadecimal digit representing 4 bits. IPv6 addresses range from
0000:0000:0000:0000:0000:0000:0000:0000 to ffff:ffff:ffff:ffff:ffff:ffff:ffff:ffff. For convenience, an IPv6 address may be abbreviated to shorter notations by application of the following rules.
n Remove one or more leading zeroes from any groups of hexadecimal digits. This is usually done to either all or none of the leading zeroes. For example, the group 0042 is converted to 42. n Replace consecutive sections of zeroes with a double colon (::). You may only use the double
colon once in an address, as multiple uses would render the address indeterminate. RFC 5952 recommends that a double colon not be used to denote an omitted single section of zeroes. The following example demonstrates applying these rules to the address
2001:0db8:0000:0000:0000:ff00:0042:8329.
n Removing all leading zeroes results in the address 2001:db8:0:0:0:ff00:42:8329.
n Omitting consecutive sections of zeroes results in the address 2001:db8::ff00:42:8329.
See RFC 4291 for more information on IPv6 address notation. 9 Verify that the Initialize Resources check box is selected and click Next.
If the check box is unselected, the resource pool, data store, and network connection assigned to the vApp will not be added to Big Data Extensions.
If you do not add the resource pool, datastore, and network when you deploy the vApp, use the vSphere Web Client or the Serengeti CLI Client to specify the resource pool, datastore, and network information before you create a Hadoop cluster.
10 Run the vCenter Single Sign-On Lookup Service URL to enable vCenter Single Sign-On. n If you use vCenter 5.x, use the following URL: https://FQDN_or_IP_of_SSO_SERVER:
7444/lookupservice/sdk
n If you use vCenter 6.0, use the following URL: https://FQDN_of_SSO_SERVER: 443/lookupservice/sdk
If you don't input the URL, vCenter Single Sign-On is disabled.
11 To disable the Big Data Extensions data collector, uncheck the Customer Experience Improvement Program checkbox.
12 (Optional) To disable the Big Data Extensions Web plug-in from automatically registering, uncheck the enable checkbox.
By default the checkbox to enable automatic registration of the Big Data Extensions Web plug-in is selected. When you first login to the Big Data Extensions Web client, it automatically connects to the Serengeti management server.
13 Specify a remote syslog server, such as VMware vRealize Log Insight, to which Big Data Extensions can send logging information to across the network.
Retention, rotation and the splitting of logs received and managed by a syslog server are controlled by that syslog server. Big Data Extensions cannot configure or control log management on a remote syslog server. For more information on log management, see the documentation for the syslog server.
Regardless of the additional syslog configuration specified with this option, logs continue to be placed in the default locations of the Big Data Extensions environment.
14 Verify the vService bindings and click Next. 15 Verify the installation information and click Finish.
vCenter Server deploys the Big Data Extensions vApp. When deployment finishes, two virtual machines are available in the vApp.
n The Management Server virtual machine, management-server (also called the Serengeti Management Server), which is started as part of the OVA deployment.
n The Node Template virtual machine, node-template, is not powered on. Big Data Extensions clones Hadoop nodes from this template when provisioning a cluster. Do not start or stop this virtual machine without good reason. The template does not include a Hadoop distribution.
IMPORTANT Do not delete any files under the /opt/serengeti/.chef directory. If you delete any of these
files, such as the serengeti.pem file, subsequent upgrades to Big Data Extensions might fail without
displaying error notifications. What to do next
Install the Big Data Extensions plug-in within the vSphere Web Client. See “Install the Big Data Extensions Plug-In,” on page 26.
If the Initialize Resources check box is not selected, add resources to the Big Data Extensions server before you create a Hadoop cluster.
Install RPMs in the Serengeti Management Server Yum Repository
Install the wsdl4j and mailx Red Hat Package Manager (RPM) packages within the internal Yum repository of the Serengeti Management Server.
The wsdl4j and mailx RPM packages are not embedded withinBig Data Extensions due to licensing agreements. For this reason you must install them within the internal Yum repository of the Serengeti Management Server.
Prerequisites
Deploy the Big Data Extensions vApp. Procedure
1 Open a command shell, such as Bash or PuTTY, and log in to the Serengeti Management Server as the user serengeti.
2 Download and install the wsdl4j and mailx RPM packages.
n If the Serengeti Management Server can connect to the Internet, run the commands as shown in the example below to download the RPMs, copy the files to the required directory, and create a repository. umask 022 cd /opt/serengeti/www/yum/repos/centos/6/base/RPMS/ wget http://mirror.centos.org/centos/6/os/x86_64/Packages/mailx-12.4-8.el6_6.x86_64.rpm wget http://mirror.centos.org/centos/6/os/x86_64/Packages/wsdl4j-1.5.2-7.8.el6.noarch.rpm createrepo ..
n If the Serengeti Management Server cannot connect to the Internet, you must run the following tasks manually.
a Download the RPM files as shown in the example below.
http://mirror.centos.org/centos/6/os/x86_64/Packages/mailx-12.4-8.el6_6.x86_64.rpm http://mirror.centos.org/centos/6/os/x86_64/Packages/wsdl4j-1.5.2-7.8.el6.noarch.rpm
b Copy the RPM files to /opt/serengeti/www/yum/repos/centos/6/base/RPMS/.
c Run the createrepo command to create a repository from the RPMs you downloaded. umask 022
chmod a+r /opt/serengeti/www/yum/repos/centos/6/base/*.rpm createrepo /opt/serengeti/www/yum/repos/centos/6/base/
Install the Big Data Extensions Plug-In
To enable the Big Data Extensions user interface for use with a vCenter Server Web Client, register the plug-in with the vSphere Web Client. The Big Data Extensions graphical user plug-interface is supported only when you use vSphere Web Client 5.5 and later.
The Big Data Extensions plug-in provides a GUI that integrates with the vSphere Web Client. Using the Big Data Extensions plug-in interface you can perform common Hadoop infrastructure and cluster management tasks.
NOTE Use only the Big Data Extensions plug-in interface in the vSphere Web Client or the Serengeti CLI Client to monitor and manage your Big Data Extensions environment. Performing management operations in vCenter Server might cause the Big Data Extensions management tools to become unsynchronized and unable to accurately report the operational status of your Big Data Extensions environment.
Prerequisites
n Deploy the Big Data Extensions vApp. See “Deploy the Big Data Extensions vApp in the vSphere Web
Client,” on page 22.
n By default, the Big Data Extensions Web plug-in automatically installs and registers when you deploy the Big Data Extensions vApp. To install the Big Data Extensions Web plug-in after deploying the Big Data Extensions vApp, you must has opted not to enable automatic registration of the Web plug-in during deployment. See “Deploy the Big Data Extensions vApp in the vSphere Web Client,” on page 22.
n Ensure that you have login credentials with administrator privileges for the vCenter Server system with which you are registering Big Data Extensions.
NOTE The user name and password you use to login cannot contain characters whose UTF-8 encoding is greater than 0x8000.
n If you want to use the vCenter Server IP address to access the vSphere Web Client, and your browser uses a proxy, add the vCenter Server IP address to the list of proxy exceptions.
Procedure
1 Open a Web browser and go to the URL of vSphere Web Client 5.5 or later.
https://hostname-or-ip-address:port/vsphere-client
The hostname-or-ip-address can be either the DNS hostname or IP address of vCenter Server. By default the port is 9443, but this might have changed during installation of the vSphere Web Client.
2 Enter the user name and password with administrative privileges that has permissions on vCenter Server, and click Login.
3 Using the vSphere Web Client Navigator pane, locate the ZIP file on the Serengeti Management Server that contains the Big Data Extensions plug-in to register to the vCenter Server.
You can find the Serengeti Management Server under the datacenter and resource pool to which you deployed it.
4 From the inventory tree, select management-server to display information about the Serengeti Management Server in the center pane.
Click the Summary tab in the center pane to access additional information. 5 Note the IP address of the Serengeti Management Server virtual machine.
6 Open a Web browser and go to the URL of the management-server virtual machine.
https://management-server-ip-address:8443/register-plugin
The management-server-ip-address is the IP address you noted in Step 5. 7 Enter the information to register the plug-in.
Option Action
Register or Unregister Click Install to install the plug-in. Select Uninstall to uninstall the plug-in. vCenter Server host name or IP
address
Enter the server host name or IP address of vCenter Server.
Do not include http:// or https:// when you enter the host name or IP address.
User Name and Password Enter the user name and password with administrative privileges that you use to connect to vCenter Server. The user name and password cannot contain characters whose UTF-8 encoding is greater than 0x8000.
Big Data Extensions Package URL Enter the URL with the IP address of the management-server virtual
machine where the Big Data Extensions plug-in package is located:
https://management-server-ip-address /vcplugin/serengeti-plugin.zip
8 Click Submit.
The Big Data Extensions plug-in registers with vCenter Server and with the vSphere Web Client. 9 Log out of the vSphere Web Client, and log back in using your vCenter Server user name and
password.
The Big Data Extensions icon appears in the list of objects in the inventory. 10 Click Big Data Extensions in the Inventory pane.
What to do next
Connect the Big Data Extensions plug-in to the Big Data Extensions instance that you want to manage by connecting to the corresponding Serengeti Management Server. See “Connect to a Serengeti Management Server,” on page 28.
Configure vCenter Single Sign-On Settings for the Serengeti
Management Server
If the Big Data Extensions Single Sign-On (SSO) authentication settings are not configured or if they change after you install the Big Data Extensions plug-in, you can use the Serengeti Management Server
Administration Portal to enable SSO, update the certificate, and register the plug-in so that you can connect to the Serengeti Management Server and continue managing clusters.
The SSL certificate for the Big Data Extensions plug-in can change for many reasons. For example, you install a custom certificate or replace an expired certificate.
Prerequisites
n Ensure that you know the IP address of the Serengeti Management Server to which you want to connect.
n Ensure that you have login credentials for the Serengeti Management Server root user.
Procedure
1 Open a Web browser and go the URL of the Serengeti Management Server Administration Portal.
https://management-server-ip-address:5480
2 Type root for the user name, type the password, and click Login. 3 Select the SSO tab.
4 Do one of the following.
Option Description
Update the certificate Click Update Certificate.
Enable SSO for the first time Type the Lookup Service URL, and click Enable SSO. The Big Data Extensions and vCenter SSO server certificates are synchronized.
What to do next
Reregister the Big Data Extensions plug-in with the Serengeti Management Server. See “Connect to a Serengeti Management Server,” on page 28.
Connect to a Serengeti Management Server
To use the Big Data Extensions plug-in to manage and monitor big data clusters and Hadoop distributions, you must connect the Big Data Extensions plug-in to the Serengeti Management Server in your
Big Data Extensions deployment.
You can deploy multiple instances of the Serengeti Management Server in your environment. However, you can connect the Big Data Extensions plug-in with only one Serengeti Management Server instance at a time. You can change which Serengeti Management Server instance the plug-in connects to, and use the
Big Data Extensions plug-in interface to manage and monitor multiple Hadoop and HBase distributions deployed in your environment.
IMPORTANT The Serengeti Management Server that you connect to is shared by all users of the Big Data Extensions plug-in interface in the vSphere Web Client. If a user connects to a different Serengeti Management Server, all other users are affected by this change.
Prerequisites
n Verify that the Big Data Extensions vApp deployment was successful and that the Serengeti Management Server virtual machine is running.
n Verify that the version of the Serengeti Management Server and the Big Data Extensions plug-in is the same.
n Ensure that vCenter Single Sign-On is enabled and configured for use by Big Data Extensions for vSphere 5.5 and later.
n Install theBig Data Extensions plug-in. Procedure
1 Use the vSphere Web Client to log in to vCenter Server. 2 Select Big Data Extensions.
3 Click the Summary tab.
4 In the Connected Server pane, click the Connect Server link.
5 Navigate to the Serengeti Management Server virtual machine in the Big Data Extensions vApp to which to connect, select it, and click OK.
The Big Data Extensions plug-in communicates using SSL with the Serengeti Management Server. When you connect to a Serengeti server instance, the plug-in verifies that the SSL certificate in use by the server is installed, valid, and trusted.
The Serengeti server instance appears as the connected server on the Summary tab of the Big Data Extensions Home page.
What to do next
You can add resource pool, datastore, and network resources to your Big Data Extensions deployment, and create big data clusters that you can provision for use.
Install the Serengeti Remote Command-Line Interface Client
Although theBig Data Extensions Plug-in for vSphere Web Client supports basic resource and cluster management tasks, you can perform a greater number of the management tasks using the Serengeti CLI Client.
Prerequisites
n Verify that the Big Data Extensions vApp deployment was successful and that the Management Server is running.
n Verify that you have the correct user name and password to log into the Serengeti CLI Client. If you are deploying on vSphere 5.5 or later, the Serengeti CLI Client uses your vCenter Single Sign-On
credentials.
n Verify that the Java Runtime Environment (JRE) is installed in your environment, and that its location is in your PATH environment variable.
Procedure
1 Use the vSphere Web Client to log in to vCenter Server. 2 Select Big Data Extensions.
3 Click the Getting Started tab, and click the Download Serengeti CLI Console link. A ZIP file containing the Serengeti CLI Client downloads to your computer.
4 Unzip and examine the download, which includes the following components in the cli directory.
n The serengeti-cli-version JAR file, which includes the Serengeti CLI Client.
n The samples directory, which includes sample cluster configurations.
n Libraries in the lib directory.
5 Open a command shell, and navigate to the directory where you unzipped the Serengeti CLI Client download package.
6 Change to the cli directory, and run the following command to open the Serengeti CLI Client: java -jar serengeti-cli-version.jar
What to do next
To learn more about using the Serengeti CLI Client, see the VMware vSphere Big Data Extensions Command-line Interface Guide.
Access the Serengeti CLI By Using the Remote CLI Client
You can access the Serengeti Command-Line Interface (CLI) to perform Serengeti administrative tasks with the Serengeti Remote CLI Client.
Prerequisites
n Use the VMware vSphere Web Client to log in to the VMware vCenter Server® on which you deployed the Serengeti vApp.
n Verify that the Serengeti vApp deployment was successful and that the Management Server is running. n Verify that you have the correct password to log in to Serengeti CLI. See the VMware vSphere Big Data
Extensions Administrator's and User's Guide.
The Serengeti CLI uses its vCenter Server credentials.
n Verify that the Java Runtime Environment (JRE) is installed in your environment and that its location is in your path environment variable.
Procedure
1 Download the Serengeti CLI package from the Serengeti Management Server.
Open a Web browser and navigate to the following URL: https://server_ip_address/cli/VMware-Serengeti-CLI.zip
2 Download the ZIP file.
The filename is in the format VMware-Serengeti-cli-version_number-build_number.ZIP.
3 Unzip the download.
The download includes the following components.
n The serengeti-cli-version_number JAR file, which includes the Serengeti Remote CLI Client.
n The samples directory, which includes sample cluster configurations.
n Libraries in the lib directory.
5 Change to the cli directory, and run the following command to enter the Serengeti CLI.
n For any language other than French or German, run the following command.
java -jar serengeti-cli-version_number.jar
n For French or German languages, which use code page 850 (CP 850) language encoding when running the Serengeti CLI from a Windows command console, run the following command.
java -Dfile.encoding=cp850 -jar serengeti-cli-version_number.jar
6 Connect to the Serengeti service.
You must run the connect host command every time you begin a CLI session, and again after the 30
minute session timeout. If you do not run this command, you cannot run any other commands. a Run the connect command.
connect --host xx.xx.xx.xx:8443
b At the prompt, type your user name, which might be different from your login credentials for the Serengeti Management Server.
NOTE If you do not create a user name and password for the
Serengeti Command-Line Interface Client, you can use the default vCenter Server administrator credentials. The Serengeti Command-Line Interface Client uses the vCenter Server login credentials with read permissions on the Serengeti Management Server.
c At the prompt, type your password.
A command shell opens, and the Serengeti CLI prompt appears. You can use the help command to get help
with Serengeti commands and command syntax. n To display a list of available commands, type help.
n To get help for a specific command, append the name of the command to the help command. help cluster create
n Press Tab to complete a command.
Upgrading Big Data Extensions
3
You can upgrade Big Data Extensions from earlier versions. This chapter includes the following topics:
n “Prepare to Upgrade Big Data Extensions,” on page 33
n “Upgrade the Big Data Extensions Virtual Appliance,” on page 34 n “Upgrade the Big Data Extensions Plug-in,” on page 35
n “Upgrade Big Data Extensions Clusters Using the Serengeti Command-Line Interface,” on page 36 n “Upgrade the Serengeti CLI,” on page 36
n “Add a Remote Syslog Server,” on page 37
Prepare to Upgrade Big Data Extensions
As a prerequisite to upgrading Big Data Extensions, you must prepare your system to ensure that you have all necessary software installed and configured properly, and that all components are in the correct state. Data from non-working Big Data Extensions deployments is not migrated during the upgrade process. If Big Data Extensions is not working and you cannot recover according to the troubleshooting procedures, do not try to perform the upgrade. Instead, uninstall the previous Big Data Extensions components and install the new version.
IMPORTANT Do not delete any files in the /opt/serengeti/.chef directory. If you delete any of these files,
such as the sernegeti.pem file, subsequent upgrades to Big Data Extensions might fail without displaying
error notifications. Prerequisites
n Verify that your previous Big Data Extensions deployment is working normally. Procedure
1 Log in to your pre-existing Serengeti Management Server.
2 Run the script /opt/serengeti/sbin/serengeti-maintenance.sh to place Big Data Extensions into
maintenance mode.
3 Verify that Big Data Extensions is in maintenance mode.
When Big Data Extensions completes all jobs that have been submitted, the maintenance status will enter safe mode. Run the serengeti-maintenance.sh with the status parameter repeatedly until it
returns the safe system status message. serengeti-maintenance.sh status safe
When the system returns the safe system status message, you can perform the system upgrade tasks.
What to do next
You can now upgrade to the new version of Big Data Extensions. See “Upgrade the Big Data Extensions Virtual Appliance,” on page 34.
Upgrade the Big Data Extensions Virtual Appliance
You must perform several tasks to complete the upgrade of the Big Data Extensions virtual appliance. Prerequisites
The new version of Big Data Extensions is successfully deployed in the same vCenter Server environment as the version from which you are upgrading.
Procedure
1 Run the Big Data Extensions Upgrade Script on page 34
The upgrade script imports the configuration from the previous version of Big Data Extensions. 2 Upgrade Serengeti Management Server Using the Serengeti Management Server Administration
Portal on page 35
You can upgrade from your previous Big Data Extensions version to the latest version using the Serengeti Management Server Administration Portal.
Run the Big Data Extensions Upgrade Script
The upgrade script imports the configuration from the previous version of Big Data Extensions. Prerequisites
n Deploy the new version of Big Data Extensions on the same vCenter Server instance as your previous deployment. This allows the upgrade script to import your Big Data Extensions settings from your previous deployment into the latest version.
n You can only upgrade from version 2.2 to version 2.3 using this method. If you are upgrading from an earlier version of Big Data Extensions, you must first upgrade to version 2.2.
n If you use a customized Hadoop template, create a new Hadoop template for your environment prior to upgrading to the new version of Big Data Extensions. See “Create a Node Template Virtual Machine using RHEL Server 6.7 and VMware Tools,” on page 64
n Have available the IP address for version 2.2 of the Serengeti Management Server. Procedure
1 Open a command shell on the version of the Serengeti Management Server you are upgrading to (version 2.3), and log in as the user serengeti.
2 Run the /opt/serengeti/sbin/upgrade.py script.
Provide the IP address for version 2.2 of the Serengeti Management Server. The script prompts you to enter the password for the serengeti user for version 2.2 of the Serengeti Management Server.
/opt/serengeti/sbin/upgrade.py ip_address_2.2
The upgrade process may take several minutes to complete. Informational messages alert you to the progress of the upgrade as it proceeds.
3 Open a command shell on the Serengeti Management Server for version 2.3, and log in as the user serengeti.
If the upgrade procedure returns an error, view the /opt/serengeti/logs/serengeti-upgrade.log file.
The log file tracks and records events when upgradingBig Data Extensions, and can be used to diagnose problems that may occur.
What to do next
You can now upgrade the Serengeti Management Server. See “Upgrade Serengeti Management Server Using the Serengeti Management Server Administration Portal,” on page 35 .
Upgrade Serengeti Management Server Using the
Serengeti Management Server Administration Portal
You can upgrade from your previous Big Data Extensions version to the latest version using the Serengeti Management Server Administration Portal.
Procedure
1 Open a Web browser and go to the URL of the Serengeti Management Server Administration Portal for Big Data Extensions 2.3.
https://management-server-ip-address:5480
2 Type root for the user name, type the password, and click Login. 3 Select the Upgrade tab.
4 Enter the IP addresses for the Big Data Extensions server from which you want to upgrade from, and the password for the serengeti user, and click Upgrade.
Upgrade the Big Data Extensions Plug-in
You must use the same version of the Serengeti Management Server and the Big Data Extensions plug-in. By default, the Big Data Extensions Web plug-in automatically installs and registers with the
Serengeti Management Server when you deploy the Big Data Extensions vApp. If you chose not to install and register the Big Data Extensions Web plug-in when installing the Big Data Extensions vApp, you must perform this task to upgrade the plug-in.
Procedure
1 Open a Web browser and go to the URL of the Serengeti Management Server plug-in manager service.
https://management-server-ip-address:8443/register-plugin
2 Select Uninstall and click Submit. 3 Select Install.
4 Enter the information to register the new plug-in, and click Submit.
Upgrade Big Data Extensions Clusters Using the Serengeti
Command-Line Interface
To enable the Serengeti Management Server to manage clusters created in a previous version of Big Data Extensions, you must upgrade the components in the virtual machines of each cluster. The Serengeti Management Server uses these components to control the cluster nodes.
When you upgrade from an earlier version of Big Data Extensions, clusters that you need to upgrade are shown with an alert icon next to the cluster name. When you click the alert icon the error message Upgrade the cluster to the latest version displays as a tool tip. See “View Provisioned Clusters in the vSphere
Web Client,” on page 119.
You can also identify clusters you need to upgrade using the cluster list command. When you run the cluster list command, the message "Earlier" displays where the cluster version normally appears.
Prerequisites
n You can upgrade any cluster created by Big Data Extensions 2.x to version 2.3. You do not need to upgrade the cluster to version 2.2 prior to upgrading it to version 2.3.
Procedure
1 Log into the vSphere Web Client that is connected to vCenter Server and navigate to Hosts and Clusters.
2 Select the resource pool of the cluster, select the Virtual Machines tab, and power on the cluster's virtual machines.
IMPORTANT It may take up to five minutes for vCenter Server to assign valid IP addresses to the Big Data cluster nodes. Do not perform the remaining upgrade steps until the nodes have received their IP addresses. If a node does not have a valid IP address, it cannot be upgraded to the new version of Big Data Extensions virtual machine tools.
3 Open a command shell, such as Bash or PuTTY, and log in to the Serengeti Management Server as user serengeti.
4 Run the cluster upgrade command for each cluster that was created with a previous version of
Big Data Extensions.
5 If the upgrade fails for a node, make sure that the failed node has a valid IP address and then rerun the
cluster upgrade command.
You can rerun the command as many times as you need to upgrade all the nodes. What to do next
Stop and restart your Big Data clusters.
Upgrade the Serengeti CLI
The Serengeti CLI must be the same version as your Big Data Extensions deployment. If you run the CLI remotely to connect to the management server, you must upgrade the Serengeti CLI.
Procedure
1 Log in to the vSphere Web Client.
2 Select Big Data Extensions from the navigation panel. 3 Click the Summary tab.


![Table 5 ‑2. Apache Bigtop Yum Repository Placeholder Values (Continued) Placeholder Value default_rpm_dir bigtop target_rpm_dir bigtop local_repo_info [bigtop] name=Apache Bigtop baseurl=http://ip_of_yum_repo_webserver/bigtop/ enabled=1 gpgcheck=0](https://thumb-us.123doks.com/thumbv2/123dok_us/9006757.2386413/48.891.145.805.114.286/apache-bigtop-repository-placeholder-continued-placeholder-webserver-gpgcheck.webp)
![Table 5 ‑5. MapR Yum Repository Placeholder Values (Continued) Placeholder Value target_rpm_dir mapr/3 local_repo_info [mapr] name=MapR Version 3 baseurl=http://ip_of_yum_repo_webserver/mapr/3/ enabled=1 gpgcheck=0 protect=1](https://thumb-us.123doks.com/thumbv2/123dok_us/9006757.2386413/50.891.143.806.113.280/repository-placeholder-values-continued-placeholder-version-webserver-gpgcheck.webp)
