Norstar ICS Remote Tools
User Guide
NRU version 10
© Copyright Nortel Networks, 2003
Norstar and Meridian are trademarks of Nortel Networks.
Microsoft, MS-DOS, Windows and Excel are registered trademarks of Microsoft Corporation in the United States and other countries. InstallShield is a registered trademark of InstallShield Corporation. Published in Canada
P0604573 05
Return
to Menu
3
Contents
Preface . . . 11
How this guide is organized . . . 11
What is ICSRT? . . . 12
Getting a Quick Start . . . 12
Text conventions . . . 13
Acronyms used in this guide . . . 13
How to get help . . . 14
Chapter 1 Understanding remote management . . . 15
Process map: Managing a Norstar system with ICSRT . . . 15
Connection hardware requirements . . . 16
Explaining RAD connections . . . 16
Connecting remotely to a Norstar system . . . 17
Connecting to a Norstar system attendant . . . 18
Connecting directly to the Norstar system . . . 19
Remote system management using ICSRT . . . 20
Constraints . . . 21
Gathering information before you start . . . 22
Chapter 2 Setting up ICS Remote Tools . . . 25
Setting up your computer for ICSRT . . . 25
Computer hardware requirements . . . 25
Modem settings . . . 26
ICSRT performance tips . . . 27
Removing ICSRT from your computer . . . 27
ICSRT error messages . . . 27
Shutting down your computer . . . 28
Installing the ICSRT . . . 29
Chapter 3 Setting up customers in ICSRT . . . 35
Using ICSRT databases . . . 35
Creating a database . . . 36
Moving between databases . . . 38
Copying a database . . . 39
Deleting a database . . . 40
Setting up a multi-user database on a LAN . . . 41
Using ICSRT in multi-user mode . . . 41
4 Table of Contents
Editing customer records . . . 45
Copying customer records to create new records . . . 47
Viewing customer records . . . 48
Deleting customer records . . . 49
Quitting the Customer Info screen . . . 49
Chapter 4 Connecting to a Norstar system from ICSRT . . . 51
Connecting to a Norstar system . . . 51
Connecting manually . . . 51
Connecting through a customer record . . . 54
Chapter 5 Understanding the Remote Set tool . . . 55
Explaining the Remote Set tool . . . 56
Accessing the Remote Set tool . . . 57
Remote Set tool command buttons . . . 59
Using the keyboard . . . 59
Remote Set tool restrictions . . . 61
Chapter 6 Understanding the Browser tool . . . 63
Understanding the Browser tool . . . 64
Accessing the Browser tool . . . 65
Understanding the Browser window . . . 66
Moving through the navigation tree . . . 67
Navigation tree icons . . . 67
Using command buttons in the right pane . . . 68
Programming the time and date . . . 69
Using the task bar . . . 70
Using the task bar buttons . . . 71
Viewing recent programming changes . . . 71
Examining the Browser navigation tree menu . . . 72
Comparing the Browser tool with set-based programming . . . 72
Expanded navigation tree . . . 73
Troubleshooting the Browser window . . . 75
Refreshing an invalid navigation tree . . . 75
Warning messages . . . 75
Feature messages . . . 76
Recovering from a lost connection . . . 76
Error messages . . . 76
Table of Contents 5
Fatal error messages . . . 77
Chapter 7 Using Workbooks and off-line programming . . . 83
Understanding workbooks and off-line programming . . . 84
Restrictions . . . 84
Configuring a workbook . . . 85
Accessing an assigned workbook . . . 85
Configuring the Workbook parameters . . . 86
Programming a system using a workbook . . . 90
Using the workbook for programming . . . 91
Programming an existing system . . . 94
Creating and using an update workbook . . . 94
Acquiring information from a programmed system . . . 96
Working with programming and acquisition errors . . . 99
Using the OLP Error dialog . . . 100
Changing the property settings for the workbook . . . 102
Understanding the About ICS Workbook dialog . . . 104
Troubleshooting worksheet data transfer . . . 105
CAP/KIM is not programmed . . . 105
There is an overflow of data during an Norstar system acquisition . . . 105
Field data transfer error . . . 105
User preference buttons do not match . . . 105
Chapter 8 Backing up and restoring Norstar data . . . 107
Backing up data with ICSRT . . . 107
Restoring data with ICSRT . . . 108
Starting the Scheduler . . . 109
Scheduling backups or restores . . . 109
Exiting Scheduler . . . 112
Troubleshooting with Scheduler . . . 112
Understanding the job queue . . . 113
Removing a job . . . 114
Updating the jobs in Job Queue . . . 114
Viewing a submitted job . . . 115
Backing up data with the Backup Restore tool . . . 116
Restoring data with the Backup Restore tool . . . 118
Chapter 9 Troubleshooting the ICS Remote Tool . . . 121
6 Table of Contents
RAD alarm codes . . . 122
Error messages . . . 123
The Debug tool . . . 125
Appendix A Connecting a modem. . . 127
Hardware required . . . 127
Modem specifications . . . 127
Preparing the remote modem . . . 128
Sample configuration . . . 128
Installing remote equipment . . . 129
Glossary . . . 131
7
Figures
Figure 1 Connecting through a dial-up modem . . . 17
Figure 2 Connecting through a PSTN line to the system attendant . . . 18
Figure 3 Connecting directly to the RAD using a serial cable . . . 19
Figure 4 Pinouts for direct connect, RAD to computer . . . 19
Figure 5 Pinouts for direct connect, Global RAD to computer . . . 20
Figure 6 ICSRT database folder contents . . . 21
Figure 7 Installation Welcome screen . . . 29
Figure 8 Remove Programs From Your Computer screen check . . . 30
Figure 9 Choose Destination Location screen . . . 31
Figure 10 Select Program Folder . . . 31
Figure 11 Select Install Components screen . . . 32
Figure 12 Confirm settings before copying . . . 32
Figure 13 Successful installation dialog . . . 33
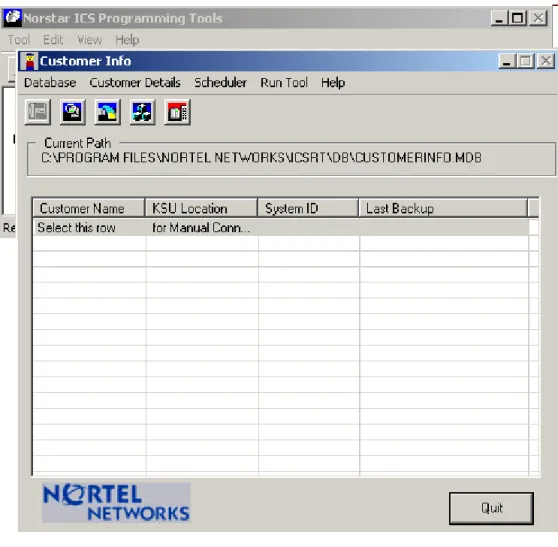
Figure 14 Customer Info screen . . . 36
Figure 15 Windows Open screen . . . 38
Figure 16 Customer Info opens in default database . . . 41
Figure 17 ICSRT Customer Info screen with Programming tools in background . . . 42
Figure 18 Add Customer Information screen . . . 43
Figure 19 Customer information on Customer Info screen . . . 45
Figure 20 Editing customer information . . . 46
Figure 21 Copy customer information . . . 47
Figure 22 View customer information . . . 48
Figure 23 Connection Properties default dialog . . . 52
Figure 24 Connection Properties screen . . . 54
Figure 25 ICSRT Remote Set tool . . . 55
Figure 26 M7310 Remote set screen display . . . 57
Figure 27 M7324 Remote set screen display . . . 58
Figure 28 F1 keyboard mapping list . . . 60
Figure 29 ICSRT Browser tool . . . 63
Figure 30 Browser main screen . . . 65
Figure 31 Expanded Line menu and data in right pane . . . 66
Figure 32 Expanded Line menu and data in right pane . . . 67
Figure 33 Copy button with dialog box cue . . . 68
Figure 34 Copy dialog box for DNs . . . 69
Figure 35 Time & date dialog box . . . 69
Figure 36 Changing position using the top bar . . . 70
Figure 37 Setting speed dials using the label field . . . 71
Figure 38 ICSRT configuration tools . . . 83
Figure 39 Windows Open screen . . . 85
8 Figures
Figure 41 Workbook Configuration screen . . . 87
Figure 42 Select System Size dialog . . . 88
Figure 43 Hardware screen . . . 89
Figure 44 Program ICS dialog box . . . 91
Figure 45 Program ICS and Connection Properties screens . . . 93
Figure 46 For you information screen . . . 94
Figure 47 Windows Open screen . . . 95
Figure 48 Windows Open screen . . . 96
Figure 49 Acquire ICS screen . . . 97
Figure 50 Acquire ICS and Connection Properties screens . . . 98
Figure 51 OLP Errors dialog box . . . 100
Figure 52 OLP Settings dialog box . . . 102
Figure 53 About ICS Workbook dialog . . . 104
Figure 54 ICSRT database backup folders . . . 107
Figure 55 Add/Submit Job screen . . . 110
Figure 56 Jobs in Queue screen . . . 113
Figure 57 View Job Info screen . . . 115
Figure 58 Maintaining manual backup files in the customer database . . . 116
Figure 59 Backup and Restore screen, Backup tab . . . 117
Figure 60 Renaming a scheduled backup file . . . 118
Figure 61 Backup and Restore screen, Restore tab . . . 119
Figure 62 Overview of how a RAD alarm center is set up . . . 121
9
Tables
Table 1 Customer and connection information . . . 43
Table 2 Connection Properties fields . . . 52
Table 3 Remote Set tool command buttons . . . 59
Table 4 Navigation tree icons . . . 68
Table 5 Program ICS dialog box options . . . 92
Table 6 Acquisition variables . . . 97
Table 7 OLP Error dialog fields . . . 101
Table 8 OLP Settings dialog box fields . . . 103
Table 9 OLP Settings dialog box fields . . . 104
Table 10 Add/Submit job fields . . . 110
Table 11 ICS and RAD alarm cross reference . . . 122
11
Preface
This guide is intended for administrators who want to centrally manage one or more Norstar systems from a computer remote to the system. The communication between the system and the remote computer is established by connecting a Remote Access Device (RAD) to the Norstar system, providing a way for the remote computer that is running ICS Remote Tools (ICSRT) to establish a programming connection to the Norstar system.
How this guide is organized
This guide is organized in the following sections:
• Application overview: Chapter 1, “Understanding remote management”, on page 15 provides an overview of remote management using ICSRT.
• Remote computer: Chapter 2, “Setting up ICS Remote Tools”, on page 25 provides computer parameters and how to install the application on your computer.
• Customer database: Chapter 3, “Setting up customers in ICSRT”, on page 35 describes how to set up customer records in the CustomerInfo database.
• Connecting to a system: Chapter 4, “Connecting to a Norstar system from ICSRT”, on page 51 provides a list of required information about the Norstar systems you want to connect to, about the RAD, and about how the computer you are using is connected.
• Configuration tools:
— Chapter 5, “Understanding the Remote Set tool”, on page 55 provides information about using the ICSRT Remote set tool.
— Chapter 6, “Understanding the Browser tool”, on page 63 provides information about using the ICSRT Browser tool
— Chapter 7, “Using Workbooks and off-line programming”, on page 83 provides information about using the ICSRT Workbooks
• Backup and Restore data: Chapter 8, “Backing up and restoring Norstar data”, on page 107
provides instructions about setting up a backup or restore, and how to schedule the system to automatically perform backups.
• Troubleshooting system operation: Chapter 9, “Troubleshooting the ICS Remote Tool”, on page 121 provides instructions about dealing with error conditions, and using the Debug tool under the guidance of your customer support.
12 Preface
What is ICSRT?
If you have older versions of Norstar systems, you may be familiar with the Norstar Manager application. The ICSRT replicates some functions of that application.
ICSRT is a software package that assists you in administering, maintaining, and programming a Norstar ICS (Integrated Communications System). Ensure that you are familiar with Norstar programming before you attempt to use this application.
For those new to remote management, you can use ICSRT to:
• connect to a remote Norstar MICS or CICS system (version 2.0 or newer) • set up records for each system in one or more databases
• program the system using one of three methods
• perform backup and restore activities, maintaining backup versions on your remote computer • troubleshoot the ICSRT tools
Getting a Quick Start
If you were comfortable with using Norstar Manager and earlier versions of Norstar ICS Tools, you can refer to the ICS Remote Tools Quick Start Guide for a quick overview of the new elements of ICSRT.
For Norstar system and feature configuration details, refer to the MICS or CICS Installation
Guides.
Warning: Data created through the Norstar Manager cannot be used by the ICSRT application. You need to re-enter all customer information through the ICSRT application.
Note: ICSRT system version compatibility
If you are managing systems that are running software earlier than version 2.0, ensure that you maintain a copy of Norstar Manager on your system to manage those systems.
Preface 13
Text conventions
This guide uses the following text conventions:
Acronyms used in this guide
This guide uses the following acronyms:angle brackets (< >), italic text
Indicates that you choose the text to enter based on the description inside the brackets. Do not type the brackets when entering the command.
Example: If the command syntax is: ping<ip_address>
you enter: ping 192.32.10.12 angle brackets (< >),
bold text
Indicates a keyboard command key, such as <Enter> or <Ctrl>.
bold Courier text Indicates command names and options and text that you need to enter. Example: Use the dinfo command.
Example: Enter show ip{alerts|routes}.
italic text Indicates book and chapter titles plain Courier
text Indicates command syntax and system output, for example, prompts and system messages. Example: Set Trap Monitor Filters
FEATURE HOLD RELEASE
Indicates that you press the button with the coordinating icon on whichever set you are using.
CICS Compact ICS
ICS Integrated Communications System
ICSRT ICS Remote Tool
KSU Key Service Unit
MICS Modular ICS
NRU Norstar Remote Utilities
14 Preface
How to get help
USA and Canada
Authorized Distributors - ITAS Technical Support Telephone:
1-800-4NORTEL (1-800-466-7835)
If you already have a PIN Code, you can enter Express Routing Code (ERC) 196#.
If you do not yet have a PIN Code, or for general questions and first line support, you can enter ERC 338#.
Website:
http://www.nortelnetworks.com/support
Presales Support (CSAN)
Telephone:1-800-4NORTEL (1-800-466-7835) Use Express Routing Code (ERC) 1063#
EMEA (Europe, Middle East, Africa)
Technical Support - CTASTelephone: 00800 800 89009 Fax: 44-191-555-7980 email: [email protected]
CALA (Caribbean & Latin America)
Technical Support - CTASTelephone: 1-954-858-7777 email:
APAC (Asia Pacific)
Technical Support - CTAS Telephone: +61 388664627 Fax: +61 388664644 email: [email protected]15
Chapter 1
Understanding remote management
This chapter provides an overview of the process of using the ICS Remote Tool (ICSRT) for remote system management. The following information is provided in this chapter:
• “Process map: Managing a Norstar system with ICSRT” on page 15
• “Connection hardware requirements” on page 16
• “Remote system management using ICSRT” on page 20
Process map: Managing a Norstar system with ICSRT
The Norstar system you want to manage has aRAD or an I-RAD installed and configured.
Determine your computer-to-RAD connection, and install the connection on your computer.
Install ICSRT on your computer.
Enter the customer information and set up connection information in the Customer Info screen.
Can you connect?
Yes
No Ensure your connection settings are correct. Check the hardware. Create a database folder for the
customer information if you do not want to use the default location.
Perform the ICSRT task that you require.
For configuration, refer to “Understanding the Remote Set tool” on page 55, “Understanding the Browser tool” on page 63, or “Using Workbooks and off-line programming” on page 83. For data maintenance, refer to “Backing up and restoring Norstar data” on page 107
If there are multiple computers with ICSRT users, set up the database on a server, and point each computer to that position.
16 Chapter 1 Understanding remote management
Connection hardware requirements
Before you can use the ICSRT to configure remote systems, you must install a RAD (MICS), or use a software key to activate the Internal-RAD (CICS) on the systems that you want to manage. The RAD Installation Guide provides details about the RAD module and how to physically connect it to the Norstar system and to the remote computer. The CICS Programming and
Installation Guide explains how to configure an I-RAD.
Explaining RAD connections
There are three ways to connect to a RAD from your computer.
If you are managing a number of systems, you could have more than one type of connection. For instance, if your computer is co-located with a system, you could use a serial cable in a direct connection. If another system is located in another building or too far away for a serial cable, you might set up a remote connection. You also might be managing another system that has high security requirements, so that you need to be verified by a central operator before you connect, so you would need to set up an operator-assisted connection to that system.
The three connection methods are:
• remote: through a dial-up modem and auto-answer line on Norstar system (Figure 1)
• operator or auto attendant-assisted: through a dial-up modem that calls a system operator or auto attendant (Figure 2)
• direct: through a serial cable directly to the RAD (Figure 3)
Note: Operator-assisted connections do not support the scheduled backup and restore operations.
Chapter 1 Understanding remote management 17
Connecting remotely to a Norstar system
With this configuration, your computer connects to the RAD by using a dial-up modem and a dial-up connection to an auto-answered line on the Norstar system.
When you click on the Connect button on an ICSRT Connection Properties screen that is correctly set for Remote connection (“Connecting to a Norstar system” on page 51), your computer dials the Norstar system using the modem. The line your computer dials through is set up on the Norstar system so that the RAD answers after a specified number of rings. When the RAD answers, ICSRT transmits the RAD password, which is entered on the connection record. If the RAD recognizes the password, the connection occurs.
Figure 1 Connecting through a dial-up modem
RAD Norstar system
Remote computer
Modem
RS-232 cable Dial-upconnection
Unsupervised line
18 Chapter 1 Understanding remote management
Connecting to a Norstar system attendant
If you want an operator or auto-attendant to direct ICSRT calls to the RAD, you can use the same hardware configuration as you use for the remote connection. However, with this connection, the modem is connected to a supervised line that directly dials the attendant or auto attendant, so you also need to attach an analog telephone to the modem. Therefore, for this type of connection, you need a modem with both a line and phone port.
To make a RAD connection using operator assistance:
1 Ensure the ICSRT Connection Properties screen is displayed on your computer, with the correct information filled out for this type of connection. (“Connecting to a Norstar system” on page 51)
2 Call the Norstar system from a telephone connected to the modem.
When the attendant answers, the attendant presses Feature 9*0 to connect the call to the RAD. When the transfer is complete, you will hear a high-pitched tone.
3 At this point, click on Connect on the ICSRT connection screen and hang up the telephone. ICSRT then follows the rest of the connection routine.
Figure 2 Connecting through a PSTN line to the system attendant
Note: The Operator-assisted connection does not support the scheduled backup or restore operations.
Note: If the line is connected to an Auto Attendant, you would have to press Feature 9*0 on your telephone to make the connection.
RAD Norstar system Remote computer Modem RS-232 cable Dial-up connection System attendant connected to line port Analog phone connected phone port
Chapter 1 Understanding remote management 19
Connecting directly to the Norstar system
If you are using a computer that is at the same site as the Norstar system, you can connect to the RAD serial port using a serial cable (RS-232) connected to one of the serial ports on your computer. Ensure that you note which serial port you use.
When you click on the Connect button on an ICSRT Connection Properties screen that is correctly set for Direct connection (“Connecting to a Norstar system” on page 51), your computer directly contacts the RAD, which verifies the RAD password and opens up a connection.
Figure 3 Connecting directly to the RAD using a serial cable
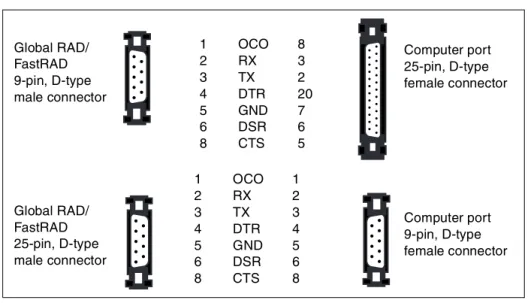
In a direct connection, the RAD is connected to one of the computer COM ports by an RS-232 cable. In this type of connection, the data transfer rate between the computer and the KSU is 9600 baud. The cable must be constructed as shown in the pinout diagrams in Figure 4 and Figure 5. Figure 4 Pinouts for direct connect, RAD to computer
RAD Norstar system Onsite computer Serial cable RAD 25-pin, D-type male connector Computer port 25-pin, D-type female connector Computer port 9-pin, D-type female connector RAD 25-pin, D-type male connector 2 TX 2 3 RX 3 5 CTS 5 6 DSR 6 7 GND 7 8 OCD 8 20 DTR 20 2 TX 3 3 RX 2 5 CTS 8 6 DSR 6 7 GND 5 8 OCD 1 20 DTR 4
20 Chapter 1 Understanding remote management
Figure 5 Pinouts for direct connect, Global RAD to computer
Remote system management using ICSRT
ICSRT provides you with the configuration ability of the on-site telephone programming, as well as a tool to schedule an off-site backup and to restore that backed-up information to the Norstar system.
A folder on your computer contains Customer and connection information in a database (.mdb) file (Figure 6). This allows you to quickly identify the system you want to manage, and to quickly connect to the system by whatever method has been used to connect to the remote system. The connection record for each customer indicates what type of connection exists.
Configuring a system using ICSRT is accomplished using one of three formats, all located under the Run Tool menu on the main ICSRT screen.
• The Remote Set tool and the Browser tool provide two different ways to configure a Norstar system directly from your computer.
• OLP Worksheets are customizable Excel spreadsheets that can be filled in separately from ICSRT. These files are also stored in the same folder where the customer database is stored (Figure 6). You can use worksheets to both send configuration information to a Norstar system, and to upload existing information (acquire) from the Norstar system into the worksheets. Each version of MICS/CICS software has a workbook that includes all the features for that version.
Remotely backing up a Norstar system is accomplished by initiating an immediate backup, or by scheduling backups to occur at preset intervals. Backup files can be restored to the Norstar system by initiating an immediate restore, or by scheduling a restore to occur on a preset date at a preset time. Scheduled backup files for each customer are stored within the same folder as the customer database (Figure 6). If you use the Backup Restore tool to perform an immediate backup, the files are stored at <ICSRT installed path>\backup\ in a file called FNVRAM.new, unless you indicate
Global RAD/ FastRAD 9-pin, D-type male connector Computer port 25-pin, D-type female connector Computer port 9-pin, D-type female connector Global RAD/ FastRAD 25-pin, D-type male connector 1 OCO 8 2 RX 3 3 TX 2 4 DTR 20 5 GND 7 6 DSR 6 8 CTS 5 1 OCO 1 2 RX 2 3 TX 3 4 DTR 4 5 GND 5 6 DSR 6 8 CTS 8
Chapter 1 Understanding remote management 21
Figure 6 provides a sample of what the folder containing one database could contain. Many customer records can be stored in one database. You can also have a number of databases, each with a set of Norstar customers. You cannot, however, pass customer records back and forth between databases, and you cannot have more than one database per folder.
Figure 6 ICSRT database folder contents
Constraints
• You can only have one CustomerInfo database file per database folder. • You cannot pass customer records back and forth between databases.
• If you delete a database folder, all information within that folder is deleted, so it is highly recommended that you create a secure folder somewhere and regularly copy each database folder to that folder as a backup.
• If you need to turn your computer off, ensure that there are no backup up or restore jobs currently running. Any jobs scheduled to run while the computer is turned off will need to be manually removed when the computer is rebooted.
• The Scheduler does not automatically update after the Daylight Savings time change if it is running during the time change. When this occurs, you need to close the Scheduler and then restart it to synchronize the Scheduler time with the computer or server time. Refer to
“Starting the Scheduler” on page 109.
<database folder name> CustomerInfo.mdb OlpWorksheets <customer system ID> <workbooknamecustomer1).xls file <workbooknamecustomer2>.xls file backup <systemIDcustomer1>.new <systemIDcustomer1>.old <systemIDcustomer2>.new <systemIDcustomer2>.old
X
X
22 Chapter 1 Understanding remote management
Gathering information before you start
Gather the following information before you attempt to add customer sites to the ICSRT database:
Customer information Values
System
Identification (ID)
You need to know the unique system number for the Norstar system you want to add.
If your customer does not know this number, get them to check in programming. (on the programming set, press SHOW at the Software keys prompt)
System software name and version
If you are using workbooks, you will need to know the software region and version of the Norstar system.
Customer Name This is the name of the company or business that owns the Norstar system.
This setting may not be unique, as a customer may own more than one system.
KSU location This is where the Norstar ICS is located on site. Address This is the business address of the customer. Contact This is the name of person at the customer site who
coordinates Norstar programming and troubleshooting. Phone number This is the phone number of the contact person. Remember to
include an area code.
Install date This is the date the Norstar system was installed.
Connection Properties RAD phone
number
This is the number which will be answered by RAD at the Norstar location if you are calling into the RAD over a phone line. This number can be supplied by the technician who set up the RAD.
RAD password The RAD is delivered without a password. The installation technician may have changed it. If not, the customer needs to program an 8-to-10-digit password through set programming. COM Port This is the communication port on the personal computer that
ICSRT uses to communicate with the Norstar system. Connect type Determine how your computer will connect to the RAD:
Refer to “Explaining RAD connections” on page 16.
Baud rate Determine the modem speed required to communicate with the Norstar system.
Refer to “Modem settings” on page 26.
Dial mode If you are using a modem to connect to the system, determine whether the system requires pulse or tone signals.
Chapter 1 Understanding remote management 23
Notes This is a scratch area. Type any information you want to add about the Norstar system.
ICSRT components
Database Determine which database the customer information will use. Create a new database folder, if required. Refer to “Creating a database” on page 36.
Programming Determine which tool you plan to use for programming. Refer to “Understanding the Remote Set tool” on page 55 and “Understanding the Browser tool” on page 63.
If you intend to use workbooks to configure the system, ensure you have a copy of the correct workbook file. Refer to “Using Workbooks and off-line programming” on page 83.
Configuration information is obtained in the Installer Guide provided to each system.
Backup and Restore
25
Chapter 2
Setting up ICS Remote Tools
This chapter describes how you set up your computer to perform remote management with the ICS Remote Tools (ICSRT) application.
This chapter provides information about:
• “Setting up your computer for ICSRT” on page 25
• “Installing the ICSRT” on page 29
Setting up your computer for ICSRT
Before you can begin using ICSRT, the software must first be installed and set up on the computer you are going to use for system management.
Setting up ICSRT on your computer involves:
• making sure your computer is configured to run the application • installing the software on the computer hard drive
• creating different databases
This section explains how you install and set up ICSRT on your computer. There is also information about optimizing performance, removing the ICSRT software, and troubleshooting the installation.
Computer hardware requirements
The ICSRT software is installed on the hard disk of the computer you intend to use to connect to Norstar systems. Ensure that your computer is equipped with:
• Windows 95, Windows 98, Windows NT, Windows 2000, Windows ME, or Windows XP • 486 or higher microprocessor (a faster processor will allow for faster backups and restores) • 32 MBytes of RAM
• 36 MBytes virtual memory (or more) • CD ROM drive
• 100 MB free space on the hard disk
•
Microsoft Excel version 7 (Office 95) or 8 (Office 97) or (Office 2000) if you intend to
use the Workbook tool. Excel 5 (Office 4.2) can also be used, but the Acquire ICS or
Program ICS dialog should be minimized, or else Excel will stall during
26 Chapter 2 Setting up ICS Remote Tools
• ODBC Drivers. If your computer does not have ODBC installed or the driver versions are older than the ICSRT driver files, the files are automatically installed on to your computer when ICSRT installs.
• a Hayes compatible modem for remote connections
Modem settings
The default value for the Modem init string is &FQ0V1&C1&D2S7=85&S0. If your modem cannot connect to a RAD, use the modem init string field to include additional commands at the beginning or end of the string, or to edit the existing string. Refer to your modem manual for information about required codes, and where to insert them. A default or existing internal string automatically displays in the Modem Init String field, which contains the following elements: • &F -- load default factory configuration
• Q0 -- return response codes • V1 -- return verbal response codes
• &C1 -- set the carrier detect (CD) high when the remote carrier is detected and drop the CD when the remote carrier is lost
• &D2 -- accept commands only when data transfer ready (DTR) is high and drop the call when DTR is low
• S7=85 -- wait up to 85 seconds for the remote carrier to be detected • &S0 -- data set ready (DSR) always on
Note: If any of drivers file is removed or gets corrupted during usage, the behavior of ICSRT tools is unpredictable
Note: For all remote connections, you require a Hayes compatible modem capable of operating at 1200, 2400, 4800, 9600, or 19200 baud. Modems used for Operator-assisted calls should also have a separate line port and phone port. To avoid any conflicts or performance delays, we recommend that you do not have any other programs running on the remote computer while you are working with ICSRT.
The default Baud rate is 19200. For a direct connection, the local baud rate at the RAD must match the baud rate used for the direct connection in ICSRT. If you are using a remote connection, 1200, 2400, 4800, 9600 or 19200 baud can be used. If you choose a baud rate for a remote connection that is higher than the rate supported by the RAD, your modem auto-bauds down to the modem speed of the RAD. It is strongly recommended that you use 9600 baud or higher for Remote or Operator-assisted connections.
Caution: ICSRT requires a Baud rate greater than 1200 to perform a successful restore operation.
Note for US Robotics modem users: Be sure to add &I0 and &B1 to your modem init strings. &I0 -- software flow control disabled; &B1 -- fixed serial port rate
Chapter 2 Setting up ICS Remote Tools 27
ICSRT performance tips
In certain situations you may find that ICSRT is operating too slowly. If you do, we recommend you do one or more of the following things to increase the speed of ICSRT:
• Do not run any other programs on your computer while you are running ICSRT operations. All programs that are operating on a computer, even those reduced to a icon, require some of the computer resources to operate.
• Use 9600 baud or higher, if supported by the RAD, when you are using ICSRT to perform a connected session.
• Using telephone lines that have very little noise reduces the number of communication errors that occur between the Norstar system and ICSRT. With fewer errors, the data is transmitted faster to and from the Norstar system.
• Use public network lines. Private network lines are usually compressed to make transmission more economical, but the compression can interfere with the connection between the computer and Norstar system. Use public network lines when making a connection to the Norstar system, or arrange ahead of time to have an uncompressed 64 kbps line available on your private network.
Removing ICSRT from your computer
If you need to remove ICSRT from your computer, use the Add/Remove Programs utility found under the Windows Start menus.
The uninstall utility does not remove the databases. If you need to remove databases, refer to
“Deleting a database” on page 40.
ICSRT error messages
When you get an error message dialog from ICSRT, you need to determine what the error message means and how it affects the Norstar system and ICSRT. Refer to Chapter 9, Troubleshooting the ICS Remote Tool, on page 121 for a list of the more common and/or critical errors.
Note: In general, you should not delete or alter any of the commands in the default string. However, the modem wait for carrier delay (S7) must be set to include both the delay before the RAD auto-answers and the time for the call to be dialed and connected. Some modems have a maximum wait of 60 seconds. If this is the case, you may set S7 in the modem init string to a lower value. If you lower the S7 value and also want the RAD to auto-answer before the modem times out, you must ensure that the seconds to wait before answering at the RAD is less than the S7 value. For best results, set the maximum modem speed to the maximum connect speed.
28 Chapter 2 Setting up ICS Remote Tools
Shutting down your computer
Do not turn off your computer unless absolutely necessary. Scheduled jobs will not run if Scheduler is not running. If you need to shut down your computer, ensure that no scheduled jobs are currently running or are scheduled to run during the shutdown period.
When you restart your computer, ensure that Scheduler is running. Refer to “Starting the Scheduler” on page 109.
Chapter 2 Setting up ICS Remote Tools 29
Installing the ICSRT
ICSRT installs easily off of the ICSRT CD. The application uses an Install Shield Wizard to move the files to your computer and install them in the C:\Program Files\Nortel Networks folder, or in a folder that you specify during the install process.
1 Put the CD with the ICSRT software into your CD drive.
2 On your computer, navigate to your CD drive and double click the Startup.exe icon.
3 Follow the prompts in the wizard to install the application.
4 When you are prompted to choose a language, use the drop down list to choose the language you want the application to use.
Click OK when you have made your selection.
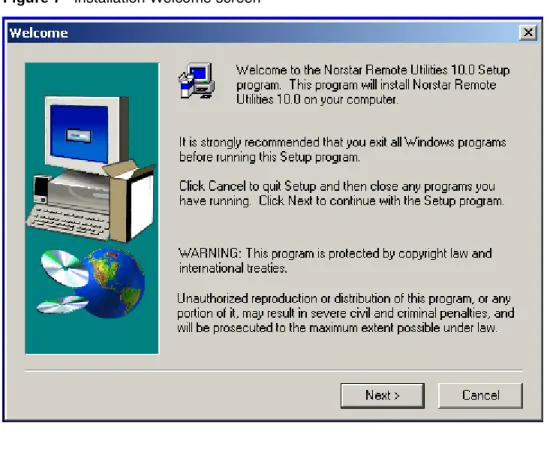
The files start downloading to your computer. Once the files download to your computer, the installation starts. The first screen you see is the welcome screen, shown in Figure 7.
Figure 7 Installation Welcome screen
5 Click Next when you are ready to proceed.
A dialog box appears asking if you want to uninstall old versions of Norstar ICS Remote Tools.
Note: This application allows you to choose whether you want to uninstall previous versions of the Norstar Remote Tools application.
30 Chapter 2 Setting up ICS Remote Tools
6 Click Yes to move forward.
7 You receive the following prompt:
8 Click Yes on the dialog box.
The following screen appears and indicates which files are being removed. Figure 8 Remove Programs From Your Computer screen check
9 When the dialog indicates that the uninstall is complete, click the OK button.
Note: If you do not uninstall previous versions of Norstar ICS Remote Tools, the new version will not install.
If you want to uninstall Norstar Manager, use the Add/Remove software option under the Windows Start button on your computer.
Do not uninstall Norstar Manager if you are managing any systems running software prior to version 2.0.
Chapter 2 Setting up ICS Remote Tools 31
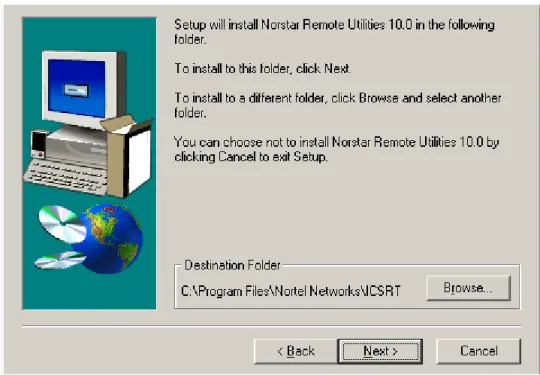
The next screen (Figure 9) prompts you to choose a destination folder.
Unless you use the Browse button to navigate to a new location, the application installs in C:\Program Files\Nortel Networks\ICSRT on your computer.
Figure 9 Choose Destination Location screen
10 Click Next.
The next screen (Figure 10) prompts you to choose a folder or to accept the default folder, Nortel Networks.
32 Chapter 2 Setting up ICS Remote Tools
11 Click Next.
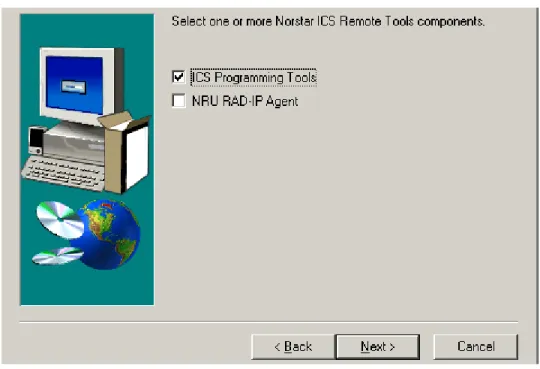
The next screen (Figure 11) prompts you to choose which Install components you want to install. ICS Programming Tools is the only one checked by default.
Figure 11 Select Install Components screen
12 Click Next.
The next screen (Figure 12) shows you information about the application and where the files will be placed on your computer. Use the Back button to move back through the wizard if you need to change anything.
Chapter 2 Setting up ICS Remote Tools 33
13 If the settings are okay, click Next. The wizard progresses through the install.
When the install is successful, a Setup Complete dialog box appears, on top of the Start Menu folder where the program files are located (Figure 13).
Figure 13 Successful installation dialog
35
Chapter 3
Setting up customers in ICSRT
This chapter provides information about the ICS Remote Tools (ICSRT) Customer Information screen and the CustomerInfo database (.mbd). The CustomerInfo.mdb file resides within a folder on your computer or on a central server. All files associated with the customer records in this database are also stored in this folder.
You can create more than one database, each of which contains one CustomerInfo.mdb file. Each database file can contain several customer records. You can have only one database per folder. You can copy this folder to make a backup of the customer information, but you cannot transfer customers from one database to another.
The sections in this chapter include: • “Using ICSRT databases” on page 35
— “Creating a database” on page 36
— “Moving between databases” on page 38
— “Copying a database” on page 39
— “Deleting a database” on page 40
— “Setting up a multi-user database on a LAN” on page 41
• “Creating a customer record” on page 42
— “Editing customer records” on page 45
— “Viewing customer records” on page 48
— “Deleting customer records” on page 49
— “Copying customer records to create new records” on page 47
Using ICSRT databases
The ICSRT database is the CustomerInfo.mdb file itself. However, this book also uses the term in reference to the folder that contains this file and all the other folders within that folder.
This section describes actions that are specific to the .mdb file.
The install wizard, by default, puts the ICSRT default files, including the folder containing the default database file, into an ICSRT folder under the Nortel Networks folder, which is located under Programming Files, which is located on your Windows installed drive.
<drive>:\Program Files\Nortel Networks\ICSRT\db
However, the person installing the application has the option of locating them elsewhere.
If you do not want to use the default database for your customer records, or if you want to create more than one database of customer records, you can create a new database, elsewhere on your computer, or on a remote server.
36 Chapter 3 Setting up customers in ICSRT
If you do not create a new database and then point the Customer Info screen to that database, any Customer records you create will be added to the default database.
Creating a database
This procedure creates an empty database at a location of your choice on your computer.
1 Open ICSRT. (Start, Nortel Networks, Norstar ICS Remote Tools XX.X, Norstar ICS Customer Info)
The Customer Info screen displays. Figure 14 Customer Info screen
Chapter 3 Setting up customers in ICSRT 37
2 On the menu, click on Database and select Create. A Create CustomerInfo Database dialog displays.
3 Click on the button beside the Database Path field. (...) A Browse for Folder dialog appears.
4 Navigate to where you want to put the database.
5 Select the location and click on OK.
The location displays in the Database Path field.
6 If the location you chose does not have a folder where you want to put the database, at the end of the entry in the Database Path field, type in
\<folder name>.
Warning: Do not connect to <installed path>\ICSRT\Template\CustomerInfo.mdb for any reason. If this file is accessed, it may become corrupted. In that situation, you need to re-install the ICSRT application.
38 Chapter 3 Setting up customers in ICSRT
7 Press OK.
If you entered a new folder name, you will be prompted to confirm that you want the system to create a new folder at the indicated location. Click OK.
The program returns to the Create CustomerInfo Database screen.
8 Ensure that the path is correct, then click OK.
A popup dialog indicates that the new database was created.
9 Click OK.
10 To open the new database, use the Change Path menu item. Refer to “Moving between databases” on page 38 for details.
Moving between databases
Use the Change Path option to move from one database to another.
1 On the Customer Info screen, click on Database and choose Change Path. A Windows Open screen appears displaying the current database path. Figure 15 Windows Open screen
2 Navigate to another database, then select CustomerInfo.mdb.
3 Click Open.
On the Customer Info screen, Current Path field shows the new path, and the list of customer records that were created in that database appear on the screen.
Warning: Do not connect to <installed path>\ICSRT\Template\CustomerInfo.mdb for any reason. If this file is accessed, it may become corrupted. In that situation, you need to re-install the ICSRT application.
Chapter 3 Setting up customers in ICSRT 39
Copying a database
If you want to copy your customer database to another location, follow the steps given below. You might use this to create a backup database or to create a local database copy of customer
information sitting in a database on a central server.
1 Have the Customer Info screen open to the database you want to copy.
2 On the Customer Info screen, click on Database and select Copy.
3 Enter the path into the Database Path field, or
click on the button beside the Database Path field. (...) to get the Browse for Folder dialog, then navigate to where you want to install the copied database,
Warning: If a database is deleted, all the customer records and all the information attached to those customer records is permanently removed.
40 Chapter 3 Setting up customers in ICSRT
When you click OK on the Browse for Folder dialog, the path fills into the Copy CustomerInfo Database dialogue.
4 If the location you chose does not have a folder where you want to put the database, at the end of the entry in the Database Path field, type in
\<folder name>.
5 Click OK.
If you entered a new folder name, you will be prompted to confirm that you want the system to create a new folder at the indicated location.
6 Click OK.
A popup dialog indicates that the database was successfully was created.
7 Click OK.
The Customer Info screen Current Path field shows the current active database location. The database you copied from becomes the backup database.
Deleting a database
To delete a database, ensure that ICSRT or any Scheduler jobs are not running, then select the database folder and delete it from your computer.
If you delete the database for the customer that was last active on the ICSRT screen, when you go back into ICSRT you will receive a message indicating that the CustomerInfo.mdb that was last used does not exist and the system will connect to the default database.
Warning: This will delete all the customer records and any information attached to those records.
Chapter 3 Setting up customers in ICSRT 41
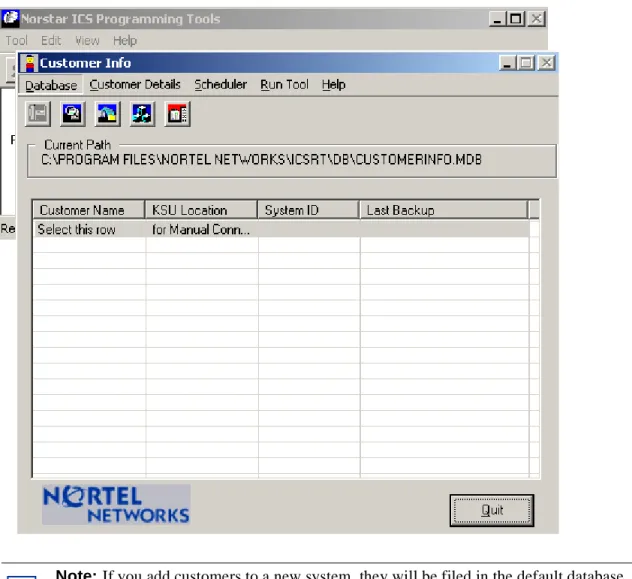
When you click on OK, the ICSRT Customer Info screen opens within the default database, as shown in Figure 16.
Figure 16 Customer Info opens in default database
Removing any other database does not have any impact on working of ICS Remote tools
application.
Setting up a multi-user database on a LAN
To use ICSRT in a local area network (LAN) configuration, you must: • set up a database folder on the LAN file server
— use the Create setting under Database to create a database on the server if one currently does not exist. (“Creating a database” on page 36).
— if you have already created customer records on one of the computers, use the Copy setting under Database to copy that database onto the server (“Copying a database” on page 39).
• install ICSRT on each computer that will be used to manage systems. Refer to “Computer hardware requirements” on page 25 for computer requirements.
• ensure the computers are connected to the LAN.
• use the ICSRT Change Path setting to point each computer to the central database. Refer to
“Moving between databases” on page 38.
Using ICSRT in multi-user mode
ICSRT operates the same in multi-user mode as it does in single-user mode. The difference is that you are using customer files from the network server. After ICSRT software is installed on each computer, indicate where the database is located on the server.
Users use the Database, Change Path setting to select the database (“Moving between databases” on page 38).
Use the Database, Refresh setting to occasionally update the database file if you know someone else is working on it with you.
Warning: Do not delete the default database file Nortel Networks/ICSRT/db/
CustomerInfo.mdb. Deleting any of the default folders may cause ICSRT to fail, and you would need to reinstall the application.
42 Chapter 3 Setting up customers in ICSRT
Creating a customer record
All information in ICSRT is associated with a customer record stored in a database file. For each Norstar system you want to monitor, you need to create a unique record through the Customer Info screen.
1 Open the ICSRT application. The Customer Info screen displays.
Figure 17 ICSRT Customer Info screen with Programming tools in background
2 Check the Current Path field to ensure you are in the database where you want to add this customer. If not, change databases. Refer to “Moving between databases” on page 38.
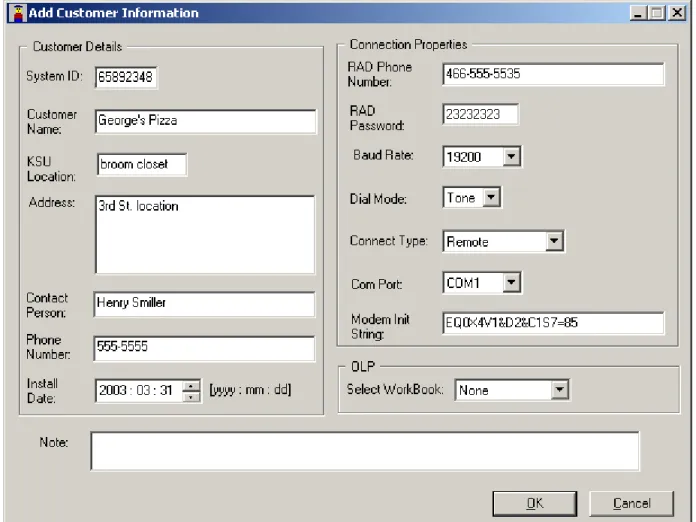
3 On the menu click on Customer Details, then select ADD. The Add Customer Information screen appears.
Note: If you add customers to a new system, they will be filed in the default database unless you create a database in another location. Refer to “Creating a database” on page 36
Chapter 3 Setting up customers in ICSRT 43
Figure 18 Add Customer Information screen
4 Fill out the fields, as required. A description of the fields is provided in the following table. Table 1 Customer and connection information
Customer information
System Identification (ID) This is a unique eight-digit number that identifies a Norstar system. On a programming set, go to Software keys, then press SHOW.
Customer Name This is the name of the company or business that owns the Norstar system. KSU location This is where the Norstar system is located on site.
Address This is the business address of the customer.
Contact This is the name of person at the customer site who coordinates Norstar programming and troubleshooting.
Phone number This is the phone number of the contact person. Remember to include an area code if the phone number is outside your local calling exchange. Install date This is the date that the Norstar system was installed, or will be installed, at
the customer site.
44 Chapter 3 Setting up customers in ICSRT
Connection Properties
RAD phone number This is the number, which will be answered by RAD at the Norstar location if you are calling into the RAD over a phone line.
RAD password This is the number ICSRT uses to identify itself as a valid user to the RAD. There is no default password, therefore, when you install a new RAD, you must use the telephone interface on site to program an eight-to-10-digit password before you can use ICSRT to connect.
COM Port This is the communication port on the personal computer that ICSRT uses to communicate with the Norstar system. You can select COM1 through COM9 if your computer supports them. COM1 is the default.
Connect type Choose the way your computer connects to the RAD: Direct, Remote (default), Operator-Assisted, Auto-Attendant.
The connection type used depends on where the Norstar system is located relative to the managing computer, and the type of assistance required at the Norstar to connect to the RAD.
Note: Operator-assisted connections do not support the scheduled backup and restore operations.
Baud rate This is the communication rate used by ICSRT to communicate with the Norstar system in an on-line session, a backup, or a restore.
The default is 19200.
If you are using a direct connection, the local baud rate at the RAD must match the baud rate chosen for the direct connection in ICSRT. Refer to “Modem settings” on page 26.
Note: The restore feature requires a baud rate greater than 1200. Dial mode The dial mode used by ICSRT can be either pulse or tone, depending on
the CO line type used by ICSRT. The default is tone.
Modem init string Some modems require special codes to allow proper communication. Refer to “Modem settings” on page 26.
Notes This is a scratch area. Type any information you want to add about the Norstar system.
Select Workbook If you created a workbook, or intend to use a workbook to configure the system, assign it here. If you have not yet created the workbook, you can assign it later.
The default value is None.
Note: When you press the OK button, OlpWorksheets\System ID directory will be created under the folder where the database is located. The
selected workbook will be copied to that directory.
Refer to “Programming a system using a workbook” on page 90. Table 1 Customer and connection information
Chapter 3 Setting up customers in ICSRT 45
5 Click on OK to save the record.
6 The record name appears in the Customer Info screen.
In the database folder, the customer record is added to CustomerInfo.mdb. Figure 19 Customer information on Customer Info screen
Editing customer records
If you need to make changes to a customer record, use the Edit setting. You will be allowed to change any field except the System ID field.
If you need to change the system ID field for a record, you would need to copy the record, but if you do this you would also lose the connection to the customer and backup files, as these are tagged by the unique System ID.
To edit customer records:
1 On the Customer Info screen, select the record you want to edit.
2 On the menu click on Customer Details, then select Edit. Refer to Figure 20.
3 Change or add the information on the Edit Customer Information screen, then click on OK. New customer record
46 Chapter 3 Setting up customers in ICSRT
Chapter 3 Setting up customers in ICSRT 47
Copying customer records to create new records
You can copy a customer record to save yourself from entering repeated data. Only the information that is unique to a system, such as the System ID is not copied.
1 On the Customer Info screen, select the record you want to copy.
2 On the menu click on Customer Details, then select Copy. The Copy Customer Information screen appears (Figure 21).
3 Enter the unique data for the new customer record.
4 Press OK to save the new record and return to the Customer Info screen. Figure 21 Copy customer information
48 Chapter 3 Setting up customers in ICSRT
Viewing customer records
If you just need to check customer record settings, without making any changes, you can use the View setting.
To view customer records:
1 On the Customer Info screen, select the record you want to view.
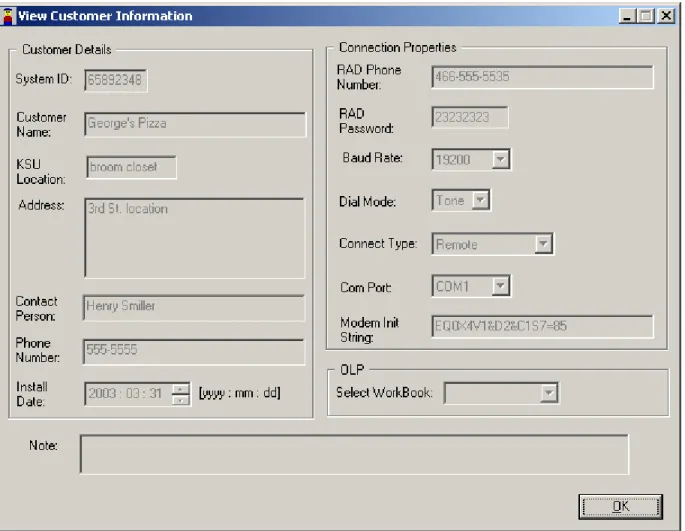
2 On the menu click on Customer Details, then select View, or double click on the entry in the Customer Info screen. The View Customer Information screen displays (Figure 22).
Note that all the fields in the View Customer Information screen are read-only.
3 Click OK to exit the screen. Figure 22 View customer information
Chapter 3 Setting up customers in ICSRT 49
Deleting customer records
You may occasionally need to delete records from a database.When you do this, all access to customer information is deleted, so ensure that this is really what you want.
To delete customer records:
1 On the Customer Info screen, select the record you want to delete.
2 On the menu click on Customer Details, then select Delete.
3 When the confirmation dialog appears, click on OK to delete the record.
Quitting the Customer Info screen
Follow these steps to log out of ICSRT.
1 Ensure that the Customer Info screen is displayed on your monitor.
2 Click the Quit button.
The following dialog displays:
3 Click OK. You will be prompted to confirm that you want to exit before closing the Customer Info dialog.
• If you need to copy the database before quitting, click the Cancel button, and perform the copy.
• If you do not need to copy the database before quitting, click OK.
Note: The For your Information dialog displays only if you have not checked Do not show this dialog in future in earlier operation(s). It will provide a prompt suggesting that you copy the database to the required location before exiting so that you will have a backup of the database.
51
Chapter 4
Connecting to a Norstar system from ICSRT
This chapter describes how to use the ICS Remote Tool (ICSRT) Connection Properties dialog to open a connection to a target Norstar system.
Before you attempt to open a connection, ensure that all the hardware connections are complete. The RAD Installation Guide describes how to install a RAD on a Norstar System.
Refer to “Explaining RAD connections” on page 16 for an overview of the different types of connections and how to use them.
Connecting to a Norstar system
There are two ways to open a connection to the RAD, both use the Connection Properties dialog: • you can open a general connection record
• you can open a record for a specific customer.
You need to open a connection to a Norstar system to use any of the tools located under the Run Tool menu item, except Select Workbook. You also need to ensure that a connection is running during scheduled backups or restores. Refer to Chapter 8, “Backing up and restoring Norstar data“, on page 107.
Connecting manually
If you are testing a RAD connection or for some other reason you want to manually enter the connection information, follow these steps:
1 On the Customer Info screen, select the first line (Select this row).
2 Click on any of the tools under Run Tool except Select Workbook. The default Connection Properties dialog appears. (Figure 23).
3 Change or enter the parameters for the connection you want to make. Refer to the following table for a description of each field.
52 Chapter 4 Connecting to a Norstar system from ICSRT
Figure 23 Connection Properties default dialog
Table 2 Connection Properties fields
Field name Values Description
Note: All fields are required for remote and operator-assisted connections. A direct connection only requires the fields marked with as asterisk (*) RAD phone
number
<area code><7-digit phone number>
This is the number, which will be answered by RAD at the Norstar location if you are calling into the RAD over a phone line.
*RAD password 8-10 digits (pre-programmed)
This is the number ICSRT uses to identify itself as a valid user to the RAD.
RAD modules are delivered with no assigned password. Therefore, when you install a new RAD, use the telephone interface on site to program a password from 8 to 10 digits long. A RAD must have a password before you can use ICSRT.
*COM Port COM1 to COM9 This is the communication port on the personal computer that ICSRT uses to communicate with the Norstar system. COM1 is the default.
*Connect type Direct
Remote (default) Operator Assisted Auto-Attendant.
The connection type used depends on where the Norstar system is located relative to the managing computer, and the type of assistance required at the Norstar to connect to the RAD. Remote is the default.
Note: Operator-assisted connections do not support the scheduled backup and restore operations.
*Baud rate 1200
2400 4800 9600 19200
This is the communication rate used by ICSRT to
communicate with the Norstar system. The default is 19200. If you are using a direct connection, the local baud rate at the RAD must match the baud rate chosen for the direct connection in ICSRT. Note that the restore process requires a minimum of 2400 baud.
Chapter 4 Connecting to a Norstar system from ICSRT 53
4 Click on Connect.
If you are connecting using one of the methods requiring attendant assistance, you need to first contact the system using the telephone attached to the modem. Refer to “Connecting to a Norstar system attendant” on page 18 for details.
5 Refer to Chapter 5, “Understanding the Remote Set tool“, on page 55, Chapter 6, “Understanding the Browser tool“, on page 63, or Chapter 8, “Backing up and restoring Norstar data“, on page 107 for descriptions of the tools that are active once the connection occurs.
6 When you complete the required activity, exit the connection to the Norstar system:
a On your desktop, click on the Norstar ICS Programming Tools screen, which sits behind the Customer Info screen.
b On the top menu of this screen, click on Tool, and select Terminate Connection.
Dial mode Tone
Pulse
The dial mode used by ICSRT. The default is tone. Modem init string <alphanumeric
characters>
Some modems require special codes to be sent to them before they are ready to communicate. Use this field to enter any special codes that ICSRT must send to your computer modem before it is ready to communicate with the RAD. Refer to “Modem settings” on page 26.
Tips: Connection Properties screen button functions Use Defaults: Returns the screen to default settings.
Use Preferences: Overwrites Connection Properties fields with information entered using Set Preference button.
Set Preference: Change the default connection properties by entering the changes, and then clicking on this button. These values now become the default values when you open the Connection Properties dialog to connect manually.
Cancel: Closes the dialog box without attempting to connect. Connect: Initiates a connection with the Norstar system. Table 2 Connection Properties fields
Field name Values Description
Note: All fields are required for remote and operator-assisted connections. A direct connection only requires the fields marked with as asterisk (*)
54 Chapter 4 Connecting to a Norstar system from ICSRT
Connecting through a customer record
You specify connection parameters when you set up the customer record (“Creating a customer record” on page 42). Consequently, when you open a tool when a customer record is selected on the Customer Info screen, the connection parameters will mirror what was entered in the Customer record.
To connect to a Norstar system through a customer record:
1 On the Customer Info screen, select the customer record for the Norstar system to which you want to connect.
2 On the menu, click on Run Tool, then select any tool except Select Workbook.
The Connection Properties dialog appears with the customer connection information filled in. Information that is not required is greyed out.
Figure 24 Connection Properties screen
3 Click on Connect.
If you are connecting using one of the methods requiring assistance at the Norstar end, you need to first contact the system using the telephone attached to the modem. Refer to
“Connecting to a Norstar system attendant” on page 18 for details.
4 Refer to Chapter 5, “Understanding the Remote Set tool“, on page 55, Chapter 6, “Understanding the Browser tool“, on page 63, or Chapter 8, “Backing up and restoring Norstar data“, on page 107 for descriptions of the tools that appear once the connection occurs.
5 When you complete the required activity, exit the connection to the Norstar system:
a On your desktop, click on the Norstar ICS Programming Tools screen, which sits behind the Customer Info screen.
55
Chapter 5
Understanding the Remote Set tool
This chapter describes the Remote Set tool, which is located under the ICS Remote Tools (ICSRT) Run Tool heading. This tool allows you to use a computer-based depiction of a Norstar M7310 or M7324 telephone to program system data.
The information in this chapter includes:
• “Explaining the Remote Set tool” on page 56
• “Accessing the Remote Set tool” on page 57
• “F1 keyboard mapping list” on page 60
Figure 25 ICSRT Remote Set tool
Remote computer
Norstar system
ICSRT
Excel Workbook tool Browser Tool
56 Chapter 5 Understanding the Remote Set tool
Explaining the Remote Set tool
Using the Remote Set tool allows you to read and modify the system data of the Norstar system to which you are connected. When your computer has an online connection with the Norstar system, any programming changes you make are either immediate, or take effect when you end the programming session.
The Remote Set tool can be used to program any Norstar system running version 2.0 or newer software.
You can use the Remote Set tool to:
• create and change programming of a Norstar system using the two simulated telephone types • copy DNs (directory numbers) and lines within a system
• remotely administer an external remote access device (RAD) on MICS systems or an internal remote access device (I-RAD) on CICS systems
• deal with direct queries of device status • access Feature **DEBUG sessions
• provide access to and remotely program Voice Mail features, except those requiring voice capability
• remotely program Station Message Detail Recording (SMDR), Door Phone and other peripherals that use the telephone for programming
Chapter 5 Understanding the Remote Set tool 57
Accessing the Remote Set tool
To access the Remote Set tool:1 Open ICSRT.
2 If you are not in the correct database, find the database where the correct customer is located. Refer to “Moving between databases” on page 38 for details.
3 Select the customer you want to connect to.
4 Click on Run Tool, and select Remote Set.
The connect screen appears, with the connect information for that system.
5 Click on Connect.
After your computer connects to the Norstar System, one of the following screens appear: Figure 26 M7310 Remote set screen display