Using VMware Horizon Client for Mac
OS X
September 2015
Horizon Client
This document supports the version of each product listed and
supports all subsequent versions until the document is
replaced by a new edition. To check for more recent editions
of this document, see
http://www.vmware.com/support/pubs
.
You can find the most up-to-date technical documentation on the VMware Web site at: http://www.vmware.com/support/
The VMware Web site also provides the latest product updates.
If you have comments about this documentation, submit your feedback to: [email protected]
Copyright © 2010–2015 VMware, Inc. All rights reserved. Copyright and trademark information.
VMware, Inc.
3401 Hillview Ave. Palo Alto, CA 94304 www.vmware.com
Contents
Using VMware Horizon Client for Mac OS X 5
1
Setup and Installation 7
System Requirements for Mac Clients 7
System Requirements for Real-Time Audio-Video 8 Smart Card Authentication Requirements 9 Supported Desktop Operating Systems 9
Preparing View Connection Server for Horizon Client 10 Install Horizon Client on Mac OS X 10
Add Horizon Client to Your Dock 11
Configuring Certificate Checking for End Users 11 Configure Advanced SSL Options 12
Configuring Log File Collection Values 13 Horizon Client Data Collected by VMware 13
2
Using URIs to Configure Horizon Client 17
Syntax for Creating vmware-view URIs 17 Examples of vmware-view URIs 20
3
Managing Remote Desktop and Application Connections 23
Connect to a Remote Desktop or Application 23 Share Access to Local Folders and Drives 26 Hide the VMware Horizon Client Window 27
Configure Horizon Client to Select a Smart Card Certificate 28 Configure Keyboard Shortcut Mappings 28
Considerations for Mapping Operating System Keyboard Shortcuts 30 Certificate Checking Modes for Horizon Client 30
Searching for Desktops or Applications 31
Select a Favorite Remote Desktop or Application 31 Switch Desktops or Applications 32
Log Off or Disconnect 33
Connecting to a View Server at Horizon Client Launch 34 Autoconnect to a Remote Desktop 34
Configure Reconnect Behavior for Remote Applications 35 Removing a View Server Shortcut from the Home Screen 35 Reordering Shortcuts 35
Roll Back a Desktop 36
4
Using a Microsoft Windows Desktop or Application on a Mac 37
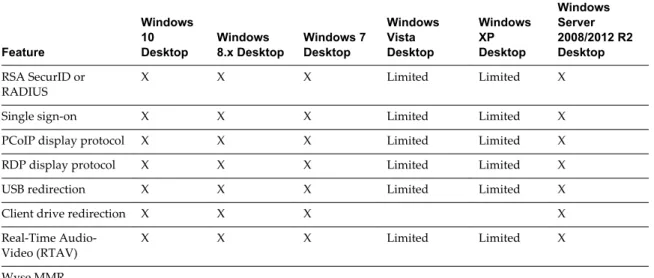
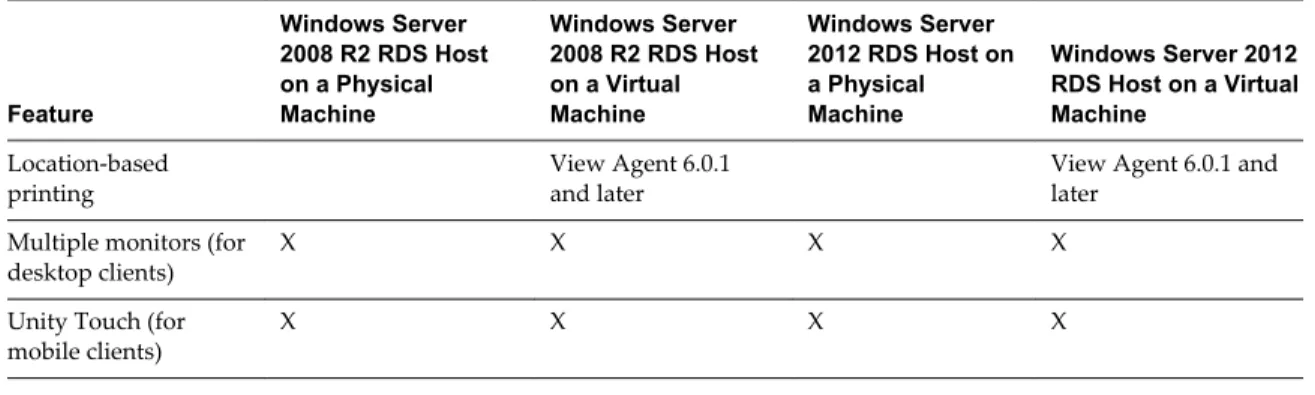
Feature Support Matrix for Mac OS X 37 Internationalization 40
Monitors and Screen Resolution 40 Connect USB Devices 40
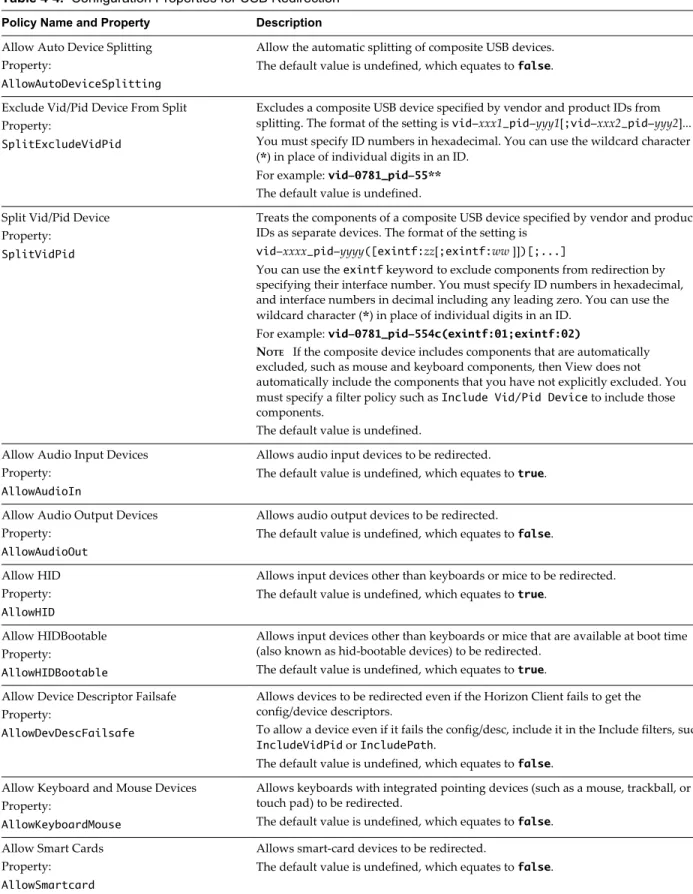
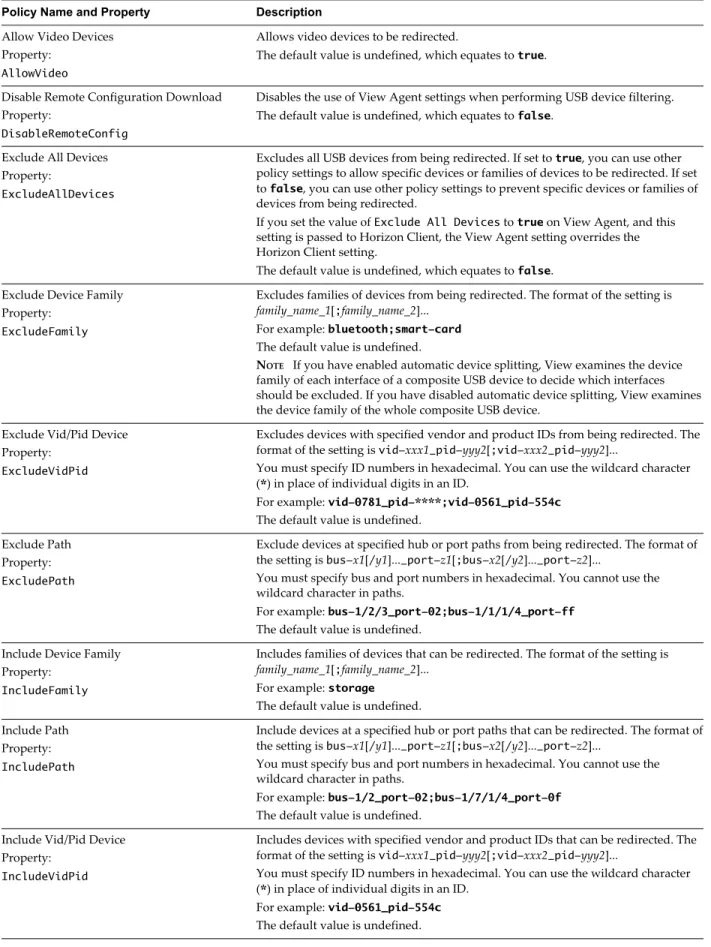
Configuring USB Redirection on a Mac OS X Client 43 USB Redirection Properties 45
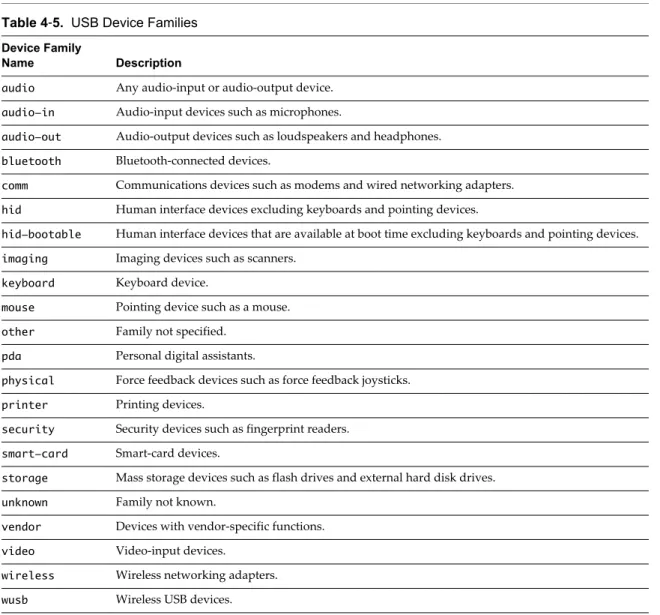
USB Device Families 47
Turn on Logging for USB Redirection 47
Using the Real-Time Audio-Video Feature for Webcams and Microphones 48 When You Can Use Your Webcam 48
Select a Default Microphone on a Mac OS X Client System 49 Configuring Real-Time Audio-Video on a Mac OS X Client 49
Configure a Preferred Webcam or Microphone on a Mac OS X Client System 50 Copying and Pasting Text and Images 52
Using Remote Applications 53
Use a Local IME with Remote Applications 53 Saving Documents in a Remote Application 54 Printing from a Remote Desktop or Application 54
Enabling Virtual Printing on the Mac OS X Client 54
Set Printing Preferences for the Virtual Printer Feature on a Remote Desktop 55 Using USB Printers 56
PCoIP Client-Side Image Cache 56
5
Troubleshooting Horizon Client 59
Reset a Remote Desktop or Application 59 Uninstalling Horizon Client 60
Using VMware Horizon Client for Mac OS X
Using VMware Horizon Client for Mac OS X provides information about installing and using VMware Horizon® Client™ software on a Mac to connect to a remote desktop or application in the datacenter. This information is intended for administrators who need to set up a View deployment that includes Mac client devices. The information is written for experienced system administrators who are familiar with virtual machine technology and datacenter operations.
Setup and Installation
1
Setting up a View deployment for Mac clients involves using certain View Connection Server configuration settings, meeting the system requirements for View servers and Mac clients, and downloading and
installing Horizon Client for Mac from the VMware Web site. This chapter includes the following topics:
n “System Requirements for Mac Clients,” on page 7
n “System Requirements for Real-Time Audio-Video,” on page 8 n “Smart Card Authentication Requirements,” on page 9 n “Supported Desktop Operating Systems,” on page 9
n “Preparing View Connection Server for Horizon Client,” on page 10 n “Install Horizon Client on Mac OS X,” on page 10
n “Add Horizon Client to Your Dock,” on page 11
n “Configuring Certificate Checking for End Users,” on page 11 n “Configure Advanced SSL Options,” on page 12
n “Configuring Log File Collection Values,” on page 13 n “Horizon Client Data Collected by VMware,” on page 13
System Requirements for Mac Clients
You can install Horizon Client for Mac OS X on all 64-bit Intel-based models that use the Mac OS X 10.6.8 or later operating system.
The Mac on which you install Horizon Client, and the peripherals it uses, must meet certain system requirements.
Model 64-bit Intel-based Mac
Memory At least 2GB of RAM
Operating systems n Mac OS X Snow Leopard (10.6.8)
n Mac OS X Lion (10.7)
n Mac OS X Mountain Lion (10.8.x) n Mac OS X Mavericks (10.9.x) n Mac OS X Yosemite (10.10.x)
n Mac OS X El Capitan (10.11)
You must install Horizon Client on Mac OS X Mountain Lion (10.8) or later to use remote applications. Remote applications do not appear in
Horizon Client if the client system is running an earlier version of OS X. NOTE Horizon Client 3.4 and later releases are not supported on Mac OS X
Snow Leopard (10.6.8) and Mac OS X Lion (10.7) operating systems.
View Connection Server, Security Server, and View Agent
Latest maintenance release of View 5.3.x and later releases
If client systems connect from outside the corporate firewall, VMware recommends that you use a security server. With a security server, client systems will not require a VPN connection.
Remote applications are available on Horizon 6.0 with View and later servers.
Display protocol for View
PCoIP or RDP
Software Requirements
for RDP Remote Desktop Connection Client for Mac from Microsoft, versions 2.0through 2.1.1. You can download this client from the Microsoft Web site.
NOTE Horizon Client for Mac OS X does not work with Microsoft Remote
Desktop 8.0 and later releases.
Smart cards See “Smart Card Authentication Requirements,” on page 9.
System Requirements for Real-Time Audio-Video
Real-Time Audio-Video works with standard webcam, USB audio, and analog audio devices, and with standard conferencing applications like Skype, WebEx, and Google Hangouts. To support Real-Time Audio-Video, your View deployment must meet certain software and hardware requirements.
View remote desktop The desktops must have View Agent 5.3 or later installed. For View Agent
5.3 desktops, the desktops must also have the corresponding Remote Experience Agent installed. For example, if View Agent 5.3 is installed, you must also install the Remote Experience Agent from View 5.3 Feature Pack 1. See the View Feature Pack Installation and Administration document for View. If you have View Agent 6.0 or later, no feature pack is required. Real-Time Audio-Video is not supported in remote applications.
Horizon Client computer
or client access device n Real-Time Audio-Video is supported on Mac OS X Mountain Lion (10.8)and later. It is disabled on all earlier Mac OS X operating systems.
n The webcam and audio device drivers must be installed, and the webcam and audio device must be operable, on the client computer. To support Real-Time Audio-Video, you do not have to install the device drivers on the desktop operating system where View Agent is installed.
Display protocol for View
PCoIP
Smart Card Authentication Requirements
Client systems that use a smart card for user authentication must meet certain requirements.
VMware recommends using a Mac OS X Mavericks (10.9) or later operating system on your client system. The following smart cards were tested:
n U.S. Department of Defense Common Access Card (CAC)
n U.S. Federal Government Personal Identity Verification (PIV), also called FIPS-201
Each client system that uses a smart card for user authentication must have the following software and hardware:
n Horizon Client
n A compatible smart card reader n Product-specific application drivers
You must also install product-specific application drivers on the remote desktops or Microsoft RDS host. For Windows 7 remote desktops, the operating system installs the related driver when you insert a smart card reader and PIV card. For Windows XP and Windows Vista remote desktops, you can install the related driver by using ActivIdentify ActivClient.
Users who authenticate with smart cards must have a smart card and each smart card must contain a user certificate. When you generate a certificate for a blank PIV card, enter the path to the server truststore file on the View Connection Server or security server host on the Crypto Provider tab in the PIV Data Generator tool. For information about creating a server truststore file, see "Configure Smart Card Authentication" in the View Administration document.
In addition to meeting these requirements for Horizon Client systems, other View components must meet certain configuration requirements to support smart cards:
n For information about configuring View servers to support smart card use, see the topic "Configure Smart Card Authentication," in the View Administration document.
NOTE Smart cards are supported only with View 5.3.2 or later servers and desktops.
All applicable CA (certificate authority) certificates for all trusted user certificates must be added to a server truststore file on the View Connection Server host or security server host. These certificates include root certificates and must include intermediate certificates if the user's smart card certificate was issued by an intermediate certificate authority.
n For information about tasks you might need to perform in Active Directory to implement smart card authentication, see the topics about preparing Active Directory for smart card authentication, in the View Installation document.
Supported Desktop Operating Systems
Administrators create virtual machines with a guest operating system and install View Agent in the guest operating system. End users can log in to these virtual machines from a client device.
For a list of the supported Windows guest operating systems, see the "Supported Operating Systems for View Agent" topic in the View 5.x or 6.x installation documentation.
Some Linux guest operating systems are also supported if you have View Agent 6.1.1 or later and
Horizon Client 3.4 or later. For information about system requirements, configuring Linux virtual machines for use in Horizon 6, and a list of supported features, see Setting Up Horizon 6 for Linux Desktops, which is part of the Horizon 6, version 6.1 documentation.
Preparing View Connection Server for Horizon Client
Administrators must perform specific tasks to enable end users to connect to remote desktops and applications.
Before end users can connect to View Connection Server or a security server and access a remote desktop or application, you must configure certain pool settings and security settings:
n If you plan to use Access Point, which is available with Horizon 6 version 6.2 or later, configure View Connection Server to work with Access Point. See Deploying and Configuring Access Point. Access Point appliances fulfill the same role that was previously played by only by View security servers.
n If you are using a security server, verify that you are using the latest maintenance releases of View Connection Server 5.3.x and View Security Server 5.3.x or later releases. See the View Installation document.
n If you plan to use a secure tunnel connection for client devices and if the secure connection is
configured with a DNS host name for View Connection Server or a security server, verify that the client device can resolve this DNS name.
To enable or disable the secure tunnel, in View Administrator, go to the Edit View Connection Server Settings dialog box and use the check box called Use secure tunnel connection to desktop.
n Verify that a desktop or application pool has been created and that the user account that you plan to use is entitled to access the pool. For View Connection Server 5.3.x, see the topics about creating desktop pools in the View Administration document. For View Connection Server 6.0 and later, see the topics about creating desktop and application pools in the Setting Up Desktop and Application Pools in View document.
IMPORTANT If end users have a Retina display and will use the High Resolution Mode client setting
while viewing their remote desktops in full screen mode, you must allocate sufficient VRAM for each Windows 7 or later remote desktop. The amount of vRAM depends on the number of monitors configured for end users and on the display resolution. To estimate the amount of vRAM you need, see the section "RAM Sizing for Specific Monitor Configurations When Using PCoIP" of the topic
"Estimating Memory Requirements for Virtual Desktops," in the View Architecture Planning document. n To use two-factor authentication with Horizon Client, such as RSA SecurID or RADIUS authentication,
you must enable this feature on View Connection Server. For more information, see the topics about two-factor authentication in the View Administration document.
Install Horizon Client on Mac OS X
End users open Horizon Client to connect to remote desktops and applications from a Mac OS X physical machine. You install Horizon Client on Mac OS X client systems from a disk image file.
Prerequisites
n Verify that the client system uses a supported operating system. See “System Requirements for Mac Clients,” on page 7.
n Verify that you can log in as an administrator on the client system.
n If you plan to use the RDP display protocol to connect to a remote desktop, verify that the Mac client system has Remote Desktop Connection Client for Mac from Microsoft, version 2.0 or later installed. n Verify that you have the URL for a download page that contains the Horizon Client installer. This URL
might be the VMware Downloads page at http://www.vmware.com/go/viewclients, or it might be the URL for a View Connection Server instance.
Procedure
1 From your Mac, browse to the URL for downloading the Horizon Client installer file.
For Horizon Client 3.0, the file name format is VMware-Horizon-View-Client-y.y.y-xxxxxx.dmg. For
Horizon Client 3.1 and later, the file name format is VMware-Horizon-Client-y.y.y-xxxxxx.dmg. xxxxxx
is the build number and y.y.y is the version number. 2 Double-click the .dmg file to open it and click Agree.
The contents of the disk image appear in a Horizon Client Finder window.
3 In the Finder window, drag the VMware Horizon View Client (Horizon Client 3.0) or VMware Horizon Client (Horizon Client 3.1 and later) icon to the Applications folder icon.
If you are not logged in as an administrator user, you are prompted for an administrator user name and password.
What to do next
Start Horizon Client and verify that you can connect to a remote desktop or application. See “Connect to a Remote Desktop or Application,” on page 23.
Add Horizon Client to Your Dock
You can add Horizon Client to your Dock just as you do with any other application.
Procedure
1 In the Applications folder, select VMware Horizon View Client (Horizon Client 3.0) or VMware Horizon Client (Horizon Client 3.1 and later).
2 Drag the VMware Horizon View Client (Horizon Client 3.0) or VMware Horizon Client ( Horizon Client 3.1 and later) icon to the Dock.
3 To configure the Dock icon to open Horizon Client at login or to show the icon in the Finder, right-click the icon on the Dock, select Options, and select the appropriate command from the context menu. When you quit Horizon Client, the application shortcut remains in the Dock.
Configuring Certificate Checking for End Users
Administrators can configure the certificate verification mode so that, for example, full verification is always performed.
Certificate checking occurs for SSL connections between View Connection Server and Horizon Client. Administrators can configure the verification mode to use one of the following strategies:
n End users are allowed to choose the verification mode. The rest of this list describes the three verification modes.
n (No verification) No certificate checks are performed.
n (Warn) End users are warned if a self-signed certificate is being presented by the server. Users can choose whether or not to allow this type of connection.
n (Full security) Full verification is performed and connections that do not pass full verification are rejected.
For details about the types of verification checks performed, see “Certificate Checking Modes for Horizon Client,” on page 30.
You can set the verification mode so that end users cannot change it. Set the "Security Mode" key in the /Library/Preferences/com.vmware.view.plist (Horizon Client 3.0)
or /Library/Preferences/com.vmware.horizon.plist (Horizon Client 3.1 and later) file on Mac clients to one
of the following values:
n 1 implements Never connect to untrusted servers.
n 2 implements Warn before connecting to untrusted servers.
n 3 implements Do not verify server identity certificates.
Configure Advanced SSL Options
You can select the security protocols that Horizon Client can use. You can also specify the cipher control string.
The advanced SSL options that you configure in Horizon Client are used to encrypt communications between Horizon Client and View Connection Server and View Agent. In Horizon Client 3.1 and later, these options are also used to encrypt the USB channel (communication between the USB service daemon and View Agent).
IMPORTANT If the only protocol you enable on the client is TLS v1.1, you must verify that TLS v1.1 is also
enabled on the remote desktop. Otherwise, USB devices cannot be redirected to the remote desktop.
Prerequisites
Verify the security protocol that the View server can use. If you configure a security protocol for
Horizon Client that is not enabled on the View server to which the client connects, an SSL error occurs and the connection fails. For information about configuring the security protocols that are accepted by View Connection Server instances, see the View Security document.
You should change the security protocols in Horizon Client only if your View administrator instructs you to do so, or if your View server does not support the current settings.
Procedure
1 Select VMware Horizon View Client > Preferences (Horizon Client 3.0) or VMware Horizon Client > Preferences (Horizon Client 3.1 and later) from the menu bar, click Security, and click Advanced. 2 To enable or disable a security protocol, select the check box next to the security protocol name.
In Horizon Client 3.0 through 3.4, TLS v1.0 and TLS v1.1 are enabled by default. In Horizon Client 3.5, TLS v1.0, TLS v1.1, and TLS v1.2 are enabled by default.
3 To change the cipher control string, replace the default string.
In Horizon Client 3.0 through 3.4, the default cipher control string is "AES:!aNULL:@STRENGTH". In Horizon Client 3.5, the default cipher control string is "!aNULL:kECDH+AES:ECDH+AES:RSA +AES:@STRENGTH".
NOTE In Horizon Client 3.1 and later, the USB service daemon adds RC4 (:RC4-SHA: +RC4) to the end
of the cipher control string when it connects to a remote desktop.
4 (Optional) If you need to revert to the default settings, click Restore Defaults. 5 Click Confirm to save your changes.
Configuring Log File Collection Values
In Horizon Client 3.1 and later, Horizon Client generates log files in the ~/Library/Logs/VMware Horizon Client directory on the Mac client. Administrators can configure the maximum number of log files and the
maximum number of days to keep log files by setting keys in
the /Library/Preferences/com.vmware.horizon.plist file on a Mac client.
Table 1‑1. plist Keys for Log File Collection
Key Description
MaxDebugLogs Maximum number of log files. The maximum value is 100. MaxDaysToKeepLogs Maximum number of days to keep log files. This value has no limit.
Files that do not match these criteria are deleted when you launch Horizon Client.
If the MaxDebugLogs or MaxDaysToKeepLogs keys are not set in the com.vmware.horizon.plist file, the
default number of log files is 5 and the default number of days to keep log files is 7.
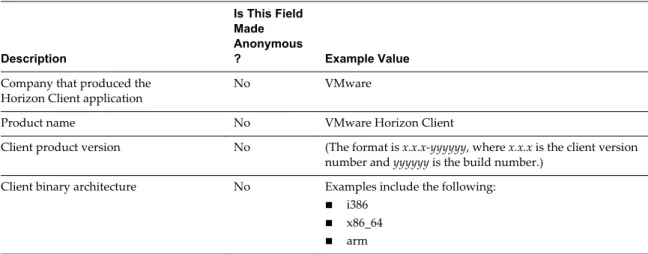
Horizon Client Data Collected by VMware
If your company participates in the customer experience improvement program, VMware collects data from certain Horizon Client fields. Fields containing sensitive information are made anonymous.
VMware collects data on the clients to prioritize hardware and software compatibility. If your company's administrator has opted to participate in the customer experience improvement program, VMware collects anonymous data about your deployment in order to improve VMware's response to customer requirements. No data that identifies your organization is collected. Horizon Client information is sent first to View Connection Server and then on to VMware, along with data from View servers, desktop pools, and remote desktops.
Although the information is encrypted while in transit to View Connection Server, the information on the client system is logged unencrypted in a user-specific directory. The logs do not contain any personally identifiable information.
The administrator who installs View Connection Server can select whether to participate in the VMware customer experience improvement program while running the View Connection Server installation wizard, or an administrator can set an option in View Administrator after the installation.
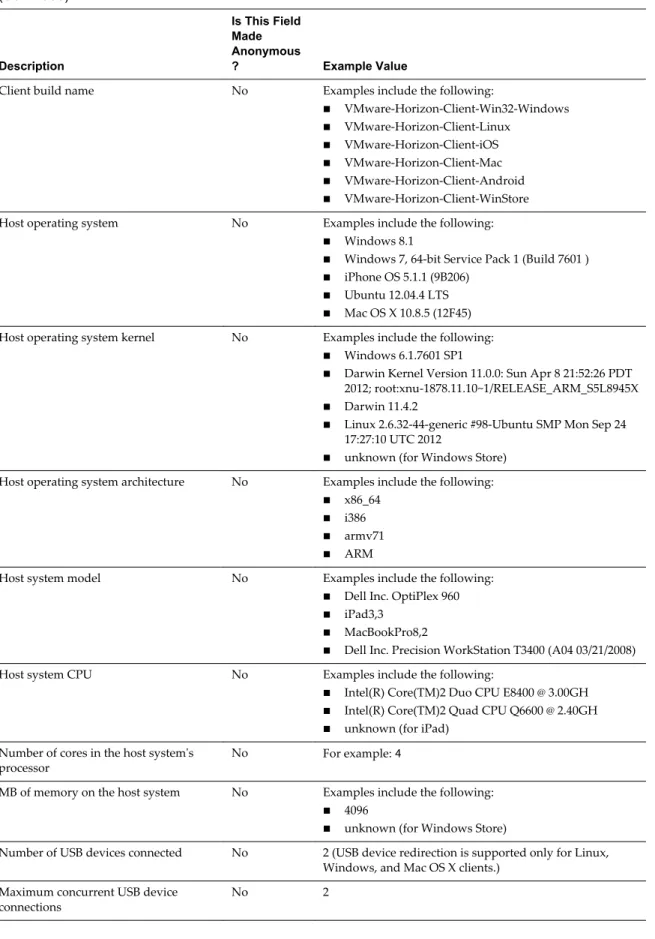
Table 1‑2. Data Collected from Horizon Clients for the Customer Experience Improvement Program
Description
Is This Field Made Anonymous
? Example Value
Company that produced the
Horizon Client application No VMware
Product name No VMware Horizon Client
Client product version No (The format is x.x.x-yyyyyy, where x.x.x is the client version number and yyyyyy is the build number.)
Client binary architecture No Examples include the following:
n i386 n x86_64 n arm
Table 1‑2. Data Collected from Horizon Clients for the Customer Experience Improvement Program (Continued)
Description
Is This Field Made Anonymous
? Example Value
Client build name No Examples include the following:
n VMware-Horizon-Client-Win32-Windows n VMware-Horizon-Client-Linux
n VMware-Horizon-Client-iOS n VMware-Horizon-Client-Mac n VMware-Horizon-Client-Android n VMware-Horizon-Client-WinStore
Host operating system No Examples include the following:
n Windows 8.1
n Windows 7, 64-bit Service Pack 1 (Build 7601 ) n iPhone OS 5.1.1 (9B206)
n Ubuntu 12.04.4 LTS n Mac OS X 10.8.5 (12F45)
Host operating system kernel No Examples include the following:
n Windows 6.1.7601 SP1
n Darwin Kernel Version 11.0.0: Sun Apr 8 21:52:26 PDT
2012; root:xnu-1878.11.10~1/RELEASE_ARM_S5L8945X
n Darwin 11.4.2
n Linux 2.6.32-44-generic #98-Ubuntu SMP Mon Sep 24
17:27:10 UTC 2012
n unknown (for Windows Store)
Host operating system architecture No Examples include the following:
n x86_64 n i386 n armv71 n ARM
Host system model No Examples include the following:
n Dell Inc. OptiPlex 960 n iPad3,3
n MacBookPro8,2
n Dell Inc. Precision WorkStation T3400 (A04 03/21/2008)
Host system CPU No Examples include the following:
n Intel(R) Core(TM)2 Duo CPU E8400 @ 3.00GH n Intel(R) Core(TM)2 Quad CPU Q6600 @ 2.40GH n unknown (for iPad)
Number of cores in the host system's
processor No For example: 4
MB of memory on the host system No Examples include the following:
n 4096
n unknown (for Windows Store)
Number of USB devices connected No 2 (USB device redirection is supported only for Linux, Windows, and Mac OS X clients.)
Maximum concurrent USB device
Table 1‑2. Data Collected from Horizon Clients for the Customer Experience Improvement Program (Continued)
Description
Is This Field Made Anonymous
? Example Value
USB device vendor ID No Examples include the following:
n Kingston n NEC n Nokia n Wacom
USB device product ID No Examples include the following:
n DataTraveler n Gamepad n Storage Drive n Wireless Mouse
USB device family No Examples include the following:
n Security
n Human Interface Device n Imaging
USB device usage count No (Number of times the device was shared)
Using URIs to Configure
Horizon Client
2
Using uniform resource identifiers (URIs), you can create a Web page or an email with links that end users click to launch Horizon Client, connect to View Connection Server, and launch a specific desktop or application with specific configuration options.
You can simplify the process of connecting to a remote desktop or application by creating Web or email links for end users. You create these links by constructing URIs that provide some or all of the following information, so that your end users do not need to supply it:
n View Connection Server address
n Port number for View Connection Server n Active Directory user name
n Domain name
n Desktop or application display name n Window size
n Actions including reset, log off, and start session n Display protocol
n Options for redirecting USB devices
To construct a URI, you use the vmware-view URI scheme with Horizon Client specific path and query parts.
NOTE You can use URIs to launch Horizon Client only if the client software is already installed on end
users' client computers.
This chapter includes the following topics:
n “Syntax for Creating vmware-view URIs,” on page 17 n “Examples of vmware-view URIs,” on page 20
Syntax for Creating vmware-view URIs
Syntax includes the vmware-view URI scheme, a path part to specify the desktop or application, and,
optionally, a query to specify desktop or application actions or configuration options.
URI Specification
Use the following syntax to create URIs for launching Horizon Client:
The only required element is the URI scheme, vmware-view. For some versions of some client operating
systems, the scheme name is case-sensitive. Therefore, use vmware-view.
IMPORTANT In all parts, non-ASCII characters must first be encoded according to UTF-8 [STD63], and then
each octet of the corresponding UTF-8 sequence must be percent-encoded to be represented as URI characters.
For information about encoding for ASCII characters, see the URL encoding reference at http://www.utf8-chartable.de/.
authority-part Specifies the server address and, optionally, a user name, a non-default port
number, or both. Note that underscores (_) are not supported in server names. Server names must conform to DNS syntax.
To specify a user name, use the following syntax:
user1@server-address
Note that you cannot specify a UPN address, which includes the domain. To specify the domain, you can use the domainName query part in the URI. To specify a port number, use the following syntax:
server-address:port-number
path-part Specifies the desktop or application. Use the desktop display name or
application display name. This name is the one specified in View Administrator when the desktop or application pool was created. If the display name has a space in it, use the %20 encoding mechanism to represent the space.
query-part Specifies the configuration options to use or the desktop or application
actions to perform. Queries are not case-sensitive. To use multiple queries, use an ampersand (&) between the queries. If queries conflict with each other, the last query in the list is used. Use the following syntax: query1=value1[&query2=value2...]
Supported Queries
This topic lists the queries that are supported for this type of Horizon Client. If you are creating URIs for multiple types of clients, such as desktop clients and mobile clients, see the Using VMware Horizon Client guide for each type of client system.
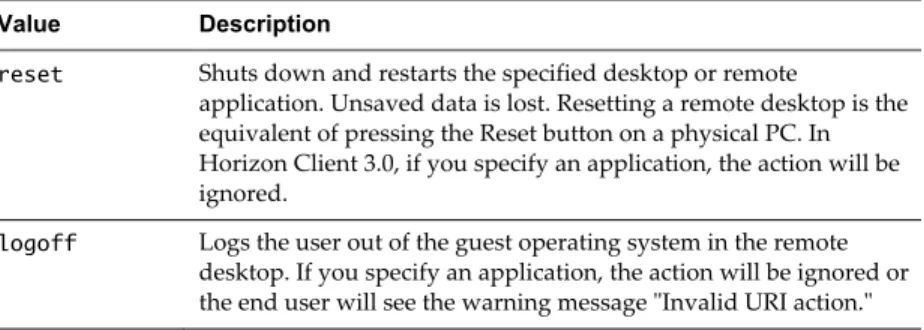
action Table 2‑1. Values That Can Be Used with the action Query
Value Description
browse Displays a list of available desktops and applications hosted on the specified server. You are not required to specify a desktop or application when using this action.
If you use the browse action and specify a desktop or application, the desktop or application is highlighted in the list of available items.
start-session Launches the specified desktop or application. If no action query is provided and the desktop or application name is provided,
Table 2‑1. Values That Can Be Used with the action Query (Continued)
Value Description
reset Shuts down and restarts the specified desktop or remote
application. Unsaved data is lost. Resetting a remote desktop is the equivalent of pressing the Reset button on a physical PC. In Horizon Client 3.0, if you specify an application, the action will be ignored.
logoff Logs the user out of the guest operating system in the remote desktop. If you specify an application, the action will be ignored or the end user will see the warning message "Invalid URI action." connectUSBOnInsert Connects a USB device to the foreground virtual desktop when you plug in
the device. This query is implicitly set if you specify the unattended query.
To use this query, you must set the action query to start-session or else not have an action query. Valid values are true and false. An example of the syntax is connectUSBOnInsert=true.
connectUSBOnStartup Redirects all USB devices that are currently connected to the client system to
the desktop. This query is implicitly set if you specify the unattended query.
To use this query, you must set the action query to start-session or else not have an action query. Valid values are true and false. An example of the syntax is connectUSBOnStartup=true.
desktopLayout Sets the size of the window that displays a remote desktop. To use this
query, you must set the action query to start-session or else not have an
action query.
Table 2‑2. Valid Values for the desktopLayout Query
Value Description
fullscreen Full screen on all connected external monitors. This is the default.
windowLarge Large window.
windowSmall Small window.
WxH Custom resolution, where you specify the width by height, in pixels. An example of the syntax is
desktopLayout=1280x800.
desktopProtocol For remote desktops, valid values are RDP and PCoIP. For example, to specify PCoIP, use the syntax desktopProtocol=PCoIP. For remote applications, regardless of the setting, the application sessions use PCoIP.
domainName The NETBIOS domain name associated with the user who is connecting to
the remote desktop or application. For example, you would use mycompany
rather than mycompany.com.
Examples of vmware-view URIs
You can create hypertext links or buttons with the vmware-view URI scheme and include these links in email
or on a Web page. Your end users can click these links to, for example, launch a particular remote desktop with the startup options you specify.
URI Syntax Examples
Each URI example is followed by a description of what the end user sees after clicking the URI link. 1 vmware-view://view.mycompany.com/Primary%20Desktop?action=start-session
Horizon Client is launched and connects to the view.mycompany.com server. The login box prompts the
user for a user name, domain name, and password. After a successful login, the client connects to the desktop whose display name is displayed as Primary Desktop, and the user is logged in to the guest operating system.
NOTE The default display protocol and window size are used. The default display protocol is PCoIP.
The default window size is full screen.
2 vmware-view://view.mycompany.com:7555/Primary%20Desktop
This URI has the same effect as the previous example, except that it uses the nondefault port of 7555 for View Connection Server. (The default port is 443.) Because a desktop identifier is provided, the desktop is launched even though the start-session action is not included in the URI.
3 vmware-view://[email protected]/Finance%20Desktop?desktopProtocol=PCoIP
Horizon Client is launched and connects to the view.mycompany.com server. In the login box, the User
name text box is populated with the name fred. The user must supply the domain name and password. After a successful login, the client connects to the desktop whose display name is displayed as Finance Desktop, and the user is logged in to the guest operating system. The connection uses the PCoIP display protocol.
4 vmware-view://[email protected]/Finance%20Desktop?domainName=mycompany
Horizon Client is launched and connects to the view.mycompany.com server. In the login box, the User
name text box is populated with the name fred, and the Domain text box is populated with
mycompany. The user must supply only a password. After a successful login, the client connects to the desktop whose display name is displayed as Finance Desktop, and the user is logged in to the guest operating system.
5 vmware-view://view.mycompany.com/
Horizon Client is launched, and the user is taken to the login prompt for connecting to the
view.mycompany.com server.
6 vmware-view://view.mycompany.com/Primary%20Desktop?action=reset
Horizon Client is launched and connects to the view.mycompany.com server. The login box prompts the
user for a user name, domain name, and password. After a successful login, Horizon Client displays a dialog box that prompts the user to confirm the reset operation for Primary Desktop. After the reset occurs, depending on the type of client, the user might see a message indicating whether the reset was successful.
NOTE This action is available only if the View administrator has enabled this feature for end users.
7 vmware-view://
Horizon Client is launched, and the user is taken to the page for entering the address of a View Connection Server instance.
HTML Code Examples
You can use URIs to make hypertext links and buttons to include in emails or on Web pages. The following examples show how to use the URI from the first URI example to code a hypertext link that says, Test Link, and a button that says, TestButton.
<html> <body>
<a href="vmware-view://view.mycompany.com/Primary%20Desktop?action=start-session">Test Link</a><br>
<form><input type="button" value="TestButton" onClick="window.location.href=
'vmware-view://view.mycompany.com/Primary%20Desktop?action=start-session'"></form> <br> </body>
</html>
Managing Remote Desktop and
Application Connections
3
Use Horizon Client to connect to View Connection Server or a security server and log in to or off of a remote desktop, and use remote applications. For troubleshooting purposes, you can also reset remote desktops and applications.
Depending on how the administrator configures policies for remote desktops, end users might be able to perform many operations on their desktops.
This chapter includes the following topics:
n “Connect to a Remote Desktop or Application,” on page 23 n “Share Access to Local Folders and Drives,” on page 26 n “Hide the VMware Horizon Client Window,” on page 27
n “Configure Horizon Client to Select a Smart Card Certificate,” on page 28 n “Configure Keyboard Shortcut Mappings,” on page 28
n “Certificate Checking Modes for Horizon Client,” on page 30 n “Searching for Desktops or Applications,” on page 31
n “Select a Favorite Remote Desktop or Application,” on page 31 n “Switch Desktops or Applications,” on page 32
n “Log Off or Disconnect,” on page 33
n “Connecting to a View Server at Horizon Client Launch,” on page 34 n “Autoconnect to a Remote Desktop,” on page 34
n “Configure Reconnect Behavior for Remote Applications,” on page 35 n “Removing a View Server Shortcut from the Home Screen,” on page 35 n “Reordering Shortcuts,” on page 35
n “Roll Back a Desktop,” on page 36
Connect to a Remote Desktop or Application
After connecting to a View server, you can use the remote desktops and applications that you are authorized to use.
Before you have end users access remote desktops and applications, test that you can connect to remote desktop or application from the client system.
Prerequisites
n Obtain the credentials you need to log in, such as a user name and password, RSA SecurID user name and passcode, RADIUS authentication user name and passcode, or smart card personal identification number (PIN).
n Obtain the NETBIOS domain name for logging in. For example, you would use mycompany rather than mycompany.com.
n Perform the administrative tasks described in “Preparing View Connection Server for Horizon Client,” on page 10.
n If you are outside the corporate network and are not using a security server to access the remote desktop, verify that your client device is set up to use a VPN connection and turn that connection on. IMPORTANT VMware recommends using a security server rather than a VPN.
n Verify that you have the fully qualified domain name (FQDN) of the server that provides access to the remote desktop or application. Note that underscores (_) are not supported in server names. You also need the port number if the port is not 443.
n If you plan to use the RDP display protocol to connect to a remote desktop, verify that the AllowDirectRDP View Agent group policy setting is enabled.
n If your administrator has allowed it, you can configure the certificate checking mode for the SSL certificate that the View server presents. See “Certificate Checking Modes for Horizon Client,” on page 30.
n If you are using smart card authentication, you can configure Horizon Client to automatically use a local certificate or the certificate on your smart card. See “Configure Horizon Client to Select a Smart Card Certificate,” on page 28.
n If end users are allowed to use the Microsoft RDP display protocol, verify that the client system has Remote Desktop Connection Client for Mac from Microsoft, version 2.0 or later. You can download this client from the Microsoft Web site.
Procedure
1 If a VPN connection is required, turn on the VPN.
2 In the Applications folder, double-click VMware Horizon View Client (Horizon Client 3.0) or VMware Horizon Client (Horizon Client 3.1 and later).
3 Click Continue to start remote desktop USB and printing services, or click Cancel to use Horizon Client without remote desktop USB and printing services.
If you click Continue, you must provide system credentials. If you click Cancel, you can enable remote desktop USB and printing services later.
NOTE The prompt to start remote desktop USB and printing services appears the first time you launch
Horizon Client. It does not appear again, regardless of whether you click Cancel or Continue. 4 Click the Add Server (Horizon Client 3.0) or New Server (Horizon Client 3.1 and later) icon on the
Horizon Client Home screen.
5 Type the server name and a port number if required, and click Continue (Horizon Client 3.0) or Connect (Horizon Client 3.1 and later).
An example using a nondefault port is view.company.com:1443.
6 If you are prompted for RSA SecurID credentials or RADIUS authentication credentials, type the user name and passcode and click Login.
7 Enter your user name and password, select a domain, and click Login.
You might see a message that you must confirm before the login dialog box appears.
8 If the desktop security indicator turns red and a warning message appears, respond to the prompt. Usually, this warning means that View Connection Server did not send a certificate thumbprint to the client. The thumbprint is a hash of the certificate public key and is used as an abbreviation of the public key.
9 (Optional) If multiple display protocols are configured for a remote desktop, configure the protocol to use by selecting the desktop name and pressing Control-click on the Apple keyboard, or click the Settings button (gear icon) in the upper right corner of the desktop and application window and select the desktop name in the left pane of the Settings dialog box.
If you press Control-click, you select the display protocol from the context menu. If you open the Settings dialog box, you select the display protocol from the Connect Via drop-down menu. The Connect Via drop-down menu is available only in Horizon Client 3.5 and later.
The default display protocol is PCoIP.
10 Double-click a remote desktop or application to connect.
If you are connecting to a session-based remote desktop, which is hosted on a Microsoft RDS host, and if the desktop is already set to use a different display protocol, you will not be able to connect
immediately. You will be prompted to either use the protocol that is currently set or have the system log you off of the remote operating system so that a connection can be made with the protocol you selected.
NOTE In Horizon Client 3.2 and later, if you are entitled to only one remote desktop on the View
server, Horizon Client automatically connects you to that desktop. After you are connected, the client window appears.
If you have Horizon Client 3.4 or later, the Sharing dialog box might appear. From the Sharing dialog box, you can allow or deny access to files on your local system. For more information, see “Share Access to Local Folders and Drives,” on page 26.
If Horizon Client cannot connect to the remote desktop or application, perform the following tasks: n Determine whether View Connection Server is configured not to use SSL. Horizon Client requires SSL
connections. Check whether the global setting in View Administrator for the Use SSL for client connections check box is deselected. If so, you must either select the check box, so that SSL is used, or set up your environment so that clients can connect to an HTTPS enabled load balancer or other intermediate device that is configured to make an HTTP connection to View Connection Server. n Verify that the security certificate for View Connection Server is working properly. If it is not, in View
Administrator, you might also see that the View Agent on desktops is unreachable.
n Verify that the tags set on the View Connection Server instance allow connections from this user. See the View Administration document.
n Verify that the user is entitled to access the desktop or application. See the Setting Up Desktop and Application Pools in View document.
n If you are using the RDP display protocol to connect to a remote desktop, verify that the client computer allows remote desktop connections.
Share Access to Local Folders and Drives
You can configure Horizon Client to share folders and drives on your local system with remote desktops and applications. Drives can include mapped drives and USB storage devices. This feature is called client drive redirection.
Client drive redirection is a Tech Preview feature in Horizon Client 3.4 . It is a fully supported feature in Horizon Client 3.5 and later.
In a Windows remote desktop, shared folders and drives appear in the Other section in the Computer folder. In a remote application, such as Notepad, you can browse to and open a file in a shared folder or drive. The folders and drives you select for sharing appear in the file system as network drives that use the naming format name on MACHINE-NAME.
You do not need to be connected to a remote desktop or application to configure client drive redirection settings. The settings apply to all your remote desktops and applications. That is, you cannot configure the settings so that local client folders are shared with one remote desktop or application but not with other remote desktops or applications.
Prerequisites
To share folders and drives with a remote desktop or application, you must have Horizon Client 3.4 or later and your View administrator must have enabled the client drive redirection feature for the remote desktop or application.
To use the client drive redirection feature, you must install View Agent 6.1.1 or later. The View Agent Client Drive Redirection option must be enabled. For more information, see the Setting Up Desktop and Application Pools in View document.
Procedure
1 Open the Preferences dialog box with the Sharing panel displayed.
Option Description From the desktop and application
selection window
Select VMware Horizon Client > Preferences and click Sharing.
From the Sharing dialog box that appears when you connect to a desktop or application
Click the Preferences > Sharing link in the dialog box.
From within a desktop OS Select VMware Horizon Client > Preferences from the menu bar and click
Sharing. 2 Configure the client drive redirection settings.
Option Action Share a specific folder or drive with
remote desktops and applications
Click the plus (+) button, browse to and select the folder or drive to share, and click Add.
NOTE You cannot share a folder on a USB device if the device is already
connected to a remote desktop or application with the USB redirection feature.
Stop sharing a specific folder or drive
Select the folder or drive in the Folder list and click the minus (-) button.
Allow remote desktops and applications access to files in your home directory
Option Action Share USB storage devices with
remote desktops and applications
Select the Allow access to removable storage check box. The client drive redirection feature automatically shares all USB storage devices inserted in your client system and all FireWire and Thunderbolt-connected external drives. You do not need to select a specific device to share.
NOTE USB storage devices already connected to a remote desktop or
application with the USB redirection feature are not shared.
If this check box is deselected, you can use the USB redirection feature to connect USB storage devices to remote desktops and applications.
Do not show the Sharing dialog box when you connect to a remote desktop or application
Select the Do not show dialog when connecting to a desktop or
application check box.
If this check box is deselected, the Sharing dialog box appears the first time you connect to a desktop or application after you connect to a server. For example, if you log in to a server and connect to a desktop, you see the Sharing dialog box. If you then connect to another desktop or application, you do not see the dialog box again. To see the dialog box again, you must disconnect from the server and then log in again.
What to do next
Verify that you can see the shared folders from within the remote desktop or application:
n From within a Windows remote desktop, open Windows Explorer, click Computer, and look in the Other section.
n From within a remote application, if applicable, select File > Open or File > Save As and navigate to the folder or drive, which appears in the file system as a network drive that uses the naming format
folder-name on MACHINE-NAME.
Hide the VMware Horizon Client Window
You can hide the VMware Horizon Client window after you launch a remote desktop or application. In Horizon Client 3.1 or later, you can hide the VMware Horizon Client window after you launch a remote desktop or application. You can also set a preference to always hide the VMware Horizon Client window after remote desktop or application launch.
Procedure
n To hide the VMware Horizon Client window after you launch a remote desktop or application, click the Close button in the corner of the VMware Horizon Client window.
The VMware Horizon Client icon remains in the Dock.
n To set a preference to always hide the VMware Horizon Client window after remote desktop or application launch, perform these steps before you connect to a View server.
a Select VMware Horizon Client > Preferences from the menu bar and click General in the Preferences dialog box.
b Select Hide client window after desktop/application launched. c Close the Preferences dialog box.
Your changes take effect when the dialog box is closed.
n To show the VMware Horizon Client window after it has been hidden, select Window > Open Selection Window from the menu bar, or right-click the VMware Horizon Client icon in the Dock and select Show All Windows.
Configure Horizon Client to Select a Smart Card Certificate
In Horizon Client 3.2 and later, you can configure Horizon Client to select a local certificate or the certificate on a smart card when you authenticate to a View server by setting a preference. If this preference is not set (the default), you must manually select a certificate.
Prerequisites
For this setting to take effect, smart card authentication must be configured on the View server and only one certificate must be available on your client system or smart card. If you have multiple certificates,
Horizon Client always prompts you to select a certificate, regardless of how this preference is set.
Procedure
1 Before you connect to a View server, select VMware Horizon Client > Preferences from the menu bar. 2 Click General in the Preferences dialog box.
3 Select Automatically select certificate. 4 Close the Preferences dialog box.
Your changes take effect when the dialog box is closed.
Configure Keyboard Shortcut Mappings
In Horizon Client 3.2 and later, you can customize how remote desktops and applications interpret Apple keyboard shortcuts by configuring keyboard shortcut mappings. You can create different keyboard shortcut mappings for remote desktops and remote applications.
When you create a keyboard mapping, you map an Apple keyboard shortcut to a Windows keyboard shortcut or action. A keyboard shortcut consists of one or more key modifiers, such as Control and Shift, and a key code. A key code can be any key on your keyboard, except for a modifier key. The available actions depend on whether the mapping applies to remote desktops or remote applications. Examples of actions include Toggle Fullscreen Mode, Quit Application, and Disabled. When you press a mapped keyboard shortcut on your Apple keyboard, the corresponding Windows keyboard shortcut or action occurs in the remote desktop or application.
Prerequisites
If you plan to map an operating system keyboard shortcut, see “Considerations for Mapping Operating System Keyboard Shortcuts,” on page 30.
Procedure
1 Select VMware Horizon Client > Preferences and click Keyboard.
2 Click the Desktop tab to configure keyboard shortcut mappings for remote desktops, or click the Applications tab to configure keyboard shortcut mappings for remote applications.
3 Configure the keyboard shortcut mappings.
Option Action Delete a keyboard shortcut
mapping
Select the mapping and click the minus (-) button.
Add a keyboard shortcut mapping a Click the plus (+) button.
b Specify the Apple keyboard shortcut sequence by clicking one or more keyboard modifiers and typing a key code in the text box. You can also select a key from the drop-down menu. The From: field shows the keyboard shortcut that you created.
c Specify the corresponding Windows keyboard shortcut sequence by clicking one or more keyboard modifiers and typing a key code in the text box. You can also select a key from the drop-down menu. The To: field shows the keyboard shortcut that you created.
d Click OK to save your changes.
Modify a keyboard shortcut mapping
Double-click the mapping and make your changes.
n To modify the Apple keyboard shortcut sequence, click one or more
keyboard modifiers and typing a key code in the text box. You can also select a key from the drop-down menu.
n To modify the corresponding Windows keyboard shortcut sequence,
click one or more keyboard modifiers and typing a key code in the text box. You can also select a key from the drop-down menu.
n To add or modify an action, select Client action and select an action
from the drop-down menu. Click OK to save your changes.
Map a keyboard shortcut to an action
a Click the plus (+) button.
b Specify the Apple keyboard shortcut sequence by clicking one or more keyboard modifiers and typing a key code in the text box. You can also select a key from the drop-down menu. The From: field shows the keyboard shortcut that you created.
c Select Client action and select an action from the drop-down menu. d Click OK to save your changes.
Disable a keyboard shortcut mapping
When you disable a keyboard shortcut mapping, Horizon Client does not send the Apple keyboard shortcut to the remote desktop or application. a Click the plus (+) button.
b Specify the Apple keyboard shortcut sequence by clicking one or more keyboard modifiers and typing a key code in the text box. You can also select a key from the drop-down menu.
The From: field shows the keyboard shortcut that you created. c Select Client action and select Disabled from the drop-down menu. d Click OK to save your changes.
Restore the default mappings Click Restore Defaults and click Restore. Any changes that you made to the default keyboard shortcut mappings are deleted and the default mappings are restored.
4 Close the Preferences dialog box.
Your keyboard mapping changes take effect immediately. You do not need to restart open remote desktops or applications to see the changes take effect.
Considerations for Mapping Operating System Keyboard Shortcuts
OS X and Windows both include default keyboard shortcuts. For example, Tab and Command-Space bar are common keyboard shortcuts on OS X systems and Ctrl+Esc and Alt+Enter are common keyboard shortcuts on Windows systems. If you attempt to map one of these operating system keyboard shortcuts in Horizon Client, the behavior of the shortcut on your Mac client system and in the remote desktop or application can be unpredictable.
n If you map an OS X keyboard shortcut, how the shortcut behaves on your Mac client system depends on how OS X manages the shortcut. For example, the keyboard shortcut might trigger an action in OS X and Horizon Client might not respond to the shortcut. Alternatively, the keyboard shortcut might trigger an action in both OS X and Horizon Client.
n Before you map an OS X keyboard shortcut in Horizon Client, you must disable the shortcut in System Preferences on your Mac client system. Not all OS X keyboard shortcuts can be disabled.
n If you map a Windows keyboard shortcut in Horizon Client, the mapped action occurs when you use the shortcut in the remote desktop or application.
n For remote applications, Windows shortcuts that include the Windows key are disabled by default and do not appear on the Horizon Client Keyboard Preferences dialog box. If you create a mapping for one of these disabled keyboard shortcuts, the shortcut appears in the Keyboard Preferences dialog box. For a list of the default OS X keyboard shortcuts, go to the Apple support website (
http://support.apple.com). For a list of the default Windows shortcuts, go to the Microsoft Windows website (http://windows.microsoft.com).
Certificate Checking Modes for Horizon Client
Administrators and sometimes end users can configure whether client connections are rejected if any or some server certificate checks fail.
Certificate checking occurs for SSL connections between View Connection Server and Horizon Client. Certificate verification includes the following checks:
n Is the certificate intended for a purpose other than verifying the identity of the sender and encrypting server communications? That is, is it the correct type of certificate?
n Has the certificate expired, or is it valid only in the future? That is, is the certificate valid according to the computer clock?
n Does the common name on the certificate match the host name of the server that sends it? A mismatch can occur if a load balancer redirects Horizon Client to a server that has a certificate that does not match the host name entered in Horizon Client. Another reason a mismatch can occur is if you enter an IP address rather than a host name in the client.
n Is the certificate signed by an unknown or untrusted certificate authority (CA)? Self-signed certificates are one type of untrusted CA.
To pass this check, the certificate's chain of trust must be rooted in the device's local certificate store. NOTE For instructions about distributing a self-signed root certificate and installing it on Mac OS X client
systems, see the Advanced Server Administration document for the Mac OS X Server you are using, available from the Apple Web site.
In addition to presenting a server certificate, View Connection Server also sends a certificate thumbprint to Horizon Client. The thumbprint is a hash of the certificate public key and is used as an abbreviation of the public key. If the View server does not send a thumbprint, you see a warning that the connection is untrusted.
If your administrator has allowed it, you can set the certificate checking mode. Select VMware Horizon View Client > Preferences (Horizon Client 3.0) or VMware Horizon Client > Preferences (Horizon Client 3.1 and later) from the menu bar. You have three choices:
n Never connect to untrusted servers. If any of the certificate checks fails, the client cannot connect to the server. An error message lists the checks that failed.
n Warn before connecting to untrusted servers. If a certificate check fails because the server uses a self-signed certificate, you can click Continue to ignore the warning. For self-self-signed certificates, the certificate name is not required to match the View Connection Server name you entered in Horizon Client.
n Do not verify server identity certificates. This setting means that View does not perform any certificate checking.
If the certificate checking mode is set to Warn, you can still connect to a View Connection Server instance that uses a self-signed certificate.
If an administrator later installs a security certificate from a trusted certificate authority, so that all certificate checks pass when you connect, this trusted connection is remembered for that specific server. In the future, if that server ever presents a self-signed certificate again, the connection fails. After a particular server presents a fully verifiable certificate, it must always do so.
Searching for Desktops or Applications
After you connect to a View server, the available desktops and applications on that server appear on the desktop and application selection window. You can search for a particular desktop or application by typing in the window.
When you begin to type, Horizon Client highlights the first matching desktop or application name. To connect to a highlighted desktop or application, press the Enter key. If you continue to type after the first match is found, Horizon Client continues to search for matching desktops and applications. If
Horizon Client finds multiple matching desktops or applications, you can press the Tab key to switch to the next match. If you stop typing for two seconds and then begin to type again, Horizon Client assumes that you are starting a new search.
Select a Favorite Remote Desktop or Application
You can select remote desktops and applications as favorites. Favorites are identified by a star. The star helps you quickly find your favorite desktops and applications. Your favorite selections are saved, even after you log off from the server.
Prerequisites
Obtain the credentials you need to connect to the server, such as a user name and password or RSA SecurID and passcode.
Procedure
1 On the Horizon Client Home screen, double-click the server icon.
2 If prompted, supply your RSA user name and passcode, your Active Directory user name and password, or both.
3 Perform these steps to select or deselect a desktop or application as a favorite.
Option Description
Select a favorite Select the desktop or application shortcut, press Control-click, and select
Mark as Favorite from the context menu. A star appears in the upper right
corner of the desktop or application shortcut.
Deselect a favorite Select the desktop or application shortcut, press Control-click, and deselect
Mark as Favorite from the context menu. A star no longer appears in the
upper right corner of the desktop or application shortcut.
4 (Optional) To display only favorite desktops or applications, click the Favorites button (star icon) in the upper right corner of the desktop and application selection window.
You can click the Favorites button again to display all the available desktops and applications.
Switch Desktops or Applications
If you are connected to a remote desktop, you can switch to another desktop. You can also connect to remote applications while you are connected to a remote desktop.
Procedure
u Select a remote desktop or application from the same server or a different server.
Option Action Choose a different desktop or
application on the same server
Perform one of the following actions:
n To keep the current desktop and also connect to another remote
desktop, select Window > VMware Horizon View Client ( Horizon Client 3.0) or Window > VMware Horizon Client ( Horizon Client 3.1 and later) from the menu bar and double-click the shortcut for the other desktop. That desktop opens in a new window so that you have multiple desktops open. You can switch between desktops from the Window menu on the menu bar.
n To close the current desktop and connect to another desktop, select Connection > Disconnect from the menu bar and double-click the
shortcut for the other desktop.
n To open another application, double-click the shortcut for the other
application. That application opens in a new window. You can have multiple applications open and you can switch between them by clicking in an application window.
Choose a different desktop or application on a different server
If you are entitled to multiple desktops or applications, so that the desktop and application selection window is open, click the Disconnect from
Server button in the left side of the toolbar in the desktop and application
selection window and disconnect from the server. If you are entitled to only one desktop or application, and the desktop and application selection window is not open, you can select File > Disconnect from Server from the menu bar and then connect to a different server.
Log Off or Disconnect
With some configurations, if you disconnect from a remote desktop without logging off, applications in the desktop can remain open. You can also disconnect from a server and leave remote applications running. Even if you do not have a remote desktop open, you can log off of the remote desktop operating system. Using this feature has the same result as sending Ctrl+Alt+Del to the desktop and then clicking Log Off. NOTE The Windows key combination Ctrl+Alt+Del is not supported in remote desktops. To use the
equivalent of pressing Ctrl+Alt+Del, select Connection > Send Ctrl-Alt-Del from the menu bar. Alternatively, you can press Fn-Control-Option-Delete on an Apple keyboard.
Procedure
n Disconnect from a remote desktop without logging off.
Option Action
Disconnect and quit Horizon Client Horizon Client 3.0 :
n Click the Close button in the corner of the window or select File > Close from the menu bar.
Horizon Client 3.1 and later:
a Click the Close button in the corner of the window or select File >
Close from the menu bar.
b Select VMware Horizon Client > Quit VMware Horizon Client from the menu bar.
Disconnect and remain in Horizon Client
Click the Disconnect button in the toolbar or select Connection >
Disconnect from the menu bar.
NOTE Your View administrator can configure your desktop to automatically log off when
disconnected. In that case, any open applications in your desktop are stopped. n Log off and disconnect from a remote desktop.
Option Action
From within the desktop OS Use the Windows Start menu to log off.
From the menu bar Select Connection > Log Off from the menu bar.
If you use this procedure, files that are open on the remote desktop will be closed without being saved first.
n Disconnect from a remote application.
Option Action Disconnect from the server and
leave the application running
Perform one of the following actions:
n Click the Disconnect from Server button in the left side of the toolbar
in the desktop and application selection window.
n Select File > Disconnect from Server from the menu bar.
Close the application and disconnect from the server
a Quit the application in the usual manner, for example, click the Close button in the corner of the application window.
b Click the Disconnect from Server button in the left side of the toolbar in the desktop and application selection window or select File >
Disconnect from Server from the menu bar.
n Log off when you do not have a remote desktop open.
If you use this procedure, files that are open on the remote desktop will be closed without being saved first.
Option Action
From the Home screen a Double-click the server shortcut and supply credentials. These might include RSA SecurID credentials and credentials for logging in to the desktop.
b Select the desktop and select Connection > Log Off from the menu bar.
From the desktop and application selection window
Select the desktop and select Connection > Log Off from the menu bar.
Connecting to a View Server at Horizon Client Launch
In Horizon Client 3.2 and later, the Always connect at launch setting is enabled by default for the first View server that you connect to with Horizon Client. When this setting is enabled for a View server,
Horizon Client always connects to that View server when you launch Horizon Client.
To disable this behavior for a View server, select the View server shortcut on the Horizon Client Home screen, press Control-click on the Apple keyboard, and deselect the Always connect at launch setting. If you have other View server shortcuts on your Horizon Client Home screen, you can enable the Always connect at launch setting for a different server.
You can enable the Always connect at launch setting for only one View server at a time.
Autoconnect to a Remote Desktop
In Horizon Client 3.2 and later, you can configure a View server to automatically launch a remote desktop when you connect to the server.
If you are entitled to only one remote desktop on a View server, Horizon Client automatically launches that desktop when you connect to the server.
NOTE You cannot configure a View server to automatically launch a remote application. Prerequisites
Obtain the credentials you need to connect to the View server, such as a user name and password, RSA SecurID user name and passcode, RADIUS authentication user name and passcode, or smart card personal identification number (PIN).
Procedure
1 On the Horizon Client Home screen, double-click the server icon. 2 If prompted, supply your credentials.
3 Click the Settings button (gear icon) in the upper right corner of the desktop and application selection window.
4 Select a desktop pool in the left pane of the Settings dialog box. 5 Select Autoconnect to this desktop.
6 Close the Settings dialog box to save your changes.