GeneMapper
®
ID-X
Software
Version 1.0
Note: To improve the clarity of graphics in this PDF file, use the zoom tool to increase magnification to 150% or greater.
GeneMapper
®
ID-X
Software
Version 1.0
Setting Up User Accounts and User Access
Managing the Auditing System
Managing the E-Signature System
Maintaining the Software and Database Application
© Copyright 2007, Applied Biosystems. All rights reserved.
For Research Use Only. Not for use in diagnostic procedures.
Information in this document is subject to change without notice. Applied Biosystems assumes no responsibility for any errors that may appear in this document.
APPLIED BIOSYSTEMS DISCLAIMS ALL WARRANTIES WITH RESPECT TO THIS DOCUMENT, EXPRESSED OR IMPLIED, INCLUDING BUT NOT LIMITED TO THOSE OF MERCHANTABILITY OR FITNESS FOR A PARTICULAR PURPOSE. IN NO EVENT SHALL APPLIED BIOSYSTEMS BE LIABLE, WHETHER IN CONTRACT, TORT, WARRANTY, OR UNDER ANY STATUTE OR ON ANY OTHER BASIS FOR SPECIAL, INCIDENTAL, INDIRECT, PUNITIVE,
MULTIPLE OR CONSEQUENTIAL DAMAGES IN CONNECTION WITH OR ARISING FROM THIS DOCUMENT, INCLUDING BUT NOT LIMITED TO THE USE THEREOF.
Notice to Purchaser: License Disclaimer.
Purchase of this software product alone does not imply any license under any process, instrument or other apparatus, system, composition, reagent or kit rights under patent claims owned or otherwise controlled by Applera Corporation, either expressly, or by estoppel.
Applera, Applied Biosystems, AB (Design), and GeneMapper are registered trademarks of Applera Corporation or its subsidiaries in the U.S. and/or certain other countries.
This product includes software developed by the Apache Software Foundation. This product includes software developed by the ExoLab Project.
JNIRegistry is copyrighted © by ICE Engineering, Inc.
Microsoft and Windows are registered trademarks of Microsoft Corporation. Oracle is a registered trademark of Oracle Corporation.
All other trademarks are the sole property of their respective owners.
Part Number 4376327 Rev. A 09/07
Preface . . . vii
How to Use This Guide . . . vii
How to Obtain More Information . . . ix
How to Obtain Support . . . x
Chapter 1
Setting Up User Accounts and User Access. . . 1
GeneMapper®ID-X Software Electronic Data Chain-of-Custody Systems . . . 2
Overview of the Security System . . . 3
Default User Accounts, Profiles, User Groups, and Security Groups . . . 5
Default Profiles . . . 7
Default Security Groups . . . 8
Default User Groups . . . 9
Default User Accounts . . . 10
Getting Started . . . 12
Starting the Security Manager . . . 12
Setting Password Policies . . . 14
Setting Up User Accounts . . . 16
Using Default User Accounts . . . 16
Creating New User Accounts . . . 18
Creating a User Account for Autoanalysis . . . 21
Using Security Groups to Control Data Access . . . 24
Customizing Profiles . . . 26
Creating Profiles . . . 26
Editing or Deleting Profiles . . . 29
Profile Elements . . . 30
Customizing User and Security Groups . . . 34
Creating Security Groups . . . 37
Maintaining User Accounts . . . 39
Editing User Accounts . . . 39
Changing the Password for a User Account . . . 39
Deleting a User Account . . . 40
Activating, Deactivating, and Suspending User Accounts . . 40
Viewing the Security Report . . . 42
Exporting and Importing the Security Settings . . . 44
Chapter 2
Managing the Auditing System . . . 45
Overview of the Audit System . . . 46
Default Audit Map Settings . . . 48
Using the Audit Map . . . 50
Starting the Audit Manager . . . 50
Configuring the Audit Map . . . 51
Printing an Audit Map Settings Report . . . 53
Audit Map Elements . . . 53
Viewing Audit History Records . . . 57
Starting the Audit History Viewer . . . 57
Creating Audit Record Queries . . . 58
Performing Audit Record Queries and Viewing Audit Records . . . 60
Example Audit Records . . . 61
Printing Audit Records . . . 62
Records . . . 74
Printing E-Signature Records . . . 74
Backing Up, Removing, and Restoring E-Signature Records . . . 74
Chapter 4
Maintaining the Software and Database Application 75
Maintenance Overview . . . 76Recommended Maintenance Schedule . . . 76
Using and Maintaining the Oracle® Database . . . 77
Database Access . . . 77
Maintaining the Database . . . 78
Using the Database Dashboard Software . . . 79
Dashboard Features . . . 79
Setting a Dashboard Password . . . 80
Starting the Database Dashboard . . . 80
Reviewing the Database Statistics . . . 81
Allocating Disk Space . . . 82
Options for Creating More Disk Space . . . 83
Allocating Additional Disk Space . . . 84
Viewing Project Statistics . . . 86
Backing Up the Database . . . 87
When to Back Up the Oracle Database . . . 87
Backing Up (Exporting) the Database . . . 87
Restoring (Importing) the Database . . . 88
Generating a Database Report . . . 90
Appendix A
Operating the Software from a Command Line . . . . 91
Operating the Software from a Command Line . . . 92
Creating a Batch File to Run the Command-Line Interface . . 93
Example Batch File . . . 95
Running the Batch File . . . 96
Example #1: Analyze Sample Files . . . 97
Example #2: Analyze Sample Files with Named Ladders . . . 98
Example #3: Export Project Data . . . 99
Example #4: Export Sample Plot to PDF . . . 99
Command-Line Arguments . . . 100
How to Use This Guide
Purpose of
This Guide
This guidedescribes the procedures for configuring and maintaining the following administrative tools of the GeneMapper®ID-X
Software Version 1.0 (v1.0) after it is installed:
• Security Manager (Chapter 1) −Use this tool to control a user’s access to the GeneMapper ID-X Software, to functions in the software, and to data (projects, plot settings, table settings, kits and panels, report settings, size standards, analysis methods). • Audit Manager (Chapter 2) −Use this tool to configure the
auditing system to create and record an audit trail for changes (create/modify/delete) to data.
• Esig Administrator (Chapter 3) − Use this tool to configure the electronic signature system that requires users to sign-off on changes to data.
• Database Dashboard (Chapter 4) −Use this tool to monitor real-time information about database performance, space utilization, and operating systems usage. You can also allocate additional disk space and back up the database.
Note: For instructions on configuring the software to prepare for analysis, see the GeneMapper®ID-X Software v1.0 Human Identification Getting Started Guide.
Audience
This guide is written for laboratory personnel responsible for configuring and maintaining the GeneMapper ID-X Software.Assumptions
This guide assumes that you have a working knowledge of the Microsoft® Windows® operating system.Preface
How to Use This Guide
Text Conventions
This guide uses the following conventions: • Bold indicates user action. For example:Enter 0, then press Enter for each of the remaining fields. • Italic text indicates new or important words and is also used for
emphasis. For example:
Before analyzing, always prepare fresh matrix.
• A right arrow bracket () separates successive commands you select from a drop-down or shortcut menu. For example:
Select FileOpenSpot Set.
Right-click the sample row, then select View Filter View All Runs.
User Attention
Words
Two user attention words appear in Applied Biosystems user documentation. Each word implies a particular level of observation or action as described below:
Note: Provides information that may be of interest or help but is not critical to the use of the product.
IMPORTANT! Provides information that is necessary for proper instrument operation, accurate chemistry kit use, or safe use of a chemical.
Examples of the user attention words appear below:
Note: The size of the column affects the run time.
How to Obtain More Information
Related
Documentation
The following related documents are shipped with the software: • GeneMapper® ID-X Software Version 1.0 Installation Guide –
Describes how to install the software.
• GeneMapper®ID-X Software Version 1.0 Human
Identification Getting Started Guide – Explains how to set up the software, configure software settings, create projects, analyze example data provided with the GeneMapper ID-X
Software, and view, interpret, and export results.
• GeneMapper®ID-X Software Version 1.0 Online Help–
Describes specific software features and provides procedures for common tasks.
• GeneMapper®ID-X Software Version 1.0 Reference Guide –
Describes peak detection and allele calling algorithms, quality values, and software optimization, validation, and verification. • GeneMapper®ID-X Software Version 1.0 Quick Reference
Guide– Provides basic workflows and compatibility information for use while using the software.
Portable document format (PDF) versions of this guide and the other documents are available on the GeneMapper®ID-X Software
Version 1.0 DocumentationCD.
Note: For additional documentation, see “How to Obtain Support” on page x.
Send Us Your
Comments
Applied Biosystems welcomes your comments and suggestions for improving its user documents. You can e-mail your comments to:
Preface
How to Obtain Support
How to Obtain Support
For HID support, you can send an e-mail to
[email protected] or call 888-821-4443 option 1.
For HID support outside North America, contact your local support office.
For the latest services and support information for all locations, go to
http://www.appliedbiosystems.com, then click Support. At the Support page, you can:
• Access worldwide telephone and fax numbers to contact Applied Biosystems Technical Support and Sales facilities. • Search through frequently asked questions (FAQs).
• Submit a question directly to Technical Support. • Order Applied Biosystems user documents, MSDSs,
certificates of analysis, and other related documents. • Download PDF documents.
• Obtain information about customer training. • Download software updates and patches.
Chapter 4 Chapter 3 Chapter 2 Chapter 1
Setting Up User Accounts
and User Access
This chapter covers:■ GeneMapper® ID-X Software Electronic Data
Chain-of-Custody Systems . . . 2
■ Overview of the Security System . . . 3
■ Default User Accounts, Profiles, User Groups, and Security Groups . . . 5
■ Getting Started. . . 12
■ Setting Up User Accounts . . . 16
■ Using Security Groups to Control Data Access . . . 24
■ Customizing Profiles . . . 26
■ Customizing User and Security Groups . . . 34
■ Maintaining User Accounts. . . 39
■ Viewing the Security Report . . . 42
■ Exporting and Importing the Security Settings . . . 44
Setting Up User Accounts and User
Access
Managing the Auditing System
Managing the E-Signature System
Maintaining the Software and Database Application
Chapter 1 Setting Up User Accounts and User Access
GeneMapper® ID-X Software Electronic Data Chain-of-Custody Systems
GeneMapper
®
ID-X
Software Electronic Data
Chain-of-Custody Systems
The GeneMapper®ID-X Software contains three systems that assist
with chain-of-custody of electronic data. These systems can be custom-configured or turned off by the GeneMapper ID-X Software System administrator as needed:
• Security system – Controls user access to software functions and data, and allows custom configuration that meets the data-sharing needs of your laboratory (described in this chapter) • Auditing system – Tracks changes and provides audit history
reports (described in Chapter 2)
• E-signature system – Requires user-authentication before changes are saved (described in Chapter 3)
Overview of the Security System
The GeneMapper®ID-X Software security system allows you to
control user behavior by specifying:
• What data a user can access, based on the user and security Group(s) the user belongs to.
• What functions a user can perform, based on the user profile. A user with an Admin profile sets up user accounts, profiles, user groups, and security groups using wizards in the Access Control Administration window.
Security System
Components
The four components of the security system are defined below.
Table 1 Components of the security system
Component Description
User Account All users log in to the GeneMapper®ID-X Software with a user account created by the GeneMapper ID-X system administrator.
Profile A profile defines the set of software functions that a user is allowed to perform. For example, profiles can allow or deny a user the right to view, create, edit, delete analysis methods, or analyze data.
The system administrator configures profiles, or uses default profiles provided with the software. When the system administrator creates a user account, the
administrator assigns a profile to the user. Users can have only one profile.
User Group User groups are associated with security groups, which control the data a user can access. Users can access data assigned to a security group only if their user group is associated with the security group.
The system administrator defines user groups or uses default user groups provided with the software.
When a user account is created, the user must be assigned to at least one user group, but the user can be assigned to several groups.
Security Group
Security groups determine the data that user groups can access. A user group must be associated with at least one security group, but can be associated with several. A user can access only data (for example, analysis methods, panels, size standards, matrices, or projects)that have been saved with a security group that is associated with one of the user groups to which the user belongs.
Chapter 1 Setting Up User Accounts and User Access Overview of the Security System
In summary:
• Each user has only one profile.
• Each user belongs to one or more user groups and each user group is associated with one or more security groups. • Security groups associated with a user group and data
determine the data a user can access. Therefore:
• A user can access the data in a security group that is associated with any of the user groups to which the user belongs.
• A user can perform any of the software functions permitted by the user’s profile.
Data Access
Control
Security groups control access to any of the following items:
Data User
User Group
Users
Users in a user group can access the data of the security groups associated with the user group Security Groups
Profile
A user can perform actions allowed by the user’s profile
Security Group
A B
A
Security Group C
cannot access
Associating a
Security Group
with an Item
Whenever users save an item, they must select a security group from a drop-down list in the Save or Save As dialog box. Users can select the GeneMapper ID-X Security Group (available to everyone) or any other security group that they are allowed to use (see below). For example, the figure below shows the drop-down list that appears when a user with access only to the Casework and GeneMapper ID-X
security groups saves a new project.
Bypassing
Security Group
Access Control
If you do not want to control access to data in your laboratory, instruct all users to specify the GeneMapper ID-X security group when creating projects and settings. All users have access to items associated with the GeneMapper ID-X security group.
Default User Accounts, Profiles, User Groups, and
Security Groups
Applied Biosystems provides default user accounts, profiles, user groups, and security groups so that you can use the security system with minimal set up. You can use the defaults without changes or as a starting point to customize your own security system.
Note: If your GeneMapper ID-X Software system administrator has modified the default user accounts, profiles, user groups, and/or security groups, the tables in this section may no longer be accurate.
Chapter 1 Setting Up User Accounts and User Access Default User Accounts, Profiles, User Groups, and Security Groups
The discussion in this section covers the default profiles, user groups, and security groups provided by the GeneMapper ID-X
Software. With these defaults, a system administrator can quickly create a working security system.
Duplicating
Defaults Before
Modifying
Before modifying a default component of the security system, duplicate it and save it under a new name.
To duplicate any default component, open the Security Manager, select the default, then select EditDuplicate.
You will need to duplicate the default user accounts multiple times to provide each user with an account that has a unique or
laboratory-specific login name.
Relationship
Between User
Accounts,
Profiles, and User
Groups
A user’s account determines what the user can do (profile) and access (user groups). Profiles and user groups must exist before any user accounts are created, so they are presented in this section before user accounts.
The GeneMapper ID-X Software system administrator is responsible for maintaining profiles and user groups. The administrator can:
• Use default profiles and user groups provided by the GeneMapper ID-X Software.
• Create custom profiles and user groups.
• Use a combination of defaults and custom profiles, user groups, and security settings.
Default Profiles
The profile that is specified in a user account determines the
software functions a user can perform. Four default profiles are provided by Applied Biosystems.
Note: If your GeneMapper ID-X Software system administrator has modified or customized the default profiles, they may differ from the defaults described in Table 2.
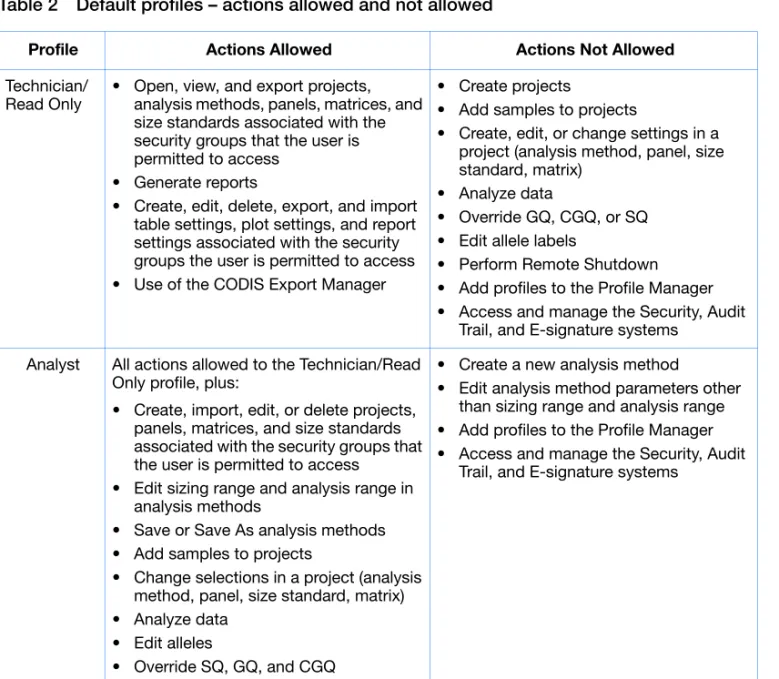
Table 2 Default profiles – actions allowed and not allowed
Profile Actions Allowed Actions Not Allowed
Technician/ Read Only
• Open, view, and export projects, analysis methods, panels, matrices, and size standards associated with the security groups that the user is permitted to access
• Generate reports
• Create, edit, delete, export, and import table settings, plot settings, and report settings associated with the security groups the user is permitted to access • Use of the CODIS Export Manager
• Create projects
• Add samples to projects
• Create, edit, or change settings in a project (analysis method, panel, size standard, matrix)
• Analyze data
• Override GQ, CGQ, or SQ • Edit allele labels
• Perform Remote Shutdown • Add profiles to the Profile Manager • Access and manage the Security, Audit
Trail, and E-signature systems
Analyst All actions allowed to the Technician/Read Only profile, plus:
• Create, import, edit, or delete projects, panels, matrices, and size standards associated with the security groups that the user is permitted to access
• Edit sizing range and analysis range in analysis methods
• Save or Save As analysis methods • Add samples to projects
• Change selections in a project (analysis method, panel, size standard, matrix) • Analyze data
• Edit alleles
• Override SQ, GQ, and CGQ
• Create a new analysis method
• Edit analysis method parameters other than sizing range and analysis range • Add profiles to the Profile Manager • Access and manage the Security, Audit
Chapter 1 Setting Up User Accounts and User Access Default User Accounts, Profiles, User Groups, and Security Groups
Default Security Groups
The security groups specified in a user account determine the: • Specific data (for example, analysis methods, panels, size
standards, matrices, and projects) a user can access. • The Read (view or select) or Update (create, edit, delete,
analyze) privileges allowed for the data.
The Read/Update privileges associated with a security group can clash with the actions permitted in user profiles (profiles also define read/write privileges). For this reason, all the default security groups defined by Applied Biosystems have both Read and Update
privileges.
IMPORTANT! There are software functions (for example, changing table or plot settings) that are not covered in profiles. You can use security group Update privileges to control use of these functions.
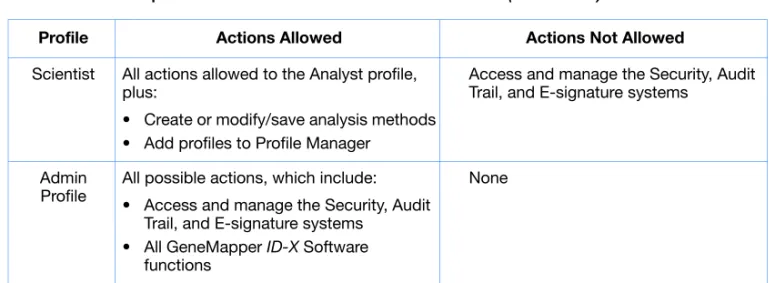
Scientist All actions allowed to the Analyst profile, plus:
• Create or modify/save analysis methods • Add profiles to Profile Manager
Access and manage the Security, Audit Trail, and E-signature systems
Admin Profile
All possible actions, which include: • Access and manage the Security, Audit
Trail, and E-signature systems • All GeneMapper ID-X Software
functions
None
Table 2 Default profiles – actions allowed and not allowed (continued)
Security group definitions are just names. Their significance depends entirely on the user groups they are associated with. When a user saves an item and assigns it a security group, it means that:
• Any user in any user group that is associated with that security group can access the data.
• Users who are only in user groups that are not associated with the selected security group cannot access the data.
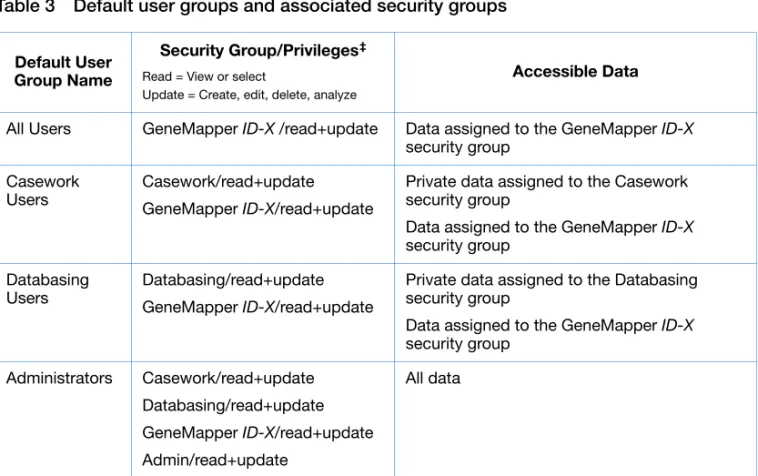
Default User Groups
Four default user groups are associated with the default security groups:
Note: If your GeneMapper ID-X Software system administrator has modified or customized the default user groups, they may differ from the defaults described in Table 3.
Table 3 Default user groups and associated security groups
Default User Group Name
Security Group/Privileges‡ Read = View or select
Update = Create, edit, delete, analyze
Accessible Data
All Users GeneMapper ID-X /read+update Data assigned to the GeneMapper ID-X
security group
Casework Users
Casework/read+update GeneMapper ID-X/read+update
Private data assigned to the Casework security group
Data assigned to the GeneMapper ID-X
security group
Databasing Users
Databasing/read+update GeneMapper ID-X/read+update
Private data assigned to the Databasing security group
Data assigned to the GeneMapper ID-X
security group
Administrators Casework/read+update Databasing/read+update GeneMapper ID-X/read+update Admin/read+update
All data
‡ A Practice user group and a Practice security group are also provided for use with the Getting Started Guide.
Chapter 1 Setting Up User Accounts and User Access Default User Accounts, Profiles, User Groups, and Security Groups
Default User Accounts
IMPORTANT! If you migrate to the GeneMapper®ID-X Software from GeneMapper ID Software v3.1 or 3.2, user accounts from v3.1 or 3.2 are deleted and not available in the GeneMapper ID-X
Software. You must create new user accounts in the GeneMapper ID-X Software.
Nine default user accounts are provided with the software. Each of these accounts has a profile and one or more user groups assigned. Table 4 shows the characteristics of the type of user who is intended for each of the nine accounts.
Note: If your GeneMapper ID-X Software system administrator has modified or customized the default user accounts, they may differ from the defaults described in Table 4.
Table 4 Default user accounts Default User Account
Name‡ Intended User
Casework Tech Databasing Tech
User who requires read-only access to the software. This user account does not allow analysis or changes to the software but does allow viewing, reporting, printing, and exporting of data.
Casework Analyst Databasing Analyst
User who requires access to analyze (with limited ability to change analysis settings), view, edit, report, and print data.
Casework Tech Lead Databasing Tech Lead
User who requires full access to all functions of the software: analyze, view, edit, report, and print data; and all administrative functions: Security Manager, Audit Manager, and E-Sig Manager.
To add a new account for a user that matches one of these
descriptions, duplicate the appropriate user account, rename it for that specific user, then assign a new password.
Applied Biosystems cannot retrieve passwords. Do not lose the new password for the gmidx account. This account can be used to reset passwords for other accounts. Applied
Biosystems cannot reset the password for this account if it is lost. For more detail about the profiles, user groups, and security groups for the default user accounts, see Table 5.
Note: If your GeneMapper ID-X Software system administrator has modified or customized the default user accounts, profiles, user groups, and/or security groups, user access may differ from the defaults described in Table 5.
Table 5 Default user accounts – data access allowed
User Account‡ Profile User Groups Belonged To
Security Group/Privileges Read = View or select
Update = Create, edit, delete, analyze Casework Tech Technician/
Read Only
All Users
Casework User Group
GeneMapper ID-X/read+update Casework/read+update
Casework Analyst
Analyst All Users
Casework User Group
GeneMapper ID-X/read+update Casework/read+update
Casework Tech Lead
Admin Profile All Users
Casework User Group
GeneMapper ID-X/read+update Casework/read+update
Databasing Tech Technician/ Read Only
All Users
Databasing User Group
GeneMapper ID-X/read+update Databasing/read+update
Databasing Analyst
Analyst All Users
Databasing User Group
GeneMapper ID-X/read+update Databasing/read+update
Databasing Tech Lead
Admin Profile All Users
Databasing User Group
GeneMapper ID-X/read+update Databasing/read+update
Chapter 1 Setting Up User Accounts and User Access Getting Started
Getting Started
When you set up the security system for the first time, open the Security Manager and set password policies.
Starting the Security Manager
Note: User names are not case-sensitive. Passwords are case-sensitive.
To access the Security Manager, you must use an account that belongs to the Administrator user group and has an Admin profile, for example, the gmidx account.
1. Select StartAll ProgramsApplied Biosystems
GeneMapperGeneMapper ID-X v1.0, then log in.
gmidx Administrator
Admin Profile All Users
Casework User Group Databasing User Group Administrators
GeneMapper ID-X/read+update Casework/read+update Databasing/read+update Admin
‡ A Practice user account with Scientist Profile is also provided for use with the Getting Started Guide. It is associated with the Practice user group and Practice security group.
Table 5 Default user accounts – data access allowed (continued)
User Account‡ Profile User Groups Belonged To
Security Group/Privileges Read = View or select
3. When prompted, specify a new password. Keep a record of the new password. The gmidx account requires that you set a new password when you log in for the first time. If you follow this procedure after first log in, the password for the account may be different from password.
Applied Biosystems cannot retrieve
passwords. Do not lose the new password for the gmidx account. This account can be used to reset passwords for other accounts. Applied Biosystems cannot reset the password for this account if it is lost.
4. In the GeneMapper ID-X main window, select
AdminSecurity Manager.
5. In the AdminToolAcc dialog box, log in with the gmidx account listed in step 2, then clickOK. The Access Control
Chapter 1 Setting Up User Accounts and User Access Getting Started
The FileNew Application command and the
Applications entry in the navigation pane are for Applied Biosystems only. Using these functions interferes with proper software operation.
Setting Password Policies
Password policies apply to all user accounts.
1. Start the Security Manager (see page 12).
2. Select SettingsPassword Policies.
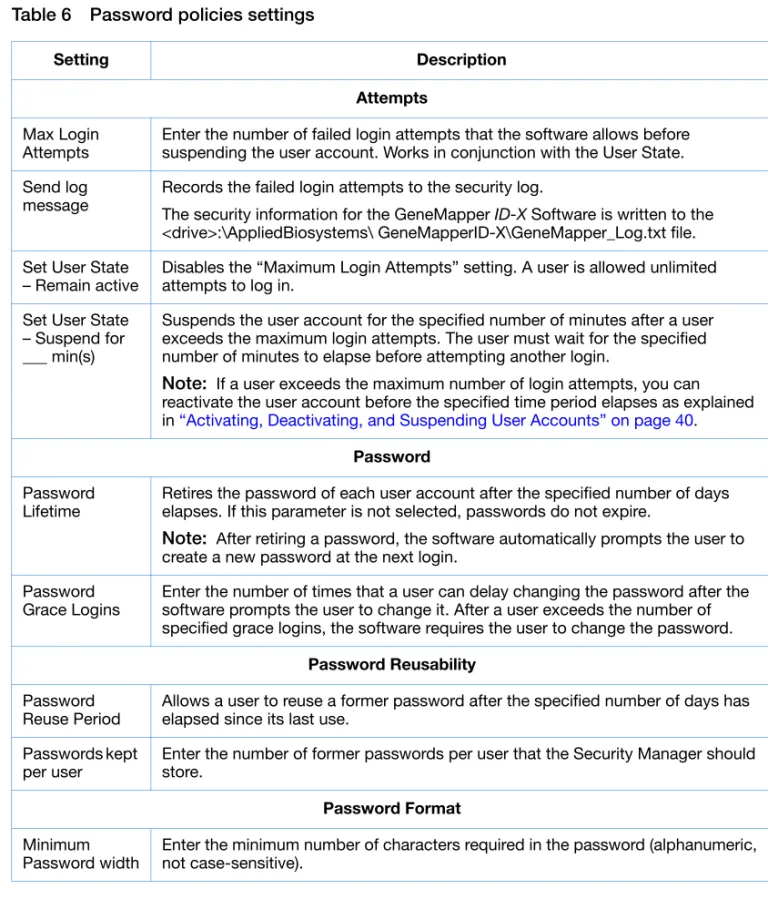
3. In the Password Policies dialog box (below), specify the password settings (see Table 6), then click Save Changes.
Note: Settings are not applied until you close and restart the GeneMapper ID-X Software.
Table 6 Password policies settings
Setting Description
Attempts Max Login
Attempts
Enter the number of failed login attempts that the software allows before suspending the user account. Works in conjunction with the User State.
Send log message
Records the failed login attempts to the security log.
The security information for the GeneMapper ID-X Software is written to the <drive>:\AppliedBiosystems\ GeneMapperID-X\GeneMapper_Log.txt file.
Set User State – Remain active
Disables the “Maximum Login Attempts” setting. A user is allowed unlimited attempts to log in.
Set User State – Suspend for ___ min(s)
Suspends the user account for the specified number of minutes after a user exceeds the maximum login attempts. The user must wait for the specified number of minutes to elapse before attempting another login.
Note: If a user exceeds the maximum number of login attempts, you can reactivate the user account before the specified time period elapses as explained in “Activating, Deactivating, and Suspending User Accounts” on page 40.
Password Password
Lifetime
Retires the password of each user account after the specified number of days elapses. If this parameter is not selected, passwords do not expire.
Note: After retiring a password, the software automatically prompts the user to create a new password at the next login.
Password Grace Logins
Enter the number of times that a user can delay changing the password after the software prompts the user to change it. After a user exceeds the number of specified grace logins, the software requires the user to change the password.
Password Reusability Password
Reuse Period
Allows a user to reuse a former password after the specified number of days has elapsed since its last use.
Passwords kept per user
Enter the number of former passwords per user that the Security Manager should store.
Password Format Minimum
Password width
Enter the minimum number of characters required in the password (alphanumeric, not case-sensitive).
Chapter 1 Setting Up User Accounts and User Access Setting Up User Accounts
Setting Up User Accounts
After setting password policies, you can:
• Accept and use all the default settings by duplicating a default user account, renaming it, and using it without further
modification,
or
• Create an entirely new user account, using any combination of defaults and your own custom settings.
Using Default User Accounts
To set up your security system using the defaults for user accounts, profiles, user groups, and security groups, follow these steps:
1. Start the Security Manager (see page 12).
2. Select the default user account type that fits the new user (see Table 2, “Default profiles – actions allowed and not allowed,” on page 7), for example, Casework Analyst.
3. Select EditDuplicate to open the User Properties dialog box (shown on the next page).
4. In the Name field in the General section, replace the name “Clone of Casework Analyst(1)” with the login name for the new account (for example, User1). The login name is not case-sensitive and must be ≤ 30 characters.
5. Set other values:
• (Optional) Enter a description in the Description field in the General section (≤1023 characters).
• In the User Details section, enter the user’s real name in the Full Name field.
• (Optional) Select Show EULAif you want the software to display the End User License Agreement (EULA) when the user logs in.
• Leave Status set to Active.
• (Optional) Select Pre-Expire, if you want to ensure that a user logging in to an account for the first time is prompted to change the password.
Chapter 1 Setting Up User Accounts and User Access Setting Up User Accounts
6. Click Set Password.
7. In the Change Password dialog box, enter a new password twice, then click OK.
8. Without making any other changes in the Access Control Administration window, select FileSave.
Note: Settings are not applied until you close and restart the GeneMapper ID-X Software.
The new user account has the same profile and group associations as the default Casework Analyst user account.
Creating New User Accounts
Preparing to Use
Custom Settings
If you will use the default profiles, user groups, and/or security groups, skip to “Creating the User Account” on page 18. If you want to use custom profiles, user groups, and/or security groups, you must create them before creating new user accounts. To create any custom:
• Profiles that you want to use, see “Customizing Profiles” on page 26.
• User groups and security groups that you want to use, see “Customizing User and Security Groups” on page 34.
• User group/security group associations that you want to use, see “Creating a New User Group” on page 35.
3. In the Create User wizard, click Next to open the Name page.
4. In the Name field in the General section, enter the login name for the new account (for example, User1). The login name is not case-sensitive and must be ≤ 30 characters.
Note: You cannot create a user account with the same name as a user account that has been previously deleted.
5. Set other values:
• (Optional) Enter a description in the Description field in the General section (≤1023 characters).
• In the User Details section, enter the user’s real name in the Full Name field.
• (Optional) Select Show EULAif you want the software to display the End User License Agreement (EULA) when the user logs in.
• Leave Status set to Active.
• (Optional) Select Pre-Expire, if you want to ensure that a user logging in to an account for the first time is prompted to change the password.
Chapter 1 Setting Up User Accounts and User Access Setting Up User Accounts
6. Click Set Password.
7. In the Change Password dialog box, enter a new password twice, then click OK.
8. In the Control Properties section, select the profile for the user.
9. Click Next to open the User Groups page (below).
10. Select the user groups for the user. If you have previously associated user groups and security groups (see “Preparing to Use Custom Settings” on page 18), this selection also
designates the security groups for this user.
11. Click Next to see a summary of the account, then click Finish.
Note: Settings are not applied until you close and restart the GeneMapper ID-X Software.
Creating a User Account for Autoanalysis
If you perform autoanalysis (the system is configured to
automatically collect data, then create, analyze, and save a project), you must create a user account for autoanalysis.
IMPORTANT! When you set up the data collection computer for autoanalysis, you are asked to create an autoanalysis user account. You must enter a user name, password, and host computer. For the host computer, enter the name of the GeneMapper ID-X database host, not a client computer. For information on autoanalysis, see the
GeneMapper® ID-X Software Version 1.0 Installation Guide and the GeneMapper® ID-X Software Help.
1. Start the Security Manager (see page 12).
2. Select FileNew User.
Chapter 1 Setting Up User Accounts and User Access Setting Up User Accounts
4. In the Name field in the General section, enter the login name for the new account (for example, Auto1). The login name is not case-sensitive and must be ≤ 30 characters.
Note: You cannot create a user account with the same name as a user account that has been previously deleted.
5. Set other values:
• (Optional) Enter a description in the Description field in the General section (≤1023 characters).
• In the User Details section, enter Autoanalysis in the Full Name field.
• Deselect Show EULA. • Leave Status set to Active. • Deselect Pre-Expire.
6. Click Set Password.
7. In the Change Password dialog box, enter a new password twice, then click OK.
8. In the Control Properties section, select the Scientist profile.
Note: If you create custom profiles for your system and do not choose to use the Scientist profile, use a profile for autoanalysis with the following minimum privileges: Read privileges for Panel Manager, Size Standard, Analysis Method; Read and Update privileges for creating and analyzing projects.
9. Click Next to open the User Groups page.
10. Associate the user account with any user group. The project that autoanalysis creates, analyzes, and saves is associated with the GeneMapper ID-X security group, which is accessible by all user groups.
11. Click Next to see a summary of the account you just created, then click Finish.
Note: Settings are not applied until you close and restart the GeneMapper ID-X Software.
Chapter 1 Setting Up User Accounts and User Access Using Security Groups to Control Data Access
Using Security Groups to Control Data Access
In the GeneMapper®ID-X Software, a user associates Security
groups with data items (such as analysis methods, table settings, plot settings, matrices, size standards, or report settings) when the user saves a data item to which he or she has access. Only users in user groups associated with that security group can later access the data items.
Using Open
Access
If you want all users to have access to all data, instruct your users to select the GeneMapper ID-X security group when they save data. The data associated with this security group are accessible to every user.
Using Access
Control
If you want to restrict user access to data, instruct users to select a security group associated with their user group. For example, you can instruct the users in the Casework user group to select the Casework security group when they save items.
Changing the
Security Group
Default
The security groups that a user can select to associate with a data item (when saving the data item) include the GeneMapper ID-X
security group as the default. However, any user can change the security group that appears as the default choice when he or she saves a data item.
1. In the In the GeneMapper ID-X main window, select
FileProject Options to open the Options dialog box.
2. Select the General tab.
For example, if you use accounts like those listed on page 11, and a Casework Tech sets Casework as the new security group default, that will also become the default for Casework Analysts and Casework Tech Leads. All other users continue to have the GeneMapper ID-X
security group as default.
Changing the
Security Group
Association for a
Data Item
In the GeneMapper ID-X Software, a user can change the security group associated with one or more data items if the user’s profile allows changing the data items.
To change the security group associated with a data item:
1. In the GeneMapper ID-X main window, select
ToolsGeneMapper ID-X Manager to open the GeneMapper
ID-X Manager.
2. Select the appropriate tab, then select the item to change.
3. Click Open.
4. Change the Security Group setting (for items that contain multiple tabs, the Security Group setting is in the General tab).
5. Click OK.
Changing the
Security Group
Association for a
Project
A user can change the security group associated with a project if the user’s profile allows the user to change the project. However, you must save the project with a new name.
1. In the GeneMapper ID-X main window, select
ToolsGeneMapper ID-X Manager to open the GeneMapperID-X Manager.
2. Select the Projects tab.
3. Select the project to change.
4. Click Save As.
5. Enter a new name for the project, select a new security group, then click OK.
Chapter 1 Setting Up User Accounts and User Access Customizing Profiles
Customizing Profiles
Profiles determine the software functions that a user can perform. Applied Biosystems recommends that you use the default profiles described in “Default Profiles” on page 7, even if you use custom user and/or security groups.
However, if the default profiles do not suit your needs, you can create custom profiles.
This section describes: • Creating Profiles
• Editing or Deleting Profiles • Profile Elements
Creating Profiles
To create a custom profile, you can:
• Duplicate an existing default profile, then edit it to meet your requirements.
• Create a new profile.
Applied Biosystems recommends that you duplicate a default profile, rename it, and then customize it, rather than change the default profile.
Duplicating and
Editing a Default
Profile
To base a new profile on an existing default profile (see Table 2, “Default profiles – actions allowed and not allowed,” on page 7):
1. Start the Security Manager (see page 12).
Creating a Profile
1. Start the Security Manager (see page 12).2. Select FileNew Profile.
3. In the Create Profile wizard, clickNext.
4. Enter a Name (≤ 30 characters) and Description (≤ 1023 characters) for the new profile.
5. In the Installed Elements table (shown on the next page), assign permissions to the new profile for the GeneMapper ID-X
module based on the actions allowed in profiles, as described in Table 7 on page 30 and Table 8 on page 32:
a. For the GeneMapper ID-X module, select OIR(Override Inherited Rights), then select Execute. All functions are automatically set to Execute. See page 28 for an
explanation of OIR.
b. For each function you want to disable, select OIR (Override Inherited Rights), then deselect Execute.
6. When you finish, clickNext, then click Finish to complete the profile setup.
7. Select FileSave.
Note: Settings are not applied until you close and restart the GeneMapper ID-X Software.
When you create a profile, do not setthe FoundationDataCollection module, which is for use by Applied Biosystems only.
IMPORTANT! To perform autoanalysis (see “Creating a User Account for Autoanalysis” on page 21), a user account requires a Scientist profile or equivalent. For a custom profile that permits autoanalysis functions, ensure that its rights are at least equivalent to those of the Scientist profile.
Chapter 1 Setting Up User Accounts and User Access Customizing Profiles
Override Inherited
Rights (OIR)
The permissions listed in the Installed Elements tables can be “inherited” in one of two ways:
• All actions ( ) are children of either an action group ( ) or an application ( ).
• Action groups ( ) are children of applications ( ).
Do not set Select OIR, then Execute, to
automatically enable all actions.
To disable an action, select OIR for the action, then deselect Execute.
Editing or Deleting Profiles
IMPORTANT! Do not modify the Admin(istrator) profile.
1. Start the Security Manager (see page 12).
2. In the navigation pane of the Access Control Administration window, select the profile to edit or to delete.
• In the Installed Elements table, to edit the rights for the profile: – For each function you want to enable, select OIR (Override
Inherited Rights) and Execute (see “Override Inherited Rights (OIR)” on page 28).
– For each function you want to disable, select OIR (Override Inherited Rights) and deselect Execute.
Note: Table 7 on page 30 and Table 8 on page 32 describe the functions displayed in the Installed Elements table.
• To delete the profile, select EditDelete, then click Yes.
3. When you finish, clickNext, then click Finish to complete the profile setup.
4. Select FileSave.
Note: Settings are not applied until you close and restart the GeneMapper ID-X Software.
Chapter 1 Setting Up User Accounts and User Access Customizing Profiles
Profile Elements
If the GeneMapper ID-X Software is installed on a computer that contains other Applied Biosystems software products, the Installed Elements table may contain elements in addition to those listed in Table 7 on page 30 and Table 8 on page 32.
All users with an administrator profile have all the permissions in Table 7. These permissions include:
• Managing user accounts, user groups, security groups, and profiles
• Using the Audit Manager • Using the ESig Manager
• All GeneMapper ID-X Software functions (described in Table 8 on page 32)
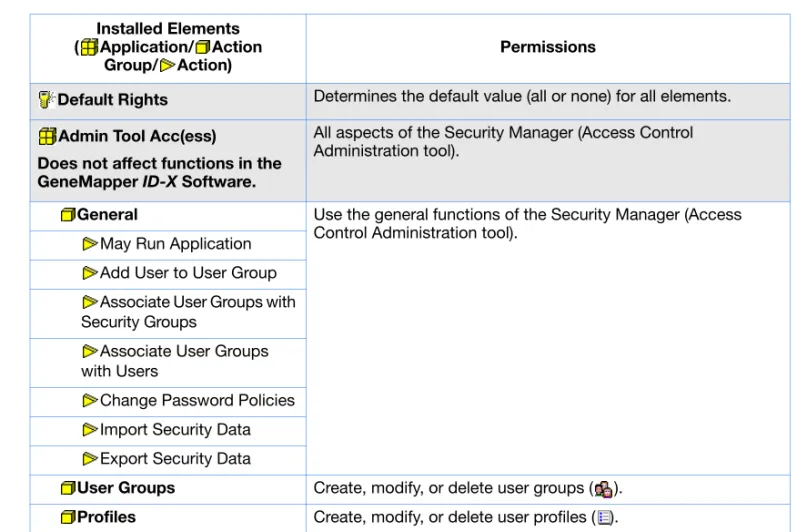
Table 7 Profile elements – actions allowed in admin profiles Installed Elements
( Application/ Action Group/ Action)
Permissions
Default Rights Determines the default value (all or none) for all elements.
Admin Tool Acc(ess)
Does not affect functions in the GeneMapper ID-X Software.
All aspects of the Security Manager (Access Control Administration tool).
General Use the general functions of the Security Manager (Access Control Administration tool).
May Run Application Add User to User Group Associate User Groups with Security Groups
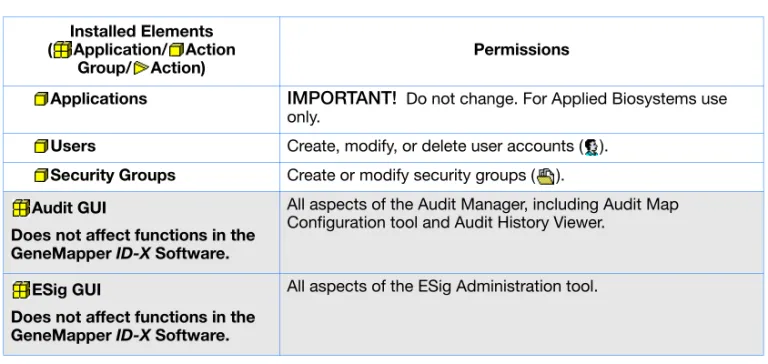
Applications IMPORTANT! Do not change. For Applied Biosystems use only.
Users Create, modify, or delete user accounts ( ). Security Groups Create or modify security groups ( ). Audit GUI
Does not affect functions in the GeneMapper ID-X Software.
All aspects of the Audit Manager, including Audit Map Configuration tool and Audit History Viewer.
ESig GUI
Does not affect functions in the GeneMapper ID-X Software.
All aspects of the ESig Administration tool. Table 7 Profile elements – actions allowed in admin profiles (continued)
Installed Elements ( Application/ Action
Group/ Action)
Chapter 1 Setting Up User Accounts and User Access Customizing Profiles
All users have permissions to use some of the GeneMapper ID-X
functions. Table 8 lists the defaults for each profile.
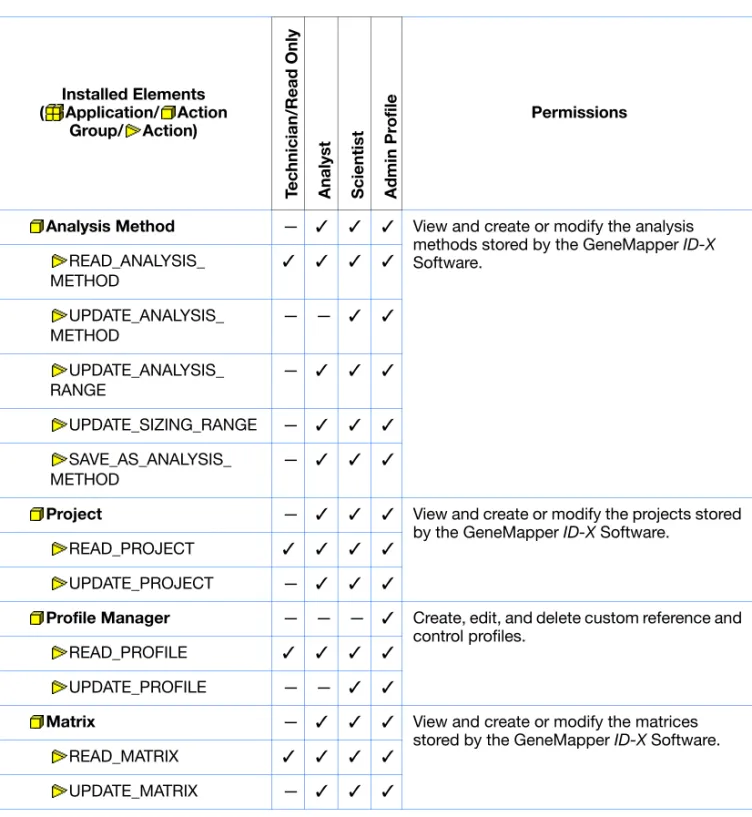
Table 8 Profile elements – actions allowed in technician, analyst, scientist, and admin profiles
Installed Elements ( Application/ Action
Group/ Action) T echnician/Read Only Ana lys t Scient ist Ad min Pr o fil e Permissions GeneMapper
— ✓ ✓ ✓ All aspects of the GeneMapper ID-X
Software.
For information on the elements listed in this column, see GeneMapper®ID-X Software
v1.0 Help.
Administration — ✓ ✓ ✓ Use the remote shutdown function.
Remote Shutdown — ✓ ✓ ✓
Panel Manager — ✓ ✓ ✓ Use the functions of the Panel Manager including:
• Viewing panels, binsets, and bin definitions
• Creating/modifying panels, binsets, and bins
READ_PANEL ✓ ✓ ✓ ✓
UPDATE_PANEL — ✓ ✓ ✓
Size Standard — ✓ ✓ ✓ View and create or modify the size standard definitions stored by the GeneMapper ID-X
Software.
READ_SIZE_ STANDARD ✓ ✓ ✓ ✓
Analysis Method — ✓ ✓ ✓ View and create or modify the analysis methods stored by the GeneMapper ID-X
Software. READ_ANALYSIS_ METHOD ✓ ✓ ✓ ✓ UPDATE_ANALYSIS_ METHOD — — ✓ ✓ UPDATE_ANALYSIS_ RANGE — ✓ ✓ ✓
UPDATE_SIZING_RANGE — ✓ ✓ ✓
SAVE_AS_ANALYSIS_ METHOD
— ✓ ✓ ✓
Project — ✓ ✓ ✓ View and create or modify the projects stored by the GeneMapper ID-X Software.
READ_PROJECT ✓ ✓ ✓ ✓
UPDATE_PROJECT — ✓ ✓ ✓
Profile Manager — — — ✓ Create, edit, and delete custom reference and control profiles.
READ_PROFILE ✓ ✓ ✓ ✓
UPDATE_PROFILE — — ✓ ✓
Matrix — ✓ ✓ ✓ View and create or modify the matrices stored by the GeneMapper ID-X Software.
READ_MATRIX ✓ ✓ ✓ ✓
UPDATE_MATRIX — ✓ ✓ ✓
Table 8 Profile elements – actions allowed in technician, analyst, scientist, and admin profiles (continued)
Installed Elements ( Application/ Action
Group/ Action) T echnician/Read Only Anal ys t Scient ist Ad min Pr o fil e Permissions
Chapter 1 Setting Up User Accounts and User Access Customizing User and Security Groups
Customizing User and Security Groups
This section describes: • Creating User Groups • Creating Security Groups
IMPORTANT! Before using the security groups and user groups you create, test them by creating, modifying, deleting, and viewing data using the appropriate user accounts.
User groups, with their associated security groups, determine the data a user can access (described on page 3). Applied Biosystems recommends that you use the default user groups and security groups described in “Default User Groups” on page 9 and “Default Security Groups” on page 8.
If the default user or security groups do not suit your needs, you can create custom groups.
Creating User Groups
To create a custom user group, you can:
• Duplicate an existing default user group, then edit it to meet your requirements,
or
• Create a new user group.
Note: Applied Biosystems recommends that you duplicate a default user group, rename it, and then customize it, rather than change the
3. Right-click, then select Duplicate (or select EditDuplicate).
4. Select the Clone of .... user group in the navigation pane.
5. In the User Group Properties section, modify the settings for the selected user group.
6. Select FileSave.
Note: Settings are not applied until you close and restart the GeneMapper ID-X Software.
Creating a New
User Group
1. In the Security Manager, select FileNew User Group.
2. In the Create User Group wizard, clickNext.
3. Enter a Name (≤ 30 characters) and Description (≤ 1023 characters) for the new user group.
4. Select both Read and Update in the Default rights when associated with a Security Group section.
Note: This is a default setting applied to the security groups that you add to a user group. You can override the default setting in the Security Group tab. See step 7.
5. ClickNext.
6. Select Associate for each user account that you want to associate with the new user group, then clickNext.
Chapter 1 Setting Up User Accounts and User Access Customizing User and Security Groups
7. Associate security groupsfor this user group:
Note: You can associate a security group with a user group at any time.
a. Select Associate for each security group that you want to associate with the user group.
b. For each associated security group, select:
IMPORTANT! Applied Biosystems recommends that you change Read and Update rights in the profile only and always enable both Read and Update rights in the user/security group.
• Read– Allows the user to view or select the data (projects, plot settings, table settings, panels and bin sets, report settings, size standards, analysis methods, and matrix files) associated with the security group associated with the user group.
• Update– Allows the user to create/modify/delete /analyze the data associated with the security groups associated with the user group (consistent with the user’s profile).
c. ClickNext.
8. Click Finish to complete the user group setup.
9. Select FileSave.
Creating Security Groups
To create a custom security group, you can:
• Duplicate an existing default security group, then edit it to meet your requirements,
or
• Create a new security group.
Note: Applied Biosystems recommends that you duplicate a default security group, rename it, and then customize it, rather than change the default security group.
Duplicating and
Editing Default
Security Groups
To base a new security group on an existing default security group (see “Default Security Groups” on page 8):
1. Start the Security Manager (see page 12).
2. In the navigation pane, select the security group to duplicate.
3. Right-click, then select Duplicate (or select EditDuplicate).
4. Select the Clone of .... security group in the navigation pane.
5. In the Security Group Properties section, modify the settings for the selected security group.
6. Select FileSave.
Note: Settings are not applied until you close and restart the GeneMapper ID-X Software.
Chapter 1 Setting Up User Accounts and User Access Customizing User and Security Groups
Creating a New
Security Group
1. Start the Security Manager (see page 12).
2. In the Security Manager, select FileNew Security Group.
3. In the Create Security Group wizard, clickNext.
4. Enter a Name (≤ 30 characters) and Description (≤ 1023 characters) for the new security group.
5. ClickNext.
6. Associate user groups for this security group:
Note: You can associate a security group with a user group at any time.
a. Select Associate for each user group that you want to associate with the security group.
b. For each associated user group, select Read and/or Update
to grant rights for the relationship to the security group.
IMPORTANT! Applied Biosystems recommends that you control functional access through the profile only and that you enable both Read and Update rights for all security groups.
c. ClickNext.
7. Click Finish to complete the setup.
Maintaining User Accounts
Applied Biosystems cannot retrieve passwords. Do not lose the new password for the gmidx account. This account can be used to reset passwords for other accounts. Applied
Biosystems cannot reset the password for this account if it is lost.
Editing User Accounts
Note: Applied Biosystems recommends that you duplicate a default user account, rename it, and then customize it, rather than change the default user account.
1. Start the Security Manager (see page 12).
2. In the navigation pane, select the user account of interest.
3. Modify the settings for the selected user account.
4. If you are changing an account name, enter the new name in the Name field.
5. Select FileSave.
Note: Settings are not applied until you close and restart the GeneMapper®ID-X Software.
Changing the Password for a User Account
1. Start the Security Manager (see page 12).
2. In the navigation pane, select the user account.
Chapter 1 Setting Up User Accounts and User Access Maintaining User Accounts
4. In the Change Password dialog box, enter a password in the Type and Retype fields. The password is not case-sensitive and can contain up to 17 alphanumeric and special characters.
5. Click OK.
6. Select or deselect Pre-Expire. If Pre-Expire is selected, the software prompts the user to enter a new password at the next log in. If Pre-Expire is deselected, the user continues to use the password you entered in step 4.
7. Select FileSave.
Note: Settings are not applied until you close and restart the GeneMapper ID-X Software.
Deleting a User Account
After you delete an account, you cannot retrieve or restore the deleted account, and you cannot create another user account with the same name.
An alternative to deleting a user account is to deactivate or suspend the account, as explained in the next section.
To delete a user account:
1. In the navigation pane of the Access Control Administration window, select the user account you want to delete.
1. Start the Security Manager (see page 12).
2. In the navigation pane, select the user account of interest.
3. In the Status drop-down list of the User Details section (see below), select the appropriate account status for the user account.
Table 9 Account statuses
4. Select FileSave.
Note: Settings are not applied until you close and restart the GeneMapper ID-X Software.
Select the desired user account.
Select the desired status.
Status Description
Active The user can log in to and use the software.
Inactive The user cannot log in. Set by a user with an Admin profile.
Suspended The user cannot log in. Set by the software when a user exceeds the limit of unsuccessful login attempts.
Chapter 1 Setting Up User Accounts and User Access Viewing the Security Report
Viewing the Security Report
About the
Security Report
The security report summarizes the current Security Manager settings.
You can print a summary of one or more components of the security system (such as access rights for a particular user). See below.
Note: The Security Manager does not monitor login attempts or other user activity (such as creating projects). To monitor and record user activity, configure the auditing system (see Chapter 2,
Managing the Auditing System, on page 45).
Printing the
Security Report
1. Start the Security Manager (see page 12).
2. In the navigation pane, select a user account or profile.
3. Select FileReport.
4. In the Print Access Control Identifiers dialog box, select options to specify the content of the report.
• Entire Access Control– Prints a summary of all user accounts, applications, and profiles.
• Selection only– Prints a report of the selected user account, application, or profile selected in the navigation pane of the Security Manager.
• Print checked objects below– Prints a report of one or more of the following elements that you select:
– Users– A report of all user accounts. – Applications– A report of all applications. – User Groups– A report of all user groups. – Security Groups– A report of all security groups. – Profiles– A report of all profiles.
5. Click Preview to view a preview of the report (see below).
6. Click Print. Otherwise, click Close, then repeat step 4 to modify the report settings as desired.
7. Click Cancel to close the Print Access Control Identifiers dialog box.
Chapter 1 Setting Up User Accounts and User Access Exporting and Importing the Security Settings
Exporting and Importing the Security Settings
Transferring
Security Settings
Between
Computers
You can export a summary of all security settings to back up or transfer to another computer. The exported security file contains password policies, user accounts, profiles, user groups, and security groups.
IMPORTANT! The GeneMapper®ID-X Software does not
automatically back up the security data when you back up the database. You must back up manually by exporting a file. Applied Biosystems recommends that you back up security settings after you make any change to the system. For more information on backing up, see Chapter 4, Maintaining the Software and Database Application, on page 75.
Exporting the
Security Settings
1. Start the Security Manager (see page 12).
2. Select FileExport Database.
3. In the Save dialog box, enter a file name for the exported file, select Access Control files (.acc), then click Save to export the security settings as an .acc file.
4. In the Export Users dialog box, click OK.
Importing the
Security Settings
IMPORTANT! Importing security settings from an .acc file automatically replaces all existing security settings.
Chapter 1
Chapter 4 Chapter 3 Chapter 2
Managing the
Auditing System
■ Overview of the Audit System . . . 46■ Default Audit Map Settings. . . 48
■ Using the Audit Map . . . 50
■ Viewing Audit History Records . . . 57
■ Backing Up, Removing, and Restoring Audit Records. . . 63 Setting Up User
Accounts and User Access
Managing the Auditing System
Managing the E-Signature System
Maintaining the Software and Database Application
Chapter 2 Managing the Auditing System Overview of the Audit System
Overview of the Audit System
Use the GeneMapper®ID-X Software audit system to specify the
types of actions you want to audit (for example, allele edits) and the auditing mode (silent, or requiring the user to enter a reason for change).
The components of the audit system are defined in Table 10.
Table 10 Components of the audit system
Component Definition
Audit Map
(open in GeneMapper ID-X
Software by selecting Admin
Audit ManagerSetting...)
Set of instructions specified by the GeneMapper ID-X Software system administrator that defines the types of data to audit, the actions to audit, and whether auditing is On (prompts the user for a Reason for Change) or Silent (tracks the change, but does not prompt the user).
Auditing in the GeneMapper
ID-X Software
The cumulative record of changes to all audited objects. When a user creates or deletes an audited item, the change is tracked. If auditing is On instead of Silent, the user must enter a reason for the change in the Reason(s) for Change dialog box (see figure on next page). When a user changes an audited item (instead of creating or deleting), the dialog box also includes an Apply To All option that applies the reason for change to future changes of the same type, until the project is saved (for example, when editing alleles, the same reason is used for all future edits of alleles until you save the project).
IMPORTANT! Audit records are saved only when a user saves the project, analysis method, size standard, or other object being changed. Audit records are not saved when a user clicks OK in the Reasons for Change dialog box. If a user clicks Cancel without saving the change, the software discards all possible audit records.
Name of the affected Action