Setup Guide
Revision BMcAfee SaaS Email Archiving for Microsoft
Exchange Server 2010
COPYRIGHT
Copyright © 2015 McAfee, Inc., 2821 Mission College Boulevard, Santa Clara, CA 95054, 1.888.847.8766, www.intelsecurity.com
TRADEMARK ATTRIBUTIONS
Intel and the Intel logo are registered trademarks of the Intel Corporation in the US and/or other countries. McAfee and the McAfee logo, McAfee Active Protection, McAfee DeepSAFE, ePolicy Orchestrator, McAfee ePO, McAfee EMM, McAfee Evader, Foundscore, Foundstone, Global Threat Intelligence, McAfee LiveSafe, Policy Lab, McAfee QuickClean, Safe Eyes, McAfee SECURE, McAfee Shredder, SiteAdvisor, McAfee Stinger, McAfee TechMaster, McAfee Total Protection, TrustedSource, VirusScan are registered trademarks or trademarks of McAfee, Inc. or its subsidiaries in the US and other countries. Other marks and brands may be claimed as the property of others.
LICENSE INFORMATION License Agreement
NOTICE TO ALL USERS: CAREFULLY READ THE APPROPRIATE LEGAL AGREEMENT CORRESPONDING TO THE LICENSE YOU PURCHASED, WHICH SETS FORTH THE GENERAL TERMS AND CONDITIONS FOR THE USE OF THE LICENSED SOFTWARE. IF YOU DO NOT KNOW WHICH TYPE OF LICENSE YOU HAVE ACQUIRED, PLEASE CONSULT THE SALES AND OTHER RELATED LICENSE GRANT OR PURCHASE ORDER DOCUMENTS THAT ACCOMPANY YOUR SOFTWARE PACKAGING OR THAT YOU HAVE RECEIVED SEPARATELY AS PART OF THE PURCHASE (AS A BOOKLET, A FILE ON THE PRODUCT CD, OR A FILE AVAILABLE ON THE WEBSITE FROM WHICH YOU DOWNLOADED THE SOFTWARE PACKAGE). IF YOU DO NOT AGREE TO ALL OF THE TERMS SET FORTH IN THE AGREEMENT, DO NOT INSTALL THE SOFTWARE. IF APPLICABLE, YOU MAY RETURN THE PRODUCT TO MCAFEE OR THE PLACE OF PURCHASE FOR A FULL REFUND.
Contents
Preface 5
About this guide . . . 5
Audience . . . 5
Conventions . . . 5
What's in this guide . . . 6
Find McAfee SaaS service documentation . . . 6
1 About Email Archiving for Microsoft Exchange Server 7 The role of envelope journaling in archiving messages . . . 7
Associating messages with users in Email Archiving . . . 7
Archiving historical messages . . . 8
Supported versions of Exchange Server 2010 . . . 8
Preparing for setup . . . 8
2 Setting up the journaling feature 11 Add a new journaling mailbox . . . 11
Enable standard journaling . . . 15
Set up premium journaling . . . 18
3 Setting journal mailbox parameters 23 Hide the journal mailbox from Exchange address lists . . . 23
Hide the journal mailbox using Exchange Management Console . . . 23
Hide the journal mailbox using Exchange Management Shell . . . 24
Prevent mail from going directly to the journal mailbox . . . 24
Prevent mail using Exchange Management Console . . . 25
Prevent mail using Exchange Management Shell . . . 26
Remove storage limits on the journal mailbox . . . 26
4 Setting up TLS on Exchange Server 29 Verify that your Exchange Server is using TLS with POP3 and IMAP4 . . . 29
Telnet to your Exchange Server by disabling POP3 authentication . . . 30
Preface
This guide provides the information you need to configure, use, and maintain your McAfee SaaS service.
Contents
About this guide
Find McAfee SaaS service documentation
About this guide
This information describes the guide's target audience, the typographical conventions and icons used in this guide, and how the guide is organized.
Audience
McAfee SaaS documentation is carefully researched and written for the target audience. The information in this guide is intended primarily for:
• Administrators — People who configure and manage specific features of a service. • Users — People who use features of a service to view and manage their own information.
Conventions
This guide uses the following typographical conventions and icons.
Book title or Emphasis Title of a book, chapter, or topic; introduction of a new term; emphasis. Bold Text that is strongly emphasized.
User input or Path Commands and other text that the user types; the path of a folder or program.
Code A code sample.
User interface Words in the user interface including options, menus, buttons, and dialog boxes.
Hypertext blue A live link to a topic or to a web site.
Note: Additional information, like an alternate method of accessing an
option.
Tip: Suggestions and recommendations.
Important/Caution: Valuable advice to protect your computer system,
What's in this guide
This guide is organized to help you find the information you need.
It's divided into functional parts intended to support the goals you need to accomplish when using your McAfee SaaS service. Each part is further divided into chapters that group relevant information together by feature and associated tasks, so you can go directly to the topic you need to successfully accomplish your goals.
Find McAfee SaaS service documentation
McAfee provides the information you need during each phase of service implementation, from setup to daily use and troubleshooting. After a service update is released, information is added to the McAfee SaaS Email and Web Security Support site.
Task
1 Go to the McAfee SaaS Email and Web Security Support page at http://support.mcafeesaas.com/.
2 Under Knowledge Base, click Reference Materials.
3 Under Reference Materials, scroll down to access information that you need: • Service Enhancements and Release Notes
• Training Materials
• Service Reference Guides
Preface
1
About Email Archiving for Microsoft
Exchange Server
The McAfee SaaS Email Archiving service stores email messages from a journal mailbox on your Microsoft Exchange Server and associates those messages with user accounts. Users can then log on to the Control Console and view their archived messages. Additionally, Email Archiving allows you to store all of your previously sent and received messages using a historical mailbox.
Contents
The role of envelope journaling in archiving messages Associating messages with users in Email Archiving Archiving historical messages
Supported versions of Exchange Server 2010 Preparing for setup
The role of envelope journaling in archiving messages
Email Archiving requires that you enable the envelope journaling feature of your Microsoft Exchange Server.
The journaling feature of Exchange Server creates a copy — or journal — of all email messages that are sent or received by the server. Using envelope journaling ensures that the BCC and distribution list recipients are captured and archived in addition to the primary sender and recipient.
After journaling is enabled, the Exchange Server sends copies of all email to a dedicated mailbox called the journal recipient mailbox. From here, the Email Archiving service can retrieve your email and archive it.
Email Archiving stores messages for a user even after that user has been removed from the Active Directory and the Exchange Server.
Associating messages with users in Email Archiving
Email Archiving automatically associates newly archived email messages with user accounts in the Control Console. This process ensures that individual users are able to view their archived messages in the Email Archiving tab of the Control Console.
Archiving historical messages
You can archive older, historical messages in addition to your active mail accounts. This involves a completely different process and does not use journaling.
Historical messages include all of the messages that were on your mail server prior to setting up Email Archiving. In order to archive these messages you can do one of the following:
• Pay for the Managed Import Service. You can ask your sales representative for details.
• Upload historical messages by setting up a designated historical mail source in the Control Console. There is no extra charge.
If you choose to upload historical messages, you should complete these activities:
• Create a user mailbox on the Exchange Server and place your historical messages into the inbox. • Set up a Historical Mail Source in the Control Console and connect it to your historical mailbox. • Enable the Historical Mail Source and messages placed into the inbox of your historical mailbox are
automatically imported into Email Archiving. After they are archived, your messages are deleted from the mailbox. Messages in subfolders, however, are not imported.
For more information, see the McAfee SaaS Email Archiving Administrator Guide or the Control Console Help.
Do not turn on journaling for your historical mailbox.
Supported versions of Exchange Server 2010
You should have one of the following versions of Microsoft Exchange Server 2010: • Exchange Server 2010 Standard Edition
• Exchange Server 2010 Enterprise Edition
Running a mixed Exchange Server environment is not recommended or supported. Interoperability limitations between different versions of Exchange Server can adversely affect journaling.
Preparing for setup
Be sure to complete the following tasks before setting up the journaling feature in Exchange Server. • You must add your users on the Control Console before you set up Email Archiving and the
journaling feature of Exchange Server.
If you don't add your users first, then the Customer Administrator will be the only user role with access to the archive.
• Check with your Firewall/Intrusion Prevention System vendor to verify that the Email Archiving service IP address space is able to communicate with your network.
• We recommend setting the maximum message size in Exchange Server to 50 MB, since the maximum message size that Email Archiving can store is 50 MB.
1
About Email Archiving for Microsoft Exchange Server• Select a journaling type. There are two types of journaling:
• Standard — This type is easier to implement and allows you to quickly enable journaling for all the users on a storage database. If you want to archive all of your users, we recommend setting up standard journaling on each of your storage databases.
• Premium — This type is more complex to implement but enables you to set up journaling based on rules. For example, you can enable journaling for specific users on a database. Premium journaling requires that you purchase an Exchange Server Enterprise client access license (CAL). Additionally, you should configure journaling agents on the appropriate Hub Transport servers.
IMAP is the recommended protocol for all setup activities in Email Archiving.
About Email Archiving for Microsoft Exchange Server
1
About Email Archiving for Microsoft Exchange Server2
Setting up the journaling feature
Contents
Add a new journaling mailbox Enable standard journaling Set up premium journaling
Add a new journaling mailbox
Set up a journaling mailbox for use with Email Archiving.
Complete these steps when setting up both standard and premium journaling. Task
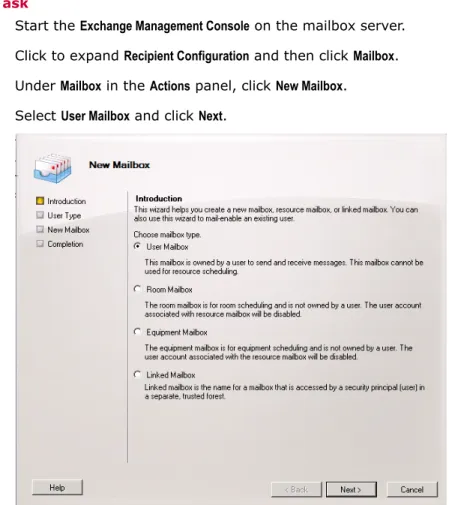
1 Start the Exchange Management Console on the mailbox server.
2 Click to expand Recipient Configuration and then click Mailbox.
3 Under Mailbox in the Actions panel, click New Mailbox.
4 Select User Mailbox and click Next.
Figure 2-1 New Mailbox — Introduction
2
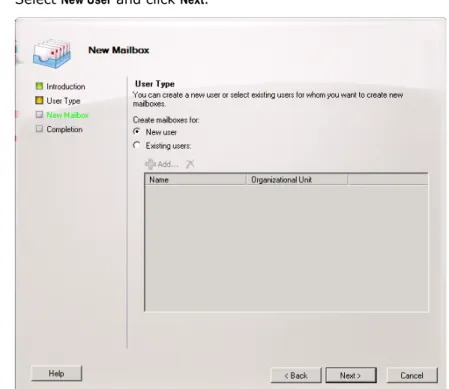
5 Select New User and click Next.
Figure 2-2 New Mailbox — User Type
6 Under User Information, complete the following:
a Enter a name in the First name and Last name fields.
b Edit the Name field as necessary.
2
Setting up the journaling featurec Enter a log on name in the User logon name (User Principal Name) field.
d Type and confirm a password in the Password and Confirm password fields.
This is the user logon name and password you will use to set up a mail source in Email Archiving.
Figure 2-3 New Mailbox - User Information 7 Click Next.
8 Under Mailbox Settings, enter an alias for the mailbox user in the Alias field.
Figure 2-4 New Mailbox — Mailbox Settings
Setting up the journaling feature
9 Click Next.
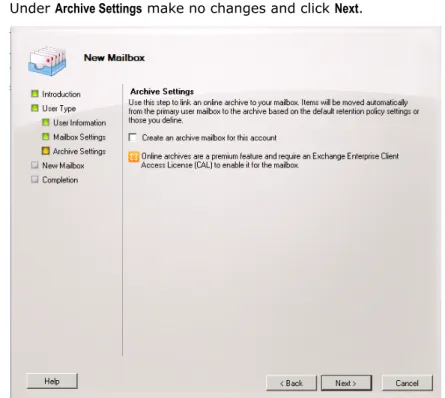
10 Under Archive Settings make no changes and click Next.
Figure 2-5 New Mailbox - Archive Settings
11 Review the Configuration Summary and click New to create the mailbox.
Figure 2-6 New Mailbox - Configuration Summary 12 Click Finish.
2
Setting up the journaling featureEnable standard journaling
Enable standard journaling by turning it on for each database. After it is enabled, standard journaling applies to all of the mailboxes on a server.
This task is required for setting up standard journaling. Do not complete this task if you are setting up premium journaling.
Task
1 Start the Exchange Management Console on the mailbox server where you are enabling standard journaling.
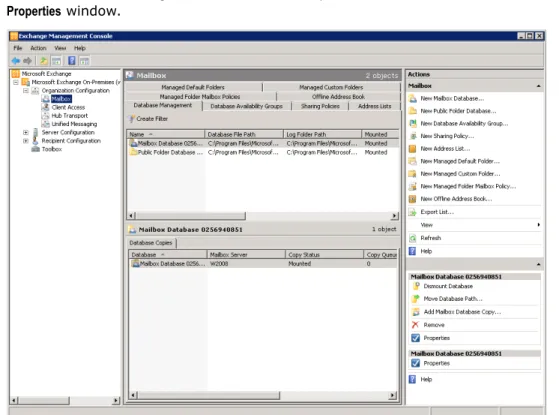
2 Click to expand Organization Configuration, then click Mailbox.
3 Under the Database Management tab in the Mailbox panel, double-click the database name to open the
Properties window.
Figure 2-7 Organization Configuration — Mailbox
Setting up the journaling feature
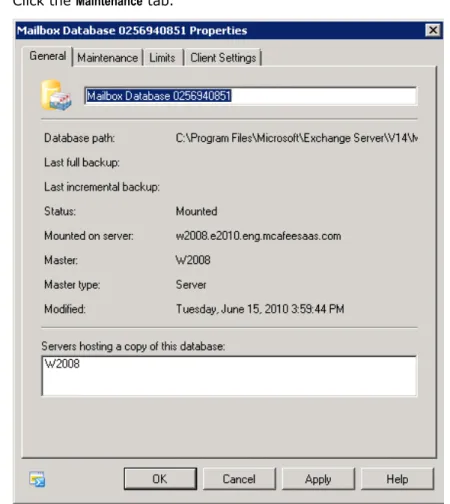
4 Click the Maintenance tab.
Figure 2-8 Mailbox Database Properties
2
Setting up the journaling feature5 Select the Journal Recipient checkbox and then click Browse to select a recipient.
Figure 2-9 Mailbox Database Properties — Maintenance
Setting up the journaling feature
6 Select the journal recipient mailbox and click OK.
Figure 2-10 Select Recipient 7 Click OK to complete the process.
All journaled messages for users on this mailbox database are sent to the journal mailbox.
Set up premium journaling
Add journal rules to enable the premium journaling options on those clients with Enterprise Edition Licensing CALs.
This task is required for setting up premium journaling. Do not complete this task if you are setting up standard journaling.
Task
1 Enable the journaling agent on the Hub Transport server.
a From the Start menu, select All Programs | Microsoft Exchange Server 20xx | Exchange Management Shell.
b To determine whether or not the journaling agent is enabled, enter: Get-TransportAgent If no agent name is returned, the agent is not enabled.
c To enable the agent, enter: Enable-TransportAgent -Identity "Journaling agent"
2 Open the Exchange Management Console on your Hub Transport Server.
3 Click to expand Organization Configuration, then click Hub Transport.
2
Setting up the journaling feature4 In the Hub Transport panel, select Journal Rules.
Figure 2-11 Hub Transport — Journal Rules
5 In the Hub Transport section of the Actions panel, click New Journal Rule.
Setting up the journaling feature
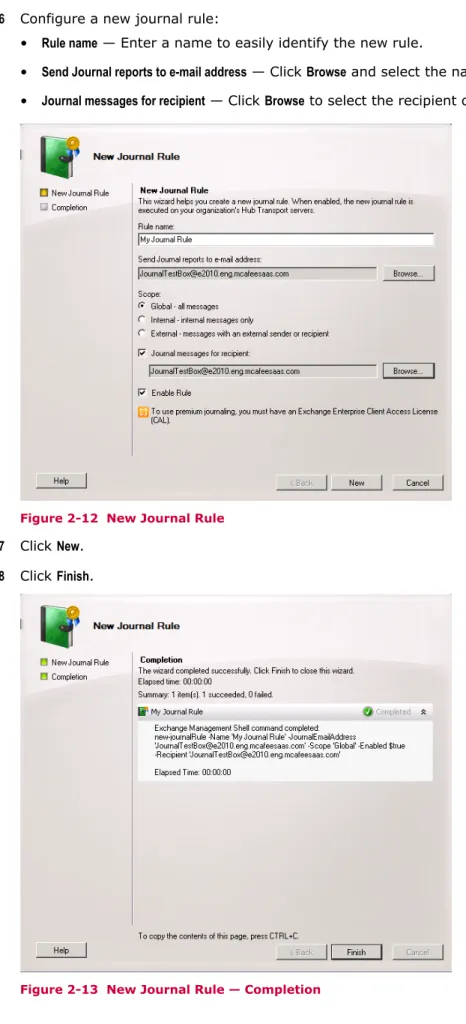
6 Configure a new journal rule:
• Rule name — Enter a name to easily identify the new rule.
• Send Journal reports to e-mail address — Click Browse and select the name of the journal mailbox. • Journal messages for recipient — Click Browse to select the recipient of the journal messages.
Figure 2-12 New Journal Rule 7 Click New.
8 Click Finish.
2
Setting up the journaling featureAll journaled messages for users on this Hub Transport server are now sent to the journal mailbox.
Setting up the journaling feature
2
Setting up the journaling feature3
Setting journal mailbox parameters
Contents
Hide the journal mailbox from Exchange address lists Prevent mail from going directly to the journal mailbox Remove storage limits on the journal mailbox
Hide the journal mailbox from Exchange address lists
You should hide the journal recipient mailbox from Exchange address lists in order to prevent it from receiving mail directly. The journal mailbox should only be used for archiving purposes.
You can complete this task using either the Exchange Management Console or the Exchange Management Shell.
Tasks
• Hide the journal mailbox using Exchange Management Console on page 23
• Hide the journal mailbox using Exchange Management Shell on page 24
Hide the journal mailbox using Exchange Management Console
Task1 Start the Exchange Management Console on the mailbox server.
2 Click to expand Recipient Configuration and then double-click the journal mailbox to open the Properties
window.
3 Select Hide from Exchange address lists.
Figure 3-1 Mailbox Properties — Hide from Exchange address lists 4 Click OK to complete the process.
Hide the journal mailbox using Exchange Management Shell
Task1 From the Start menu, select All Programs | Microsoft Exchange Server 20xx | Exchange Management Shell. 2 Type Set-Mailbox journalmailbox -HiddenFromAddressListsEnabled $true.
Where journalmailbox is the name of your journal mailbox.
Prevent mail from going directly to the journal mailbox
You should remove the journal recipient mailbox from the Global Address List in order to keep it from receiving mail directly. The journal mailbox should only be used for archiving purposes.
You can complete this task using either the Exchange Management Console or the Exchange Management Shell.
3
Setting journal mailbox parametersTasks
• Prevent mail using Exchange Management Console on page 25
• Prevent mail using Exchange Management Shell on page 26
Prevent mail using Exchange Management Console
Task1 Start the Exchange Management Console on the mailbox server.
2 Click to expand Recipient Configuration, then double-click the journal mailbox to open the Properties
window.
3 Select Mail Flow Settings.
Figure 3-2 Mailbox Properties — Mail Flow Settings
Setting journal mailbox parameters
4 Double-click Message Delivery Restrictions to set your configuration options.
Figure 3-3 Message Delivery Restrictions 5 Select Only senders in the following list.
6 Click Add to open the Select Recipient window.
7 Select a recipient, then click OK.
8 Click OK to complete the process.
Prevent mail using Exchange Management Shell
Task1 From the Start menu, select All Programs | Microsoft Exchange Server 20xx | Exchange Management Shell. 2 Type Set-Mailbox journal mailbox -AcceptMessagesOnlyFrom journal mailbox.
Where journal mailbox is the name of your journal mailbox.
Remove storage limits on the journal mailbox
3
Setting journal mailbox parametersmessages to be removed before they can be archived. As a result, you should consider removing storage limits that can affect the journal mailbox.
Before you begin
Set up your journal recipient mailbox before completing this task.
Task
1 Start the Exchange Management Console on the mailbox server.
2 Click to expand Recipient Configuration and then double-click the journal mailbox to open the Properties
window.
3 Select Mailbox Settings.
Figure 3-4 Mailbox Properties — Mailbox Settings
Setting journal mailbox parameters
4 Double-click Storage Quotas.
Figure 3-5 Storage Quotas
5 Deselect all of the options under Storage Quotas and Deleted item retention, and then click OK.
6 Click OK to complete the process.
3
Setting journal mailbox parameters4
Setting up TLS on Exchange Server
Transport Layer Security (TLS) is an encryption protocol that provides secure communications on the internet for such things as web browsing, email, internet faxing, instant messaging, and other data transfers. Email Archiving supports TLS, allowing you to enhance the security of your outbound journaled email messages. Using TLS is not required.
Email Archiving uses a TLS certificate to authenticate your Exchange Server. It then automatically accepts the encrypted messages as they are transported from Exchange Server, decrypts the messages, and stores them using a 256-bit encryption method.
You can find detailed information about setting up TLS for Exchange Server on the Microsoft website:
http://technet.microsoft.com/en-us/library/bb430764.aspx
Contents
Verify that your Exchange Server is using TLS with POP3 and IMAP4 Telnet to your Exchange Server by disabling POP3 authentication
Verify that your Exchange Server is using TLS with POP3 and
IMAP4
Secure POP3 and IMAP4 access with TLS are both enabled by default. However, you should verify the settings to ensure that both are using SecureLogin.
IMAP is the recommended protocol for Email Archiving. Task
1 On the Exchange Server computer, select Start | All Programs | Microsoft Exchange Server 20xx Exchange Management Shell to open a command prompt.
2 Type Get-POPsettings.
3 Verify that the LoginType field is set to SecureLogin.
UnencryptedOrTLSBindings SSLBindings LoginType X509Certifcate Name –––––––––––––––––––––––– ––––––––––– ––––––––– ––––––––––––––––––– {:::110, 0.0.0.0:110} {:::995, 0.0.0.0:995} SecureLogin w2008
4 Type Get-IMAPsettings.
5 Verify that the LoginType field is set to SecureLogin.
UnencryptedOrTLSBindings SSLBindings LoginType X509Certifcate Name –––––––––––––––––––––––– ––––––––––– ––––––––– ––––––––––––––––––– {:::143, 0.0.0.0:143} {:::993, 0.0.0.0:993} SecureLogin w2008
6 Close the command prompt.
Telnet to your Exchange Server by disabling POP3
authentication
It can be useful to connect to Exchange Server using Telnet. However, it is not possible to Telnet on port 110 when the POP3 LoginType is set to SecureLogin. To Telnet, you will need to change your POP3 Authentication settings to Plain text logon (Basic Authentication) and connect without TLS.
When you attempt to login with Telnet you may see an error message:
+OK The Microsoft Exchange POP3 service is ready. User username -ERR Command is not valid in this state.
When this occurs you should change your settings.
Task
1 Change your POP3 authentication settings.
a Start the Exchange Management Console.
b Expand Server Configuration and click Client Access.
c Click POP3 and IMAP4.
d From the list, double-click POP3 to open the POP3 Properties dialog box.
e Click Authentication and select Plain text login (Basic Authentication).
f Click OK.
2 Restart the POP3 service.
a Select Start | All Programs | Administrative Tools | Services.
b Right-click Microsoft Exchange POP3 and click Restart.
3 Start a new Telnet session.
a Open a command prompt and type Telnet example_hostname 110.
b Type USER example_user_name.
c Type PASS example_password.
4
Setting up TLS on Exchange ServerIndex
A
About this guide 5 Audience 5
C
Conventions 5
F
Find documentation 6