IBM
Program Directory for
Operations Manager for z/VM
version 1 release 4.0
Program Number 5697-J10
for Use with
z/VM version 5 release 4
z/VM version 6 release 1
z/VM version 6 release 2
Document Date: November 2012
Note
Before using this information and the product it supports, be sure to read the general information under “Notices” on page 60.
This program directory, dated November 2012, applies to Operations Manager for z/VM version 1 release 4 (Operations Manager), Program Number 5697-J10.
A form for reader's comments appears at the back of this publication. When you send information to IBM, you grant IBM® a nonexclusive right to use or distribute the information in any way it believes appropriate without incurring any obligation to you. © Copyright International Business Machines Corporation 2005, 2012. All rights reserved.
Contents
1.0 Introduction . . . 1
1.1 Program Description . . . 1
2.0 Program Materials . . . 2
2.1 Basic Machine-Readable Material . . . 2
2.2 Optional Machine-Readable Material . . . 3
2.3 Program Publications . . . 3
2.3.1 Base Program Publications . . . 3
2.3.2 Softcopy Publicatons . . . 3
2.4 Program Source Materials . . . 4
2.5 Publications Useful During Installation . . . 4
3.0 Program Support . . . 5
3.1 Preventive Service Planning . . . 5
3.2 Statement of Support Procedures . . . 5
4.0 Program and Service Level Information . . . 6
4.1 Program Level Information . . . 6
4.2 Cumulative Service Tape . . . 6
5.0 Installation Requirements and Considerations . . . 7
5.1 Hardware Requirements . . . 7
5.2 Program Considerations . . . 7
5.2.1 Operating System Requirements . . . 7
5.2.2 Other Program Product Requirements . . . 7
5.2.3 Migration Considerations . . . 7
5.2.3.1 Migrating from Operations Manager V1.3.0 . . . 7
5.2.3.2 Migrating from Operations Manager V1.2.0 . . . 8
5.2.3.3 Migrating from Operations Manager V1.1.0 . . . 9
5.2.4 Program Installation and Service Considerations . . . 11
5.3 DASD Storage and User ID Requirements . . . 12
6.0 Installation Instructions . . . 17
6.1 VMSES/E Installation Process Overview . . . 17
6.2 Plan Your Installation For Operations Manager . . . 18
6.3 Allocate Resources for Installing Operations Manager . . . 22
6.3.1 Installing Operations Manager on Minidisk . . . 23
6.3.2 Installing Operations Manager in SFS Directories . . . 24
6.4 Install Operations Manager . . . 28
6.4.1 Update Build Status Table for Operations Manager . . . 32
6.6.1 Copy Operations Manager Files Into Production on z/VM V6.2 or Later Using Minidisks . . . 33
6.6.2 Copy Operations Manager Files Into Production on z/VM V6.2 or Later Using Shared File System . . . 35
6.6.3 Copy Operations Manager Files Into Production on z/VM V6.1 or Earlier Using Minidisks . . . 36
6.6.4 Copy Operations Manager Files Into Production on z/VM V6.1 or Earlier Using Shared File System . . . 38
6.7 Post-Installation Considerations . . . 39
7.0 Service Instructions . . . 40
7.1 VMSES/E Service Process Overview . . . 40
7.2 Servicing Operations Manager . . . 41
7.2.1 Automated Service Commands . . . 41
7.3 Place the New Operations Manager Service Into Production . . . 43
7.3.1 Copy the New Operations Manager Serviced Files Into Production on z/VM V6.2 or Later Using Minidisks . . . 44
7.3.2 Copy the New Operations Manager Serviced Files Into Production on z/VM V6.2 or Later Using Shared File System . . . 45
7.3.3 Copy the New Operations Manager Serviced Files Into Production on z/VM V6.1 or Earlier Using Minidisks . . . 47
7.3.4 Copy the New Operations Manager Serviced Files Into Production on z/VM V6.1 or Earlier Using Shared File System . . . 48
Appendix A. Create Product Parameter File (PPF) Override . . . 50
Appendix B. Traditional Service Commands . . . 53
B.1.1.1 Prepare to Receive Service . . . 53
B.1.1.2 Receive the Service . . . 55
B.1.1.3 Apply the Service . . . 56
B.1.1.4 Update the Build Status Table . . . 57
B.1.1.5 Build Serviced Objects . . . 59
Notices . . . 60
Trademarks and Service Marks . . . 61
Reader's Comments . . . 62
Figures
1. Basic Material: Program Tape . . . 22. Program Tape: File Content . . . 2
3. Material: Program Publications . . . 3
5. Publications Useful During Installation / Service on z/VM version 6 . . . 4
6. PSP Upgrade and Subset ID . . . 5
7. Component IDs . . . 5
1.0 Introduction
This program directory is intended for the system programmer responsible for program installation and maintenance. It contains information concerning the material and procedures associated with the installation of Operations Manager. You should read all of this program directory before installing the program and then keep it for future reference.
The program directory contains the following sections:
2.0, “Program Materials” on page 2 identifies the basic and optional program materials and documentation for Operations Manager.
3.0, “Program Support” on page 5 describes the IBM support available for Operations Manager. 4.0, “Program and Service Level Information” on page 6 lists the APARs (program level) and PTFs
(service level) incorporated into Operations Manager.
5.0, “Installation Requirements and Considerations” on page 7 identifies the resources and considerations for installing, migrating, and using Operations Manager.
6.0, “Installation Instructions” on page 17 provides detailed installation instructions for Operations Manager.
7.0, “Service Instructions” on page 40 provides detailed servicing instructions for Operations Manager. Appendix A, “Create Product Parameter File (PPF) Override” on page 50 provides detailed
information on overriding the Product Parameter File (PPF).
Appendix B, “Traditional Service Commands” on page 53 provides alternative instructions for servicing Operations Manager.
Before installing Operations Manager, read 3.1, “Preventive Service Planning” on page 5. This section tells you how to find any updates to the information and procedures in this program directory.
1.1 Program Description
Operations Manager helps improve the monitoring and management of z/VM® virtual machines. By automating routine maintenance tasks and automatically responding to predictable situations that require intervention, Operations Manager allows z/VM system programmers and administrators to focus on more critical tasks.
2.0 Program Materials
An IBM program is identified by a program number. The program number for Operations Manager for z/VM version 1 is 5697-J10.
The program announcement material describes the features supported by Operations Manager. Ask your IBM marketing representative for this information if you have not already received a copy.
The following sections identify:
basic and optional program materials available with this program publications useful during installation.
2.1 Basic Machine-Readable Material
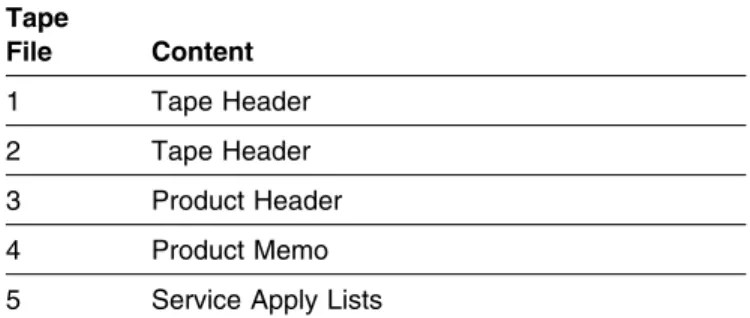
This program is available through the IBM® z/VM® SDO on 3590 or 3592 tape cartridge. You can also receive this program electronically by ordering it through the z/VM SDO using IBM ShopzSeries. For more information about IBM ShopzSeries go to www.ibm.com/software/ShopzSeries. The tape cartridge or electronic envelope contains all the programs and data needed for installation. See section 6.0, “Installation Instructions” on page 17 for more information about how to install the program. Figure 1 describes the tape cartridge. Figure 2 describes the file content of the program tape cartridge or product envelope.
Please refer to the Media Report, that comes with your order, for a description of the contents of each individual deliverable.
Figure 1. Basic Material: Program Tape
Feature
Number Medium
Physical
Volume Tape Content External Tape Label
5802 3590 cart. 1 Operations Manager V1.4.0 Ops Mgr z/VM V1.4 5802 3592 cart. 1 Operations Manager V1.4.0 Ops Mgr z/VM V1.4
Figure 2 (Page 1 of 2). Program Tape: File Content
Tape File Content 1 Tape Header 2 Tape Header 3 Product Header 4 Product Memo 5 Service Apply Lists
2.2 Optional Machine-Readable Material
There are no optional machine-readable materials for Operations Manager.
2.3 Program Publications
The following sections identify the basic and optional publications for Operations Manager.
2.3.1 Base Program Publications
Figure 3 identifies the program publications for Operations Manager.
2.3.2 Softcopy Publicatons
The Operations Manager publications can be found in Adobe® Portable Document Format off of the Operations Manager World Wide Web home page at url:
www.ibm.com/software/sysmgmt/zvm/operations/
They can also be downloaded using the specific publication number through the IBM Publication Center at:
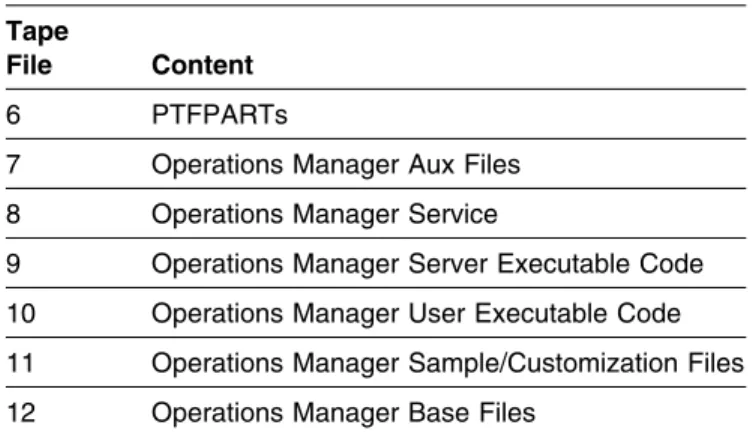
www.ibm.com/shop/publications/order Figure 2 (Page 2 of 2). Program Tape: File Content
Tape
File Content
6 PTFPARTs
7 Operations Manager Aux Files 8 Operations Manager Service
9 Operations Manager Server Executable Code 10 Operations Manager User Executable Code 11 Operations Manager Sample/Customization Files 12 Operations Manager Base Files
Figure 3. Material: Program Publications
Publication Title Form Number
2.4 Program Source Materials
No program source materials or viewable program listings are provided for Operations Manager.
2.5 Publications Useful During Installation
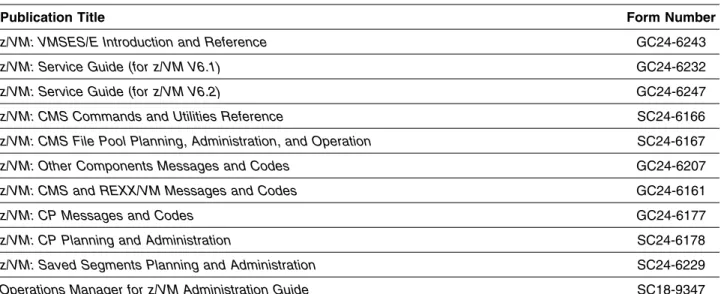
The publications listed in Figure 4 may be useful during the installation of Operations Manager. To order copies, contact your IBM representative.
Figure 4. Publications Useful During Installation / Service on z/VM version 5
Publication Title Form Number
z/VM: VMSES/E Introduction and Reference GC24-6130
z/VM: Service Guide GC24-6117
z/VM: CMS Commands and Utilities Reference SC24-6073
z/VM: CMS File Pool Planning, Administration, and Operation SC24-6074
z/VM: Other Components Messages and Codes GC24-6120
z/VM: CMS and REXX/VM Messages and Codes GC24-6118
z/VM: CP Messages and Codes GC24-6119
z/VM: CP Planning and Administration SC24-6083
z/VM: Saved Segments Planning and Administration SC24-6116
Operations Manager for z/VM Administration Guide SC18-9347
Figure 5. Publications Useful During Installation / Service on z/VM version 6
Publication Title Form Number
z/VM: VMSES/E Introduction and Reference GC24-6243
z/VM: Service Guide (for z/VM V6.1) GC24-6232
z/VM: Service Guide (for z/VM V6.2) GC24-6247
z/VM: CMS Commands and Utilities Reference SC24-6166
z/VM: CMS File Pool Planning, Administration, and Operation SC24-6167
z/VM: Other Components Messages and Codes GC24-6207
z/VM: CMS and REXX/VM Messages and Codes GC24-6161
z/VM: CP Messages and Codes GC24-6177
z/VM: CP Planning and Administration SC24-6178
z/VM: Saved Segments Planning and Administration SC24-6229
3.0 Program Support
This section describes the IBM support available for Operations Manager.
3.1 Preventive Service Planning
Before installing Operations Manager, check with your IBM Support Center or use IBMLink™ (ServiceLink) to see whether there is additional Preventive Service Planning (PSP) information. To obtain this
information, specify the following UPGRADE and SUBSET values:
3.2 Statement of Support Procedures
Report any difficulties you have using this program to your IBM Support Center. If an APAR is required, the Support Center will tell you where to send any needed documentation.
Figure 7 identifies the component ID (COMPID), Retain Release and Field Engineering Service Number (FESN) for Operations Manager.
Figure 6. PSP Upgrade and Subset ID
Retain
Upgrade Subset
COMPID Release
5697J1000 140 OPSZVM140 OPS140
Figure 7. Component IDs
Retain
Component Name FESN
COMPID Release
4.0 Program and Service Level Information
This section identifies the program and any relevant service levels of Operations Manager. The program level refers to the APAR fixes incorporated into the program. The service level refers to the PTFs shipped with this product. Information about the cumulative service tape is also provided.
4.1 Program Level Information
The following APAR fixes against the previous release of Operations Manager have been incorporated into this release. PK72568 / UK40086 PK73592 / UK40633 PK85970 / UK46451 PK96966 / UK50454 PM06671 / UK54225 PM12977 / UK56409
If you are installing Operations Manager from an SDO dated March 2012 or later, the following Operations Manager V1.4.0 PTFs have already been pre-installed:
PM28019 / UK62815
Check the OPSZVM140 PSP bucket for any additional PTFs that should be installed or any additional install information.
4.2 Cumulative Service Tape
Cumulative service for Operations Manager release 4.0 is available through a monthly corrective service tape, Expanded Service Option, ESO. You need to specify the product ID, 5697J10D, when ordering the ESO.
5.0 Installation Requirements and Considerations
The following sections identify the system requirements for installing and activating Operations Manager.
5.1 Hardware Requirements
Operations Manager release 4.0 will operate on any hardware that supports the prerequisite software.
5.2 Program Considerations
The following sections list the programming considerations for installing and activating Operations Manager.
5.2.1 Operating System Requirements
Operations Manager supports the following VM operating systems: z/VM version 5 release 4
z/VM version 6 release 1 z/VM version 6 release 2
5.2.2 Other Program Product Requirements
The following products are required to use specific functions of Operations Manager:
An External Security Manager, such as the RACF® Security Server feature for z/VM, is required for: – Command level authorization
– Read versus update access to consoles using VIEWCON – Read versus update access to spool files using VIEWSPL
5.2.3 Migration Considerations
5.2.3.1 Migrating from Operations Manager V1.3.0
The following changes are required to a system running Operations Manager V1.3.0 in order to run V1.4.0:
1. You must update the CP directory entry for the main Operations Manager server (OPMGRM1, by default.) Add the SHARE option to the XCONFIG ADDRSPACE statement. The updated statement should look like this:
2. You must update the CP directory entries for all action processing servers (OPMGRS1, OPMGRS2, OPMGRS3, and OPMGRS4, by default.)
Replace the following line: MACHINE ESA
with MACHINE XC
Add the following XCONFIG statements: XCONFIG ACCESSLIST ALSIZE 126
XCONFIG ADDRSPACE MAXNUMBER 126 TOTSIZE 512M SHARE
3. You must update the PROFILE EXECs or CP directory entries for the following user IDs to link to the V1.4.0 code on 5697J10D rather than the V1.3.0 code on 5697J10C:
OPMGRM1
All OPMGRSn user IDs
All users and administrators linking to any of the 5697J10C disks
5.2.3.2 Migrating from Operations Manager V1.2.0
The following changes are required to a system running Operations Manager V1.2.0 in order to run V1.4.0:
1. The sample GOMDGD4 command is no longer recommended to set or reset the CP alternate user ID for an action processing server. The ALTUSER operand on the DEFACTN statement should be used instead.
2. The TIMER function is no longer supported in V1.4.0. It was previously replaced by a scheduling function: DEFSCHD and DELSCHD. Therefore, the following files should be removed from your Operations Manager installation:
All files with filename DEFTIMR All files with filename DELTIMR
These files are typically on the 5697J10B 310 and 2B2 minidisks and only need to be removed if you are still using these disks for V1.4.0. Copies of the files may also exist on the MAINT 19D minidisk or any other shared disk on your system if you copied the help files to another disk during installation. 3. Additional statements are required in the directory entry for user ID OPMGRM1. Refer to the
Operations Manager Administration Guide (SC18-9347) for details on the requirement for IUCV *SPL, OPTION APPLMON, and IUCV *VMEVENT statements.
4. Any references to the MONITOR operand on the CONFIG, STATUS, SUSPEND, and RESUME commands must be changed to MACHINE. This operand has been changed to more easily distinguish between monitors for virtual machines, monitors for spool space, and monitors for *VMEVENT. The DEFMMON and DELMMON statements remain unchanged.
5. The format of accounting and monitor collection records has changed. Details are provided in the Operations Manager Administration Guide.
6. You must update the PROFILE EXECs or CP directory entries for the following user IDs to link to the V1.4.0 code on 5697J10D rather than the V1.2.0 code on 5697J10B:
OPMGRM1
All OPMGRSn user IDs
All users and administrators linking to any of the 5697J10B disks
7. You must update the CP directory entry and PROFILE EXEC for user ID OPMGRM1 to link and access the new 198 disk or .CONFIGURATION directory. It is recommended that OPMGRM1 link the disk in RR mode so that other authorized users can link it MR and make changes to the configuration data while OPMGRM1 is running.
8. You must make your Operations Manager configuration file(s) available to user ID OPMGRM1 and any users who require access. All configuration files should now be maintained on the OPMGRM1 198 minidisk or in the filepool:OPMGRM1.CONFIGURATION directory.
9. If you have updated GOMCLG EXEC (for log file management on user ID OPMGRM1), move your customized version from the OPMGRM1 191 disk to the OPMGRM1 198 disk.
10. You must update the CP directory entry for the main Operations Manager server (OPMGRM1, by default.) Add the SHARE option to the XCONFIG ADDRSPACE statement. The updated statement should look like this:
XCONFIG ADDRSPACE MAXNUMBER 122 TOTSIZE 4G SHARE
11. You must update the CP directory entries for all action processing servers (OPMGRS1, OPMGRS2, OPMGRS3, and OPMGRS4, by default.)
Replace the following line: MACHINE ESA
with MACHINE XC
Add the following XCONFIG statements: XCONFIG ACCESSLIST ALSIZE 126
XCONFIG ADDRSPACE MAXNUMBER 126 TOTSIZE 512M SHARE
5.2.3.3 Migrating from Operations Manager V1.1.0
The following changes are required to a system running Operations Manager V1.1.0 in order to run V1.4.0:
1. The CP directory entry for the user ID OPMGRM1 now requires "OPTION ACCT" to allow it to use DIAG x'4C' and generate accounting records. This statement is only required if you want accounting records to be created.
2. The user ID OPMGRM1 requires the ability to issue CP QUERY OBSERVER and CP QUERY SECUSER. This is typically privilege class A, B, or C, and requires an update to the CP directory entry for OPMGRM1.
3. If you are planning to use OBSERVER instead of SECUSER to monitor consoles, and plan to send commands back to monitored consoles using Operations Manager, then the user ID OPMGRM1 requires the ability to issue CP SEND. This is typically privilege class C, and requires an update to the CP entry directory for OPMGRM1.
4. The TIMER function is no longer supported in V1.4.0. It was previously replaced by a scheduling function: DEFSCHD and DELSCHD. Therefore, the following files should be removed from your Operations Manager installation.
All files with filename DEFTIMR All files with filename DELTIMR
These files are typically on the 5697J10A 310 and 2B2 disks and only need to be removed if you are still using these disks for V1.4.0. Copies of the files may also exist on the MAINT 19D minidisk or any other shared disk on your system if you copied the help files to another disk during installation.
5. Additional statements are required in the directory entry for user ID OPMGRM1. Refer to the
Operations Manager Administration Guide (SC18-9347) for details on the requirement for IUCV *SPL, OPTION APPLMON, and IUCV *VMEVENT statements.
6. Any references to the MONITOR operand on the CONFIG and STATUS commands must be changed to MACHINE. This operand has been changed to more easily distinguish between monitors for virtual machines, monitors for spool space, and monitors for *VMEVENT. The DEFMMON and DELMMON statements remain unchanged.
7. You must update the PROFILE EXECs or CP directory entries for the following user IDs to link to the V1.4.0 code on 5697J10D rather than the V1.1.0 code on 5697J10A:
OPMGRM1
All OPMGRSn user IDs
All users and administrators linking to any of the 5697J10A disks
8. You must update the CP directory entry and PROFILE EXEC for user ID OPMGRM1 to link and access the new 198 disk or .CONFIGURATION directory. It is recommended that OPMGRM1 link the disk in RR mode so that other authorized users can link it MR and make changes to the configuration data while OPMGRM1 is running.
9. You must make your Operations Manager configuration file(s) available to user ID OPMGRM1 and any users who require access. All configuration files should now be maintained on the OPMGRM1 198 minidisk or in the filepool:OPMGRM1.CONFIGURATION directory.
10. You must update the CP directory entry for the main Operations Manager server (OPMGRM1, by default.) Add the SHARE option to the XCONFIG ADDRSPACE statement. The updated statement should look like this:
XCONFIG ADDRSPACE MAXNUMBER 122 TOTSIZE 4G SHARE
11. You must update the CP directory entries for all action processing servers (OPMGRS1, OPMGRS2, OPMGRS3, and OPMGRS4, by default.)
Replace the following line: MACHINE ESA
with MACHINE XC
Add the following XCONFIG statements: XCONFIG ACCESSLIST ALSIZE 126
XCONFIG ADDRSPACE MAXNUMBER 126 TOTSIZE 512M SHARE
5.2.4 Program Installation and Service Considerations
This section describes items that should be considered before you install or service Operations Manager. VMSES/E is required to install and service this product.
If multiple users install and maintain licensed products on your system, there may be a problem getting the necessary access to MAINT's 51D disk. If you find that there is contention for write access to the 51D disk, you can eliminate it by converting the Software Inventory from minidisk to Shared File System (SFS). See the VMSES/E Introduction and Reference manual, section "Changing the Software Inventory to an SFS Directory", for information on how to make this change.
Customers will not install and service Operations Manager strictly using the MAINT user ID, but will use a new user ID--5697J10D. This is the IBM suggested user ID name. You are free to change this to any user ID name you wish; however, a PPF override must be created.
Note: It may be easier to make the above PPF override change during the installation procedure 6.2, “Plan Your Installation For Operations Manager” step 6 on page 20, rather than after you have
installed this product.
If you are installing on z/VM V6.2 or later, there are several considerations for Single System Image (SSI). Refer to the following web site for more information:
http://www.ibm.com/support/search.wss?q=SSI&tc=SSMR76
If you are using an External Security Manager (such as IBM RACF Security Server), the following must be permitted:
– From user ID 5697J10D, LINK MAINT 51D in MR mode – From user ID 5697J10D, LINK MAINT 5E5 in RR mode – From user ID 5697J10D, LINK OPMGRM1 198 in MR mode
– If you plan to place Operations Manager general use code on MAINT's 19E disk (the 'Y' disk) or the Operations Manager help files on the system AMENG Help (MAINT's 19D) disk, then one of the following is required:
- From user ID MAINT or MAINTvrm, LINK 5697J10D 310 in RR mode
- From user ID MAINT or MAINTvrm, ACCESS 5697J10D.OPMGR.TESTUSER
The access required depends on whether you are installing Operations Manager on minidisk or in SFS.
– All LINK statements specified in the sample directory entries for the Operations Manager user IDs. Refer to 5.3, “DASD Storage and User ID Requirements” on page 12 for a list of Operations Manager user IDs.
– Read access to the Operations Manager user code for all user IDs that will issue Operations Manager commands. By default, this code is on the 5697J10D 410 minidisk or in the SFS directory filepool:5697J10D.OPMGR.PRODUSER. During product installation you may copy this code to MAINT 19D and MAINT 19E and let users access it from there.
5.3 DASD Storage and User ID Requirements
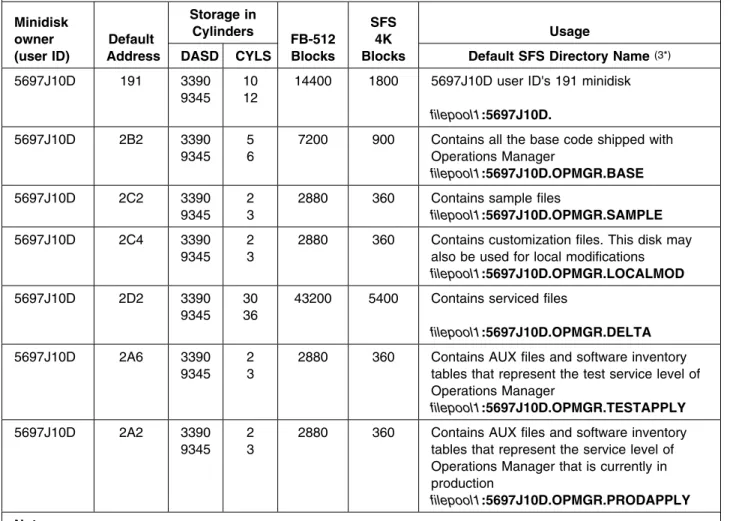
Figure 8 lists the user IDs, minidisks and default SFS directory names that are used to install and service Operations Manager.
Important Installation Notes:
User ID(s) and minidisks or SFS directories will be defined in 6.2, “Plan Your Installation For Operations Manager” on page 18 and are listed here so that you can get an idea of the resources that you will need prior to allocating them.
5697J10D is a default user ID and can be changed. If you choose to change the name of the installation user ID you need to create a Product Parameter Override (PPF) to reflect this change. This can be done in 6.2, “Plan Your Installation For Operations Manager” step 6 on page 20. If you choose to install Operations Manager on a common user ID the default minidisk addresses
for Operations Manager may already be defined. If any of the default minidisks required by Operations Manager are already in use you will have to create an override to change the default minidisks for Operations Manager so they are unique.
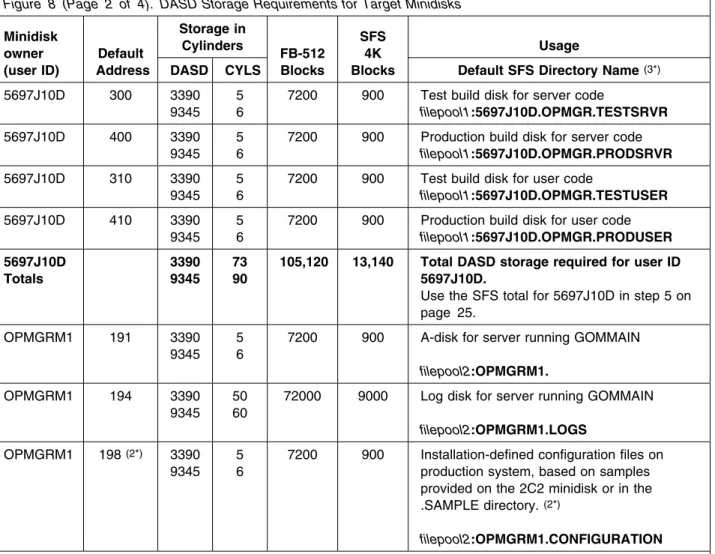
Figure 8 (Page 1 of 4). DASD Storage Requirements for Target Minidisks Minidisk owner (user ID) Default Address Storage in Cylinders FB-512 Blocks SFS 4K Blocks Usage
DASD CYLS Default SFS Directory Name (3*)
5697J10D 191 3390 9345
10 12
14400 1800 5697J10D user ID's 191 minidisk
filepool1:5697J10D.
5697J10D 2B2 3390 9345
5 6
7200 900 Contains all the base code shipped with Operations Manager filepool1:5697J10D.OPMGR.BASE 5697J10D 2C2 3390 9345 2 3
2880 360 Contains sample files
filepool1:5697J10D.OPMGR.SAMPLE
5697J10D 2C4 3390 9345
2 3
2880 360 Contains customization files. This disk may also be used for local modifications
filepool1:5697J10D.OPMGR.LOCALMOD
5697J10D 2D2 3390 9345
30 36
43200 5400 Contains serviced files
filepool1:5697J10D.OPMGR.DELTA
5697J10D 2A6 3390 9345
2 3
2880 360 Contains AUX files and software inventory tables that represent the test service level of Operations Manager filepool1:5697J10D.OPMGR.TESTAPPLY 5697J10D 2A2 3390 9345 2 3
2880 360 Contains AUX files and software inventory tables that represent the service level of Operations Manager that is currently in production
filepool1:5697J10D.OPMGR.PRODAPPLY Notes:
1. Cylinder values defined in this table are based on a 4K block size. FB-512 block and SFS values are derived from the 3390 cylinder values in this table. The FBA blocks are listed as 1/2K but should be CMS formatted at 1K size.
2. It is recommended that the MDISK entry for the OPMGRM1 198 disk in the CP directory specify the disk as RR. OPMGRM1 will then link the disk RR, allowing other authorized users to link the disk MR and make changes to the configuration data while OPMGRM1 is running.
3. The default SFS file pool is VMSYS. If you are installing on z/VM V6.2 or later, IBM recommends creating a PPF override to use:
VMPSFS for all directories that will be shared across the cluster. These are noted as filepool1 in the table.
A unique SFS file pool for all directories that should be unique on each member of the cluster. These are noted as filepool2 in the table. For this unique file pool, you can use VMSYS (provided by IBM) or you can create a new unique file pool such as MYPOOL1.
Figure 8 (Page 2 of 4). DASD Storage Requirements for Target Minidisks Minidisk owner (user ID) Default Address Storage in Cylinders FB-512 Blocks SFS 4K Blocks Usage
DASD CYLS Default SFS Directory Name (3*)
5697J10D 300 3390 9345
5 6
7200 900 Test build disk for server code
filepool1:5697J10D.OPMGR.TESTSRVR
5697J10D 400 3390 9345
5 6
7200 900 Production build disk for server code
filepool1:5697J10D.OPMGR.PRODSRVR
5697J10D 310 3390 9345
5 6
7200 900 Test build disk for user code
filepool1:5697J10D.OPMGR.TESTUSER
5697J10D 410 3390 9345
5 6
7200 900 Production build disk for user code
filepool1:5697J10D.OPMGR.PRODUSER 5697J10D Totals 3390 9345 73 90
105,120 13,140 Total DASD storage required for user ID 5697J10D.
Use the SFS total for 5697J10D in step 5 on page 25.
OPMGRM1 191 3390 9345
5 6
7200 900 A-disk for server running GOMMAIN
filepool2:OPMGRM1.
OPMGRM1 194 3390 9345
50 60
72000 9000 Log disk for server running GOMMAIN
filepool2:OPMGRM1.LOGS
OPMGRM1 198 (2*) 3390 9345
5 6
7200 900 Installation-defined configuration files on production system, based on samples provided on the 2C2 minidisk or in the .SAMPLE directory. (2*)
filepool2:OPMGRM1.CONFIGURATION Notes:
1. Cylinder values defined in this table are based on a 4K block size. FB-512 block and SFS values are derived from the 3390 cylinder values in this table. The FBA blocks are listed as 1/2K but should be CMS formatted at 1K size.
2. It is recommended that the MDISK entry for the OPMGRM1 198 disk in the CP directory specify the disk as RR. OPMGRM1 will then link the disk RR, allowing other authorized users to link the disk MR and make changes to the configuration data while OPMGRM1 is running.
3. The default SFS file pool is VMSYS. If you are installing on z/VM V6.2 or later, IBM recommends creating a PPF override to use:
VMPSFS for all directories that will be shared across the cluster. These are noted as filepool1 in the table.
A unique SFS file pool for all directories that should be unique on each member of the cluster. These are noted as filepool2 in the table. For this unique file pool, you can use VMSYS (provided by IBM) or you can create a new unique file pool such as MYPOOL1.
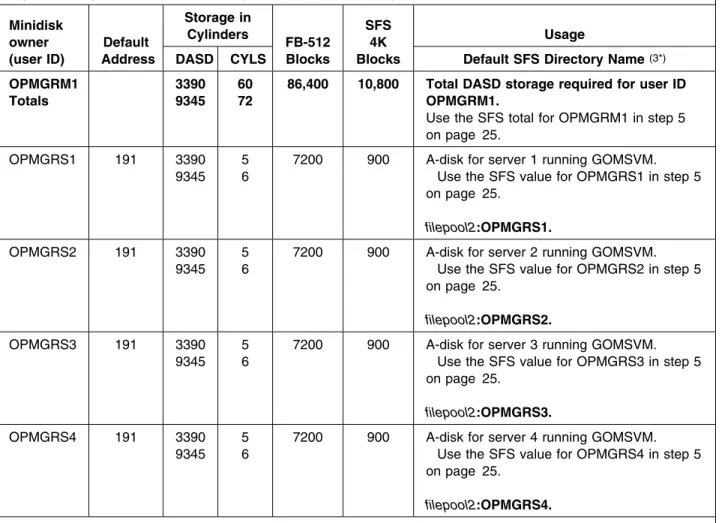
Figure 8 (Page 3 of 4). DASD Storage Requirements for Target Minidisks Minidisk owner (user ID) Default Address Storage in Cylinders FB-512 Blocks SFS 4K Blocks Usage
DASD CYLS Default SFS Directory Name (3*)
OPMGRM1 Totals 3390 9345 60 72
86,400 10,800 Total DASD storage required for user ID OPMGRM1.
Use the SFS total for OPMGRM1 in step 5 on page 25.
OPMGRS1 191 3390 9345
5 6
7200 900 A-disk for server 1 running GOMSVM. Use the SFS value for OPMGRS1 in step 5 on page 25. filepool2:OPMGRS1. OPMGRS2 191 3390 9345 5 6
7200 900 A-disk for server 2 running GOMSVM. Use the SFS value for OPMGRS2 in step 5 on page 25. filepool2:OPMGRS2. OPMGRS3 191 3390 9345 5 6
7200 900 A-disk for server 3 running GOMSVM. Use the SFS value for OPMGRS3 in step 5 on page 25. filepool2:OPMGRS3. OPMGRS4 191 3390 9345 5 6
7200 900 A-disk for server 4 running GOMSVM. Use the SFS value for OPMGRS4 in step 5 on page 25.
filepool2:OPMGRS4. Notes:
1. Cylinder values defined in this table are based on a 4K block size. FB-512 block and SFS values are derived from the 3390 cylinder values in this table. The FBA blocks are listed as 1/2K but should be CMS formatted at 1K size.
2. It is recommended that the MDISK entry for the OPMGRM1 198 disk in the CP directory specify the disk as RR. OPMGRM1 will then link the disk RR, allowing other authorized users to link the disk MR and make changes to the configuration data while OPMGRM1 is running.
3. The default SFS file pool is VMSYS. If you are installing on z/VM V6.2 or later, IBM recommends creating a PPF override to use:
VMPSFS for all directories that will be shared across the cluster. These are noted as filepool1 in the table.
A unique SFS file pool for all directories that should be unique on each member of the cluster. These are noted as filepool2 in the table. For this unique file pool, you can use VMSYS (provided by IBM) or you can create a new unique file pool such as MYPOOL1.
Figure 8 (Page 4 of 4). DASD Storage Requirements for Target Minidisks Minidisk owner (user ID) Default Address Storage in Cylinders FB-512 Blocks SFS 4K Blocks Usage
DASD CYLS Default SFS Directory Name (3*)
All user IDs Totals
3390 9345
153 186
220,320 27,540 Total DASD storage required for all Operations Manager user IDs. Notes:
1. Cylinder values defined in this table are based on a 4K block size. FB-512 block and SFS values are derived from the 3390 cylinder values in this table. The FBA blocks are listed as 1/2K but should be CMS formatted at 1K size.
2. It is recommended that the MDISK entry for the OPMGRM1 198 disk in the CP directory specify the disk as RR. OPMGRM1 will then link the disk RR, allowing other authorized users to link the disk MR and make changes to the configuration data while OPMGRM1 is running.
3. The default SFS file pool is VMSYS. If you are installing on z/VM V6.2 or later, IBM recommends creating a PPF override to use:
VMPSFS for all directories that will be shared across the cluster. These are noted as filepool1 in the table.
A unique SFS file pool for all directories that should be unique on each member of the cluster. These are noted as filepool2 in the table. For this unique file pool, you can use VMSYS (provided by IBM) or you can create a new unique file pool such as MYPOOL1.
6.0 Installation Instructions
This chapter describes the installation methods and the step-by-step procedures to install and activate Operations Manager.
The step-by-step procedures are in two-column format. The steps to be performed are in bold, large numbers. Commands for these steps are on the left-hand side of the page in bold print. Additional information for a command may exist to the right of the command.
Each step of the installation instructions must be followed. Do not skip any step unless directed to do so. Throughout these instructions, the use of IBM-supplied default minidisk addresses and user IDs is assumed. If you use different user IDs, minidisk addresses, or SFS directories to install Operations Manager, adapt these instructions as needed for your environment.
Note
The sample console output presented throughout these instructions was produced on a z/VM V6.1 system. If you're installing Operations Manager on a different z/VM system, the results obtained for some commands may differ from those depicted here.
6.1 VMSES/E Installation Process Overview
The following is a brief description of the main steps in installing Operations Manager using VMSES/E. Plan Your Installation
Use the VMFINS command to load several VMSES/E files from the product tape and to obtain Operations Manager resource requirements.
Allocate Resources
The information obtained from the previous step is used to allocate the appropriate minidisks (or SFS directories) and user IDs needed to install and use Operations Manager.
Install the Operations Manager Product
Use the VMFINS command to load the Operations Manager product files from tape to the test BUILD and BASE minidisks/directories. VMFINS is then used to update the VM SYSBLDS file used by VMSES/E for software inventory management.
Install Service for Operations Manager
Use the SERVICE command or the traditional service commands to install any available PTFs for Operations Manager.
Copy files from the test BUILD disks to production BUILD disks. Perform Post-installation Tasks
Information about file tailoring and initial activation of the program is presented in the Operations Manager Administration Guide (SC18-9347).
For a complete description of all VMSES/E installation options refer to VMSES/E Introduction and Reference.
6.2 Plan Your Installation For Operations Manager
The VMFINS command will be used to plan the installation. This section has 2 main steps that will: load the first tape file, containing installation files
generate a 'PLANINFO' file listing
– all user ID and mdisks/SFS directory requirements – required products
Note
If you are installing Operations Manager from a product envelope file, be sure to place the envelope file on the MAINTvrm 500 minidisk if you are installing on z/VM V6.2 or later, or MAINT 500 minidisk if you are installing on z/VM V6.1 or earlier.
To obtain planning information for your environment:
1
Log on as Operations Manager installation planner.This user ID can be any ID that has read access to MAINT's 5E5 minidisk and write access to the MAINT 51D minidisk. IBM suggests using MAINTvrm
if you are installing on z/VM V6.2 or later, or MAINT if you are installing on z/VM V6.1 or earlier.
2
Provide the installation planning user ID access to the code.a
If installing from tape, mount the Operations Manager installation tape and attach it to the user ID at virtual address 181. The VMFINS EXEC requires the tape drive to be at virtual address 181.b
If installing from a product envelope file on z/VM V6.2 or laterlink MAINTvrm 500 500 rr acc 500 c
c
If installing from a product envelope file on z/VM V6.1 or earlierlink MAINT 500 500 rr acc 500 c
3
Establish read access to the VMSES/E code.link MAINT 5e5 5e5 rr access 5e5 b
The 5E5 disk contains the VMSES/E code.
4
Establish write access to the Software Inventory disk.link MAINT 51d 51d mr access 51d d
The MAINT 51D disk is where the VMSES/E system-level Software Inventory and other dependent files reside.
Note: If another user already has the MAINT 51D minidisk linked in write mode (R/W), you will only obtain read access (R/O) to this minidisk. If this occurs, you will need to have that user re-link the 51D in read-only mode (RR), and then re-issue the above LINK and ACCESS commands. Do not continue with these procedures until a R/W link is established to the 51D minidisk.
5
Load the Operations Manager product control files to the 51D minidisk. The VMFINS INFO command will perform the following:load Memo-to-Users
load various product control files, including the Product Parameter File (PPF) and the PRODPART files
create VMFINS PRODLIST on your A-disk. The VMFINS PRODLIST contains a list of products on the installation media.
a
If installing from tapevmfins install info (nomemo The NOMEMO option will load the memos from the tape but will not issue a prompt to send them to the system printer. Specify the MEMO option if you want to be prompted for printing the memo.
vmfins install info (nomemo env envfilename envfilename is the file name of the product envelope file. The file type must be SERVLINK. The NOMEMO option will load the memos from the envelope file but will not issue a prompt to send them to the system printer. Specify the MEMO option if you want to be prompted for printing the memo.
VMFINS276I VMFINS processing started
VMFINS199I VMFINS PRODLIST created on your A-disk VMFINS276I VMFINS processing completed successfully Ready;
6
Obtain resource planning information for Operations Manager.Note:
The product will not be loaded by the VMFINS command at this time. The default SFS file pool is VMSYS. If you are installing on z/VM V6.2 or
later, IBM recommends
– Using VMPSFS for all directories that will be shared across the cluster
– Using a unique SFS file pool on each member of the cluster for the directories which should be unique on each member. These include production directories and all directories for multipconfiguration users. For this unique file pool, you can use VMSYS (provided by IBM) or you can create a new unique file pool such as MYPOOL1.
You will need to create a PPF override to use these file pools.
If you change the PPF name, a default user ID, or other parameters via a PPF override, you will need to use your changed values instead of those indicated (when appropriate), throughout the rest of the installation instructions, as well as the instructions for servicing Operations Manager. For example, you will need to specify your PPF override file name instead of 5697J10D for certain VMSES/E commands.
If you're not familiar with creating PPF overrides using VMFINS, you should review the "Using the Make Override Panel" section in Chapter 3 of the VMSES/E Introduction and Reference before you continue. This same chapter has information about changing the VMSYS file pool name, if you need it.
a
If installing from tapevmfins install ppf 5697J10D {OPMGR | OPMGRSFS} (plan nomemo
Use OPMGR for installing on minidisks or
OPMGRSFS for installing in Shared File System directories.
The PLAN option indicates that VMFINS will perform requisite checking, plan system resources, and provide an opportunity to override the defaults in the product parameter file.
You can override any of the following: the name of the product parameter file the default user IDs
minidisk/directory definitions
b
If installing from a product envelope filevmfins install ppf 5697J10D {OPMGR | OPMGRSFS} (plan nomemo env envfilename
envfilename is the file name of the product envelope file. The file type must be SERVLINK. Use OPMGR for installing on minidisks or
OPMGRSFS for installing in Shared File System directories.
The PLAN option indicates that VMFINS will perform requisite checking, plan system resources, and provide an opportunity to override the defaults in the product parameter file.
You can override any of the following: the name of the product parameter file the default user IDs
VMFINS2767I Reading VMFINS DEFAULTS B for additional options VMFINS276I VMFINS processing started
VMFINS261R Do you want to create an override for :PPF 5697J1D OPMGR :PRODID 5697J1D%OPMGR?
Enter (No), 1 (Yes) or 2 (Exit)
VMFINS263I Processing product :PPF 5697J1D OPMGR :PRODID 5697J1D%OPMGR
VMFREQ199I 5697J1D PLANINFO created on your A-disk
VMFREQ285I Product :PPF 5697J1D OPMGR :PRODID 5697J1D%OPMGR has passed requisite checking
VMFINT263I Planning for the installation of product :PPF 5697J1D OPMGR :PRODID 5697J1D%OPMGR
VMFRMT276I VMFRMT processing started
VMFRMT276I VMFRMT processing completed successfully VMFINS276I VMFINS processing completed successfully
7
Review the install message log ($VMFINS $MSGLOG). If necessary, correct any problems before going on. For information about handling specific error messages, see the appropriate z/VM: System Messages and Codes, or use on-line HELP.vmfview install
8
If you manage your system directory on the MAINT 2CC minidisk, re-access itacc 2CC c
6.3 Allocate Resources for Installing Operations Manager
Note
If you are installing on z/VM V6.2 or later, there are several considerations for Single System Image (SSI). Refer to the following web site for more information:
http://www.ibm.com/support/search.wss?q=SSI&tc=SSMR76
Use the planning information in the 5697J10D PLANINFO file, created in the PLAN step, to:
Create the 5697J10D and service virtual machine user directories for minidisk install. Refer to 6.3.1, “Installing Operations Manager on Minidisk” on page 23 for detailed instructions.
Create the 5697J10D and service virtual machine user directories for SFS install. Refer to 6.3.2, “Installing Operations Manager in SFS Directories” on page 24 for detailed instructions.
6.3.1 Installing Operations Manager on Minidisk
1
Obtain the user directories from the 5697J10D PLANINFO file.Note: The user directory entries are located in the resource section of the PLANINFO file, at the bottom; these entries will contain all of the links and privilege classes necessary for the 5697J10D and service virtual machine user IDs. Use the directory entries found in PLANINFO as a model as input to your system directory.
2
Add the 5697J10D and service virtual machine directory entries to the system directory.IBM recommends the following user IDs be defined as single configuration users:
5697J10D
IBM recommends the following user IDs be defined as multiconfiguration users: OPMGRM1 OPMGRS1 OPMGRS2 OPMGRS3 OPMGRS4
Change the passwords for all the user IDs you are adding from xxxxx to valid passwords, in accordance with your security guidelines.
3
Add the MDISK statements to the directory entry for 5697J10D and any service virtual machine you will be using. Use Figure 8 on page 12 to obtain the minidisk requirements.4
Place the new directory on-line using the DIRECTXA command or an equivalent CP directory maintenance method, such as DIRMAINT. If you are installing Operations Manager in a z/VM Single System Image cluster, place the directory on-line on each member of the cluster.5
Format all minidisks for the 5697J10D user ID and the service virtual machine user IDs. For each user ID, perform the following:link userid devaddr1 devaddr2 mr format devaddr2 filemode
1
label
rel devaddr2 (det
userid is the user ID that owns the disk you are formatting (for example, the installion user ID or one of the Operations Manager service virtual machine user IDs.)
devaddr1 is the virtual device address to be formatted for specified user ID.
devaddr2 is an available virtual device address.
filemode is an available filemode.
label is the minidisk label.
6
Continue with 6.4, “Install Operations Manager” on page 28.6.3.2 Installing Operations Manager in SFS Directories
1
Obtain the user directory from the 5697J10D PLANINFO file.Note: The user directory entries are located in the resource section of the PLANINFO file, at the bottom; these entries will contain all of the links and privilege classes necessary for the 5697J10D and service virtual machine user IDs. Use the directory entries found in PLANINFO as a model as input to your system directory.
2
Add the 5697J10D and service virtual machine directory entries to the system directory.IBM recommends the following user IDs be defined as single configuration users:
5697J10D
IBM recommends the following user IDs be defined as multiconfiguration users: OPMGRM1 OPMGRS1 OPMGRS2 OPMGRS3 OPMGRS4
Change the passwords for all the user IDs you are adding from xxxxx to valid passwords, in accordance with your security guidelines.
3
If you intend to use an SFS directory as the work space for the 5697J10D user ID or any of the service virtual machine user IDs you will use, include the following IPL control statement in their directory entry:IPL CMS PARM FILEPOOL filepool
where filepool is the name of the file pool you specified for installation of Operations Manager in SFS. Refer to Figure 8 on page 12.
4
Place the new directory on-line using the DIRECTXA command or an equivalent CP directory maintenance method, such as DIRMAINT. If you are installing Operations Manager in a z/VM Single System Image cluster, place the directory on-line on each member of the cluster.5
An SFS installation will also require the following steps:a
Determine the number of 4K blocks that are required for SFS directories by adding up the 4K blocks required for each SFS directory, for each user ID, you plan to use.If you intend to use all of the default Operations Manager SFS directories, the 4K block requirements for the directories are summarized in Figure 8 on page 12.
This information will be used when enrolling the 5697J10D and service virtual machine user IDs in the VMSYS, VMPSFS, or MYPOOL1 file pool.
b
Enroll user 5697J10D in the appropriate file pools using the ENROLL USER command:ENROLL USER 5697J1D filepool: (BLOCKS blocks
where blocks is the number of 4K blocks that you calculated in the previous step for this user ID only.
where filepool is the name of the file pool. If you are installing on z/VM V6.2 or later, IBM recommends using a unique file pool. For this unique file pool, you can use VMSYS (provided by IBM) or you can create a new unique file pool such as MYPOOL1. If you are installing on z/VM V6.1 or earlier, the default is VMSYS.
Note: This must be done from a user ID that is an administrator for the specified file pool.
c
Enroll any of the service virtual machines, that you are going to use, in the appropriate file pool using the ENROLL USER command. You need to issue the ENROLL USER command for each service machine user ID you plan on using.where svmID is the service virtual machine user ID.
where filepool is the name of the file pool. If you are installing on z/VM V6.2 or later, IBM recommends using a unique file pool for the service machines. For this unique file pool, you can use VMSYS (provided by IBM) or you can create a new unique file pool such as MYPOOL1. If you are installing on z/VM V6.1 or earlier, the default is VMSYS. where blocks is the number of 4K blocks that you calculated in the previous step for the SVM user ID you are enrolling.
Note: This must be done from a user ID that is an administrator for the specified file pool.
d
Determine if there are enough blocks available in the file pool to install Operations Manager. This information can be obtained from the QUERY FILEPOOL STORGRP command. If the number of blocks free is smaller than the total 4K blocks needed to install Operations Manager you will need to add space to the file pool. See the CMS File Pool Planning, Administration, and Operation manual for information on adding space to a file pool.e
Create the necessary subdirectories listed in the 5697J10D PLANINFO file using the CREATE DIRECTORY command.set filepool filepool:
create directory dirid
dirid is the name of the SFS directory you're creating.
filepool is the name of the file pool. If you are installing on z/VM V6.2 or later, IBM recommends using both VMPSFS and a file pool that is unique on each member of the cluster. For this unique file pool, you can use VMSYS (provided by IBM) or you can create a new unique file pool such as MYPOOL1. If you are installing on z/VM V6.1 or earlier, the default is VMSYS.
An example of the create command is: create directory filepool:5697J1D.opmgr create directory filepool:5697J1D.opmgr.base
:
If necessary, see the CMS Command Reference
manual for more information about the CREATE DIRECTORY command.
A complete list of default Operations Manager SFS directories is provided in Figure 8 on page 12.
f
Give the service virtual machine user IDs, that you will be using, READ authority to the server production build directory, using the GRANT AUTHORITY command. You need to repeat the grant auth command for each SVM you are going to be using.grant auth filepool:5697J10D.opmgr.prodsrvr to svmID (read newread
where svmID is the service virtual machine user ID.
where filepool is the name of the file pool. If you are installing on z/VM V6.2 or later, IBM
recommends using both VMPSFS and a file pool that is unique on each member of the cluster. For this unique file pool, you can use VMSYS
(provided by IBM) or you can create a new unique file pool such as MYPOOL1. If you are installing on z/VM V6.1 or earlier, the default is VMSYS. If necessary, see the CMS Command Reference
manual for more information about the GRANT AUTHORITY command.
g
If you plan to place Operations Manager general use code on MAINT's or MAINTvrm's 19E disk then you need to give the MAINT orMAINTvrm user ID READ authority to the general-use test build
directory, using the GRANT AUTHORITY command. Refer to step 3 on page 35 or 3 on page 38 for more information on placing general use code on MAINT 19E disk.
If installing on z/VM V6.2 or later
grant auth filepool:5697J10D.opmgr.testuser to MAINTvrm (read newread
where MAINTvrm is the installation and
maintenance user ID for the release of z/VM you are using.
where filepool is the name of the file pool. IBM recommends using VMPSFS.
If installing on z/VM V6.1 or earlier
where filepool is the name of the file pool. The default is VMSYS.
If necessary, see the CMS Command Reference
manual for more information about the GRANT AUTHORITY command.
6.4 Install Operations Manager
The ppfname used throughout these installation instructions is 5697J10D, which assumes you are using the PPF supplied by IBM for Operations Manager. If you have your own PPF override file for Operations Manager, you should use your file's ppfname instead of 5697J10D. The ppfname you use should be used
throughout the rest of this procedure.
1
Logon to the installation user ID 5697J10D.2
Create a PROFILE EXEC that will contain the ACCESS commands for MAINT 5E5 and 51D minidisks and define a RETRIEVE key.xedit profile exec a ===> input /**/
===> input 'access 5e5 b' ===> input 'access 51d d' ===> input 'cp set pf12 retrieve' ===> file
If either 5E5 or 51D is in a shared file system (SFS) then substitute your SFS directory name in the access command.
In this example, you can now use PF12 to find, modify, and execute previously executed commands.
3
Run the profile to access MAINT's minidisks and activate the RETRIEVE key.profile
4
If the Software Inventory disk (51D) was accessed R/O (read only) then establish write access to the Software Inventory disk.Note: If the MAINT 51D minidisk was accessed R/O, you will need to have the user who has it linked R/W link it as R/O. You then can issue the following commands to obtain R/W access to it.
link MAINT 51d 51d mr access 51d d
a
If installing from tape, mount the Operations Manager installation tape and attach it to the user ID at virtual address 181. The VMFINS EXEC requires the tape drive to be at virtual address 181.b
If installing from a product envelope file on z/VM V6.2 or laterlink MAINTvrm 500 500 rr acc 500 c
c
If installing from a product envelope file on z/VM V6.1 or earlierlink MAINT 500 500 rr acc 500 c
6
Install Operations Manager.Note:
If you have already created a PPF override file, you should specify your override file name, in place of the default PPF name (5697J10D), after the PPF keyword for the following VMFINS command.
You may be prompted for additional information during VMFINS INSTALL processing depending on your installation environment. If you're unsure how to respond to a prompt, refer to the "Installing Products with VMFINS" and "Install Scenarios" chapters in the VMSES/E Introduction and Reference to decide how to proceed.
a
If installing from tapevmfins install ppf 5697J10D {OPMGR | OPMGRSFS} (nomemo nolink
Use OPMGR for installing on minidisks or
OPMGRSFS for installing in Shared File System directories.
The NOLINK option indicates that you don't want VMFINS to link to the appropriate minidisks, only access them if not accessed.
b
If installing from a product envelopeenvfilename is the file name of the product envelope file. The file type must be SERVLINK. Use OPMGR for installing on minidisks or
OPMGRSFS for installing in Shared File System directories.
The NOLINK option indicates that you don't want VMFINS to link to the appropriate minidisks, only access them if not accessed.
VMFINS2767I Reading VMFINS DEFAULTS B for additional options VMFINS276I VMFINS processing started
VMFINS261R Do you want to create an override for :PPF 5697J1D OPMGR :PRODID 5697J1D%OPMGR?
Enter (No), 1 (Yes) or 2 (Exit)
VMFINS263I Processing product :PPF 5697J1D OPMGR :PRODID 5697J1D%OPMGR VMFREQ285I Product :PPF 5697J1D OPMGR :PRODID 5697J1D%OPMGR has passed requisite checking
VMFINT263I Installing product :PPF 5697J1D OPMGR :PRODID 5697J1D%OPMGR VMFSET276I VMFSETUP processing started for 5697J1D OPMGR
VMFUTL225I Minidisk|Directory Assignments:
String Mode Stat Vdev Label/Directory VMFUTL225I LOCALMOD E R/W 2C4 OPM2C4
VMFUTL225I LOCALSAM F R/W 2C2 OPM2C2 VMFUTL225I APPLY G R/W 2A6 OPM2A6 VMFUTL225I H R/W 2A2 OPM2A2 VMFUTL225I DELTA I R/W 2D2 OPM2D2 VMFUTL225I BUILD J R/W 3 OPM3 VMFUTL225I BUILD2 K R/W 31 OPM31 VMFUTL225I BASE1 L R/W 2B2 OPM2B2 VMFUTL225I --- A R/W 191 OPM191 VMFUTL225I --- B R/O 5E5 MNT5E5 VMFUTL225I --- C R/W 5 MNT5 VMFUTL225I --- D R/W 51D MNT51D VMFUTL225I --- S R/O 19 MNT19 VMFUTL225I --- Y/S R/O 19E MNT19E
VMFSET276I VMFSETUP processing completed successfully VMFREC276I VMFREC processing started
VMFREC1852I Volume 1 of 1 of INS ENVELOPE 1 VMFREC1851I (1 of 8) VMFRCAXL processing AXLIST VMFRCX2159I Loading part(s) to DELTA 2D2 (I) VMFREC1851I (2 of 8) VMFRCPTF processing PARTLST VMFRCP2159I Loading part(s) to DELTA 2D2 (I) VMFREC1851I (3 of 8) VMFRCALL processing APPLY VMFRCA2159I Loading part(s) to APPLY 2A6 (G) VMFRCA2159I Loaded 1 part(s) to APPLY 2A6 (G) VMFREC1851I (4 of 8) VMFRCCOM processing DELTA VMFRCC2159I Loading part(s) to DELTA 2D2 (I) VMFREC1851I (5 of 8) VMFRCALL processing SERVER VMFRCA2159I Loading part(s) to BUILD 3 (J) VMFRCA2159I Loaded 9 part(s) to BUILD 3 (J) VMFREC1851I (6 of 8) VMFRCALL processing USER VMFRCA2159I Loading part(s) to BUILD2 31 (K) VMFRCA2159I Loaded 55 part(s) to BUILD2 31 (K) VMFREC1851I (7 of 8) VMFRCALL processing SAMPLE VMFRCA2159I Loading part(s) to LOCALSAM 2C2 (F) VMFRCA2159I Loaded 12 part(s) to LOCALSAM 2C2 (F) VMFREC1851I (8 of 8) VMFRCALL processing BASE VMFRCA2159I Loading part(s) to BASE1 2B2 (L) VMFRCA2159I Loaded 77 part(s) to BASE1 2B2 (L) VMFREC276I VMFREC processing completed successfully VMFINT263I Product installed
VMFINS276I VMFINS processing completed successfully
7
Review the install message log ($VMFINS $MSGLOG). If necessary, correct any problems before going on. For information about handling specific error messages, see the appropriate z/VM: System Messages and Codes, or use on-line HELP.vmfview install
6.4.1 Update Build Status Table for Operations Manager
1
Update the VM SYSBLDS software inventory file for Operations Manager.vmfins build ppf 5697J10D {OPMGR | OPMGRSFS} (serviced nolink
Use OPMGR for installing on minidisks or
OPMGRSFS for installing in Shared File System directories.
The SERVICED option will build any parts that were not built on the installation tape (if any) and update the Software Inventory build status table showing that the product 5697J10D has been built.
2
Review the install message log ($VMFINS $MSGLOG). If necessary, correct any problems before going on. For information about handling specific error messages, see the appropriate z/VM: System Messages and Codes, or use on-line HELP.vmfview install
6.5 Install Service for Operations Manager
Follow the instructions in 7.2, “Servicing Operations Manager” on page 41 to apply any available PTFs for Operations Manager. You can then continue with the service instructions in 7.3, “Place the New Operations Manager Service Into Production” on page 43 or follow the steps below in 6.6, “Place Operations Manager Into Production” on page 33 to place Operations Manager into production.
6.6 Place Operations Manager Into Production
If you are installing on z/VM V6.2 or later, and are using minidisks, follow the steps in 6.6.1, “Copy Operations Manager Files Into Production on z/VM V6.2 or Later Using Minidisks” and then go to 6.7, “Post-Installation Considerations” on page 39.
If you are installing on z/VM V6.2 or later, and are using Shared File System, follow the steps in 6.6.2, “Copy Operations Manager Files Into Production on z/VM V6.2 or Later Using Shared File System” on page 35 and then go to 6.7, “Post-Installation Considerations” on page 39.
If you are installing on z/VM V6.1 or earlier, and are using minidisks, follow the steps in 6.6.3, “Copy Operations Manager Files Into Production on z/VM V6.1 or Earlier Using Minidisks” on page 36 and then go to 6.7, “Post-Installation Considerations” on page 39.
If you are installing on z/VM V6.1 or earlier, and are using Shared File System, follow the steps in 6.6.4, “Copy Operations Manager Files Into Production on z/VM V6.1 or Earlier Using Shared File System” on page 38 and then go to 6.7, “Post-Installation Considerations” on page 39.
6.6.1 Copy Operations Manager Files Into Production on z/VM V6.2 or
Later Using Minidisks
1
Logon to 5697J10D and move the Operations Manager Service Machine executables to the production disk.access 300 e access 400 f
vmfcopy * * e = = f (prodid 5697J10D%OPMGR olddate replace
The VMFCOPY command will update the VMSES PARTCAT file on the 400 disk.
2
Logon to 5697J10D to move the general use code and help files to the production disk.access 310 e access 410 f
vmfcopy * * e = = f (prodid 5697J10D%OPMGR olddate replace
The VMFCOPY command will update the VMSES PARTCAT file on the 410 disk.
3
Logon to MAINTvrm on each member of a cluster if you plan to put Operations Manager general use code on the 'Y' disk (product code or MAINT's 19E disk). Or logon to the owner of the disk that will contain the 'production' level of the Operations Manager code.link 5697J10D 310 310 rr access 310 e
link MAINTvrm 19e 19e mr access 19e f
vmfcopy * module e = = f2 (prodid 5697J10D%OPMGR olddate replace vmfcopy * text e = = f2 (prodid 5697J10D%OPMGR olddate replace vmfcopy * exec e = = f2 (prodid 5697J10D%OPMGR olddate replace
The VMFCOPY command will update the VMSES PARTCAT file on the 19E disk.
4
Logon to MAINTvrm on each member of a cluster if you plan to put Operations Manager help files on the system AMENG Help (MAINTvrm's 19D) disk.link 5697J10D 310 310 rr access 310 e
link MAINTvrm 19d 19d mr access 19d f
vmfcopy * helpagom e = = f2 (prodid 5697J10D%OPMGR olddate replace vmfcopy agom* helpmenu e = = f2 (prodid 5697J10D%OPMGR olddate replace
The VMFCOPY command will update the VMSES PARTCAT file on the AMENG Help (MAINT 19D) disk.
5
If the MAINTvrm 19E disk was updated, rebuild the CMS saved system, to return the Y-disk (product code or MAINT's 19E disk) to 'shared' status. Perform this step on each member of a cluster.put2prod savecms
6
If you are installing on z/VM V6.3, skip this step.If you are installing on z/VM V6.2 and the MAINT 19D disk was updated, rebuild the CMS HELP logical saved segment, to include Operations Manager's help files from the AMENG Help (MAINT's 19D) disk. Perform this step on each member of a cluster.
put2prod segments helpseg
6.6.2 Copy Operations Manager Files Into Production on z/VM V6.2 or
Later Using Shared File System
1
Logon to 5697J10D and move the Operations Manager Service Machine executables to the production disk.access 5697J10D.OPMGR.TESTSRVR e access 5697J10D.OPMGR.PRODSRVR f
vmfcopy * * e = = f (prodid 5697J10D%OPMGR olddate replace
The VMFCOPY command will update the VMSES PARTCAT file in the PRODSRVR directory.
Note that although you are installing in SFS, you should not use OPMGRSFS in this command. OPMGR is required.
2
Logon to 5697J10D to move the general use code and help files to the production disk.access 5697J10D.OPMGR.TESTUSER e access 5697J10D.OPMGR.PRODUSER f
vmfcopy * * e = = f (prodid 5697J10D%OPMGR olddate replace
The VMFCOPY command will update the VMSES PARTCAT file in the PRODUSER directory.
Note that although you are installing in SFS, you should not use OPMGRSFS in this command. OPMGR is required.
3
Logon to MAINTvrm on each member of a cluster if you plan to put Operations Manager general use code on the 'Y' disk (product code or MAINT's 19E disk). Or logon to the owner of the disk that will contain the 'production' level of the Operations Manager code.access 5697J10D.OPMGR.TESTUSER e link MAINTvrm 19e 19e mr
access 19e f
vmfcopy * module e = = f2 (prodid 5697J10D%OPMGR olddate replace vmfcopy * text e = = f2 (prodid 5697J10D%OPMGR olddate replace vmfcopy * exec e = = f2 (prodid 5697J10D%OPMGR olddate replace
The VMFCOPY command will update the VMSES PARTCAT file on the 19E disk.
Note that although you are installing in SFS, you should not use OPMGRSFS in this command. OPMGR is required.
4
Logon to MAINTvrm on each member of a cluster if you plan to put Operations Manager help files on the system AMENG Help (MAINT's 19D)access 5697J10D.OPMGR.TESTUSER e link MAINTvrm 19d 19d mr
access 19d f
vmfcopy * helpagom e = = f2 (prodid 5697J10D%OPMGR olddate replace vmfcopy agom* helpmenu e = = f2 (prodid 5697J10D%OPMGR olddate replace
The VMFCOPY command will update the VMSES PARTCAT file on the AMENG Help (MAINT 19D) disk.
Note that although you are installing in SFS, you should not use OPMGRSFS in this command. OPMGR is required.
5
If the MAINTvrm 19E disk was updated, rebuild the CMS saved system, to return the Y-disk (product code or MAINT's 19E disk) to 'shared' status. Perform this step on each member of a cluster.put2prod savecms
6
If you are installing on z/VM V6.3, skip this step.If you are installing on z/VM V6.2 and the MAINT 19D disk was updated, rebuild the CMS HELP logical saved segment, to include Operations Manager's help files from the AMENG Help (MAINT's 19D) disk. Perform this step on each member of a cluster.
put2prod segments helpseg
7
Continue with 6.7, “Post-Installation Considerations” on page 39.6.6.3 Copy Operations Manager Files Into Production on z/VM V6.1 or
Earlier Using Minidisks
1
Logon to 5697J10D and move the Operations Manager Service Machine executables to the production disk.access 300 e access 400 f
vmfcopy * * e = = f (prodid 5697J10D%OPMGR olddate replace
The VMFCOPY command will update the VMSES PARTCAT file on the 400 disk.