Web Filter
www.surfcontrol.com
SurfControl Web Filter for
Check Point
™FireWall-1
®Getting Started Guide
Configuring CheckPoint FireWall-1 i
Notices
N
OTICES
Copyright © 2005 SurfControl plc. All rights reserved.
No part of this publication may be reproduced, stored in a retrieval system, or transmitted, in any form or by any means, electronic, mechanical, photocopying, recording, or otherwise, without the prior permission of the copyright owner. This product includes software developed by the Apache Software Foundation (http://www.apache.org/).
SurfControl is a registered trademark, and SurfControl and the SurfControl logo are trademarks of SurfControl plc. All other trademarks are property of their respective owners.
Printed September 2005
C
OMMENTS
ON
THIS
G
UIDE
?
You can view updated documentation and support information at http://www.surfcontrol.com
Was this guide helpful? E-mail us at documentation@surfcontrol.com to suggest changes or make a correction.
Technical Support
T
ECHNICAL
S
UPPORT
• For the latest support information on SurfControl products, visit http://www.surfcontrol.com/support
• Read the Top Issues - This page has a quick list that covers the most common support issues encountered with SurfControl products.
• Search our Knowledge Base - our new, constantly updated Knowledge Base contains articles, FAQs and glossary items to answer your questions about all SurfControl products.
• If your question or problem cannot be answered by the Top Issues or is not in the Knowledge Base, fill out an Online Support Request Form.
• Telephone Support - If you would like to speak with a Technical Support Representative, our excellent SurfControl Technical Support is just a phone call away.
S
URF
C
ONTROL
S
ALES
For product and pricing information, or to place an order, contact SurfControl. To find your nearest SurfControl office, please visit our Website.
Configuring CheckPoint FireWall-1 iii
CONTENTS
C
ONTENTS
Notices...i
Comments on this Guide?...i
Technical Support ...ii
SurfControl Sales...ii
G
ETTINGS
TARTED...1
SurfControl Web Filter ...2
Overview of Web Filter ...2
Before You Install...3
Installing Web Filter ...4
C
HECKP
OINTF
IREW
ALL-1 ...5
Configuring Check Point FireWall-1 ...6
Create a Network Object ...7
Create an OPSEC Application...9
Creating an OPSEC Application ...9
Set up the sslca authentication ...12
Configure the UFP and AMON Server in Web Filter ...13
Using the UFP and AMON Server ...14
Create a URI Resource...16
Enhanced UFP Performance ...18
Insert the URI Resource into an Access Policy ...19
What to do next...21
Chapter 1
Getting Started
SurfControl Web Filter page 2
Before You Install page 3
GETTING STARTED
SurfControl Web Filter
1
S
URF
C
ONTROL
W
EB
F
ILTER
In the workplace SurfControl Web Filter can help you to enhance employee productivity, optimize network bandwidth, reduce legal liability and safeguard students by blocking suspect sites. It does this with the following group of components designed to enable you to monitor users’ surfing behavior, produce reports on Internet access trends then use rules to manage this access
This guide will give you a quick overview of the program, along with references to where you can find more detailed information in the Installation and Administrator guides. You will also be shown how to set up Web Filter to work with Check Point® FireWall-1™.
O
VERVIEW
OF
W
EB
F
ILTER
• Monitor - provides a view of activity by user and sites requested. As traffic is generated on the network, information about user activity is recorded in the SurfControl database and then displayed in the Monitor window.
• Real Time Monitor - shows activity on the network as it is happening in real time, rather than by displaying past activity as recorded in the SurfControl database. As traffic is generated on the network you will see it appear in the Real-Time Monitor.
• Rules Administrator - enables you to create rules that will control the Internet access of the users that you are monitoring. These rules can govern who can access what areas of the Internet at what time of day. Rules can be positive (allowing access to sites or categories) or negative (denying access to sites or categories of sites).
• Scheduler - enables you to schedule events at a later date and time. This is a convenient way to update the URL Categories database or perform other tasks on a regular basis.
• Virtual Control Agent (VCA) - evaluates unknown web sites, reading and analyzing content page by page. It then uses artificial intelligence algorithms to study and classify each Web page into one of the SurfControl Web Filter categories.
• Report Central - SurfControl’s powerful reporting tool.
• Remote Administration - enables you to use a computer other than the one on which SurfControl Web Filter is installed to control any of the SurfControl services running on a Web Filter machine. It requires a Remote Administration installation of SurfControl Web Filter on the machine that you are going to use remotely along with a full product installation on the machine where the services are running.
Configuring Check Point FireWall-1 3
GETTING STARTED
Before You Install
1
B
EFORE
Y
OU
I
NSTALL
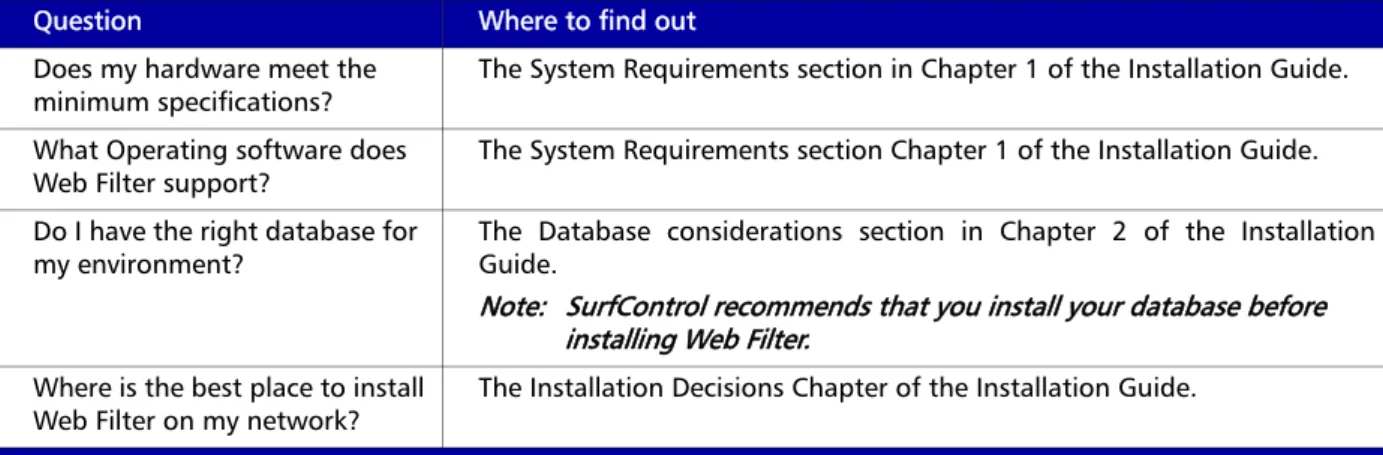
You need to know the answers to the following questions in Table 1 before installing SurfControl Web Filter: Table 1 Pre-installation checks
Question Where to find out
Does my hardware meet the minimum specifications?
The System Requirements section in Chapter 1 of the Installation Guide. What Operating software does
Web Filter support? The System Requirements section Chapter 1 of the Installation Guide. Do I have the right database for
my environment?
The Database considerations section in Chapter 2 of the Installation Guide.
Note: SurfControl recommends that you install your database before installing Web Filter.
Where is the best place to install Web Filter on my network?
GETTING STARTED
Installing Web Filter
1
I
NSTALLING
W
EB
F
ILTER
To install SurfControl Web Filter, follow Procedure 3-2 in Chapter 3 of the Installation Guide. Following installation and re-booting your SurfControl Web Filter server, you can then configure your Check Point FireWall -1 to communicate with Web Filter. This is covered in Chapter 2.
Chapter 2
Check Point FireWall-1
Configuring Check Point FireWall-1 page 6
Create a Network Object page 7
Create an OPSEC Application page 9
Set up the sslca authentication page 12
Create a URI Resource page 16
CHECK POINT FIREWALL-1
Configuring Check Point FireWall-1
2
Configuring Check Point FireWall-1
After installing Web Filter, you need to configure Check Point FireWall-1 to use the Web Filter UFP server. There are three stages to this process:
1 Create a Network Object to represent the machine on which the Web Filter URL Filtering Protocol (UFP) Server is installed.
2 Create an OPSEC™ Application to establish and monitor the connection between Web Filter and Check Point FireWall-1.
Configuring Check Point FireWall-1 7
CHECK POINT FIREWALL-1
Configuring Check Point FireWall-1
2
C
REATE
A
N
ETWORK
O
BJECT
You must create a network object on FireWall-1 for the machine on which the Web Filter UFP Server is installed.
To Create a Network Object, follow Procedure 2-1:
Note: If you have installed the Web Filter UFP Server on the same machine as FireWall-1, skip this procedure.
Procedure 2-1: Creating a Network Object
Step Action Action
1 Launch the Check Point SmartDashboard™.
2 From the Manage menu select Network Objects. The Network Objects dialog will display.
3 Click New.
CHECK POINT FIREWALL-1
Configuring Check Point FireWall-1
2
4 Select General
Properties. Fill in the fields as follows: Name: enter the name for your Network object, e.g., WebFilterServer. IP Address: enter the name or the IP address of the Web Filter UFP Server.
5 Click OK.
6 Close the Network Objects.
Procedure 2-1: Creating a Network Object (Continued)
Configuring Check Point FireWall-1 9
CHECK POINT FIREWALL-1
Create an OPSEC Application
2
Create an OPSEC Application
You now have to create an OPSEC Application to connect to a UFP and AMON server.
C
REATING
AN
OPSEC A
PPLICATION
A UFP Server object represents a Network Object that provides URL categorization services. Once you have added the Web Filter network object, you need to create a new Server object. Follow Procedure 2-2:
Procedure 2-2: Creating an OPSEC Application
Step Action
1 Launch the Check Point SmartDashboard and select Manage > Servers and OPSEC Applications. The OPSEC Applications dialog box will display.
2 Select New then choose OPSEC Application. The OPSEC Application Properties dialog will display. 3 Select the General tab. Fill in the fields as
follows:
Name: enter the name for your OPSEC Application, e.g., SurfControl_WebFilter. Host: select the network object for your Web Filter Server from the list.
Vendor: select User defined.
Note: the "Vendor", "Product", and "Version" fields under "Application Properties" do not affect the functioning of this integration product. The values for these fields are updated by Check Point, and these values can get outdated as newer products are released. To avoid any confusion, please set the "Vendor" field to "User Defined".
CHECK POINT FIREWALL-1
Create an OPSEC Application
2
4 Select the UFP Options tab.
5 Select the Use early versions compatibility mode checkbox.
6 Select Clear (opsec): unauthenticated communication.
Note: Only the Clear communication mode is allowed if the URI resource (created later in Procedure 2-4 “Creating a URI Resource” on page 16) is set to "Enhance UFP Performance" instead of the default "Enforce URI Capabilities". However other SIC (Secure Internal
Communication) modes like sslca can be used if the URI resource is set to "Enforce URI
Capabilities". In that case do not select the "Use early versions compatibility mode" checkbox. The following sections describe how to set up the sslca communication mode for AMON. If one of the SIC modes is used for UFP then appropriate changes will be required for the UFP settings in the ufp.conf file (e.g., use the lines "ufp_server auth_port 18182" and "ufp_server auth_type sslca", instead of "ufp_server port 18182"). 7 Click Get Dictionary to retrieve the Web Filter
URL Category List and details.
Note: if you do not see the list of categories, check that the UFP Server is running and that the host name is correct.
8 Click OK.
Procedure 2-2: Creating an OPSEC Application
Configuring Check Point FireWall-1 11
CHECK POINT FIREWALL-1
Create an OPSEC Application
2
9 Select the AMON Options tab.
10 Leave Service and AMON identifier set to their default settings.
11 Select the General tab and click Communication. The Communication dialog box will display.
12 Enter an Activation Key (password), and confirm it.
13 Click Initialize. The Trust state will change from Uninitialized to Initialized but trust not established. 14 Click Close.
Click OK from the General tab
Procedure 2-2: Creating an OPSEC Application
CHECK POINT FIREWALL-1
Create an OPSEC Application
2
S
ET
UP
THE
SSLCA
AUTHENTICATION
You now have to set up the sslca authentication on the AMON server. To set this up follow Procedure 2-3:
Procedure 2-3: Setting up sslca authentication
Step Action
1 Locate the opsec_pull_cert.exe file. In a default SurfControl Web Filter installation this will be
located in:
C:\Program Files\SurfControl\Web Filter\OPSEC
2 Open a Command prompt from within this folder and type the following command.
opsec_pull_cert -h host -n object_name -p password [-o cert_file] [-od dn_file]
Key:
host - the resolvable name or IP address of computer on which the Check Point FireWall-1 Server is
installed.
object_name - name of the OPSEC Application object you created in Procedure 2-2.
password - the Activation Key used in Procedure 2-2.
cert_file - the name of the output file (default is opsec.p12).
dn_file - the name of the file containing the Secure Internal Communication (SIC) name of the
object. If not specified, the object’s SIC name is printed to stdout.
3 Launch the Check Point SmartDashboard and select Manage > Servers and OPSEC Applications. The OPSEC Applications dialog box will display
Configuring Check Point FireWall-1 13
CHECK POINT FIREWALL-1
Create an OPSEC Application
2
C
ONFIGURE
THE
UFP
AND
AMON S
ERVER
IN
W
EB
F
ILTER
SurfControl Web Filter is supplied with a configuration file, ufp.conf. In a default installation this is found in
the following location:
C:\Program Files\SurfControl\Web Filter\OPSEC
4 Select the UFP server object you created in Procedure 2-1. Click Details.
5 Click Communication.
The Trust state will now be set to Trust established.
The DN field will also be populated.
6 Click OK.
7 Click Save from the Check Point SmartDashboard.
Procedure 2-3: Setting up sslca authentication (Continued)
CHECK POINT FIREWALL-1
Create an OPSEC Application
2
As supplied, the contents of ufp.conf will be as below:
This supplied file allows the UFP server to communicate to Check Point FireWall-1 using the Clear (opsec) authentication method, as described in Procedure 2-2 - “Creating an OPSEC Application” on page 9.
Other communication modes are available within Check Point FireWall-1. For details on all communication modes, consult the following Check Point documentation:
http://www.opsec.com/developer/gw_comm_mode.html
U
SING
THE
UFP
AND
AMON S
ERVER
when configuring the UFP server using Clear authentication, and the AMON server with sslca authentication, the ufp.conf file is modified as part of the certification process. An example of a modified ufp.conf file may
look as below:
ufp_server port 18182
amon_server auth_port 18193 amon_server auth_type sslca
# The following lines must be customized for each installation and then uncommented. Please see SurfControl
# documentation for details on replacing the placeholders "DN_for_SurfControl_UFP_Server",
# "DN_for_Check_Point_FireWall-1" and "pathname_for_sslca_file". #opsec_sic_name "DN_for_SurfControl_UFP_Server"
#opsec_entity_sic_name "DN_for_Check_Point_FireWall-1" #opsec_sslca_file "pathname_for_sslca_file"
ufp_server port 18182
amon_server auth_port 18193 amon_server auth_type sslca
# The following lines must be customized for each installation and then uncommented. Please see SurfControl
# documentation for details on replacing the placeholders "DN_for_SurfControl_UFP_Server",
Configuring Check Point FireWall-1 15
CHECK POINT FIREWALL-1
Create an OPSEC Application
2
The additional entries are as follows:
opsec_sic_name "CN=SurfControl_WebFilter,O=checkpointai..f4m2sd"
This entry specifies the distinguished name (DN) of the SurfControl Web Filter UFP server. The value for this entry can be obtained from the properties of the OPSEC Application object. See step 5 of "Procedure 2-3: Setting up sslca authentication" for more details.
opsec_entity_sic_name "cn=cp_mgmt,o=checkpointai..f4m2sd"
This entry specifies the distinguished name (DN) of the Check Point FireWall-1. The value for this entry can be obtained from the General Properties of the Check Point Gateway object. Alternatively, this value can be easily derived from the value for opsec_sic_name. In the above example, this can be achieved by replacing the name of the OPSEC Application object (i.e., "SurfControl_WebFilter") with "cp_mgmt".
opsec_sslca_file "C:\Program Files\SurfControl\Web Filter\OPSEC\opsec.p12"
This entry specifies the location of the certificate file - opsec.p12.
CHECK POINT FIREWALL-1
Create a URI Resource
2
Create a URI Resource
A URI is a Uniform Resource Identifier, of which the familiar URL (Uniform Resource Locator) is a specific case. URI Resources can define schemes (HTTP, FTP, GOPHER, etc.), methods, (GET, POST, etc.), hosts (for example “*.com”), paths and queries. In addition, the Security Administrator can define how to handle responses to allowed resources:1
Procedure 2-4: Creating a URI Resource
Step Action
1 From the Check Point SmartDashboard, select Resources from the Manage menu. The Resources dialog box will display.
Configuring Check Point FireWall-1 17
CHECK POINT FIREWALL-1
Create a URI Resource
2
1. Taken from the following Check Point document:
http://www.checkpoint.com/support/downloads/docs/firewall1/ng/fp3/SmartCenter_NG_FP3.pdf
3 From the General tab:
Give the URI Resource a name, for example SWF_Block.
Note: The name must not contain any spaces. In the Use this resource to: section, the default selection is Enforce URI Capabilities. You can alternatively select Enhance UFP Performance. For an explanation of Enhance UFP Performance, see “Enhanced UFP Performance” on page 18. In the URI Match Specification Type section, select UFP.
4 Select the Match tab:
5 From the UFP Server drop-down list box, select your UFP Server, as set up in Procedure 1. From the UFP caching control drop-down list box, select No caching.
Note: No caching allows all HTTP requests to be submitted to the SurfControl Web Filter UFP server. This will give you the most accurate filtering, monitoring and reporting from Web Filter.
From the Categories, select Block.
Procedure 2-4: Creating a URI Resource
CHECK POINT FIREWALL-1
Create a URI Resource
2
E
NHANCED
UFP P
ERFORMANCE
You can use Enhanced UFP Performance instead of Enforce URI Capabilities. This uses FireWall-1 kernel inspection together with a dedicated UFP daemon (aufpd) to increase the performance of the UFP. UFP caching, Content Vectoring Protocol (CVP) checking and authentication are not available in this mode, as well as HTTP Header method and length verifications.
6 Select the Action tab.
Note: The Action tab will not be available if you have configured the URI resource as “Enhance UFP Performance” in Step 3.
7 You can specify a Replacement URI which will launch when a user tries to access a blocked site. In the Replacement URI field, enter the URL to which user will be redirected.
Note: If you have specified a Redirect URL in the Web Filter Rules Administrator, this will override the Replacement URI.
8 Click OK. The next time that you access the Resources tab, you will see this resource listed.
Procedure 2-4: Creating a URI Resource
Configuring Check Point FireWall-1 19
CHECK POINT FIREWALL-1
Create a URI Resource
2
I
NSERT
THE
URI R
ESOURCE
INTO
AN
A
CCESS
P
OLICY
You now need to define two rules for HTTP traffic that should be checked by Web Filter. To insert the Web Filter URI Resource into the FireWall-1 access policy, follow Procedure 2-5:
Procedure 2-5: Inserting the URI Resource into a FireWall-1 Access
Policy
Step Action
1 Launch the Check Point SmartDashboard:
2 From the Rules menu, select Add Rule and select where you want the rule to appear in the list. The options are:
• Bottom
• Top
• Below
• Above
CHECK POINT FIREWALL-1
Create a URI Resource
2
4 The Add With Resource
dialog will display. From the Service: section, select http. From the Resource: section, select the resource created in Procedure 2-4, for example, SWF_Block. Click OK.
5 Right-click on the Action column. From the menu, select how FireWall-1 will respond to requests to access URLs in this URI resource. The options are:
• accept • drop • reject • User auth • Client auth • Session auth
SurfControl recommend using the reject action.
6 Right-click in the Track column and choose the level of logging required. The options are:
• None • Log • Account • Alert • Snmp Trap • Mail
You can also set up user defined logging options.
7 Create another rule that will allow all HTTP traffic. Create this rule with the following parameters:
Procedure 2-5: Inserting the URI Resource into a FireWall-1 Access
Policy
Configuring Check Point FireWall-1 21
CHECK POINT FIREWALL-1
What to do next
2
W
HAT
TO
DO
NEXT
SurfControl recommends the following to help you get the most from Web Filter:
• Check that you have a Category List update scheduled event listed in the SurfControl Scheduler. This list is updated daily by the SurfControl content team. See Available Events in Chapter 9 of the Administrator’s Guide for more details.
• Configure SurfControl Report Central to enable you to run reports on your network’s Internet activity. See Chapter 11 of the Administrator’s Guide for more details.
• Consideration should also be given to basic database administration tasks such as purging, archiving and compacting. See the Database Chapter of the Administrator’s Guide for more details.
F
URTHER
A
SSISTANCE
• SurfControl’s Knowledge base - SurfControl have an extensive knowledge base covering all areas of SurfControl Web Filter. It can be found at:
http://kb.surfcontrol.com
• Technical Support - details of how to contact SurfControl’s Technical Support teams for your location can be found at:
CHECK POINT FIREWALL-1
Further Assistance