Jay Balunas
Red Hat JBoss Web Framework
Kit 2
Getting Started With HTML5
Mobile Web Development
for use with JBoss Enterprise Application Platform
Edition 2.0.0
Red Hat JBoss Web Framework Kit 2 Getting Started With HTML5
Mobile Web Development
for use with JBoss Enterprise Application Platform
Edition 2.0.0
Jay Balunas Red Hat
Copyright © 2012 Red Hat, and others.
This document is licensed by Red Hat under the Creative Commons Attribution-ShareAlike 3.0 Unported License. If you distribute this document, or a modified version of it, you must provide attribution to Red Hat, Inc. and provide a link to the original. If the document is modified, all Red Hat trademarks must be removed.
Red Hat, as the licensor of this document, waives the right to enforce, and agrees not to assert, Section 4d of CC-BY-SA to the fullest extent permitted by applicable law.
Red Hat, Red Hat Enterprise Linux, the Shadowman logo, JBoss, MetaMatrix, Fedora, the Infinity Logo, and RHCE are trademarks of Red Hat, Inc., registered in the United States and other countries. Linux ® is the registered trademark of Linus Torvalds in the United States and other countries. Java ® is a registered trademark of Oracle and/or its affiliates.
XFS ® is a trademark of Silicon Graphics International Corp. or its subsidiaries in the United States and/or other countries.
MySQL ® is a registered trademark of MySQL AB in the United States, the European Union and other countries.
Node.js ® is an official trademark of Joyent. Red Hat Software Collections is not formally related to or endorsed by the official Joyent Node.js open source or commercial project.
The OpenStack ® Word Mark and OpenStack Logo are either registered trademarks/service marks or trademarks/service marks of the OpenStack Foundation, in the United States and other countries and are used with the OpenStack Foundation's permission. We are not affiliated with, endorsed or
sponsored by the OpenStack Foundation, or the OpenStack community. All other trademarks are the property of their respective owners.
Abstract
This book is a guide to getting started with HTML5 and REST. This approach uses a pure HTML5 based front-end that interacts with server-side content through RESTful endpoints.
. . . . . . . . . . . . . . . . . . . .
Table of Contents
Preface 1. Document Conventions 1.1. Typographic Conventions 1.2. Pull-quote Conventions 1.3. Notes and Warnings2. Getting Help and Giving Feedback 2.1. Do You Need Help?
2.2. Give us Feedback
Chapter 1. Getting Started
1.1. Prerequisites Prerequisites
1.2. Creating, Deploying, and Testing the Application 1.2.1. Using the Command Line
Deploying the Application Testing
1.2.2. Using JBoss Developer Studio Testing
1.3. Application in Action
JBoss Developer Studio Browser Simulator
Chapter 2. Further Information
2.1. Client Source Code
2.1.1. HTML5 Semantic Tags and Structure 2.1.2. HTML5 Form API
2.1.3. app.js File 2.1.4. CSS Files
2.1.5. Third Party Libraries
2.1.6. JAX-RS Endpoint Source Code 2.1.6.1. Member.java 2.1.6.2. MemberService.java 2.1.6.3. JSONP Support Revision History Index F H 3 3 3 4 5 5 5 6 7 7 7 7 7 8 9 9 11 13 16 18 18 19 19 22 24 25 26 26 26 28 30 30 30 30 Table of Contents
Preface
1. Document Conventions
This manual uses several conventions to highlight certain words and phrases and draw attention to specific pieces of information.
In PDF and paper editions, this manual uses typefaces drawn from the Liberation Fonts set. The
Liberation Fonts set is also used in HTML editions if the set is installed on your system. If not, alternative but equivalent typefaces are displayed. Note: Red Hat Enterprise Linux 5 and later include the Liberation Fonts set by default.
1.1. Typographic Conventions
Four typographic conventions are used to call attention to specific words and phrases. These conventions, and the circumstances they apply to, are as follows.
Mono-spaced Bold
Used to highlight system input, including shell commands, file names and paths. Also used to highlight keys and key combinations. For example:
To see the contents of the file m y_next_bestselling_novel in your current working directory, enter the cat m y_next_bestselling_novel command at the shell prompt and press Enter to execute the command.
The above includes a file name, a shell command and a key, all presented in mono-spaced bold and all distinguishable thanks to context.
Key combinations can be distinguished from an individual key by the plus sign that connects each part of a key combination. For example:
Press Enter to execute the command.
Press Ctrl+Alt+F2 to switch to a virtual terminal.
The first example highlights a particular key to press. The second example highlights a key combination: a set of three keys pressed simultaneously.
If source code is discussed, class names, methods, functions, variable names and returned values mentioned within a paragraph will be presented as above, in m ono-spaced bold. For example:
File-related classes include filesystem for file systems, file for files, and dir for directories. Each class has its own associated set of permissions.
Proportional Bold
This denotes words or phrases encountered on a system, including application names; dialog-box text; labeled buttons; check-box and radio-button labels; menu titles and submenu titles. For example:
Choose System → Preferences → Mouse from the main menu bar to launch Mouse
Preferences. In the Buttons tab, select the Left-handed m ouse check box and click
Close to switch the primary mouse button from the left to the right (making the mouse suitable for use in the left hand).
To insert a special character into a gedit file, choose Applications → Accessories →
Character Map from the main menu bar. Next, choose Search → Find… from the Character Map menu bar, type the name of the character in the Search field and click
Next. The character you sought will be highlighted in the Character T able. Double-click this highlighted character to place it in the T ext to copy field and then click the Copy
button. Now switch back to your document and choose Edit → Paste from the gedit menu bar.
The above text includes application names; system-wide menu names and items; application-specific menu names; and buttons and text found within a GUI interface, all presented in proportional bold and all distinguishable by context.
Mono-spaced Bold Italic or Proportional Bold Italic
Whether mono-spaced bold or proportional bold, the addition of italics indicates replaceable or variable text. Italics denotes text you do not input literally or displayed text that changes depending on
circumstance. For example:
To connect to a remote machine using ssh, type ssh username@ domain.name at a shell prompt. If the remote machine is exam ple.com and your username on that machine is john, type ssh john@ exam ple.com.
The m ount -o rem ount file-system command remounts the named file system. For example, to remount the /hom e file system, the command is m ount -o rem ount /hom e. To see the version of a currently installed package, use the rpm -q package command. It will return a result as follows: package-version-release.
Note the words in bold italics above: username, domain.name, file-system, package, version and release. Each word is a placeholder, either for text you enter when issuing a command or for text displayed by the system.
Aside from standard usage for presenting the title of a work, italics denotes the first use of a new and important term. For example:
Publican is a DocBook publishing system.
1.2. Pull-quote Conventions
Terminal output and source code listings are set off visually from the surrounding text. Output sent to a terminal is set in m ono-spaced rom an and presented thus:
books Desktop documentation drafts mss photos stuff svn books_tests Desktop1 downloads images notes scripts svgs
package org.jboss.book.jca.ex1;
import javax.naming.InitialContext;
public class ExClient {
public static void main(String args[]) throws Exception
{
InitialContext iniCtx = new InitialContext();
Object ref = iniCtx.lookup("EchoBean"); EchoHome home = (EchoHome) ref;
Echo echo = home.create(); System.out.println("Created Echo");
System.out.println("Echo.echo('Hello') = " + echo.echo("Hello")); }
}
1.3. Notes and Warnings
Finally, we use three visual styles to draw attention to information that might otherwise be overlooked.
Note
Notes are tips, shortcuts or alternative approaches to the task at hand. Ignoring a note should have no negative consequences, but you might miss out on a trick that makes your life easier.
Important
Important boxes detail things that are easily missed: configuration changes that only apply to the current session, or services that need restarting before an update will apply. Ignoring a box labeled “Important” will not cause data loss but may cause irritation and frustration.
Warning
Warnings should not be ignored. Ignoring warnings will most likely cause data loss.
2. Getting Help and Giving Feedback
2.1. Do You Need Help?
If you experience difficulty with a procedure described in this documentation, visit the Red Hat Customer Portal at http://access.redhat.com. Through the customer portal, you can:
search or browse through a knowledgebase of technical support articles about Red Hat products. submit a support case to Red Hat Global Support Services (GSS).
access other product documentation.
Red Hat also hosts a large number of electronic mailing lists for discussion of Red Hat software and technology. You can find a list of publicly available mailing lists at https://www.redhat.com/mailman/listinfo. Click on the name of any mailing list to subscribe to that list or to access the list archives.
2.2. Give us Feedback
If you find a typographical error, or know how this guide can be improved, we would love to hear from you. Submit a report in Bugzilla against the product JBoss_Enterprise_WFK_Platform _2 and the component doc-Getting-Started-With-HT ML5-Mobile-Web-Developm ent. The following link will take you to a pre-filled bug report for this product: http://bugzilla.redhat.com/.
Fill out the following template in Bugzilla's Description field. Be as specific as possible when describing the issue; this will help ensure that we can fix it quickly.
Document URL:
Section Number and Name: Describe the issue:
Suggestions for improvement: Additional information:
Chapter 1. Getting Started
1.1. Prerequisites
This guide is a walkthrough of creating a new HTML5 mobile application using a Maven archetype, deploying it to the JBoss Enterprise Application Platform 6, and executing server/client test suites. It also provides an overview of basic behaviour of the application including both command line and JBoss Developer Studio instructions.
Prerequisites
Java 6.0 (Java SDK 1.6) Maven 3+
JBoss Enterprise Application Platform 6 JBoss Developer Studio 5
HTML5-compatible browser: Chrome 14+
Safari 5+ Firefox 5+
Internet Explorer 9+
Mobile web support is limited to Android and IOS devices but may also run on HP and Blackberry devices.
1.2. Creating, Deploying, and Testing the Application
There are multiple ways to create the example application from the Maven archetype. The archetype is located in the Maven central repository.
1.2.1. Using the Command Line
1. Step One
cd into the directory the project will be created in. 2. Step Two
Run the following Maven archetype command:
mvn archetype:generate \
-DarchetypeArtifactId=jboss-html5-mobile-archetype \ -DarchetypeGroupId=org.jboss.aerogear.archetypes \ -DarchetypeVersion=1.0.0.M4
3. Step Three
Maven downloads the archetype and its dependencies and prompts for more information:
GroupID
the base package for the project
ArtifactID
the name of the project
Version
the starting version of the project
Package
if it is different from the GroupID
Select the required values and press 'Y' when prompted.
Result
The project is created in a directory named after the ArtifactID. Check the readme.md for extra information.
This example uses the ExampleDS, and a single table. The table suffix can be changed by passing "-DtableSuffix=<your_desired_suffix> when running m vn archetype:generate. Use this when running multiple application generated by the same archetype, or other examples that use the same table name.
Deploying the Application
1. Start the JBoss container
To start the JBoss container on Linux, run:
$JBOSS_HOME/bin/standalone.sh
To start the JBoss container on Windows, run:
$JBOSS_HOME/bin/standalone.bat
Note
Add -b 0.0.0.0 to these commands to allow external clients such as phones, tablets, and desktops to connect through your local network. For example:
$JBOSS_HOME/bin/standalone.sh -b 0.0.0.0
2. Create the archive
Run this command to create the archive:
mvn package
3. Deploy
Deploy the artifact by executing this command:
mvn jboss-as:deploy
Result
The application can be accessed at: http://localhost:8080/<artifactID> where <artifactID> is the equivalent to what was entered at creation time.
4. Undeploy
Run this command to undeploy:
mvn jboss-as:undeploy
Testing
This application uses Arquillian for in-container testing of services, and QUnit for verifying JavaScript. Please see Chapter 2, Further Information for more information.
By default, tests with Arquillian are configured to be skipped. The sample test is an Arquilliant test, which requires the use of a container. Use Procedure 1.1, “Arquillian testing” to run the test.
Procedure 1.1. Arquillian testing
1. Step One
Start the container instance. On Linux, run:
$JBOSS_HOME/bin/standalone.sh
To start the JBoss container on Windows, run:
$JBOSS_HOME/bin/standalone.bat
2. Step Two
Run the test goal with the following profile activated:
mvn clean test -Parq-jbossas-remote
QUnit is a JavaScript unit testing framework used and built by jQuery. This application includes a set of QUnit tests in order to verify JavaScript that is core to this HTML5 application. To execute a QUnit test case, load the following HTML in the browser to be tested:
<app-root>/src/test/qunit/index.html
1.2.2. Using JBoss Developer Studio
The following instructions assume JBoss Developer Studio 5 is installed and JBoss Enterprise Application Platform 6 is set up as a server in the IDE.
JBoss Developer Studio 5 introduces a splash screen called JBoss Central. This gives quick access to JBoss quickstarts, tutorials, and more.
Procedure 1.2. JBoss Developer Studio
1. Step One
Select the HT ML 5 project button and use the wizard to create the project. 2. Step Two
Enter the following details into the Wizard: Project Name
Package Target Runtime
Directory to create project in.
Click Finish
3. Step Three
Check that the next page has been pre-populated with values from the previous screen and update as required. Click Finish
Result
The application is created and imported as a new project in the workspace.
Procedure 1.3. Deploying the Project with JBoss Developer Studio
1. Step One
If the instructions were followed correctly, there should be a server tab that looks like this:
Figure 1.1. Server tab
Right click on JBoss Enterprise Application Platform 6 Runtim e Server and select Add and Rem ove
2. Step Two
In the Wizard that appears, select the application on the left and add it to the right. 3. Step Three
Click Finished.
Result
Figure 1.2. Management tab
4. Step Four
Start the server and access it at: http://localhost:8080/<artifactId>
Testing
This application uses Arquillian for in-container testing of services, and QUnit for verifying JavaScript. See Chapter 2, Further Information for more information.
Arquillian's in-container tests can be executed like any JUnit test case in JBoss Developer Studio; except that the JBoss container should be started following the JBoss Developer Studio instructions. Once this has been done, follow Procedure 1.4, “JBoss Developer Studio and Arquillian” to continue testing.
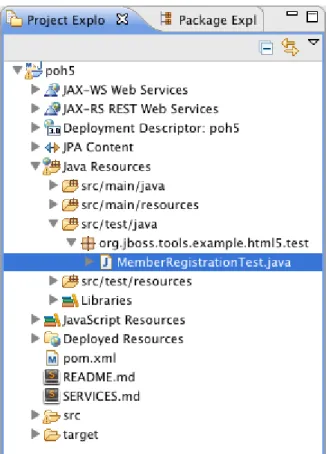
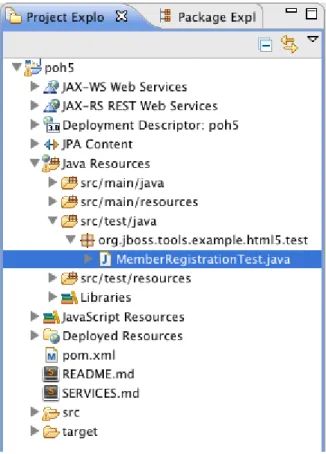
Procedure 1.4 . JBoss Developer Studio and Arquillian
1. Step One
Navigate to MemberRegistrationTest.java:
Figure 1.3. Management tab
2. Step Two
Right click on the file and select Run As and then JUnit T est.
Result
The console shows the tests being deployed and executed.
Procedure 1.5. QUnit and JBoss Developer Studio
QUnit is a JavaScript unit testing framework used and built by jQuery. This application includes a set of QUnit tests in order to verify JavaScript that is core to this HTML5 application.
Step One
Navigate to the QUnit index.htm l file as shown below; right click on this and choose to Open With --> Web Browser.
Figure 1.4 . QUnit Index
Result
The default browser launches, loading and executing the QUnit tests in the process. The browser window will look like this:
Figure 1.5. QUnit Browser
1.3. Application in Action
Now that the application is running, the following are some of the application screens on both desktop
and mobile devices.
This is the application's main page when viewed within a desktop browser. This form can be used to create new members, and show all current members in a table at the bottom of the page. jQuery is being used to make JAX-RS requests to the JBoss Enterprise Application Platform 6, handle POST and GET requests/responses, and handling errors. HTML5 form and page elements are also used to help with client-side validation.
Figure 1.6. Main Page
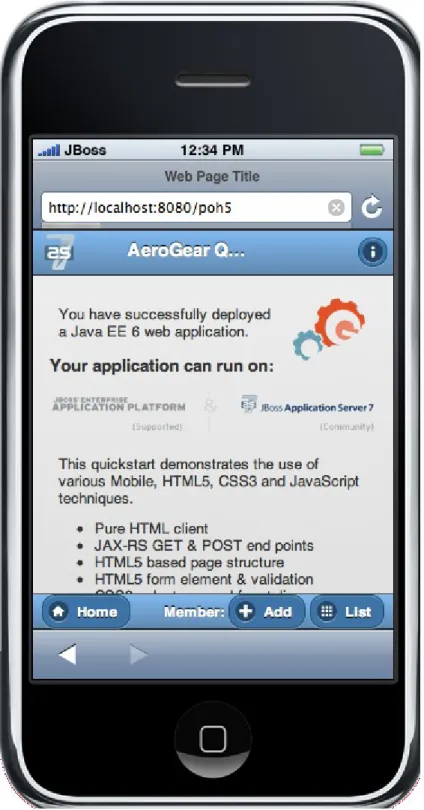
Figure 1.7. Mobile
Here jQuery Mobile is used to help transform the same basic content into a mobile web optimized application. In the mobile version, "pages" are created that jQuery mobile then transitions to as we make various requests. This application uses the same JAX-RS endpoints and access JavaScript as the desktop, allowing for reuse across clients. Since those HTML5 form elements are being used, the iPhone will provide users with the correct keyboard based on the data type requested.
Figure 1.8. Mobile
JBoss Developer Studio Browser Simulator
JBoss Developer Studio 5 has a browser simulator that mimics different mobile browsers. This means the application screen can be quickly checked for adjustments before testing in emulators, or physical hardware. Procedure 1.6, “JBoss Developer Studio Browser Simulator” explains how to use the BrowserSim function.
Procedure 1.6. JBoss Developer Studio Browser Simulator
Open JBoss Developer Studio 5 and navigate to the index.htm l file. 2. Step Two
Right click index.htm l and choose Open With → BrowserSim
Result
A new window like Figure 1.9, “Mobile” opens on the loading page. The browsers to mimic can then be manipulated using the Devices menu.
Figure 1.9. Mobile
Chapter 2. Further Information
This chapter details the significant files, libraries, and source code for the AeroGear archetype and quickstarts that are part of the JBoss Enterprise Application Platform quickstart suite called kitchensink-html5-mobile.
2.1. Client Source Code
Source <project-root>/src/m ain/webapp/index.htm l
This application follows the single page application approach. This means the entire client application can be encapsulated into a single html file. This approach follows the "responsive design" concept, which means the application can be adjusted based on the client accessing it.
Header
The header of the document shows that this is a HTML5 file by the inclusion of the <!DOCTYPE html> tag. The <meta> tags are then set to define the scaling and viewport properties for our application. In this case, the initial width of the page is set to the width of the device, and the initial scale to 1.
Following this is the 3rd party libraries being used. See Section 2.1.5, “Third Party Libraries” for more information on these libraries.
The app.js file contains the majority of the JavaScript logic, which is also pulled in. The README has more information about minifying the app.js.
<!DOCTYPE html> <html>
<head>
<title>AeroGear QuickStart</title>
<meta http-equiv="Content-Type" content="text/html; charset=utf-8"/>
<!-- Set viewport scaling and zoom features -->
<meta name="viewport" content="width=device-width, initial-scale=1"/>
<!-- Include the full development version of Modernizr. In production, you should use a -->
<!-- minimized custom build to reduce file size -->
<script type="text/javascript" src="js/libs/modernizr-2.5.3.min.js"></script>
<script type="text/javascript" src="js/libs/underscore-min.js"></script>
<!-- Minification - See Readme for details -->
<!-- For minification, comment out this file -->
<script type="text/javascript" src="js/app.js"></script>
<!-- For minification, uncomment this file -->
<!-- <script type="text/javascript" src="js/app.min.js"></script> -->
Following the heading is the initialization logic for the application. This is best viewed in the source code starting from line 44.
This logic does a couple of different things:
1. Demonstrates how to use the yepnope library to conditionally load the jquery-m in.js file from a CDN , or fallback to a local non-minified version for development.
Using this information jQuery mobile support and which CSS files to include in the app is toggled. 3. When these are complete, the initial event listeners are set up, and the member table from the
server is populated.
2.1.1. HTML5 Semantic Tags and Structure
HTML5 has a suite of new semantic-based tags. This means descriptive tags that better described the contained content, such as <section>, <footer>, <aside> for example. These make it possible to easily break up the structure of your project without resulting in many <div id=""> in the document
These semantic tags are used in the quickstart application to break up the different sections of the page, define the footer, and various article in the application. Breaking up the desktop version of the application makes moving to a mobile browser using jQuery Mobile easier. Each article is a different page, the aside is the "info" link, for example.
<section> <article/> <article/> <article/> <aside/> <footer/> </section>
CSS rules can also be used to 'hide' parts of the page based on the client type and format. This is helped by the media queries described previously, and also by how jQuery Mobile defines its page sections.
2.1.2. HTML5 Form API
A new feature of HTML5 and its related specifications are the HTML form elements and APIs. Several of the new features are used in the member form of the quickstart.
<fieldset>
<legend>Register a member:</legend>
<div>
<label for="name">Name:</label>
<input type="text" name="name" id="name" placeholder="Your Name" required autofocus/>
</div>
<div>
<label for="email">Email:</label>
<input type="email" name="email" id="email" placeholder="Your Email" required/>
</div>
<div>
<label for="phoneNumber">Phone #:</label>
<input type="tel" name="phoneNumber" id="phoneNumber" pattern= "[0-9]{10,12}" placeholder="Your Phone #" required/>
</div>
<div id="formMsgs"></div>
<div data-role="controlgroup" data-type="horizontal">
<input type="submit" name="register" id="register" value="Register"/>
<input type="button" name="cancel" id="cancel" value="Cancel"/>
</div> </fieldset>
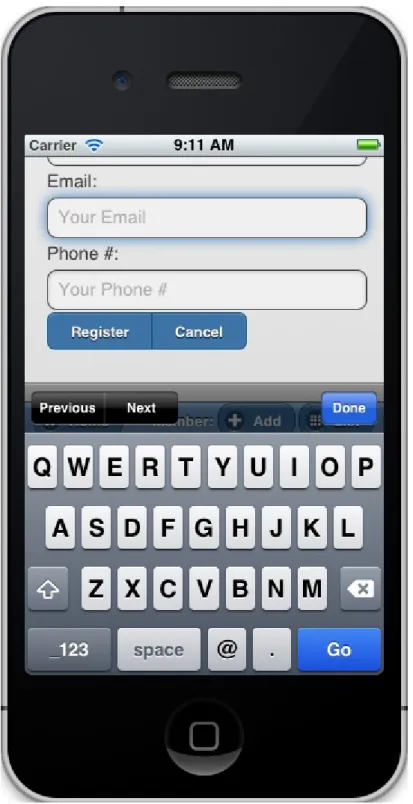
Input Type Attribute
By setting the input type attribute based on the type of field it represents, browsers can make various optimizations. Mobile browsers that support this attribute will display special optimized keyboards - as shown below. Some desktop browsers (such as Webkit and Firefox) will automatically validate the field as well; for example checking that the field is a valid email.
Figure 2.1. Mobile
Placeholder and Autofocus
The "placeholder" and "autofocus" attributes can also be seen. The placeholder attribute allows you to set a default text string that will display in your field when there is no value. This is valuable for mobile devices where you can shrink or eliminate regular labels for fields. The autofocus attribute allows the keyboard/input focus to automatically be on the specified field.
Input Validation
Another critical update to the form fields is around built-in client validation. It features attribute such as required and pattern. Along with input type, these allow browsers that support it to
validate fields on the client side. Currently this is limited to Chrome, Safari,a nd Firefox.
Note
Any validation entered here should match the Bean Validation from Member.java class.
2.1.3. app.js File
Source <project-root>/src/m ain/webapp/js/app.js
The app.js file contains the example's core JavaScript logic, and handles the RESTful requests to the server, as well as handling the updates to the UI based on them.
updateMemberTable
This method performs a simple GET call to the server, calls the buildMemberRows() method with the response data.
/* Uses JAX-RS GET to retrieve current member list */
function updateMemberTable() { $.ajax({
url: "rest/members", cache: false,
success: function(data) {
$('#members').empty().append(buildMemberRows(data)); },
error: function(error) {
//console.log("error updating table -" + error.status);
} }); }
buildMemberRows and getMemberTemplate
Using underscore.js these methods retrieve the member.tmpl file from the server and populates it with the json data retrieved from the updateMemberTable method. The output of this process is the table body for the member table on the application's main page. For more on what
[
/* Get the member template */
function getMemberTemplate() { $.ajax({
url: "tmpl/member.tmpl", dataType: "html",
success: function( data ) { $( "head" ).append( data ); updateMemberTable();
} }); }
/* Builds the updated table for the member list */
function buildMemberRows(members) {
return _.template( $( "#member-tmpl" ).html(), {"members": members}); }
registerMember
This method does the heavy lifting of creating a new member on the server using a POST request, and handling any error responses by highlighting fields that are not valid. Besides basic steps like clearing out older messages, if the request is successful it triggers the member table to update.
[
function registerMember(memberData) { //clear existing msgs
$('span.invalid').remove(); $('span.success').remove(); $.ajax({
url: 'rest/members',
contentType: "application/json", dataType: "json",
type: "POST",
data: JSON.stringify(memberData), success: function(data) {
//console.log("Member registered");
//clear input fields
$('#reg')[0].reset();
//mark success on the registration form
$('#formMsgs').append($('<span class="success">Member Registered</span>'));
updateMemberTable(); },
error: function(error) {
if ((error.status == 409) || (error.status == 400)) { //console.log("Validation error registering user!");
var errorMsg = $.parseJSON(error.responseText); $.each(errorMsg, function(index, val) {
$('<span class="invalid">' + val + '</span>').insertAfter($('#' + index));
}); } else {
//console.log("error - unknown server issue");
$('#formMsgs').append($('<span class="invalid">Unknown server error</span>'));
} } }); }
If, on the other hand the request fails for some reason the method processes the JSON response and based on the JAX-RS response status displays validation errors to the user based on the field, and message provided by the server. For more on the response codes and format see the server side section below on the MemberService.java class.
2.1.4. CSS Files
mobile. These contain the various styles needed for the application. The following is an example of using the new CSS3 selectors to make styling table cells easier.
/* Using new CSS3 selectors for styling*/
#members tr:nth-child(odd) { background: #f4f3f3; }
#members tr:nth-child(even) { background: #ffffff; }
This code allow odd rows to be styled easily.
2.1.5. Third Party Libraries
Source <project-root>/client/src/m ain/webapp/js/libs
This application uses several 3rd party libraries to assist with basic programming. These libraries represent just one combination, and there are many other quality libraries out there.
All of these libraries are packaged in both development and minized versions. Use the minimized versions in production for best performance, and development in the development phase.
jQuery Mobile
http://jquerymobile.com
One of several JavaScript mobile framework projects available. This is a very complete framework for mobile devices and has a great range of device support. This also means it is one of the larger libraries out there so performance should be considered. It does a great job of getting you running and is backed by the jQuery project.
jQuery
http://jquery.com
One of the most popular general purpose JavaScript projects available. This example uses it mainly for DOM manipulation and ajax requests.
Modernizr
http://www.modernizr.com
The Moderizr library is primarily used to check device, and browser capabilities allowing you to have a fine grain of control over your application no matter what device or client may be
accessing it. This library integrates with yepnope to combine feature detection with media queries and conditional resource loading.
Yepnope
http://www.yepnopejs.com/
As the yepnope web site says it is an asynchronous conditional resource loader that's super-fast, and allows you to load only the scripts that your users need. Our example uses it with modernizr to control resource loading and behavior based on the client accessing the application.
Underscore.js
Underscore.js
This is great utility library that has many great functions. This examples primary use for it is to process templating of new member table rows by dynamically loading and populating the member.tmpl file.
2.1.6. JAX-RS Endpoint Source Code
The server side of this application consists of a basic domain model using Bean Validation, and JAX-RS service endpoints using RESTEasy to provide access.
2.1.6.1. Member.java
Source
<project-root>/src/m ain/java/org/jboss/as/quickstarts/htm l5_m obile/m odel/Mem ber.java
@Entity
@XmlRootElement
@Table(name = "Member_html5mobi", uniqueConstraints = @UniqueConstraint(columnNames = "email"))
public class Member implements Serializable {
/** Default value included to remove warning. Remove or modify at will. **/
private static final long serialVersionUID = 1L; @Id
@GeneratedValue private Long id; @NotNull
@Size(min = 1, max = 25, message = "1-25 letters and spaces")
@Pattern(regexp = "[A-Za-z ]*", message = "Only letters and spaces") private String name;
@NotNull @NotEmpty
@Email(message = "Invalid format") private String email;
@NotNull
@Size(min = 10, max = 12, message = "10-12 Numbers") @Digits(fraction = 0, integer = 12, message = "Not valid") @Column(name = "phone_number")
private String phoneNumber;
Here you can see the domain object that is the base of the quickstart. This class has three fields (Name, Email, and PhoneNumber). It uses Bean Validation annotations to define constraints for each of these fields so that only valid values will be accepted.
Also note that at the top table name is defined for this object, and specifies that the Email field must be unique in the data table. This will come into play later when it is needed to validate this in the JAX-RS services, and process the response codes effectively.
root>/src/m ain/java/org/jboss/as/quickstarts/htm l5_m obile/rest/Mem berService .java
This class contains the actual RESTful endpoint definitions and processing code. It uses RESTEasy, which is the JBoss implementation of the JAX-RS specification, to make this easy to do, and is
configured using annotations.
@Path("/members") @RequestScoped @Stateful
public class MemberService { ....
Any requests to /members will be routered to this class and be processed by its methods that are defined below.
@GET
@Produces(MediaType.APPLICATION_JSON) public List<Member> listAllMembers() ...
@GET
@Path("/{id:[0-9][0-9]*}")
@Produces(MediaType.APPLICATION_JSON)
public Member lookupMemberById(@PathParam("id") long id) { ...
The methods above define the different ways of "getting" data from the service. There are two ways of creating more members. One approach uses the traditional POST approach with the @POST
annotation. While the other uses the GET method with an additional /new path. This can be used for JSONP support. The GET method uses query parameters while the POST method uses form parameters. Both of these methods delegate to the same method that processes the request.
A full list of members, and invidual members can be accessed, either in XML or JSON format. These are automatically marshaled from one form to another.
@POST
@Consumes(MediaType.APPLICATION_JSON) @Produces(MediaType.APPLICATION_JSON)
public Response createMember(Member member) { ...
JAX-RS allows the method to accept standard URL encoding form variables, and make it easy to map these to method parameters using the @FormParam annotation.
//Create a new member class from fields
Member member = new Member(); member.setName(name);
member.setEmail(email); member.setPhoneNumber(phone);
Using those values it then constructs a new member object.
try {
//Validates member using bean validation
validateMember(member);
The validateMember method validates the given Member variable and throws validation exceptions based on the type of error. If the error is a standard bean validation violation then it will throw a
ConstraintValidationException containing a set of the constraints violated. If the error is caused because an existing member with the same email is registered it throws a regular validation exception so that it can be interpreted separately by the catch block.
} catch (ConstraintViolationException ce) { //Handle bean validation issues
builder = createViolationResponse(ce.getConstraintViolations()); } catch (ValidationException e) {
//Handle the unique constrain violation
Map<String, String> responseObj = new HashMap<String, String>(); responseObj.put("email","Email taken");
builder = Response.status(Response.Status.CONFLICT).entity(responseObj); }
If the member is not valid them a map is created that contains the field name(s) that are not valid, and the error message associated with them from model class. It is also very important to set the response code correctly. In this case, 400 BAD REQUEST is used for standard constraints, and 409 CONFLICT for another member already has the same email.
If the member is valid the object is committed to the database and a CDI event is triggered just in case anything in the application wanted to know when a new member was created. The method then returns a standard HTTP 200 OK message using the Response.OK() method.
//Register the member
log.info("Registering " + member.getName()); em.persist(member);
//Trigger the creation event memberEventSrc.fire(member); //Create an "ok" response builder = Response.ok(); ...
2.1.6.3. JSONP Support
Source
<project-root>/src/m ain/java/org/jboss/as/quickstarts/htm l5_m obile/util/JSONPRequestF ilter.java
JSONP support makes requests accessible across domains by adding a callback function to the
Misc
Source
<project-source>src/m ain/java/org/jboss/as/quickstarts/htm l5_m obile/rest/JaxRsActivato r.java
The JaxRsActivator class does two things. It initializes JAX-RS without the need of a web.xml file, and defines the root path for all other JAX-RS HTTP call like this:
@ApplicationPath("/rest")
public class JaxRsActivator extends Application { /* class body intentionally left blank */
}
Source
<project-source>/src/m ain/java/org/jboss/as/quickstarts/htm l5_m obile/util/Resources.j ava
The Resources class uses CDI to alias Java EE resources, such as the persistence context, to CDI beans. This makes them available to all other CDI beans, ala MemberSerice.java.
Revision History
Revision 2.0.0-2.4 05 Tue Dec 17 2013 Rüdiger Landmann
Rebuild with Publican 4.0.0
Revision 2.0.0-2 Fri Jun 22 2012 Rebecca Newton
Pushing live for JBoss Web Framework Kit 2.0.0 GA.
Index
F
feedback
- contact information for this manual, Give us Feedback
H
help