Notice IRM-378
UNITED STATES DEPARTMENT OF AGRICULTURE
Farm Service Agency
Washington, DC 20250
For
: FSA Employees and Contractor Employees
Implementation of Encrypting File System (EFS) on Portable Computers
Approved by:
Acting Deputy Administrator, Management
1
Implementation of EFS Solution
A Background
Notice IRM-371 provided FSA policy for the management of sensitive (Privacy Act
protected) data. Notice IRM-372 provided an interim encryption solution approved for the
protection of sensitive data.
To help ensure that all portable computers are properly secured, OCIO/Information
Technology Services (ITS) is deploying an additional capability to help protect our Privacy
Act and other sensitive data on all Common Computing Environment (CCE) portable
(laptop, notebook, and tablet) computers that are supplied to FSA employees. Beginning on
the morning of Monday, September 11, an EFS solution will begin deployment on all CCE
portable computers.
Proper use of the EFS solution will encrypt and therefore provide protection of sensitive data
stored on CCE portable computers. After implementation of the EFS solution is completed,
it will no longer be necessary to use WinZip Advanced Encryption Standard (AES), 256-bit
encryption (see Notice IRM-372) to protect sensitive files on these CCE portable computers.
However, WinZip AES, 256-bit encryption will continue to provide an approved interim
solution for the protection of sensitive data, and may continue to be used to protect data
transported via unsecure means or media such as e–mail, wide-area networks, CD, or floppy
disk as the need arises.
B Purpose
This notice provides detailed information on the EFS solution being deployed by ITS on all
CCE portable computers including both of the following:
•
ITS Newsflash 20060906C, Workstation - Implementation of XP Encrypting File System
(EFS) for Laptop and Tablet Computers (Exhibit 1)
Note:
This exhibit is for technical staffs only.
•
Users Guide to Using EFS on ITS Laptops (Exhibit 2).
Note:
This exhibit is for all users of portable computers.
Disposal Date
October 1, 2007
Distribution
All FSA employees and Contractor employees; State
Offices relay to County Offices
Notice
IRM-378
1
Implementation of EFS Solution (Continued)
C Action
Because using EFS requires user interaction and understanding, supervisors and contracting
officer representatives shall ensure that all employees and contractors that have portable
computers receive a copy of Exhibit 2.
Employees that have technical questions or concerns about the implementation of EFS on
their portable computers should consult with their local OCIO/ITS Technical Support
Division (Help Desk) staffs. Help Desk contact information is provided in Notice IRM-364.
D Contacts
Direct any questions about this notice to either of the following:
•
Louis Iacoletti, ITSD, by:
•
e-mail to
[email protected]
•
telephone at 202-720-5320
•
Brian Davies, Acting Chief, Information Security Office, ITSD, by:
•
e-mail to
[email protected]
Notice IRM-378
Exhibit 1
ITS NewFlash
ITS Team Members,
September 6, 2006
Workstation - Implementation of XP Encrypting File System (EFS) for Laptop and Tablet Computers
Beginning on the morning of Friday September 8, an Encrypting File System (EFS) solution will begin deployment forest wide for all laptop and tablet computers. Once this solution is placed into the Domain and has replicated out to the environment the EFS implementation will take part in two stages. The first stage will happen in the Group Policy Object (GPO) startup script upon a workstation reboot for laptops and tablet computers that are on the ITS network. The GPO startup script executes each time a workstation is rebooted and is a method by which we have deployed some software updates in the past. The GPO Startup script will install two software updates and mark several folders on ITS laptop and tablet computers for file encryption. The folders that are marked for encryption will be c:\usda\backup and c:\home. This initial phase will not encrypt any existing files in these folders.
The second stage will occur when a user logs onto the laptop or tablet computer for the first time after the computer reboot. During this stage, file encryption will be performed for the user’s files in the following folders; C:\home\firstname.lastname, C:\Documents and Settings\firstname.lastname\Outlook and C:\Documents and Settings\firstname.lastname\My Documents. The Startup script is able to identify laptops and tablet computers since a plug and play battery is installed in most of these devices. The script will not run on any desktop computers as EFS is being initially deployed only on laptops and tablet computers. The majority of laptops and tablets in the ITS environment have the plug and play battery. The one known exception is the Gateway 5300 Solo laptop that does not have a plug and play battery. It should be noted that these machines have been tagged for disposal so there may be no 5300 Solo laptops that need this action performed. If one of these systems is going to be used it will be necessary to use the stand alone package that is posted to team services. In addition any laptop or tablet that is not on the ITS network, such as machines that connect via VPN or dialup and can not receive the GPO Startup script will need to have the stand alone package installed by the ITS staff.
The stand alone package, EFSStandAlone.zip, is available at the Team Services Website at
http://century.itc.nrcs.usda.gov/cce-states/ and under the Supplemental Applications and Instructions library at
http://century.itc.nrcs.usda.gov/cce-states/Supplemental%20Application%20Instructions/Forms/AllItems.htm. There is also a User Guide called “User Guide to Using EFS on ITS Laptops”, under the samelibrary that will need to be provided to each laptop or tablet user.
For the systems which you will need to install the stand alone package, you will need to extract the EFSStandAlone.zip to the c:\temp folder of the workstation and then, while logged in as an Administrator, execute the
c:\temp\EFSStandAlone\install.cmd. The stand alone installation will reboot the workstation and then when the User logs on for the first time will perform the encryption on their files. As a reminder the manual installation will need to occur on laptops and tablets that connect only via VPN or Dialup (any machine that does not have access to the GPO Startup script) and the Gateway 5300 Solo laptops.
It should be noted that when the encryption process is run, the user’s files will change modification dates as they are being encrypted. This could affect searches for files based on such dates. Encrypted files are also only readable by the user that encrypted them. For the most part, this is transparent to the user and should not be an issue on single user machines.
Notice IRM-378
Exhibit 1
ITS NewFlash (Continued)
The directories that will contain encrypted files are:
C:\usda\backup (all new files will be encrypted but existing ones will not be until they are overwritten with the backup procedures)
C:\Home (encryption will occur on c:\home\firstname.lastname upon the first time log onto the system and then any new files and directories will be encrypted. Existing files under C:\home that are not in the c:\home\firstname.lastname or in folders of a different name will not automatically be encrypted. Since it is not known who owns the files placed there it would be necessary to manually encrypt the folders or files.)
C:\Documents and Settings\[username]\Outlook (All current and future contents will be encrypted) C:\Documents and Settings\[username]\My Documents (All current and future contents will be encrypted)
Backups are covered in the user guide but will essentially require the users to run the manual backup process from the start menu while they are connected to the network.
It will be critical that the steps to Update the User Certificate be performed by the user after the files have been encrypted. See the User Guide for performing this action.
If there are questions or problems, please refer to the User Guide first and then contact the ITS Service Desk if the problem is still not answered.
Jack Zechman
Branch Chief
Infrastructure Deployment Branch/ Interoperability Lab Email: [email protected]
Phone: 301-504-4162 Fax: 301-504-4101 Cell: 202-641-3574
Notice IRM-378
Exhibit 2
United States Department of Agriculture
GUIDE
User Guide to Using EFS on ITS Laptops
Final Version 1.0 September 6, 2006 ABD.60074-00.F*0-ITS
Prepared by:
OCIO Information Technology Services Infrastructure Deployment Branch
Notice IRM-378
Exhibit 2
User Guide to Using EFS on ITS Laptops
Revision History
RECORD OF CHANGE Revision/Change
Number
Update Number
Date of Change
Description/Reason for Change Pages/Sections Affected
Notice IRM-378
Exhibit 2
Table of Contents
1. Overview ... 4
1.1.
Purpose...4
1.2.
Introduction...4
2. File Encryption ... 5
2.1.
Implementing File Encryption on Laptop and Tablet Computers ...5
2.2.
First Time Logon After Encryption Has Been Administered...5
3. How to tell if a File or Directory is Encrypted ... 6
4. Encrypting a Directory ... 7
5. Updating Recovery Certificate... 9
6. Other Useful Information... 10
6.1.
Workstation Backups ...10
6.2.
Moving and Copying Files ...10
6.3.
Standard Encrypted Folders...11
6.4.
File Strategies ...11
6.5.
Data Files for Applications...11
6.6.
Multiple Users ...11
6.7.
Opening an Encrypted File of Another User...12
Notice IRM-378
Exhibit 2
1. Overview
1.1. Purpose
The USDA Service Center concept is a cornerstone of the department’s reorganization effort undertaken subsequent to the Department of Agriculture Reorganization Act of 1994. By consolidating its individual agency field offices into service centers, the USDA intends to see a greater return on investment, and at the same time provide taxpayers with more efficient service at reduced cost.
One of the key components of this concept is the implementation of the Information Technology Services (ITS) organization. The ITS vision is to be recognized as a professional team of customer-driven service providers who respond to the needs of its customers by providing outstanding service and cost-efficient, highly effective technical solutions.
1.2. Introduction
In response to recent concerns regarding the safety of sensitive data on mobile devices, ITS will be enabling the Encrypted File System (EFS) feature within the WINDOWS XP operating system running on all notebook, laptop, and tablet workstations. The process to enable EFS will be implemented through a start up script when the workstation is rebooted on the ITS network.
Â
For machines that can not receive the start up script, i.e. dialup or vpn locations or
Gateway 5300 Solo laptops it will be necessary for the ITS staff to manually install the
software to implement EFS.
The first time a user logs on to these types of devices, a script will execute that will encrypt folders that have been identified in this guide. It is important to remember that notebooks, laptops and tablet workstations are more vulnerable than normal desktop computers as they are easier to steal and this is the main reason these units have been targeted for this initial rollout of EFS.
IMPORTANT!!!
Users need to make sure that when they need to store files on these portable
devices, they must save the files in the folders that have been encrypted.
Â
While the process is running please refrain from using
M
ICROSOFTO
UTLOOKand any other
programs that store data within the affected directories
.Notice IRM-378
Exhibit 2
2. File
Encryption
In order to maintain the security of sensitive information on machines that leave USDA property, the Encrypting File System built into Windows XP is going to be used. This will add a number of new concerns to ensure the data is also accessible to authorized persons.
Â
For the most part, file access is transparent to the creator of the file.
2.1. Implementing File Encryption on Laptop and Tablet Computers
A script has been set up to implement the file encryption for each user that logs on to a laptop or tablet computer. This script is made available to the computer by performing a reboot of the machine while on the ITS network.
For machines that are not on the ITS network, i.e. use dial-up or VPN connection all of the time, it will be necessary to obtain the manual installation script and have it installed by the ITS staff.
2.2. First Time Logon After Encryption Has Been Administered
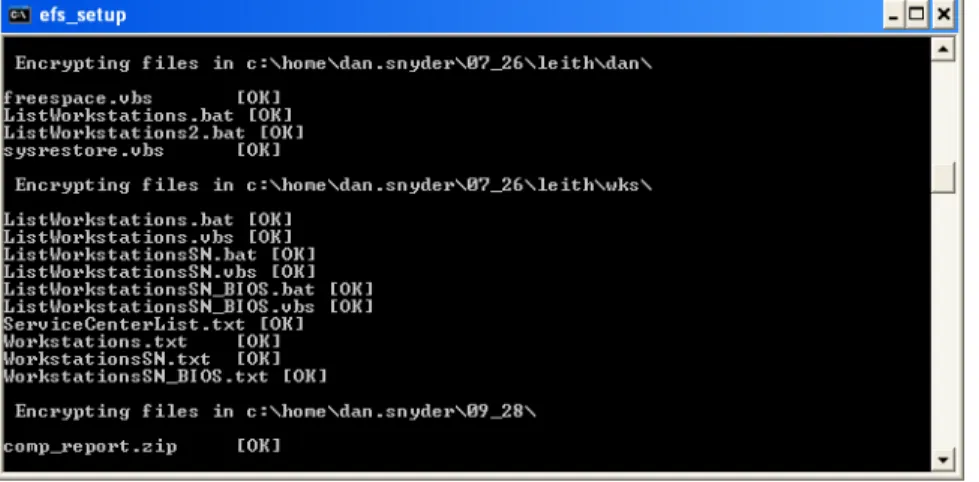
1. At the CTRL + Alt+ Delete log on screen, log on to the laptop or tablet workstation with regular user account. You will see a new screen, such as the one shown in Figure 2.2.a below, as the encryption of existing files takes place.
Figure 2.2.a – Encryption Screen
Â
Depending on the number of files in the folders to be encrypted the encryption can take
from 10 minutes to over an hour. Errors will be received if the encryption is attempting to
encrypt files that are in use, such as
O
UTLOOK, so it is necessary to wait until the one time
encryption is finished before using the system.
2. When the encryption is finished you will be returned to the normal desktop. Make sure you perform the action in Section 5 to establish an encryption key for the files that were encrypted.
Â
All files which are encrypted will have their date/time stamp changed to the time of their
file encryption. Thus the first time the script is run, all files in the folder will be updated.
Notice IRM-378
Exhibit 2
3. How to tell if a File or Directory is Encrypted
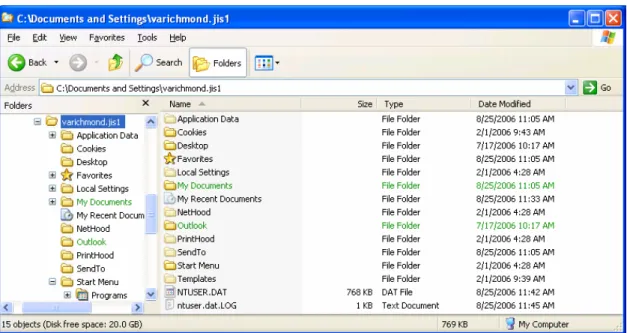
The easiest way to see if a file is encrypted is through the use of WINDOWS EXPLORER. If the file or directory is encrypted, it will display with a green color. See Figure 3.0 below.
Notice IRM-378
Exhibit 2
4. Encrypting a Directory
Although ITS is setting what it considers the most common directories for file storage to encrypt by default, there will be additional directories that may contain sensitive information. As those directories are identified by the Agency or user, they should be encrypted as well.
Â
Bear in mind that programs encrypted by one user are usually not usable by another user.
The steps to encrypt files in a directory are below:
1. Open WINDOWS EXPLORER by right-clicking the [ Start ] button.
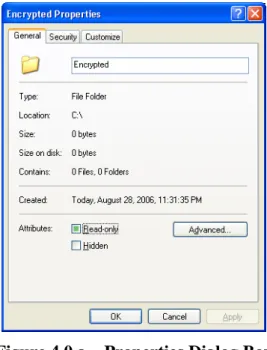
2. Choose [ Explore ]. Navigate to the directory where encryption is to take place. 3. Right-click the Directory and choose [ Properties ]. See Figure 4.0.a below.
Figure 4.0.a – Properties Dialog Box
4. Click the [ Advanced ] button. See Figure 4.0.b on the following page.
Figure 4.0.b – Advanced Attributes
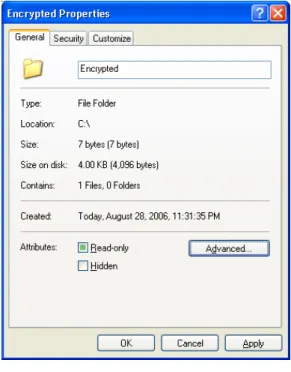
5. Put a check in the box next to [ Encrypt Contents to secure data ] and click [ OK ]. You will be returned to the previous screen. See Figure 4.0.c below.
Notice IRM-378
Exhibit 2
Figure 4.0.c – Properties Dialog Box
6. You should see the screen shown in Figure 4.0.c. Click [ OK ].
7. If the directory already contains items, it will ask if you would like to encrypt those as well. See Figure 4.0.d below. Choose [ Apply changes to this folder, subfolders and files ] and click [ OK ].
Figure 4.0.d – Confirm Attribute Changes
Notice IRM-378
Exhibit 2
5. Updating Recovery Certificate
In order to use files you have encrypted, it is important that you have two items that are referred to as a Certificate and a Key. Normally, the existence and usage of these items is transparent.
However, in the case of a critical failure of the laptop, it is important that a backup of the Certificate for these files be kept off the machine. There is a semi-automated process on the machine that will guide you through the process and then save the file to your H:\certificates folder. In this example the H: drive is on the ITS Server.
Â
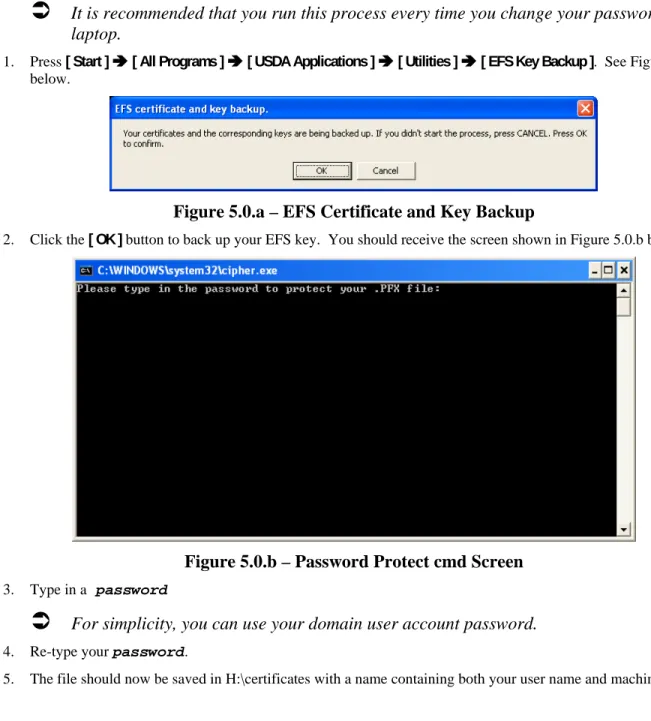
It is recommended that you run this process every time you change your password on the
laptop.
1. Press [ Start ] Ä [ All Programs ] Ä [ USDA Applications ] Ä [ Utilities ] Ä [ EFS Key Backup ]. See Figure 5.0.a below.
Figure 5.0.a – EFS Certificate and Key Backup
2. Click the [ OK ] button to back up your EFS key. You should receive the screen shown in Figure 5.0.b below.
Figure 5.0.b – Password Protect cmd Screen
3. Type in a password
Â
For simplicity, you can use your domain user account password.
4. Re-type your password.
Notice IRM-378
Exhibit 2
6. Other Useful Information
6.1. Workstation
Backups
One of the workstation backup strategies that has been in place is for a scheduled task that is on the ITS Server to perform a connection to each workstation during the night and utilize the WINZIP software to perform a backup of the user and data files that reside on the workstation. With the implementation of encryption the WINZIP software can not back up the folders which have been encrypted unless the task is performed by the user that owns the files. The workstation backups that are performed from the Server will continue to run but it will only backup the files that are not in the encrypted folders. This allows the data files to still be backed up by a scheduled task.
Until a long term solution can be found it will be necessary for the individual user to perform a backup of the tablet or laptop by using the Nightly Backup menu option that is on the machine. This backup method requires you to be connected to the network and an H: drive mapped to the Server.
One item to be aware of is that the manual execution of the nightly backup will only allow the encrypted files of the user that is logged on to be created in the backup zip file. You will get access denied messages for files that are not owned by the user performing the backup.
To perform a manual backup execute the following steps.
1. While logged on as Regular User Account, click [ Start ] Ä [ All Programs ] Ä [ USDA Applications ] Ä [ Backup ] Ä [ Manual Run of Nightly Backup].
2. This will perform a backup of the user files and data files that have been configured on the workstation. A copy of the backup file will be located under the c:\usda\backup folder as well as to the H: drive for the user.
6.2. Moving and Copying Files
When needing to make your files available in other folder locations than the current encrypted folder you need to be aware of what happens to the encryption based on where you place the files or folders. The following guide lines are helpful in understanding this scenario.
• Any file that is created or saved in an encrypted folder will automatically become encrypted and only accessible by the user that placed the file in the folder location.
• Any files that are saved to the User’s desktop will not be encrypted as the desktop is not an encrypted folder location.
Â
Sensitive data should not be stored on the User’s desktop.
• If you attach an encrypted file to an mail it will automatically be un-encrypted when the recipient receives the e-mail. Remember it is not a good security practice to send sensitive information via e-e-mail.
• If you copy, cut or move files or folders from an encrypted location, the encryption will stay on the files or folders, if they will be placed in another location on the hard drive. For example, you go into WINDOWS EXPLORER and copy a file from c:\home\firstname.lastname and then paste the file into c:\temp. The copied file will now be in the c:\temp folder and it will be encrypted based on your user account and no one else can open the file.
• If you attempt to copy an encrypted file or folder to the ITS Server the file will not be encrypted. On the initial roll out of the encryption it may be possible but an eventual policy will prohibit this action.
• Encryption will not stay on a file or folder if you write the files to a CD-ROM. The original file or folder that is still on your system will remain encrypted.
Notice IRM-378
Exhibit 2
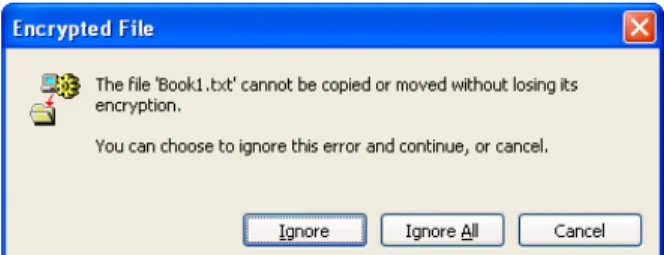
• In addition, if you copy the file to a USB Memory Stick, encryption will not remain on the file and you will get a screen similar to the one shown in Figure 6.2.a below. The original file or folder that is still on your system will remain encrypted.
Figure 6.2.a – Encrypted File Screen
6.3. Standard Encrypted Folders
The following folder locations will be encrypted upon setting up encryption for the first time.
•
C:\home and all subfolders – The folder specific to the user would be
c:\home\firstname.lastname
•
User’s My Documents Folder, (C:\documents and settings\username\My Documents) - providing
they are on the laptop or tablet
•
User’s C:\documents and settings\username\Outlook
•
C:\USDA\Backup
6.4. File
Strategies
For users that spend most of their time in the office with a network Server and occasionally take their laptop or tablet out of the office, you may want to make sure you save the files that you use on the Server and then when you need to leave the office, copy the files that you need to the encrypted folder (c:\home\firstname.lastname), use them while out of the office and then when you get back copy them back to the Server.
6.5. Data Files for Applications
At this time we are not encrypting folders that would contain data files for applications. Additional testing must be
performed before we can implement this strategy. If the application allows you to store the file in a different folder and then move it back when needed then you could store the file in an encrypted area and then when you need to access it, move it to the folder where the application resides, un-encrypt the data and then use the data.
Â
Remember if you perform this action you need to make sure you move the data file back to
the encrypted folder when you are finished using it.
6.6. Multiple
Users
If there are multiple users that utilize the same laptop or tablet you will not be able to access the other person’s files that are located in their encrypted folder. For example a file located in c:\home\joe.smith and was created by joe.smith can not be accessed by another user that logs onto the tablet or laptop.
Notice IRM-378
Exhibit 2
6.7. Opening
an
Encrypted File of Another User
If you try to open an encrypted file that another user owns you will get an error message similar to the following;
Figure 6.7.a – Access Privileges Screen
6.8. Removing Encryption On A File
1. If is necessary to remove encryption on a file so that someone else can use it you can copy the file to another folder location such as c:\temp and then right-click the file and select [ Properties ].
2. Click on the [ Advanced ] tab and remove the check mark in front of [ Encrypt Contents to Secure Data ]. 3. Make sure that you do something with the file and then remove it from this location so that the data is secure.