S T O R A G E S Y S T E M S W H I T E P A P E R
1. Abstract ...1
2. Introduction to Snap EDR...1
3. Product Architecture...1
4. Replicate Data Management Tool ...2
4.1. Default Functionality ...2
5. System Setup and Software Installation ...2
5.1. Installing the Snap EDR Management Console Software...2
5.2. Installing Snap EDR Agents ...3
6. Configuring Schedules...3
7. Monitoring Performance ...4
7.1. Viewing Job Statistics ...4
7.2. Viewing the Job Log Files...4
8. Verifying Performance ...4
8.1. Report Types ...4
9. Best Practices...5
9.1. Bandwidth Requirements...5
9.2. Directory Configuration on Remote Nodes ...6
9.3. Permissions Selection ...6
9.4. Platform Choice ...7
9.5. Use of Compression...7
9.6. Delivery Mode ...7
9.7. Synchronize Source and Target ...7
10. Conclusion...7
Replicating File Data with Snap Enterprise
Data Replicator (Snap EDR)
T E C H N I C A L O V E R V I E W
1. Abstract
This white paper provides an overview of the Snap EDR prod-uct, and details the components and configuration of a Snap EDR Replicate solution. This solution allows users to schedule a job where files are transferred from one source machine to one target machine on the following platforms: Snap Servers powered by Guardian OS, Windows clients, and UNIX/Linux clients.
Common business needs for replication of file data include, but are not limited to, the following:
• Replication of user data for disaster recovery purposes • Replication of data for high data availability purposes • Keeping a document repository synchronized with a single
other site
2. Introduction to Snap EDR
Snap EDR includes three Data Management Tools to automate the secure flow of data between systems:
• The Aggregate tool allows jobs to be scheduled to transfer files from multiple hosts to a single target host
• The Distribute tool allows jobs to be scheduled to transfer from one source machine to one or more target machines • The Replicate tool allows jobs to be scheduled to transfer
files between two systems
Snap EDR also includes the Advanced Data Management (ADM) Suite that groups together the functionality of Remote
Inventory, Remote Archiving, and Remote Backup and Restore. These solutions provide exceptional functionality to create and deploy policies for solving remote data management problems such as variability, dissimilar computing platforms, security needs, and data integrity.
The Advanced Data Management Suite performs the following tasks:
• Inventory, to determine storage utilization
• Archive, to move selected data for permanent archive • Backup, to protect data
• Restore, to recover backup data
Separate white papers provide details on the Distribute and Aggregate tools and each tool in the ADM suite, and are avail-able from the following location:
http://www.adaptec.com/worldwide/product/markeditindex.html ?sess=no&language=English+US&docType=Whitepapers
3. Product Architecture
Snap EDR consists of a Management Console that is installed on a Snap Server powered by GuardianOS, and a collection of agents running on the other servers/workstations involved in the transfer. The Management Console coordinates and logs the data transfer activities carried out by the distributed agents. The Snap EDR agents are responsible for the actual transfer of data.
Users access the Management Console using a web browser that allows them to configure Snap EDR and to create data transfer jobs from any location.
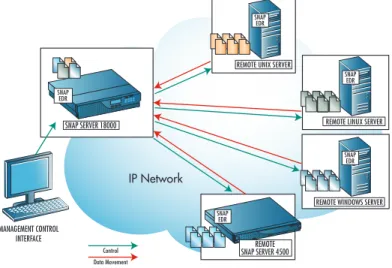
The following diagram shows an example of a Snap EDR solu-tion:
Figure 1: Snap EDR Architecture
The Administrator logs into the Management Console to cre-ate and configure jobs through this interface. The Manage-ment Console then communicates with the Snap EDR agents involved in the job, and the agents transfer the data to the appropriate machine(s). The Management Console logs the transfer activity, and allows the user to view these logs and reports.
Note that the flow of control and data movement illustrated above differs depending on the type of transfer one has creat-ed. In some cases, users may want to transfer data from a sin-gle source agent to one or more target agent(s) (called a "push" transfer). In other cases, users may want to transfer data from multiple source agents to one target agent (called a "pull transfer").
The replication of data using Snap EDR is a straightforward process involving the activation of the Snap EDR agents on two machines, configuring the parameters of the replication job (e.g., source and target directories, etc.) and scheduling the job.
4. Replicate Data Management Tool
The Replicate data management tool allows users to schedule a simple one-to-one transfer where files are transferred from one source machine to one target machine.
4.1. Default Functionality
The Replicate data management tool has the following default functionality:
• File transfer from one source to one target host
• Cross-platform support
• Option to exclude files from transfer
• Option to exclude sub-directories from transfer
• Option to synchronize target host directory structure with source host directory structure
• Option to transfer changed bytes only, or entire file con-tents
By default, any files that are in use during the transfer will be skipped without error. This allows users to transfer common files from a central repository.
Users can set information in the following categories: • Source agent selection
• Directory and file options • Target agent selection • File transfer options • Job options
• Scheduling parameters • Email notification
5. System Setup and Software Installation
The Snap EDR system requires users to install the Manage-ment Console that coordinates and logs the data transfer activities of the distributed Agents. The Management Console should be installed on a Snap Server powered by GuardianOS. Users can install the agent software on a GuardianOS-based Snap Server, Windows, or UNIX/Linux system involved in the data transfers.
Installing and configuring the Snap EDR software involves the following procedures:
• Installing the Management Console software on a Snap Server
• Installing Snap EDR Agent software on Snap Server, Win-dows, and/or UNIX/Linux system
Note that Snap EDR installs only on GuardianOS 3.2.019 or higher.
Once the software is installed, users can login to the Manage-ment Console and configure and schedule replication jobs. 5.1. Installing the Snap EDR Management Console Software
Note: Only one Management Console should be configured to handle all of the agents in the Snap EDR replication environ-ment.
Install the Management Console through the browser-based Administration Tool for the Snap Server. For detailed proce-dures on how to install the Management Console software, refer to the product documentation.
IP Network
REMOTE UNIX SERVER
SNAP EDR
Control
SNAP EDR
REMOTE LINUX SERVER
SNAP EDR
REMOTE WINDOWS SERVER
REMOTE SNAP SERVER 4500
SNAP EDR
SNAP EDR
SNAP SERVER 18000
MANAGEMENT CONTROL INTERFACE
5.2. Installing Snap EDR Agents
Snap EDR agents are responsible for the actual transfer of data. An agent is installed automatically on the Snap Server that is designated as the Management Console. The Snap EDR agent software must be installed on each remote node in your system that will be part of the Snap EDR data replication environ-ment.
Users can install a Snap EDR agent on any Snap Server, Win-dows, or UNIX/Linux system that meets the following require-ments:
For detailed procedures on installing the Snap EDR Agent soft-ware on a Snap Server, Windows, or UNIX/Linux system, refer to the product documentation.
6. Configuring Schedules
Once Snap EDR has been installed, login to the Management Console to configure the Replicate Data Management tool to schedule the type of replication job desired.
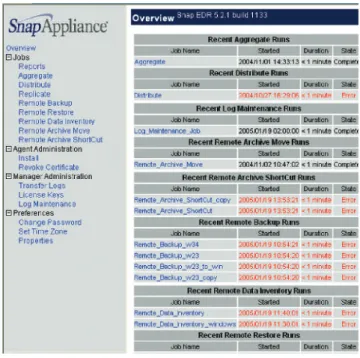
Upon login to the Management Console, the following screen appears, displaying a menu on the left-side that allows users to schedule a variety of jobs (aggregate, distribute, backup, repli-cate, and so on), install agents, change user preferences, run maintenance tasks, generate reports, and view transfer logs:
Figure 2: Management Console
Snap EDR provides a straightforward interface to schedule a replicate job by clicking on the replicate menu item on the left side of the screen. The Replicate Configuration and Scheduling screen is similar to the following:
Figure 3: Replicate Job Creation Screen
When creating a job, users can specify the source and target agents, which sub-directories to exclude, file ownership
preser-Item Description
Operating System
Snap Server with GuardianOS v3.2.019 or higher AIX 4.3, 5.1, 5.2
Solaris 5.7, 5.8 HP-UX 11.x, 11i
Fedora Linux, RedHat Linux 7.2/7.3, Enterprise Linux 2.1 or 3.0 or SUSE
LINUX 8.2 and 9.0
Windows 2000 (with SP2 or higher), Windows 2003, Windows Server Appliance Kit (SAK) 2.01, or Windows XP
System Memory 128 MB or more
Disk Space Windows systems: 5 MB or more
UNIX systems: 5 MB or more
Installation directory: 100 MB, 20 MB free in /tmp on all platforms
Network Connection
100 Mbps Ethernet or faster OR a WAN connection capable of supporting the throughput required to meet the volume and ‘window of time’ requirements
vation and so on. For detailed instructions on creating a Repli-cate job, see the product documentation.
7. Monitoring Performance
There are a number of ways a user can monitor the perform-ance of a job, including the following:
• Viewing Job Statistics • Viewing the Job Log Files 7.1. Viewing Job Statistics
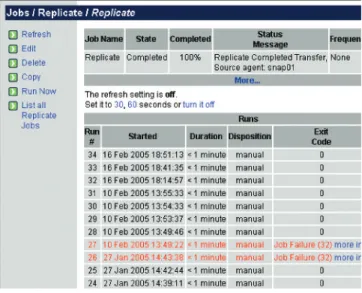
When a job that has run to completion is selected, the screen displays the job's statistics, including information such as the start and end time of the job and whether or not the job ran successfully. The Scheduled Job View screen also allows access to console functions where other tasks can be performed with the scheduled job. These tasks include manually running a job and viewing past log files. The following is a sample of the Job View screen:
Figure 4: Job Statistics Screen
Exit codes appear in the Exit Code column in the list of job runs. An exit code indicates whether or not a job completed successfully, and if there was an error, the type of error that occurred. A “0” exit code indicates that the job completed suc-cessfully. For a description of what each non-zero exit code means, click “more info” beside the exit code in the “Exit Code” column of the job screen, or refer to the product docu-mentation.
7.2. Viewing the Job Log Files
Whenever users run a scheduled job, the Management Console generates a log file. If you click on the job, the job's display area shows log files for the most recent run and up to ten previous job runs. If there are more than ten job runs, the oldest job log is deleted to allow space for the latest job log.
Clicking on the word “view” beside any past job run displays a detailed log summary for that particular job run:
Figure 5: Job Log Screen
This summary displays messages about the data transfer, and is generated by the Management Console and the agents while the job is running. These messages vary in severity, from sim-ple information messages (e.g., “starting group: Replicate (sequential)), to warnings (e.g., “Preserve ownership may fail for target 'snap01' because the system types are different.”), to errors and debug messages. These messages are useful for eval-uating the job run.
Click the “Filter” button to change the type of log information displayed or to download the job log file to the local machine. Downloading the file allows you it to be loaded into different programs (for searching, printing and so on). The log file is a plain text file.
8. Verifying Performance
The Management Console creates statistical records for each completed job run and stores them in the rules database. Using the Management Console, users can generate a number of dif-ferent types of reports to evaluate the operation of each job. 8.1. Report Types
Using the Management Console, the following types of reports can be generated:
Report Type Description
Stats Summary Report
Provides a summary and totals of the data from all jobs in the selected job group (all Distribute, Aggregate and Replicate jobs are in the Published_Solutions job group), based on how the user chooses to group the data (by month, day, etc.).
Detail Report Provides a detailed record of the data from the selected job
group (all distribute, aggregate and replicate jobs are in the Published_Solutions job group). Note that the number of records the report displays depends on the number of agents on which the job runs. The report displays a record for every agent on which the job runs.
Custom Query Report
Provides a customized query of detail records from the job name within a selected job group (all distribute, aggregate and repli-cate jobs are in the Published_Solutions job group). Note that the number of records the report displays depends on the num-ber of agents on which the job runs. The report displays a record for every agent on which the job runs.
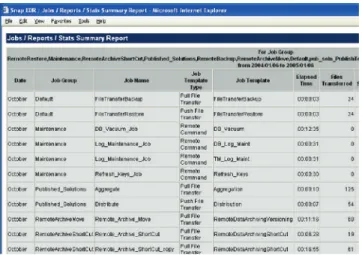
Template names can be assigned to created reports. The tem-plate appears in the Report view. Report temtem-plates allow reports to be generated without having to change the initial parameters. Templates are especially useful for generating the same type of report on a regular basis. Run, Edit, Remove, or Schedule a report by clicking on the appropriate word beside the report template. Click “Schedule” to run reports daily, weekly or monthly at specific times. The following diagram is a sample of a Stats Summary Report:
Figure 6: Sample Stats Summary Report
For detailed instructions on how to generate reports, see the product documentation.
9. Best Practices
To obtain the best performance from the replicate job, consider the following issues:
• bandwidth requirements ("window of time" to transfer the data, and the volume of data)
• directory configuration on remote nodes • permissions selection
• platform choice • use of compression • delivery mode
• synchronizing source and targets 9.1. Bandwidth Requirements
To determine performance requirements for the replication job, it is important to have the following information: • Amount of data to be retrieved
• Amount of time available for the replication
• Bandwidth of the most constrained segment of the network (can be either the speed of the network or a limit imposed by bandwidth throttling)
• Activity of the network at the time the job is run. If the network is busy, the ‘effective’ throughput could be
substan-tially less than during ‘off-peak’ times.
Use the following equations to manually calculate bandwidth requirements:
Sender bandwidth Mbps=(MB to transfer*8)/(Avail. Hrs for Replication *3600)
Receiver bandwidth Mbps=Sender bandwidth Mbps * Number of Agents
Example: A document repository needs to be replicated nightly (between 6pm and 6am) from one location. The maximum logsize is 1GB and you are running on a T-1 (1.544 Mbps) net-work connection.
Sender bandwidth Mbps=(MB to transfer*8)/(Avail Hrs*3600) Sender bandwidth Mbps = 1000 * 8 / 12 * 3600
Sender bandwidth Mbps = 8,000 / 43,200 Sender bandwidth Mbps = 0.185 Mbps
(Each sender has sufficient bandwidth: 0.185 Mbps < 1.544 Mbps) Receiver bandwidth required Mbps=Sender bandwidth Mbps * Number of Agents
Receiver bandwidth required Mbps=0.185 x 1 Receiver bandwidth required Mbps=0.185 Mbps
(The receiver has sufficient bandwidth, as the required 0.185 Mbps is less than the available T-3 (44 Mbps).)
To determine the “maximum” network performance to the receiver, perform a transfer of a single large file (i.e., 20 MB or more) across the same network using the same equipment and storage that will be used in production to the receiver. Ensure that the network performance exceeds required performance. Several network factors will impact the ability of the Snap EDR agents to use all of the available bandwidth: network latency, packet drop rates, network congestion, etc. For these reasons, it is useful to perform test data transfers over the actual net-works that will be used.
IMPORTANT: This calculation would be an estimate of WORST CASE bandwidth requirements. The Snap EDR soft-ware is optimized to make the best use of network bandwidth through features like in-stream data compression and byte-level incremental transfers. Therefore, for repeatedly transfer-ring files that change only by a small amount, the bandwidth required might be very small for transfers that are not the “first time” transfer.
Although a T1, for example, claims a throughput of 1.544 Mbps, it is an absolute BEST CASE number. The effective throughput is much less, and an accurate throughput number can be determined ONLY by running the test suggested previ-ously under the SAME conditions when the replicate job is intended to run.
9.2. Directory Configuration on Remote Nodes When running a replicate job using hosts on multiple plat-forms, users must ensure that the same directory is being used on each host.
9.3. Permissions Selection
The file ownership transfer option allows users to specify whether files maintain the source user ID and group owner-ship after they are transferred, and what method is used. Users can choose from the following options to preserve ownership:
GuardianOS -When transferring between two Snap Servers
powered by GuardianOS, ACLs are extracted and set using Snap Server-specific routines. ACLs are transferred only if both the source and target are Windows or if both are running GuardianOS. If no match is found, a warning is generated. ACLs without matches are dropped. When transferring between Windows, UNIX, Linux, or GuardianOS, user name matching is done for the owner and group regardless of the source and target OS type. Owners and groups without match-es are replaced with the transfer user (root on UNIX, system on Windows, or UID 1 on GuardianOS).
Inherited ACLs are not explicitly copied between Windows machines. For example, a file that inherits its ACLs from a folder on the source is transferred to a folder on the target that has different ACLs. However, the source folder is not trans-ferred. In this case, the file's inherited ACLs on the target will come from the target folder into which it is transferred and not from the source folder.
GuardianOS mode is the default mode of transfer.
Windows - Preserves Windows SIDs in homogenous Windows
environments. A security identifier (SID) is a unique value of variable length that is used to identify a security principal (e.g., user or security group) in Windows 2000. Well-known SIDs are a group of SIDs that identify generic users or generic groups - these do not change from system to system. In this mode, the security stream and all other alternate data streams are copied; inherited ACLs are explicitly copied. Use this option when transferring data between Windows hosts only.
UNIX - Tries to match the usernames/groupnames found on
the source and target systems. Used when transferring between Windows/UNIX/Linux/Guardian OS.
The file ownership transfer capability may not work on some UNIX systems such as HPUX 11 and Solaris 7 that use Orange Book security standards.
Off- Do not preserve ownership. The user ID specified in the target User ID field of this job template owns files written to the target. The file will be owned by root on UNIX, NT Authority/System on Windows and UID1 on GuardianOS. The following table provides a matrix for transfer of owner-ship, permissions and attributes with Snap EDR:
(a) The read-only file attribute is mapped by setting permis-sion bits to r--r--r-- for read-only files and rw-rw-rw- for all others.
• The execute bit is also set for folders and executable files (e.g., file suffix .exe, .com, etc).
• The system, hidden, temporary, encrypted and compressed attributes are dropped.
• The modified and accessed dates are preserved from the source.
• The create date is not preserved from the source (b) File owner, group, and other users are mapped. • If the write permission mode bit is off for "all" on the
source, the read-only attribute is set on the target.
• The system, hidden, temporary, encrypted, and compressed attributes are set to "off " on the target.
• The modified date and accessed date are preserved from the source
• The create date is not preserved from the source (c) Optimal file ownership and permissions transfer is achieved when users are consistent across the servers involved in the data transfer, such as being in the same Domain. If not, Snap EDR will try to match users based on the permissions transfer method selected.
When using the file ownership transfer options for Windows, the backup job user must be a member of the “Backup Opera-tors” group on the Windows hosts. As well, ensure that the backup job user has the following local security policies (the Backup Operators group may already be assigned to these security policies):
• Backup files and directories • Manage auditing and security log • Restore files and directories
Note that as members of the Administrators group, Domain Admins automatically become members of the Backup Opera-tors group.
Transfer Type Permissions
Transferred
EDR Optimal Permissions Transfer Setting(c) Replicate, Aggregate, Distribute Tool
Windows To Windows All Windows
Windows to UNIX RWX, Owner, Group UNIX
Windows to GuardianOS RWX(a),Owner, Group,
Others GuardianOS
GuardianOS to Windows RWX(b), Owner, Group,
Others Windows
UNIX to Windows RWX, Owner, Group GuardianOS
UNIX to UNIX RWX, Owner, Group UNIX
UNIX to Guardian OS RWX, Owner, Group UNIX
Copyright 2005 Adaptec Inc. All rights reserved. Adaptec and the Adaptec logo are trademarks of Adaptec, Inc., which may be registered in some jurisdictions. All other trademarks used are owned by their respective owners.
Information supplied by Adaptec Inc., is believed to be accurate and reliable at the time of printing, but Adaptec Inc., assumes no responsibility for any errors that may appear in this document. Adaptec, Inc., reserves the right, without notice, to make changes in product design or specifications. Information is subject to change without notice.
P/N 666762-011 Printed in USA 3/05 3718_1.2
Adaptec, Inc.
691 South Milpitas Boulevard Milpitas, California 95035 Tel: (408) 945-8600 Fax: (408) 262-2533
Literature Requests:
US and Canada: 1 (800) 442-7274 or (408) 957-7274 World Wide Web: http://www.adaptec.com
Pre-Sales Support: US and Canada: 1 (800) 442-7274 or (408) 957-7274
Pre-Sales Support: Europe: Tel: (32) 2-352-34-11 or Fax: (32) 2-352-34-00
9.4. Platform Choice
Cross-platform transfer of file data is supported natively; how-ever, to preserve permissions it is recommended that you repli-cate data between similar platforms (e.g., Windows to Win-dows and UNIX/Linux to UNIX/Linux).
9.5. Use of Compression
If the compression option is set to “Yes”, the source Agent(s) compresses each file in the data transfer stream before sending it. The files will be uncompressed automatically on the target agent(s). The degree of compression depends on the type of data being transferred. The following are typical rates of com-pression for different types of data:
Plain text: 70-95% TIFF images: 20-40% Binary files: 0-5%
Generally this feature provides maximum benefit in wide area network (WAN) data transfers where bandwidth is limited (e.g., less than 3 mbits per second). Using this feature may increase CPU usage, and is not recommended on a local area network (LAN), since it may slow down the transfer. 9.6. Delivery Mode
In considering the selection of a delivery mode, the first ques-tion to ask is whether a ‘signed receipt’ of the delivery is required. If so, the ‘certify file content’ option is the only mode that should be considered. The “fast mode” option will perform best when bandwidth is high-speed and highly avail-able; however, check pointing of file data will not be used (i.e., if a transfer is interrupted the entire file will be retransmitted). In most local area networks, the “fast mode” option is the best choice. Fast mode should be used when writing to a NAS share and preserving ownership.
9.7. Synchronize Source and Target
This option specifies whether the agent creates identical direc-tory structures on the source and target nodes. If set to “Yes”, the agent deletes any files in the target directory structure that do not have a corresponding file in the source directory struc-ture, and transfers any files from the source that do not have a corresponding file in the target directory structure. The default value is “No”.
10. Conclusion
The Snap EDR Replicate solution is a valuable and easy-to-use tool to replicate file data in a one-to-one transfer between Snap Servers powered by GuardianOS, Windows, or
UNIX/Linux servers. It provides a comprehensive solution to assist with common business needs for replication in a variety of business scenarios.