EDB Failover Manager Guide
Failover Manager Version 2.0.3
EDB Failover Manager Guide, Version 2.0.3 by EnterpriseDB Corporation Copyright © 2013 - 2015 EnterpriseDB Corporation. All rights reserved.
EnterpriseDB Corporation, 34 Crosby Drive Suite 100, Bedford, MA 01730, USA
Table of Contents
1 Introduction ... 5
1.1 What’s New ... 6
1.2 Typographical Conventions Used in this Guide ... 7
2 Failover Manager - Overview ... 8
2.1 Supported Platforms... 9
2.2 Prerequisites ... 10
2.3 Failover Manager Product Keys ... 12
3 Installing and Configuring Failover Manager... 13
3.1 Extending Failover Manager Permissions ... 14
3.2 Configuring Failover Manager ... 16
3.2.1 The Cluster Properties File ... 16
3.2.1.1 Specifying Cluster Properties ... 17
3.2.1.2 Encrypting Your Database Password... 25
3.2.2 The Cluster Members File ... 27
3.3 Using Failover Manager with Virtual IP Addresses ... 28
4 Using Failover Manager ... 31
4.1 Managing a Failover Manager Cluster ... 32
4.1.1 Starting the Failover Manager Cluster ... 32
4.1.2 Adding Nodes to a Cluster ... 33
4.1.3 Changing the Priority of a Standby ... 34
4.1.4 Promoting a Failover Manager Node ... 34
4.1.5 Stopping a Failover Manager Agent ... 35
4.1.6 Stopping a Failover Manager Cluster ... 35
4.1.7 Removing a Node from a Cluster ... 36
4.2 Monitoring a Failover Manager Cluster ... 37
4.2.1 Reviewing the Cluster Status Report ... 37
4.2.2 Monitoring Streaming Replication with Postgres Enterprise Manager ... 40
4.3 Running Multiple Agents on a Single Node ... 42
4.3.1 RHEL 6.x or CentOS 6.x ... 44
4.3.2 RHEL 7.x or CentOS 7.x ... 44
5 Controlling the Failover Manager Service ... 46
5.2 Using the systemctl Utility on RHEL 7.x and CentOS 7.x ... 48
5.3 Using the efm Utility ... 49
6 Controlling Logging... 52
7 Notifications ... 53
8 Supported Failover and Failure Scenarios ... 59
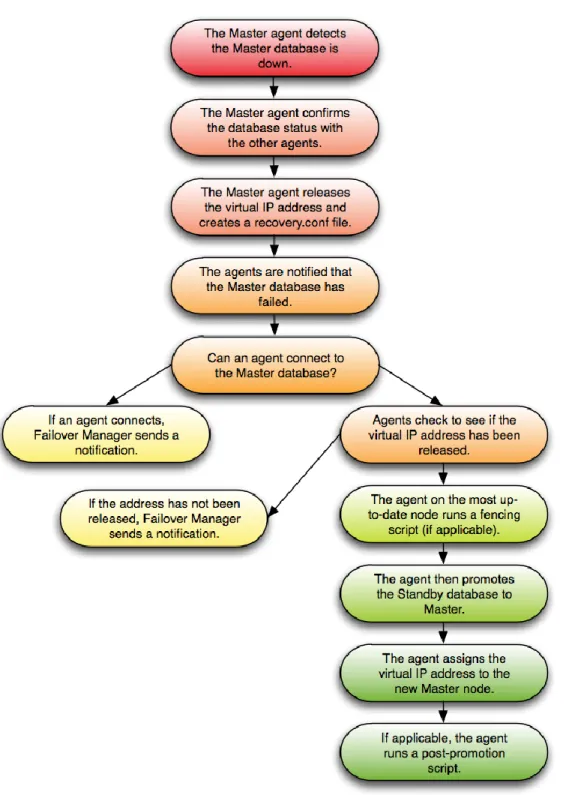
8.1 Master Database is Down ... 60
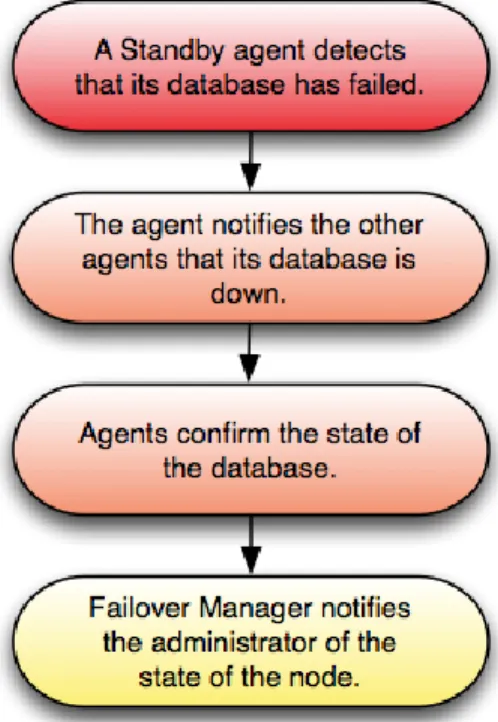
8.2 Standby Database is Down ... 62
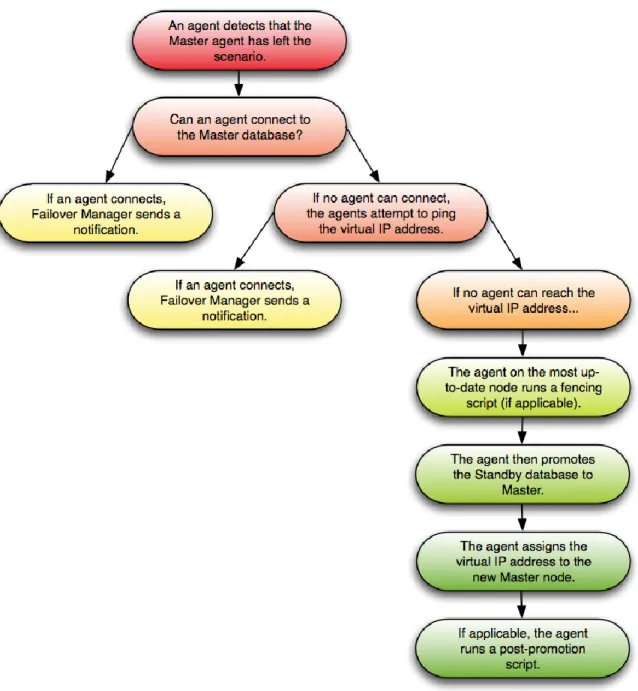
8.3 Master Agent Exits or Node Fails ... 63
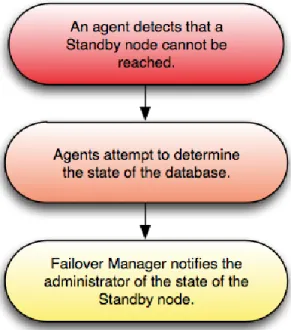
8.4 Standby Agent Exits or Node Fails ... 65
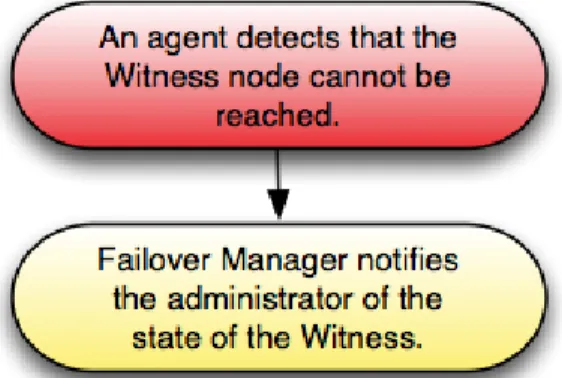
8.5 Dedicated Witness Agent Exits / Node Fails ... 66
8.6 Nodes Become Isolated from the Cluster ... 67
9 Upgrading an Existing Cluster ... 68
9.1 Un-installing Failover Manager ... 69
10 Appendix A - Configuring Streaming Replication ... 70
10.1 Configuring the Master Node ... 70
10.2 Configuring the Standby Node ... 71
10.3 Confirming Replication from the Master to Standby ... 73
10.4 Manually Invoking Failover ... 74
11 Appendix B - Configuring SSL Authentication on a Failover Manager Cluster ... 75
1 Introduction
EDB Failover Manager is a high-availability module from EnterpriseDB that enables a Postgres Master node to automatically failover to a Standby node in the event of a software or hardware failure on the Master.
This guide provides information about installing, configuring and using Failover Manager.
This document uses Postgres to mean either the PostgreSQL or Postgres Plus Advanced Server database. For more information about using Postgres Plus products, please visit the EnterpriseDB website at:
1.1 What’s New
The following features have been added to EnterpriseDB Failover Manager 1.1 to create EnterpriseDB Failover Manager 2.0.3:
Failover Manager now supports multiple Standby nodes.
Prior to 2.0, a dedicated Witness node was required. Now, if the cluster includes at least two Standby nodes, you do not need a dedicated Witness node.
Failover Manager now supports the use of a hostname or IP address when defining Agent or Witness nodes.
Failover Manager can now invoke user-supplied scripts in the event of the failure of a monitored database or isolation of the master node. Supporting notifications will alert you if a script is invoked, or in the event of script failure.
Failover Manager now supports SSL secure connections.
Failover Manager now allows an administrative user to share access to the efm
1.2 Typographical Conventions Used in this Guide
Certain typographical conventions are used in this manual to clarify the meaning and usage of various commands, statements, programs, examples, etc. This section provides a summary of these conventions.
In the following descriptions a term refers to any word or group of words that are language keywords, user-supplied values, literals, etc. A term’s exact meaning depends upon the context in which it is used.
Italic font introduces a new term, typically, in the sentence that defines it for the first time.
Fixed-width (mono-spaced) font is used for terms that must be given literally such as SQL commands, specific table and column names used in the examples, programming language keywords, etc. For example, SELECT * FROM emp;
Italic fixed-width font is used for terms for which the user must substitute values in actual usage. For example, DELETE FROMtable_name; A vertical pipe | denotes a choice between the terms on either side of the pipe. A
vertical pipe is used to separate two or more alternative terms within square brackets (optional choices) or braces (one mandatory choice).
Square brackets [ ] denote that one or none of the enclosed term(s) may be
substituted. For example, [ a | b ], means choose one of “a” or “b” or neither of the two.
Braces {} denote that exactly one of the enclosed alternatives must be specified. For example, { a | b }, means exactly one of “a” or “b” must be specified. Ellipses ... denote that the proceeding term may be repeated. For example, [ a |
2 Failover Manager - Overview
A Failover Manager (FM) cluster is comprised of FM processes that reside on the following hosts on a network:
A Master node - The Master node is the primary database server that is servicing database clients.
One or more Standby nodes - A Standby node is a streaming replication server associated with the Master node.
A Witness node - The Witness node confirms assertions of either the Master or a Standby in a failover scenario. A cluster does not need a dedicated witness node if the cluster contains three or more nodes; if you do not have a third cluster member that is a database host, you can add a dedicated Witness node.
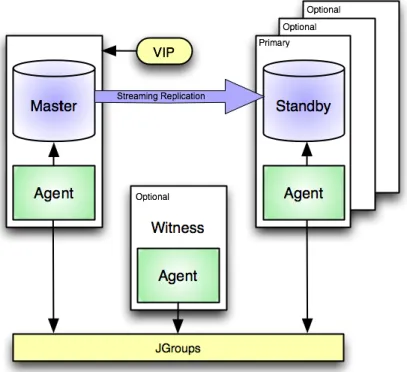
Traditionally, a cluster is a single instance of Postgres managing multiple databases. In this document, the term cluster refers to a Failover Manager cluster. A Failover Manager cluster consists of a Master agent, one or more Standby agents, and an optional Witness agent that reside on servers in a cloud or on a traditional network and communicate using the JGroups toolkit.
When an agent starts, it connects to the local database and checks the state of the database. If it finds that the database is in recovery, the agent assumes the role of standby; if the database is not in recovery, the agent assumes the role of master. JGroups provides technology that allows Failover Manager to create clusters whose member nodes can communicate with each other and detect node failures. For more information about JGroups, visit the official project site at:
http://www.jgroups.org
Figure 2.1 illustrates a Failover Manager cluster that employs a virtual IP address. You can use a load balancer in place of a virtual IP address if you provide your own fencing script to re-configure the load balancer in the event of a failure. For more information about using Failover Manager with a virtual IP address, see Section 3.3. For more information about using a fencing script, see Section 3.2.
2.1 Supported Platforms
Failover Manager 2.0.3 is supported on Postgres Plus Advanced Server or PostgreSQL (version 9.2 and higher) installations running on Intel x86_64 systems:
CentOS 6.x and 7.x
Red Hat Enterprise Linux 6.x and 7.x Oracle Enterprise Linux 6.x and 7.x
2.2 Prerequisites
Before configuring a Failover Manager cluster, you must satisfy the prerequisites described below.
Provide an SMTP Server
Failover Manager sends notification emails to the email address specified in the cluster properties file. An SMTP server must be running on each node of the Failover Manager scenario. For more information about using an SMTP server, visit:
https://access.redhat.com/site/documentation
Configure Streaming Replication
Failover Manager requires that PostgreSQL streaming replication be configured between the Master node and the Standby node or nodes. Failover Manager does not support other types of replication. For more information about streaming replication, see Appendix A - Configuring Streaming Replication.
Please note that Failover Manager does not support automatic reconfiguration of the standby databases after a failover if you use replication slots to manage your WAL segments. If you use replication slots, you should set the auto.reconfigure parameter
to false, and manually reconfigure the standby servers in the event of a failover.
Modify the pg_hba.conf File
You must modify the pg_hba.conf file on the Master and Standby nodes, adding entries that allow communication between the all of the nodes in the cluster. The
following example demonstrates entries that might be made to the pg_hba.conf file on the Master node:
# access for itself
host fmdb efm 127.0.0.1/32 md5 # access for standby
host fmdb efm 192.168.27.1/32 md5 # access for witness
host fmdb efm 192.168.27.34/32 md5
Where:
efm specifies the name of a valid database user.
fmdb specifies the name of a database to which the efm user may connect. For more information about the properties file, see Section 3.2.
By default, the pg_hba.conf file resides in the data directory, under your Postgres
installation. After modifying the pg_hba.conf file, you must reload the configuration file on each node for the changes to take effect. You can use the following command:
# /etc/init.d/ppas-9.x reload
Where x specifies the Postgres version.
Ensure Communication Through Firewalls
If a Linux firewall (i.e. iptables) is enabled on the host of a Failover Manager node, you may need to add rules to the firewall configuration that allow tcp communication between the Failover Manager processes in the cluster. For example:
# iptables -I INPUT -p tcp --dport 7800:7810 -j ACCEPT /sbin/service iptables save
The command shown above opens a small range of ports (7800 through 7810). Failover
Manager will connect via the port that corresponds to the port specified in the cluster properties file.
Install Java 1.6 (or later)
Before using Failover Manager, you must first install Java (version 1.6 or later). You can use the Yum package manager to install Java. Open a terminal window, assume superuser privileges, and enter:
2.3 Failover Manager Product Keys
The initial installation of Failover Manager does not require a product key. Upon installation you are granted full access to the cluster monitoring and failover features under a Limited Use License for evaluation purposes for a 60-day trial period. At the end of the trial period, you are required to either un-install the software or purchase a valid subscription. In addition, at the end of the trial period, the Failover Manager agents will exit making cluster monitoring and failover non-operational. Failover Manager will send multiple email alerts alerting your system administrator of the approaching end of trial period.
To use Failover Manager beyond the evaluation period, you are required to purchase a database server subscription (i.e. Standard Edition with the Failover Manager option or Enterprise Edition) from EnterpriseDB. With the purchase of a subscription you will receive a product key, which will re-enable Failover Manager's cluster monitoring and failover operations. The product key is applied to the Failover Manager configuration file and will restore full functionality for the term of your subscription.
After purchasing a product key, edit the cluster properties file, adding the value to the right of the efm.license parameter:
efm.license=license_key
Where license_key specifies the product key you received from EDB.
You do not need to restart the agents after adding the product key. Every 6 hours, Failover Manager agents check for and validate the product key, so the parameter update will be detected dynamically. For more information about editing the properties file, see Section 3.2.1.
To purchase a database subscription that includes Failover Manager, contact one of the EnterpriseDB offices listed at:
http://www.enterprisedb.com/company/offices or contact EnterpriseDB at:
3 Installing and Configuring Failover
Manager
Creating a Failover Manager cluster is a relatively simple process. After creating a Postgres streaming replication scenario and ensuring that the nodes have sufficient permissions to communicate with each other, you must:
1. Use Yum to install a Failover Manager agent on each node in the cluster. Failover Manager is packaged and delivered as an RPM. To install Failover Manager, copy the RPM package to the Master, Standby and Witness systems. After copying the archive to each system, use yum to install the package: # yum install efm20-x.x.x-x.distribution.rpm
Failover Manager must be installed by root. During the installation process, the installer will also create a user named efm that has sufficient privileges to invoke scripts that control the Failover Manager service for clusters owned by
enterprisedb or postgres.
If you are using Failover Manager to monitor a cluster owned by a user other than
enterprisedb or postgres, see Section 3.1, Extending Failover Manager Permissions.
2. Modify the cluster properties file on each node. For detailed information about modifying the cluster properties file, see Section 3.2.1.
3. Modify the cluster members file on each node. For more information about the cluster members file, see Section 3.2.2.
4. If applicable, configure and test virtual IP address settings and pre/post-promotion scripts.
5. Start the Failover Manager agent on each node of the cluster. For more information about using the Failover Manager service, see Section 5.
Failover Manager File Locations
Failover Manager components are installed in the following locations: Executables: /usr/efm-2.0/bin
Libraries: /usr/efm-2.0/lib
Cluster configuration files: /etc/efm-2.0
Logs: /var/log/efm-2.0
Lock files: /var/lock/efm-2.0
Log rotation file: /etc/logrotate.d/efm-2.0
sudo configuration file: /etc/sudoers.d/efm-20
3.1 Extending Failover Manager Permissions
During the Failover Manager installation, the installer creates a user named efm. efm
does not have sufficient privileges to perform management functions that are normally limited to the database owner or operating system superuser. When performing
management functions, efm invokes the efm_functions script; the efm_functions
script performs management functions on behalf of the efm user. When assigning or releasing a virtual IP address, efm uses the efm_address script to assign or release the
VIP.
The sudoers file contains entries that allow the user efm to control the Failover Manager service for clusters owned by postgres or enterprisedb. You can modify a copy of the sudoers file to grant permission to manage Postgres clusters owned by other users to
efm.
The efm-20 file is located in /etc/sudoers.d, and contains the following entries:
# Copyright EnterpriseDB Corporation, 2014. All Rights Reserved. #
# Do not edit this file. Changes to the file may be overwritten # during an upgrade.
#
# This file assumes you are running your efm cluster as user # 'efm'. If not, then you will need to copy this file. #
# Allow user 'efm' to sudo efm_functions as either 'postgres' or # 'enterprisedb'. If you run your db service under a non-default # account, you will need to copy this file to grant the proper # permissions and specify the account in your efm cluster # properties file by changing the 'db.service.owner' property. efm ALL=(postgres) NOPASSWD: /usr/efm-2.0/bin/efm_functions efm ALL=(enterprisedb) NOPASSWD: /usr/efm-2.0/bin/efm_functions
# Allow user 'efm' to sudo efm_functions as 'root' to # write/delete the PID file, validate the db.service.owner # property, etc.
efm ALL=(ALL) NOPASSWD: /usr/efm-2.0/bin/efm_functions # Allow user 'efm' to sudo efm_address as root for VIP tasks. efm ALL=(ALL) NOPASSWD: /usr/efm-2.0/bin/efm_address # relax tty requirement for user 'efm'
Defaults:efm !requiretty
If you are using Failover Manager to monitor clusters that are owned by users other than
postgres or enterprisedb, make a copy of the efm-20 file, and modify the content to allow the user to access the efm_functions script to manage their clusters.
If an agent cannot start because of permission problems, make sure the default
/etc/sudoers file contains the following line at the end of the file:
## Read drop-in files from /etc/sudoers.d (the # here does not mean a comment)
3.2 Configuring Failover Manager
Configurable Failover Manager properties are specified in two user-modifiable files:
efm.properties
efm.nodes
The efm.properties file contains the properties of the individual node on which it
resides, while the efm.nodes file contains a list of the current Failover Manager cluster members.
By default, the installer places the files in the /etc/efm-2.0 directory.
3.2.1 The Cluster Properties File
The Failover Manager installer creates a file template for the cluster properties file named
efm.properties.in in the /etc/efm-2.0 directory. After completing the Failover Manager installation, you must make a working copy of the template before modifying the file contents.
The following command copies the efm.properties.in file, creating a properties file
named efm.properties:
#cp/etc/efm-2.0/efm.properties.in/etc/efm-2.0/efm.properties
Please note: By default, Failover Manager expects the cluster properties file to be named
efm.properties. If you name the properties file something other than
efm.properties, you must modify the service script to instruct Failover Manager to use a different name.
After creating the cluster properties file, add (or modify) configuration parameter values as required. For detailed information about each parameter, see Section 3.2.1, Specifying Cluster Properties.
The property files are owned by root. The Failover Manager service script expects to find the files in the /etc/efm-2.0 directory. If you move the property file to another
location, you must create a symbolic link that specifies the new location.
Note that you must use the efmencrypt command to encrypt the value supplied in the
db.password.encrypted parameter. For more information about encrypting a
3.2.1.1 Specifying Cluster Properties
You can use the parameters listed in the cluster properties file to specify connection properties and behaviors for your Failover Manager cluster. Modifications to
configuration parameter settings will be applied when Failover Manager starts. If you modify a parameter value (with the exception of the efm.license parameter) you must restart Failover Manager to apply the changes.
Property values are case-sensitive. Note that while Postgres uses quoted strings in parameter values, Failover Manager does not allow quoted strings in the parameter values. For example, while you might specify an IP address in a PostgreSQL configuration parameter as:
listen_addresses='192.168.2.47'
Failover Manager requires that the value not be enclosed in quotes:
bind.address=192.168.2.54:5444
Use the parameters in the efm.properties file to specify connection, administrative, and operational details for Failover Manager.
Use the efm.license parameter to provide the Failover Manager product key: # The full license to run failover manager.
efm.license=
The trial period is 60 days. When there are five (or fewer) days left in the trial period, Failover Manager will send an email warning you that it is time to provide a valid license number. If you have not provided a product key before the trial period expires, all Failover Manager agents will exit.
You do not need to restart the agents after adding the product key to the properties file. Every six hours the Failover Manager agent will attempt to locate and validate the product key.
The auto.failover parameter enables automatic failover. By default,
auto.failover is set to true.
# Whetherornotfailoverwillhappenautomatically when the master # fails.Settofalseifyouwanttoreceivethefailovernotifications # butnothaveEFM actually perform the failover steps.
# Thevalueofthisproperty must be the same across all agents. auto.failover=true
Use the auto.reconfigure parameter to instruct Failover Manager to enable or disable
automatic reconfiguration of remaining Standby servers after the primary standby is promoted to Master. Set the parameter to true to enable automatic reconfiguration (the default) or false to disable automatic reconfiguration. This property is not required on a dedicated witness node.
# After a standby is promoted, failover manager will attempt to # update the remaining standbys to use the new master. Failover # manager will back up recovery.conf, change the host
# parameter of the primary_conninfo entry, and restart the
# database. The restart command is contained in the efm_functions # file; default is:
# "pg_ctl restart -m fast -w -t <timeout> -D <directory>"
# where the timeout is the local.timeout property value and the # directory is specified by db.recovery.conf.dir. To turn off # automatic reconfiguration, set this property to false. auto.reconfigure=true
Please note: primary_conninfo is a space-delimited list of keyword=value pairs. Please note: If you are using replication slots to manage your WAL segments, automatic reconfiguration is not supported; you should set auto.reconfigure to false. For more information, see Section 2.2.
Use the following parameters to specify connection properties for each node of the Failover Manager cluster:
# The value for the password property should be the output from # 'efm encrypt' -- do not include clear text password here. To # prevent accidental sharing of passwords among clusters, the # cluster name is incorporated into the encrypted password. If # you change the cluster name (the name of this file), you must # encrypt the password again with the new name.
# The db.port property must be the same for all nodes. db.user=
db.password.encrypted= db.port=
db.database=
For information about encrypting the password for the database user, see Section 3.2.2, Encrypting Your Database Password.
The db.reuse.connection.count parameter allows the administrator to specify the number of times Failover Manager reuses the same database connection to check the database health. The default value is 0, indicating that Failover Manager will create a fresh connection each time. This property is not required on a dedicated witness node.
# This property controls how many times a database connection is # reused before creating a new one. If set to zero, a new
# connection will be created every time an agent pings its local # database.
db.reuse.connection.count=0
Use the jdbc.ssl parameter to instruct Failover Manager to use SSL connections.
# Use this property to enable ssl for EFM connections. Setting # this property to true will force the agents to use 'ssl=true' # for all JDBC database connections, both to local and remote # databases.
jdbc.ssl=false
For information about configuring and using SSL, please see:
http://www.enterprisedb.com/docs/en/9.4/pg/ssl-tcp.html and
https://jdbc.postgresql.org/documentation/94/ssl.html
Use the admin.port parameter to specify the port on which Failover Manager listens for administrative commands.
# This property controls the port binding of the administration # server which is used for some commands (ie cluster-status). admin.port=
The local.period parameter specifies how many seconds between attempts to contact
the database server.
The local.timeout parameter specifies how long an agent will wait for a response from the local database server.
The local.timeout.final parameter specifies how long an agent will wait after the
final attempt to contact the database server on the current node. If a response is not received from the database within the number of seconds specified by the
local.timeout.final parameter, the database is assumed to have failed.
For example, given the default values of these parameters, a check of the local database happens once every 10 seconds. If an attempt to contact the local database does not come back positive within 60 seconds, Failover Manager makes a final attempt to contact the database. If a response is not received within 10 seconds, Failover Manager declares database failure and notifies the administrator listed in the user.email parameter. These properties are not required on a dedicated witness node.
# These properties apply to the connection(s) EFM uses to monitor # the local database. Every 'local.period' seconds, a database # check is made in a background thread. If the main monitoring # thread does not see that any checks were successful in
# 'local.timeout' seconds, then the main thread makes a final # check with a timeout value specified by the
# 'local.timeout.final' value. All values are in seconds.
# Whether EFM uses single or multiple connections for database# # checks is controlled by the 'db.reuse.connection.count'
# property. local.period=10 local.timeout=60
local.timeout.final=10
If necessary, you should modify these values to suit your business model.
Use the remote.timeout parameter to specify how many seconds an agent waits for a response from a remote database server (i.e., how long a standby agent waits to verify that the master database is actually down before performing failover).
# Timeout for a call to check if a remote database is responsive. # For example, this is how long a standby would wait for a
# DB ping request from itself and the witness to the master DB # before performing failover.
remote.timeout=10
The jgroups.max.tries parameter specifies the number of consecutive times Failover Manager attempts to contact a node before the node is assumed to be down.
jgroups.timeout specifies the number of milliseconds before the connection attempts time out.
# These properties apply to the jgroups connection between the # nodes. Description copied from jgroups:
#
# Max tries: Number of times to send an are-you-alive message. # Timeout (in ms): Timeout to suspect a node P if neither a # heartbeat nor data were received from P.
#
# The value of these properties must be the same across all # agents.
jgroups.max.tries=8 jgroups.timeout=5000
If necessary, you should modify these values to suit your business model.
# Email address of the user for notifications. The value of this # property must be the same across all agents.
user.email=
The bind.address parameter specifies the IP address and port number of the agent on
the current node of the Failover Manager cluster.
# This property specifies the ip address and port that jgroups # will bind to on this node. The value is of the form
# <ip>:<port>.
# Note that the port specified here is used for communicating # with other nodes, and is not the same as the admin.port above, # used only to communicate with the local agent to send control # signals.
bind.address=
Set the is.witness parameter to true to indicate that the current node is a witness
node. If is.witness is true, the local agent will not check to see if a local database is running.
# Specifies whether or not this is a witness node. Witness nodes # do not have local databases running.
is.witness=
The Postgres pg_is_in_recovery() function is a boolean function that reports the recovery state of a database. The function returns true if the database is in recovery, or
false if the database is not in recovery. When an agent starts, it connects to the local
database and invokes the pg_is_in_recovery() function. If the server responds
true, the agent assumes the role of standby; if the server responds false, the agent assumes the role of master. If is.witness is true, Failover Manager will not check the recovery state.
Use the db.service.owner parameter to specify the name of the operating system user that owns the cluster that is being managed by Failover Manager. This property is not required on a dedicated witness node.
# This property tells EFM which OS user owns the $PGDATA dir for # the 'db.database'. By default, the owner is either "postgres" # for PostgreSQL or "enterprisedb" for Postgres Plus Advanced # Server. However, if you have configured your db to run as a # different user, you will need to copy the /etc/sudoers.d/efm-XX # conf file to grant the necessary permissions to your db owner. #
# This username must have write permission to the # 'db.recovery.conf.dir' specified below.
db.service.owner=
Use the db.recovery.conf.dir parameter to specify the location to which a recovery file will be written on the Master node of the cluster. This property is not required on a dedicated witness node.
# Specify the location of the db recovery.conf file on the node. # On a standby node, the trigger file location is read from the # file in this directory. After a failover, the recovery.conf # files on remaining standbys are changed to point to the new # master db (a copy of the original is made first). On a master # node, a recovery.conf file will be written during failover and # promotion to ensure that the master node can not be restarted # as the master database.
db.recovery.conf.dir=
Use the db.bin parameter to specify the location of the pg_ctl command for the local
database server. This property is not required on a dedicated witness node.
# Specify the directory containing the pg_ctl command, for # instance: /usr/pgsql-9.3/bin. The pg_ctl command is used to # restart standby databases after a failover so that they are # streaming from the new master node.
db.bin=
The virtualIp parameter specifies virtual IP address information for the Failover
Manager cluster. Use the virtualIp.interface parameter to specify an alias for your network adaptor (for example, eth0:1 specifies an alias for the adaptor, eth0). You might create multiple aliases for each adaptor on a given host; for more information about running multiple agents on a single node, please see Section 4.3. The
virtualIp.netmask parameter specifies which bits in the virtual IP address refer to the network address (as opposed to the host address).
For information about using a virtual IP address, see Section 3.3.
# This is the IP and netmask that will be remapped during fail # over. If you do not use VIPs as part of your failover
# solution, then leave these properties blank to disable EFM's # support for VIP processing (assigning, releasing, testing # reachability, etc).
#
# If you enable VIP, then all three properties are required. #
# The address and netmask must be the same across all agents. # The 'interface' value must contain the secondary virtual ip # id (ie ":1", etc).
virtualIp=
virtualIp.interface= virtualIp.netmask=
Use the pingServer parameter to specify the IP address of a server that Failover
Manager can use to confirm that network connectivity is not a problem.
# This is the address of a well-known server that EFM can ping # in an effort to determine network reachability issues. It # might be the IP address of a nameserver within your corporate # firewall or another server that *should* always be reachable # via a 'ping' command from each of the EFM nodes.
#
# There are many reasons why this node might not be considered # reachable: firewalls might be blocking the request, ICMP might # be filtered out, etc.
#
# Do not use the IP address of any node in the EFM cluster
# (master, standby, or witness because this ping server is meant # to provide an additional layer of information should the EFM # nodes lose sight of each other.
#
# The installation default is Google's DNS server. pingServerIp=8.8.8.8
Use the pingServerCommand parameter to specify the command used to test network connectivity.
# This command will be used to test the reachability of certain # nodes.
#
# Do not include an IP address or hostname in on the end of this # command - it will be added dynamically at runtime with the # values contained in 'virtualIp' and 'pingServer'.
#
# Make sure this command returns reasonably quickly - test it # from a shell command line first to make sure it works properly. pingServerCommand=/bin/ping -q -c3 -w5
script.fence specifies an optional path to a user-supplied script that will be invoked during the promotion of a standby node to master node.
# absolute path to fencing script run during promotion #
# This is an optional user-supplied script that will be run # during failover on the standby database node. If left blank, # no action will be taken. If specified, EFM will execute this # script before promoting the standby. The script is run as the
# efm user. #
# NOTE: FAILOVER WILL NOT OCCUR IF THIS SCRIPT RETURNS A NON-ZERO EXIT CODE.
script.fence=
Please note that the fencing script runs as the efm user; you must ensure that the efm user has sufficient privileges to invoke any commands included in the fencing script. For more information about Failover Manager permissions, please see Section 3.1. Use the script.post.promotion parameter to specify an optional path to a user-supplied script that will be invoked after a standby node has been promoted to master.
# Absolute path to fencing script run after promotion #
# This is an optional user-supplied script that will be run after # failover on the standby node after it has been promoted and # is no longer in recovery. The exit code from this script has # no effect on failover manager, but will be included in a
# notification sent after the script executes. The script is run # as the efm user.
script.post.promotion=
Use the script.db.failure parameter to specify the complete path and script name of a script that Failover Manager will invoke if an agent detects that the database that it monitors has failed. This script is optional.
# Absolute path to script run after database failure #
# This is an optional user-supplied script that will be run after # an agent detects that its local database has failed. The script # is run as the efm user.
script.db.failure=
Use the script.master.isolated parameter to specify the complete path and script
name of a script that Failover Manager will invoke if the agent monitoring the master database detects that the master is isolated from the majority of the Failover Manager cluster. This script is called immediately after the VIP is released (if a VIP is in use). This script is optional.
# Absolute path to script run on isolated master #
# This is an optional user-supplied script that will be run after # a master agent detects that it has been isolated from the # majority of the efm cluster. The script is run as the efm user.
script.master.isolated=
Use the jgroups.loglevel and efm.loglevel parameters to specify the level of detail logged by Failover Manager. The default value is INFO. For more information about logging, see Section 6, Controlling Logging.
# Logging levels for JGroups and EFM.
# Valid values are: FINEST, FINER, FINE, CONFIG, INFO, WARNING, # SEVERE
# Default value: INFO
# It is not necessary to increase these values unless debugging a # specific issue. If nodes are not discovering each other at # startup, increasing the jgroups level to FINER will show # information about the TCP connection attempts that may help # diagnose the connection failures.
jgroups.loglevel=INFO efm.loglevel=INFO
3.2.1.2 Encrypting Your Database Password
Failover Manager requires you to encrypt your database password before including it in the cluster properties file. Use the efm utility (located in the /usr/efm-2.0/bin
directory) to encrypt the password; open a command line, and enter the command:
#efm encrypt cluster_name
Where cluster_name specifies the name of the Failover Manager cluster.
The Failover Manager service will prompt you to enter the database password twice before generating an encrypted password for you to place in your cluster property file. When the utility shares the encrypted password, copy and paste the encrypted password into the cluster property files.
Please note: Many Java vendors ship their version of Java with full-strength encryption included, but not enabled due to export restrictions. If you encounter an error that refers to an illegal key size when attempting to encrypt the database password, you should download and enable a Java Cryptography Extension (JCE) that provides an unlimited policy for your platform.
The following example demonstrates using the encrypt utility to encrypt a password for
the acctg cluster:
# efm encrypt acctg
in your EFM cluster property file.
Please enter the password and hit enter: Please enter the password again to confirm:
The encrypted password is: 835fb18954f198e94fd3d6f4b070350b Please paste this into your cluster properties file.
db.password.encrypted=835fb18954f198e94fd3d6f4b070350b
After receiving your encrypted password, paste the password into the cluster properties file and start the Failover Manager service. If there is a problem with the encrypted password, the Failover Manager service will not start:
[witness@localhost ~]# service efm-2.0 start Starting local efm-2.0 service: [FAILED]
If you receive this message when starting the Failover Manager service on RHEL 6.x or CentOS 6.x, please see the startup log (located in /var/log/efm-2.0/startup-efm.log) for more information.
If you are using RHEL 7.x or CentOS 7.x, startup information is available via the following command:
systemctl status efm-2.0
To prevent a cluster from inadvertently connecting to the database of another cluster, the cluster name is incorporated into the encrypted password. If you modify the cluster name, you will need to re-encrypt the database password and update the cluster properties file.
3.2.2 The Cluster Members File
Each member of a Failover Manager cluster maintains a cluster members file. The file contains the IP address and port number of the current members of the cluster. The Failover Manager installer creates a file template for the cluster members file named
efm.nodes.in in the /etc/efm-2.0 directory. After completing the Failover Manager installation, you must make a working copy of the template.
For example, the following command copies the efm.nodes.in file, creating a file named efm.nodes that resides in the same directory:
#cp/etc/efm-2.0/efm.nodes.in/etc/efm-2.0/efm.nodes
Please note: By default, Failover Manager expects the cluster members file to be named
efm.nodes. If you name the cluster members file something other than efm.nodes, you must modify the service script (efm-2.0) to instruct Failover Manager to use a different name.
You are not required to modify the contents of the cluster members file on the first running node of the cluster, but on each subsequent node, you must edit the file, adding the IP address and port number of the other server or servers that are currently members of the cluster. For example, if you are adding a third node to a cluster that contains two members, the file will contain the two addresses and ports of the other nodes:
10.0.1.8:7800 10.0.1.9:7800
Each node must be listed in an address:port format, separated by white space.
Please note: If you know the IP addresses and ports of the nodes that will be joining the cluster, you can include the addresses in the cluster members file at any time. At startup, any addresses that do not identify cluster members are ignored.
Some Failover Manager commands modify the contents of the cluster members file: When you start an agent on a new node, the existing agents will update the cluster
members files to include the address of the new node.
When you stop the agent on a node, Failover Manager will remove the node's address from the cluster members list on all of the running nodes of the cluster. If you stop the entire cluster, Failover Manager does not modify the files.
If you stop an agent, and (while the agent is down) another node joins or leaves the cluster, when you restart that agent, you must manually update the file to include all of the current cluster members.
3.3 Using Failover Manager with Virtual IP Addresses
Failover manager uses the efm_address script to assign or release a virtual IP address.
By default, the script resides in:
/usr/efm-2.0/bin/efm_address
The following command invokes the efm_address script to assign a virtual IP address:
# efm_address assign interface_name ip_address netmask
The following command invokes the efm_address script to release a virtual IP address:
# efm_address release interface_name ip_address
Where:
interface_name matches the name specified in the virtualIp.interface
parameter in the cluster properties file.
ip_address matches the name specified in the virtualIp parameter in the
cluster properties file.
netmask matches the name specified in the virtualIp.netmask parameter in the cluster properties file.
For more information about properties that describe a virtual IP address, see Section 3.2.1.
You must invoke the efm_address script as the root user. The efm user is created during the installation, and is granted privileges in the sudoers file to run the
efm_address script. For more information about the sudoers file, see Section 3.1, Extending Failover Manager Permissions.
When using a virtual IP (VIP) address with Failover Manager, it is important to test the VIP functionality manually before starting failover manager. This will catch any network-related issues before they cause a problem during an actual failover. The following steps test the actions that failover manager will take. The example uses the following property values:
virtualIp=172.24.38.239 virtualIp.interface=eth0:0 virtualIp.netmask=255.255.255.0
pingServerCommand=/bin/ping -q -c3 -w5
When instructed to ping the VIP from a node, use the command defined by the
pingServerCommand property.
1. Ping the VIP from all nodes to confirm that the address is not already in use:
# /bin/ping -q -c3 -w5 172.24.38.239
PING 172.24.38.239 (172.24.38.239) 56(84) bytes of data. --- 172.24.38.239 ping statistics ---
4 packets transmitted, 0 received, +3 errors, 100% packet loss, time 3000ms
You should see 100% packet loss.
2. Run the efm_addressassign command on the Master node to assign the VIP and
then confirm with ifconfig:
# efm_address assign eth0:0 172.24.38.239 255.255.255.0 # ifconfig
<output truncated>
eth0:0 Link encap:Ethernet HWaddr 36:AA:A4:F4:1C:40 inet addr:172.24.38.239 Bcast:172.24.38.255 Mask:255.255.255.0
UP BROADCAST RUNNING MULTICAST MTU:1500 Metric:1
Interrupt:247
3. Ping the VIP from the other nodes to verify that they can reach the VIP:
# /bin/ping -q -c3 -w5 172.24.38.239
PING 172.24.38.239 (172.24.38.239) 56(84) bytes of data. --- 172.24.38.239 ping statistics ---
3 packets transmitted, 3 received, 0% packet loss, time 1999ms
rtt min/avg/max/mdev = 0.023/0.025/0.029/0.006 ms
You should see no packet loss.
4. Use the efm_address release command to release the address on the master node and confirm the node has been released with ifconfig:
# efm_address release eth0:0 172.24.38.239 # ifconfig
eth0 Link encap:Ethernet HWaddr 22:00:0A:89:02:8E inet addr:10.137.2.142 Bcast:10.137.2.191
...
The output from this step should not show an eth0:0 interface
5. Repeat step 3, this time verifying that the Standby and Witness do not see the VIP in use:
# /bin/ping -q -c3 -w5 172.24.38.239
PING 172.24.38.239 (172.24.38.239) 56(84) bytes of data. --- 172.24.38.239 ping statistics ---
4 packets transmitted, 0 received, +3 errors, 100% packet loss, time 3000ms
You should see 100% packet loss. Repeat this step on all nodes.
6. Repeat step 2 on all Standby nodes to assign the VIP to every node. You can ping the VIP from any node to verify that it is in use.
# efm_address assign eth0:0 172.24.38.239 255.255.255.0 # ifconfig
<output truncated>
eth0:0 Link encap:Ethernet HWaddr 36:AA:A4:F4:1C:40 inet addr:172.24.38.239 Bcast:172.24.38.255 Mask:255.255.255.0
UP BROADCAST RUNNING MULTICAST MTU:1500 Metric:1
Interrupt:247
After the test steps above, release the VIP from any non-Master node before attempting to start Failover Manager.
4
Using Failover Manager
Failover Manager 2.0 offers support for monitoring and failover of clusters with one or more Standby servers. You can add or remove nodes from the cluster as your demand for resources grows or shrinks.
For failover protection, the initial cluster should have a master and one or more standby nodes. If the cluster contains more than one Standby node, a dedicated Witness node is not required. If there is only one Standby node, the cluster should include a dedicated Witness node.
Before configuring and starting Failover Manager, you should configure PostgreSQL Streaming Replication between the Master node and one or more Standby nodes on an Advanced Server or PostgreSQL installation. For more information about implementing streaming replication, see the PostgreSQL core documentation at
http://www.enterprisedb.com/warm-standby.html.
Before starting a Failover Manager agent, you must install Failover Manager (see Section 3), and specify your configuration preferences in the cluster properties file (see Section 3.2.1) and the cluster members file (see Section 3.2.2) on the server on which the agent will be running.
Using WAL Archiving on Advanced Server 9.2 or PostgreSQL 9.2 Instances
If you use WAL archiving on your Postgres 9.2 instance, and a failover occurs, Failover Manager does not automatically reconfigure WAL archiving on the new master node. You must manually configure WAL archiving on the new master node of your cluster to ensure that it will work properly during the next failover.
4.1 Managing a Failover Manager Cluster
Once configured, a Failover Manager cluster requires no regular maintenance. The following sections provide information about performing the management tasks that may occasionally be required by a Failover Manager Cluster.
By default, some of the commands listed below must be invoked by efm or by an OS superuser; an administrator can selectively permit users to invoke these commands by adding the user to the efm group. The commands are:
efm add-node
efm remove-node
efm stop-cluster
efm promote
efm resume
4.1.1 Starting the Failover Manager Cluster
You can start the nodes of a Failover Manager cluster in any order.
To start the Failover Manager cluster on RHEL 6.x or CentOS 6.x, assume superuser privileges, and invoke the command:
service efm-2.0 start
To start the Failover Manager cluster on RHEL 7.x or CentOS 7.x, assume superuser privileges, and invoke the command:
systemctl start efm-2.0
If the cluster properties file for the node specifies that is.witness is true, the node will start as a Witness node.
If the node is not a dedicated Witness node, Failover Manager will connect to the local database and invoke the pg_is_in_recovery() function. If the server responds
false, the agent assumes the node is a Master node, and assigns a virtual IP address to the node (if applicable). If the server responds true, the Failover Manager agent assumes that the node is a Standby server.
After joining the cluster, the Failover Manager agent checks the supplied database credentials to ensure that it can connect to all of the databases within the cluster. If the agent cannot connect, the agent will shut down.
4.1.2 Adding Nodes to a Cluster
You can add a node to a Failover Manager cluster at any time. To be a useful Standby for the current node, the node must be a standby in the PostgreSQL Streaming
Replication scenario.
To add an additional node to a cluster, you must:
1. Assume the identity of efm or the OS superuser on any existing node (that is
currently part of the running cluster), and invoke the efm add-node command, adding the IP address of the new node to the Failover Manager Allowednode hostlist.
When invoking the command, specify the cluster name, the IP address of the new node, and if applicable, the failover priority of the new node:
efm add-node cluster_name ip_address [priority]
For more information about using the efm add-node command or controlling a Failover Manager service, see Section 5.
2. Install a Failover Manager agent and configure the cluster properties file on the new node. For more information about modifying the properties file, see Section 3.2.1.
3. Configure the cluster members file on the new node, adding an entry for each current member of the Failover Manager cluster. For more information about modifying the cluster members file, see Section 3.2.2.
4. Assume superuser privileges on the new node, and use the service efm-2.0 start command to start the Failover Manager agent:
service efm-2.0 start
When the new node joins the cluster, Failover Manager will send a notification to the administrator email provided in the user.email parameter in the cluster properties file.
4.1.3 Changing the Priority of a Standby
If your Failover Manager cluster includes more than one Standby server, you can use the
efm add-node command to influence the promotion priority of the Standby nodes. Invoke the command on any existing member of the Failover Manager cluster, and specify a priority value after the IP address of the member.
For example, the following command instructs Failover Manager that the acctg cluster member that is monitoring 10.0.1.9:7800 is the primary Standby (1):
efm add-node acctg 10.0.1.9:7800 1
In the event of a failover, Failover Manager will first retrieve information from Postgres streaming replication to confirm which Standby node has the most recent data, and promote the node with the least chance of data loss. If two Standby nodes contain equally up-to-date data, the node with a higher user-specified priority value will be promoted to Master. To check the priority value of your Standby nodes, use the command:
efm cluster-status cluster_name
Please note: The promotion priority may change if a node becomes isolated from the cluster, and later re-joins the cluster.
4.1.4 Promoting a Failover Manager Node
You can invoke efmpromote on any node of a Failover Manager cluster to start a
manual promotion of a Standby database to Master database. Manual promotion should only be performed during a maintenance window for your database cluster. If you do not have an up-to-date Standby database available, you will be prompted before continuing. To start a manual promotion, assume the identity of efm or the OS superuser, and invoke the command:
efm promote cluster_name
During a manual promotion, the Master agent releases the virtual IP address before creating a recovery.conf file in the directory specified by the db.recovery.conf.dir
parameter. The Master agent remains running, and assumes a status of Idle.
The Standby agent confirms that the virtual IP address is no longer in use before pinging a well-known address to ensure that the agent is not isolated from the network. The Standby agent runs the fencing script and promotes the Standby database to Master. The Standby agent then assigns the virtual IP address to the Standby node, and runs the post-promotion script (if applicable).
Failover Manager currently does not provide fallback functionality to restore the old Master database - you must perform this configuration manually.
Please note that this command instructs the service to ignore the value specified in the
auto.failover parameter in the cluster properties file.
4.1.5 Stopping a Failover Manager Agent
When you stop an agent, Failover Manager will remove the node's address from the cluster members list on all of the running nodes of the cluster, but will not remove the address from the Failover Manager Allowednodehostlist.
To stop the Failover Manager agent on RHEL 6.x or CentOS 6.x, assume superuser privileges, and invoke the command:
service efm-2.0 stop
To stop the Failover Manager agent on RHEL 7.x or CentOS 7.x, assume superuser privileges, and invoke the command:
systemctl stop efm-2.0
Until you invoke the efm remove-node command (removing the node's address of the node from the Allowednodehostlist), you can use the serviceefm-2.0start
command to restart the node at a later date without first running the efm add-node
command again.
4.1.6 Stopping a Failover Manager Cluster
To stop a Failover Manager cluster, connect to any node of a Failover Manager cluster, assume the identity of efm or the OS superuser, and invoke the command:
efmstop-cluster cluster_name
The command will cause all Failover Manager agents to exit. Terminating the Failover Manager agents completely disables all failover functionality.
4.1.7 Removing a Node from a Cluster
The efm remove-node command removes the IP address of a node from the Failover Manager Allowednodehostlist. Assume the identity of efm or the OS superuser on any existing node (that is currently part of the running cluster), and invoke the efm remove-node command, specifying the cluster name and the IP address of the node:
efm remove-node cluster_name ip_address
The efm remove-node command will not stop a running agent; the service will
continue to run on the node until you stop the agent (for information about controlling the agent, see Section 5). If the agent or cluster is subsequently stopped, the node will not be allowed to rejoin the cluster, and will be removed from the failover priority list (and will be ineligible for promotion).
After invoking the efm remove-node command, you must use the efm add-node
command to add the node to the cluster again. For more information about using the efm utility, see Section 5.3.
4.2 Monitoring a Failover Manager Cluster
You can use either the Failover Manager efm cluster-status command or the PEM Client graphical interface to check the current status of a monitored node of a Failover Manager cluster.
4.2.1 Reviewing the Cluster Status Report
The cluster-status command returns a report that contains information about the status of the Failover Manager cluster. To invoke the command, enter:
# efm cluster-status acctg
The following status report is for a cluster with five nodes running:
Cluster Status: acctg
Agent Type Address Agent DB Info --- Idle 172.24.38.106 UP UNKNOWN Standby 172.24.38.123 UP UP Standby 172.24.38.103 UP UP Idle 172.24.38.152 UP UNKNOWN Master 172.24.38.163 UP UP Allowed node host list:
172.24.38.106 172.24.38.163 172.24.38.103 172.24.38.123 172.24.38.152
Standby priority host list: 172.24.38.103 172.24.38.123 Promote Status:
DB Type Address XLog Loc Info --- Master 172.24.38.163 2/35000230 Standby 172.24.38.103 2/35000230 Standby 172.24.38.123 2/35000230 Standby database(s) in sync with master. It is safe to promote.
Idle Node Status (idle nodes ignored in XLog location comparisons):
Address XLog Loc Info
--- 172.24.38.152 2/35000160 DB is not in recovery.
172.24.38.106 UNKNOWN Connection refused. Check that the hostname and port are correct and that the postmaster is accepting TCP/IP connections.
The ClusterStatus section provides an overview of the status of the agents that reside
on each node of the cluster:
Cluster Status: acctg
Agent Type Address Agent DB Info --- Idle 172.24.38.106 UP UNKNOWN Standby 172.24.38.123 UP UP Standby 172.24.38.103 UP UP Idle 172.24.38.152 UP UNKNOWN Master 172.24.38.163 UP UP
Failover Manager agents provide the information displayed in the ClusterStatus
section.
The Allowednode host list and Standby priority host list provide an easy way to tell which nodes are allowed to join the cluster, and the promotion order of the standby nodes:
Allowed node host list:
172.24.38.106 172.24.38.163 172.24.38.103 172.24.38.123 172.24.38.152
Standby priority host list: 172.24.38.103 172.24.38.123
The PromoteStatus section of the report is the result of a direct query from the node on which you are invoking the cluster-status command to each database in the
cluster; the query also returns the transaction log location of each database.
Promote Status:
DB Type Address XLog Loc Info --- Master 172.24.38.163 2/35000230 Standby 172.24.38.103 2/35000230 Standby 172.24.38.123 2/35000230
If a database is down (or if the database has been restarted, but the resume command has
not yet been invoked), the state of the agent that resides on that host will be Idle. If an agent is idle, the cluster status report will include a summary of the condition of the node.
Idle Node Status (idle nodes ignored in XLog location comparisons):
Address XLog Loc Info
--- 172.24.38.152 2/35000160 DB is not in recovery. 172.24.38.106 UNKNOWN Connection refused. Check that the hostname and port are correct and that the postmaster is accepting TCP/IP connections.
Exit Codes
The cluster status process returns an exit code that is based on the state of the cluster: An exit code of 0 indicates that all agents are running, and the databases on the
Master and Standby nodes are running and in sync.
A non-zero exit code indicates that there is a problem. The following problems can trigger a non-zero exit code:
A database is down or unknown (or has an idle agent).
Failover Manager cannot decrypt the provided database password. There is a problem contacting the databases to get xlog locations. There is no Master agent.
There are no Standby agents.
4.2.2 Monitoring Streaming Replication with Postgres Enterprise Manager
If you use Postgres Enterprise Manager (PEM) to monitor your servers, you can configure the Streaming Replication Analysis dashboard (part of the PEM client graphical interface) to display the state of a Master or Standby node that is part of a Streaming Replication scenario.
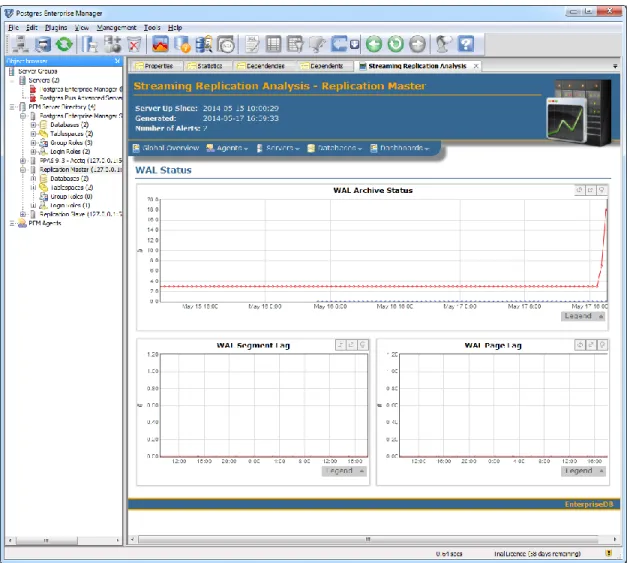
Figure 4.1 - The Streaming Replication dashboard (Master node)
The Streaming Replication Analysis Dashboard (shown in Figure 4.1) displays statistical information about WAL activity for any monitored server on which streaming replication is enabled. The dashboard header identifies the status of the monitored server (either
ReplicationMaster or ReplicationSlave), and displays the date and time that the server was last started, the date and time that the page was last updated, and a current count of triggered alerts for the server.
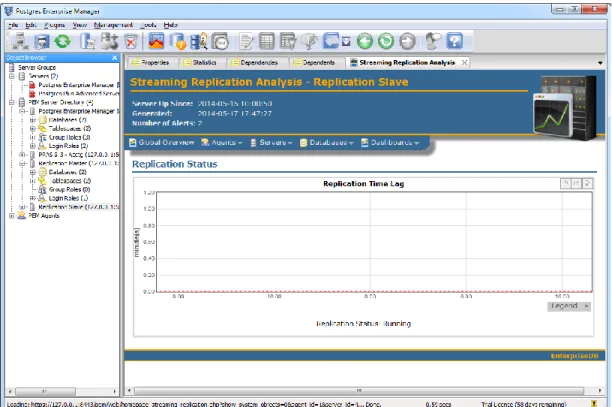
When reviewing the dashboard for a Replication Slave (a Standby node), a label at the bottom of the dashboard confirms the status of the server (see Figure 4.2).
Figure 4.2 - The Streaming Replication dashboard (Standby node) By default, the PEM replication probes that provide information for the Streaming Replication Analysis dashboard are disabled. To view the Streaming Replication Analysis dashboard for the Master node of a replication scenario, you must enable the following probes:
Streaming Replication WAL Archive Status
To view the Streaming Replication Analysis dashboard for the Standby node of a replication scenario, you must enable the following probes:
Streaming Replication Lag Time
To enable a probe, highlight the name of the replication master in the PEM client
Objectbrowser pane, and select ProbeConfiguration... from the Management
menu. Use the ProbeConfiguration dialog to enable each probe. For more information about PEM, please visit the EnterpriseDB website at:
4.3 Running Multiple Agents on a Single Node
You can monitor multiple database clusters that reside on the same host by running multiple Master or Standby agents on that Failover Manager node. You may also run multiple Witness agents on a single node. To configure Failover Manager to monitor more than one database cluster, while ensuring that Failover Manager agents from different clusters do not interfere with each other, you must:
1. Create a cluster properties file for each member of each cluster that defines a unique set of properties and the role of the node within the cluster.
2. Create a cluster members file for each member of each cluster that lists the members of the cluster.
3. Customize the service script for each cluster to specify the names of the cluster properties and the cluster members files.
4. Start the services for each cluster.
The examples that follow uses two database clusters (acctg and sales) running on the same node:
Data for acctg resides in /opt/pgdata1; its server is monitoring port 5444. Data for sales resides in /opt/pgdata2; its server is monitoring port 5445. To run a Failover Manager agent for both of these database clusters, use the
efm.properties.in template to create two properties files. Each cluster properties file
must have a unique name. For this example, we create acctg.properties and
sales.properties to match the acctg and sales database clusters. The following parameters must be unique in each cluster properties file:
admin.port bind.address db.port
db.recovery.conf.dir script.fence (if used)
virtualIp (if used)
virtualIp.interface (if used)
Within each cluster properties file, the db.port parameter should specify a unique value for each cluster, while the db.user and db.database parameter may have the same value or a unique value. For example, the acctg.properties file may specify:
db.user=efm_user
db.password.encrypted=7c801b32a05c0c5cb2ad4ffbda5e8f9a db.port=5444
db.database=acctg_db
While the sales.properties file may specify:
db.user=efm_user
db.password.encrypted=e003fea651a8b4a80fb248a22b36f334 db.port=5445
db.database=sales_db
Some parameters require special attention when setting up more than one Failover Manager cluster agent on the same node. If multiple agents reside on the same node, each port must be unique. Any two ports will work, but it may be easier to keep the information clear if using ports that are not too close to each other.
Remember, the database user specified in the cluster properties file must have read access to the database.
When creating the cluster properties file for each cluster, the db.recovery.conf.dir
parameters must also specify values that are unique for each respective database cluster. If you are using a fencing script, use the script.fence parameter to identify a fencing
script that is unique for each cluster. In the event of a failover, Failover Manager does not pass any information to the fencing script that could identify which master has failed. If a Linux firewall is enabled on the host of a Failover Manager node, you may need to add rules to the firewall configuration that allow tcp communication between the EFM processes in the cluster; see Section 2.2 for more information.
The following parameters are used when assigning the virtual IP address to a node. If your Failover Manager cluster does not use a virtual IP address, leave these parameters blank.
virtualIp
You must specify a unique virtual IP address for each cluster. If the same address is used, a failure of one database cluster would cause the address to be released from the master, breaking existing connections to the remaining database cluster.
virtualIp.interface
You must specify a unique interface name for each cluster. For example,
acctg.properties might include a value of eth0:0, while
virtualIp.netmask
This parameter value is determined by the virtual IP addresses being used and may or may not be the same for both acctg.properties and sales.properties.
After creating the acctg.properties and sales.properties files, create a service script for each cluster that points to the respective property files; this step is platform specific. If you are using RHEL 6.x or CentOS 6.x, see Section 4.3.1; if you are using RHEL 7.x or CentOS 7.x, see Section 4.3.2.
4.3.1 RHEL 6.x or CentOS 6.x
If you are using RHEL 6.x or CentOS 6.x, you should copy the efm-2.0 service script to new file with a name that is unique for each cluster. For example:
# cp /etc/init.d/efm-2.0 /etc/init.d/efm-acctg # cp /etc/init.d/efm-2.0 /etc/init.d/efm-sales
Then edit the CLUSTER variable, modifying the cluster name from efm to acctg or sales.
After creating the service scripts, run:
# chkconfig efm-acctg on # chkconfig efm-sales on
Then, use the new service scripts to start the agents. For example, you can start the
acctg agent with the command:
# service efm-acctg start
4.3.2 RHEL 7.x or CentOS 7.x
If you are using RHEL 7.x or CentOS 7.x, you should copy the efm-2.0 service script to
new file with a name that is unique for each cluster. For example:
# cp /usr/lib/systemd/system/efm-2.0.service /usr/lib/systemd/system/efm-acctg.service # cp /usr/lib/systemd/system/efm-2.0.service /usr/lib/systemd/system/efm-sales.service
Then edit the CLUSTER variable, modifying the cluster name from efm to acctg or sales.
After copying the service scripts, use the following commands to enable the services:
# systemctl enable efm-acctg.service # systemctl enable efm-sales.service
Then, use the new service scripts to start the agents. For example, you can start the
acctg agent with the command:
5 Controlling the Failover Manager
Service
Each node in a Failover Manager cluster hosts a Failover Manager agent that is controlled by a service script. By default, the service script expects to find:
A configuration file named efm.properties that contains the properties used by the Failover Manager service. Each node of a replication scenario must contain a properties file that provides information about the node.
A cluster members file named efm.nodes that contains a list of the cluster
members. Each node of a replication scenario must contain a cluster members list.
Note that if you are running multiple clusters on a single node you will need to manually create configuration files with cluster-specific names and modify the service script for the corresponding clusters.
The commands that control the Failover Manager service are platform-specific; for information about controlling Failover Manager on a RHEL 6.x or CentOS 6.x host, see Section 5.1. If you are using RHEL 7.x or CentOS 7.x, see Section 5.2.
5.1 Using the service Utility on RHEL 6.x and CentOS 6.x
On RHEL 6.x and CentOS 6.x, Failover Manager runs as a Linux service named (by default) efm-2.0 that is located in /etc/init.d. Each database cluster monitored by Failover Manager will run a copy of the service on each node of the replication cluster. Use the following service commands to control a Failover Manager agent that resides on a RHEL 6.x or CentOS 6.x host:service efm-2.0 start
The start command starts the Failover Manager agent on the current node. The local Failover Manager agent monitors the local database and communicates with Failover Manager on the other nodes. You can start the nodes in a Failover Manager cluster in any order.
service efm-2.0 stop
Stop the Failover Manager on the current node. This command must be invoked by root.
service efm-2.0 status
The status command returns the status of the Failover Manager agent on which it is invoked. You can invoke the status command on any node to instruct Failover Manager to return status information. For example:
[witness@localhost ~]# service efm-2.0 status efm-2.0 (pid 50836) is running...
service efm-2.0 help