BIG-IP
®
Global Traffic Manager
™
:
Implementations
Version 11.3
Table of Contents
Legal Notices...11
Acknowledgments...13
Chapter 1: Upgrading BIG-IP GTM to Version 11.x...17
Converting a statistics collection server to a Prober pool automatically...18
Chapter 2: Sending Traffic Through BIG-IP GTM...19
Overview: Configuring GTM to screen traffic to an existing DNS server...20
About listeners...20
About wildcard listeners...20
Task summary...21
Placing GTM on your network to forward traffic...21
Creating a listener to forward traffic to a DNS server ...21
Creating a wide IP...21
Implementation result...22
Chapter 3: Replacing a DNS Server with BIG-IP GTM...23
Overview: Replacing a DNS server with BIG-IP GTM...24
About listeners...24
Task summary...24
Configuring a back-end DNS server to allow zone file transfers...25
Acquiring zone files from the legacy DNS server...25
Creating a self IP address using the IP address of the legacy DNS server...25
Designating GTM as the primary server for the zone...26
Creating listeners to alert GTM to DNS traffic destined for the system...26
Creating a wide IP...27
Implementation result...27
Chapter 4: Load Balancing Non-Wide IP DNS Traffic to a Pool of DNS Servers...29
Overview: Screening and forwarding non-wide IP traffic to a pool of DNS servers...30
About listeners...30
Task summary...30
Creating a pool of local DNS servers...31
Creating a listener that alerts GTM to DNS queries for a pool of DNS servers...31
Implementation result...31
Chapter 5: Delegating DNS Traffic to Wide IPs...33
Overview: Delegating DNS traffic to wide IPs...34
3 Table of Contents
About listeners...34
Task summary...34
Creating a delegated zone on a local DNS server...35
Creating a listener to handle traffic for wide IPs...35
Implementation result...35
Chapter 6: Integrating BIG-IP GTM with Other BIG-IP Systems...37
Overview: Integrating GTM with older BIG-IP systems on a network...38
About iQuery and communications between BIG-IP systems...38
Task summary...38
Defining a data center...38
Defining BIG-IP GTM systems...39
Defining BIG-IP LTM systems...40
Running the big3d_install script...41
Implementation result...42
Chapter 7: Integrating BIG-IP LTM with BIG-IP GTM Systems...43
Overview: Integrating LTM systems with GTM systems on a network...44
Task summary...44
Defining a data center...44
Defining BIG-IP GTM systems...45
Defining BIG-IP LTM systems...46
Running the bigip_add utility...47
Implementation result...47
Chapter 8: Ensuring Correct Synchronization When Adding GTM to a Network...49
Overview: Ensuring correct synchronization when adding GTM to a network...50
About configuration synchronization...50
About adding an additional BIG-IP GTM to your network...50
Task summary...50
Defining an NTP server on the existing GTM...51
Enabling synchronization on the existing GTM...51
Creating a data center on the existing GTM...51
Defining a server on the existing GTM...52
Running the gtm_add script on the new GTM...53
Implementation result...53
Chapter 9: Configuring BIG-IP GTM VIPRION Systems...55
Overview: Configuring BIG-IP GTM VIPRION systems...56
Configuring virtual server status for clusters...56
Chapter 10: Setting Up a BIG-IP GTM Redundant System Configuration...57
Overview: Configuring a BIG-IP GTM redundant system...58
4
Task summary...58
Defining an NTP server...58
Creating listeners to identify DNS traffic...59
Defining a data center...59
Defining a server ...60
Enabling global traffic configuration synchronization...60
Running the gtm_add script ...61
Chapter 11: Configuring GTM on a Network with One Route Domain...63
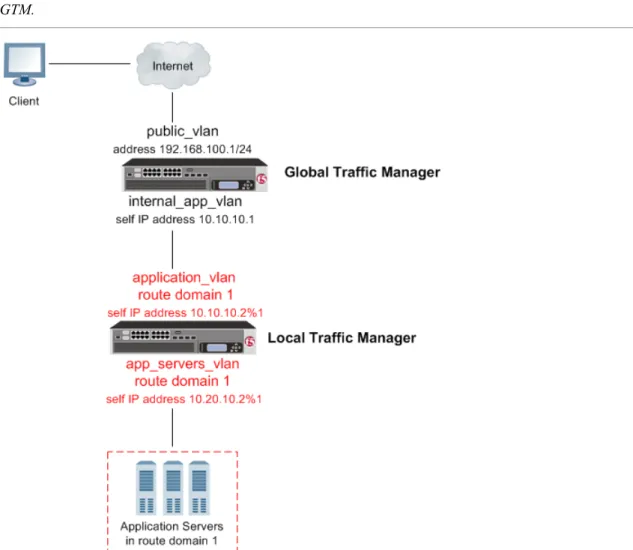
Overview: How do I deploy BIG-IP GTM on a network with one route domain?...64
Task summary...64
Creating VLANs for a route domain on BIG-IP LTM...65
Creating a route domain on the BIG-IP system...65
Creating a self IP address for a route domain on BIG-IP LTM...66
Defining a server for a route domain on BIG-IP GTM...67
Implementation result...67
Chapter 12: Configuring GTM on a Network with Multiple Route Domains...69
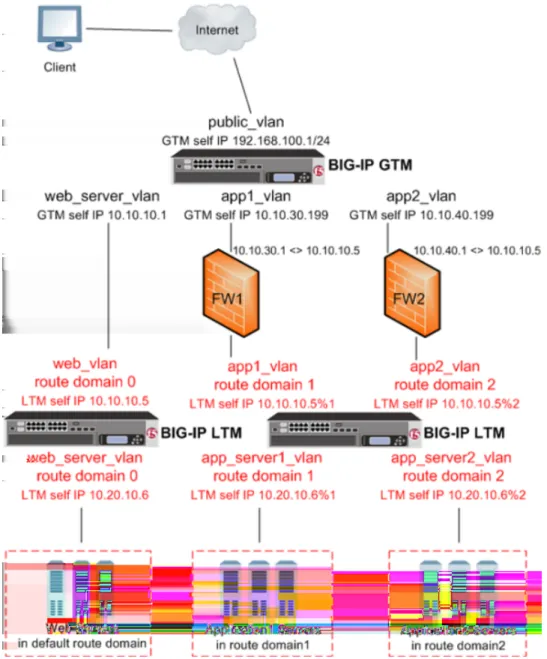
Overview: How do I deploy BIG-IP GTM on a network with multiple route domains?...70
Task summary...71
Creating VLANs for a route domain on BIG-IP LTM...72
Creating a route domain on BIG-IP LTM...72
Creating a self IP address for a route domain on BIG-IP LTM...73
Disabling auto-discovery at the global-level on BIG-IP GTM...73
Defining a server for a route domain on BIG-IP GTM...73
Implementation result...74
Chapter 13: Authenticating with SSL Certificates Signed by a Third Party...75
Overview: Authenticating with SSL certificates signed by a third party...76
About SSL authentication levels...76
Configuring Level 1 SSL authentication...76
Importing the device certificate...76
Importing the root certificate for the gtmd agent...77
Importing the root certificate for the big3d agent...77
Verifying the certificate exchange...77
Implementation Results...78
Configuring certificate chain SSL authentication...78
Creating a certificate chain file ...78
Importing the device certificate from the last CA server in the chain...78
Importing a certificate chain file for the gtmd agent...79
Importing a certificate chain for the big3d agent...79
Verifying the certificate chain exchange...79
Implementation result...80
5 Table of Contents
Chapter 14: Configuring the Save Interval for GTM Configuration Changes...81
Overview: Configuring the interval at which GTM saves configuration changes...82
Task summary...82
Configuring the GTM save interval...82
Implementation result...82
Chapter 15: Configuring a TTL in a DNS NoError Response...83
Overview: Configuring a TTL in an IPv6 DNS NoError Response...84
About SOA records and negative caching...84
Task summary...84
Creating a pool...84
Creating a wide IP that provides for negative caching ...85
Implementation result...85
Chapter 16: Configuring DNS64...87
Overview: Configuring DNS64...88
Task summary...88
Creating a custom DNS profile ...88
Assigning a DNS profile to a virtual server...89
Implementation result...90
Chapter 17: Configuring DNSSEC...91
Overview: Configuring DNSSEC...92
How do I prepare for a manual rollover of a DNSSEC key?...92
About enhancing DNSSEC key security...92
Task summary...93
Creating listeners to identify DNS traffic...93
Creating DNSSEC key-signing keys...94
Creating DNSSEC zone-signing keys...95
Creating DNSSEC zones...96
Confirming that GTM is signing DNSSEC records ...97
Viewing DNSSEC records in ZoneRunner...97
Implementation result...97
Chapter 18: Configuring DNS Express...99
How do I configure DNS Express?...100
What is DNS Express?...100
Task summary...100
Configuring a back-end DNS server to allow zone file transfers...100
Creating a DNS Express TSIG key...100
Creating a DNS Express zone...101
Enabling DNS Express ...102
6
Assigning a DNS profile to a listener...103
Viewing information about DNS Express zones...103
Implementation result...103
Chapter 19: Caching DNS Responses from External Resolvers...105
Overview: Improving DNS performance by caching responses from external resolvers...106
Task summary...106
Creating a transparent DNS cache...107
Creating a custom DNS profile for transparent DNS caching...107
Assigning a custom DNS profile to a GTM listener...108
Creating a custom DNS monitor...108
Creating a pool of local DNS servers...108
Determining DNS cache performance...109
Clearing a DNS cache...110
Implementation result...111
Chapter 20: Resolving DNS Queries and Caching Responses...113
Overview: Improving DNS performance by resolving queries and caching responses...114
Task summary...115
Creating a resolver DNS cache...115
Creating a custom DNS profile for DNS resolving and caching...115
Assigning a custom DNS profile to a GTM listener...116
Determining DNS cache performance...116
Clearing a DNS cache...118
Implementation result...118
Chapter 21: Resolving DNS Queries and Caching Validated Responses...119
Overview: Resolving queries and caching validated responses...120
Task summary...121
Creating a validating resolver DNS cache...121
Creating a custom DNS profile for validating resolver DNS caching...122
Assigning a custom DNS profile to a GTM listener...123
Determining DNS cache performance...123
Clearing a DNS cache...125
Implementation result...126
Chapter 22: Customizing a DNS Cache...127
Overview: Customizing a DNS cache...128
Configuring a DNS cache to answer queries for local zones...128
Configuring a DNS cache to use specific root nameservers...128
Configuring a DNS cache alert for cache poisoning...128
7 Table of Contents
Chapter 23: Configuring IP Anycast (Route Health Injection)...131
Overview: Configuring IP Anycast (Route Health Injection)...132
Task summary...132
Enabling the ZebOS dynamic routing protocol...132
Creating a custom DNS profile...132
Configuring a listener for route advertisement...133
Verifying advertisement of the route ...134
Implementation result...134
Chapter 24: Redirecting a DNS Query Using a Wide IP with a CNAME Pool...135
Overview: Redirecting DNS queries using a wide IP with a CNAME pool ...136
About CNAME records...136
Task summary...136
Creating a pool using a CNAME...136
Creating a wide IP with a CNAME pool ...137
Implementation result...137
Chapter 25: Monitoring Third-Party Servers with SNMP...139
Overview: SNMP monitoring of third-party servers...140
Task summary...140
Creating an SNMP monitor...140
Defining a third-party host server that is running SNMP...140
Implementation result...141
Chapter 26: Configuring Remote High-Speed DNS Logging...143
Overview: Configuring remote high-speed DNS logging...144
Task summary...145
Creating a pool of remote logging servers...146
Creating a remote high-speed log destination...146
Creating a formatted remote high-speed log destination...147
Creating a publisher ...147
Creating a custom DNS Logging profile for logging DNS queries ...147
Creating a custom DNS Logging profile for logging DNS responses...148
Creating a custom DNS Logging profile for logging DNS queries and responses ...148
Creating a custom DNS profile to enable DNS logging ...149
Configuring a GTM listener for DNS logging...149
Disabling DNS logging ...149
Implementation result...150
Chapter 27: Configuring Device-Specific Probing and Statistics Collection...151
Overview: Configuring device-specific probing and statistics collection...152
8
About Prober pools...152
About Prober pool status...153
About Prober pool statistics...153
Task summary...154
Creating a Prober pool...154
Assigning a Prober pool to a data center...154
Assigning a Prober pool to a server...155
Viewing Prober pool statistics and status...155
Determining which Prober pool member marked a resource down...156
Implementation result...156
Chapter 28: Setting Up and Viewing DNS Statistics...157
Overview: Setting up and viewing DNS statistics...158
Task summary...158
Creating a DNS profile for DNS AVR statistics collection...159
Configuring a GTM listener for DNS AVR statistics collection...159
Viewing DNS AVR statistics...159
Viewing DNS AVR statistics in tmsh...160
Viewing DNS global statistics...161
Viewing DNS statistics for a specific virtual server...161
Implementation result...161
Chapter 29: Diagnosing Network Connection Issues...163
Diagnosing network connection issues...164
Viewing iQuery statistics ...164
iQuery statistics descriptions...164
9 Table of Contents
10
Legal Notices
Publication Date
This document was published on January 31, 2014. Publication Number
MAN-0388-02 Copyright
Copyright©2012-2014, F5 Networks, Inc. All rights reserved.
F5 Networks, Inc. (F5) believes the information it furnishes to be accurate and reliable. However, F5 assumes no responsibility for the use of this information, nor any infringement of patents or other rights of third parties which may result from its use. No license is granted by implication or otherwise under any patent, copyright, or other intellectual property right of F5 except as specifically described by applicable user licenses. F5 reserves the right to change specifications at any time without notice.
Trademarks
Access Policy Manager, Advanced Client Authentication, Advanced Routing, APM, Application Security Manager, ARX, AskF5, ASM, BIG-IP, BIG-IQ, Cloud Extender, CloudFucious, Cloud Manager, Clustered Multiprocessing, CMP, COHESION, Data Manager, DevCentral, DevCentral [DESIGN], DNS Express, DSC, DSI, Edge Client, Edge Gateway, Edge Portal, ELEVATE, EM, Enterprise Manager, ENGAGE, F5, F5 [DESIGN], F5 Management Pack, F5 Networks, F5 World, Fast Application Proxy, Fast Cache, FirePass, Global Traffic Manager, GTM, GUARDIAN, IBR, Intelligent Browser Referencing, Intelligent Compression, IPv6 Gateway, iApps, iControl, iHealth, iQuery, iRules, iRules OnDemand, iSession, L7 Rate Shaping, LC, Link Controller, Local Traffic Manager, LTM, Message Security Manager, MSM, OneConnect, OpenBloX, OpenBloX [DESIGN], Packet Velocity, Policy Enforcement Manager, PEM, Protocol Security Manager, PSM, Real Traffic Policy Builder, Rosetta Diameter Gateway, ScaleN, Signaling Delivery Controller, SDC, SSL Acceleration, StrongBox, SuperVIP, SYN Check, TCP Express, TDR, TMOS, Traffic Management Operating System, Traffix Diameter Load Balancer, Traffix Systems, Traffix Systems (DESIGN), Transparent Data Reduction, UNITY, VAULT, VIPRION, vCMP, virtual Clustered Multiprocessing, WA, WAN Optimization Manager, WebAccelerator, WOM, and ZoneRunner, are trademarks or service marks of F5 Networks, Inc., in the U.S. and other countries, and may not be used without F5's express written consent.
All other product and company names herein may be trademarks of their respective owners. Patents
This product may be protected by U.S. Patents 6,374,300; 6,473,802; 6,970,733; 7,047,301; 7,707,289. This list is believed to be current as of January 31, 2014.
Export Regulation Notice
This product may include cryptographic software. Under the Export Administration Act, the United States government may consider it a criminal offense to export this product from the United States.
RF Interference Warning
This is a Class A product. In a domestic environment this product may cause radio interference, in which case the user may be required to take adequate measures.
FCC Compliance
This equipment has been tested and found to comply with the limits for a Class A digital device pursuant to Part 15 of FCC rules. These limits are designed to provide reasonable protection against harmful interference when the equipment is operated in a commercial environment. This unit generates, uses, and can radiate radio frequency energy and, if not installed and used in accordance with the instruction manual, may cause harmful interference to radio communications. Operation of this equipment in a residential area is likely to cause harmful interference, in which case the user, at his own expense, will be required to take whatever measures may be required to correct the interference.
Any modifications to this device, unless expressly approved by the manufacturer, can void the user's authority to operate this equipment under part 15 of the FCC rules.
Canadian Regulatory Compliance
This Class A digital apparatus complies with Canadian ICES-003. Standards Compliance
This product conforms to the IEC, European Union, ANSI/UL and Canadian CSA standards applicable to Information Technology products at the time of manufacture.
12
Acknowledgments
This product includes software developed by Gabriel Forté. This product includes software developed by Bill Paul. This product includes software developed by Jonathan Stone. This product includes software developed by Manuel Bouyer. This product includes software developed by Paul Richards.
This product includes software developed by the NetBSD Foundation, Inc. and its contributors. This product includes software developed by the Politecnico di Torino, and its contributors.
This product includes software developed by the Swedish Institute of Computer Science and its contributors. This product includes software developed by the University of California, Berkeley and its contributors. This product includes software developed by the Computer Systems Engineering Group at the Lawrence Berkeley Laboratory.
This product includes software developed by Christopher G. Demetriou for the NetBSD Project. This product includes software developed by Adam Glass.
This product includes software developed by Christian E. Hopps. This product includes software developed by Dean Huxley. This product includes software developed by John Kohl. This product includes software developed by Paul Kranenburg. This product includes software developed by Terrence R. Lambert. This product includes software developed by Philip A. Nelson. This product includes software developed by Herb Peyerl.
This product includes software developed by Jochen Pohl for the NetBSD Project. This product includes software developed by Chris Provenzano.
This product includes software developed by Theo de Raadt. This product includes software developed by David Muir Sharnoff. This product includes software developed by SigmaSoft, Th. Lockert.
This product includes software developed for the NetBSD Project by Jason R. Thorpe.
This product includes software developed by Jason R. Thorpe for And Communications, http://www.and.com. This product includes software developed for the NetBSD Project by Frank Van der Linden.
This product includes software developed for the NetBSD Project by John M. Vinopal. This product includes software developed by Christos Zoulas.
This product includes software developed by the University of Vermont and State Agricultural College and Garrett A. Wollman.
This product includes software developed by Balazs Scheidler ([email protected]), which is protected under the GNU Public License.
This product includes software developed by Niels Mueller ([email protected]), which is protected under the GNU Public License.
In the following statement,This softwarerefers to the Mitsumi CD-ROM driver: This software was developed by Holger Veit and Brian Moore for use with 386BSD and similar operating systems.Similar operating systemsincludes mainly non-profit oriented systems for research and education, including but not restricted to NetBSD, FreeBSD, Mach (by CMU).
This product includes software developed by the Apache Group for use in the Apache HTTP server project (http://www.apache.org/).
This product includes software licensed from Richard H. Porter under the GNU Library General Public License (©1998, Red Hat Software), www.gnu.org/copyleft/lgpl.html.
This product includes the standard version of Perl software licensed under the Perl Artistic License (©1997,
1998 Tom Christiansen and Nathan Torkington). All rights reserved. You may find the most current standard version of Perl at http://www.perl.com.
This product includes software developed by Jared Minch.
This product includes software developed by the OpenSSL Project for use in the OpenSSL Toolkit (http://www.openssl.org/).
This product includes cryptographic software written by Eric Young ([email protected]).
This product contains software based on oprofile, which is protected under the GNU Public License. This product includes RRDtool software developed by Tobi Oetiker (http://www.rrdtool.com/index.html) and licensed under the GNU General Public License.
This product contains software licensed from Dr. Brian Gladman under the GNU General Public License (GPL).
This product includes software developed by the Apache Software Foundation (http://www.apache.org/). This product includes Hypersonic SQL.
This product contains software developed by the Regents of the University of California, Sun Microsystems, Inc., Scriptics Corporation, and others.
This product includes software developed by the Internet Software Consortium.
This product includes software developed by Nominum, Inc. (http://www.nominum.com).
This product contains software developed by Broadcom Corporation, which is protected under the GNU Public License.
This product contains software developed by MaxMind LLC, and is protected under the GNU Lesser General Public License, as published by the Free Software Foundation.
This product includes Intel QuickAssist kernel module, library, and headers software licensed under the GNU General Public License (GPL).
This product includes software licensed from Gerald Combs ([email protected]) under the GNU General Public License as published by the Free Software Foundation; either version 2 of the License, or any later version. Copyright©1998 Gerald Combs.
This product includes software developed by Thomas Williams and Colin Kelley. Copyright©1986 - 1993,
1998, 2004, 2007
Permission to use, copy, and distribute this software and its documentation for any purpose with or without fee is hereby granted, provided that the above copyright notice appear in all copies and that both that copyright notice and this permission notice appear in supporting documentation. Permission to modify the software is granted, but not the right to distribute the complete modified source code. Modifications are to be distributed as patches to the released version. Permission to distribute binaries produced by compiling modified sources is granted, provided you
14
1. distribute the corresponding source modifications from the released version in the form of a patch file along with the binaries,
2. add special version identification to distinguish your version in addition to the base release version number,
3. provide your name and address as the primary contact for the support of your modified version, and
4. retain our contact information in regard to use of the base software.
Permission to distribute the released version of the source code along with corresponding source modifications in the form of a patch file is granted with same provisions 2 through 4 for binary distributions. This software is provided "as is" without express or implied warranty to the extent permitted by applicable law.
This product contains software developed by Google, Inc. Copyright©2011 Google, Inc.
Permission is hereby granted, free of charge, to any person obtaining a copy of this software and associated documentation files (the "Software"), to deal in the Software without restriction, including without limitation the rights to use, copy, modify, merge, publish, distribute, sublicense, and/or sell copies of the Software, and to permit persons to whom the Software is furnished to do so, subject to the following conditions: The above copyright notice and this permission notice shall be included in all copies or substantial portions of the Software.
THE SOFTWARE IS PROVIDED "AS IS", WITHOUT WARRANTY OF ANY KIND, EXPRESS OR IMPLIED, INCLUDING BUT NOT LIMITED TO THE WARRANTIES OF MERCHANTABILITY, FITNESS FOR A PARTICULAR PURPOSE AND NONINFRINGEMENT. IN NO EVENT SHALL THE AUTHORS OR COPYRIGHT HOLDERS BE LIABLE FOR ANY CLAIM, DAMAGES OR OTHER LIABILITY, WHETHER IN AN ACTION OF CONTRACT, TORT OR OTHERWISE, ARISING FROM, OUT OF OR IN CONNECTION WITH THE SOFTWARE OR THE USE OR OTHER DEALINGS IN THE SOFTWARE.
This product includes software developed by Digital Envoy, Inc.
15 BIG-IP® Global Traffic Manager™: Implementations
Chapter
1
Upgrading BIG-IP GTM to Version 11.x
• Converting a statistics collection server to a Prober pool automatically
Converting a statistics collection server to a Prober pool automatically
In version 10.2 of BIG-IP®Global Traffic Manager™(GTM™), you could assign a single BIG-IP®system to probe a server to gather health and performance data. You did this by specifying the IP address of the BIG-IP system (which you chose to perform probes of the server) in theStatistics Collection Serverfield of the server. In version 11.0, this feature was replaced by the Prober pool feature.
When you upgrade from version 10.2.x to version 11.x, if a single BIG-IP system was assigned to probe a server, BIG-IP GTM converts the single server to a Prober pool with one member, and then assigns the Prober pool to the server to which the Statistics Collection server was originally assigned. The name of the new Prober pool is based on the IP address of the original Statistics Collection server. If the original Statistics Collection server had an IP address of10.10.2.3, the name of the automatically created Prober pool is prober_pool_10_10_2_3.
18
Chapter
2
Sending Traffic Through BIG-IP GTM
• Overview: Configuring GTM to screen traffic to an existing DNS server
• Task summary • Implementation result
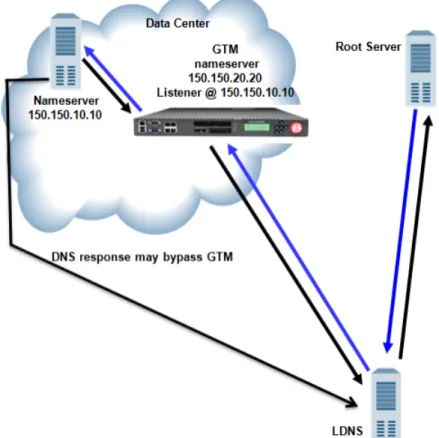
Overview: Configuring GTM to screen traffic to an existing DNS server
You can use BIG-IP®Global Traffic Manager™(GTM™) as a traffic screener in front of an existing DNS server. With this setup, all DNS traffic flows through BIG-IP GTM. Listeners that you configure on BIG-IP GTM verify incoming DNS queries. If the query is for a wide IP, BIG-IP GTM resolves the request. If the query is for a destination that does not match a wide IP or for an IP address that is not configured on BIG-IP GTM, the system forwards the query to the specified DNS server for resolution. When forwarding a query, BIG-IP GTM transforms the source address to a self IP address on BIG-IP GTM.
Figure 1: Traffic flow when BIG-IP GTM screens traffic to a DNS server
About listeners
Alisteneris a specialized virtual server that uses port 53 and to which you assign a specific IP address. When a DNS name resolution request is sent to the IP address of a listener, BIG-IP GTM either handles the request locally or forwards the request to the appropriate resource.
About wildcard listeners
Awildcard listeneris a special listener that is assigned an IP address of0.0.0.0and the DNS query port (port 53). When you want BIG-IP GTM to respond to DNS name resolution requests coming into your network, regardless of the destination IP address of the given request, you create a wildcard listener. BIG-IP GTM responds not only to wide IP requests, but also forwards other DNS name resolution requests to other DNS servers.
20
Task summary
Perform these tasks to send traffic through BIG-IP®GTM™. Placing GTM on your network to forward traffic
Creating a listener to forward traffic to a DNS server Creating a wide IP
Placing GTM on your network to forward traffic
Determine to which DNS server you want BIG-IP®GTM™to forward traffic.
Place GTM on your network between LDNS servers and clients making DNS name resolution requests.
1. Physically connect GTM to your Internet connection.
2. Connect the LDNS to an Ethernet port on GTM (optional).
3. Connect the LDNS to a switch.
Creating a listener to forward traffic to a DNS server
Determine to which DNS server you want this listener to forward traffic.
Create a listener that alerts the BIG-IP system to traffic destined for a DNS server.
1. On the Main tab, clickGlobal Traffic>Listeners. The Listeners List screen opens.
2. ClickCreate.
The new Listeners screen opens.
3. In theDestinationfield, type the IP address on which BIG-IP GTM listens for network traffic. The destination is the IP address of a DNS server to which you want the listener to route traffic. Important: The destination must not match a self IP address on BIG-IP GTM.
4. From theVLAN Trafficlist, selectAll VLANs.
5. ClickFinished.
Creating a wide IP
Ensure that at least one load balancing pool exists in the configuration before you start creating a wide IP. Create a wide IP to map a FQDN to one or more pools of virtual servers that host the content of the domain.
1. On the Main tab, clickGlobal Traffic>Wide IPs. The Wide IPs List screen opens.
2. ClickCreate.
The New Wide IP screen opens.
3. In theNamefield, type a name for the wide IP.
21 BIG-IP® Global Traffic Manager™: Implementations
Tip: You can use two different wildcard characters in the wide IP name: asterisk (*) to represent several
characters and question mark (?) to represent a single character. This reduces the number of aliases you have to add to the configuration.
4. From thePoollist, select the pools that this wide IP uses for load balancing.
The system evaluates the pools based on the wide IP load balancing method configured. a) From thePoollist, select a pool.
A pool can belong to more than one wide IP. b) ClickAdd.
5. ClickFinished.
Implementation result
You now have an implementation in which BIG-IP®GTM™receives all DNS queries. If the query is for a wide IP, BIG-IP GTM load balances the request to the appropriate resource. If the query is for an IP address of a DNS server, BIG-IP GTM either routes or forwards the query to the DNS server for resolution.
22
Chapter
3
Replacing a DNS Server with BIG-IP GTM
• Overview: Replacing a DNS server with BIG-IP GTM
• Task summary • Implementation result
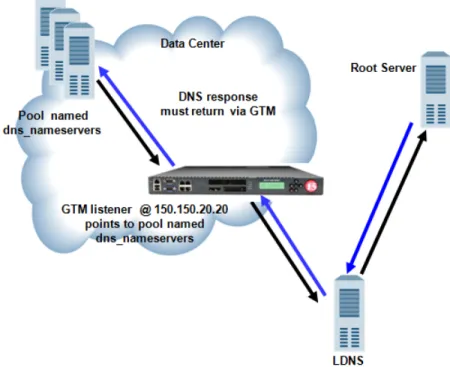
Overview: Replacing a DNS server with BIG-IP GTM
BIG-IP®Global Traffic Manager™(GTM™) load balances incoming wide IP traffic to your network resources. BIG-IP GTM can also replace a local DNS server as the authoritative nameserver for wide IPs, zones, and all other DNS-related traffic. You can configure BIG-IP GTM to replace the DNS server that currently manageswww.siterequest.com. BIG-IP GTM becomes the authoritative nameserver for
www.siterequest.comand load balances traffic across the web-based applications store.siterequest.comandcheckout.siterequest.com.
Figure 2: Traffic flow when BIG-IP GTM replaces DNS server
About listeners
Alisteneris a specialized virtual server that uses port 53 and to which you assign a specific IP address. When a DNS name resolution request is sent to the IP address of a listener, BIG-IP GTM either handles the request locally or forwards the request to the appropriate resource.
Task summary
Perform these tasks to replace a DNS server with BIG-IP GTM. Configuring a back-end DNS server to allow zone file transfers Acquiring zone files from the legacy DNS server
Creating a self IP address using the IP address of the legacy DNS server Designating GTM as the primary server for the zone
Creating listeners to alert GTM to DNS traffic destined for the system Creating a wide IP
24
Configuring a back-end DNS server to allow zone file transfers
If you are unfamiliar with how to modify DNS server files, review the fifth edition ofDNS and BIND, available from O’Reilly Media.
To configure a back-end DNS server to allow zone file transfers to the BIG-IP®system, add to the DNS server anallow-transferstatement that specifies a self IP address on the BIG-IP system.
You can modify the following allow-transfer statement to use a self IP address on the BIG-IP system:
allow-transfer { localhost; <self IP address of BIG-IP system>; };
Acquiring zone files from the legacy DNS server
Ensure that you have configured the legacy DNS server with an allow-transfer statement that authorizes zone transfers to BIG-IP®GTM™.
For BIG-IP GTM to acquire zone files from the legacy DNS server, create a new zone.
1. On the Main tab, clickGlobal Traffic>ZoneRunner>Zone List. The Zone List screen opens.
2. ClickCreate.
The New Zone screen opens.
3. From theView Namelist, select the view that you want this zone to be a member of. The default view isexternal.
4. In theZone Namefield, type a name for the zone file in this format, including the trailing dot: db.[viewname].[zonename].
For example,db.external.siterequest.com.
5. From theZone Typelist, selectMaster.
6. From theRecords Creation Methodlist, selectTransfer from Server.
7. In theSource Serverfield, type the IP address of the DNS server (the server from which you want BIG-IP GTM to acquire zone files).
8. ClickFinished.
Creating a self IP address using the IP address of the legacy DNS server
To avoid a conflict on your network, unplug BIG-IP®GTM™from the network.When you want BIG-IP GTM to handle DNS traffic previously handled by a DNS server, create a self IP address on BIG-IP GTM using the IP address of the legacy DNS server.
1. On the Main tab, clickNetwork>Self IPs. The Self IPs screen opens.
2. ClickCreate.
The New Self IP screen opens.
3. In theNamefield, type a unique name for the self IP.
4. In theIP Addressfield, type the IP address of the legacy DNS server.
25 BIG-IP® Global Traffic Manager™: Implementations
The system accepts IPv4 and IPv6 addresses.
5. In theNetmaskfield, type the network mask for the specified IP address.
6. ClickFinished.
The screen refreshes, and displays the new self IP address in the list.
Designating GTM as the primary server for the zone
Ensure that you have created a self IP address on BIG-IP®GTM™using the IP address of the legacy DNS server.
Add this self IP address to the BIG-IP GTM server object. Then modify the DNS server based on your network configuration.
1. Log on to BIG-IP GTM.
2. On the Main tab, clickGlobal Traffic>Servers. The Server List screen opens.
3. Click the name of the BIG-IP GTM system that you want to modify. The server settings and values display.
4. In the Address List area, add the new self IP address.
5. ClickUpdate.
6. Do one of the following based on your network configuration:
• Modify the IP address of the legacy DNS server so that it becomes a secondary DNS server to BIG-IP GTM. Ensure that the IP address of the DNS server does not conflict with the self IP address that you added to the BIG-IP GTM server object.
Note: If you are using BIND servers, and you are unfamiliar with how to change a DNS server from
a primary to a secondary, refer to the fifth edition of DNS and BIND, available from O’Reilly Media.
• Remove the legacy DNS server from your network.
BIG-IP GTM is now the primary authoritative name server for the zone. The servers for the zone do not need to be updated, because the IP address of the legacy DNS server was assigned to BIG-IP GTM.
Creating listeners to alert GTM to DNS traffic destined for the system
To alert the BIG-IP®GTM™system to DNS traffic (previously handled by the DNS server), create two listeners: one that uses the UDP protocol, and one that uses the TCP protocol.
Note: DNS zone transfers use TCP port53. If you do not configure a listener for TCP the client might receive the error:connection refused or TCP RSTs.
1. On the Main tab, clickGlobal Traffic>Listeners. The Listeners List screen opens.
2. ClickCreate.
The new Listeners screen opens.
3. In theDestinationfield, type the IP address previously used by the legacy DNS server.
4. From theVLAN Trafficlist, selectAll VLANs.
5. From theProtocollist, selectUDP.
26
6. ClickFinished.
Create another listener with the same IP address, but selectTCPfrom theProtocollist.
Creating a wide IP
Ensure that at least one load balancing pool exists in the configuration before you start creating a wide IP. Create a wide IP to map a FQDN to one or more pools of virtual servers that host the content of the domain.
1. On the Main tab, clickGlobal Traffic>Wide IPs. The Wide IPs List screen opens.
2. ClickCreate.
The New Wide IP screen opens.
3. In theNamefield, type a name for the wide IP.
Tip: You can use two different wildcard characters in the wide IP name: asterisk (*) to represent several
characters and question mark (?) to represent a single character. This reduces the number of aliases you have to add to the configuration.
4. From thePoollist, select the pools that this wide IP uses for load balancing.
The system evaluates the pools based on the wide IP load balancing method configured. a) From thePoollist, select a pool.
A pool can belong to more than one wide IP. b) ClickAdd.
5. ClickFinished.
Implementation result
BIG-IP®GTM™replaces the legacy DNS server as the primary authoritative nameserver for the zone. BIG-IP GTM handles all incoming DNS traffic, whether destined for a wide IP or handled by the BIND instance on the system.
27 BIG-IP® Global Traffic Manager™: Implementations
Chapter
4
Load Balancing Non-Wide IP DNS Traffic to a Pool of DNS
Servers
• Overview: Screening and forwarding non-wide IP traffic to a pool of DNS servers • Task summary
Overview: Screening and forwarding non-wide IP traffic to a pool of DNS
servers
BIG-IP®Global Traffic Manager™(GTM™) can function as a traffic screener in front of a pool of DNS servers. In this situation, BIG-IP GTM checks incoming DNS queries and if the query is for a wide IP, resolves the query. Otherwise, BIG-IP GTM forwards the DNS query to one of the servers in a pool of DNS servers, and that server handles the query.
Figure 3: Traffic flow when BIG-IP GTM screens traffic to a pool of DNS servers
About listeners
Alisteneris a specialized virtual server that uses port 53 and to which you assign a specific IP address. When a DNS name resolution request is sent to the IP address of a listener, BIG-IP GTM either handles the request locally or forwards the request to the appropriate resource.
Task summary
Perform these tasks to screen non-wide IP traffic and forward the traffic to a pool of DNS servers. Creating a pool of local DNS servers
Creating a listener that alerts GTM to DNS queries for a pool of DNS servers
30
Creating a pool of local DNS servers
Ensure that at least one custom DNS monitor exists on the BIG-IP®system. Gather the IP addresses of the DNS servers that you want to include in a pool to which the BIG-IP®system load balances DNS traffic. Create a pool of local DNS servers when you want to load balance DNS requests to back end DNS servers.
1. On the Main tab, clickLocal Traffic>Pools. The Pool List screen opens.
2. ClickCreate.
The New Pool screen opens.
3. In theNamefield, type a unique name for the pool.
4. For theHealth Monitorssetting, from theAvailablelist, select the custom DNS monitor you created, and click<<to move the monitor to theActivelist.
5. Using theNew Memberssetting, add each resource that you want to include in the pool: a) Either type an IP address in theAddressfield, or select a node address from theNode List. b) Type a port number in theService Portfield, or select a service name from the list. c) To specify a priority group, type a priority number in thePriorityfield.
d) ClickAdd.
6. ClickFinished.
Creating a listener that alerts GTM to DNS queries for a pool of DNS servers
Configure a listener that alerts BIG-IP®GTM™to DNS queries destined for DNS servers that are members of a pool.
1. Log on to the command-line interface of BIG-IP GTM.
2. Typetmsh, to access the Traffic Management Shell.
3. Run this command sequence to create a listener:create /gtm listener <name of listener> address <IP address on which you want the listener to alert GTM to DNS traffic> ip-protocol udp pool <name of pool> translate-address enabled
The system creates a listener with the specified name and IP address that alerts BIG-IP GTM to queries destined for the members of the specified pool.
4. Run this command sequence to save the listener:save /sys config
5. Run this command sequence to display the listener:list /gtm listener The system displays the new listener configuration.
Implementation result
You now have an implementation in which BIG-IP®GTM™receives DNS queries, handles wide IP requests, and forwards all other DNS queries to members of the pool of DNS servers.
31 BIG-IP® Global Traffic Manager™: Implementations
Chapter
5
Delegating DNS Traffic to Wide IPs
• Overview: Delegating DNS traffic to wide IPs • Task summary
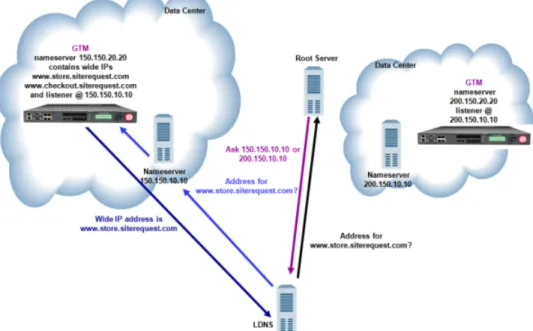
Overview: Delegating DNS traffic to wide IPs
BIG-IP®Global Traffic Manager™(GTM™) resolves DNS queries that match a wide IP name. BIG-IP GTM can work in conjunction with an existing DNS server on your network. In this situation, you configure the DNS server to delegate wide IP-related requests to BIG-IP GTM for name resolution.
Figure 4: Traffic flow when DNS server delegates traffic to BIG-IP GTM
This implementation focuses on the fictional company SiteRequest that recently purchased BIG-IP GTM to help resolve queries for two web-based applications:store.siterequest.comand
checkout.siterequest.com. These applications are delegated zones ofwww.siterequest.com. Currently, a DNS server manageswww.siterequest.com.
SiteRequest administrators have already configured BIG-IP GTM with two wide IPs,
www.store.siterequest.comandwww.checkout.siterequest.com. These wide IPs correspond to the two web applications.
About listeners
Alisteneris a specialized virtual server that uses port 53 and to which you assign a specific IP address. When a DNS name resolution request is sent to the IP address of a listener, BIG-IP GTM either handles the request locally or forwards the request to the appropriate resource.
Task summary
Perform these tasks to delegate DNS traffic to wide IPs. Creating a delegated zone on a local DNS server Creating a listener to handle traffic for wide IPs
34
Creating a delegated zone on a local DNS server
Determine which DNS servers will delegate wide IP-related requests to BIG-IP®GTM™.
If you are using BIND servers and you are unfamiliar with how to modify the files on these servers, consider reviewing the fifth edition ofDNS and BIND, available from O’Reilly Media.
In order for BIG-IP GTM to manage the web applications ofstore.siterequest.comand checkout.siterequest.com, you must create a delegated zone on the DNS server that manages www.wip.siterequest.com. Perform the following steps on the selected DNS server.
1. Create anaddress record(A record) that defines the domain name and IP address of each BIG-IP GTM in your network.
2. Create anameserver record(NS record) that defines the delegated zone for which BIG-IP GTM is responsible.
3. Createcanonical namerecords (CNAME records) to forward requests forstore.siterequest.com andcheckout.siterequest.comto the wide IPsstore.siterequest.comand
checkout.siterequest.com, respectively.
A delegated zone forstore.siterequest.comandcheckout.siterequest.comexists on each DNS server on which you performed this procedure.
Creating a listener to handle traffic for wide IPs
Determine the self IP address of BIG-IP GTM.Create a listener on BIG-IP®GTM™that identifies the wide IP traffic for which BIG-IP®GTM™is responsible.
1. On the Main tab, clickGlobal Traffic>Listeners. The Listeners List screen opens.
2. ClickCreate.
The new Listeners screen opens.
3. In theDestinationfield, type the IP address on which BIG-IP GTM listens for network traffic. The destination is a self IP address on BIG-IP GTM.
4. From theVLAN Trafficlist, selectAll VLANs.
5. From theProtocollist, select eitherUDPorTCP.
6. ClickFinished.
Implementation result
You now have an implementation of BIG-IP®GTM™in which the DNS server manages DNS traffic unless the query is forstore.sitrequest.comorcheckout.siterequest.com. When the DNS server receives these queries, it delegates them to BIG-IP GTM, which then load balances the queries to the appropriate wide IPs.
35 BIG-IP® Global Traffic Manager™: Implementations
Chapter
6
Integrating BIG-IP GTM with Other BIG-IP Systems
• Overview: Integrating GTM with older BIG-IP systems on a network
• Task summary • Implementation result
Overview: Integrating GTM with older BIG-IP systems on a network
You can add BIG-IP®Global Traffic Manager™(GTM™) systems to a network in which BIG-IP®Local Traffic Manager™(LTM®) systems are already present. This expands your load balancing and traffic management capabilities beyond the local area network. For this implementation to be successful, you must authorize communications between the systems.
Note: The BIG-IP GTM systems in a synchronization group, and the BIG-IP LTM and BIG-IP Link
Controller™systems that are configured to communicate with the systems in the synchronization group must have TCP port 4353 open through the firewall between the systems. The BIG-IP systems connect and communicate through this port.
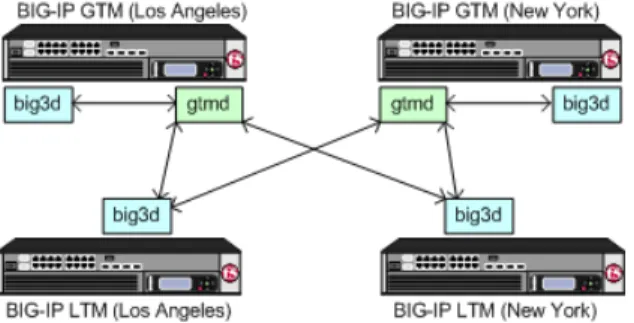
About iQuery and communications between BIG-IP systems
Thegtmdagent on BIG-IP®Global Traffic Manager™(GTM™) uses the iQuery®protocol to communicate with the localbig3dagent, and thebig3dagents installed on other BIG-IP systems. Thegtmdagent monitors both the availability of the BIG-IP systems, and the integrity of the network paths between the systems that host a domain and the local DNS servers that attempt to connect to that domain.
Figure 5: Communications between big3d and gtmd agents using iQuery
Task summary
To authorize communications between BIG-IP®systems, perform the following tasks on the BIG-IP GTM™ that you are adding to the network.
Defining a data center
Defining BIG-IP GTM systems Defining BIG-IP LTM systems Running the big3d_install script
Defining a data center
Create a data center to contain the servers that reside on a subnet of your network.
1. On the Main tab, clickGlobal Traffic>Data Centers.
38
The Data Center List screen opens.
2. ClickCreate.
The New Data Center screen opens.
3. Type a name for the data center.
Important: The data center name is limited to 63 characters.
4. In theLocationfield, type the geographic location of the data center.
5. In theContactfield, type the name of either the administrator or the department that manages the data center.
6. From theStatelist, selectEnabled.
7. ClickFinished.
You can now create server objects and assign them to this data center. Repeat this procedure to create additional data centers.
Defining BIG-IP GTM systems
Ensure that at least one data center exists in the configuration before you start creating a server. Create a server object for BIG-IP®GTM™.
1. On the Main tab, clickGlobal Traffic>Servers. The Server List screen opens.
2. ClickCreate.
The New Server screen opens.
3. In theNamefield, type a name for the server.
Important: Server names are limited to 63 characters.
4. From theProductlist, selectBIG-IP System (Single).
The server type determines the metrics that the system can collect from the server.
5. In the Address List area, add the IP addresses of the server.
You can add more than one IP address, depending on how the server interacts with the rest of your network.
Important: You must use a self IP address for a BIG-IP system; you cannot use the management IP
address.
6. From theData Centerlist, select the data center where the server resides.
7. In the Health Monitors area, assign thebigipmonitor to the server by moving it from theAvailablelist to theSelectedlist.
8. From theVirtual Server Discoverylist, select how you want virtual servers to be added to the system.
Description Option
The system does not use the discovery feature to automatically add virtual servers. This is the default value. Use this option for a standalone BIG-IP GTM or for a
Disabled
BIG-IP GTM/LTM combo system when you plan to manually add virtual servers to the system.
39 BIG-IP® Global Traffic Manager™: Implementations
Description Option
The system uses the discovery feature to automatically add virtual servers. Use this option for a BIG-IP GTM/LTM combo system when you want BIG-IP GTM to discover BIG-IP LTM virtual servers.
Enabled
The system uses the discovery feature to automatically add virtual servers and does not delete any virtual servers that already exist. Use this option for a BIG-IP
Enabled (No Delete)
GTM/LTM combo system when you want BIG-IP GTM to discover BIG-IP LTM virtual servers.
9. From theLink Discoverylist, select how you want links to be added to the system.
Description Option
The system does not use the discovery feature to automatically add links. This is the default value. Use this option for a standalone BIG-IP GTM or for a BIG-IP GTM/LTM combo system when you plan to manually add links to the system.
Disabled
The system uses the discovery feature to automatically add links. Use this option for a BIG-IP GTM/LTM combo system when you want BIG-IP GTM to discover links.
Enabled
The system uses the discovery feature to automatically add links and does not delete any links that already exist. Use this option for a BIG-IP GTM/LTM combo system when you want BIG-IP GTM to discover links.
Enabled (No Delete)
10.ClickCreate.
The Server List screen opens displaying the new server in the list.
Defining BIG-IP LTM systems
On BIG-IP®GTM™, define servers that represent the BIG-IP LTM®systems in your network.
1. On the Main tab, clickGlobal Traffic>Servers. The Server List screen opens.
2. ClickCreate.
The New Server screen opens.
3. In theNamefield, type a name for the server.
Important: Server names are limited to 63 characters.
4. From theProductlist, select eitherBIG-IP System (Single)orBIG-IP System (Redundant). The server type determines the metrics that the system can collect from the server.
5. In the Address List area, add the IP addresses of the server.
You can add more than one IP address, depending on how the server interacts with the rest of your network.
Important: You must use a self IP address for a BIG-IP system; you cannot use the management IP
address.
6. From theData Centerlist, select the data center where the server resides.
7. In the Health Monitors area, assign thebigipmonitor to the server by moving it from theAvailablelist to theSelectedlist.
40
8. From theVirtual Server Discoverylist, select how you want virtual servers to be added to the system.
Description Option
The system does not use the discovery feature to automatically add virtual servers. This is the default value. Use this option for a standalone BIG-IP GTM or for a
Disabled
BIG-IP GTM/LTM combo system when you plan to manually add virtual servers to the system.
The system uses the discovery feature to automatically add virtual servers. Use this option for a BIG-IP GTM/LTM combo system when you want BIG-IP GTM to discover BIG-IP LTM virtual servers.
Enabled
The system uses the discovery feature to automatically add virtual servers and does not delete any virtual servers that already exist. Use this option for a BIG-IP
Enabled (No Delete)
GTM/LTM combo system when you want BIG-IP GTM to discover BIG-IP LTM virtual servers.
9. From theLink Discoverylist, select how you want links to be added to the system.
Description Option
The system does not use the discovery feature to automatically add links. This is the default value. Use this option for a standalone BIG-IP GTM or for a BIG-IP GTM/LTM combo system when you plan to manually add links to the system.
Disabled
The system uses the discovery feature to automatically add links. Use this option for a BIG-IP GTM/LTM combo system when you want BIG-IP GTM to discover links.
Enabled
The system uses the discovery feature to automatically add links and does not delete any links that already exist. Use this option for a BIG-IP GTM/LTM combo system when you want BIG-IP GTM to discover links.
Enabled (No Delete)
10.ClickCreate.
The Server List screen opens displaying the new server in the list.
Running the big3d_install script
Determine the self IP addresses for the existing BIG-IP®systems that you want to upgrade with the latest big3dagent.
Ensure that port 22 is open.
Run thebig3d_installscript to upgrade thebig3dagents on the BIG-IP systems and instructs these systems to authenticate with the other systems through the exchange of SSL certificates. For additional information about running the script, see SOL8195 on AskF5.com (www.askf5.com).
You must perform this task from the command-line interface.
Important: Run thebig3d_installscript on BIG-IP GTM™only for target systems that are running the same or an older version of BIG-IP software.
1. Log on to the command-line interface of the new BIG-IP GTM.
2. At the BASH prompt, typetmsh.
3. At the tmsh prompt, typerun gtm big3d_install
<IP_addresses_of_target_BIG-IP_systems>, and press Enter. The script instructs BIG-IP GTM to connect to each specified BIG-IP system.
41 BIG-IP® Global Traffic Manager™: Implementations
4. If prompted, supply the root password for each system.
The SSL certificates are exchanged, authorizing communications between the systems. Thebig3dagent on each system is upgraded to the same version as is installed on BIG-IP GTM from which you ran the script.
Implementation result
You now have an implementation in which the BIG-IP®systems can communicate with each other. BIG-IP GTM™can now use the other BIG-IP systems when load balancing DNS requests, and can acquire statistics and status information for the virtual servers these systems manage.
42
Chapter
7
Integrating BIG-IP LTM with BIG-IP GTM Systems
• Overview: Integrating LTM systems with GTM systems on a network
• Task summary • Implementation result
Overview: Integrating LTM systems with GTM systems on a network
You can add BIG-IP®Local Traffic Manager™(LTM™) systems to a network in which BIG-IP®Global Traffic Manager™(GTM®) systems are already present. This expands your load balancing and traffic management capabilities to include the local area network. For this implementation to be successful, you must authorize communications between the LTM and GTM systems. When the LTM and GTM systems use the same version of thebig3d agent, you run thebigip_addutility to authorize communications between the systems.
Note: The BIG-IP GTM and BIG-IP LTM systems must have TCP port 4353 open through the firewall
between the systems. The BIG-IP systems connect and communicate through this port.
Task summary
To authorize communications between BIG-IP®GTM and BIG-IP LTM systems, perform the following tasks on the BIG-IP GTM™.
Integrating BIG-IP LTM with BIG-IP GTM Systems Defining a data center
Defining BIG-IP GTM systems Defining BIG-IP LTM systems Running the bigip_add utility
Defining a data center
Create a data center to contain the servers that reside on a subnet of your network.
1. On the Main tab, clickGlobal Traffic>Data Centers. The Data Center List screen opens.
2. ClickCreate.
The New Data Center screen opens.
3. Type a name for the data center.
Important: The data center name is limited to 63 characters.
4. In theLocationfield, type the geographic location of the data center.
5. In theContactfield, type the name of either the administrator or the department that manages the data center.
6. From theStatelist, selectEnabled.
7. ClickFinished.
You can now create server objects and assign them to this data center. Repeat this procedure to create additional data centers.
44
Defining BIG-IP GTM systems
Ensure that at least one data center exists in the configuration before you start creating a server. Create a server object for BIG-IP®GTM™.
1. On the Main tab, clickGlobal Traffic>Servers. The Server List screen opens.
2. ClickCreate.
The New Server screen opens.
3. In theNamefield, type a name for the server.
Important: Server names are limited to 63 characters.
4. From theProductlist, selectBIG-IP System (Single).
The server type determines the metrics that the system can collect from the server.
5. In the Address List area, add the IP addresses of the server.
You can add more than one IP address, depending on how the server interacts with the rest of your network.
Important: You must use a self IP address for a BIG-IP system; you cannot use the management IP
address.
6. From theData Centerlist, select the data center where the server resides.
7. In the Health Monitors area, assign thebigipmonitor to the server by moving it from theAvailablelist to theSelectedlist.
8. From theVirtual Server Discoverylist, select how you want virtual servers to be added to the system.
Description Option
The system does not use the discovery feature to automatically add virtual servers. This is the default value. Use this option for a standalone BIG-IP GTM or for a
Disabled
BIG-IP GTM/LTM combo system when you plan to manually add virtual servers to the system.
The system uses the discovery feature to automatically add virtual servers. Use this option for a BIG-IP GTM/LTM combo system when you want BIG-IP GTM to discover BIG-IP LTM virtual servers.
Enabled
The system uses the discovery feature to automatically add virtual servers and does not delete any virtual servers that already exist. Use this option for a BIG-IP
Enabled (No Delete)
GTM/LTM combo system when you want BIG-IP GTM to discover BIG-IP LTM virtual servers.
9. From theLink Discoverylist, select how you want links to be added to the system.
Description Option
The system does not use the discovery feature to automatically add links. This is the default value. Use this option for a standalone BIG-IP GTM or for a BIG-IP GTM/LTM combo system when you plan to manually add links to the system.
Disabled
The system uses the discovery feature to automatically add links. Use this option for a BIG-IP GTM/LTM combo system when you want BIG-IP GTM to discover links.
Enabled
45 BIG-IP® Global Traffic Manager™: Implementations
Description Option
The system uses the discovery feature to automatically add links and does not delete any links that already exist. Use this option for a BIG-IP GTM/LTM combo system when you want BIG-IP GTM to discover links.
Enabled (No Delete)
10.ClickCreate.
The Server List screen opens displaying the new server in the list.
Defining BIG-IP LTM systems
On BIG-IP®GTM™, define servers that represent the BIG-IP LTM®systems in your network.
1. On the Main tab, clickGlobal Traffic>Servers. The Server List screen opens.
2. ClickCreate.
The New Server screen opens.
3. In theNamefield, type a name for the server.
Important: Server names are limited to 63 characters.
4. From theProductlist, select eitherBIG-IP System (Single)orBIG-IP System (Redundant). The server type determines the metrics that the system can collect from the server.
5. In the Address List area, add the IP addresses of the server.
You can add more than one IP address, depending on how the server interacts with the rest of your network.
Important: You must use a self IP address for a BIG-IP system; you cannot use the management IP
address.
6. From theData Centerlist, select the data center where the server resides.
7. In the Health Monitors area, assign thebigipmonitor to the server by moving it from theAvailablelist to theSelectedlist.
8. From theVirtual Server Discoverylist, select how you want virtual servers to be added to the system.
Description Option
The system does not use the discovery feature to automatically add virtual servers. This is the default value. Use this option for a standalone BIG-IP GTM or for a
Disabled
BIG-IP GTM/LTM combo system when you plan to manually add virtual servers to the system.
The system uses the discovery feature to automatically add virtual servers. Use this option for a BIG-IP GTM/LTM combo system when you want BIG-IP GTM to discover BIG-IP LTM virtual servers.
Enabled
The system uses the discovery feature to automatically add virtual servers and does not delete any virtual servers that already exist. Use this option for a BIG-IP
Enabled (No Delete)
GTM/LTM combo system when you want BIG-IP GTM to discover BIG-IP LTM virtual servers.
9. From theLink Discoverylist, select how you want links to be added to the system.
46
Description Option
The system does not use the discovery feature to automatically add links. This is the default value. Use this option for a standalone BIG-IP GTM or for a BIG-IP GTM/LTM combo system when you plan to manually add links to the system.
Disabled
The system uses the discovery feature to automatically add links. Use this option for a BIG-IP GTM/LTM combo system when you want BIG-IP GTM to discover links.
Enabled
The system uses the discovery feature to automatically add links and does not delete any links that already exist. Use this option for a BIG-IP GTM/LTM combo system when you want BIG-IP GTM to discover links.
Enabled (No Delete)
10.ClickCreate.
The Server List screen opens displaying the new server in the list.
Running the bigip_add utility
Determine the self IP addresses of the BIG-IP LTM®systems that you want to communicate with BIG-IP GTM™.
Run thebigip_addutility on BIG-IP GTM. This utility exchanges SSL certificates so that each system is authorized to communicate with the other.
You must perform this task from the command-line interface.
1. On BIG-IP GTM, log on to the command-line interface.
2. At the command prompt, type:bigip_add <IP_addresses_of_BIG-IP_LTM_systems>, and press Enter.
The utility exchanges SSL certificates so that each system is authorized to communicate with the other. The specified BIG-IP®systems can now communicate with BIG-IP GTM.
Implementation result
You now have an implementation in which the BIG-IP®systems can communicate with each other. BIG-IP GTM™can now use the other BIG-IP systems when load balancing DNS requests, and can acquire statistics and status information for the virtual servers these systems manage.
47 BIG-IP® Global Traffic Manager™: Implementations
Chapter
8
Ensuring Correct Synchronization When Adding GTM to a
Network
• Overview: Ensuring correct synchronization when adding GTM to a network
• Task summary • Implementation result
Overview: Ensuring correct synchronization when adding GTM to a network
You can configure BIG-IP®Global Traffic Manager™(GTM)™systems in collections called synchronization groups. All BIG-IP GTM systems in the same synchronization group have the same rank, exchange heartbeat messages, and share probing responsibility.
Figure 6: BIG-IP GTM systems in a synchronization group
About configuration synchronization
Configuration synchronizationensures the rapid distribution of BIG-IP®Global Traffic Manager™(GTM) settings to other BIG-IP systems that belong to the same synchronization group. Asynchronization group
might contain both BIG-IP GTM and BIG-IP®Link Controller™systems. Configuration synchronization occurs in the following manner:
• When a change is made to a BIG-IP GTM configuration, the system broadcasts the change to the other systems in the configuration synchronization group.
• When a configuration synchronization is in progress, the process must either complete or timeout, before another configuration synchronization can occur.
About adding an additional BIG-IP GTM to your network
BIG-IP GTM systems exchange heartbeat messages when different software versions are installed on the systems. However, configuration synchronization cannot occur when different software versions are installed on the systems. Therefore, when you upgrade BIG-IP GTM, the configuration of the upgraded system does not automatically synchronize with the configuration of the systems in the synchronization group that have an older software version.
Task summary
When adding an additional BIG-IP®GTM™system to your network, perform the following tasks. Defining an NTP server on the existing GTM
Enabling synchronization on the existing GTM
50