Symantec Mail Security for
SMTP
Symantec Mail Security for SMTP
Administration
Guide
The software described in this book is furnished under a license agreement and may be used only in accordance with the terms of the agreement.
April 27, 2006
Copyright notice
Copyright © 1998-2006 Symantec Corporation. All rights reserved. Symantec, the Symantec logo, Brightmail, LiveUpdate, SESA, and Norton AntiVirus are U.S. registered trademarks or registered trademarks of Symantec Corporation or its affiliates in other countries. Other names may be trademarks of their respective owners.
Symantec Mail Security for SMTP 5.0 is protected under U.S. Patent Nos. 6,052,709; 5,999,932; and 6,654,787.
The product described in this document is distributed under licenses restricting its use, copying, distribution, and decompilation/reverse engineering. No part of this document may be reproduced in any form by any means without prior written authorization of Symantec Corporation and its licensors, if any.
THE DOCUMENTATION IS PROVIDED “AS IS” AND ALL EXPRESS OR IMPLIED CONDITIONS, REPRESENTATIONS AND WARRANTIES, INCLUDING ANY IMPLIED WARRANTY OF MERCHANTABILITY, FITNESS FOR A PARTICULAR PURPOSE OR NON-INFRINGEMENT, ARE DISCLAIMED, EXCEPT TO THE EXTENT THAT SUCH
DISCLAIMERS ARE HELD TO BE LEGALLY INVALID. SYMANTEC CORPORATION SHALL NOT BE LIABLE FOR INCIDENTAL OR CONSEQUENTIAL DAMAGES IN CONNECTION WITH THE FURNISHING PERFORMANCE, OR USE OF THIS DOCUMENTATION. THE INFORMATION CONTAINED IN THIS DOCUMENTATION IS SUBJECT TO CHANGE WITHOUT NOTICE.
The Licensed Software and Documentation are deemed to be “commercial computer software” and “commercial computer software documentation” as defined in FAR Sections 12.212 and DFARS Section 227.7202.
Symantec Corporation 20330 Stevens Creek Blvd. Cupertino, CA 95014 http://www.symantec.com
Printed in the United States of America. 10 9 8 7 6 5 4 3 2 1
Technical support
As part of Symantec Security Response, the Symantec global Technical Support group maintains support centers throughout the world. The Technical Support group’s primary role is to respond to specific questions on product feature/ function, installation, and configuration, as well as to author content for our Web-accessible Knowledge Base. The Technical Support group works
collaboratively with the other functional areas within Symantec to answer your questions in a timely fashion. For example, the Technical Support group works with Product Engineering as well as Symantec Security Response to provide Alerting Services and Virus Definition Updates for virus outbreaks and security alerts.
Symantec technical support offerings include:
■ A range of support options that give you the flexibility to select the right amount of service for any size organization
■ Telephone and Web support components that provide rapid response and up-to-the-minute information
■ Upgrade insurance that delivers automatic software upgrade protection
■ Content Updates for virus definitions and security signatures that ensure the highest level of protection
■ Global support from Symantec Security Response experts, which is available 24 hours a day, 7 days a week worldwide in a variety of languages for those customers enrolled in the Platinum Support Program
■ Advanced features, such as the Symantec Alerting Service and Technical Account Manager role, offer enhanced response and proactive security support
Please visit our Web site for current information on Support Programs. The specific features available may vary based on the level of support purchased and the specific product that you are using.
To receive the latest product information by email, go to:
http://www.symantec.com/techsupp/bulletin/enterprise.html
and join our support bulletin mailing list.
Licensing and registration
If the product that you are implementing requires registration and/or a license key, the fastest and easiest way to register your service is to access the
Symantec licensing and registration site at www.symantec.com/certificate. Alternatively, you may go to www.symantec.com/techsupp/ent/enterprise.html, select the product that you wish to register, and from the Product Home Page, select the Licensing and Registration link.
Contacting Technical Support
Customers with a current support agreement may contact the Technical Support group via phone or online at http://www.symantec.com/techsupp/ enterprise/ .
Customers with Platinum support agreements may contact Platinum Technical Support via the Platinum Web site at http://www-secure.symantec.com/ platinum/ .
When contacting the Technical Support group, please have the following:
■ Product release level
■ Hardware information
■ Available memory, disk space, NIC information
■ Operating system
■ Version and patch level
■ Network topology
■ Router, gateway, and IP address information
■ Problem description
■ Error messages/log files
■ Troubleshooting performed prior to contacting Symantec ■ Recent software configuration changes and/or network changes
Customer Service
To contact Enterprise Customer Service online, go to www.symantec.com, select the appropriate Global Site for your country, then choose Service and Support. Customer Service is available to assist with the following types of issues:
■ Questions regarding product licensing or serialization
■ Product registration updates such as address or name changes
■ General product information (features, language availability, local dealers)
■ Latest information on product updates and upgrades
■ Information on upgrade insurance and maintenance contracts
■ Information on Symantec Value License Program
■ Advice on Symantec's technical support options
■ Nontechnical presales questions
Contents
Chapter 1
About Symantec Mail Security for SMTP
Key features ... 11
Functional overview ... 12
Architecture ... 13
Where to get more information ... 14
Chapter 2
Configuring system settings
Configuring certificate settings ... 17Configuring host (Scanner) settings ... 20
Working with the Services page ... 20
HTTP proxies ... 21
SMTP Scanner settings ... 22
Advanced SMTP settings ... 25
Configuring internal mail hosts ... 28
Testing Scanners ... 28
Configuring LDAP settings ... 29
Replicating data to Scanners ... 37
Starting and stopping replication ... 38
Replication status information ... 38
Troubleshooting replication ... 39
Configuring Control Center settings ... 40
Control Center administration ... 41
Control Center certificate ... 42
Configuring, enabling and scheduling Scanner replication ... 42
SMTP host ... 44
System locale ... 44
Chapter 3
Configuring email settings
Configuring address masquerading ... 45Importing masqueraded entries ... 46
Configuring aliases ... 47
Importing aliases ... 49
Configuring local domains ... 50
6 Contents
Understanding spam settings ... 51
Configuring suspected spam ... 52
Choosing language identification type ... 52
Software acceleration ... 53
Configuring spam settings ... 53
Configuring virus settings ... 54
Configuring LiveUpdate ... 54
Excluding files from virus scanning ... 55
Configuring general settings ... 56
Configuring invalid recipient handling ... 56
Configuring scanning settings ... 57
Configuring container settings ... 57
Configuring content filtering settings ... 58
Chapter 4
Configuring email filtering
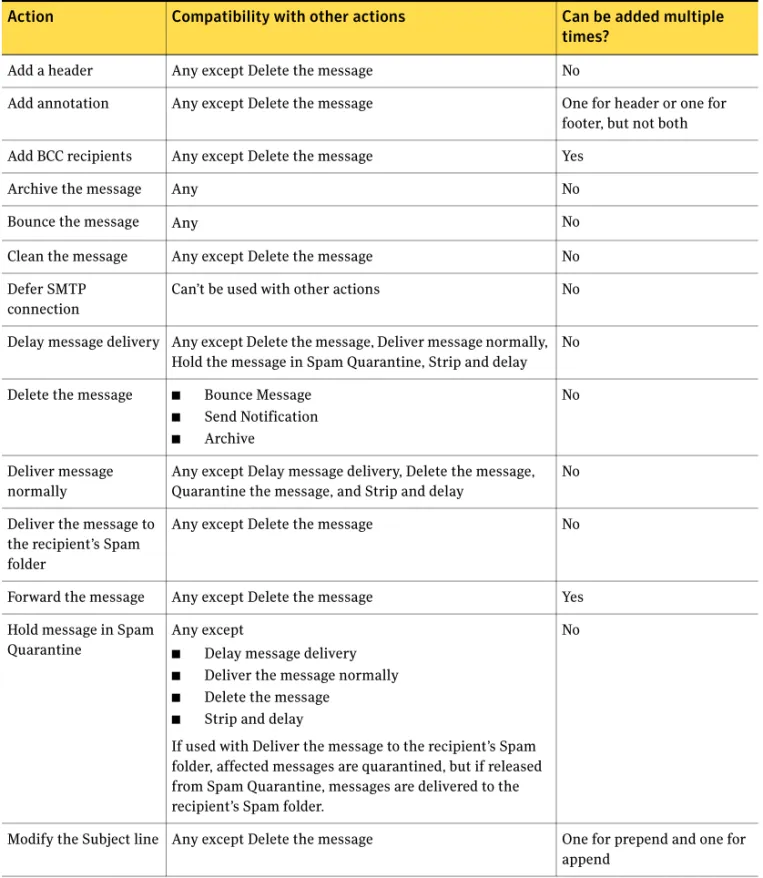
About email filtering ... 61Notes on filtering actions ... 66
Multiple actions ... 67
Multiple policies ... 69
Security risks ... 70
About precedence ... 71
Creating groups and adding members ... 72
Assigning filter policies to a group ... 75
Selecting virus policies for a group ... 75
Selecting spam policies for a group ... 77
Selecting compliance policies for a group ... 78
Enabling and disabling end user settings ... 79
Allowing or blocking email based on language ... 80
Managing Group Policies ... 81
Creating virus, spam, and compliance filter policies ... 82
Creating virus policies ... 83
Creating spam policies ... 85
Creating compliance policies ... 86
Managing Email Firewall policies ... 93
Configuring attack recognition ... 94
Configuring sender groups ... 95
Configuring Sender Authentication ...105
Managing policy resources ...106
Annotating messages ...106
Archiving messages ...109
Configuring attachment lists ...110
Configuring dictionaries ...112
7 Contents
Chapter 5
Working with Spam Quarantine
About Spam Quarantine ...117
Delivering messages to Spam Quarantine ...117
Working with messages in Spam Quarantine for administrators ...118
Accessing Spam Quarantine ...118
Checking for new Spam Quarantine messages ...118
Administrator message list page ...118
Administrator message details page ...121
Searching messages ...123
Configuring Spam Quarantine ...126
Delivering messages to Spam Quarantine from the Scanner ...126
Configuring Spam Quarantine port for incoming email ...127
Configuring Spam Quarantine for administrator-only access ...128
Configuring the Delete Unresolved Email setting ...128
Configuring the login help ...128
Configuring recipients for misidentified messages ...129
Configuring the user and distribution list notification digests ...130
Configuring the Spam Quarantine Expunger ...135
Specifying Spam Quarantine message and size thresholds ...136
Troubleshooting Spam Quarantine ...137
Chapter 6
Working with Suspect Virus Quarantine
About Suspect Virus Quarantine ...143Accessing Suspect Virus Quarantine ...143
Checking for new Suspect Virus Quarantine messages ...144
Suspect Virus Quarantine messages page ...144
Searching messages ...146
Configuring Suspect Virus Quarantine ...148
Configuring Suspect Virus Quarantine port for incoming email ...148
Configuring the size for Suspect Virus Quarantine ...148
Chapter 7
Testing Symantec Mail Security for SMTP
Verifying normal delivery ...151Verifying spam filtering ...151
Testing antivirus filtering ...152
Verifying filtering to the Spam Quarantine ...153
Chapter 8
Configuring alerts and logs
Configuring alerts ...155Viewing logs ...157
8 Contents
Chapter 9
Working with reports
About reports ...163
Choosing a report ...164
About charts and tables ...172
Selecting report data to track ...172
Setting the retention period for report data ...173
Running reports ...173
Saving and editing Favorite Reports ...174
Running and deleting favorite reports ...175
Troubleshooting report generation ...175
No data available for the report type specified ...175
Sender HELO domain or IP connection shows gateway information ...176
Reports presented in local time of Control Center ...176
By default, data are saved for one week ...176
Processed message count recorded per message, not per recipient ...176
Recipient count equals message count ...177
Deferred or rejected messages are not counted as received ...177
Reports limited to 1,000 rows ...177
Printing, saving, and emailing reports ...177
Scheduling reports to be emailed ...178
Chapter 10
Administering the system
Getting status information ...181Overview of system information ...182
Message status ...182 Host status ...186 LDAP synchronization ...187 Log details ...188 Scanner replication ...188 Version Information ...188 Managing Scanners ...188 Editing Scanners ...189
Enabling and disabling Scanners ...189
Deleting Scanners ...190
Administering the system through the Control Center ...191
Managing system administrators ...191
9 Contents
Administering the Control Center ...193
Starting and stopping the Control Center ...193
Checking the Control Center error log ...194
Increasing the amount of information in BrightmailLog.log ...195
Starting and stopping UNIX and Windows services ...196
Starting and stopping Windows services ...196
Starting and stopping UNIX services ...198
Periodic system maintenance ...198
Backing up logs data ...198
Backing up the Spam and Virus Quarantine databases ...199
Maintaining adequate disk space ...200
Appendix A
Feature Cross-Reference
New features for all users ...202Changes for Symantec Mail Security for SMTP users ...203
New feature names ...204
Discontinued features ...204
Changes for Symantec Brightmail Antispam users ...205
About email filtering and message handling options ...206
Appendix B
Spam foldering and the Symantec Outlook Spam Plug-in
About foldering and the plug-in ...209Installing the Symantec Outlook Spam Plug-in ...210
Usage scenarios ...210
End user experience ...210
Software requirements ...212
Configuring automatic spam foldering ...217
Configuring the Symantec Spam Folder Agent for Exchange ...217
Configuring the Symantec Spam Folder Agent for Domino ...218
Enabling automatic spam foldering ...221
Enabling language identification ...222
Appendix C
Integrating Symantec Mail Security with Symantec
Security Information Manager
About Symantec Security Information Manager ...223Interpreting events in the Information Manager ...224
Configuring data sources ...225
Firewall events that are sent to the Information Manager ...226
Definition Update events that are sent to the Information Manager ...226
Message events that are sent to the Information Manager ...227
10 Contents
Appendix D
Editing antivirus notification messages
Modifying notification files ...231
Changing the notification file character set ...232
Editing messages in the notification file ...232
Notification file contents ...233
Glossary
Chapter
1
About Symantec Mail
Security for SMTP
This chapter includes the following topics:
■ Key features ■ Functional overview ■ Architecture
■ Where to get more information
Key features
Symantec Mail Security for SMTP offers enterprises an easy-to-deploy, comprehensive gateway-based email security solution through the following:
■ Antispam technology – Symantec’s state-of-the-art spam filters assess and classify email as it enters your site.
■ Antivirus technology – Virus definitions and engines protect your users from email-borne viruses.
■ Content Compliance – These features help administrators enforce corporate email policies, reduce legal liability, and ensure compliance with regulatory requirements.
■ Group policies and filter policies – An easy-to-use authoring tool lets administrators create powerful and flexible ad hoc filters for individuals and groups.
12 About Symantec Mail Security for SMTP Functional overview
Functional overview
You can deploy Symantec Mail Security for SMTP in different configurations to best suit the size of your network and your email processing needs.
Each Symantec Mail Security for SMTP host can be deployed in the following ways:
■ Scanner – Deployed as a Scanner, a Symantec Mail Security for SMTP host filters email. Your installation can have one or many Scanners. Symantec Mail Security for SMTP runs alongside your existing email or groupware server(s).
■ Control Center – Deployed as a Control Center, a Symantec Mail Security for SMTP host is a Web-based configuration and administration center. Use it to configure and manage email filtering, SMTP routing, system settings, and all other functions. Your enterprise-wide deployment of Symantec Mail Security for SMTP can have multiple Scanners but only one Control Center, from which you configure and monitor all the Scanner hosts.
The Control Center provides status for all Symantec Mail Security for SMTP hosts in your system, system logs, and extensive customizable reporting. Use it to configure both system-wide and host-specific details.
The Control Center provides the Setup Wizard, for initial configuration of all Symantec Mail Security for SMTP instances at your site, and also the Add Scanner Wizard, for adding new Scanners.
It also hosts the Spam and Suspect Virus Quarantines, for storage of spam and virus messages respectively. End users can access the Control Center to view their quarantined spam messages and set their preferences for language filtering and blocked and allowed senders. Alternatively, you can configure the Spam Quarantine for administrator-only access.
■ Scanner and Control Center – A single Symantec Mail Security for SMTP host performs both functions.
Note: Symantec Mail Security for SMTP provides neither mailbox access for end
users nor message storage; it is not intended for use as the only MTA in your email infrastructure.
Note: Symantec Mail Security for SMTP does not filter messages that don’t flow
through the SMTP gateway. For example, when two mailboxes reside on the same MS Exchange Server, or on different MS Exchange Servers within an Exchange organization, the messages will not pass through the Symantec Mail Security for SMTP filters.
13 About Symantec Mail Security for SMTP
Architecture
Architecture
Symantec Mail Security for SMTP processes a mail message as follows. For the sake of discussion, our sample message passes through the Filtering Engine to the Transformation Engine without being rejected.
■ The incoming connection arrives at the inbound MTA via TCP/IP.
■ The inbound MTA accepts the connection and moves the message to its inbound queue.
14 About Symantec Mail Security for SMTP Where to get more information
■ The Filtering Hub consults the LDAP SyncService directory to expand the message’s distribution list.
■ The Filtering Engine determines each recipient’s filtering policies.
■ The message is checked against Blocked/Allowed Senders Lists defined by administrators.
■ Virus and configurable heuristic filters determine whether the message is infected.
■ Content Compliance filters scan the message for restricted attachment types or keywords, as defined in configurable dictionaries.
■ Spam filters compare message elements with current filters published by Symantec Security Response to determine whether the message is spam. At this point, the message may also be checked against end-user defined Language settings.
■ The Transformation Engine performs actions per recipient based on filtering results and configurable Group Policies.
Where to get more information
In addition to this Administration Guide, your Symantec Mail Security for SMTP product comes with the following documentation:
■ Symantec Mail Security for SMTP Installation Guide
■ Symantec Mail Security for SMTP Planning Guide
■ Symantec Mail Security for SMTP Getting Started
Symantec Mail Security also includes a comprehensive help system that contains conceptual and procedural information.
You can visit the Symantec Web site for more information about your product. The following online resources are available:
Provides access to the technical support Knowledge Base, newsgroups, contact information, downloads, and mailing list subscriptions
www.symantec.com/ techsupp/ent/ enterprise.html
Provides information about registration, frequently asked questions, how to respond to error messages, and how to contact Symantec License Administration
www.symantec.com /licensing/els/help/en/ help.html
Provides product news and updates www.enterprisesecurity. symantec.com
15 About Symantec Mail Security for SMTP
Where to get more information
Provides access to the Virus Encyclopedia, which contains information about all known threats; information about hoaxes; and access to white papers about threats
www.symantec.com/ avcenter/global/index.html
16 About Symantec Mail Security for SMTP Where to get more information
Chapter
2
Configuring system
settings
System settings apply to the Control Center and to attached and enabled Scanners. This section explains the following:
■ Configuring certificate settings ■ Configuring host (Scanner) settings ■ Testing Scanners
■ Configuring LDAP settings ■ Replicating data to Scanners ■ Configuring Control Center settings
Configuring certificate settings
Manage your certificates using the Certificate Settings page. The two types of certificates are as follows:
■ MTA TLS certificate—This is the TLS certificate used by the MTAs in each Scanner. Every Scanner has separate MTAs for inbound messages, outbound messages, and message delivery. Assign this certificate from the Inbound Mail Settings and Outbound Mail Settings portions of the SMTP tab on the Settings > Hosts page.
■ User interface HTTPS certificate—This is the HTTPS certificate used by the Control Center for secure Web management. Assign this certificate from the Settings > Certificates page.
18 Configuring system settings Configuring certificate settings
You can add certificates to the certificate list in the following two ways:
■ Add a self-signed certificate by adding the certificate and filling out the requested information as presented to you at the time.
■ Add a Certification Authority Signed certificate by submitting a certificate request to a Certification Authority. When you receive the certificate back from the Certification Authority, you then import the certificate into the Control Center.
Manage certificates
Follow these steps to add either self-signed or Certification Authority Signed certificates and to assign certificates.
To add a self-signed certificate to the list
1 In the Control Center, click Settings > Certificates. 2 Click Add.
3 In the Certificate type drop-down list, choose Self-Signed Certificate. 4 Complete the information on the Add Certificate page.
5 Click Create.
To add a Certification Authority Signed certificate to the list 1 In the Control Center, click Settings > Certificates. 2 Click Add.
3 In the Certificate type drop-down list, choose Certificate Authority Signed. 4 Fill in the information on the Add Certificate page.
5 Click Request.
A new page is displayed, showing the certificate information in a block of text, designed for use by the Certification Authority.
6 Copy the block of text that appears and submit it to the Certification Authority.
Each Certification Authority has its own set of procedures for granting certificates. Consult your Certificate Authority for details.
7 When you receive the certificate file from the Certification Authority, place the file in an easily accessed location on the computer from which you are connecting to the Control Center.
19 Configuring system settings Configuring certificate settings
9 On the Import Certificate page, type the full path and filename or click Browse and choose the file.
10 Click Import.
To view or delete a certificate
1 In the Control Center, click Settings > Certificates.
2 Check the box next to the certificate to be viewed or deleted. 3 Click View to read the certificate.
4 Click Delete to remove the certificate. To assign an MTA TLS certificate
1 In the Control Center, click Settings > Hosts. 2 Select a host and click Edit.
3 Click the SMTP tab.
4 Check Accept TLS encryption as appropriate.
5 Choose the TLS certificate from the Certificate drop-down list for the inbound or outbound MTA.
6 Click Save.
To assign a user interface HTTPS certificate
1 In the Control Center, click Settings > Control Center.
2 Select a certificate from the User interface HTTPS certificate drop-down list.
20 Configuring system settings Configuring host (Scanner) settings
Configuring host (Scanner) settings
The following sections describe changes that can be made to individual hosts. Information is available on these topics:
■ Working with the Services page ■ HTTP proxies
■ SMTP Scanner settings
Working with the Services page
You can stop or start the following services on a Scanner.
■ Conduit
■ LiveUpdate
■ Filter Engine
■ MTA
Note: If you stop the filter-hub or the MTA service and wish to continue
receiving alerts, specify an operating MTA IP address in the settings for the Control Center.
In addition, you can configure individual Scanner replication and MTA settings that can help you take a Scanner offline on this page.
Work with the services page
Use the following procedures from the Services page to manage individual Scanner services, replication, and stop the flow of messages through a Scanner. To start and stop services
1 In the Control Center, click Settings > Hosts. 2 Check the Scanner to edit.
3 Click Edit.
4 Select the services to be started or stopped.
5 Click Stop to stop a running service or Start to start a stopped service. To enable or disable Scanner replication for a host
1 In the Control Center, click Settings > Hosts. 2 Check the Scanner to edit.
21 Configuring system settings Configuring host (Scanner) settings
3 Click Edit.
4 Using the Scanner Replication portion of the page, check Enable Scanner Replication for this host to enable Scanner replication. (Replication is enabled by default.)
5 Using the Scanner Replication portion of the page, uncheck Enable Scanner Replication for this host to disable Scanner replication. The Control Center will not update the directory for this Scanner when the box is not checked. 6 Click Save to store your changes.
To take a Scanner out of service
1 In the Control Center, click Settings > Hosts. 2 Check the Scanner to edit.
3 Click Edit.
4 On the MTA Operation portion of the page, check Do not accept incoming messages.
All messages in Scanner queues are processed as needed, but no new messages will be received.
5 Click Save to store your changes.
HTTP proxies
The Conduit and Symantec LiveUpdate run on each Scanner, and receive filter updates from Symantec. If you need to add proxy and/or other security settings to your server definition, use the steps below.
To change or add proxy information
1 In the Control Center, click Settings > Hosts. 2 Check the Scanner to edit.
3 Click Edit.
4 Click the Proxy tab. 5 Check Use proxy server.
6 Specify the proxy host name and port on this panel. In addition to this information, you can include a user name and password as needed. 7 Click Save to store your information.
22 Configuring system settings Configuring host (Scanner) settings
SMTP Scanner settings
A full complement of SMTP settings has been provided to help you define internal and external SMTP configurations for Scanners. Inbound SMTP settings determine how the inbound MTA processes inbound messages. Outbound SMTP settings determine how the outbound MTA processes outbound messages. If you set up inbound or outbound SMTP filtering rather than using Content Compliance filters, you can save resources because messages that do not meet the SMTP criteria will be rejected before content filtering begins. To modify SMTP settings for a Scanner
1 In the Control Center, click Settings > Hosts. 2 Check the Scanner to edit.
3 Click Edit. 4 Click SMTP.
5 As appropriate, complete the SMTP definition for the scanner. The following parameters are included:
Setting Description
Scanner Role Determines if the Scanner is used for Inbound mail filtering only,
Outbound mail filtering only, or Inbound and outbound mail filtering.
23 Configuring system settings Configuring host (Scanner) settings
Inbound Mail Settings*
Provides settings for inbound messages. In this area, you can provide the following information:
■ Inbound mail IP address— Location at which inbound messages will be received.
■ Inbound mail SMTP port—Port on which inbound mail is received, typically port 25.
■ Accept TLS encryption—Indicates if TLS encryption is accepted. Check the box to accept encryption. You must have a certificate defined for MTA TLS certificate in Settings > Certificates to accept TLS encryption.
■ Certificate—Specifies an available certificate for TLS encryption.
■ Accept inbound mail connections from all IP addresses— Indicates that all connections for inbound messages are accepted when checked. This is the default.
■ Accept inbound mail connections from only the following IP addresses and domains—Indicates that only the addresses or domain names entered in the checked IP Address/Domains
box are accepted.
If you specify one or more IP addresses, you must include the IP address of the Control Center so that Spam Quarantine and Suspect Virus Quarantine can release messages. After you add the first entry, the IP address of the Control Center is added automatically and selected. If you are using a different IP address for the Control Center, or have the Control Center and Scanner installed on different machines, you must add the new IP address and disable the one that was added automatically.
Warning: If you are deploying this Scanner behind a gateway, and are specifying one or more IP addresses instead of All IP addresses, you must add the IP addresses of ALL upstream mail servers in use by your organization. Upstream mail servers that are not specified here may be classified as spam sources.
Relay local domain mail to:
Gives the location where inbound mail is sent after being received on the inbound port.
24 Configuring system settings Configuring host (Scanner) settings
(*)Classless InterDomain Routing (CIDR) is supported for inbound and outbound mail connection IP addresses.
6 Click Save to store your changes.
Outbound Mail settings*
Provides settings for outbound mail characteristics. In this area, you can provide the following information:
■ Outbound mail IP address—Specifies the IP address on which outbound messages are sent.
■ Outbound mail SMTP port—Specifies the port on which outbound mail is sent, typically port 25.
■ Accept TLS encryption—Indicates if TLS encryption is accepted. Check the box to accept encrypted information. You must have a certificate defined for MTA TLS certificate in Settings > Certificates to accept TLS encryption.
■ Certificate—Specifies an available certificate for TLS encryption.
■ Accept outbound mail connections from the following IP addresses and domains—Indicates that only the addresses entered in the checked IP Address/Domains box are accepted. If you specify one or more IP addresses, you must include the IP address of the Control Center so that Spam Quarantine and Suspect Virus Quarantine can release messages. After you add the first entry, the IP address of the Control Center is added automatically and selected. If you are using a different IP address for the Control Center, or have the Control Center and Scanner installed on different machines, you must add the new IP address and disable the one that was added automatically. If you specify one or more IP addresses, you must include the IP address of the Control Center so that Spam Quarantine and Suspect Virus Quarantine can release messages. After you add the first entry, the IP address of the Control Center is added automatically and selected. If you are using a different IP address for the Control Center, or have the Control Center and Scanner installed on different machines, you must add the new IP address and disable the one that was added automatically.
Relay non-local mail to:
Specifies how outbound SMTP message relaying is routed. By default, MX Lookup is used.
Apply above settings to all hosts
Indicates that when saved, all settings on this page are applied immediately to all hosts.
Advanced Settings Provides for inbound, outbound and delivery advanced settings. See
“Advanced SMTP settings” on page 25 for details. Setting Description
25 Configuring system settings Configuring host (Scanner) settings
Advanced SMTP settings
Use the MTA Configuration portion of the page to specify the MTA host name. The MTA Host Name gives you the ability to define the Hello banner during the initial portion of the SMTP conversation.
Use the following advanced inbound SMTP settings to further define your SMTP configuration:
Use the following advanced outbound SMTP settings to define further your SMTP configuration:
Table 2-1 Inbound SMTP advanced setting descriptions
Item Description
Maximum number of connections
Sets the maximum number of simultaneous inbound connections allowed. Additional attempted connections are rejected. The default is 2,000 connections.
Maximum number of connections from a single IP address
Sets the maximum number of simultaneous inbound connections allowed from a single IP address. Additional connections for the same IP address will be rejected. The default is 20. You can also limit the number of connections from a single IP address per time period. Click Policies > Attacks in the Control Center.
Maximum message size in bytes
Sets the maximum size of a message before it is rejected. The default is 10,485,760 bytes.
Maximum number of recipients per message
Sets the maximum number of recipients for a message. The default is 1,024 recipients.
Insert RECEIVED header to inbound messages
Places a RECEIVED header in the message during inbound SMTP processing.
Enable reverse DNS lookup
Causes the system to perform reverse DNS lookup on the SMTP client IP addresses to resolve the IP address to a name when checked. This is the default condition. When
unchecked, reverse DNS lookup is not performed for inbound messages.
Table 2-2 Outbound SMTP advanced setting descriptions
Item Description
Maximum number of connections
Sets the maximum number of permissible simultaneous outbound connections. Additional attempted connections are rejected. The default is 2,000 connections.
26 Configuring system settings Configuring host (Scanner) settings
Settings also exist governing SMTP delivery configuration for your site. Delivery configuration message settings are as follows:
Maximum message size in bytes
Sets the maximum size allowable for a message before it is rejected. The default is 10,485,760 bytes.
Maximum number of recipients per message
Indicates the maximum number of recipients permitted to receive this message. The default is 1,024 recipients.
Default domain for sender addresses with no domain
Sets a default domain when none can be found in the message.
Insert RECEIVED header
Places a RECEIVED header in the message during outbound SMTP processing when checked. When unchecked, no RECEIVED header is inserted during outbound SMTP processing. If Insert RECEIVED header and Strip RECEIVED headers are both checked, the outbound SMTP RECEIVED header remains when the message goes to the delivery queue.
Strip pre-existing RECEIVED headers from outbound messages
Removes all RECEIVED headers for the message when checked. When headers are stripped, message looping can occur depending on the settings of other MTAs. When unchecked, RECEIVED headers remain in the message during outbound processing. The RECEIVED header for outbound SMTP processing remains in the message when Insert a RECEIVED header and Strip pre-existing RECEIVED headers from outbound messages are checked. Enable reverse DNS
lookup
Causes the system to perform reverse DNS lookup on the SMTP client IP addresses to resolve the IP address to a name. when checked. This is the default condition. When unchecked, reverse DNS lookup is not allowed for outbound messages.
Table 2-3 SMTP delivery advanced setting descriptions
Item Description
Maximum number of external connections
Sets the maximum number of simultaneously allowed external connections. Additional attempted connections are rejected. The default is 100 connections.
Maximum number of external connections to a single IP address
Sets the maximum number of simultaneous connections allowed to a single IP address. Additional connections to this IP address are rejected. The default is 50 connections. You can also limit the number of connections to a single IP address per time period.
Table 2-2 Outbound SMTP advanced setting descriptions
27 Configuring system settings Configuring host (Scanner) settings
To set up the SMTP Advanced Configuration
1 From the Control Center, click Settings > Hosts. 2 Select a Scanner from the displayed list. 3 Click Edit.
4 Click the SMTP tab.
On this page, you will see some general-purpose settings described in
“SMTP Scanner settings” on page 22. 5 Click Advanced Settings.
On this page you will see some advanced Scanner configuration SMTP settings. These settings are fully described in “Advanced SMTP settings” on page 25.
6 As appropriate, modify the settings explained above. 7 Click Save to store your information.
You are returned to the main SMTP configuration page. 8 Click Save.
Maximum number of connections to all internal mail servers
Sets the maximum number of connections allowed to all defined internal mail servers. Any additional connection attempts are rejected. The default is 100 internal mail server connections. Maximum number
of connections per single internal mail server
Sets the maximum number of connections to one internal mail server. Any additional attempt to make a connection is rejected. The default is 50 connections.
Minimum retry interval
Sets the smallest interval the SMTP server waits before trying to deliver a message again. The default is 15 minutes.
Sent message time-out
Sets the time after which a undelivered message times out and is rejected from the queue. The default is 5 days.
Message delay time in queue before notification
Sets the time a message waits in the mail queue before notification of nondelivery is sent. The default is 4 hours.
Enable TLS encryption
Allows TLS encryption when checked. If unchecked, TLS encryption is not performed. By default, TLS encryption is not enabled.
Table 2-3 SMTP delivery advanced setting descriptions
28 Configuring system settings Testing Scanners
Configuring internal mail hosts
You can add or delete internal mail hosts at your site. Configure internal mail hosts
Follow these procedures to add or delete internal mail hosts. To add an internal mail host
1 From the Control Center, click Settings > Hosts. 2 Check the Scanner you want to configure. 3 Click Edit.
4 Click the Internal Mail Hosts tab.
5 Specify the IP address for an internal mail host. 6 Click Add.
7 Click Save to store the information. To delete an internal mail host
1 From the Control Center, click Settings > Hosts. 2 Check the Scanner you want to configure. 3 Click Edit.
4 Click the Internal Mail Hosts tab. 5 Select an internal mail host. 6 Click Delete.
7 Click Save to store the information.
Testing Scanners
After adding or editing a Scanner, you can quickly test that the Scanner is operating and that the Agent is able to make a connection. The Agent is a component that facilitates communicating configuration information between the Control Center and each Scanner.
To test a Scanner
1 In the Control Center, click Status > Host Details.
2 If only one Scanner is attached to your system, you can see a snapshot of how it is currently functioning.
29 Configuring system settings
Configuring LDAP settings
3 If more than one Scanner is attached, select the Scanner you want to test from the drop-down list.
You will see a snapshot of its current status.
Configuring LDAP settings
The Control Center can optionally use directory information from LDAP servers at your site for one or both of the following purposes:
■ Authentication—LDAP user and password data is used for Quarantine access authentication and resolving email aliases for quarantined messages. The Control Center reads user and password data directly from the LDAP server.
■ Synchronization—LDAP user and group data is used for group policies, directory harvest attack recognition, distribution list expansion and dropping messages for invalid recipients. User and group data is read from the LDAP server and cached in the Control Center and Scanners, but not written back to the LDAP server.
Symantec Mail Security for SMTP supports the following LDAP directory types:
■ Windows 2000 Active Directory
■ Windows 2003 Active Directory
■ Sun Directory Server 5.2 (formerly known as the iPlanet Directory Server)
■ Exchange 5.5
■ Lotus Domino LDAP Server 6.5
Note: If you are using version 5.2 of the SunOne LDAP server, you must update
to patch 4 to address some changelog issues that arose in patch 3.
Configure LDAP settings
Follow these procedures to configure LDAP settings. To add an LDAP server
1 In the Control Center, click Settings > LDAP. 2 Click Add.
3 Complete the necessary fields presented for defining a new LDAP Server. The values you complete will depend on your choice in the Usage drop-down list.
30 Configuring system settings Configuring LDAP settings
Note: When adding an LDAP server that performs synchronization, you can
replicate data from the Control Center to attached and enabled Scanners with the Replicate now button. Begin this replication only after initial
synchronization has completed successfully as shown on the Status > LDAP Synchronization page, and the number of rejected entries is 0 or stays constant after successive synchronization changes. If synchronization has not completed successfully, error messages will be shown on the Status > LDAP
Synchronization page. Alternatively, you can wait until the next scheduled replication occurs at which time all Scanners will be fully updated by the LDAP synchronization server.
Note: If you see the error during server creation, Failed to create user mappings
for source, and you have recently changed DNS servers, restart your LDAP synchronization components. Windows users use the Services control panel to first stop SMS Virtual Directory, then start SMS Sync Server. Dependencies are automatically restarted. Alternatively, the host can be rebooted. Linux/Solaris users issue the following command:
/etc/init.d/sms_ldapsync restart Then, follow the above steps again.
The following table describes the available settings for LDAP authentication and synchronization services when an LDAP server is being added to the Control Center
Table 2-4 LDAP Server Parameters when adding a server
Item Description
Description Text describing the LDAP server being defined. Permissible
characters are any alphanumeric character (0-9, a-z, and A-Z), a space ( ), hyphen (-), or underline (_) character. Any other symbol will cause the definition to fail.
Host Host name or IP address.
Port TCP/IP port for the server. The default port is 389.
Directory Type Specifies the type of directory used by the LDAP server. Available choices are:
■ Active Directory
■ iPlanet/Sun ONE/Java Directory Server
■ Exchange 5.5
31 Configuring system settings
Configuring LDAP settings
Usage Describes how this LDAP server will be used. Available usage modes are:
■ Authentication
■ Synchronization
■ Authentication and Synchronization
You can have only one authentication server defined in the Control Center.
Administrator Credentials
Specifies login and usage information for the LDAP server as follows: Anonymous bind—Allows you to login to an LDAP server without providing specific user ID and password information. Before using anonymous bind, configure your LDAP server to grant anonymous access to the changelog and base DN. For the Domino Directory Type using anonymous bind, group and dlist data are not retrieved.
■ Name (bind DN)—Login name allowing you to access the LDAP server.
When entering the Name (bind DN) for an Exchange 5.5 server, be sure to use the full DN such as
cn=Administrator,cn=Recipients,ou=mysite,o=myorg rather than a shortened form such as cn=Administrator to ensure detection of all change events and guarantee full authentication by the LDAP server.
For an Active Directory server, the full DN or logon name with User Principal Name suffix can be required.
■ Password—Password information that allows you to access the LDAP server.
■ Test Login—Verifies the anonymous bind connection or the user id and password given for accessing the LDAP server.
Windows Domain Names (Active Directory only)
Windows domain names you see in the Log on to dropdown list when logging onto a Windows host. Use commas or semicolons to separate multiple domain names.
Primary domain (Domino only)
Internet domain to which mail is delivered.
Domain aliases (Domino only)
Internet domain names that resolve to the primary domain. For example, you could assign company.net to be an alias for company.com. Use commas to separate multiple names.
Table 2-4 LDAP Server Parameters when adding a server
32 Configuring system settings Configuring LDAP settings
Authentication Query Details
Contains the following options:
■ Autofill—Places default values in the field for you to modify as needed.
■ Query start (Auth base DN)—Designates the point in the directory from which to start searching for entries to authenticate. If an entry contains an ampersand, delimit the ampersand as follows:
OU=Sales \& Marketing,OU=test,DC=domain,DC=com & OU=test1,DC=domain,DC=com
■ Login attribute—Specifies the attribute that identifies a directory entry representing a person.
■ Primary email attribute—Finds users based on the attribute which represents a mailbox.
■ Email alias attribute—Finds users based on the attribute representing an alternative address for entities’ mailbox.
■ Login query—Finds users based on their Login attributes.
■ Test—Attempts to execute the query as defined.
Note: For Exchange 5.5, the user directory Name (rdn) must be the same as the alias (uid) for that user.
Synchronization Configuration
Allows for the following definitions governing synchronization behavior:
■ Synchronize every—Specifies how often scheduled
synchronization occurs. You can specify a number of minutes, hours, or days. The default is 1 day.
■ Audit level—Verbosity setting for LDAP audit logs. Choices of Off, Low, and Verbose are available. The default is Off.
■ Page size—Number of discrete changes that are accepted together for synchronization. Use a number between 1 and 2,000. The default is 25. If you are using the iPlanet/SunOne directory server, change Page size to 0 for optimal performance. This section is grayed out if Usage type is Authentication.
Table 2-4 LDAP Server Parameters when adding a server
33 Configuring system settings
Configuring LDAP settings
To edit an LDAP server
1 In the Control Center, click Settings > LDAP.
2 Choose an LDAP server definition by checking the box next to it. 3 Click Edit.
4 Make changes as appropriate. 5 Click Save.
Synchronization Query Details
Specifies queries to use for synchronization. Available choices are:
■ Autofill—Places default values in the field for you to modify as needed.
■ Query start (Sync base DN)—Designates the point in the directory from which to start searching for entries with email addresses/aliases or groups. To use this field, begin by clicking Auto Fill for the naming contexts of the directory. Reduce the received list of DN’s brought into the field by Auto Fill to a single DN, or write your own DN based on the provided list.
■ Custom query start—Allows for the addition of a customized query.
■ User query—Finds users in the LDAP server.
■ Group query—Finds LDAP groups in the LDAP server.
■ Distribution list query—Finds Distribution Lists in the LDAP Server.
Buttons labelled Test allow you to test each synchronization query type.
Note: If you need to change Host, Port, base DN, ldap Group filter, User filter, or Distribution List filter after saving an LDAP synchronization source, you must delete the source, add the source including all attributes to be filtered, and perform a full
synchronization.
Table 2-4 LDAP Server Parameters when adding a server
34 Configuring system settings Configuring LDAP settings
Not all parameters are available for editing in an LDAP definition. Only the following can be changed after an LDAP server has been defined:
Table 2-5 LDAP Server Parameters when editing a server
Item Description
Administrator Credentials
Specifies login and usage information for the LDAP server as follows: Anonymous bind—Allows you to login to an LDAP server without providing specific user ID and password information. Before using anonymous bind, configure your LDAP server to grant anonymous access to the changelog and base DN. For the Domino Directory Type using anonymous bind, group and dlist data are not retrieved.
■ Name (bind DN)—Login name allowing you to access the LDAP server.
When entering the Name (bind DN) for an Exchange 5.5 server, be sure to use the full DN such as
cn=Administrator,cn=Recipients,ou=mysite,o=myorg rather than a shortened form such as cn=Administrator to ensure detection of all change events and guarantee full authentication by the LDAP server.
For an Active Directory server, the full DN or logon name with User Principal Name suffix can be required.
■ Password—Password information that allows you to access the LDAP server.
■ Test Login—Verifies the anonymous bind connection or the user id and password given for accessing the LDAP server.
Windows Domain Names (Active Directory only)
Windows domain names you see in the Log on to dropdown list when logging onto a Windows host. Use commas or semicolons to separate multiple domain names.
Primary domain (Domino only)
Internet domain to which mail is delivered.
Domain aliases (Domino only)
Internet domain names that resolve to the primary domain. For example, you could assign company.net to be an alias for company.com. Use commas to separate multiple names.
35 Configuring system settings
Configuring LDAP settings
Editing an LDAP server definition can cause a full synchronization to be initiated. This can have serious performance impact on your system until the synchronization completes.
To initiate an LDAP synchronization 1 Click Status > LDAP Synchronization.
2 If you wish to synchronize fewer than 1,000 changes of LDAP data, click Synchronize Changes.
3 If you wish to synchronize 1,000 changes of LDAP data or more, click Full Synchronization.
Authentication Query Details
Contains the following options:
■ Autofill—Places default values in the field for you to modify as needed.
■ Query start (Auth base DN)—Designates the point in the directory from which to start searching for entries to authenticate.
■ Login attribute—Specifies the attribute that identifies a directory entry representing a person.
■ Primary email attribute—Finds users based on the attribute which represents a mailbox.
■ Email alias attribute—Finds users based on the attribute representing an alternative address for entities’ mailbox.
■ Login query—Finds users based on their Login attributes.
■ Test—Attempts to execute the query as defined. Synchronization
Configuration
Allows for the following definitions governing synchronization behavior:
■ Synchronize every—Specifies how often scheduled
synchronization occurs. You can specify a number of minutes, hours, or days. The default is 1 day.
■ Audit level—Verbosity setting for LDAP audit logs. Choices of Off, Low, and Verbose are available. The default is Off.
■ Page size—Number of discrete changes that are accepted together for synchronization. Use a number between 1 and 2,000. The default is 25. If you are using the iPlanet/SunOne directory server, change Page size to 0 for optimal performance. This section is grayed out if Usage type is Authentication.
Table 2-5 LDAP Server Parameters when editing a server
36 Configuring system settings Configuring LDAP settings
To cancel an LDAP synchronization in progress 1 Click Status > LDAP Synchronization. 2 Click Cancel Synchronization. To delete an LDAP server
1 In the Control Center, click Status > LDAP Synchronization.
Check to be sure that no synchronization is processing. You cannot delete a synchronization server while synchronization is running.
2 Click Settings > LDAP.
3 Choose an LDAP server definition by checking the box next to it. 4 Click Delete.
Synchronization status information
When LDAP data is synchronized between an LDAP server and the Control Center, status information is generated and displayed via the Status tab. To view LDAP Synchronization status information
◆ In the Control Center, click Status > LDAP Synchronization. The following information is displayed:
Item Description
Status Information about synchronization activity. Status can be any of the following:
■ Idle—Nothing is happening.
■ Starting—A synchronization request was issued either by the Control Center or through a replication request from a Scanner.
■ Cancelled—Either the LDAP synchronization was cancelled manually via clicking Status > LDAP Synchronization > Cancel, or a
replication was in progress when a scheduled or manual LDAP synchronization was initiated.
■ In Progress—A synchronization request has been acknowledged by the synchronization server and the process is under way.
■ Success—The synchronization has completed successfully.
■ Failed—The synchronization has failed. Consult your logs to identify possible causes.
Started The time at which the most recent synchronization began. Ended The time at which the most recent synchronization finished.
37 Configuring system settings Replicating data to Scanners
Replicating data to Scanners
After an LDAP server has been defined to the Control Center, and after the synchronization of LDAP data between the LDAP server and the Control Center has successfully completed one full cycle, LDAP data can be synchronized to all attached and enabled Scanners.
LDAP data includes:
■ Directory information
■ User settings
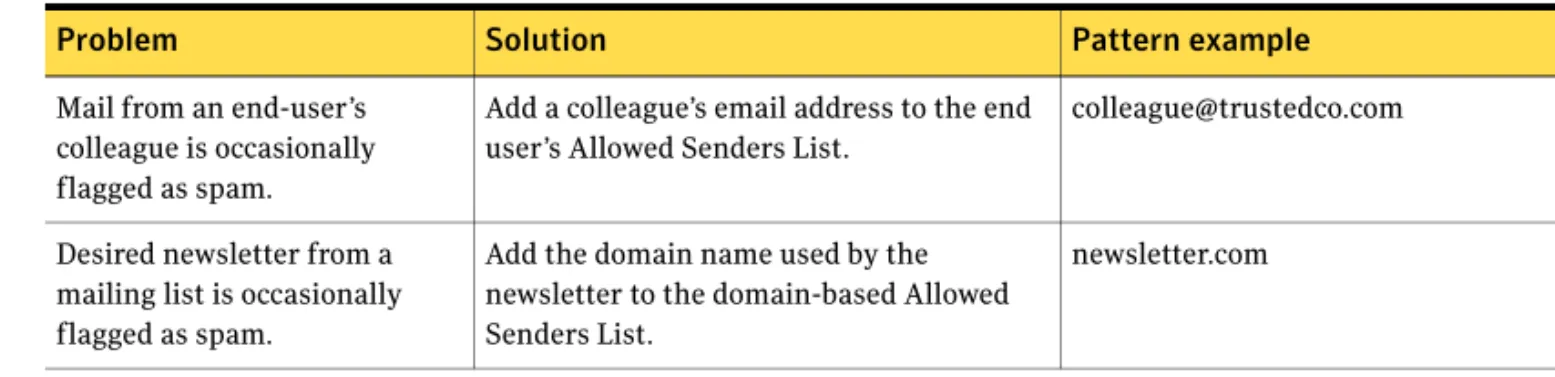
■ Allowed/Blocked Sender settings
■ Language settings
For replication to work properly, you must have completed the procedures in
“Configuring, enabling and scheduling Scanner replication” on page 42 and Read The number of directory entries read from the synchronization server. For
a full synchronization, this number is equal to the total number of records from the LDAP source.
Added The number of directory entries added from the synchronization server to the Control Center.
Modified The number of records modified in the Control Center based on synchronization server information.
Deleted The number of entries deleted from the Control Center based on synchronization server information.
Rejected The number of directory entries from the LDAP server rejected by the synchronization server.
A number of LDAP transactions can be rejected when an attempt to add a group entry fails because one or more of the group members is not yet known to the LDAP synchronization service. Generally, this can be resolved by issuing a Synchronize Changes request from the Control Center. Each time this is done, the number of rejected entries should decrease. Once all group members are propagated, the group entries are added successfully. If, after a number of LDAP synchronization attempts, you continue to see the same number of rejected entries for an LDAP Source, examine the logs at Status > Logs with Control Center: LDAP selected in the Log Type: drop-down list. Use the information on this page to determine why the entries are repeatedly rejected. Pay particular attention to the file error.log.X, where X is a number.
38 Configuring system settings Replicating data to Scanners
made certain that Scanner replication is enabled for each Scanner as described in “Working with the Services page” on page 20.
In this section, information is available on the following:
■ Starting and stopping replication ■ Replication status information ■ Troubleshooting replication
Starting and stopping replication
You may occasionally need to start or stop replication manually. Start or stop replication
Start and stop replication using the following procedures. To start a manual replication cycle
1 In the Control Center, click Status > Scanner Replication. 2 Click Replicate Now.
To stop a replication in progress
1 In the Control Center, click Status > Scanner Replication. 2 Click Cancel Replication.
Replication status information
When LDAP data is replicated from the Control Center to one or more Scanners, status information is generated and displayed via the Status interface in Symantec Mail Security for SMTP.
To view replication status information
39 Configuring system settings Replicating data to Scanners
The following information is displayed:
Troubleshooting replication
Replication will not complete until at least one LDAP synchronization source is available, and synchronization has completed successfully. Until this happens, there is no data that replication can use to update Scanners.
Troubleshoot replication
The following techniques can help you troubleshoot replication problems. Basic troubleshooting procedure
1 Verify that synchronization has occurred.
2 If a successful synchronization has occurred, check your replication status and take one or more of the actions described below.
To verify that synchronization has completed successfully 1 In the Control Center, click Status > LDAP Synchronization. 2 Check the Status column for a Success message.
For additional information about synchronization status, see
“Synchronization status information” on page 36. To check replication status
1 In the Control Center, click Status > Scanner Replication. Item Description
Status Status can be any of the following:
■ Idle—Nothing is happening.
■ Started—A replication request has been issued.
■ Cancelled—Either the LDAP synchronization was cancelled manually via clicking Status Synchronization > LDAP > Cancel, or a replication was in progress when a scheduled or manual LDAP synchronization was initiated.
■ In Progress—A replication request has been acknowledged by the Control Center and the process is under way.
■ Success—The replication has completed successfully.
■ Failed—The replication has failed. Consult your logs to identify possible causes. Started The time at which the most recent replication began.
Ended The time at which the most recent replication finished. Size The number of bytes of replicated data.
40 Configuring system settings Configuring Control Center settings
2 Check the Status column for each attached and enabled Scanner on the list. For additional information about replication status, see “Replication status information” on page 38.
To troubleshoot a status message
1 If the Scanner has a Status of Success, all attached and enabled Scanners are fully updated with LDAP information and no action is required.
2 If a message is displayed indicating that replication has been cancelled and was not cancelled via Status > Replication and clicking Cancel, an LDAP synchronization source was found, but either synchronization has not yet completed, or synchronization has failed.
Check your synchronization status. (See “To check replication status” on page 39.) Check the Control Center log for errors about creating or moving synchronization data within the Control Center, or errors regarding communication between the Control Center and a Scanner. Check LDAP synchronization logs for any errors that occur in transforming data from the Control Center database to a Scanner database.
3 If you see the message No scanners configured for replication, make sure you have successfully added an LDAP synchronization server, that the initial synchronization service has completed successfully, that you have enabled global replication via Settings > Replication Settings, and that replication is enabled on at least one attached and enabled Scanner via the Replication tab at Settings > Hosts > Edit.
4 If the replication process shows the message IN-PROGRESS for an unusually long period of time, the replication process has stalled. It is difficult to predict the length of time a replication can take. As a benchmark, a user population of 25k users and 5k distribution lists (with nesting levels ranging from 1-10), can take as much as 7.5 hours on a Dell 1850 running Linux. To resolve a replication process with a message of In-Progress
◆ Perform a manual replication from the Control Center.
If replication still stalls, restart the Control Center software and begin the entire cycle again with a full synchronization.
Configuring Control Center settings
The Symantec Mail Security for SMTP Control Center allows you to configure the following:
■ Control Center administration ■ Control Center certificate
41 Configuring system settings Configuring Control Center settings
■ Configuring, enabling and scheduling Scanner replication ■ SMTP host
■ System locale
Control Center administration
You access the Control Center via a Web browser. By default anyone with the correct address and logon information has access from any host. You can choose to limit host access to the Control Center if you wish. Users attempting to log into the Control Center from unauthorized computers will see a 403 Forbidden page in their Web browser. Reverse Domain Name Server (DNS) lookup must be enabled in your DNS software for this feature to work with host names. When entering host names, there is a possibility that a name can be entered incorrectly. If it is the only name on the list, you have effectively blocked yourself all access to the Control Center. See the procedure below for help resolving this situation.
Specify Control Center access or reset Control Center access
Follow these instructions to specify Control Center access or to regain access to the Control Center.
To specify Control Center access
1 In the Control Center, click Settings > Control Center.
2 Check All hosts to allow any host access to the Control Center.
3 Check Only the following hosts to assign specific hosts to access the Control Center.
All other hosts are rejected after you add one or more hosts to the list. Add and Delete buttons are available to help you manage the list of allowed hosts.
4 To add a host, type host name, IP address, IP address with subnet mask, or Classless Inter-Domain Routing (CIDR) netblock and click Add.
Specify additional computers or networks as needed. 5 Click Save to store the current settings.
To regain access to the Control Center when no host name matches the list 1 Log in to the MySQL Control Center.
2 Select the Brightmail database. use brightmail;
42 Configuring system settings Configuring Control Center settings
3 Delete the host control access items from the database. truncate settings_host_access_control;
About specifying host names for Control Center access
When specifying host names for Control Center access, the Control Center allows clients to connect based on the Control Center’s own DNS perspective. If the client’s IP address resolves into a name that is allowed (a “reverse lookup”), then it’s a match and the client is allowed to access the Control Center. The reverse lookup of an IP address is controlled by the owner of a netblock, not necessarily a user of that netblock, so users often have no control over what name their IP addresses resolve to. Also, two different DNS servers may each have mappings for the same netblock that are not the same. For example, the client’s authoritative DNS server has a reverse lookup record ofm1.example.com for the client’s IP address, while the DNS that is configured to be the Control Center’s primary DNS server has a reverse mapping of
dhcp23.example.com for the same IP address. In this case, the Control Center will see the dhcp23.example.com name whenever the client connects, so that is the name that should be entered into the host access control list in the Control Center. This situation happens more frequently on private networks than on the public Internet.
Control Center certificate
Through the Control Center, you can designate a user interface HTTPS
certificate. This enhances the security for the Control Center and those logging into it.
To designate a Control Center certificate
1 In the Control Center, click Settings > Control Center.
2 Through the User interface HTTPS certificate dropdown list, select the desired choice.
3 Click Save to store the current settings.
Configuring, enabling and scheduling Scanner replication
In the Control Center, replication refers to the process by which LDAP data are propagated from the Control Center to attached and enabled Scanners. Replication is controlled by global settings in the Control Center and by locally configurable settings on each Scanner. The following information will assist you in configuring and scheduling replication. However, no replication can occur until you have defined one or more LDAP servers to the Control Center and one
43 Configuring system settings Configuring Control Center settings
full synchronization cycle has completed. For information on setting up LDAP services, see “Configuring LDAP settings” on page 29.
The replication attributes on the Control Center > Replication Settings page determine how replication operates in your installation. You can determine if replication is to take place, and how often it occurs. These are in addition to settings available on local Scanners attached and enabled through the Control Center.
To configure Control Center replication settings
1 In the Control Center, click Settings > Control Center.
2 To activate Scanner replication, check Enable Scanner Replication. 3 If Scanner replication is enabled, set the frequency and interval of
replication for Replicate every as follows:
■ Frequency—Use this edit box to enter a digit indicating the number of
intervals at which replication occurs.
■ Interval—Use the combo box to select the interval of time between replications. Available choices are hours and days.
The replication schedule should begin at a different time than the synchronization schedule to avoid schedule conflicts. For instance, if you have replication set to every 12 hours, setting the LDAP synchronization schedule to 53 minutes will help prevent one from starting while the other is in progress.
4 Click Replicate Now to have LDAP data replicated to all attached and enabled Scanners immediately.
5 Click Save to store the current settings.
6 To verify the most recent replication, click Status > Scanner Replication in the Control Center.
Note: The replication process will not complete until an LDAP
synchronization source is available.
Local replication settings
Local replication settings for each Scanner are configured by editing the Scanner configuration. For more information, see “Starting and stopping replication” on page 38. Additional information is available for checking the status of Scanner replication and for troubleshooting possible problems with Scanner replication in “Replicating data to Scanners” on page 37 and