Microsoft Dynamics NAV
Programming Conventions ... 3
General C/AL Programming Format ... 3
Multilanguage Functionality ... 9 C/AL Statements ... 12 Miscellaneous ... 16 User-Defined Functions ... 26 User Messages ... 27 Table Locking ... 31
Putting Functions in Objects ... 33
Naming Conventions ... 34
General Guidelines ... 35
Visible Named Items ... 36
Other Named Items ... 41
Numbering Conventions ... 44
The Numbering System ... 45
Objects ... 46
Table Fields... 50
Developing Add-on Applications ... 51
Protecting Objects ... 52
Changing Base Application Objects - General Guidelines ... 53
Changing Table Fields ... 54
Changing Reports ... 55
Changing Form Controls ... 56
Changing C/AL Code ... 57
Programming Conventions
To make it easy to maintain an application, it is important to follow a few strict guidelines when writing C/AL code. This chapter describes these guidelines.
General C/AL Programming Format
This section describes the general rules for spacing, indentation and use of parentheses. It also describes how to order expressions and variables and how to write comments and use symbolic values.
General Rule
If these chapters do not specify what to do in a certain situation, please use the existing base application as a guide. Consistency is important; each programmer should not use his or her own special programming styles. In all important aspects, the Microsoft Dynamics NAV base application follows the guidelines described here.
Note
All C/AL code should be entered as English (United States). If all code is in the same language, it is easier to maintain the application including add-ons in several countries.
Spacing
There must be exactly one space character on each side of a binary operator such as assignment or plus.
Example
y := (a + b) / 100;
There must be no space between a unary operator and its argument. Example
y := -x;
Refer to multiple dimensions in a record array by using sets of brackets with no space characters in between.
Example
a[i][j] := b;
Example PROCEDURE P(); BEGIN x := a; y := (a + b) / 100; END;
Alignment
In general, use an indentation of two character spaces. Example
IF a <> '' THEN
Record.TESTFIELD(b);
Splitting Lines
When you split a C/AL statement into two or more lines, do not align the continuation lines according to user- or system-defined variables, functions, field names, object names, and so on. Instead, indent the continuation lines by two characters.
Example Correct: MyVariable := Variable1 + Variable2 * 2 + Variable3 * 3; Incorrect:
MyVariable := Variable1 + Variable2 * 2 + Variable3 * 3;
The second format might look clearer in your program, but the alignment will not hold if the variable name MyVariable is changed to something shorter or longer in another national territory version.
Note
Although the system-defined variable and function names are not likely to change for the moment, the rule also applies when using them.
Additional Examples Example
MyFunction(
Expression1,Expression2, Expression3,Expression4);
Example ERROR( StringExpression, Expression1,Expression2,Expression3); Example IF NOT SETCURRENTKEY( aaaaaaaaaa,bbbbbbbbbb,cccccccccc, dddddddddd,eeeeeeeeee) THEN SETCURRENTKEY(bbbbbbbbbb,aaaaaaaaaa);
Aligning Parentheses
A left parenthesis in an expression should be aligned with a corresponding parenthesis on the line above.
Example aaaaaaaaaa := ((xxxxxxxxxxx / yyyyyyyyyyyyy) - (1 + zzzzzzzzzz / 100)) * 100; Example IF (xxx <> '') AND ((A = 1) OR (B = 2)) THEN ...
Using Parentheses
Do not use parentheses in a function call if the function does not have any parameters. Example
PostLine;
Use parentheses only to enclose compound expressions inside compound expressions. Example
IF Boolean1 AND Boolean2 AND (x = y) THEN x := a + b
ELSE
x := b / (a + b);
Comments
Always start comments with // followed by one space character. Never use curly brackets ({ and }). To emphasize a comment, put it on a separate line and insert one empty line before it.
Example x := x + 1; // Comment x := x * 2;
If the comment is on the same line as the C/AL code, add one space character before the comment sign.
Example
x := '....'; // Comment
Use Symbolic Values
Whenever possible, use the name of the option for a field instead of just an integer for the value. Example (CORRECT) Table.Field := Table.Field::Option; Example (INCORRECT) Table.Field := 1: Example (CORRECT)
IF Table.Field IN[Table.Field::Option1,Table.Field::Option2] THEN EXIT;
Whenever possible, use option names instead of hard code values in the conditional possibilities in a CASE statement.
Example CASE xxx OF xxx::aaa,xxx::bbb: x := y; ELSE y := x; END;
Parameters
Use parameters whenever you need to transfer information to a function.
To use a parameter as an option field, define it in the function. When you call the function, use an integer as parameter in the call.
Example ... P(0); ...
BEGIN CASE MyOption OF MyOption::Value0: x := x * 10; MyOption::Value1: x := x * 15; MyOption::Value2: x := x * 20; END; END;
Order in Expressions
The variable you are operating on or comparing to something else must always come first in expressions. Example Correct: IF x <> 0 THEN x := x - 100; Example Correct:
IF (Date < a) OR (Date > b) THEN Date := c; Example Incorrect: IF 0 > x THEN x := x - 100;
Order of Variables
Variables should be listed in the following order: Record variables
Form variables Report variables Dataport variables Codeunit variables
Dialog, File and BLOB variables Simple variables
Record variables are listed in an order that reflects the hierarchy of the tables used in the database. Base tables come before journals and other non-posted lines and headers, which themselves come before ledger entries and posted lines and headers.
Example VAR GLSetup : Record 98; UserSetup : Record 91; ItemPostingGr : Record 94; Item : Record 27; ItemJnlTemplate : Record 82; ItemJnlBatch : Record 233; ItemJnlLine : Record 83; ItemReg : Record 46; ItemLedgEntry : Record 32;
Multilanguage Functionality
Microsoft Dynamics NAV is multilanguage enabled. This means changes in the way that developers work in the application.
The purpose of the multilanguage-enabled environment is to make translation easier and make it possible to switch from one language to another in the user interface so that, for example, a German and a Swede can work side by side in their own languages on the same database.
When you develop in a multilanguage-enabled environment, it is important to remember the following rules of thumb:
Everything has a Name property in English (United States).
Text constants replace text strings such as error messages. Everything that the user will see must have a Caption property.
Note
Before you start working in a multilanguage-enabled database, you should set the application language as English (United States). You do this by clicking Tools, Languages and selecting English (United States).
For more information about how to develop multilanguage-enabled applications in English (United States), see the Microsoft Dynamics NAV 2009 Developer and IT Pro Help.
Code Base Language
In Microsoft Dynamics NAV, the code base is English (United States). This means that the Name property of, for example, an object must always be English (United States).
The code base in English (United States) includes, among other things, the following: Object names
Field names
Function and variable names Comments
Option strings Control names
Name Property
As mentioned above, all code should be in English (United States), abbreviated ENU. The Name property of an object should always be ENU, but it should also never be visible to the user. In all references to the user interface, you must use the Caption property instead. For example, if you want to call on a field from the code in connection with a user message, you will call it by its Name property but make sure that the Caption property is displayed:
VATPostingSetup.FIELDCAPTION("VAT Calculation Type");
Text Constants
Error messages and other message strings must be entered as text constants. That way, the message can be easily translated and the users can see the same message in their own languages.
Text constants will automatically be assigned unique IDs by C/SIDE. You can see the ID by opening the C/AL Globals window, selecting the text constant and opening its Properties window.
When you are working in the C/AL Editor window and place the cursor on a text constant, the content of the text constant will be shown in the message line.
Caption Rather Than Name
The Name property is only used internally and is not translated, so you must never use the Name property for the user interface; use the Caption property instead.
The CaptionML property is what makes it possible to change languages. Everything must have a CaptionML property where the value is set to the correct term in ENU. The ENU value is followed by whatever translations there may be of that object.
Example
In a Canadian database, Table 37, Field 1 has the following CaptionML values:
ENU=Document Type;FRC=Type document
Option Buttons
When you design an option button, fill in the properties for the control as follows:
Property Value
Name Name of control, for example Control1.
CaptionML Caption of control (option button) in ENU and your local language, for example ENU=Item Ledger Entry.
OptionValue Caption of control (option button) in ENU, for example
ENU=Item Ledger Entry.
Option Strings
When you design a control with an option string, fill in the properties for the control as follows:
Property Value
Name Name of control, for example, Control1.
CaptionML Caption of control in ENU and your local language, for example, ENU=Source Type.
OptionCaptionML Option string in ENU and your local language, for example, ENU=Sale,Purchase.
C/AL Statements
This section describes the structure of C/AL statements.
IF THEN ELSE
IF and THEN should normally be on the same line. ELSE should be on a separate line. Example
IF x = y THEN x := x + 1 ELSE
x := -x - 1;
If there are many or long expressions, THEN should be on a new line – aligned with IF. Example IF (xxxxxxxxxx = yyy) AND (aaa = bbbbbbbbbb) THEN x := a ELSE y := b;
When you write IF expressions with THEN and ELSE parts, try to write them so that the THEN consequence is more probable than the ELSE one.
Example
IF condition THEN rule
ELSE
exception
If the IF expression is too complex, reverse the THEN and ELSE parts.
If the last statement in the THEN part of an IF-THEN-ELSE statement is an EXIT or an ERROR, do not continue with an ELSE statement.
Example IF x <> y THEN EXIT(TRUE); x := x * 2; y := y - 1; Example Incorrect: IF x < y THEN EXIT(TRUE) ELSE BEGIN x := x * 2; y := y - 1; END;
BEGIN and END
When BEGIN follows THEN, ELSE or DO, it should be on the same line, preceded by one space character.
Example
IF (x = y) AND (a = b) THEN BEGIN x := a; y := b; END; Example IF (xxx = yyyyyyyyyy) AND (aaaaaaaaaa = bbb) THEN BEGIN x := a; x := y; a := y; END ELSE BEGIN y := x; y := a; END;
REPEAT UNTIL
Indentation of REPEAT statements: Simple case: REPEAT <Statement>; UNTIL <expr>; Complex case: REPEAT <Statement>; UNTIL <expr> AND <expr> AND <expr>;
REPEAT should always be alone on a line. Example IF x < y THEN BEGIN REPEAT x := x + 1; a := a - 1; UNTIL x = y; b := x; END;
WHILE-DO
This is the format for simple cases (one expression after WHILE): Example
WHILE <expr> DO <Statement>; Example
WHILE <expr> DO BEGIN <Statement>;
<Statement>; END;
This is the format for complex cases (several expressions after WHILE): Example
WHILE <expr> AND <expr> AND <expr> DO
<Statement>; Example
WHILE <expr> AND <expr> AND <expr> DO BEGIN <Statement>; <Statement>: END;
CASE
When you use CASE, indent the possibilities by two character spaces. Two or more possibilities on the same line are separated by commas (with no spaces), and the last possibility on a line is immediately followed by a colon (with no preceding space).
The action starts on the line after the possibility, further indented by two character spaces. If there is a BEGIN, it should be placed on a separate line unless it follows ELSE. In this case, it should be on the same line as ELSE.
Example CASE Field OF Field::A: BEGIN x := x + 1; y := -y - 1; END; Field::B: x := y; Field::C,Field::D: y := x; ELSE BEGIN y := x; a := b;
END; END;
CASE or IF
If there are more than two alternatives, use a CASE statement. Otherwise, use IF.
WITH-DO
When you write WITH-DO statement blocks, be careful when creating one WITH-DO block within another explicit or implicit WITH-DO block. (Implicit WITH-DO blocks exist, for example, in table objects and in forms that have been attached to a record.)
The WITH-DO block that you create within another WITH-DO block must always be attached to a variable of the same type as the variable that is attached to the surrounding WITH-DO block. Otherwise it can be difficult to see what variable a member variable or function refers to. Below is a good example of nesting WITH-DO blocks (both WITH-DO blocks are attached to a “Customer Ledger Entry” record variable). There is also a bad example, where you cannot directly tell which record variable the MyField field refers to.
Example (CORRECT)
WITH CustLedgEntry DO BEGIN INSERT;
...;
WITH CustLedgEntry2 DO BEGIN INSERT;
...; END; END;
Example (INCORRECT)
WITH CustLedgEntry DO BEGIN ...;
WITH VendLedgEntry DO BEGIN MyField := <Some Value>; ...;
END; END;
Within WITH-DO blocks, do not repeat the name of the object with the member variable or function. For example, in the following example do not replace the call of the member function INSERT with MyRecord.INSERT.
Example
WITH MyRecord DO BEGIN INSERT;
...; END;
Miscellaneous
Keep it Simple
When you program a solution in C/SIDE, try to keep it simple. This applies to everything that becomes visible either to other programmers or to any users. Here are a few simple
examples of where you should not make a complex solution:
If the default value for a property is adequate for a certain purpose, do not make the default value explicit.
If a variable can be reset using a statement like a := 0; then do not use a special C/AL function to do the job. That is, do not do this:
CLEAR(a);
If the contents of a record can be copied using a statement like MyRec := MyRec2;
then do not use a special C/AL function to do the job. That is, do not do this:
MyRec.TRANSFERFIELDS(MyRec2);
Activating Objects
Generally, when you want to use the value of a field to find a record in a table, or you want to activate an object identified by the field, make sure that the field actually contains a value. To do this, use the TESTFIELD function. This will produce more informative error messages if the value is zero or blank.
Example GLEntry.TESTFIELD("Department Code"); Dept.GET(GLEntry."Department Code"); GenJnlTemplate.TESTFIELD("Report ID"); REPORT.RUN(GenJnlTemplate."Report ID")
Copying Solutions
Sometimes you may wish to achieve the same degree of functionality as exists somewhere in the base application. We suggest that you copy (using new ID and Name) objects from the original solution and change the copies, using the steps below as a pattern.
You could use this method, for example, to implement journal functionality (using journal template, batch and line tables).
Here are the steps you would follow:
Start by copying the command button in the main menu that activates the journal solution you want to copy.
See which objects this command button calls (and check that these objects are specific to the journal).
Make a copy of these objects and call them from within your application.
Then see which objects are referred to by the objects you have copied (and check that these objects are specific to the journal), and copy these referred-to objects too.
Change the references to point to the new objects.
Continue this recursive process until you have copied all the journal-specific objects that the main menu command button points to (directly and indirectly).
Modify the new objects appropriately. For example, you must decide which fields to include in the journal line table.
Setting Properties
To set properties from C/AL, use the following style:
"Customer No.".Visible := TRUE; Cust.MARK := TRUE; CurrReport.SHOWOUTPUT := TRUE; Do not write: Customer." No.".Visible(TRUE); Cust.MARK(TRUE); CurrReport.SHOWOUTPUT(TRUE); Editable=No on FlowField
Remember to set the property Editable=No on FlowFields unless you want to be able to enter values in the field. For example, it is possible to enter values in the Budgeted Amount field in the G/L Account table.
Disabling FIelds
Since a disabled field cannot be included in a form, never release a table with disabled fields.
Mandatory Primary Key
As default, set the property NotBlank=Yes on the primary key fields in a table. No other fields in a table should have this property.
Validating Table Relations
When you apply the property ValidateTableRelation=No to a field, you should also apply the property TestTableRelation=No. Otherwise a database test on the field relations in a
Programming Lookups
When programming lookups, do not filter records that the user might want to select. Instead, program the record cursor to be positioned on the most relevant record for the search, even though it may not be first on the list.
When programming the OnLookup trigger for a field, remember that the system will not call the code in the field’s OnValidate trigger unless you call Field.VALIDATE explicitly.
Remember also that if errors can occur in the validation, you must operate on a copy of the Rec variable (as shown in the example below) instead of directly on Rec.
Example
Department Code – OnLookup
WITH Cust DO BEGIN Cust := Rec;
Dept.Code := "Department Code";
IF FORM.RUNMODAL(O,Dept) = Action::LookupOK THEN BEGIN "Department Code" := Dept. Code;
VALIDATE("Department Code"): Rec := Cust:
END; END;
Field Lengths
As a rule, use 20 characters for a code field that is likely to be visible to external companies or organizations. Otherwise, use 10 characters.
Field Type Code or Text
These are the rules for choosing between the types Code and Text:
If the field is part of a primary key, it should have type Code.
If the field has a TableRelation, it should have type Code.
If the field in other ways is assigned values from a Code field, it should have type Code. (The
Document No. field in tables like the G/L Entry table is copied from the primary key field No.
in tables like the Sales Header and Purchase Header.)
In all other cases, the field should have type Text.
DateFormula
Fields containing a date formula must not have data type Code. Instead, use data type DateFormula. All fields with data type Code must be converted into data type DateFormula.
To assign a value to data type DateFormula, whether it is a field or a variable, you must use the EVALUATE function.
Example
IF FORMAT(Dateformulavariable) = ' ' THEN EVALUATE(Dateformulavariable, '1W');
You must use the FORMAT function to make a comparison with a text string. If you do not use this function, the IF statement will fail, because you can not compare DateFormula with
data type Text.
Designing Journal Forms
The default order of fields in journals is:
Date, Document Type, Document No., No., Description, Amount
The order of fields in ledger entry forms should be the same. The order of fields in forms and reports should also be the same.
Using Subforms
When you add a subform control to a form you should normally set the properties
HorzGlue=Both, VertGlue=Both and Border=No. Remember that the subform control and the form you refer to must be the same size.
Making Semi-Editable Tabular Forms
Instead of setting the property Editable=No on a tabular form, you can set the property InlineEditing=Yes on the TableBox. This makes the form semi-editable.
Making Non-Editable Card Forms
To make it possible to delete records on a card form but not possible to edit the field on the form, set the property Editable=No on the card form’s TabControl, and set the properties InsertAllowed=No and ModifyAllowed=No on the form.
Table Relations to System Tables
To make Lookup work on a field that has a table relation to a system table, you must always explicitly set the LookupFormID property on controls showing the field.
Form Evaluation Order
It can be hard to know exactly how triggers in a form are activated. To test what actually happens, you can add code to the triggers so that a log is written to an external text file.
Translating Objects
When you translate a set of objects or an entire application, you must use correct and consistent terminology. You must also prevent the translation from adding new errors to the application.
Follow these steps when you translate the objects to identify any errors that you may have introduced.
Remove Date, Time and Modified flags from the objects. Export the objects to a text file.
Use the Tools, Translate functions to translate the objects. Compile the translated objects.
Translate the objects back to the original language. Compile the retranslated objects.
Remove Date, Time and Modified flags from the objects. Export the objects to a text file.
Compare the original object text file with the new one. Any differences are likely to be due to conflicting translations.
Table Functions
In C/SIDE 1.10 and later versions, it is possible to write functions in table objects and call these functions from outside the table. Therefore we recommend that all small functions that were previously located in separate codeunits now be placed in the tables.
Following this recommendation will make your application more object-oriented because most functions that manipulate data in a specific table will be defined directly in the table itself.
FormIDs on Tables
Remember to set the LookupFormID and DrillDownFormID properties on most tables. You cannot anticipate when a user will need to be able to activate a Lookup or DrillDown button – for example, if someone makes a report with a filter tab on the table, the Lookup button on the filter tab will not appear unless the LookupFormID property is set on the table.
Calculating Totals in Reports
It is important not to calculate manually a total that you want to show in a TransportHeader or TransportFooter (because you never know whether the TransportHeader or
Therefore, use the CurrReport.CREATETOTALS function to calculate totals in a report. Never have code like Sum := Sum + Number in the OnAfterGetRecord trigger for a data item.
Never Stop in OnModify
The OnModify trigger on a table should never contain code that can stop the user from recording a change – for example, code for displaying error messages.
That is, if a user has previously changed the contents of some fields in a record, these changes must always be accepted by the system.
Similarly, in tables where records are entered in forms having the property
DelayedInsert=Yes, any code in an OnInsert trigger should always succeed. This applies to journal lines, for example.
Placing Fields on Forms
Microsoft Dynamics NAV provides you with several features for creating forms that are both useful and attractive.
If you use tab controls on card forms, you can show many fields without giving a cluttered impression. And on tabular forms, the facility of hiding/showing columns lets you hide many fields that are still included - the user can easily see the fields when needed.
These features make it possible to demonstrate most of the functionality of Microsoft Dynamics NAV and thus ensure a match between the program and the market segment. This section contains guidelines for which fields to include on forms in Microsoft Dynamics NAV – and in which order. You will find a section about card forms and a section about tabular forms.
For card forms as well as tabular forms, consistency is important. Similar forms in the application areas must be composed the same way.
Card Forms
Some card forms are related to a table that contains only a few fields. It is not hard to create such forms because it is often obvious how to select and place the fields.
Most card forms, however, are related to tables with many fields. It can be difficult to create these forms, so the guidelines concentrate on them.
Many forms use several tab controls. How many tabs are needed and what to call the tabs are specific to each form. Two tabs are often used: "General" as the first (and maybe only) tab and "Invoicing" or "Posting" as the second (sometimes third) tab.
All relevant fields must be included on a card form. Even card forms with many tabs have a limited space for fields, so you have to consider relevancy carefully. Which fields to include depends on the purpose of each form.
Please note:
Dimensions (such as department, project or location) must always be included.
Do not include fields that are automatically filled in and do not normally need to be changed by the user.
Do not place the same field twice on a form - not even on different tabs. If two or more fields are related according to source or function, group them.
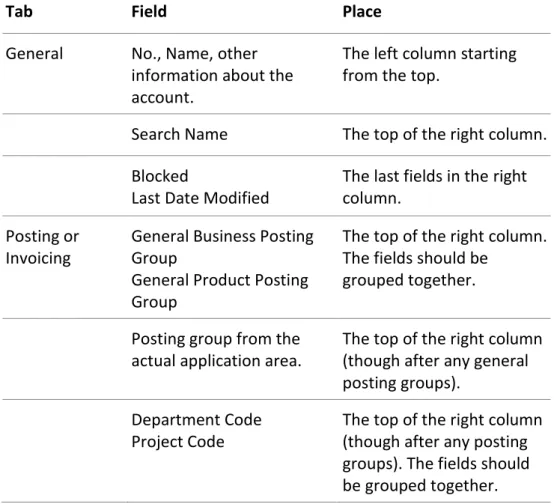
Where to place a field also depends on the specific form. Some tabs and fields are used on many forms, however. For the sake of consistency, please use the location listed here - unless it is very inappropriate for some reason - if you use one of the following fields:
Tab Field Place
General No., Name, other information about the account.
The left column starting from the top.
Search Name The top of the right column.
Blocked
Last Date Modified
The last fields in the right column.
Posting or Invoicing
General Business Posting Group
General Product Posting Group
The top of the right column. The fields should be
grouped together.
Posting group from the actual application area.
The top of the right column (though after any general posting groups).
Department Code Project Code
The top of the right column (though after any posting groups). The fields should be grouped together.
Tabular Forms
In general, all fields are included on tabular forms. Some exceptions are mentioned below. The fields are shown or hidden depending on how relevant they are and what the layout of the form is.
You must consider the following points when you create tabular forms:
Dimensions (such as department or project) must always be included. The fields should normally be hidden.
FlowFields are calculated even when they are hidden. Therefore, do not include FlowFields on tabular forms (unless the form is seldom used or the field is essential).
Including more than about 25 fields on a form will affect performance. Therefore, use the possibility of "including all fields but hiding most" very carefully. Because performance considerations, tabular forms should not include fields that may be informative but cannot be changed - Posting Group, Journal Name, Weights and Source Type, for example.
Never include fields that are used internally in the program, such as Closed by Entry No. Tabular forms are used for all the forms in the Setup menu. Creating these forms does not typically cause problems because they often contain only a code and a few information fields.
Tabular forms like journals, sales/purchase lines and ledgers are more difficult to create and maintain properly because the related tables contain a lot of functionality and many fields. Making a decision about which fields to use on a form (and in which order) can be difficult. In W1 the same template is used to compose these forms so that they look similar. The template is shown in the following.
The template is divided into sections according to functionality. In each section, the most common field names are mentioned. Please note that the template does not include all functionality in W1 and that in certain cases in W1 the order indicated in the template has not been followed.
Section Example of Fields
Dates Posting Date
Document Date
Document Entry Type
Document Type Document No. No. (of Account)
Posting Description
Dimensions Department Code
Project Code Business Unit Code Location Code
Salesperson/Purchaser Code Work Type Code
Phase Code Task Code Step Code
Currency Currency Code Exchange Rate General Posting Setup General Posting Type
General Business Posting Group General Product Posting Group
Quantity Quantity
Invoiced Quantity Remaining Quantity Unit of Measure Code Prices/Cost Direct Unit Cost
Indirect Cost % Unit Cost Total Cost Profit % Unit Price Total Price Price Group Code Chargeable
The exact name and order depend on the application area.
Amounts Amount
Amount Including VAT VAT Amount
Remaining Amount
Amounts in LCY must follow each amount type. Balancing Account Balancing Account Type
Balancing Account No.
Balancing General Posting Type
Balancing General Business Posting Group Balancing General Product Posting Group Sales/Purchase and
Discount
Sales/Purchase (LCY) Profit (LCY)
Line Discount % Line Discount Amount Allow Invoice Discount Invoice Discount Amount Payment Terms Payment Terms Code
Due Date
Payment Discount Date Payment Discount %
Application Serial No.
Applies-to Document Type Applies-to Document No. Applies-to ID
Applies-to Item Entry Applies-to Entry Apply and Close (Job) Open Miscellaneous Information Cost Is Adjusted Cost Posted to G/L On Hold
Bank Payment Type Intrastat Transaction Type
Transport Method Country Code Posting Information Quantity to Ship
Quantity Shipped Quantity to Invoice Quantity Invoiced Audit Information User ID
Source Code Reason Code Entry No.
User-Defined Functions
When to Create New Functions
Do not move a piece of code to a new function unless the code is non-trivial and the new function is afterwards called from more than one place.
When to Create Parameters for a Function
Create for a function only those parameters that are necessary for it to operate on different data – depending on where it is called from. If a function also changes a global variable, however, you can transfer the global variable to the function to indicate that the function will change this variable.
When to Create Local Variables for a Function
You can use additional local variables in the same way that you would use them in other development languages and environments.
When you create a user-defined function, set the property Local=Yes unless you actually want to access the function from outside the object.
User Messages
When you write messages users will see, follow these guidelines:
Write the messages as correctly as possible according to the guidelines for your national language. This is the most important rule to follow.
When you write a message that is similar to one in the ETX file, phrase it to be as similar to the ETX message as possible. This will make messages consistent throughout the system. Do not use backslashes to indicate line breaks in a message. Windows will usually do the line formatting. In Dialog.OPEN, however, you must use backslashes in order for the message to be aligned correctly.
Use the C/AL functions FIELDNAME and TABLENAME whenever possible so the user can always recognize a term that indicates a field or table name.
The only exception to this is in Dialog.OPEN. Here you can use the field name directly; otherwise it may be difficult to align correctly. If you refer to a field name without using FIELDNAME, type the field name without any single or double quotation marks.
Try to write all messages (and other sentences) on one line only. If you need to use more than one line, try to start each new line after a period rather than in the middle of a sentence.
Do not enter the text directly in the C/AL code. Instead, you must enter it as a text constant so that the message can be translated.
Note
There is no naming convention for the text constants. However, you can do as the examples describe.
ERROR, FIELDERROR
The message must describe what is wrong and also how to solve the problem. Write a short descriptive message; do not use more words than necessary.
Always end ERROR with a period. A period is automatically inserted at the end of FIELDERROR. After ERROR, enter a reference to the text constant and create the text constant in the C/AL Globals window.
For more information, see the Microsoft Dynamics NAV 2009 Developer and IT Pro Help. Example
ERROR(
Text1000);
Then, in the C/AL Globals window, enter the message as a text constant with name value=Text1000 and ConstValue=%1 must be specified.
Or:
IF FileName = ' ' THEN
ERROR(Text1001);
where the ConstValue of the text constant is:
%1 ... %2.',FIELDNAME(Field1),Field1);
Tell the user when he or she must or cannot do something, so it is clear what action must be taken.
Example
ERROR(Text1002)
ConstValue=You cannot...
Example
ERROR(Text1003)
ConstValue=You must enter the ...
Use the present rather than the past tense. Example
ERROR(Text1004)
ConstValue=There is nothing to post.
MESSAGE
Always end MESSAGE with a period.
Supply the user with a message when the system has finished doing something. Write the message in the past tense.
Example
In the C/AL Editor, enter the following:
MESSAGE(Text1000);
Then, in the C/AL Globals window, enter the message as a text constant with name value=Text1000 and ConstValue=The journal lines were successfully posted.
CONFIRM
Example
IF NOT CONFIRM(Text1010) THEN EXIT;
ConstValue=Do you want to continue?
Dialog.OPEN
Use Dialog.OPEN only to indicate that the system is doing something. If possible, use a progress indicator. Enter the actual message as a text constant as mentioned above. When you enter the message, use the active voice. (For example, say “Processing items” rather than “Items are being processed.”)
End a message statement with an ellipsis (three periods) to indicate that the system is doing something.
Use two backslashes at the end of a line in a message to insert extra space before the next lines. These subsequent lines (if there are any) tell what is actually being processed.
The #-fields are aligned to the left with at least one space character between the longest text and #. There is also at least one space character between the #- and @-fields.
The text before #- and @-fields must always span at least 16 characters, including a final space character. This means that you will need to add extra space characters if your text is less than 15 characters long.
Example
Window.OPEN(Text1011);
ConstValue=Processing items...
Example
Window.OPEN(Text1012)
ConstValue=Processing items...\\Account 123456\Date010101
Example
Window.OPEN(Text1012)
ConstValue=Batch Name 123456\\Checking lines #2###### @5@@@@@@@@@@@@@\Checking balance #3######
@5@@@@@@@@@@@@@\Posting lines #4###### @5@@@@@@@@@@@@@
The character lengths for the # and @-fields are displayed in the table below.
Data Type Field Length
Code 12 Date 8 Decimal (default) 12 Decimal (percentage) 8 Integer 8 Option Field 12 Progress Indicator 15 Text 25 Time 8
Table Access
If it is necessary to change the key before accessing a table in the database, first set the correct key, then set the correct filters, and finally, access the table.
Put only the necessary key fields in a call of SETCURRENTKEY. That is, if the table order is not important, use only the fields that are used in the subsequent calls of SETRANGE and
SETFILTER. This makes it possible to change the definition of the key (as long as it still includes the fields mentioned in the call of SETCURRENTKEY – in the order given) without having to change any code.
Example Rec.RESET; Rec.SETCURRENTKEY(Field1,Field2); Rec.SETRANGE(Field1,x); Rec.SETRANGE(Field2,y); Rec.FIND('-');
In the example, a possible key is Field 1, Field2, Field 3. Without changing the code above, the key could be changed to Field1, Field3, Field2.
Table Locking
To avoid deadlock and maintain consistency in the database, certain rules must be observed. The Microsoft Dynamics NAV database has a deadlock protection that prevents the entire system from locking up.
Locking Orders
To prevent individual users from experiencing deadlock, however, certain tables must be locked in a specific order. In the base application, there are four main groups of tables to consider:
Journals
Non-posted lines and headers Posted lines and headers Ledger entries and registers
Journals
The main rule in Microsoft Dynamics NAV is always to lock tables on the lowest level first. A journal has three levels: templates are on the highest level and lines on the lowest. Batch names are in between. When a journal template is to be deleted, the application will first delete the journal lines and thereby implicitly lock them. It will then repeat the process with the batch names. Finally, the template can be deleted. The rule results in this locking order: Journal line
Batch name Journal template
Non-Posted Lines and Headers
Because database consistency in the application is very important, there is another rule that must be followed when sales lines are locked before the corresponding sales header. When a user tries to insert a new sales line, the Sales Line table is automatically locked. Another user cannot delete the sales header at the exact same time, because the sales lines have to be deleted before a sales header can be deleted. Because of this, there will never be sales lines without a corresponding sales header. The same is true for purchase headers and lines. The locking order is as follows:
1. Sales Line table/Purchase Line table 2. Sales Header table/Purchase Header table
Posted Lines and Headers
You must also respect a locking order when working with both posted headers and lines and with headers and lines that are not yet posted. The main principles are that posted headers are locked before posted lines, and purchase tables are locked before sales tables. Posted tables are locked before non-posted tables. These principles result in the following locking order:
1. Purch. Rcpt. Header 2. Purch. Rcpt. Line 3. Sales Shipment Header 4. Sales Shipment Line
5. Sales Invoice Header/Sales Cr. Memo Header/Purch. Inv. Header/ Purch. Cr. Memo Hdr.
6. Sales Invoice Line/Sales Cr. Memo Line/Purch. Inv. Line/ Purch. Cr. Memo Line
7. Purchase Line 8. Purchase Header 9. Sales Line
10.Sales Header
Ledger Entries and Registers
A ledger entry table must always be locked before its corresponding register table, for example, G/L Entry before G/L Register.
Putting Functions in Objects
When you write a function, you will often need user input such as the value, key or filter of a table record in a form. In these cases, attach the table to a codeunit and put the function in the OnRun trigger, so that the function can be activated directly from a form using the Property Sheet. That is, unless it is absolutely necessary, don’t force people to write C/AL code in order to use your objects when they design forms.
If you want to provide the user with more filtering and sorting possibilities or other option settings before starting a function, use a report object (with the property
ProcessingOnly=Yes), unless a single call of CONFIRM or STRMENU to ask for user information will do.
Naming Conventions
Precise and consistent terminology helps the end user work with the application. Rules for naming and abbreviating everything will also help programmers gain an understanding of the base application and develop new features faster.
This chapter contains guidelines for naming everything in your application – that is, objects, table fields, variables, and so on.
General Guidelines
Use the existing terminology whenever possible.
Everything in a set of objects must be named in the same language. This chapter describes naming conventions in English (United States).
Note
Whenever you review the terminology in a set of objects, use the Tools, Translate, Export/Import functions in C/SIDE. Export the texts to a text file to review them, and then import the text file into C/SIDE.
Visible Named Items
This section describes naming of all visible items in an application such as table fields – that is, all those items that might be presented to a Microsoft Dynamics NAV user.
When you develop in C/SIDE, set the application language to English (United States) so that the Name property is equal to the caption in English (United States). This will make it easier to upgrade and reuse modifications.
Remember that the user will see the value of the Caption property but not the Name property. But you as the developer must follow the naming convention in this section both for the name in English (United States) and for the caption in your local language.
Naming Objects
Two objects of the same type must not have the same name.
In general, each object must be named in a way that leaves no doubt as to what it is concerned with (for example, an object can be specifically related to customers, items or resources). Do not give a table the name “Status,” for example, because the word Status is too general and could refer to something in almost every table.
Table Objects
The names of table objects are always in the singular. That is, the table name corresponds to what one record in the table is called.
Form Objects
The name of a form depends on the form type. A card form has the singular form of the table name; a tabular form has the plural form of the table name. This gives the users an idea of the type of form they have selected or that will be presented. If a table can be accessed by both a card form and a tabular form, the form names should explicitly describe the form types (for example, Item Card and Item List). This tells the user that there is more than one way to access the table. Other form types (statistics, for example) are given names that are as descriptive as possible.
Report Objects
The naming of reports is as important as that of forms and tables. Users see the caption of a report object when they need to identify a sales invoice, for example, or when they modify or create reports. The caption is also shown in the request window. This is why the caption (and the name in English) should be as descriptive as possible and not include abbreviations. Whenever possible, the caption should be the same as the heading in the actual report.
Table Fields
The name and caption of a field should be as descriptive as possible and should be able to stand alone; that is, the user should not need to see the caption in the context of other fields in order to understand what it is.
Describe Field Contents and Field Type
The field contents and the field type should be described in the caption. For example: Include “Date” when you name a date field: Posting Date, for example. The exception is a date interval: Allow Posting From, for example.
If the field contains a percentage, include this. Percent is displayed with the percent sign:
Profit %, for example.
Include “Quantity” (or “Qty.”) when you name a quantity field: Quantity Shipped, for example. Replace quantity with “No.” when referring to the number of entries: No. Printed
and No. of New Records, for example.
Include “Amount” (or “Amt.”) when you name an amount field: Debit Amount, for example.
Amount, Cost and Price
On the other hand, do distinguish between amount and cost or price. Cost and price are typically used when naming an amount per unit, while amount is cost or price multiplied by quantity.
“Amount” can also be omitted when the following words are included in the caption:
Adj. (LCY) Balance Base Charge COGS Discounts Fee Net Change Payments
Profit
Purchases
Sales
Usage
Amount” becomes “Amounts” in naming a FlowField: Invoice Amounts, for example. When there is some doubt about whether an amount field is in the local currency (in the
Cust. Ledger Entry table, for example), the fields in local currency should have names that end with the ISO currency code for the country, in parentheses. For the worldwide version, LCY (Local Currency) is used: Sales (LCY), for example. If there is a symbol for a country’s currency, it can be used instead: Sales ($). These fields will not ordinarily be included in the forms, so users will not be confused by the (LCY).
If the field contains parentheses, put a space character before the parentheses: Usage (Price), for example.
Formulate names for boolean fields as positive questions or statements: Cost is Adjusted, for example.
No. and Code
For many tables, the primary key is a code, and the field that contains it is just called Code. Exceptions to this are the main tables listed below, where the user will typically use numeric values as keys. Because of this, the field is called No. even though the field type is still code.
G/L Account Customer Vendor Item Item Group Resource Resource Group Job Purchase Header
Sales Header
Table Relations
With table relations, base the field name on the table and its primary key – for example,
Project Code and Pay-to Vendor No.
Exceptions to this are relations to G/L accounts and posting groups:
A field name that refers to a G/L Account always ends with “Account” (or “Acc.”), never with “G/L Account No.” An example of this is Inventory Account.
An exception is when the field name refers to the actual G/L Account – for example, G/L Account No. in the G/L Entry table. Account No. is also used in the General Journal. This field can contain either a G/L account number, a customer number or a vendor number. (Only in this situation are customers and vendors also considered to be accounts.)
When a field has a table relation to a posting group table, the field is called Posting Group.
From/To, Starting/Ending, First/Last and Before/After
Use From, To, Starting, Ending, First, Last, Before and After in field names as follows: From/To
Use From or To when referring to a line number in a ledger entry table: From Entry No., for example.
Starting/Ending
Starting Date is used as a “valid-from” date; Ending Date means “valid until.”
First/Last
First means the earliest. Last means the latest: Last Sales Inv. No., for example. Before/After
Use Before or After with an amount before or after a calculation: Amount Added Before, for example.
Form Buttons
Captions for command and menu buttons (and for the menu items on a menu button) depend on whether the control is used as a routing choice to open another form or as a control to activate something.
Routing Choice
The first menu button on a card, tabular or list form normally bears the name of the
corresponding table. A menu item below this is considered to be the second part of the full name of the form that will be opened when the control is clicked. For example, the caption for a menu button is “Customer”, one of the menu items is “Statistics”, and the form which is about to be opened is named “Customer Statistics”.
When option buttons are used on the main menu form with the property ButtonBorder set to Yes, the caption for these controls is the name of the application module.
Action Choice
When a control is used to activate something, the caption for it must be a verb in the imperative: Check, for example. If a form has many action controls, they can be gathered as menu items on one menu button called Function or Posting, for example.
Other Named Items
This section describes naming of “internal” items, that is, naming that is not visible to a Microsoft Dynamics NAV user. Since they are never shown to users, they do not have captions.
Codeunit Objects
A codeunit is named almost like a report except that the name begins with the object that the codeunit processes, followed by a dash. The object is normally a record abbreviated as a variable (see rules for this below). The description of the codeunit is written in the
imperative (without abbreviations if possible): Purch-Explode BOM, for example.
Variables
Blanks, periods and other characters (such as parentheses) that would make quotation marks around a variable necessary must be omitted. For example, the periods and blanks are omitted in GenJnlBatch. In addition, currency unit signs, such as $, should be replaced by the corresponding currency unit code: AmountUSD, for example.
This alone is not enough to make a variable unique (that is, not the same as the
corresponding field name). The variable is not necessarily unique when translated to another language.
A variable must begin with a capital letter. If a variable is a compound of two or more words or abbreviations, each word or abbreviation should begin with a capital letter.
The name of a variable should describe its usage wherever possible. If necessary, you can start with the table name: CustInvDiscAmountLCY, for example. In a form for a report, if there are several variables that would otherwise have the same name, use appropriate prefixes or suffixes to differentiate them: EnteredPostingDate (prefix is “Entered”), for example.
When naming variables, follow country-specific rules for abbreviations.
When setting up table and field variables, give the variable the same name as the table or field, following the rules above.
If a variable with the same name already exists, add the suffix 2 to the variable name. If a variable with this name also exists, use 3 instead, and so on. Use these numbers only be if you cannot establish a unique variable in another way. NewCustLedgEntry is better than CustLedgEntry2, for example.
When you want to use a variable to store a value temporarily, start with Temp: TempType, for example. Old and New can be used as prefixes for record variables when you use these for old tables and new tables. Do not use “x” as a prefix. This is used only in table triggers, where the record variable is created automatically by the development environment.
Usage of From/To, Starting/Ending, First/Last and Before/After follows the same guidelines as described for table fields From/To, St. For variables, follow these guidelines:
From/To
Use From or To when copying from or to a table.
Starting/Ending
Use Starting or Ending with dates and positions.
First/Last
Use First or Last when you mean the first (or last) record in a table or line in a journal. You can also use it as a flag to indicate that this is the first record that is processed: FirstOrder, for example.
Variables that refer to codeunits and reports must be named exactly like the object being referred to. Only characters that would require quotation marks must be removed.
Parameters and Local Variables
Parameters and local variables have their own number series, so do not call a parameter GenJnlLine4, for example, because a global variable called GenJnlLine3 already exists.
Object Variables
When a variable is of the object type (Record, Form, Report, Dataport or Codeunit) and the object has a name that also functions as a field name or local function name, you can give the variable name the suffix Rec, Form, Report, Dataport or Codeunit.
Example VAR
SourceCodeRec : Record "Source Code"; SourceCode : Code(10);
Since “Source Code” is the name of a table as well as the name of a field in other tables, using the name “SourceCode” for variables holding the two different kinds of information would be confusing.
User-Defined Functions
When naming user-defined functions, start if possible with a verb in the imperative: ApplyCustLedgEntry, for example.
Usage of function name prefixes:
If the code makes something, use “Make” as a prefix. If the code inserts something, use “Insert” as a prefix. If something is checked, use “Check” as a prefix.
Form Controls
Do not give a form control a name unless you want to refer to it in your C/AL code. When it is necessary to name it, prefix the name with the abbreviated name of the associated table or form.
Numbering Conventions
Programmers will be able to understand the base application and develop new features more quickly if they familiarize themselves with the guidelines for numbering objects and fields.
Each object and field in C/SIDE is identified by a number stored in its ID property. This chapter starts by describing the numbering system for the entire development system. Numbering conventions used in the base application are also described, as well as some guidelines that can be used outside the base application.
The Numbering System
Objects
The objects in C/SIDE are grouped as indicated in the table below.
Object Number Interval Description
1–9,999 Base application design area
10,000–49,999 Country design area
50,000–99,999 Customer design area
100,000–999,999,999 Microsoft Certified Partner design area
Note
Even though they lie in the Customer Design Area, do not use the object numbers 99,000–99,999 because the training material for Microsoft Dynamics NAV use these numbers.
Fields
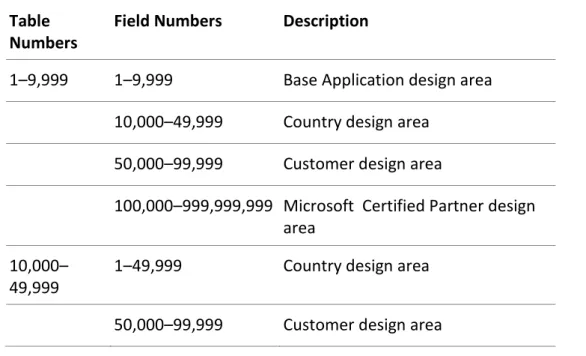
The fields in C/SIDE are grouped as indicated in the table below:
Table Numbers
Field Numbers Description
1–9,999 1–9,999 Base Application design area
10,000–49,999 Country design area
50,000–99,999 Customer design area
100,000–999,999,999 Microsoft Certified Partner design area
10,000– 49,999
1–49,999 Country design area
100,000–999,999,999 Microsoft Certified Partner design area
50,000– 99,999
1–999,999,999 Customer design area
100,000– 999,999,999
1–9,999 Microsoft Certified Partner design area
10,000–49,999 Country design area
50,000–99,999 Customer design area
100,000–999,999,999 Microsoft Certified Partner design area
Note
Even though they lie in the Customer Design Area, do not use the field numbers 99,000–99,999 in tables numbered between 1 and 49,999 because the training materials for Microsoft Dynamics NAV use these numbers.
When a Microsoft Certified Partnerbuys the insert permissions for a table number interval (for example 200,000–200,099), he or she also gets insert permissions for the same number interval (200,000–200,099) for fields in all other tables. Although the creator of a table could in fact create fields in all field number intervals in the tables for which he or she has purchased insert permissions, only the recommended field numbers should be used. Otherwise fields in solutions from different vendors can interfere with each other.
Objects
The numbering conventions for objects depend on the object type.
Tables
Table object numbers are not divided into intervals in the Microsoft Dynamics NAV base application. Use the first available object number when you create a table. Try to group related tables together.
Forms
Form object numbers are not divided into intervals in the Microsoft Dynamics NAV base application. Use the first available object number when you create a form. Try to group related forms together.
Reports
Report objects are numbered in intervals in the Microsoft Dynamics NAV base application. There is an interval for each application area. See the list below.
Report Number Interval
Application Areas
1–99 G/L, including VAT and Consolidation
100–199 Accounts Receivable
200–299 Sales
300–399 Accounts Payable
400–499 Purchases
500–599 Common to both Purchases and Sales including Exchange Rate
600–699 Requisition
700–799 Item, including IntraStat
800–899 Bill of Materials
900–999 Item Group
1,000–1,099 Inventory (common to Item, BOM and Item Group)
1,100–1,199 Resource
1,200–1,299 Job
1,300–1,399 General
1,400–9,899 Future areas
9,900–9,999 Utilities
When you create a new report that does not belong in one of the existing application areas, use a number from a new interval (of length 100) between 1,400–9,9899. This can also be necessary if an interval is full.
Note
Reports made by Microsoft Certified Partners cannot use the numbering intervals specified previously. Instead, they must use their own numbering intervals.
Reports and Batch Jobs
If a report object can print, obviously it is called a report. Otherwise, it is called a batch job. Reports are numbered starting at the lower end of the interval. Batch jobs are numbered starting at the higher end, with decreasing numbers.
Similar Reports
Almost identical reports within the application areas are numbered when possible with the same two final digits, even if the report name is different. For example, the Sales Invoice report is number 206 and the similar Purchase Invoice report is number 406. Other examples are the date compression batch jobs for ledger entry tables, which always end with 98, and date compressions for budget entries, which always end with 97. This practice may cause gaps in the numbering sequence, but it helps the programmer when adjustments to similar reports elsewhere in the application are needed.
Codeunits
Codeunit object numbers are not divided into intervals. Use the first available object number when you create a codeunit. Try to group related codeunits together.
Journal Posting Codeunits
The journal posting codeunits follow a pattern that makes it easier to understand a new journal once you are familiar with one group of journal posting codeunits.
A group consists of two parts. Codeunits in the first part post a journal, and those in the second part manage the journals.
Codeunit Final Digit Journal Posting Codeunits
1 Journal Line–Check
2 Journal Line–Post
3 Batch Name–Post
Codeunit Final Digit Journal Managing Codeunits
1 Journal–Post 2 Journal–Post+Print 3 Journal–Batch Post 4 Journal–Batch Post+Print 5 Register–Show Ledger Invoices
Codeunits for posting invoices and so on have a system, too:
Codeunit Final Digit Sales/Purchase Posting Codeunits
0 Sales/Purchase–Post
1 Sales/Purchase–Post (Yes/No)
2 Sales/Purchase–Post+Print
When you create codeunits for the sales application areas, use the same final digit for similar purchase application areas.
Table Fields
When you assign numbers to new fields in a table, consider whether the table is associated with other related tables. If so, the fields should often be added to these tables as well. In this case, the field must have the same field number in all of the tables. If you add a new field to the Customer table, for example, but you do not add the field to the Vendor table, you still have to reserve that field number in the Vendor table for the Customer field. It is easier to maintain the application when the tables look very similar.
Examples of associated tables are:
Customer and Vendor tables
Journal Template tables
Batch Name tables
Journal Line tables
Sales Header, Sales Shipment Header, Sales Invoice Header and Sales Credit Memo Header tables
Purchase Line, Purchase Receipt Line, Purchase Invoice Line and Purchase Credit Memo Line tables
Developing Add-on Applications
Many questions arise in connection with the development of add-on applications for Microsoft Dynamics NAV.
When you develop an add-on application for the Microsoft Dynamics NAV base application, you will always need to make some changes in it. These changes can vary from a simple menu button on one of the menus to more complicated changes in the tables and the
associated C/AL code for existing objects. One goal for an add-on application developer must be to develop the application in a way that makes independent updates of the base
application plus one or more add-on applications as automatic as possible, so that the customer does not need not to hire consultants to take care of an update.
Protecting Objects
We recommend that you do not protect your code because in the future we are moving toward, things will be more and more open.
In connection with copyright considerations, remember that add-on applications are
associated with protected license areas that ensure a steady income flow. Microsoft has, for example, set the price of the base application low enough and the price of objects in the custom area high enough that programming a new customer application is not attractive. Microsoft intends the authorization process for new add-on applications to ensure that a new application will not resemble an existing one too closely.
For example, let’s say that in industry A, a certain developer has offered add-on application 1 for a period of time. Now another developer wants to offer add-on application 2 for the same industry. The applications resemble each other very much, and some of the source code is almost identical. In this case, Microsoft will not approve application 2. On the other hand, if a third developer produces add-on application 3 that is for the same industry but has very different functionality from application 1, Microsoft will approve application 3 as long as the guidelines and other rules are followed.
There can, however, be situations in which outside demands require protecting particular objects. Certain institutions (such as banks, tax authorities and so on) may have
requirements that some code be approved and protected; if you change this type of code, you will have to get the product approval renewed.
Changing Base Application Objects - General Guidelines
Because the entire application is programmed in C/AL, the 4th generation programming language for Microsoft Dynamics NAV, the application code is open and accessible. The openness makes it particularly easy to program add-on applications, but an open program interface also means that there can be situations where add-on applications come to interfere with existing objects in the base application.
Before any changes are actually made, it is important for the developer to have a clear idea of how changes in the base objects will be undertaken and how the changes will be
documented, so that there will be uniform documentation for other developers who will maintain the system.
Microsoft has the following guidelines that must be followed for fields, form controls and C/AL code that affect the Microsoft Dynamics NAV base application.
Keep changes to base objects to an absolute minimum. Each change you make to a base object will cost your customers money when future updates are needed.
To modify an object other than a report, make your changes directly in the existing object. It will be best to do this in the case of reports, too, but if you want to make substantial changes in a report, you may copy the original report and modify the copy.
Microsoft plans to develop and maintain tools that will simplify the work involved in updating add-on applications when new versions of the base application are released. Microsoft intends to publish recommendations about maintaining a log that describes how add-on applications and customer-specific modifications affect the application.
If you must make changes in the base application, we recommend that you follow the rules in the following sections.
Changing Table Fields
Updates of Microsoft Dynamics NAV will not affect new fields that have been added to existing tables. That is, the new fields and their properties will be left intact.
Because the fields are defined by field number, the field number is itself a type of
documentation, but it is a good idea to indicate the relationship to the add-on application in
the Description field on the Property Sheet.
We recommend that you have your add-on application approved; you will then be assigned a reserved number series for the add-on application.