IMPLEMENTATION GUIDE DECEMBER 2014
HGST
Flash Pools
Implementation
Guide
for
MySQL
Database
Tale of Contents
2 Introduction
2 HGST Software
2 HGST Space (logical volume) and HA Benefits
2 MySQL Challenges
3 HGST Flash Pool Solution for MySQL
3 Evolution from Master/Slave to Flash Pool
4 Database Snapshot for Backup, ETL and Other
Off-host Process
5 Implementation
5 System Configuration
5 Four Servers: Supermicro X9DRT
5 Hardware and Software requirements
5 Software Requirements
5 Network Configuration
5 Summary of steps to Implement HGST Flash Pools
for MySQL database
6 Disable SELinux and iptables
6 Install MySQL
6 Install and Enable CLVM on All Servers
6 Load the Drivers on All Servers in the Cluster
8 Cluster Configuration
8 Space Creation
8 Networking Selection
8 Creating the CLVM Space and the Mirror Space
9 Creating LVM Volumes for Each Master
10 MySQL Configuration and Database Creation
10 HGST MySQL Monitoring
11 Testing Failover of a Master to the Redundant Server
12 Database Snapshots for Off-host Processing
13 Cleanup
13 Performance Metrics
13 HDD Master/Slave Replication vs. FlashMAX Master/
Slave Replication
14 HGST Flash Pools Replication Compared to Master/
Slave SSD Replication
HGST FLASH POOLS IMPLEMENTATION GUIDE FOR MYSQL DATABASE
IMPLEMENTATION GUIDE
Introduction
MySQL is one of the most popular and widely used open source databases. MySQL instances power many of the web’s most demanding applications. Benefits of MySQL are its ease of use, security, inexpensiveness, speed, memory management, ACID compliance, scalability and multi-OS support.
HGST Software
HGST Software is based on FlashMAX®, a PCIe SSD which provides scalable infrastructure with very high performance while running on commodity servers. The software has a volume management feature called HGST Space, which provides aggregated block device from a pool of servers, with a volume-level mirroring feature providing transparent, synchronous replication of data to deliver High Availability.
With Space you can cluster multiple FlashMAX devices and establish full mirroring between them. With 16 nodes, fully mirrored, using 4.8TB FlashMAX Capacity SSDs, you can have 38.4TB of Flash as a single, highly available pool. You can then use the new Graphical User Interface to carve that pool into volumes of any size and serve them up to applications as needed. All hosts in the cluster can see all volumes. Adding servers or devices is a snap and volumes can grow or shrink dynamically.
HGST Space (logical volume) and HA
Benefits
• Highest performance for data intensive workloads
• Pool Flash across entire cluster, break free from single server limitations
• Distributes IOs within the aggregated devices for maximum performance
• Space can be extended to scale to many TBs • Automatic pausing of IOs during failures.
• Transparent replication and high availability via synchronous mirroring
MySQL Challenges
Although MySQL has been widely used by many web and enterprise application, it has key issues in terms of scalability, performance and high availability.
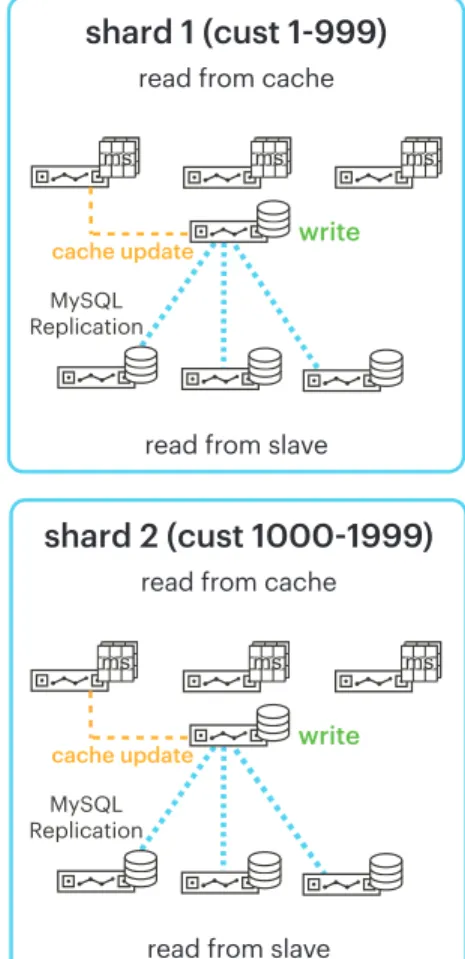
In order to overcome these limitations, users try to split reads from writes by using a Master/Slave infrastructure and partitioning the data by means of sharding.
Most users have these pairs to provide resiliency. Should the Master go down, a slave can be promoted and serving queries in seconds, with only minimal data loss.
Other architectures have more than one slave and use them to offload read queries from the web tier. These read-only copies are needed because traditional spinning disk MySQL’s performance just can’t keep up with their application needs.
Another common use for MySQL slaves is ETL or backup purposes. Dumping the database can cause disk and cache thrashing, so it’s important not to run it on a Master that has critical SLAs to meet, so a slave is used for this purpose often.
Finally, a slave can be pulled from a cluster and used to test schema changes, migrate to the development cluster, or other development uses. This greatly simplifies the developer and DBA’s tasks since if things go wrong, the slave can be resynchronized to the Master easily. This leads into enormous hardware infrastructure and complex database management issues.
The main issues are
• Poor utilization of hardware resources like CPU and storage
• Master/Slave lag since replication is asynchronous • Multiple shards having sets of slaves introduces
manageability issue
• CAPEX and OPEX increases as number of server increases
HGST FLASH POOLS IMPLEMENTATION GUIDE FOR MYSQL DATABASE
Figure 1 – HGST Space Cluster & Volume Manager
Figure 2 – Traditional Master/Slave Architecture
MySQL Sharding and Replication
shard 1 (cust 1-999)
read from cache
read from slave
shard 2 (cust 1000-1999)
read from cache
read from slave
write cache update MySQL Replication write cache update MySQL Replication
shard 1 (cust 1-999)
read from cache
read from slave
shard 2 (cust 1000-1999)
read from cache
read from slave
write cache update MySQL Replication write cache update MySQL Replication
HGST Flash Pool Solution
for MySQL
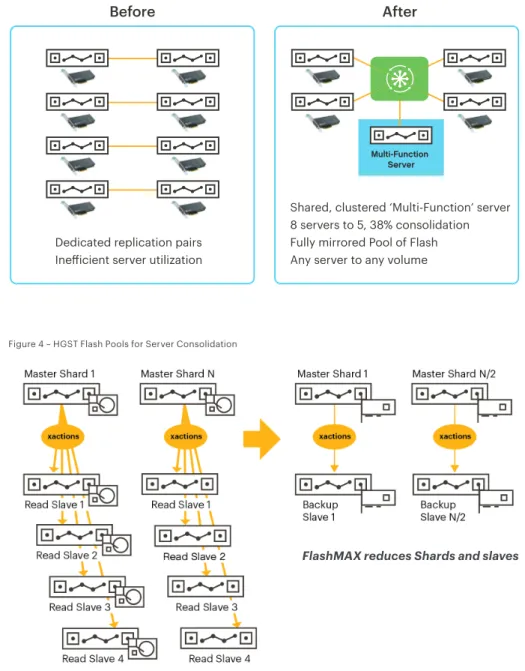
HGST believes that scale-out database architectures are ideal for SSDs. For this type of an environment, FlashMAX PCIe based SSDs have the greatest benefits. FlashMAX can deliver more performance per server than other storage technologies resulting in server consolidations that range from 2:1 to 40:1 depending upon the type of disk being replaced. HGST customers have even seen reductions of 3:1 in servers that were using lower-end SAS and SATA based SSDs, resulting in subsequent power and footprint expense drops of 3x while giving IOPS increases of 400%.
HGST Space with FlashMAX storage provides a unique solution for server consolidation in MySQL or other scale-out databases that use sharding. Using Space, replication can be set from multiple Masters to multiple “virtual” slaves using unique Space volumes. A separate “Redundant Server” can be added to the cluster. When it is needed, the Redundant Server can mount any of the replicated volumes from the Space pool and be used to ensure continued application availability.
In the example shown above, you can see 8 servers going to 5, a reduction of 38% and significant TCO/ROI benefit.
The main benefits of this solution are
• Improve on cluster performance capabilities • Reduce management overhead
• Enhance server utilization and drive TCO • Improve performance, even with fewer servers
Evolution from Master/Slave to Flash
Pool
So let’s actually step through how we get to a Flash Pool architecture from a typical Master/Slave configuration.
Let’s begin with a sharded database comprised of a series of Masters backed by a group of read Slaves. They are all running on HDD arrays, and replication is handled by standard MySQL replication, on a lagging transaction basis.
All those read slaves are consuming too much space and power, so we replace them with PCIe Flash and reduce the number of shards needed accordingly. But we still need a Slave for each Master, mostly for high availability. Because the Master and Slave need to be identically configured, they both have PCIe Flash installed. Replication still lags, being transaction based.
Figure 3 – HGST Flash Pools Redefines MySQL Master/Slave Approach
Dedicated replication pairs Inefficient server utilization
Shared, clustered ‘Multi-Function’ server 8 servers to 5, 38% consolidation Fully mirrored Pool of Flash Any server to any volume
Multi-Function Server
Before
After
Figure 4 – HGST Flash Pools for Server Consolidation
HGST FLASH POOLS IMPLEMENTATION GUIDE FOR MYSQL DATABASE
IMPLEMENTATION GUIDE
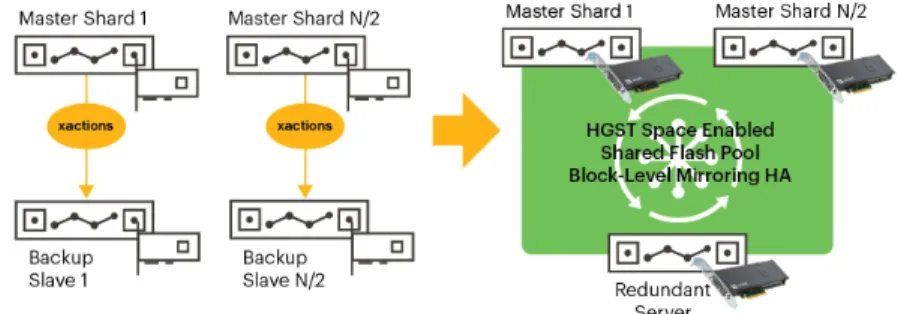
Finally, we consolidate even more by introducing a Flash Pool. In the diagram on the right the same number of Masters are present, they still have Flash, but the slaves are removed and consolidated into a single server. This is made possible because all Flash in the system is now made redundant and visible to all members of the cluster.
It’s conceptually the same as if the Flash inside the servers was made into a redundant SAN array, transparently, while preserving the access times and performance of local PCIe Flash.
The redundant server, instead of running MySQL in normal operation, is only running a monitoring script. No need for setting up Master/Slave pairs as each MySQL server’s data is replicated across the cluster at a disk block level. On a failure, the redundant server can connect itself automatically (via a scripting interface similar to mysqlfailover) to the data files of the failed Master and take over without losing a single transaction in the process.
Database Snapshot for Backup, ETL
and Other Off-host Process
Database level snapshot on CLVM mirrors can be created using custom scripts provided by HGST. The snapshots are available on the redundant server to perform off-host processing, or on the same Master if needed.
Figure 5 – Synchronous Mirroring for Server Consolidation
Figure 6 – Snapshots for Recovery & Multi-Use
Summary of steps to Implement HGST Flash Pools for MySQL
database
• Disable SELINUX and firewalls(iptables and ip6tables), or configure them appropriately • Install and enable Cluster LVM (CLVM) daemon on all nodes
• Install MySQL binaries on all the nodes • Install HGST Space on all four servers
• Install Flash pool script on the fourth server which will act as backup node for the other three nodes in the cluster. • Configure Space on all the nodes.
• Create a Space Volume with HA to run MySQL instance on three nodes • Start the vgc_mysql_failover script on the fourth node
• Configure and create Linux CLVM volume for the three nodes • Create MySQL database on the nodes other than the backup node. • Run YCSB test tool
• Run the vgc_mysql_prepare and vgc_mysql_snap to create mirror and break. • Run the vgc_mysql_clone on the fourth node.
• Check the MySQL instance is up and running. • Stop the MySQL instance on backup node.
• Reboot one of the server running MySQL instance, instance should failover to the backup node. • Check if the backup node is running the Master Instance.
• Provide performance numbers.
Implementation
Installation and Configuration
Installation of cluster solution is very similar to installation of the base FlashMAX drivers. It will require root access, of course, and about 10 minutes to complete.
The following is the configuration used to implement this solution.
System Configuration
Four Servers: Supermicro X9DRT
• Intel® Xeon® CPU E5-2630 v2 @ 2.60GHz• Memory: 64GB • Hard disk: 1 TB • CentOS 6.4
• 10Gb Ethernet network (suggested 10Gb for better performance)
Hardware and Software requirements
• 1 HGST FlashMAX device per server• Minimum of three servers and the fourth server without FlashMAX device.
Software Requirements
For software requirements and compatible versions refer to “HGST Solutions Release Notes 2.0” and “HGST Solutions 2.0 Product Brief”.
Network Configuration
HGST Space Software requires either an InfiniBand or Ethernet network connection before configuring the software. Please refer the HGST Solutions 2.0 User Guide for more details to configure networking.
HGST FLASH POOLS IMPLEMENTATION GUIDE FOR MYSQL DATABASE
IMPLEMENTATION GUIDE
Disable SELinux and iptables
To disable selinux, edit the selinux config file and setSELINUX=disabled on all the servers. If desired it is also possible to configure SELinux to allow MySQL access to the appropriate files, but that is not covered in this document.
Space Software requires the ability to connect between servers via TCP/IP. To ensure this communication can occur without impediment we recommend completely disabling the firewalls by stopping iptables and ensuring it doesn’t start up at boot time, as shown below. Again, if firewalls are required they may be enabled as long as the appropriate ports are opened for access. See the Solutions 2.0 User’s Guide for more information.
Install MySQL
MySQL can be downloaded and installed from Oracle, Percona, or MariaDB. Make sure to install the same version on all nodes on the cluster including the redundant server.
Install and Enable CLVM on All Servers
Install and enable CLVM on all servers.Load the Drivers on All Servers in the
Cluster
Do `service vgcd start` to load drivers. The drivers are set by default to load at system boot time, so you could also simply reset the server.
root@(all servers) # vim /etc/selinux/config ...
SELINUX=disabled
root@(all servers) # echo 0 >/selinux/enforce
root@(all servers) # service iptables stop
iptables: Flushing firewall rules: [ OK ] iptables: Setting chains to policy ACCEPT: filter [ OK ] iptables: Unloading modules: [ OK ] root@(all servers) # chkconfig iptables off
root@(all servers) # service ip6tables stop
ip6tables: Flushing firewall rules: [ OK ] ip6tables: Setting chains to policy ACCEPT: filter [ OK ] ip6tables: Unloading modules: [ OK ] root@(all servers) # chkconfig ip6tables off
root@(all servers) # yum install –y lvm2-cluster cmirror root@(all servers)# service clvmd start
Starting clvmd:
Activating VG(s): No volume groups found
[ OK ] root@(all servers)# service cmirrord start
Starting cmirrord: [ OK ] root@(all servers)# chkconfig clvmd on
root@(all servers)# chkconfig cmirrord on
root@(all servers) # service vgcd start
Loading kernel modules... [ OK ] Rescanning SW RAID volumes... [ OK ] Rescanning LVM volumes... [ OK ] Enabling swap devices... [ OK ] Rescanning mount points... [ OK ]
[root@all server]# vgc-monitor
vgc-monitor: Cluster Solutions 2.0.73696.V6 Driver Uptime: 6 days 6:18
Card Name Num Partitions Card Type Status vgca 1 VIR-M2-LP-550-1B Good Partition Usable Capacity RAID FMC
vgca0 555 GB enabled disabled
[root@allservers]# vgc-config -p /dev/vgca0 -m maxperformance --en-able-fmc
vgc-config: Cluster Solutions 2.0.73696.V6
*** WARNING: this operation will erase ALL data on this drive, type <yes> to continue: yes
*** Formatting partition. Please wait... *** On all the servers, please do a ‘vgc-monitor ’ to check the status of
the card.
Enable HGST Space feature “fmc” by running following vgc-config on all servers. This will require a low-level format of the cards and destroy any data present on them.
Run vgc-monitor to make sure FMC feature is enabled:
[root@all servers]# vgc-monitor
vgc-monitor: Cluster Solutions 2.0.73696.V6 Driver Uptime: 6 days 7:24
Card Name Num Partitions Card Type Status vgca 1 VIR-M2-LP-550-1B Good Partition Usable Capacity RAID FMC
HGST FLASH POOLS IMPLEMENTATION GUIDE FOR MYSQL DATABASE
IMPLEMENTATION GUIDE
Cluster Configuration
The vgcclustermgr service should be running on at least N/2 servers on a given N servers on a cluster
Space Creation
The Space is the “shared LUN” that will be used to contain the CLVM volumes for MySQL to execute on. We need to create one “CLVM Space” large enough to contain the CLVM volumes for all of the MySQL instances, and another “Mirror Space” large enough to contain a snapshot/mirror of the largest MySQL volume.
Networking Selection
Spaces communicate across networks using Infiniband RDMA or IP for Ethernet. List all the available networks to use for space and determine which one is your 10Gb link:
Creating the CLVM Space and the
Mirror Space
Create one “CLVM Space” large enough to contain the CLVM volumes for all of the MySQL instances. For example, if each MySQL database is 100GB, and 3 Masters are used, create a 300GB CLVM space. Specify each server as a “-S” storage host, and a “-A” application host. Specify the “-N” network using the name shown above (be sure to use appropriate quotations around the network name). Also, ensure that the “--redundancy” value is “1” to guarantee availability of the data in case of server loss.
[root@tm17 ~]# vgc-cluster domain-add-node –h tm18 DOMAIN_ADD_NODE0000000464
Request Succeeded
[root@tm17 ~]# vgc-cluster domain-add-node –h tm19 DOMAIN_ADD_NODE0000000465
Request Succeeded
[root@tm17 ~]# vgc-cluster domain-add-node –h tm20 DOMAIN_ADD_NODE0000000466
Request Succeeded
[root@tm17 ~]# vgc-cluster domain-list Host State Role
---- ---
---tm17 Online Manager (Active) ====> will act as redundant node for this guide tm18 Online
tm19 Online tm20 Online
[root@tm17 ~]# vgc-cluster network-list
Network Name Type Flags Description
--- ---- --- -
---Net 1 (IPv4) IPv4 autoConfig 172.16.72.0/22
Net 2 (IPv6) IPv6 autoConfig fe80::/64 Net 3 (IPv4) IPv4 autoConfig 192.0.0.0/24
[root@tm17 ~]# vgc-cluster vspace-create -n shard1 -N “Net 3 (IPv4)” -S tm18 -S tm19 -S tm20 -A tm18 -A tm19 -A tm20 -s 325 --redundancy 1
Create another “Mirror Space” large enough to contain a snapshot/ mirror of the largest MySQL volume. For example, using the same example sizes above, this should be a 100GB space as it’s the size of an individual MySQL instance. Use the same name as the prior space and add a postfix of “_m1” to identify it as the Mirror Space.
Creating LVM Volumes for Each Master
Create LVM volume using the Space volume, one for each Master.Create and mount file systems for each Master Once the LVM volumes are created they can be used as if they were local storage in each of the servers. The usual file system creation, fstab creation, etc. should be performed on each Master in the cluster.
Create a file system using any non-cluster file system (XFS, EXT4, etc.). Even though this is a clustered redundancy architecture, each server is accessing its own private LUN and no special clustered file systems are required.
[root@tm17 ~]# vgc-cluster vspace-create -n shard1_m1 -N “Net 3 (IPv4)” -S tm18 -S tm19 -S tm20 -A tm18 -A tm19 -A tm20 -s 100 --redundancy 1
[root@tm18 ~]# pvcreate /dev/shard1 /dev/shard1_m1 Physical volume “/dev/shard1” successfully created Physical volume “/dev/shard1_m1” successfully created [root@tm18 ~]# vgcreate mysql_vg1 /dev/shard1 /dev/shard1_m1 Volume group “mysql_vg1” successfully created
[root@tm18 ~]# lvcreate -L 100 -n shard1_vol mysql_vg1 Logical volume “shard1_vol” created
[root@tm18 ~]# lvcreate -L 100 -n shard2_vol mysql_vg1 Logical volume “shard2_vol” created
[root@tm18 ~]# lvcreate -L 100 -n shard3_vol mysql_vg1 Logical volume “shard3_vol” created
[root@tm18 ~]# mkfs -t ext4 /dev/mysql_vg1/shard1_vol mke2fs 1.41.12 (17-May-2010)
Filesystem label= OS type: Linux
Block size=1024 (log=0) Fragment size=1024 (log=0)
Stride=0 blocks, Stripe width=0 blocks 12288 inodes, 49152 blocks
2457 blocks (5.00%) reserved for the super user First data block=1
Maximum filesystem blocks=50331648 6 block groups
8192 blocks per group, 8192 fragments per group 2048 inodes per group
Superblock backups stored on blocks: 8193, 24577, 40961
Writing inode tables: done
Creating journal (4096 blocks): done
Writing superblocks and filesystem accounting information: done This filesystem will be automatically checked every 33 mounts or 180 days, whichever comes first. Use tune2fs -c or -i to override.
HGST FLASH POOLS IMPLEMENTATION GUIDE FOR MYSQL DATABASE
IMPLEMENTATION GUIDE
Mount the filesystem and give proper permission to the mount point.
Edir /etc/fstab to enable auto mount of the lvm volume for each Master instance.
MySQL Configuration and Database
Creation
Edit the /etc/my.cnf to point mysql data directory on the mounted file system on each Master.
Create MySQL database using the mysql_install_db script or any custom script, start MySQL daemon and use mysqladmin CLI to generate password for the database. Also copy the /etc/my.cnf to redundant server with the shard name embedded into it.
HGST MySQL Monitoring
Start the HGST MySQL monitoring tool for failover on the Redundant Server.
Copy the vgc_mysql_failovr script to /usr/bin directory. On the redundant server disable the MySQL auto startup
[root@tm18 ~]# mount -t ext4 /dev/mysql_vg1/shard1_vol /data [root@tm18 ~]# chmod -R 755 /data
/dev/mapper/mysql_vg1/shard1_vol /data ext4 defaults 0,0
[root@tm18 ~]# mysql_install_db --defaults-file=/etc/my.cnf [root@tm18 ~]# mysqld --defaults-file=/etc/my.cnf --user=root & [root@tm18 ~]# mysqladmin -u root password ‘test’
[root@tm18 ~]#scp /etc/my.cnf root@tm17:/etc/my_shard1.cnf [mysqld]
datadir=/data/mysql
#List of server running the shards Master=tm18,tm19,tm20
#interval to check Master is alive Interval=10
#pre-fail script to be executed, script to make all the #client refer to the new host where new Master is running pre-fail=
#post-fail script to be executed Post-fail=
#lvm volume name of the Master #Mount point of the Master Mount_point=
#daemon, background, none Startup=daemon
#log type debug,info Log=debug
The MySQL monitoring script needs to be configured using /etc/ vgc/mysql_failover.conf
[root@redunadant server]# chkconfig mysqld off
Testing Failover of a Master to the
Redundant Server
At this point the cluster should be operational and all databases running. We’ll test failover by powering a server down and ensuring the Redundant Server starts the MySQL service up automatically.
Shutdown the server running shard1 database to test failover
[root@tm18 ~]# shutdown -h 0 Broadcast message from root@tm18 (/dev/pts/0) at 23:17 ... The system is going down for halt NOW!
HGST FLASH POOLS IMPLEMENTATION GUIDE FOR MYSQL DATABASE
IMPLEMENTATION GUIDE
The backup server running the monitoring script will detect the failure and will start the shard1 instance
Database Snapshots for Off-host
Processing
Snapshots can be taken of the Master LVM volumes using a special sequence of commands. Do not attempt to use the standard LVM snapshotting capabilities, as they do not function and return errors when running under CLVM.
Prepare the database volume to take a CLVM snapshot, and generate the snapshot. Because this snapshot is actually a full LVM mirror underneath, the time it takes will be longer than the lightweight LVM snapshots you may be used to, and a runtime of around 30 seconds per GB to generate the snapshot is expected. The snapshot should be initiated from the Master being snapshotted.
Once completed, break the snapshot before mounting it on the same or another server. Again, this operation needs to run on the Master being snapshotted.
[root@tm18 ~]# bash vgc_mysql_prepare.sh /data NOTICE: Volume is not Mirrored
Do you want to mirror the volume [y/n]?y
volume mysql_shard1 mirroring completed successfully [root@tm18 ~]#
At the beginning we enabled the monitoring script: [root@tm17 ~]# python vgc_mysql_failover
NOTICE: python version check complete …
Master TM18 shut down …
NOTICE: Block device is visible NOTICE: Volume is visible
NOTICE: Volume shard1_vol mounted on /data NOTICE: Fail-over of correct Master tm18
root 14749 14714 0 23:44 pts/0 00:00:00 mysqld --datadir=/ data/mysql
NOTICE: Fail-over completed.
[root@tm18 ~]# bash vgc_mysql_snap.sh /data Logical volume mysql_shard1 converted.
Start the database on the redundant server using the snapshot volume using the helper scripts provided:
Cleanup
After using the snapshot for any off-host processing activity, following steps to be performed for cleanup
a. stop the MySQL clone instance running on the snapshot using mysqladmin or kill command
b. unmount the filesystem c. remove the lvm volume
After this operation use the prepare command to create mirror for any of the MySQL Master database as required.
Performance Metrics
We performed a series of MySQL benchmarks on the test
configuration shown to demonstrate the performance of the HGST FlashMAX and the superior speed of HGST Flash Pools versus traditional replication.
HDD Master/Slave Replication vs.
FlashMAX Master/Slave Replication
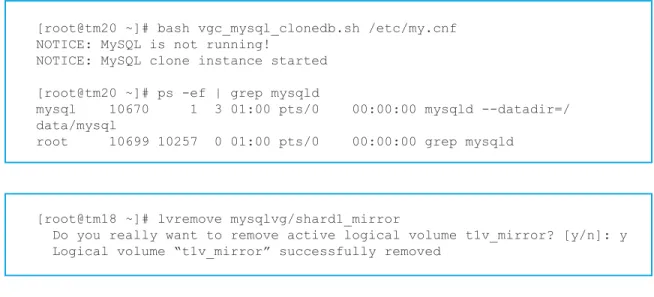
HGST Flash Pools deliver dramatically superior performance compared to an HDD-based array. This first test compares MySQL standard Master/Slave replication under a mysqlslap workload. The servers used in this example demonstrated over 40x higher number of transactions per minute than a HDD array, demonstrating the speed and consolidation possibilities of moving from spinning media to FlashMAX.[root@tm20 ~]# bash vgc_mysql_clonedb.sh /etc/my.cnf NOTICE: MySQL is not running!
NOTICE: MySQL clone instance started [root@tm20 ~]# ps -ef | grep mysqld
mysql 10670 1 3 01:00 pts/0 00:00:00 mysqld --datadir=/ data/mysql
root 10699 10257 0 01:00 pts/0 00:00:00 grep mysqld
[root@tm18 ~]# lvremove mysqlvg/shard1_mirror
Do you really want to remove active logical volume t1v_mirror? [y/n]: y Logical volume “t1v_mirror” successfully removed
Figure 7 – HDDs vs. SSDs for Replication
Transactions/Seconds
MySQL Master/Slave HGST Flash Pool Master/Slave 40 X 30 X 20 X 0 X 10 X 1 X 40.5 X
HGST FLASH POOLS IMPLEMENTATION GUIDE FOR MYSQL DATABASE
IMPLEMENTATION GUIDE
Summary
HGST Flash Pools for MySQL removes the administrative complexity of managing Master/Slave cluster architecture to a more simple and scalable architecture making MySQL a low latency high performance database.
Putting PCIe Flash to work into your MySQL environment will yield immediate performance benefits, but there’s more. Since Flash is so much faster and lower latency, you can consolidate servers by up to 38%, shifting CAPEX and OPEX expenses to profitable business initiatives. With HGST Flash Pools, you can eliminate the barriers that have persisted with conventional MySQL Master/Slave architecture with a multi-function server. As a result you’ll enhance data availability and achieve a significant reduction in capital expense for hardware, software and maintenance. The impact on data center energy costs will be enormous, setting the stage for future growth initiatives. Finally, because HGST Flash Pools use synchronous mirroring, you guarantee replication transactions integrity resulting in a High Availability MySQL cluster with no replication lag.
© 2014-2015 HGST, Inc., 3403 Yerba Buena Road, San Jose, CA 95135 USA. Produced in the United States 11/14, revised 8/15. All rights reserved.
FlashMAX is a registered trademark of HGST, Inc. and its affiliates in the United States and/or other countries. HGST trademarks are intended and authorized for use only in countries and jurisdictions in which HGST has obtained the rights to use, market and advertise the brand. Contact HGST for additional information. HGST shall not be liable to third parties for unauthorized use of this document or unauthorized use of its trademarks. All other trademarks are the property of their respective owners.
References in this publication to HGST’s products, programs, or services do not imply that HGST intends to make these available in all countries in which it operates.
This presentation is presented for information purposes only and does not constitute a warranty. Actual results may vary depending on a number of factors. The user is responsible for ensuring the suitability of any proposed solution for its particular purpose.
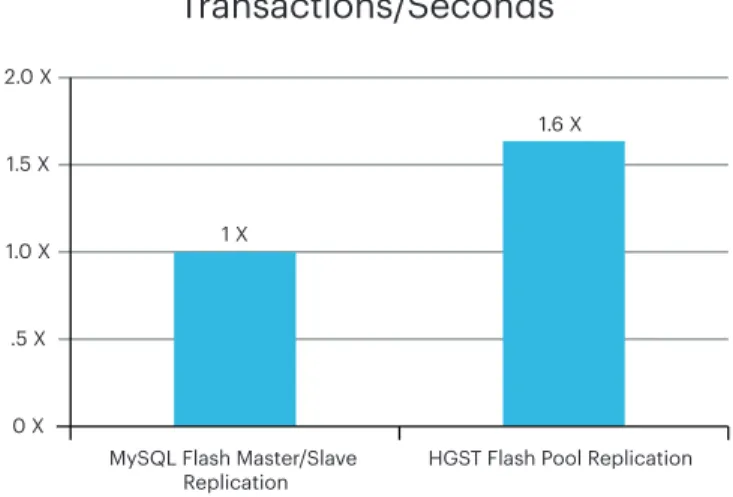
HGST Flash Pools Replication
Compared to Master/Slave SSD
Replication
For this test we took identical server pairs running fully on HGST FlashMAX and tried using standard MySQL Master/Slave replication to Flash Pool replication under the same mysqlslap workload.
HGST Flash Pools achieved over 60% higher performance, with only about half the number of servers. In addition, since the replication is synchronous and at the block-level, we can assure much more granular recovery in the event of a Master failure
Figure 8 – Generic PCie SSDs vs. HGST FlashMAX SSDs for Replication
Transactions/Seconds
MySQL Flash Master/Slave
Replication HGST Flash Pool Replication 2.0 X 1.5 X 1.0 X 0 X .5 X 1 X 1.6 X