(*)
Grupo de Investigación IMTEF. Programa de Ingeniería Mecánica. Universidad Autónoma del Caribe. Barranquilla, Colombia. E-mail: [email protected].
Este documento se ha construido a partir de la ponencia del mismo nombre presentada por los autores en el “I Congreso Internacional de Ingeniería Mecatrónica y Automatización”, organizado por el Programa de Ingeniería Mecatrónica de la Facultad de Ingeniería de la Universidad Autónoma de Occidente, con el apoyo del Capítulo ACOFI de los programas de Ingeniería Mecatrónica y de Automatización. El documento es inédito.
!"#$%&!%'!"!(")*+,%-./01/20-3%4% !"#$%&!%$"!(5$")*+,%30/01/20-36
Creation of Computer
Aided Manufacturing
software from Computer
Aided Design software
in the milling process
JUAN CARLOS CARRASCO GARCÍA*
Abstract
The purpose of this paper is to describe a new Graphical User Inter-face (GUI) for Design and Computer Aided Manufacturing (CAD/CAM) applications for academic context uses. This application,created by the autor of this paper, is developed for automatic generation of Computer Numerical Control (CNC) code of two dimensio-nal drawing created in the commercial software Autocad and using the Visual Basic programming language.
In production environments, the ma-chining of complex parts such as molds and die cast that requires high production rates and quality are tested before they are manufactured using CAD/CAM applications, where numerical control is coded automatically and is transmitted to the milling machine. These applications are characterized by high accuracy.
The intuitive GUI proposed in this work is an easy to use interface that transforms two dimensional drawing 7$8!&%)+%5#!%('9(')!5$':%;<59=;>%?@!%
1. Introduction
At present most metalworking projects are drawn up and tested prior to manufacture, sup-ported by powerful computational tools Design and Computer Aided Manufacturing CAD/ CAM. This technology is used in many machi-ning processes with or without metal removal in the manufacture of complex parts, molds, dies and prototypes that require a high dimensional accuracy and quality of manufacture. There are a wide range of CAD/CAM softwares in which pieces are drawn, the machining is simulated and is generated automatically the CNC code to transmitting it to a machine for subsequent ma-chining. As a reference of this kind of software, A!% "$+% ?+&% B$75!'"$CD% E9F% =;>/=;BD% GH% CAD/CAM (Carrasco, 2006). These applications are very effective for machining by computer.
There are CAD software such as Autocad, that allow to design the model and save the &'$A)+I%)+%>H %J9'C$5%%K>'$A)+I%LM"#$+I!%?@!% format), which is a sequence of ASCII values J'9C%A#!'!%)5%"$+%9F5$)+%5#!%C9&!@N7%"#$'$"5! -ristics such as the coordinates, radius, angles, lengths, layers, colors, etc. AutoCAD was chosen because is extensively used in academia and in the industry. Furthermore AutoCAD allows to save in ASCII format the coordinates and cha-racteristics of the entities drawn (Ochoa, 2006). The information of the entities in the DXF ?@!%!M5!+7)9+%"$+%F!%9F5$)+!&%F:%('9I'$CC)+I% software such as Visual Basic and convert this information into codes Computer Numerical Controlled (CNC) codes, for simulation and milling of the workpiece.
The CNC program is a set of codes represen-5)+I%9'&!'7%I)8!+%59%5#!%C$"#)+!N7%C98!C!+57D% such as the movement of the tool in the XYZ axis, the spindle rotation speed, written in a special language (code) composed of letters and numbers. The numerical control (NC) interprets 5#!%('9I'$CN7%)+75'<"5)9+7D%$+&%5#!:%$'!%"9+8!'
-!M5!+5)9+%>H %)+59%$%?@!%J9'C$5%5#$5%"$+%F!% used directly in a Fanuc control installed in a Benchman milling CNC machine.
Keywords: CNC, CAM, CAD/CAM, AutoCAD, manufacturing, milling, com-puter numerical control.
ted into signals that moves the devices of the machine. This program can be obtained in two ways: through manual programming, in this case, coordinates are calculated manually and written in a CAM software from which it transmits to the control. On the other hand, it could be obtained through a CAD/CAM software, where the part is drawn on the computer, the simulation of mecha-nizing is done and allow to get ‘automatically’ the CNC program (Ochoa, 2006; Pacheco, 2001).
The following is an example of a small CNC program that is transmitted to the CNC machine to mechanizing the model (CNC Software, 1998; Carrasco, 2001). G90 G71 M3 S1200 G0 X0 Y0G1 Z-5 F50 G1 X10.0 Y10 F100 G2 X 15 Y15 R 5 G1 Y30 G1 X0 Y0 G0 Z2 M5 M30 Here: G90: Absolute programming G71: Units in millimeters M3: Spindle ON M5: Spindle OFF S: Revolutions/Minute
G0: Lineal interpolation with fast movement G1: Lineal interpolation with feed rate G2: Clockwise circular interpolation M30: End program
O#!%"99'&)+$5!7%HD%PD%Q%'!('!7!+5%5#!%599@N7% displacement.
2. Instructions of programming and use of software
Initially the bidimensional sketch of the piece is drawn in AutoCAD, then extract the coordina-tes of the displacement of the tool into the work piece to be milled. These procedures are detailed in the following 3 steps:
4% Drawing of the work piece and creation of the toolpaths mechanizing in AutoCAD. 4% Conversion of coordinates to Numerical
Control (NC) codes.
4% Use of AutoCNC Mill software and its connection with the software Benchman for milling.
4% Milling the parts.
2. 1 Drawing of the work piece and creation of the toolpaths mechanizing in AutoCAD
Below is how to get the Toolpath of mi-lling on the AutoCAD taking into account the recommendations of (Ochoa, 2006; Pacheco, 200-R% S$'C$D% -TTTR% U)+% V% U)<D% -TT.R%O9I9'!7% V%W5!'9D%2003X,
Create 4 layers of drawing named D1, A1, PERIFERIA and PIEZA.
D1:%Y$C!%9J%5#!%@$:!'%9J%5#!%?'75%'9<I#)+I% mill (if more roughing create layers D2, D3, etc.).
A1:%Y$C!%9J%5#!%@$:!'%9J%5#!%?'75%?+)7#)+I% C)@@% K)J% C9'!% ?+)7#)+I% "'!$5!7% @$:!'7%;2D% A3, etc.).
PERIFERIA: Name of the layer for the roughing limit.
PIEZA: Name of the layer for the final drawing piece.
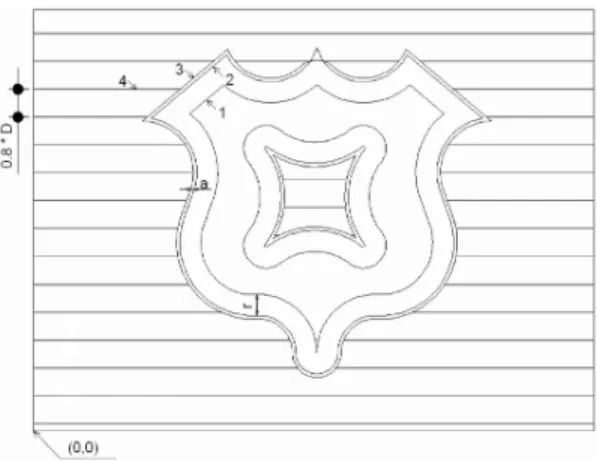
Draw a rectangle for the stock in the point 0.0 on the layer named "0". See Figure 1.
Draw the piece 1 in the PIEZA layer (the length units are in millimeters). Convert the piece into a polyline using the command PEDIT Auto-CAD (Pacheco, 2001), in the A1 layer create an equidistant contour of the part 1 with a distance equal to the radius (r) of the mill, generate in the PERIFERIA layer the equidistant 3 of the work piece 1 equal to the sum of the oversize J9'%?+)7#)+I%K$X%$+&%5#!%C)@@%'$&)<7%K$%Z%'XD%"'!$5!%
the hatch 4 in the D1 layer between the contours of PERIFERIA and the rectangle of the stock, that hatch should be selected as horizontal lines and spacing line equal to or less than 80% of the diameter of the cutter mill.
Select the D1 layer entities, ungroup them using the command Modify/Explode (Carrasco, 2005).
S$8!%5#!%?@!%A)5#%$%>H %!M5!+7)9+%F:%7!@!" -5)+I%S$8!%;7%"9CC$+&%666%$+&%7!@!"5)+I%?@!%5:(!%% AutoCAD 2004 DXF (*.Dxf).
Figure 1. Drawing of the machining path in AutoCAD (units: Millimeters)
Source: by the author (drawing done in Autocad V2012© software).
O#!%>H %?@!%#$7%5#!%)+J9'C$5)9+%$F9<5%@)+!7% and arcs present in the drawing as follows:
For roughing lines:
AcDbEntity
D1 : Name of the layer 100
AcDbLine : Type of entity, in this case a line. 10
136.65 : (Xi) X coordinate of line start point 20
136.91 : (Yi) Y coordinate of line start point 30
0.0 : (ZI) Z coordinate of line start point 11
192.92 : (Xf) X coordinate of the endpoint of the line
21
136.91 : (Yf) Y coordinate of the endpoint of the line
31
0.0 : (Zf), Z coordinate of the endpoint of the line
9'%5#!%$'"7%)+%(9@:@)+!7%?+)7#)+I,
AcDbPolyline 10
28.61 : (Xf) X coordinate of the endpoint of the arc
20
43.72 : (Yf), Y coordinate of the endpoint of the arc
42
0.22 : Tangent of a quarter of the angle swept by the arc
2. 2 Conversion of coordinates to Numerical Con-trol (NC) codes
Using the Basic Language for Visual Basic 6.0 was developed software named AutoCNC Mill. The programming is described below.
The coordinates of the lines, the centers, ra-dius, angles of the arcs and circles was read from 5#!%>H %?@!%<7)+I%5#!%U[YL%[Y\]O%"9CC$+&% K^!7!@C$+D%\!$7@!:%V%\'<+"#+)$_D%-TTTX,%
ArchivoDXF Open For Input As # 1 >9%`#)@!%Y95%LW %K-X%a%O'<! Line Input # 1, variable Loop
Close # 1
The main cutting parameters are introduced as variables in text boxes of the application. These parameters are: Total depth of the work piece, feed rate of the tool in the XY plane and depth in the plane Z, Speed of rotation of the
cutter mill, approaching distance, and diameter of the cutter mill.
Then in the AutoCNC Mill, taking into account the above coordinates and parameters, the piece automatically was drawn. Using the PRINT command, proceed to the generation of Numerical Control codes (NC).
For example to generate the codes for an anti-clockwise arc was programmed as follows:
\')+5%b%2D%cd3c%V%cHc%V%G$@%KHJX%V%c;Y>c% V%G$@%KPJX%V%c^c%V%G$@%K^X
`#!'!D
Xf, Yf: X, Y coordinates of the end point of the arc.
R: Radius of the arc.
2. 3 Use of Mill AutoCNC Mill software and its connection with the software Benchman for me-chanizing
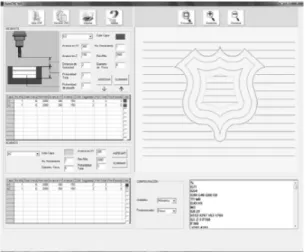
Runs the AutoCNC Mill Software. See Figure 2.
Figure 2. Drawing part and generating CNC codes in AutoCNC Mill software
Source: image from AutoCnc Mill © Software.
Complete the following dialog box to intro-duce the cutting parameters.
Figure 3. Table to introduce cutting parameters
Source: image from AutoCnc Mill © Software.
In the Figure 3, the parameters have the next units:
Avance en XY(Feed rate in XY Plane), Avan-"!%!+%Q%K !!&%'$5!%)+%Q%$M)7X,%eCC%/%C)+f6
Distancia de seguridad (Distance of ap-proach), Profundidad total (Total depth), Pro-fundidad de pasada (Depth of cut), Diámetro de fresa (Mill diameter): mm. Rev/min (Revolutions per minute): rev/min.
Click on the Abrir DXF button, to open the ;<59=;>% ?@!6% S!@!"5% d!+!'$'% =Y=% F<559+% 59% generate the CNC code. See Figure 4.
Figure 4. Buttons Abrir DXF, Generar CNC, Imprimir
Source: image from AutoCnc Mill © Software.
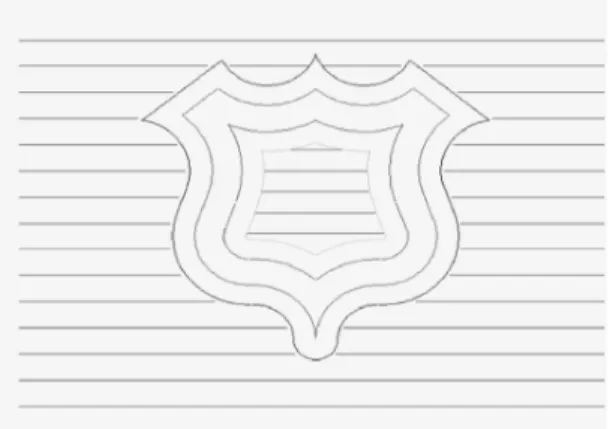
The drawing area displays the sketch.
Figure 5. Drawing area
Source: image from AutoCnc Mill © Software.
The CNC code is displayed in the next window:
Figure 6.%=Y=%`)+&9A
Source: image from AutoCnc Mill © Software.
Save the CNC code.
Then run the software Benchman, by the W\LY%F<559+D%9(!+%5#!%('!8)9<7%?@!%A)5#%!M5!+ -7)9+6%Y=D%"9+?I<'!%5#!%+!"!77$':%($'$C!5!'7%$+&% through the VERIFY button simulate the milling. See Figure 7.
Figure 7. Simulation of milling in Benchman Software
Source: by the author (simulation in Benchman 4000 © Software).
After the simulation, mount the piece in a CNC mill for machining.
2. 4 Milling the parts
The piece with dimensiones 70 x 60 x 30 mm. is mounted in the Machining Center Benchman VMC 4000 located in the Robotics Laboratory at Universidad Autónoma del Caribe.
The original set point is established in the piece to proceed to mill with an end mill 6 mm. in diameter. See Figure 8.
3. Results
In AutoCAD was created the methodology of route generation of displacement of the mill.
It was developed the AutoCnc Mill software to convert the CAD software AutoCAD into a CAM software, allowing generate the CNC co-des from the bidimensional drawing of the piece. As can be seen in Figure 7, the simulation did not generates errors displacement of the tool, which motivated us the mechanizing of the piece.
It can be seen the real machining and the resultant piece in the Figure 8 and 9.
Figure 8. Milling the piece in the Mechanizing Center
Source: by the author (image: Robotic Labs at Universidad Autónoma del Caribe).
Figure 9. The milled wokpiece
Source: by the author (image. Robotic Labs at Universidad Autónoma del Caribe).
4. Discussion
It is very important to work with Autocad because it allows to obtain the coordinates and characteristics of entities drawn from DXF for-mat, as this is the information needed to develop applications that process the data and generate results from-CAD-Software.
The machining was successful with the qua-lity and the expected parameters.
Software AutoCNC Mill, the product of this research shows that in Colombia is possible to "'!$5!% 79J5A$'!% )+% 5#!% ?!@&% 9J% "9C(<5!'g$)&!&% manufacturing.
Using this methodology it is possible to crea-te other applications in the areas of Archicrea-tecture, Civil Engineering, Robotics, Mechanical Design, Turning Process among others.
AutoCNC Mill can be enhanced in the fo-llowing aspects:
4% Make it independent of AutoCAD. Drawing the part within the same-software.
4% Generate 3D simulation software within the AutoCnc Mill or AutoCAD.
4% Generate the toolpath of three-dimensio-nal surfaces.
4% Generate Calculating Application for machining times and costs.
4% Extending the program to accept other CAD format, such as the parasolid kernel <7!&%F:%S9@)&%`9'_%$+&%S9@)&%L&I!6
References
Carrasco, J. C. (2001). Curso Práctico Inte-ractivo de Mastercam. CD-ROM. Barranquilla, Colombia.
Carrasco, J. C. (2005). Curso Multimedia de Autocad 2 dimensiones. CD-ROM. Barranquilla, Colombia: Edición de Polilinea.
Carrasco, J. C. (2006). Tecnología Avanzada del Diseño y Manufactura Asistidos por Com-putador - CAD-CAM. Prospectiva, Una Nueva Visión Para la Ingeniería, 6, 75-81.
CNC Software, Inc. (1998). Mastercam –Mill Reference Manual. Tolland, USA.
h<5iD%j6D%S"#$'_<7D%L6%V%U9F!'5D%^6%K-T.1X6% Tablas para la Industria Metalúrgica. (3 ed). Eschborn, Germany. 114-116.
U)+%;6%V%U)<D%j6%K-TT.X6%;<59C$5)"%I!+!'$ -tion of NC cutter path from massive data points. Computer- Aided Des., 30, (1), 79-90.
Ochoa, L. (2006). Programa CAD-IGMAS. Manual del Usuario. 5-10. Retrieved from http:// www.docentes.unal.edu.co/lhochoag/docs/Soft-wareDesarrollado/01 CAD-IGMAS.pdf.
Pacheco, J. (2001). Cómo usar Mastercam. Barranquilla-Colombia. Capítulos 1, 4.
^!7!@C$+D%E6D%\!$7@!:D%^6%V%\'<+"#+)$_D%`6% (1999). Descubre Visual Basic 6. Madrid, España. Chapters 13-19.
Sarma, S. (1999). The crossing function an its application to zigzag toolpaths. Computer- Aided Des., 14, (31), 881-890.
O9I9'!7D% ^6% V% W5!'9D% =6% K2003X6% Progra-mación en AutoCAD con Visual Lisp. Madrid, España. Chapters 17-18.