Corticon Server:
Deploying Web Services with
.NET
Table of Contents
Chapter 1: Conceptual overview...5
What is a web service?...5
What is a decision service?...6
What is the Corticon Server for .NET?...6
What is a web services consumer?...6
Chapter 2: Getting started with Corticon Server for .NET...7
Chapter 3: Installing Corticon Server for .NET...9
Downloading the Corticon Server for .NET package...9
System requirements...10
Corticon Server for .NET setup wizard...10
Chapter 4: Setting up .NET Framework...15
Chapter 5: Setting up Internet Information Services (IIS)...17
Chapter 6: Preparing and configuring Corticon .NET Server to run in IIS.25
Installing Corticon Server into IIS...26Setting up a virtual directory for Corticon Web Services...27
Setting Access Permissions for axis directories...28
Changing web.config...30
Setting up the application...30
Testing the configuration...36
Updating your Corticon license JAR for .NET...36
Chapter 7: Corticon .NET Server files and API tools...39
Setting up Corticon .NET Server use cases...40
Installing Corticon .NET Server as an in-process server...40
Installing Corticon .NET Server as a remote server on IIS...41
The Corticon .NET Server home and work directories...41
.NET Configurations that use global environment settings...42
The Corticon .NET Server Sandbox...42
Testing the installed Corticon .NET Server...43
Testing a remote server on IIS...45
Chapter 8: Deploying a Ruleflow to the Corticon Server for .NET...49
Creating a Ruleflow...50
Creating and installing a Deployment Descriptor file...50
Using the Deployment Console tool's Decision Services on the .NET Server...50
Installing the Deployment Descriptor file...53
Hot re-deploying deployment descriptor files and ruleflows...54
Chapter 9: Consuming a Decision Service...55
Integrating and testing a Decision Service...56
Path 1- Using Corticon Studio as a SOAP client to consume a Decision Service...56
Configuring Studio to send a SOAP Message to IIS...57
Creating a new .NET server test in Corticon Studio ...57
Executing the remote test...58
Path 2 - Using bundled C# sample code to consume a Decision Service...59
Creating the WSDL and proxy files...59
Path 3 - Using SOAP client to consume a Decision Service...61
Web services messaging styles...61
Creating a service contract using the Deployment Console...61
Creating a request message for a decision service...62
Sending a request message to the server...63
Limits of the default evaluation license...63
Troubleshooting...63
Chapter 10: Using .NET Business Objects as payload for Decision
Services...65
Chapter 11: Support for Windows Communication Framework (WCF)...77
Creating WSDL and proxy files...77
1
Conceptual overview
This guide is a walkthrough of fundamental concepts and functions of Corticon Server for .NET. The examples focus on Microsoft Internet Information services (IIS) as the web server to provide .NET Web Services.
For details, see the following topics:
•
What is a web service?•
What is a decision service?•
What is the Corticon Server for .NET?•
What is a web services consumer?What is a web service?
From the business perspective: A Web Service is a software asset that automates a task and
can be shared, combined, used, and reused by different people or systems within or among organizations.
From the information systems perspective: A Web service is a software system designed to
support interoperable machine-to-machine interaction over a network. It has an interface described in a machine-processable format (specifically WSDL). Other systems interact with the Web Service in a manner prescribed by its description using SOAP-messages, typically conveyed using HTTP with an XML serialization in conjunction with other Web-related standards. [From
What is a decision service?
A Decision Service automates a discrete decision-making task. It is implemented as a set of business rules and exposed as a web service (or Java component or .NET library). By definition, the rules within a Decision Service are complete and unambiguous; for a given set of inputs, the Decision Service addresses every logical possibility uniquely, ensuring "decision integrity". A Ruleflow is built in Corticon Studio. Once deployed to the Corticon Server for .NET, it becomes a Decision Service.
What is the Corticon Server for .NET?
The Corticon Server for .NET is a high-performance, scalable and reliable system resource that manages pools of Decision Services and executes their rules against incoming requests. The Corticon Server for .NET can be easily configured as a web services server, which exposes the Decision Services as true web services.
What is a web services consumer?
A Web Services Consumer is a software application that makes a request to, and receives a response from, a web service. Most modern application development environments provide native capabilities to consume web services, as do most modern Business Process Management Systems. Chapter 1: Conceptual overview
2
Getting started with Corticon Server for .NET
This tutorial steps through the procedure necessary for running the Corticon Server for .NET as a web services server, deploying Ruleflows to the Server, exposing the Ruleflows as Decision Services and testing them with document-style SOAP requests. There are other installation, deployment and integration options available beyond the SOAP/Web Services method described here, including Java-centric options using Java objects and APIs. More detailed information on all available methods is contained in the Server Integration & Deployment Guide.
This tutorial consists of four main sections:
Using the Corticon Server for .NET installer
This section explains how to download and install Corticon Server for .NET on your designated server machine.
Installing the Corticon Server for .NET as a web services server
This section explains how to install Corticon Business Rules Server for .NET in Microsoft’s Internet Information Services (IIS) server.
Deploying a Rule Set to the Corticon Server for .NET
This section describes how to deploy Rule Sets to the Server for .NET and expose them as web services, which are then known as Decision Services. Once a Rule Set becomes a Decision Service, it can be consumed by any external application or process capable of interacting with standard document-style or RPC-style web services.
Consuming a Decision Service
This section describes how to integrate and test your deployed Decision Service by creating and sending request messages to the Corticon Server for .NET, and viewing the response messages it returns to you. Three methods of integration and testing are discussed: one method assumes you have access only to the tools contained in the default Studio installation, while the other two methods assume you have a commercially available SOAP client or ability to code one using C# tools to perform these tasks.
3
Installing Corticon Server for .NET
For details, see the following topics:
•
Downloading the Corticon Server for .NET package•
System requirements•
Corticon Server for .NET setup wizardDownloading the Corticon Server for .NET package
Corticon Server for .NET and its Service Packs are packaged in executable installer applications:•
The 5.3 installer, PROGRESS_CORTICON_5.3_SERVER.NET.exe, to perform a new installation.•
The 5.3.4 Service Pack installer, PROGRESS_CORTICON_5.3.4_SERVER.NET.exe, to update a 5.3.0 installation.To download the required installers:
1. Get credentials to access and download packages on the Progress Software Electronic Software
Download (ESD) site.
2. Connect to the ESD, and then navigate to the Corticon 5.3 pages.
3. Locate, download, and save the required installers to a temporary location accessible by the
System requirements
Corticon Server for .NET requirements include:
•
All Java-supported processors•
512 MB RAM recommended•
10 MB disk space (core libraries)•
150 MB disk space (full install)Progress Corticon Server for .NET is supported on several Microsoft Windows platforms. See the Progress Software web page Progress Corticon 5.3 - Supported Platforms Matrix for more information.
Corticon Server for .NET setup wizard
Installation type
There are three ways to create Corticon Server .NET 5.3.4 installations:
•
New 5.3.4 installation - Perform a new installation, then update it with the 5.3.4 Service Pack.•
Update a 5.3.3, 5.3.2, 5.3.1, or 5.3.0 installation with the latest Service Pack - Apply the5.3.4 Service Pack. Note that a higher Service Pack in a version rolls up the features of all preceding Service Packs.
•
Upgrade a 5.2 or earlier installation to the latest 5.3 Service Pack - An installed version ofCorticon Server .NET 5.2 or earlier installed on the target machine must be uninstalled, then
Corticon 5.3.0 Server .NET installed, followed by applying the 5.3.4 Service Pack. Consult with Progress Corticon Support or your Progress representative to consider your migration strategies for existing assets before you take action.
New installation
To perform a new installation of Corticon Server for .NET:
1. Double click on PROGRESS_CORTICON_5.3_SERVER.NET.exe to open the Progress Corticon Server .NET Setup Wizard.
2. Click Next to continue.
The License Agreement panel opens. Chapter 3: Installing Corticon Server for .NET
3. After you have read, understood, and agreed to the terms of End User License Agreement,
choose I accept the terms of the license agreement, and then click Next. The Corticon Server .NET Install and Work Directory panel opens.
4. Select the installation and work directories. To accept the default locations, click Next.
To specify preferred locations, click Choose, navigate to each preferred directory, click OK to close the chooser dialog, and then click Next.
The Pre-Installation Summary page opens. Corticon Server for .NET setup wizard
Verify your selections in the Pre-Installation Summary panel.
5. Click Install to continue.
The installation status window opens.
This panel displays a status bar during the installation process. When done, the Install Complete panel opens.
6. Choose Done to complete the Corticon Server for .NET installation and close the installer.
Service Pack updater
To update a 5.3.3, 5.3.2, 5.3.1, or 5.3.0 installation of Corticon Server for .NET with a Service Pack:
1. If the installed Corticon Server you want to update is running, stop it now.
2. Double click on PROGRESS_CORTICON_5.3.4_SERVER.NET.exe to open the Progress Corticon Server .NET Service Pack Setup Wizard. Note the revised Progress branding scheme in the 5.3.4 update wizard:
3. Click Next through the panels, and then click Install. When the 5.3 installation of Corticon
Server for .NET is detected, and it is determined that this Service Pack has not already been applied, the updater proceeds to complete the update of the installation.
4. IMPORTANT - If your Corticon update was applied to an established Corticon .NET Server that
was fully configured on Internet Information Services, you need to update the Corticon files in the IIS location. To do this:
a. At C:\Program Files (x86)\Progress\Corticon 5.3\Server
.NET\webservice\bin, copy all the .dll files, and then paste them to replace the files at C:\inetpub\wwwroot\axis\bin.
b. At C:\Program Files (x86)\Progress\Corticon 5.3\Server
.NET\webservice\lib, copy all the .jar files, and then paste them to replace the files at C:\inetpub\wwwroot\axis\lib.
Uninstalling Corticon Server .NET
To remove any version of the server to prepare for a new installation (or if you want to fully remove it), use this procedure.
Note: Uninstall removes a complete major.minor version.You cannot uninstall just a Service Pack.
To uninstall Corticon Server for .NET: 1. Stop the server.
2. Backup any files you want to retain.
3. Navigate to [CORTICON_HOME]\Uninstall Progress Corticon Server .NET.
4. Run Uninstall Progress Corticon Server .NET.exe.
The installed files are removed. Note that files you created are NOT removed or replaced during this process.
If the Uninstaller program is unable to fully remove components (usually because they are open), it will display messages, and might require a reboot to complete the process.
4
Setting up .NET Framework
The following procedures outline the general instructions for setting up a Microsoft Windows installation to use Internet Information Services (IIS). Consult your specific operating system guide and your system administrator for any special considerations or requirements in your deployment topology.
Note: Internet Information Services is usually pre-installed but not turned on. If IIS is not installed,
you might need to access download sites or appropriate operating system media.
Confirm that .NET Framework 4.0 is installed
Microsoft .NET Framework 4.0 is the supported version for the release of Corticon. Check to see if the target machine already has a v4.0.X folder at
C:\Windows\Microsoft.NET\Framework64\ or
C:\Windows\Microsoft.NET\Framework\.
Note: If you have the Framework Client Profile, check to see that the file aspnet_regiis.exe
is listed. You might need to download and install the Microsoft .NET Framework 4 Extended upgrade to make all the required files available.
As needed, follow these steps to install it before you start setting up IIS:
1. Browse to http://www.microsoft.com/downloads.
2. Search for .NET Framework 4 download
3. Choose the appropriate installer for your operating system: Web Installer for Windows 7, or
4. Download and save the installer to your hard drive. You might have to add the download URL
to your list of trusted sites.
5. Double-click the installer executable and follow its instructions.
5
Setting up Internet Information Services (IIS)
Once you have completed and verified the .NET Framework installation and configuration, proceed to set up IIS.
The following procedures outline the general instructions for setting up a Microsoft Windows installation to use Internet Information Services (IIS).
Note: Platforms and versions
The procedures in this section demonstrate the set up of IIS 7.5 for Corticon Server .NET on a Windows 7 platform. Consult your specific operating system guide and your system administrator for any special considerations or requirements in your deployment topology. As IIS and Windows are third-party products, this information might change without notice.
The procedures in this chapter also apply to Windows Server 2012; however, the changes in Windows 2012 security that give an Administrator less global authority call for some added tasks. These tasks are: (1) creation of a sandbox in the Windows/System32 directory is prohibited; instead create it elsewhere, and (2) URL rewrite does not work on the server; instead add
/services/Corticon.asmx so that SOAP requests perform correctly.
The procedures for setting up IIS on an earlier Microsoft OS are located in the appendix Configuring IIS 6.0 on Windows Server 2003.
You can refer to Microsoft information resources or interpolate from these procedures to set up IIS on other supported Windows OS version and IIS version combinations. Contact Progress Corticon support for assistance.
Turning on the Windows IIS feature
Windows installations typically include the Internet Information Server (IIS) but require user interaction to enable it.
Note: If IIS is not installed, you might need to access download sites or appropriate operating
system media.
To enable IIS on a host machine for Corticon Server for .NET:
1. Choose Start > Control Panel. Choose Programs and Features, and then select Turn Windows feature on or off, as shown:
2. Select the following features:
•
Internet Information Services -> Web Management Tools -> IIS Management Console•
Internet Information Services -> World Wide Web Services -> Application Development Features:•
.NET Extensibility•
ASP•
ASP .NET•
CGI•
ISAPI Extensions•
ISAPI Filters3. Click OK. Windows installs the selected components.
IIS is now enabled.
Choose Start > Control Panel > All Control Panel Items > Administrative Tools > Internet
Information Services (IIS) Manager, as shown:
•
•
Select Start, type iis, and then choose the IIS Manager, as shown:Configuring IIS for .NET Framework
To configure IIS to use .NET Framework v4.0:2. Enter C: to change to the install drive, and then change directory (cd) to the v4.0 Microsoft .NET Framework location, typically
C:\Windows\Microsoft.NET\Framework64\v4.0.30319.
3. Enter the command
aspnet_regiis –i as shown:
The system registers the current directory’s .NET Framework with IIS; in this example,
v4.0.30319
4. In the IIS Manager, right-click on the root level, and then choose Refresh, as shown:
5. Click on Application Pools in the left panel. The Application Pools panel opens, as shown:
ASP .NET v4.0 and ASP .NET v4.0 Classic are listed if you are properly set up to this point. 6. In the left panel, expand Sites > Default Web Site > aspnet_client > system_web. Verify that
(Note that .NET Framework 2.0 is also listed because IIS includes that version.) IIS is now configured to use .NET Framework v4.0.
Optional steps in IIS setup
Some additional steps are not required yet might be important in your setup.
1. Click on Application Pools in the left panel.
If there are Managed Pipeline Modes listed as Integrated, they must be stopped.
Click on each Application Pool that is not a Classic type, and then select Actions > Application
Pool Tasks > Stop in the right pane, as shown:
2. When completed, each integrated Application Pool has the status Stopped, as shown:
3. Click on the root level, locate the IIS section, and then click on ISAPI and CGI Restrictions,
as shown:
4. In the ISAPI and CGI Restrictions panel, confirm that the ASP.NET v4.0.30319 is Allowed.
If Framework or Framework64 are listed as Not Allowed, right-click on each line, and then choose Allow, as shown:
6
Preparing and configuring Corticon .NET
Server to run in IIS
Checklist
Before proceeding, confirm that:
•
Corticon Server for .NET 5.3 is installed. In this tutorial format, it is installed in its[CORTICON_HOME] default location, C:\Program Files\Progress (x86)\Corticon 5.3.
•
Corticon Server for .NET has been updated to Service Pack 4 (5.3.4).•
Microsoft .NET Framework (32-bit or 64-bit) version 4.0 is set up.•
Microsoft Internet Information Services (IIS) is set up as the host platform for Corticon Server for .NET 5.3.4. In this tutorial format, the IIS is installed in its default location, C:\Inetpub, and that <IISRoot> is set to that location.For details, see the following topics:
•
Installing Corticon Server into IIS•
Setting up a virtual directory for Corticon Web Services•
Setting Access Permissions for axis directories•
Changing web.config•
Setting up the application•
Testing the configurationInstalling Corticon Server into IIS
To install Corticon Server for .NET into your IIS installation: 1. Run [CORTICON_HOME]\Server .NET\IIS\install.batFigure 1: Running IIS install.bat in a Command Prompt
2. When prompted, enter the location of the WWW root of the IIS, or press Enter to place it into standard IIS location in <IISRoot>, which is C:\Inetpub\wwwroot by default.
The result is as follows:
Confirm that the installers created a new directory named axis under <IISRoot>\wwwroot, typically as C:\Inetpub\wwwroot\axis. If not, create that directory yourself now.
Setting up a virtual directory for Corticon Web
Services
While not required, you might want to set up a virtual directory To set up a virtual directory:
1. Confirm that the installers created a new directory named axis under <IISRoot>\wwwroot, typically as C:\Inetpub\wwwroot\axis. If not, create that directory yourself now.
2. In the IIS Manager's left pane, navigate to Default Web Site, as shown: Setting up a virtual directory for Corticon Web Services
3. Right-click on Default Web Site, and then choose Add Virtual Directory.
The Add Virtual Directory dialog box opens. 4. In the Alias entry area, type axis.
5. In the Physical path entry area, type , type <IISRoot>\axis. The typical default path is as shown:
6. Click OK.
Setting Access Permissions for axis directories
Chapter 6: Preparing and configuring Corticon .NET Server to run in IISTo set permissions for axis-related directories:
1. In the IIS Manager, right-click on Default Web Site, and then choose Edit Permissions, as shown:
2. In the axis Properties dialog box, choose the Security tab.
3. In the Group or user names section, click Add, add Everyone, and then click OK. 4. Click on the Everyone group, select Full Control, as shown:
5. Click OK.
6. Add users to the Everyone group to give them full server access.
7. Repeat these steps for the CcServerSandbox and Logs sub directories.
Note: If you are unable to make these changes, you may not have administrator rights to IIS.
Contact your IIS administrator for assistance.
These permissions might seem rather lax. It is recommended that you set them up this way to ensure functionality, and then you can choose to tighten the permissions to just read, write, and run scripts in a specialty group such as IIS_IUSERS.
Changing web.config
You only need to perform this step if either of the following is true:
•
the <IISRoot>is a non-default location (that is, not C:\inetpub\wwwroot)•
the axis virtual directory is not under wwwrootUsing a text editor, edit the IIS web.config file to insert lines that add keys for Corticon home and Corticon work, as highlighted with my location:
<?xml version="1.0"?> <configuration>
<appSettings>
<add key="CORTICON_HOME" value="C:\my_inetpub\wwwroot\axis" /> <add key="CORTICON_WORK_DIR" value="C:\my_inetpub\wwwroot\axis" />
<add key="SOAP_LOGGING" value="false" /> <add key="PRELOAD_CDDS" value="true" /> </appSettings>
Setting up the application
Creating the application and binding it to the Application Pool
Chapter 6: Preparing and configuring Corticon .NET Server to run in IIS2. Expand the tree and navigate to the axis directory.
3. Right-click on axis, and then select Convert to Application, as shown:
4. In the Add Application Pool dialog t hat opened, enter axis as the name, and then choose the .NET Framework version .NET Framework v4.0.30319, and the Managed pipeline mode
Classic, as shown:
5. Once completed, the ASP.NET v4.0 Classic indicates that it is bound to an application, as
shown:
Adjusting the application's assigned pool
If the application is not assigned to the correct application pool, you can revise the application assignment. In the following illustrations, the stopped integrated pool hosts the application, and the running classic pool has no applications.
To change an application's assigned pool:
1. Click on Application Pools, select the inappropriately assigned pool for the application, and
then click View Applications in the right panel, as shown: Chapter 6: Preparing and configuring Corticon .NET Server to run in IIS
2. The Applications panel lists each application's binding to the selected application pool. As the
axis application is not set to ASP.NET v4.0 Classic, right click on the application, and then click Change Application Pool, as shown:
3. In the Select Application Pool dialog box, select ASP.NET v4.0 Classic in the dropdown list
(as shown), and then click OK. Setting up the application
The application axis assigned to the ASP.NET v4.0 Classic application pool.
Configuring Corticon Wildcard
To configure Corticon Wildcard for .asmx file extensions:
1. Click on the top level node in the tree on the left side, and then double click Handler Mappings,
as shown:
2. On the Handler Mappings page's right panel, click Add Wildcard Script Map, as shown:
The Add Wildcard Script Map dialog box opens, as shown:
3. As shown:
- Request path: Read-only and defaulted to *.
- Executable: Browse to the .NET Framework 4.0 installation directory, and then select
aspnet_isapi.dll.
- Name: Enter an identifying name, such as CorticonWildcard. Click OK.
4. In the confirmation alert that opens, click Yes.
5. You might need to restart IIS. To do so in the IIS Manager, right-click on the root to choose Stop, and then after a few seconds, choose Start. (You might prefer to execute iisreset in a Command Prompt to restart IIS.)
The IIS 7.5 Server on Windows 7 is now running the axis web service and Corticon ASP.NET Webservices Source files.
Testing the configuration
With Corticon Server for .NET installed in IIS, it is a good practice to test the remote server setup to ensure it is running and listening. At this point, no Decision Services have been deployed, so Corticon Server for .NET is not yet ready to process transactions.
In a browser, access the following URLs (assuming that IIS is running on its default port 80):
•
http://localhost/axis/services/CorticonAdmin.asmx•
http://localhost/axis/services/Corticon.asmx•
http://localhost/axis/services/CorticonExecute.asmxSelecting any of these URLs displays a web page in the following format:
Figure 2: Testing the Corticon Web Service
Updating your Corticon license JAR for .NET
Chapter 6: Preparing and configuring Corticon .NET Server to run in IIS•
Corticon Studio evaluation licenses let you use database access (Enterprise Data Connector or "EDC"), and are timed to expire on a preset date.•
Corticon Server evaluation licenses do not enable use of Enterprise Data Connector, and limit the number of decision services, rules, and pools in use. They too are timed to expire on a preset date.When you obtain a license file, it applies to Studios as well as Servers. You must perform
configuration tasks to record it for each Corticon Studio, each Corticon Server, and each Deployment Console. If you intend to use EDC on your Corticon Servers, your Corticon license must allow it. Contact Progress Corticon technical support if you need to acquire a license.
The Corticon Server license is placed at two locations in the installation to enable use and -- when specified in the license -- enable EDC functions for:
•
Corticon Server•
Corticon Deployment ConsoleTo configure Corticon .NET Server to access its license file: 1. Copy the license JAR with its default name, CcLicense.jar.
2. Navigate to the .NET Server installation's samples\lib directory to paste the file and overwrite the existing file in that location.
3. Navigate to the .NET Server installation's webservice\lib directory to paste the file and overwrite the existing file in that location.
When you launch the Corticon Deployment Console, your license with its registration information is registered for the Corticon Deployment Console. When your license enables EDC, the Database
Access fields and functions are enabled.
Note:
You can choose to locate the license by another JAR name at a preferred location, and then expressly identify it to the server.
To custom configure Corticon .NET Server's license location:
1. Navigate in the file system to the Corticon .NET Server installation's, Server .NET\samples\bin subdirectory.
2. Double-click on Corticon-Api-Inprocess-Test.exe, then do the following:
a. Type 416 and then press Enter.
b. Enter (or copy/paste) the complete path to the location of the license JAR file, as in this
example, C:\licenses\myCorticonEDC_CcLicense.jar. The command echoes back
Transaction completed.
c. To confirm the setting, type 415 and then press Enter. The path is echoed back (you might need to scroll up to the command line.)
3. Once the .NET Server is running in remote mode, you can double-click on
Corticon-Api-Remote-Test.exe in that same directory to perform the same 416 and 415
tasks as in Step 2 above Updating your Corticon license JAR for .NET
7
Corticon .NET Server files and API tools
Corticon Server is provided in two installation sets: Corticon Server for Java, and Corticon Server for .NET.
Corticon Servers implement web services for business rules defined in Corticon Studios.
•
The Corticon Server for deploying web services with Java is supported on various application servers, databases, and client web browsers. After installation on a supported Windows platform, that server installation's deployment artifacts can be redeployed on various UNIX and Linux web service platforms. The guide Corticon Server: Deploying Web Services with Java provides details on the full set of platforms and web service software that it supports, as well as installation instructions in a tutorial format for typical usage.•
The Corticon Server for deploying web services with .NET facilitates deployment on Windows .NET framework 4.0 and Microsoft Internet Information Services (IIS) that are packaged in the supported operating systems. The guide Corticon Server: Deploying Web Services with .NET provides details on the full set of platforms and web service software that it supports, as well as installation instructions in a tutorial format for typical usage.Note: This is the Corticon .NET Server documentation. For corresponding information on the
Corticon Java Server, see Corticon Java Server files and API tools. For details, see the following topics:
•
Setting up Corticon .NET Server use cases•
The Corticon .NET Server home and work directories•
The Corticon .NET Server SandboxSetting up Corticon .NET Server use cases
In most production deployments, Corticon Server JARs are bundled and given an interface class or classes. The interface class is often called a "helper" or "wrapper" class because its purpose is to receive the client application's invocation, translate it (if necessary) into a call which uses Corticon Server's native API, and then forwards the call to Corticon Server's classes. The type of interface class depends on the container where you intend to deploy the Corticon Server.
Corticon Studio makes in-process calls to the same Corticon Server classes (although packaged differently) when Ruletests are executed. This ensures that Ruleflows behave exactly the same way when executed in Studio Ruletests as they do when executed by Corticon Server, no matter how Corticon Server is installed.
Installing Corticon .NET Server as an in-process server
If you choose to manage Corticon .NET Server in-process via your client application or via a custom container, you are taking responsibility for many of the tasks that are normally performed by a web or application server. But by doing it in your own code, you can optimize your environment and eliminate unneeded overhead. This can result in much smaller footprint installations and faster performance.
Because Corticon Server is a set of classes, it can easily be deployed in-process in an application. When deployed in-process, the following tasks are the responsibility of the client application:
•
Management of application settings, ensuring the base set of Corticon Server classes is properly referenced.•
Lifecycle management, including server startup/shutdown•
Security (if needed)Corticon Server can also be installed into a custom container within any application. It has a small footprint and thus can be installed into client applications including browser-based applications, laptops and mobile devices.
For step-by-step instructions on using the Installer to gain access to Corticon Server's core files, see Installing Corticon Server for .NET on page 9 of this guide.
Installation in-process or in a custom container involves these basic steps:
1. Place the following Corticon Server directories and their contents in a directory that is accessible by the application container.
•
/bin•
/lib•
/conf2. Configure the application to reference all DLL files located in the /bin directory.
3. Change the logPath property inside CcCommon.properties to an explicit path to a directory for the Corticon Server Log file.
CORTICON_HOME - A directory value for the location of /bin, /lib, and /conf.
•
•
CORTICON_WORK_DIR - The explicit path to the working directory•
CORTICON_LICENSE - The explicit path to the CcL icense.jar file.•
Deploys the Decision Services into the Corticon Server•
Requests a decision by marshaling the data payload and then invoking the relevant Corticon Decision Service•
Processes the response from the Decision Service.Sample code is provided that demonstrates an in-process deployment of Corticon .NET Server. This code is packaged as the executable Corticon-Api-Inprocess-Test.exe in the
Server\bin directory of your Corticon .NET Server installation directory. You can also launch it from the Windows Start menu, as shown:
Installing Corticon .NET Server as a remote server on IIS
For a remote server on IIS, see the instructions in Setting up .NET Framework on page 15 and
Configuring the installations, and the supporting topics for IIS configuration, Configuring IIS 6.0 on Windows Server 2003 on page 81 and, on Windows 7, Setting up Internet Information Services (IIS) on page 17.
The Corticon .NET Server home and work directories
As a Corticon installation completes, it tailors two properties that define its global environment. As you could have elected to specify preferred locations for the installation directory and for the work directory, the installer sets CORTICON_HOME to the Server Install Directory, (referred to within the installer as %CORTICON_INSTALL_DIR%), and CORTICON_WORK_DIR to the Server WorkDirectory you specified. These variables are used throughout the product to determine the relative
location of other files.
.NET Configurations that use global environment settings
CORTICON_HOME and CORTICON_WORK_DIR
These properties are set in the web.config file when they are different from the standard IIS location, IISRoot. See Changing web.config on page 30 for detailed instructions.
CORTICON_WORK_DIR
The logs should be stored in the Corticon Server work directory. That target subdirectory is defined by the logPath property defined in CcCommon.properties (inside CcConfig.jar) as:
logpath=%CORTICON_WORK_DIR%/logs
Therefore, when Corticon Server is launched, the logPath location will be, in a default installation,
C:\Users\{username}\Progress\Corticon 5.3\logs.
It is a good practice to use global environment settings
Many file paths and locations are determined by the CORTICON_HOME and CORTICON_WORK_DIR
variables. Be sure to call corticon_env.bat, and then use these variables in your scripts and wrapper classes so that they are portable to deployments that might have different install paths.
The Corticon .NET Server Sandbox
When Corticon Server starts up, it checks for the existence of a "sandbox" directory. This Sandbox is a directory structure used by Corticon Server to manage its state and deployment code. The location of the Sandbox is controlled by com.corticon.ccserver.sandboxDir inside
CcServer.properties (inside CcConfig.jar).
This configuration setting is defined by the CORTICON_WORK_DIR variable, in this case: com.corticon.ccserver.sandboxDir=%CORTICON_WORK_DIR%/%CORTICON_SETTING%/CcServerSandbox The result for this in a default Windows installation is
C:\Users\{username}\Progress\CorticonWork_5.3\CcServerSandbox. In other words, in the SER subdirectory of the CORTICON_WORK_DIR. This directory is created (as well as peer directories, logs and output) during the first launch of Corticon Server.
Note: If the location specified by com.corticon.ccserver.sandboxDir cannot be found or is not available, the Sandbox location defaults to the current working directory as it is typically the location that initiated the call.
Testing the installed Corticon .NET Server
With Corticon Server installed in the environment and container of your choice, it is useful to test the installation to ensure Corticon Server is running and listening. At this point, no Decision Services have been deployed, so Corticon Server is not ready to process transactions. However, the Corticon Server API set contains administrative methods that interrogate it and return status information. Several tools are provided to help you perform this test.
Testing as in-process
Sample code is provided that demonstrates an in-process deployment of Corticon .NET Server. This code is packaged as the executable Corticon-Api-Inprocess-Test.exe in the
Server\bin directory of your Corticon .NET Server installation directory. You can also launch it from the Windows Start menu, as shown:
The API in-process test opens a Windows console and displays the API menu, as shown below:
Figure 3: Top Portion of the .NET Server in-process API console
The menu displayed in the Windows console is too large to fit on a single printed page, so it has been divided into two screenshots here. In the upper portion of the Windows console, shown in the figure above, the class loading process is visible. Once all classes are loaded, Corticon .NET Server starts up in the IIS.
Figure 4: Lower Portion of the .NET Server in-process API console
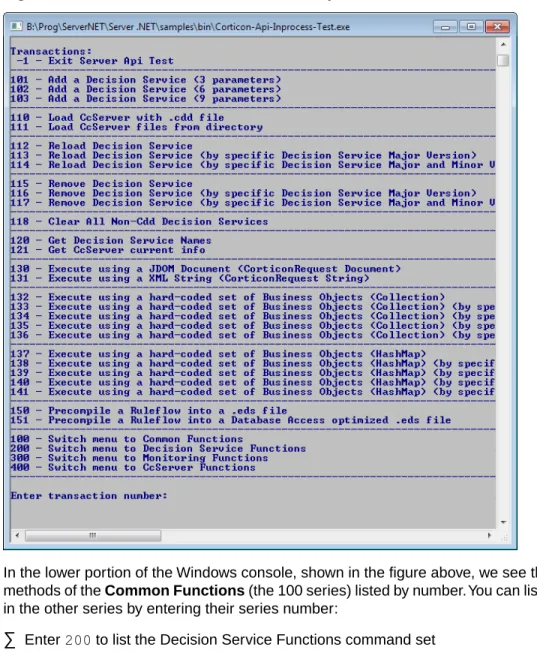
In the lower portion of the Windows console, shown in the figure above, we see the available API methods of the Common Functions (the 100 series) listed by number.You can list the commands in the other series by entering their series number:
•
Enter 200 to list the Decision Service Functions command set•
Enter 300 to list the Monitoring Functions command set•
Enter 400 to list the CcServer Functions command set•
Enter 100 to again list the Common Functions command setNote: After you enter a transaction, the result is displayed followed a restating of the current
command set. You might need to scroll back a bit to see your results. Chapter 7: Corticon .NET Server files and API tools
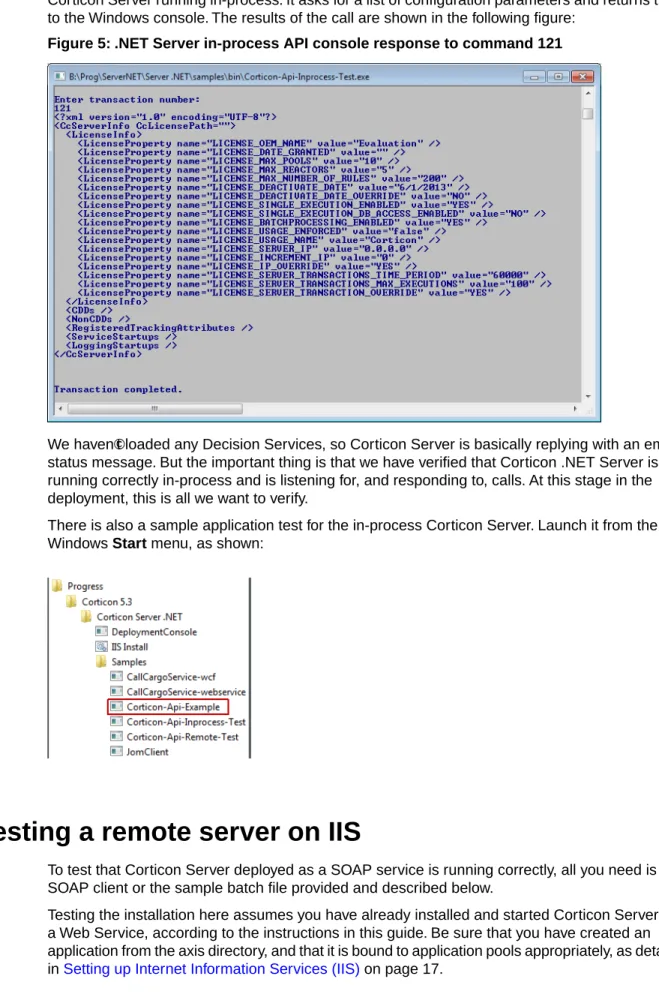
To try this, enter 121 in the command window. The CcServerApiTest class makes a call to the Corticon Server running in-process. It asks for a list of configuration parameters and returns them to the Windows console. The results of the call are shown in the following figure:
Figure 5: .NET Server in-process API console response to command 121
We haven't loaded any Decision Services, so Corticon Server is basically replying with an empty status message. But the important thing is that we have verified that Corticon .NET Server is running correctly in-process and is listening for, and responding to, calls. At this stage in the deployment, this is all we want to verify.
There is also a sample application test for the in-process Corticon Server. Launch it from the Windows Start menu, as shown:
Testing a remote server on IIS
To test that Corticon Server deployed as a SOAP service is running correctly, all you need is a SOAP client or the sample batch file provided and described below.
Testing the installation here assumes you have already installed and started Corticon Server as a Web Service, according to the instructions in this guide. Be sure that you have created an application from the axis directory, and that it is bound to application pools appropriately, as detailed in Setting up Internet Information Services (IIS) on page 17.
Because a SOAP service is listening for SOAP calls, we need a way to invoke an API method via a SOAP message then send that message to Corticon Server using a SOAP client. In the sample code supplied in the default installation, Corticon provides an easy way to send API calls through a SOAP message.
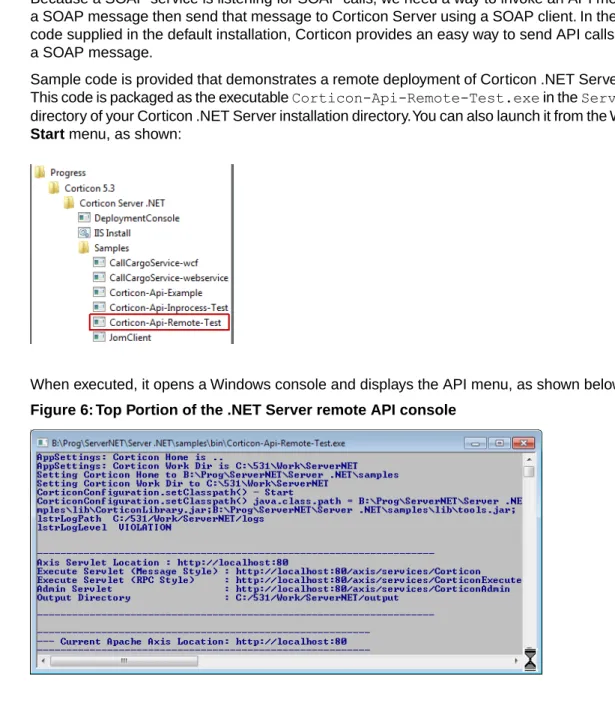
Sample code is provided that demonstrates a remote deployment of Corticon .NET Server on IIS. This code is packaged as the executable Corticon-Api-Remote-Test.exe in the Server\bin
directory of your Corticon .NET Server installation directory.You can also launch it from the Windows
Start menu, as shown:
When executed, it opens a Windows console and displays the API menu, as shown below:
Figure 6: Top Portion of the .NET Server remote API console
The menu displayed in the Windows console is too large to fit on a single printed page, so it has been divided into two screenshots here. In the upper portion of the Windows console, shown in the figure above, the classpath definition process is visible. Once all classes are loaded, the Corticon .NET Server starts up in the IIS, which is needed by our simple SOAP client class.
Figure 7: Lower Portion of the .NET Server remote API console
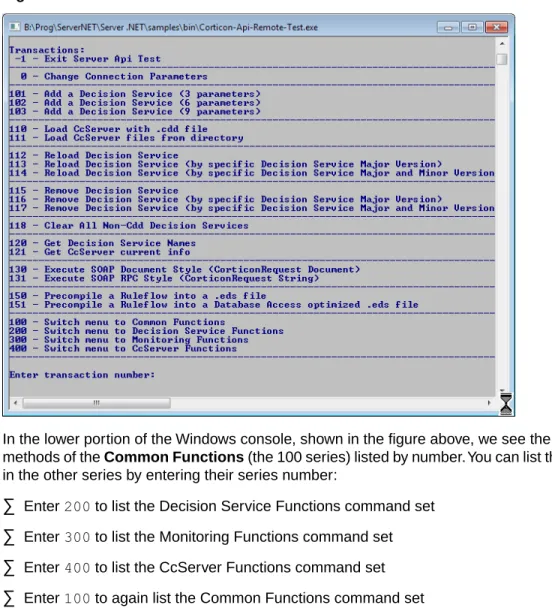
In the lower portion of the Windows console, shown in the figure above, we see the available API methods of the Common Functions (the 100 series) listed by number.You can list the commands in the other series by entering their series number:
•
Enter 200 to list the Decision Service Functions command set•
Enter 300 to list the Monitoring Functions command set•
Enter 400 to list the CcServer Functions command set•
Enter 100 to again list the Common Functions command setNote: After you enter a transaction, the result is displayed followed a restating of the current
command set. You might need to scroll back a bit to see your results.
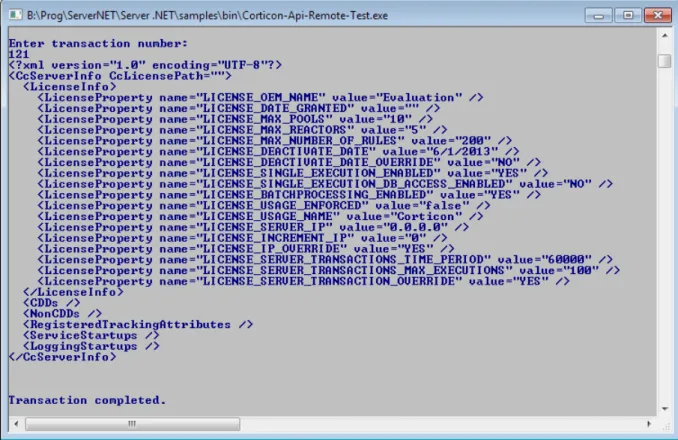
Since we have not deployed any Ruleflows yet, we will use an administrative method to test if Corticon Server is correctly installed as a SOAP service inside our web server. A good administrative method to call is transaction #121, Get CcServer current info. This choice corresponds directly to the API method getCcServerInfo().
To try this, confirm that IIS is running, and then enter 121 in the command window. The
CcServerAxisTest class makes a call to the Corticon Server SOAP Servlet. It asks for a list of configuration parameters and returns them to the Windows console. The results of the call are shown in the following figure:
Figure 8: .NET Server remote API console response to command 121
The response verifies that our Corticon Server is running correctly as a SOAP Servlet and is listening for, and responding to, calls. At this stage in the deployment, this is all we want to verify. Chapter 7: Corticon .NET Server files and API tools
8
Deploying a Ruleflow to the Corticon Server
for .NET
Just because Corticon Server for .NET has been installed does not mean it is ready to process transactions. It must still be "loaded" with one or more Ruleflows. Once a Ruleflow has been loaded, or deployed, to the Corticon Server we call it a Decision Service because it is a service ready and able to make decisions for any external application or process ("client") that requests the service properly.
Loading the Corticon Server with Ruleflows can be accomplished in two ways:
•
Deployment Descriptor files - This is the easiest method and the one we will use in thisTutorial because it is also the method typically used in production web service deployments.
•
.NET APIs - This method requires more knowledge of the Server for .NET API set, and is notdiscussed in this Tutorial.
Both methods are described more thoroughly in the Server Integration & Deployment Guide. For details, see the following topics:
•
Creating a RuleflowCreating a Ruleflow
For purposes of this Tutorial, we assume you have already created a Ruleflow suitable for deployment. If you have completed the Corticon Tutorial: Basic Rule Modeling , then you have indeed created a sample Ruleflow that is ready for deployment to the Server for .NET.
In the Corticon Tutorial: Basic Rule Modeling we built and tested a new Ruleflow from scratch. We will use that Ruleflow here, but the same steps we outline must be followed regardless of the Ruleflow we use.
If you no longer have your original Ruleflow, then use tutorial_example.erf located in
[CORTICON_HOME]\Samples\Rule Projects\Tutorial\Tutorial-Done as a substitute. The rules inside are essentially the same as those built in the first part of the Corticon Tutorial: Basic Rule Modeling .
Creating and installing a Deployment Descriptor file
A Deployment Descriptor file tells the Corticon Server for .NET which Ruleflows to load and how to handle transaction requests for those Ruleflows. A Deployment Descriptor file has the suffix.cdd, and we will often simply refer to it as a .cdd file.
Important: The.cdd file "points" at the Ruleflow via a path name – it is important that this path
not contain space characters. For example, a Ruleflow stored in My Documents cannot be referenced by a Deployment Descriptor file because its path contains a space. Even though the default storage location for your Ruleflow files is inside a Corticon Studio installation's
[CORTICON_WORK_DIR]\Tutorial\Tutorial-Done (which contains a space), we avoid the problem by substituting ../../ as a relative reference to the directory structure.
Deployment Descriptors are easily created using the Deployment Console, which is installed by the Server installer.
Using the Deployment Console tool's Decision Services
on the .NET Server
The Corticon Deployment Console is started, as follows:
•
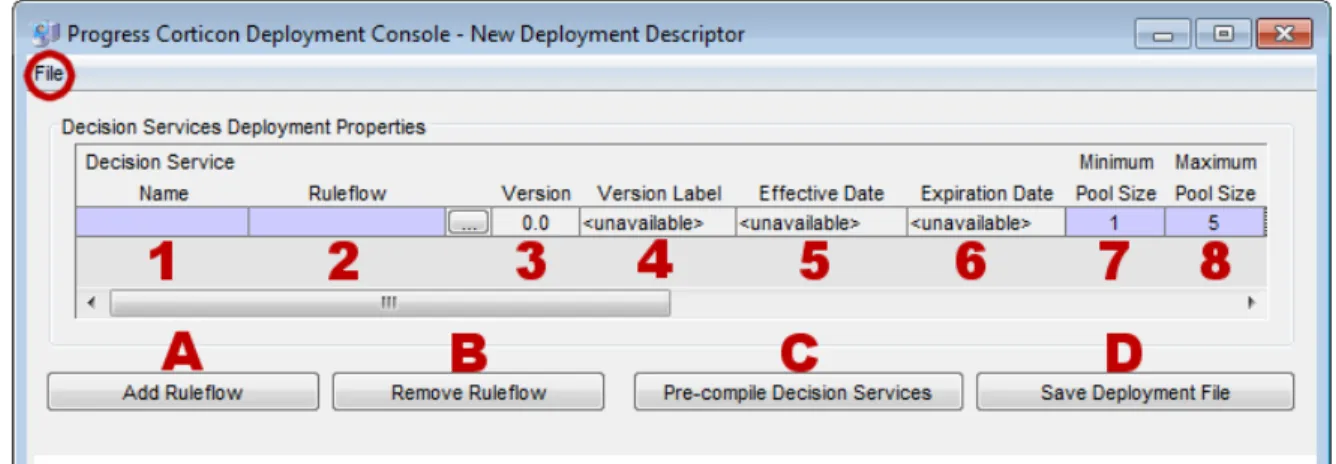
.NET Server: On the Windows Start menu, choose Programs > Progress > Corticon n.n > Corticon Server .NET > Deployment Console to launch the executable file Server .NET\samples\bin\DeploymentConsole.exe.The Deployment Console is divided into two sections. Because the Deployment Console is a rather wide window, its columns are shown as two screen captures in the following figures. The red identifiers are the topics listed below.
Figure 9: Left Portion of Deployment Console, with Deployment Descriptor File Settings Numbered
Figure 10: Right Portion of Deployment Console, with Deployment Descriptor File Settings Numbered
The name of the open Deployment Descriptor file is displayed in the Deployment Console's title bar.
The File menu, circled in the top figure, enables management of Deployment Descriptor files:
•
To save the current file, choose (File > Save).•
To open an existing .cdd, choose (File > Open).•
To save a .cdd under a different name, choose (File > Save As).The marked steps below correspond to the Deployment Console columns for each line in the Deployment Descriptor.
1. Decision Service Name - A unique identifier or label for the Decision Service. It is used when
invoking the Decision Service, either via an API call or a SOAP request message. See Invoking Corticon Server for usage details.
2. Ruleflow - All Ruleflows listed in this section are part of this Deployment Descriptor file.
Deployment properties are specified on each Ruleflow. Each row represents one Ruleflow. Use the button to navigate to a Ruleflow file and select it for inclusion in this Deployment Creating and installing a Deployment Descriptor file
Descriptor file. Note that Ruleflow absolute pathnames are shown in this section, but relative pathnames are included in the actual .cdd file.
The term "deploy", as we use it here, means to "inform" the Corticon Server that you intend to load the Ruleflow and make it available as a Decision Service. It does not require actual physical movement of the .erf file from a design-time location to a runtime location, although you may do that if you choose – just be sure the file's path is up-to-date in the Deployment Descriptor file. But movement isn't required – you can save your .erf file to any location in a file system, and also deploy it from the same place as long as the running Corticon Server can access the path.
3. Version - the version number assigned to the Ruleflow in the Ruleflow > Properties window
of Corticon Studio. Note that this entry is editable only in Corticon Studio and not in the Deployment Console. A discussion of how Corticon Server processes this information is found in the topics Decision Service versioning and effective dating Also see the Quick Reference Guide for a brief description of the Ruleflow Properties window and the Rule Modeling Guide for details on using the Ruleflow versioning feature. It is displayed in the Deployment Console simply as a convenience to the Ruleflow deployer.
4. Version Label - the version label assigned to the Ruleflow in the Ruleflow > Properties window
of Corticon Studio. Note that this entry is editable only in Corticon Studio and not in the Deployment Console. See the Quick Reference Guide for a brief description of the Ruleflow Properties window and the purpose of the Ruleflow versioning feature.
5. Effective Date - The effective date assigned to the Ruleflow in the Ruleflow > Properties
window of Corticon Studio. Note that this entry is editable only in Corticon Studio and not in the Deployment Console. A discussion of how Corticon Server processes this information is found in the topics Decision Service versioning and effective dating Also see the Quick Reference Guide for a brief description of the Ruleflow Properties window and the purpose of the Ruleflow effective dating feature.
6. Expiration Date - The expiration date assigned to the Ruleflow in the Ruleflow > Properties
window of Corticon Studio . Note that this entry is editable only in Corticon Studio and not in the Deployment Console. A discussion of how Corticon Server processes this information is found in the topics Decision Service versioning and effective dating Also see the Quick Reference Guide for a brief description of the Ruleflow Properties window and the purpose of the Ruleflow expiration dating feature.
7. Minimum Pool Size - The minimum number of instances or 'copies' created for a Decision
Service when it is loaded by Corticon Server. Instances of a Decision Service are known as
Reactors - These Reactors are placed in a pool, where they wait for assignment by Corticon
Server to an incoming request, or they expire due to inactivity. The larger the pool size, the greater the concurrency (but greater the memory usage). The default value is 1, which means that even under no load (no incoming requests) Corticon Server will always maintain one Reactor in the pool for this Decision Service.
8. Maximum Pool Size - The maximum number of Reactors Corticon Server can put into the
pool for this Decision Service. Therefore, the number of Reactors that can execute concurrently is determined by the max pool size. If additional requests for the Decision Service arrive when all Reactors are busy, the new requests queue until Corticon Server can allocate a Reactor to the new transaction (usually right after a Reactor is finished with its current transaction). The more Reactors in the pool, the greater the concurrency (and the greater the memory usage). See Performance and Tuning chapter for more guidance on Pool configuration. The default value is 5.
Note: If you are evaluating Corticon, your license requires that you set the parameter to 1.
9. Database Access - Controls whether the deployed Rule Set has direct access to a database,
and if so, whether it will be read-only or read-write access.
10. Entities Returned - Determines whether the Corticon Server response message should include
all data used by the rules including data retrieved from a database (All Instances), or only data provided in the request and created by the rules themselves (Incoming/New Instances).
11. Database Access Properties File - The path and filename of the database access properties
file (that was typically created in Corticon Studio) to be used by Corticon Server during runtime database access. Use the adjacent button to navigate to a database access properties file.
12. Dynamic Reload - If Yes, then Corticon Server will periodically look to see if a Deployment
Descriptor file, or any of the Decision Service entries in that file, has changed since the .cdd
was last loaded. If so, it will be automatically reloaded. The time interval between checks is defined by property com.corticon.ccserver.serviceIntervals in CcServer.properties. Even if No, Corticon Server will still use the most recent Ruleflow when it adds new Reactors into the pool.
13. XML Messaging Style - Determines whether request messages for this Decision Service
should contain a flat (Flat) or hierarchical (Hier) payload structure. The Decision Service Contract Structures section of the Integration chapter provides samples of each. If set to Auto Detect, then Corticon Server will accept either style and respond in the same way.
The indicated buttons at the bottom of the Decision Service Deployment Properties section provide the following functions:
•
(A) Add Ruleflow - Creates a new line in the Decision Service Deployment Properties list.There is no limit to the number of Ruleflows that can be included in a single Deployment Descriptor file.
•
(B) Remove Ruleflow - Removes the selected row in the Decision Service DeploymentProperties list.
•
(C) Pre-compile Decision Services - Compiles the Decision Service before deployment, andthen puts the .eds file (which contains the compiled executable code) at the location you specify. (By default, Corticon Server does not compile Ruleflows until they are deployed to Corticon Server. Here, you choose to pre-compile Ruleflows in advance of deployment.) The
.cdd file will contain reference to the .eds instead of the usual .erf file. Be aware that setting the EDC properties will optimize the Decision Service for EDC.
•
(D) Save Deployment File - Saves the .cdd file. (Same as the menu File > Save command.)Installing the Deployment Descriptor file
Once Corticon Server for .NET has been installed and deployed on IIS, the following sequence occurs:
1. IIS server starts.
2. Corticon Server for .NET starts as a web service in IIS. Creating and installing a Deployment Descriptor file
3. Corticon Server looks for Deployment Descriptor files in the <IISRoot>\axis\cdd directory. 4. Corticon Server for .NET loads into memory the Ruleflow(s) referenced by the Deployment
Descriptor files, and creates Reactors for each according to their minimum pool size settings. At this stage, we say that the Ruleflows have become Decision Services because they are now callable by external applications and clients.
In order for the Corticon Server for .NET to find Deployment Descriptor files when it looks in step 3, we must ensure that the .cdd files are stored in the default location, the
[CORTICON_WORK_DIR]\cdd directory. When creating .cdd files, save them to this directory so they become accessible to the deployed Corticon Server for .NET.
Note: This location is configurable, but be aware that Deployment Descriptor files usually contain
paths relative to where they were created; as such, copying or moving them to a different location can make the file behave incorrectly. See the Deploying Corticon Ruleflows chapter of the Server Integration & Deployment Guide for details.
Now, when the startup sequence reaches step 3 above, the server knows where all Ruleflows are located because .cdd files contain their pathnames.
Hot re-deploying deployment descriptor files and
ruleflows
Changes to a Deployment Descriptor file or any of the Ruleflows it references do not require restarting IIS. A maintenance thread in the Corticon Server for .NET watches for additions, deletions, and changes and updates appropriately. A Ruleflow can be modified in Studio even while it is also simultaneously deployed as a Decision Service and involved in a transaction - Server can be configured to update the Decision Service dynamically for the very next transaction.
Having selected No for the Dynamic Reload setting earlier, our tutorial_example Decision Service will not update automatically when the .erf file is changed. To enable this automatic refresh, choose Yes for the Dynamic Reload setting.
9
Consuming a Decision Service
Let's review what we have accomplished so far:
1. We have installed Corticon Server for .NET files onto a workstation or server . 2. We have configured Corticon Server for .NET as a web service onto IIS.
3. We have used the Deployment Console to generate a Deployment Descriptor file for our
sample Ruleflow.
4. We have installed the Deployment Descriptor file in the location where Corticon Server for .NET
looks when it starts.
Now we are ready to consume this Decision Service by sending a real XML/SOAP "request" message and inspecting the "response" message it returns.
For details, see the following topics:
•
Integrating and testing a Decision Service•
Path 1- Using Corticon Studio as a SOAP client to consume a Decision Service•
Path 2 - Using bundled C# sample code to consume a Decision Service•
Path 3 - Using SOAP client to consume a Decision Service•
Limits of the default evaluation licenseIntegrating and testing a Decision Service
In order to use a Decision Service in a process or application, it is necessary to understand the Decision Service's service contract, also known as its interface. A service contract describes in precise terms the kind of input a Decision Service is expecting, and the kind of output it returns following processing. In other words, a service contract describes how to integrate with a Decision Service.
When an external process or application sends a request message to a Decision Service that complies with its service contract, the Decision Service receives the request, processes the included data, and sends a response message. When a Decision Service is used in this manner, we say that the external application or process has successfully "consumed" the Decision Service. This Tutorial describes three paths for consuming a Decision Service:
•
Path 1Use Progress Corticon as a SOAP client to send and receive SOAP messages to a Decision Service running on a remote Corticon Server - This is different from testing
Ruleflows in Corticon "locally." This path is the easiest method to use and requires the least amount of technical knowledge to successfully complete. If you have already installed Corticon Studio, then you have all necessary components to complete this path. If not but want to follow this path, we recommend completing the Corticon Studio Installation Guide and the Corticon Studio Basic Tutorial before continuing on this path.
•
Path 2Manually integrate and test a Decision Service - In this path, we will use bundled sample
code (a command file) to send a request message built in Corticon Studio's Tester, and display the results. This path requires more technical knowledge and confidence to complete, but illustrates some aspects of the software which may be interesting to a more technical audience. If you have already installed Studio, then you have all necessary components to complete this path. If not but want to follow this path, we recommend completing the Studio Installation Guide and the Basic Tutorial for Corticon Studio – Modeling Rules before continuing on this path.
•
Path 3Use a commercially available SOAP client to integrate with and test a Decision Service
- In other words, this SOAP client will read a web-services-standard service contract (discussed below), generate a request message from it, send it to the Corticon Server and display the response message. Corticon does not include such an application, so you must obtain one in order to complete this path.
Path 1- Using Corticon Studio as a SOAP client to
consume a Decision Service
In this path, we will use Corticon Studio as a SOAP client to execute Decision Services running Chapter 9: Consuming a Decision Service
Configuring Studio to send a SOAP Message to IIS
Corticon Studio is configured by default to query a localhost web server on port 8082. Because we are using IIS, we’ll change the port used by Studio to send Test messages.
Note: Instead of localhost, you can use the static IP or DNS-resolvable name of the host, a good idea as it emulates actual deployment.
To configure the port: 1. Navigate to the directory
[CORTICON_HOME]\Studio\eclipse\configuration\com.corticon.brms. 2. Create a text file named brms.properties in that location.
3. Add the following line to the file so that your IIS points to its server port:
com.corticon.deployment.soapbindingurl_2=http://localhost:80/axis
4. Save the edited file. 5. Restart Corticon Studio.
The edited value is added to the list of Remote Servers.
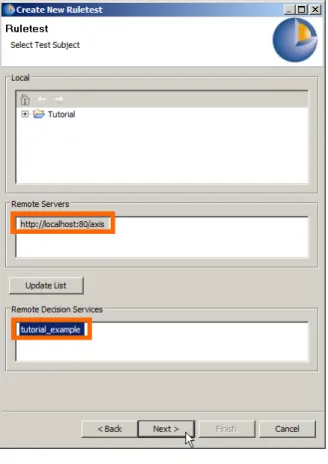
Creating a new .NET server test in Corticon Studio
Return to Corticon Studio, or reopen it if closed. Open Cargo.ecore and then, without opening any Ruleflows, open a new Test by selecting File>New>Ruletest from the Corticon Studio menubar. For the Ruletest creation process outlined below, see also Requesting List of Remote Decision Services:
1. You will be asked to Select Test Subject. Be sure to select the http://localhost:80/axis in the
Remote Servers box.
2. Select Update List. Corticon Studio will attempt to contact a Corticon Server instance at the location specified above. If a Corticon Server instance is running, it will respond with a list of available Decision Services, and display that list in the Remote Decision Services window. 3. Choose the Decision Service to invoke. In this Tutorial, we want tutorial_example. 4. Click Next>
5. Select the Vocabulary to use, as per normal Ruletest creation procedure.
Important: Remember, even though we are using Corticon Studio to test, we are using its remote
testing feature, which executes a Decision Service running on Corticon Server ("remotely"), not a Ruleflow open in Corticon Studio ("locally").
To keep this distinction clear, we are not going to open tutorial_example.erf in Corticon Studio – it is not necessary since we're really testing the Decision Service running on Corticon Server.
In step 1, you selected the default URL: Corticon Server running on localhost. If you want to change the URL to another address, see Configuring Corticon properties and settings "Designer properties & settings" in Server Integration & Deployment Guide for more information about configuring Corticon Studio properties.
Figure 11: Requesting List of Remote Decision Services
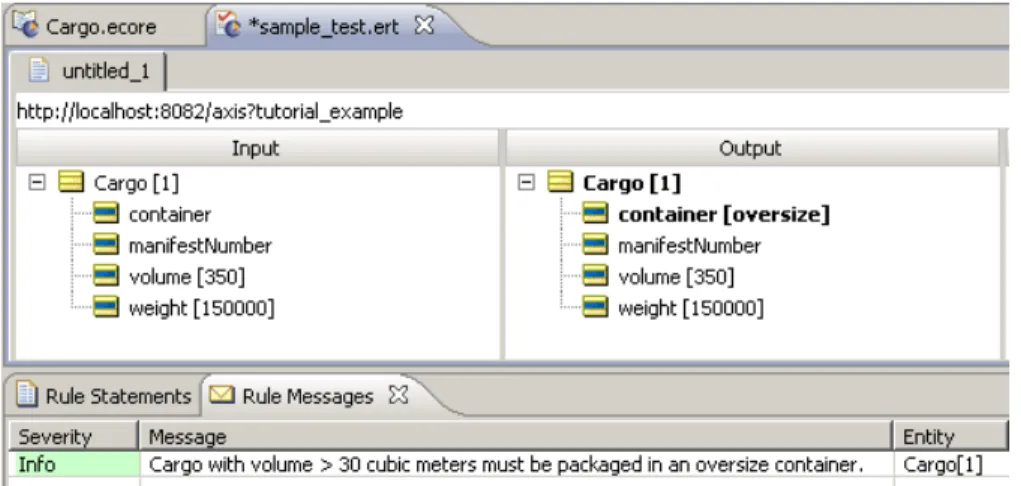
Now, drag a Cargo entity from the Vocabulary to the Input pane. Enter sample data as shown:
Figure 12: Sample Data in a Studio Remote Ruletest
We should see an Output pane similar to the following:
Figure 13: Response from Remote Decision Service
The Output pane of the Testsheet shown above displays the response message returned by the Corticon Server. This confirms that our Decision Service has processed the data contained in the request and sent back a response containing new data (the container attribute and the message).
Path 2 - Using bundled C# sample code to consume
a Decision Service
To use this path, you should have solid .NET programming skills and familiarity with the .NET Framework SDK environment. This portion of the Tutorial does not provide in-depth explanations of working within the .NET environment.
Sample web service client code is provided in [CORTICON_HOME]Server .NET\samples\webservice-client. This sample includes the following files:
•
Cargo_FlightPlan.wsdl - WSDL generated by the Deployment Console•
CargoDecisionProxy_ASPNET.cs - C# web service proxy generated by wsdl.exe•
CallCargoService.cs - C# code demonstrating how to call the web service•
GenProxy.bat - Code to generate the decision service proxy from the WSDLCreating the WSDL and proxy files
The WSDL and the proxy files are created as follows:
1. If your .NET Server and Studio are colocated, you have the Tutorial Ruleflow in
[CORTICON_HOME]\samples\Tutorial\Tutorial-Done\tutorial_example.erf
If your .NET Server and Studio are on separate machines, copy and stage that file so that it can be accessed on the .NET server machine.
2. Launch the Deployment Console on the Corticon Server .NET machine by choosing the Start menu command All Programs > Progress > Corticon 5.3 > Corticon Server .NET >
Deployment Console
3. Click the ... button to the right of the Ruleflow on the one empty line listed, and the locate the
tutorial_example.erf file.
4. In the lower section, click the Type dropdown, and then choose WSDL. The window should now look like this:
Figure 14: Creating a new WSDL using the Deployment Console
5. Click Generate Service Contracts to save the service contract file, which is named
Cargo_Cargo.wsdl. It may be convenient to generate this file into a separate directory. Here, we use directory [CORTICON_WORK_DIR].
Note: To generate a web service proxy, you need wsdl.exe. When you run wsdl.exe Cargo_Cargo.wsdl, the file CargoDecisionService.cs is created. Place that file in the .NET Server's [CORTICON_HOME]. Refer to the GenProxy.bat file located at
[CORTICON_HOME_\Server .NET\samples\wcf-client for the WSDL options, typically
/namespace: and /out:.
6. Write C# client code to call the web service. We provide a sample in CallCargoService.cs, which sets values of attributes used in the rules.
7. Compile CargoDecisionService.cs and CallCargoService.cs using the csc *.cs
command. Generally, the compile process needs to occur in your .NET Framework root directory, so you may need to move both C# files to that directory prior to compilation. In our case, the .NET Framework is installed at C:\WINDOWS\Microsoft.NET\Framework\v4.0.30319
This generates an executable file named CallCargoService-webservice.exe. Store the file in your [CORTICON_WORK_DIR].
8. If you have not already done so, deploy the tutorial_example Decision Service to Corticon Chapter 9: Consuming a Decision Service
9. Run CallCargoService-webservice.exe to execute the call to Corticon Server. You will see the following output:
Figure 15: Invoking Corticon Server for .NET via C# Sample Code
Path 3 - Using SOAP client to consume a Decision
Service
Web Services Service Contracts
Many commercial SOAP and web services development tools have the ability to import an XSD or WSDL service contract and generate a compliant request message directly from it. This path assumes you have access to such a tool and want to use it to consume a Decision Service. The Corticon Deployment Console can produce both XSD and WSDL documents. The Server Integration & Deployment Guide contains much more information about these documents, including detailed descriptions of their structure and elements. However, if you have chosen this path, we assume you are already familiar enough with service contracts to be able to use them correctly once generated.
Web services messaging styles
There are also two types of messaging styles commonly used in web services:
1. RPC-style, which is a simpler, less-capable messaging style generally used to send smaller
messages and receive single variable an