D0 Note 3782
October 13, 2009
Oracle Designer Tutorial:
Creating an Oracle Database
Elizabeth Gallas
Fermi National Accelerator Laboratory
Oracle Designer (OD) must be used to design the databases that will be used for D0
in Run II. This document is a tutorial showing how to use Oracle Designer to generate
the code necessary to produce a database on the development platform. It shows how to
use Oracle Designer to
•
create tables, relations, and views,
•
assign and grant Roles,
•
specify triggers and constraints and
•
generate accurate storage requirements.
Every design should contain many, if not all, of these elements. With the basic tools
described in this document, a database designer will be familiar enough with OD to go
forth to develop larger applications with more complex features. The author emphasizes
that the advice and assistance of the Fermilab Support DB Project group are invaluable in
this process. Keeping them in the loop will enhance the success of your database project.
Contents
1 Introduction
3
2 List of Essentials
4
3 Using Oracle Designer
5
3.1 ER Diagrammer . . . .
5
3.1.1
Summary Information . . . .
5
3.1.2
Create your Entities (Tables) . . . .
5
3.1.3
Add Columns, Estimate Records . . . .
6
3.1.4
Domains (optional) . . . .
7
3.1.5
Relationships . . . .
7
3.1.6
Unique Identifiers . . . .
7
3.1.7
The ER Diagram . . . .
7
3.1.8
DDT - Database Design Transformer . . . .
8
3.2 RON - Repository Object Navigator . . . .
9
3.2.1
Synonyms . . . .
9
3.2.2
Views . . . .
9
3.2.3
Sequences . . . 10
3.2.4
Triggers . . . 11
3.2.5
Define your Application . . . 12
3.2.6
Roles and d0db Accounts . . . 12
3.2.7
Storage Definitions . . . 13
3.2.8
Final Checks: . . . 14
3.3 DE - Design Editor . . . 14
3.3.1
Generate the DDL . . . 14
4 Creating the Database
15
5 Cutting Scripts
16
6 Data Entry
17
7 MISWEB
17
1
Introduction
Oracle Designer (OD) must be used to design databases used in D0 for Run II. Used correctly, it will make your life easier, not harder, to bring your database to the production environment more quickly and efficiently.
In this tutorial, I describe how to use OD to define (then OD creates):
Tables and Relationships (*.tab and *.ind files)
The attributes [columns] of the entities [tables] and the entity’s relationships to each other are pictured in the ER [Entity Relational] diagram. Anentityin the diagram becomes atablein your database.
Theattributesin each entity become thecolumnsin your tables.
It should be emphasized that the design of the database is all in the ER diagram: the collection of information stored in each table and the relationship between the tables. You will come back and revamp this ER Diagram many times as your database evolves to it’s final form. Remember: tables are entities, entities are like tables. Because I am an amateur, I frequently use the terms ‘table’ or ‘column’ in this document where technically in the ER diagrammer I should be saying ‘entity’ or ‘attribute’, respectively !
Grants or Roles (*.grt)
• who [which d0db database users] will be granted
• what type [select, update, insert, delete] of access
• to each table, view or sequence.
Storage Requirements (*.tab and *.ind)
Are generated for all tables, keys and indexes in a report that requires only that you enter for each table the initial number of records and the maximum number of records for that table.
Triggers (*.trg)
Database triggers are PL/SQL scripts that are executed automatically when a logical condition is satisfied.
Constraints (*.con)
Constraints are necessary to promote database integrity (prevent inappropriate entries in a table for example). Many fall out of the design naturally from the ER Diagram. Constraints can be enforced at the database and/or the interface level.
Sequences (*.sqs)
Tables with columns intended to have ascending integral values can use sequences to generate the current or next value in the sequence.
Views (*.vw)
A view is a special table-like object that you can define that makes the data in a number of tables available from client applications or SQLPlus as though they are in the same table.
Synonyms (*.syn)
Global synonyms allow other d0db users to look at your objects (tables, views, sequences, for example) without always prefixing them with the table owner. It saves typing for all users of your objects. Oracle Designer requires you to plan all the design up front, but generates all the code required to build the database with all the specified features on the UNIX machines. This code, collectively called the ‘DDL’ (Database Definition Language), is a set of files with extensions such as .con, .grt, .ind, .sql, .syn, .tab, .trg, and .vw as described above. This is not a comprehensive list of all fea-tures/extensions, but those described above are some commonly used features. Using Oracle Designer to create the ER diagram and to create these files are the first steps that must be satisfied in order to put your database on the production platform. The full set of standards are currently listed at http://fncduh.fnal.gov:80/supportdb/working/run2 standards.html and
This document is NOT a tutorial on the SQL language, PL/SQL scripting, how to use SQLPlus or how to design databases using the Entity Relational (ER) database model. If you are new to the database world, you will need to learn elements of each of these concepts to become proficient in database design and management. Relational database design concepts and their application to a more complex application is described in D0 note 710 [1]. Oracle documentation can be found from the D0 database home page http://d0db.fnal.gov/d0db , which includes Reference and User’s Guides for Oracle 8, SQLPlus and PL/SQL.
This document describes step-by-step how to implement a database project using Oracle Designer and create it on the D0 offline development platform (d0ora1). There are sections at the end of this document about data entry and an easy way to make dynamic database queries from web pages. The database used as an example in this tutorial is a real database used to store the information collected in a web based survey of the collaboration (D0 Authorlist Survey Project). Henceforth in this document, it will be referred to as “the survey project”.
2
List of Essentials
The first step to start your database application project is obtaining the following:
• If you don’t already have them, see http://d0server1.fnal.gov/d0 account.html to get a D0 NT account and a UNIX account.
• Contact [email protected]:
1. Request an Oracle Designer account for your application. Include a project name and a description of your project, your full name, your institution, and your Fermilab username. The OD account name for the survey project is AUTHOR SURVEY DESIGN (OD account names always end with ‘ DESIGN’). You must indicate if you are designing an online or offline database because they use different OD repositories: ‘d0ofdev1’ or ‘d0ondev1’, respectively. 2. Request a d0db database account (which will be the same name as your username). My d0db
username is gallas.
3. Request a d0db username for the ‘owner of the tables’ for your application. You are not the table owner (do not confuse this d0db username with your d0db username). The owner of the tables for the survey project is ALS OWNER.
4. Request tablespace for your application. Typically, two tablespaces are assigned, called * DATA for the tables and * IDX for the indexes, which are separated to improve database performance. For the survey project they are called ALS DATA and ALS IDX.
• Contact the d0 CVS manager at [email protected] to request a CVS package name(s) for your application. Include the suggested name of the CVS package and a description of your application and give the names and emails of individuals who will have write access to it. The CVS package name for the survey project is Author survey database.
The following items will be needed later (described more completely Section 3.2.5). Don’t ask for them at the onset since they will depend somewhat on your application. You will contact [email protected] to get
• one or more d0db account usernames that may be needed by your interfaces (after you think about how you are going to enter and display the data in your tables).
• one or more Roles, listing the corresponding d0db account usernames.
If there is one piece of advice I should give you, this is it: Take some time to choose your names and shortnames carefully and consistently and don’t change them unless you really have to because while it is possible, it is not easy. Discuss the names with experts in your group and make sure they are descriptive and distinct. Also, consider the fact that database tables from other parts of the experiment will reside in the same online or offline database as yours. It is therefore important to choose names so as not to conflict
or be confused with the purpose of their tables. It may also help to use other database applications as a guide for your naming conventions. Another consideration is that since you will type these names many times, really long names will quickly become tedious.
D0 database organization, documentation and Oracle documentation can be found from the D0 database home page http://d0db.fnal.gov/d0db . Obtaining many of the items in the list above and help with your application can be obtained through the Fermilab Support DB Project group in person or by email to [email protected] .
3
Using Oracle Designer
Use the PC D0nt84 located in DAB1 (where Oracle Designer/2000 has been installed) and log in using your D0 NT account. Click on Start (lower left corner). Under ‘Programs’, choose ‘Oracle Designer R6.0/Oracle Designer’. Login under the OD username for your application using the connect string “d0ofdev1” or “d0ondev1” which connects you to the offline or online development repository, respectively, as requested. The Oracle repository stores your diagram and backs it up.
The OD username for the survey project is author survey design on d0ofdev1. As I walk through the steps, the choices I make for the survey project are generally in parentheses. If you have an online database project, type D0ONDEV1 rather than the D0OFDEV1 in this document.
For the survey project, I named the ‘Application System’ ALS DIAGRAM and then clicked on the create button. Then that name appears in the box below and is highlighted. Click on OK. The Oracle Designer Front Panel will pop up. One other note: the successful execution of many tasks outlined in this document depends on the successful execution of previous sections.
3.1
ER Diagrammer
It should be emphasized that the design of the database is all in the ER diagrammer and expressed in the ER diagram: ie the collection of information stored in each table and the relationship between the tables. You will come back and rework this ER Diagram many (tens or hundreds of!) times as your database evolves to it’s final form.
From the Oracle Designer Front Panel, choose the ‘Entity Relationship Diagrammer’ icon. Under ‘File’, select ‘New.’ Your new diagram is by default named ERD1. I rename mine to ALS DIAGRAM1 using the ‘Save Diagram as’ option under ‘File’.
3.1.1 Summary Information
Under ‘file,’ I select ‘Summary Information’ and enter my diagram title, author and click any other information I want printed on my ER Diagram (see upper left corner of ER Diagram in Figure 1).
3.1.2 Create your Entities (Tables)
Click on the oval labeled ‘Entity’ to create a new table, then click on the page to place it on the diagram. I create 2 tables for the survey project called ALS ENTRY (stores all entries for each survey) and ALS ID (stores the survey id’s and passcodes for each survey). The entity name should be singular (ALS ENTRY and ALS ID), the shortnames should be as short as possible (AE and AI) and the plurals generally just have an ‘s’ on the entity name (ALS ENTRIES and ALS IDS). Technically, the plural form is the table name and the singular form is the entity name.
3.1.3 Add Columns, Estimate Records
Double click on a table to edit it (ALS ENTRY). Under the ‘Definition’ tab, estimate the number of initial records in the table (‘Initial’=100) and the maximum number of records (‘Maximum’=800 since there are less than 600 collaborators).
Under the ‘Attributes’ tab:
‘Names’ of the columns in the table should be as short but as descriptive as possible.
‘Opt’ Optional (not mandatory) columns have the optional boxchecked.
‘Seq’ is just the order the columns appear in the table. Put the most significant columns at the top:
primary key(s) should have the lowest ‘Seq’=1 ... Give optional columns the highest numbers, then they will have storage at the bottom of the record and if not filled, they will not take up any space.
‘Format’ (data type) is required for all columns. Data types I have used are INTEGER (for true integer
columns), NUMBER (for true signed number columns requiring ‘Dec’ places after the decimal point), VARCHAR2 (can store up to 4000 characters of any type), TIMESTAMP (stores date/time in Oracle date/time format). All these types have a ‘MaxLen’, except for the TIMESTAMP.
‘Comment’ - All columns should have a description entered here.
Here is a table of columns in ALS ENTRY:
IDNUM I define an INTEGER(MaxLen=10) type column called IDNUM as the
pri-mary key (click the ‘pripri-mary’ box) with ‘Seq’ = 1 so it is the first column listed in the table on the ER diagram.
IDNUM2 I define a second integer column called IDNUM2. This mandatory column is
needed for the interface (the reasons are not relevant here).
CREATE DATE
and
CREATE USER
Use domains of the same names described in the next subsection.
M01 - M08 Eight columns named M01 - M08 will store the results of the yes/no
ques-tions of the survey (here I use the domain YESNO defined in the next section). Therefore, these columns will have ‘Format’=VARCHAR2 with ‘MaxLen’=30 and the possible values specified below.
Q01 This column stores the content of the one essay-type question in the survey so people can enter any comments or suggestions. I give this column the highest ‘Seq’ number, make it optional and give it a ‘Format’=VARCHAR2 (‘MaxLen’=2000). This gives plenty of space for a text entry, but puts it at the bottom of the record, so if it is not filled, it takes no space.
MODIFY DATE
and
MODIFY USER
Use the domains of the same names described in the next subsection.
When finished with a table, click on OK.
The contents of table ALS ID is simpler: It contains an INTEGER(10) primary key called IDNUMC. It also contains an optional column named PSSCODE with type VARCHAR2(30) that the interface uses to prevent multiple submissions of the same survey. This table also contains CREATE and MODIFY the DATE and USER.
The primary key for ALS ID will actually be a combination of IDNUMC along with IDNUM from ALS ENTRY (will be brought in as a foreign key when the relationship is defined in the ‘Relationships’ and ‘Unique Identifiers’ subsections below). I use this as an example to emphasize: Do not insert any foreign keys into a table under ‘Attributes’ since these will automatically be included when the relationships are made.
Since there is a one-to-one relationship between the tables, you might ask why I did not put everything in the same table ! The reason is: The Roles (who will be allowed to Select, Update, Insert and Delete records) for table ALS ENTRY will be different than for table ALS ID. This will be described in the Roles section of this document.
3.1.4 Domains (optional)
Use of domains is optional but can be useful when
1. columns with the same definitions appear in more than one table or 2. when multiple columns in the same table have the same characteristics.
An example of the first case is: I like to record the creation date and user for each record in every table. Under ‘Edit’, select ‘Domains...’. I create a domain named CREATE DATE with ‘Format’ and ‘Datatype’ = TIMESTAMP and a column called CREATE USER with ‘Format’ and ‘Datatype’ = VARCHAR2 (‘MaxLen’=30) and give both an appropriate description. Similarly, I define a MODIFY DATE and MODIFY USER.
An example of the latter case is: The ALS ENTRY table contains answers to eight “yes or no” questions. Therefore, I create a domain named YESNO with ‘Format’ and ‘Datatype’ = VARCHAR2 (‘MaxLen’=30). Under the ‘Value’ tab, I give the YESNO domain 3 possible values of “YES”, “NO” or “NA” (for no answer).
After doing this, I can use these domains to quickly create columns in my tables with different column names but the same characteristics (used in the previous subsection).
3.1.5 Relationships
Now define the relationships between the tables (the lines on the ER Diagram). My ALS ENTRY table contains all the survey entry data. The ALS ID table allows a record for each submitted survey which the web interface uses to prevent multiple submissions of the same survey.
The relationship between table ALS ENTRY and ALS ID is: There is one entry in ALS ENTRY for each entry in ALS ID, in other words, a one-to-one correspondence. Furthermore the relationship is mandatory (M) on the ALS ID end and optional (O) on the ALS ENTRY end. Mandatory means every entry in the ALS ID table MUST have a corresponding entry in the ALS ENTRY table, but not vice-versa. Therefore, I click on the solid to dashed line icon [labeled “1:1 M to O Relationship”], put the first end of the line in the ALS ID table (click) and the other end of the line in the ALS ENTRY table (click). Type ‘from’ and ‘to’ in the ‘Create Relationship’ box that pops up until you think of better words to describe the relationship.
This one-to-one relationship is simple and not often used but the same steps can be applied for one to many relationships which are most common: In OD, ‘Relationship’ icons are ordered from left to right in the order of how often they are generally used. Chances are, you will use the one (optional) to many (mandatory) relationship [M:1 (M to O)] 99% of the time. Ask for help/advice for more complex relationships (such as many-to-many) from the Support DB Project Group because frequently when they are used, there is a flaw in your logic!
3.1.6 Unique Identifiers
As mentioned in the last few sections, the primary key (unique identifier for each record) for the ALS ID table is a combination of IDNUMC along with IDNUM from ALS ENTRY (brought in as a foreign key) To make this association, double click on the relationship (line between the tables). Put a Check in the ‘Primary UID’ box for the ‘Relationship End’. When you click on ‘OK’, you should see a tick mark on the line near the box adopting the primary key(s).
Check your primary keys for that table by double clicking on that table (ALS ID). The set of columns used as the primary key for any table is listed in the ‘Unique Identifier Contents’ box at the bottom of this screen. If you want to add any further columns to the primary key for that table, highlight those ‘Candidate Attributes’ or ‘Candidate Relationships’, then click on the down arrow. Click on Okay. Check the UIDs for all your tables.
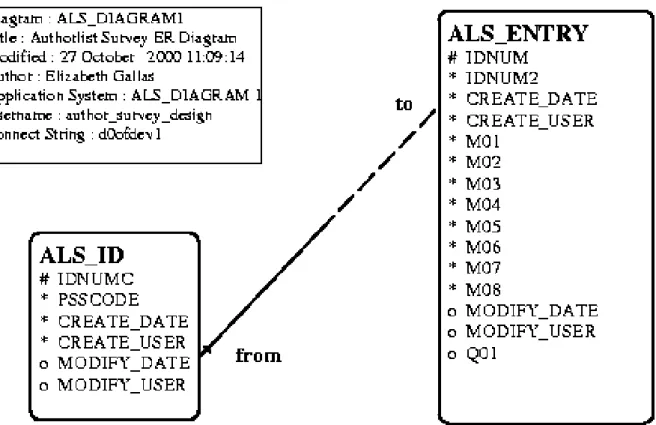
3.1.7 The ER Diagram
The ER diagram for the survey is shown in Figure 3.1.7. The box at the upper lefthand corner is the summary information I selected in subsection 3.1.1. There are 2 tables (entities) called ALS ID
Figure 1: ER (Entity Relational) Diagram for the D0 Authorlist survey project database.
and ALS ENTRY. Primary key columns are denoted with the ‘#’ symbol. Columns with ‘*’ indicate mandatory columns. Columns with the ‘o’ symbol are optional and should always be at the bottom of the table.
A solid line to the ALS ID table indicates a mandatory relationship. The tick mark indicates one or more foreign keys from ALS ENTRY comprise all/part of the primary keys in ALS ID. The dashed line to the ALS ENTRY table means this relationship is optional to this table.
You will eventually need to submit a hard copy of your ER Diagram to the DB Support Group, a requirement of the code review when you want to move out of the development environment (into integration and production).
3.1.8 DDT - Database Design Transformer
Phase 1 of your design is complete (completion of the ER Diagram). Under ‘Utilities’ choose ‘Database Design Transformer’ (DDT). Running the DDT passes all the information from the ER Diagrammer into RON, the Repository Object Navigator (next section).
In DDT, choose to Run the Transformer in Default Mode for ‘All Entities’. Click on ‘Settings’. Under the ‘Other Settings’ tab, you do NOT want prefixes generated for ‘Foreign key columns’ or ‘Surrogate key columns’ or ‘Columns’ (un-check any of these boxes if they are checked). Under ‘Column component priority’, check all these boxes (by default they are checked). A message box pops up that the ‘Settings will not be stored until the Run button is pressed’. Click on ‘OK’. Back on the DDT main screen, click on ‘Run’. The ‘DDT Output Window’ may or may not show messages that are meaningful to you (at first), but they sometimes indicate errors. It is always good to take a look before you close this window.
3.2
RON - Repository Object Navigator
From the Oracle Designer Front Panel, choose the Repository Object Navigator Utility icon. Close the ‘Enterprise Modeling’ folder anytime it pops up. We’ll start out in the ‘Server Model Definition’ folder to define Synonyms, Views, Sequences and Triggers. We’ll then make sure that the database is properly connected to the tablespace, name the table owner, and connect all table, view, sequence and trigger implementations in ‘Database and Network Design’. Then we’ll briefly go back to the ER Diagrammer to rerun the DDT. Then we can go back into RON, where Storage Definitions are defined in the ‘Reference Data Definition’ folder. Finally, Roles are defined in ‘Database and Network Design’ and then final checks can be done.
3.2.1 Synonyms
Global synonyms allow other d0db users to look at your objects (tables, views, sequences, for example) without always prefixing them with the table owner. It saves typing for all users of your objects. I define both the plural and singular forms of my table/entity names to be global synonyms for my tables so that either name can be used in SQLPlus by any d0db user. Technically, the plural form is the table name and the singular form is the entity name. Synonyms can also be used for other objects like sequences and views and I will define those synonyms when I define those objects.
For the Table name synonyms, open the ‘Server Model Definition’ folder. In here, open the ‘Table Definitions’ folder. For each of your table folders (like ALS ENTRY), open the folder and highlight ‘Synonyms’ (single click). Then click on the ‘green +’ icon that appears on the left. Enter your two synonym names for that table: the entity name itself (ALS ENTRY) and its plural (ALS ENTRIES) (the table name).
To commit your changes, choose ‘Requery All’ from the ‘Edit’ menu, or click on the ‘Requery All’ icon at the left.
3.2.2 Views
A view is a special table-like object that you can define that can make the data in a number of tables available from client applications or SQLPlus as though they are in a single table. Because of the Role restriction I am defining into the ALS ID table, a multi-table view is not very useful for the survey project example. But I will define a view here as an example which includes the primary keys and columns from both tables as an example.
Views are defined in RON under the ‘Server Model Definition’ folder, ‘Table Definitions’ sub-folder. Highlight ‘View Definitions’, then click on the ‘green +’ icon on the left. A ‘View Definition Properties’ property palate should appear on the right. Click on the chart icon to get the ‘default view’ (rather than the ‘SpreadTable View’ where only a few columns are visible). I’ll call my view ‘Name’ = ALS VIEW. ‘Free Format Select Text?’ = YES. Double click on the ‘Select Text’ bubble and a ‘Text Pad’ will pop up, into which I type a SQL-like text that lists the table.columns that will be included, a ‘from’ clause and a ‘where’ clause.
ae.idnum,ae.idnum2,ae.create date,ae.create user,ai.idnumc,ai.psscode from als entries ae,als ids ai
where ae.idnum=ai.idnum and ae.idnum2=ai.idnumc
After defining the properties (above), open the view folder that you just created under ‘View Defini-tions’. Click on ‘Base Tables’ and then click on the ‘green +’ icon on the left. Highlight all the tables you use in that view, then click on ‘OK’. Click on ‘Columns’ and then click on the ‘green +’ icon on the left. Enter the names of all the columns you use in that view, then click on ‘OK’.
Once a view is defined, SQL SELECT queries of that view can return records from the database as if that view were a table. Other d0db users will be more easily able to use your view if you define a global synonym for it: Highlight ‘Synonyms’, click on the ‘green +’ icon and enter the view name as a synonym name for that view. Click on the ‘Requery All’ icon.
3.2.3 Sequences
I have 2 unique integer identifiers in my tables, IDNUM and IDNUMC, for which I need sequence number generators. Such generators will know the current and next numbers in the sequence.
To define these sequence generators, I open the ‘Server Model Definition’ folder. I highlight ‘Sequence Definitions’ then click on the ‘green +’ icon on the left. I define a sequence called IDNUM SEQ for column IDNUM, and a sequence called IDNUMC SEQ for column IDNUMC. It is best to define a global synonym for all your sequences: Highlight ‘Synonyms’, click on the ‘green +’ icon and enter the sequence name as a synonym name for each of your sequences. Click on ‘Save’ or the ‘Requery All’ icon.
3.2.4 Triggers
Database triggers are PL/SQL scripts that are executed automatically when a logical condition is sat-isfied. For example, both tables in the survey project database contain the fields CREATE DATE, CREATE USER, MODIFY DATE AND MODIFY USER. I will create a trigger to automatically pop-ulate MODIFY DATE and MODIFY USER whenever an UPDATE request is executed. I will create another trigger to automatically populate CREATE DATE, CREATE USER and the integer sequence primary keys IDNUM and IDNUMC using their respective sequences whenever an INSERT request is executed.
Open the ‘Server Model Definition’ folder. Click on PL/SQL Definitions, then click on the ‘green +’ icon on the left. I name my first trigger MODIFY BEF U (fills the MODIFY columns before an UPDATE). If a property palate does not appear on the right, then choose ‘Property Palate’ under the ‘Tools’ menu. Click on the chart icon to get the ‘default view’ (rather than the ‘SpreadTable View’ where only a few columns are visible).
For this trigger: ‘ShortName’=MBU, ‘Name’=MODIFY BEF U, ‘Purpose’ = populate the modify date and user columns, ‘Type’ = Trg-Logic, ‘Status’=Completed, ‘Scope’=Public and ‘Candidate’=Yes. Double click on the PL/SQL block. A ‘Text Pad’ will pop up, into which you must type some PL/SQL.
:new.modify date:=sysdate; :new.modify user:=lower(user);
I can define another trigger that will automatically populate the CREATE DATE and CREATE USER columns as well as generate the unique integer identifier IDNUM in the table so that when an INSERT is initiated on the ALS ENTRY table, the next IDNUM in the sequence IDNUM SEQ is automatically generated. The sequences defined above, IDNUM SEQ and IDNUMC SEQ, will be required. I call this trigger IDNUM SEQ BEF I (shortname ISBI). The PL/SQL block here is more complex:
declare
temp seq number (38); begin
select idnum seq.nextval into temp seq from dual; :new.idnum:=temp seq;
:new.create date:=sysdate; :new.create user:=lower(user); end;
I define a similar PL/SQL definition called ICSBI for the population of CREATE DATE, CREATE USER, and IDNUMC in table ALS ID (using the sequence IDNUMC SEQ).
To engage the triggers, these PL/SQL definitions must be associated with the tables upon which they operate. In the the ‘Server Model Definition’ folder, open the ‘Table Definitions’ subfolder. For each of your table folders (like ALS ID), open the folder and highlight ‘Triggers’ (single click) then click on the ‘green +’ icon. I make the trigger name a concatenation of the table shortname with the trigger shortname with TRIG on the end: AI MBU TRIG for the modify trigger. I make it ‘Complete’=Yes, ‘Enabled’=Yes, ‘Time’=Before triggering statement, ‘Update’=Yes. This trigger will populate MOD-IFY DATE and MODMOD-IFY USER whenever an UPDATE statement is executed on table ALS ID. Simi-larly, I make a trigger called AE MBU TRIG to populate MODIFY DATE and MODIFY USER when-ever an UPDATE statement is executed on table ALS ENTRY.
Similarly, I make triggers called AE ISBI TRIG and AI ICSBI TRIG using PL/SQL definitions ISBI and ICSBI to operate on the ALS ENTRY and ALS ID tables, respectively to populate CREATE DATE and CREATE USER and their respective integer identifiers whenever an INSERT statement is executed on that table. One note: you cannot define multiple triggers to act simultaneously on the same table.
3.2.5 Define your Application
In RON, under ‘Database and Network Design’ in the ‘Databases (Oracle)’ folder, add a new database called D0OFDEV1 (or D0ONDEV1 for online) if it is not there by clicking on the ‘green +’ icon. In this new folder (‘D0OFDEV1’), add a ‘User’=owner of the tables (ALS OWNER). Open this new folder (ALS OWNER). Below it: Open the ‘Schema Objects’ subfolder.
• Highlight ‘Table Implementations’, then click on the ‘green +’ icon to add all your tables (ALS ENTRY and ALS ID).
• Highlight ‘View Implementations’ and add all your views (ALS VIEW).
• Highlight ‘Sequence Implementations’ and add any sequences you have defined (IDNUM SEQ and IDNUMC SEQ).
• Highlight ‘PL/SQL Implementations” then add any PL/SQL you need for your triggers (CBI, ISBI and MBU).
Also under ‘Database and Network Design’/ ‘Databases (Oracle)’/ ‘D0OFDEV1’, open the ‘Stor-age’ folder. Add the names of your tablespaces under the ‘Tablespaces’ folder (Tablespace names are ALS DATA and ALS IDX for the survey project).
Go back and rerun the DDT as described in Section 3.1.8 but now when you click on ‘Settings’, you can choose the ‘Database’, ‘Database Owner’ and ‘Default storage definitions’ under the ‘Database’ tab. Be sure to use your DATA tablespace for your Tables, and your IDX tablespace for your Indexes.
3.2.6 Roles and d0db Accounts
Roles allow particular database users to have a well defined access to each of your objects (tables, sequences and views). Consult the Support DB group if you need help assessing the number of Roles you need for your application. The d0db-support group creates the Roles for your application in the database, creates any special d0db accounts you need and associates each Role with one or more d0db users. Send them an email containing your database application name, your Roles, and the users who should be assigned those Roles.
Here is a table of Roles and their associated d0db database accounts and how they are used for the survey project. Note that Roles and the d0db accounts that use them cannot have identical names.
Role d0db
account(s)
objects (privileges)
Purpose AS READ gerber, duflot,
barberis, diehl
ALS ENTRY (S) This Role is used by the reporting interface to report results of the survey (read-only) to the D0 Authorlist Committee members (named here). This Role will have no INSERT, UPDATE or DELETE privilege. AS UPDATE ALS UPDATE ALS ENTRY (I)
ALS ID (SUI) IDNUM SEQ (S) IDNUMC SEQ (S)
This Role is associated with the d0db account which is used by the survey entry interface to be used by the collaboration to enter their responses to the survey. It requires SELECT privilege to both the sequences since the user can INSERT into both tables. The interface will be run from a d0 private area on D0 world, which requires users to have a d0 web password.
AS MASTER gallas (SUID) I get all privileges: SELECT, UPDATE, INSERT and DELETE
Don’t forget to give yourself (your d0db account) some Roles. The owner of the tables (ALS OWNER) automatically has all privileges so does not need to be included in the list above. But data should never be entered, modified or deleted by the owner of the tables. The table owner d0db account is for creating the database and making changes to it, but never data entry.
Once the Roles are created in the database by the DB Support group, you need to define them in your application, associate them with the appropriate objects and define what privileges that role has for each object (S:Select, I:Insert, U:Update, D:Delete). This is done in RON in the ‘Database and Network
Design’ folder. In the ‘Databases (Oracle)’ folder open the ‘D0OFDEV1’ subfolder. Open the ‘Roles’ folder. You will see a ‘Public’ role folder (a Role assigned by default to all applications). Just leave this folder as it is (you could add objects here if it is appropriate to have objects be public for your application).
Every application has to have a read role. The read role for the survey project is AS READ. To define it, I highlight ‘Roles’ then click on the ‘green +’ icon. I name the role AS READ and click on ‘Save’ or ‘Requery All’. Open the folder ‘AS READ’ and highlight ‘Database Object Privileges’, then click on the ‘green +’ icon. A list of all available tables, view, sequences and PL/SQL scripts is presented. I highlight table ALS ENTRY and click on ‘OK’. On the ‘Database Object Grant Properties’ palate on the right, I set ‘Select’=YES and all the other privileges=NO.
A second Role called AS UPDATE will allow d0db account ALS UPDATE (the web interface user) to submit a survey. Highlight ‘Roles’, then click on the ‘green +’ icon. I define the Role AS UPDATE and click on ‘Save’ or ‘Requery All’. Then I open folder ‘AS UPDATE’, highlight ‘Database Object Privileges’, then click on the ‘green +’ icon. I add table ALS ENTRY with ‘Insert’=YES and all the other privileges=NO. Similarly, under ‘Database Object Privileges’, I add table ALS ID with ‘Se-lect’=‘Update’=‘Insert’=YES, and all the other privileges=NO.
The web interface user (using Role AS UPDATE) makes entries in both tables and therefore needs ‘Se-lect’ privilege on the sequences for those tables. Again, highlight ‘Database Object Privileges’, then click on the ‘green +’ icon. Choose the sequences needed (in this example IDNUM SEQ and IDNUMC SEQ), then click on ‘OK’. For these sequences, grant ‘Select’=YES privileges all the other privileges = NO.
Finally and in the same way, I define the Role called AS MASTER to have ‘Select’, ‘Update’, ‘Insert’, and ‘Delete’=YES for all tables and views in the survey project.
Click on the ‘Save’ or ‘Requery All’ icon.
3.2.7 Storage Definitions
Proper Storage Definitions are a requirement to get your database properly into the development envi-ronment. You need to create a ‘Storage Definition’ for every table, primary key and foreign key index in the report. It is suggested that you do not do Storage definitions until your design is stable. The DB Support Group can help you assess if you should proceed with making the Storage Definitions.
In RON, open the ‘Reference Data Definition’ folder. Highlight ‘Storage Definitions’. Name your Storage Definitions the same as the names of your tables, primary keys, and foreign key indexes listed for all your tables in the ‘Table Definitions’ subfolder of the ‘Server Model Definition’ folder (you will recognize how your table shortnames are used to compose the names). I have 5 storage definitions for the survey project: ALS ENTRIES, ALS IDS (note use of plural table names), AE PK, AI PK (PK stands for Primary Key), and AI AE FK I (the Index for the Foreign Key between the tables).
Now associate each of the Storage Definitions you made with the object of the same name in your database: In RON, in the ‘Database and Network Design’ folder, open the series of folders ‘Databases (Oracle)’, ‘D0OFDEV1’, ‘Users’, ‘ALS OWNER’, ‘Schema Objects’, ‘Table Implementations’.
For each table, highlight each table name (for example ALS ENTRIES). If a ‘Table Implementa-tion Property Palate’ does not appear on the right, choose ‘Property Palate’ under the ‘Tools’ menu at the top. On the ‘Property Palate’, ‘Table’=ALS ENTRIES, ‘Complete’=YES, ‘Scope’=Database, ‘Tablespace’=ALS DATA, and ‘Storage Definition’=ALS ENTRIES. Similarly, I associate the storage definition ALS IDS with table ALS IDS.
For primary keys, under the folder for each table name (for example ALS ENTRIES) highlight ‘User Object Index Storage’ and add the storage definition for the primary key giving it ‘Table’=ALS ENTRIES, ‘Primary key’=AE PK, ‘Index Type’=Global, ‘Tablespace’=ALS IDX, and ‘Storage Definition‘’=AE PK. Similarly, I associate the storage definition AI PK with its primary key AI PK. Note that primary key storage definitions go in your index ( IDX) tablespace not the DATA tablespace!
Table ALS IDS also has a foreign key index so under the folder for that table (ALS IDS) I highlight ‘User Object Index Storage’ and add the storage definition for the index giving it ‘Table’=ALS IDS, ‘In-dex’=AI AE FK I, ‘Index Type’=Global, ‘Tablespace’=ALS IDX, and ‘Storage Definition’=AI AE FK I. Note that foreign key index storage definitions go in your index ( IDX) tablespace not the DATA ta-blespace!
Now, you need to generate a ‘Repository Report’: Under ‘Tools’, select ‘Repository Reports’. Open the ‘Database and Network Design’ folder. Highlight the ‘Database Table and Index Size Estimates’, choose your Database Name (d0ofdev1), Database User (ALS OWNER), Database Block Size (8192), then click on the green light icon. A ‘Previewer’ screen will pop up after a bit of a wait. If you print it out, but I suggest you print it portrait, double sided and scale it downward to about 90%, otherwise some of the document runs off the page.
With the Storage Report in hand, go back to the ‘Reference Data Definition’ folder. In the ‘Storage Definition’ subfolder, edit each of the storage definitions by highlighting them and adding ‘Percent In-crease’(always = 0), ‘Initial Extent’, ‘Next Extent’, ‘Min’ and ‘Max Extents’ according to the ‘Suggested Storage Parameters’ in the Storage Report. You may choose to round off the extents to a convenient higher integer.
You will need to submit the Storage Report to the DB Support Group.
3.2.8 Final Checks:
Open the ‘Server Model Definition’ folder, then the ‘Table Definitions’ folder and then for each of the table names open the ‘Columns’ subfolder. Check the order of the columns in each table so that primary key columns are at the top, optional columns are on the bottom, and the largest and/or least likely to be filled optional columns are the bottommost. This saves space and improves database performance. Also check to see if there are any columns in your table that you don’t recognize, which should be reported to the DB Support Group.
Click on the ‘Requery All’ icon. You may close RON now.
3.3
DE - Design Editor
From the Oracle Designer Front Panel, choose the ‘Design Editor’ icon. Anytime the ‘Database Admin-istrator Guide’ pops up, close it.
3.3.1 Generate the DDL
On the ‘Welcome to the Design Editor’ front panel, choose ‘Database Administration’, then click on OK (or in the Navigator, choose the ‘DB Admin’ tab). In the folder with your ER diagram name, open the following sequence of nested folders: ‘D0OFDEV1’ (use D0ONDEV1 for online applications), ‘Users’, ‘ALS OWNER’ (this is the owner of my survey report tables – the name of your table owner should be a folder here), ‘Schema Objects’, ‘Table’, ‘View’ and ‘Sequence Implementations’. Highlight all the implementation instances (in this case, my tables, views and sequences) by doing a left mouse click on the top one, then shift-left mouse click on the bottom one. Then click on the ‘Generate DDL’ symbol (yellow block with black arrow into white disk stack).
A ‘Generate Database from Server Model’ window will pop up.
• Under the ‘Objects’ tab, hit the double right arrow so that all your implementations get highlighted on the right hand side (labeled ‘Generate’).
• Under the ‘Target’ tab, select ‘DDL Files Only’ of ‘Type’=Oracle8. The DDL files created by OD are written by default to the C: drive on the PC that you are working in under the directory orant/BIN/. The filenames are by default are cdsddl.*, where * is one or more of the following: con, grt, ind, sql, syn, tab, trg, and vw (additional extensions may also be produced). I name files for the survey project ‘File Prefix’=cdsddl auth in order to distinguish them from other OD projects written to this PC.
Click on the ‘Start’ button. If there are errors, consult with the DB support group if you need help interpreting them. If there are no errors you will find the DDL files in the directory and with the filenames you specified. You must copy them to the unix machines to run them.
4
Creating the Database
On D0ora1 (or D0mino), create the directory structure that will hold your database, data and in-terface code. The head directory for the development version of the survey project is on D0ora1 in
∼gallas/auth1/. This is my working directory for the development version.
Below this directory, I create the following subdirectories, which organize the source code as described here.
cgi/ - python-cgi source code for the web interface (this may be documented in a separate note)
www/ - html source code for the web interface (this may be documented in a separate note)
cutver/ - stores scripts to automatically generate the database cuts (creation and subsequent changes)
that may be made over the history of the project
data/ - stores any data that may need to be loaded into the database for a specific cut
ddl/ - stores the DDL (Database Definition Language) used to define the database tables etc for the first cut and modifies the tables during subsequent cuts.
doc/ - store documentation (this document, for example)
This structure can also be used to archive these files in a CVS package (replacing the head directory with the CVS package name).
For your application, request a CVS package name to store all the code (or a package for database definition and additional packages for interface code). The CVS package name for the survey project is Author survey database. Copy the DDL files from the PC in your working ddl/ directory on the unix machines. Also put a copy in the ddl directory of your checked out CVS package and check these files into CVS.
There is one bug currently in Oracle Designer 6.0 which puts the table owner name in the public synonym definitions in the *.syn file. It is necessary to remove this in the DDL file before going to integration and production (it does not seem to be a problem in development). To fix this, edit your *.syn file, removing all instances of the table owner name from that file (including the dot). For example, one of my synonyms is created with the SQL statement:
CREATE PUBLIC SYNONYM ALS ID FOR ALS OWNER.ALS IDS I change this command to be:
CREATE PUBLIC SYNONYM ALS ID FOR ALS IDS Now you can run the DDL in SQLPlus (SQLPlus is the Oracle online interpreter). On D0ora1:
! go to the directory where you put the DDL files (*.sql ...) >cd auth1/ddl/
! setup Oracle then enter SQLPlus (log in as the owner of the tables for your application) >setup Oracle
>SQLPlus
! log in as the owner of your tables (in my case als owner)
! execute main sql script which runs all the DDL (for survey project: cdsddl auth.sql) SQL>@cdsddl auth
! the log file is written to cdsddl auth.lst. SQL>commit;
SQL>exit
! look at the log file, searching for any errors: >grep error cdsddl auth.lst
You will eventually need to submit a hard copy of the DDL to the DB Support Group, a requirement of the code review when you want to move out of the development environment (into integration and production).
This is the simplest way to create the database but eventually you will need a script to do it because you may be loading data. By running a script, you and the DB support group will see everything running flawlessly, which will then allow you to get through the integration and into the production environment. An example of such a script is described in the next section.
5
Cutting Scripts
A database ‘cut’ is any operation that changes the structure of the database tables for your application including the initial database creation. Since I am creating the database for the first time, I am on cut version v0 1. Subsequent changes to the database after going to production might be version v0 2 or according to whatever numbering scheme you choose. Cuts are run from the head directory, where the Makefile points to the cutver/ directory which contains all the scripts for making a database ‘cut’ and the Makefile.def makes some environment variable assignment. In the cutver/ directory, the Makefile points to v0 1 as the current cut. The convert.* files below specify which DDL files to run for the current cut and may also include the execution of additional files which manipulate existing data or load new data. Once all the script files are in place, the database can be built and loaded by running the set of scripts checked out directly from cvs with a single make command (after the appropriate environment variables are set). The setup I have found to work is to execute the following sequence of commands (your results may vary):
! This procedure will run the set of scripts to cut the version v0 1 of the ! Author survey database database onto the offline development platform. ! Start from the home directory, make a junk subdirectory and go there >mkdir junk
>cd junk
! you must be in the products group >newgrp products
! setup d0cvs and checkout your package >setup d0cvs
>cvs co Author survey database >cd Author survey database
! annoying but necessary, you’ll need to make your scripts executable >cd cutver
>chmod +x convert.* >cd v0 1
>chmod +x convert.*
! get back to the head directory >up
>up
! make sure these environment variables are set to d0ofdev1 , d0ofint1 ... >env |sort
>echo $TWO TASK >echo $ORACLE SID
! if your environment variables are not set to d0ofdev1 , d0ofint1 ... >setenv TWO TASK d0ofdev1
>setenv ORACLE SID d0ofdev1
! do this IF you forgot to change group to products before checkout >chgrp -R products *
! one more environment variable
>setenv ALS DB DIR /junk/Author survey database
Check the log file written to dev1.lis for errors. Your scripts must be running perfectly with no errors before you will be allowed to go to integration or production. When you go to integration or production, you will run the same scripts, replacing ‘dev’ with ‘int’ or ‘prd’, respectively.
6
Data Entry
There are many ways to enter data into your database tables. Modes of entry fall into three categories 1. A transfer of data (copy) from another Oracle database.
2. SQLLoader - a utility for bulk loading of data using flat delimited files. 3. SQL INSERT or UPDATE statements.
The mode of data entry that you should use is highly dependent on your application and who is entering your data. User friendly interfaces, such as web interfaces, can hide the actual mechanism of entering data from the user (usually done by INSERT or UPDATE statements). Higher level interfaces also provide another layer of error and constraint checking that improves data integrity. Consult with the Support DB Project Group to decide on the best mode of data entry for your application.
One note about data entry: Data should never be entered by the owner of the tables. This d0db account is for creating the database and making changes to it, but never data entry.
7
MISWEB
MISWEB is a toolset that makes it easy to dynamically query your Oracle database tables from a web page. The MISWEB documentation can be found at http://miscomp.fnal.gov/misweb/ .
To use MISWEB, you only have to write basic html in a web page. By including special SQL variables and tags, your page will act as a query Launcher.
An example of a MISWEB application for the author survey project can be found at http://www-d0.fnal.gov/ gallas/d0 private/als/als misweb.html . The same html can be found in the www/ subdi-rectory of the CVS package Author survey database.
8
Getting your database On-line
The steps in this document describe many of the procedures to give your database the feature you will need. You will go through these steps multiple times as your database design grows and takes shape. Unfortunately this document does not emphasize the design process enough so I should reemphasize that the DB support group should be consulted with as often as possible in order for you to fully exploit the features an Oracle database can provide to you. A poor design will simply not be implemented.
Once you have a final design and implementation on the development platform, you will bring a copy of your ER Diagram, your DDL and your storage report (generated by OD) to the DB support group for a code review. The current review process is outlined at
http://fncduh.fnal.gov:80/supportdb/working/run2 standards.html and http://fncduh.fnal.gov:80/supportdb/working/designer report checklist.html .
References
[1] Elizabeth Gallas, “Lab8 Board Production Database”, D0 note 710, June 7, 1988. This was a Relational Database built using RDB, a relational database product on the VAX/VMS systems. The ER diagram uses different symbols, but the relationship concepts are the same. Another difference in this diagram (from the OD ER diagram) is that only the primary and foreign keys are shown in the tables to emphasize columns that are shared (non-key columns are listed separately). There is a difference in the language as well. Tables (or Entities) are called Relations here. Columns (attributes) are called fields in this document.