47 47
3, Chapter3
Chapter 2 covered planning the installation of Fedora/RHEL: determining the requirements; performing an upgrade versus a clean installation; planning the layout of the hard disk; obtaining the files you need for the installation, including how to download and burn CD/DVD ISO images; and collecting information about the system. This chapter focuses on installing Fedora/RHEL. Fre-quently the installation is quite simple, especially if you have done a good job of planning. Sometimes you may run into a problem or have a special circumstance; this chapter gives you tools to use in these cases. Read as much of this chapter as you need to; once you have installed Fedora/RHEL, continue with Chapter 4, which covers getting started using the Fedora/RHEL desktop. If you install a textual (command line) system, continue with Chapter 5.
In This Chapter
Running a Fedora Live Session . . . 48 Installing from a Live Session . . . . 51 Installing/Upgrading from the
Install DVD . . . 51 The Anaconda Installer . . . 53 Using Disk Druid to Partition
the Disk . . . 66 LVs: Logical Volumes . . . 75 Setting Up a Dual-Boot System . . . 79 The X Window System. . . 80 system-config-display: Configures
the Display . . . 80
3
Step-by-Step
Installation
000.book Page 47 Friday, April 4, 2008 9:22 AM48 Chapter 3 Step-by-Step Installation
Running a Fedora Live Session
As discussed in Chapter 2, a live session is a Linux session that you run on a computer without installing Linux on the computer. When you reboot after a live session, the computer is untouched. If you are running Windows, after a live ses-sion Windows boots the way it did before the live sesses-sion. If you choose, you can install Fedora from a live session. Red Hat Enterprise Linux does yet not offer live sessions.
A live session gives you a chance to preview Fedora without installing it. Boot from the KDE Live CD to begin a live session and work with Fedora as explained in Chapter 4. When you are finished, remove the CD and reboot the system. The sys-tem will then boot as it did before the live session took place.
Because a live session does not write to the hard disk (other than using a swap par-tition if one is available), none of the work you save will be available once you reboot. You can use a USB flash drive, Webmail, or another method to transfer files you want to preserve to another system.
Booting the System
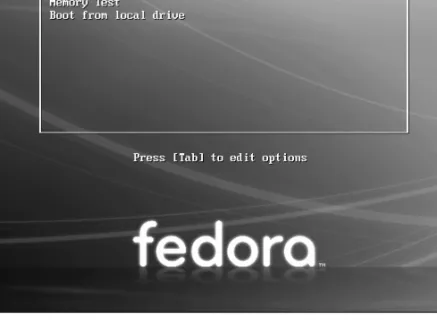
Before Fedora can display the desktop of a live session or install itself on a hard disk, the Linux operating system must be read into memory (booted). This Figure 3-1 Live session, automatic boot screen
Running a Fedora Live Session 49
process can take a few minutes on older, slower systems or systems with minimal RAM (memory).
In most cases, you can boot Fedora to run a live session that displays a desktop without doing anything after you boot from a Live CD. To begin, insert the Live CD (either the standard GNOME Fedora Desktop Live Media or the Fedora KDE Live Media) into the CD drive and turn on or reset the system. Refer to “BIOS setup” on page 26 if the system does not boot from the CD. Refer to “Modifying Boot Param-eters (Options)” on page 63 if Fedora does not boot or displays an error message. A few moments after you start the system, Fedora displays a screen that says Auto-matic boot in 10 seconds and counts down from 10 to 1 (Figure 3-1). Text then scrolls by as the system boots. After a few moments, the system displays a graphical screen showing the word Fedora, the Fedora logo, and a progress bar.
Checking the disk The first time you use a CD, it is a good idea to check it for defects. To do so,
inter-rupt the automatic boot by pressing a key such as the SPACE BAR while Fedora is
count-ing down. Fedora displays the Welcome menu (Figure 3-2). Use the DOWN ARROW key
to highlight the line that starts with Verify and boot Fedora... and press RETURN (the
mouse will not work yet). Fedora verifies the contents of the CD, keeping you apprised as it does so. If the CD is good, the system continues to boot.
GNOME If you are installing from Fedora Desktop Live Media, you are installing the GNOME desktop manager. When you boot from this disk, Fedora displays a login screen for 60 seconds, automatically logs in as the user named fedora, and displays
Figure 3-2 The Fedora Live Welcome menu 000.book Page 49 Friday, April 4, 2008 9:22 AM
50 Chapter 3 Step-by-Step Installation
the GNOME desktop (Figure 3-3). To speed up this process, you can log in as fedora (no password) when Fedora displays the login screen.
KDE If you are installing from Fedora KDE Live Media, you are installing the KDE desktop manager. When you boot from this disk, Fedora next displays a KDE startup screen and then the KDE desktop—there is no need to log in. If the system can connect to the Internet, KDE displays the message Connection Established.
optional
Seeing What Is Going on
If you are curious and want to see what Fedora is doing as it boots, remove quiet from the boot parameters (Figure 3-16 on page 64; the list of parameters will be dif-ferent from those shown in the figure). With the Fedora Live Welcome menu dis-played (Figure 3-2), press TAB to display the boot command line parameters. Use the BACKARROW key to back up over—but not remove—the words to the right of quiet.
Press BACKSPACE or DEL to back up over and erase quiet from the boot command line.
Press RETURN. As Fedora boots, it displays information about what it is doing. Text
scrolls on the screen, although sometimes too rapidly to read.
Installing Fedora/RHEL Linux
You can install Fedora/RHEL from a live session (preceding section, FEDORA only) or from the Install DVD (RHEL+FEDORA). Installing from a live session is simpler, but does not give you the flexibility that installing from the Install DVD does. For example,
Figure 3-3 A GNOME Live desktop 000.book Page 50 Friday, April 4, 2008 9:22 AM
Installing Fedora/RHEL Linux 51 you cannot select the language the installer uses nor can you choose which software packages you want to install when you install from a live session.
The Install DVD holds many of the software packages that Fedora/RHEL supports. You can install whichever packages you like from this disk without connecting to the Internet. However, without an Internet connection, you will not be able to update the software on the system.
The Live CD holds a limited set of software packages. Once you install from this CD, you must connect to the Internet to update the software on the system and download and install additional packages.
To begin most installations, insert the Live CD or the Install DVD into the CD/DVD drive and turn on or reset the system. For hard disk and network-based installa-tions, you can use the rescue CD (page 42) or a USB flash drive instead.
Installing from a Live Session
Bring up a live GNOME or KDE session as explained on page 48. Double-click (left-click) the object labeled Install to Hard Drive (Figure 3-3) to begin installing Linux. Continue reading at “The Anaconda Installer” on page 53.
Installing/Upgrading from the Install DVD
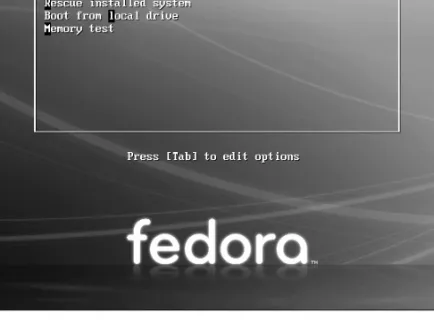
FEDORA To install Fedora from the Install DVD, insert the Install DVD into the DVD drive and turn on or reset the system. After a few moments, Fedora displays the Install DVD Welcome menu (Figure 3-4, next page) and a message that says Automatic boot in 60 seconds.
Press a key, such as the SPACE BAR, within 60 seconds to stop the countdown and
dis-play the message Press [TAB] to edit options as shown in Figure 3-4. If you do not press a key, after 60 seconds Fedora begins a graphical install/upgrade. Refer to “BIOS setup” on page 26 if the system does not boot from the DVD. Refer to “Mod-ifying Boot Parameters (Options)” on page 63 if Fedora/RHEL does not boot or dis-plays an error message.
The Welcome menu has the following selections:
Install or upgrade a system
Installs a graphical Fedora/RHEL system using the graphical installer.
Install or upgrade a system (text mode)
Installs a graphical Fedora/RHEL system using the textual installer.
Rescue installed system
Brings up Fedora/RHEL but does not install it. After detecting the system’s disks and partitions, the system enters rescue mode and allows you to mount an existing Linux filesystem. For more information refer to “Rescue Mode” on page 411.
Check to see what is on the hard disk before installing Fedora/RHEL
caution
Unless you are certain the hard disk you are installing Fedora/RHEL on has nothing on it (it is a new disk) or you are sure the disk holds no information of value, it is a good idea to examine the con-tents of the disk before you start the installation. You can use gparted (page 69) for this purpose. 000.book Page 51 Friday, April 4, 2008 9:22 AM52 Chapter 3 Step-by-Step Installation
Boot from local drive
Boots the system from the hard disk. This selection frequently has the same effect as boot-ing the system without the CD/DVD (dependboot-ing on how the BIOS [page 26] is set up).
Memory test Runs memtest86+, a GPL-licensed, stand-alone memory test utility for x86-based computers. Press C to configure the test; press ESCAPE to exit and reboot. See
www.memtest.org for more information.
RHEL The process of installing Red Hat Enterprise Linux is similar to that of installing Fedora. The biggest difference is in the initial screen the two systems display. While FEDORA displays a menu, RHEL displays a boot: prompt. Follow the instructions on the screen for installing RHEL in graphical or textual mode. To bring the system up in Rescue mode (page 411), enter linux rescue and press RETURN. Most parameters you
enter at the boot: prompt begin with the word linux. You can use all of the parame-ters discussed in “Modifying Boot Parameparame-ters (Options)” on page 63, but they must be preceded by the word linux. Press the function keys listed at the bottom of the screen for more information.
The Disc Found Screen
The first screen that the Install DVD installation process displays is the pseudo-graphical Disc Found screen. Because it is not a true pseudo-graphical screen, the mouse does not work. Instead, you must use the TAB or ARROW keys to highlight different
choices and press RETURN to select the highlighted choice. This screen allows you to
test as many installation CD/DVDs as you like. Choose OK to test the media or Skip to bypass the test. See the caution box on the next page.
A DVD may fail the media test if the software that was used to burn the disk did not include padding. If a DVD fails the media test, try booting with the nodma parame-ter. See page 63 for information on adding parameters to the boot command line.
Figure 3-4 The Install DVD Welcome menu 000.book Page 52 Friday, April 4, 2008 9:22 AM
Installing Fedora/RHEL Linux 53
If the DVD passes the media test when you boot the system with the nodma param-eter, the DVD is good; reboot the system without this parameter before installing Fedora/RHEL. If you install Linux after having booted with this parameter, the ker-nel will be set up to always use this parameter. As a consequence, the installation and operation of the system may be very slow.
The Anaconda Installer
Anaconda, which is written in Python and C, identifies the hardware, builds the filesystems, and installs or upgrades the Fedora/RHEL operating system. Anaconda can run in textual or graphical (default) interactive mode or in batch mode (see “Using the Kickstart Configurator” on page 78).
Exactly which screens Anaconda displays depends on whether you are installing Fedora from a live session or from the Install DVD, or whether you are installing Red Hat Enterprise Linux, and which parameters you specified on the boot command line. With some exceptions—most notably if you are running a textual installation—Anaconda probes the video card and monitor, and starts a native X server with a log in /tmp/X.log. (This log is not preserved unless you complete the installation.)
While it is running, Anaconda opens the virtual consoles (page 125) shown in Table 3-1. You can display a virtual console by pressing CONTROL-ALT-Fx, where x is the
virtual console number and Fx is the function key that corresponds to the virtual
console number.
Test Install DVDs
caution
Many people download ISO images from the Web and burn disks using these images. It is possi-ble for data to become corrupted while fetching an ISO image; it is also possipossi-ble for a transient error to occur while writing an image to recordable media. When you boot Fedora/RHEL from an Install DVD, Anaconda displays the CD Found screen before starting the installation. From this screen, you can verify that the installation DVD does not contain any errors. Testing the DVD takes a few minutes and can save you hours of aggravation if the installation fails due to bad media.Table 3-1
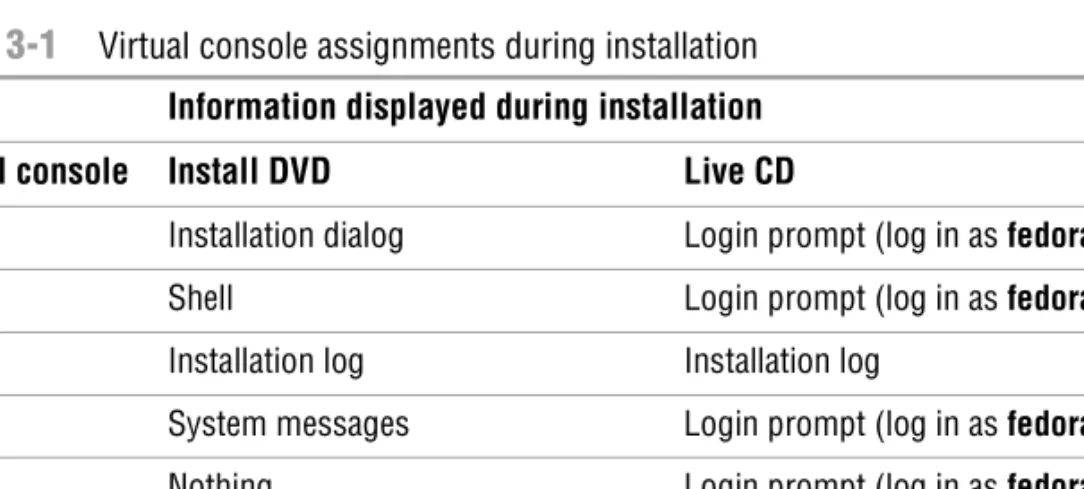
Virtual console assignments during installation Information displayed during installationVirtual console Install DVD Live CD
1 Installation dialog Login prompt (log in as fedora)
2 Shell Login prompt (log in as fedora)
3 Installation log Installation log
4 System messages Login prompt (log in as fedora)
5 Nothing Login prompt (log in as fedora)
6 GUI interactive installation screena
a. The GUI appears on virtual console 6 or 7.
Login prompt (log in as fedora) 7 GUI interactive installation screena GUI interactive installation 000.book Page 53 Friday, April 4, 2008 9:22 AM
54 Chapter 3 Step-by-Step Installation
At any time during the installation, you can switch to virtual console 2 (CONTROL-ALT-F2)
and give commands to see what is going on. Do not give any commands that change any part of the installation process. To switch back to the graphical installation screen, press CONTROL-ALT-F6 or CONTROL-ALT-F7.
Using Anaconda
Anaconda provides a button labeled Next at the lower-right corner of each installa-tion screen and a button labeled Back next to it on most screens. When you have completed the entries on an installation screen, click Next or F12; from a textual
installation, press the TAB key until the Next button is highlighted and then press RETURN. Select Back to return to the previous screen. Click Release Notes at the
lower-left corner of the screen to display the release notes for the version of Fedora/RHEL you are installing.
Anaconda Screens
Anaconda displays different screens depending on which commands you give and which choices you make. During a graphical installation, Anaconda starts, loads drivers, and probes for the devices it will use during installation. After probing, it starts the X server. This section describes the screens that Anaconda displays during a default installation and explains the choices you can make on each of them.
Logo Anaconda displays the Logo screen (Figure 3-5) after it obtains enough information
to start the X Window System. There is nothing for you to do on this screen except display the release notes. Click Next.
Language Select the language you want to use for the installation. This language is not
neces-sarily the same language that the installed system will display.
Keyboard Select the type of keyboard attached to the system.
Initialize warning Anaconda displays this warning if the hard disk has not been used before. The dia-log box says that the partition table on the device was unreadable and asks if you want to initialize the drive. When you initialize a drive, all data on the drive is lost.
Figure 3-5 The Logo screen 000.book Page 54 Friday, April 4, 2008 9:22 AM
Installing Fedora/RHEL Linux 55
Click Yes if it is a new drive or if you do not need the data on the drive. Anaconda initializes the hard disk immediately.
Install or Upgrade Anaconda displays the Install or Upgrade screen (Figure 3-6) only if it detects a
ver-sion of Fedora/RHEL on the hard disk that it can upgrade. Anaconda gives you the choice of upgrading the existing installation or overwriting the existing installation with a new one. Refer to “Upgrading an Existing Fedora/RHEL System Versus Installing a Fresh Copy” on page 28 for help in making this selection.
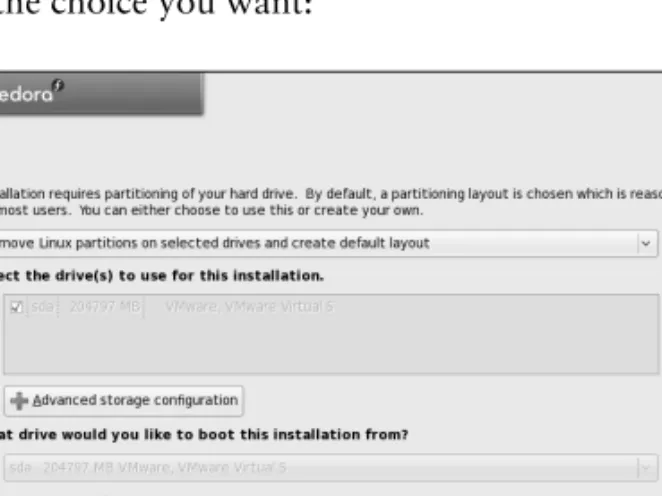
Disk Partitioning The Disk Partitioning screen (Figure 3-7) allows you to specify partition
informa-tion and to select which drives you want to install Fedora/RHEL on (assuming the system has more than one drive). Specify which drives you want to install Linux on in the frame labeled Select the drive(s) to use for this installation. Anaconda pre-sents the following options in the drop-down list near the top of the screen; click the box and then click the choice you want:
Figure 3-6 The Install or Upgrade screen
Figure 3-7 The Disk Partitioning screen 000.book Page 55 Friday, April 4, 2008 9:22 AM
56 Chapter 3 Step-by-Step Installation
• Remove all partitions on selected drives and create default layout—Deletes all data on the hard disk and creates a default layout on the entire hard disk, as though you were working with a new hard disk.
• Remove Linux partitions on selected drives and create default layout— Removes all Linux partitions, deleting the data on those partitions and creating a default layout in place of one or more of the removed partitions. If there is only a Linux system on the hard disk, this choice is the same as the previous one.
• Use free space on selected drives and create default layout—Installs Fedora/RHEL in the free space (page 29) on the disk. This choice does not work if there is not enough free space.
• Create custom layout—Does not alter hard disk partitions. This choice causes Anaconda to run Disk Druid (page 66) so you can preserve the par-titions you want to keep and overwrite other parpar-titions. It is a good choice for installing Fedora/RHEL over an existing system where you want to keep /home, for example, but want a clean install and not an upgrade.
Default layout The default layout that the first three choices create includes two logical volumes (swap and root [/]) and one standard partition (/boot). With this setup, most of the space on the disk is assigned to the root partition. For information on the Logical Volume Manager, see page 35.
Disk Druid Anaconda runs Disk Druid only if you put a check mark in the box labeled Review and modify partitioning layout or if you select Createcustomlayout from the drop-down list as described earlier. You can use Disk Druid to verify and modify the layout before it is written to the hard disk. For more information refer to “Using Disk Druid to Partition the Disk” on page 66.
Warning Anaconda displays a warning if you are removing or formatting partitions. Click
Yes or Format to proceed.
Boot Loader Configuration
Anaconda displays the Boot Loader Configuration screen (Figure 3-8) only when you put a check mark in the box labeled Review and modify partitioning layout or select Create custom layout from the drop-down list in the Partition the Disk screen. By default, Anaconda installs the grub boot loader (page 545). If you do not want to install a boot loader, click the radio button next to Nobootloader will be installed. When you install Fedora/RHEL on a machine that already runs another operating system, Anaconda frequently recognizes the other operating system and sets up grub so you can boot from either operating system. Refer to “Setting Up a
The disk is not partitioned until later
tip
Anaconda does not write to the hard disk when you specify partitions. Instead, it creates a table that specifies how you want the hard disk to be partitioned. The disk is actually partitioned and for-matted when you click Next from the Begin Installation screen (Figure 3-13, page 61). However, if Anaconda displays the Initialize Warning dialog box (page 54), when you click Yes, it writes to the disk immediately.Installing Fedora/RHEL Linux 57
Dual-Boot System” on page 79. To manually add other operating systems to grub’s list of bootable systems, click Add and specify a label and device to boot from. For a more secure system, specify a boot loader password.
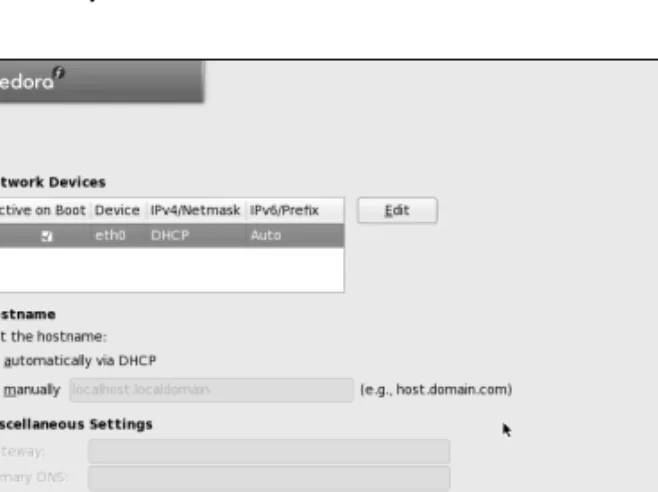
Network Configuration
The Network Configuration screen, which allows you to specify network configura-tion informaconfigura-tion, has three parts: Network Devices, Hostname, and Miscellaneous Settings (Figure 3-9). If you are using DHCP to set up the network interface, you do not need to change anything on this screen.
The Network Devices frame lists the network devices that the installer finds. Nor-mally you want network devices to become active when the system boots. Remove the check mark from the box at the left of a device if you do not want that device to become active when the system boots.
Figure 3-8 The Boot Loader Configuration screen
Figure 3-9 The Network Configuration screen 000.book Page 57 Friday, April 4, 2008 9:22 AM
58 Chapter 3 Step-by-Step Installation
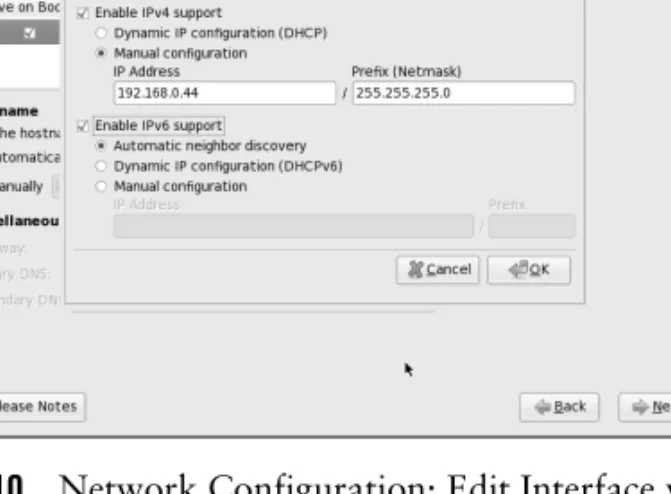
To configure a network device manually (not using DHCP), highlight the device and click Edit to the right of the list of devices. Anaconda displays the Edit Interface window (Figure 3-10). To set up IPv4 networking manually, click the radio button labeled Manual configuration under Enable IPv4 support and enter the IP address and netmask of the system in the appropriate boxes. You can also set up or disable IPv6 networking on this screen. Click OK.
If you are not using DHCP, click the radio button labeled manually under Set the hostname in the network configuration screen and enter the name of the system. When you turn off DHCP configuration in Network Devices, Anaconda allows you to specify a gateway address and one or more DNS (nameserver) addresses. You do not have to specify more than one DNS address, although it can be useful to have two in case the first nameserver stops working. Click Next.
Root Password Specify the root password twice to make sure you did not make a mistake typing it.
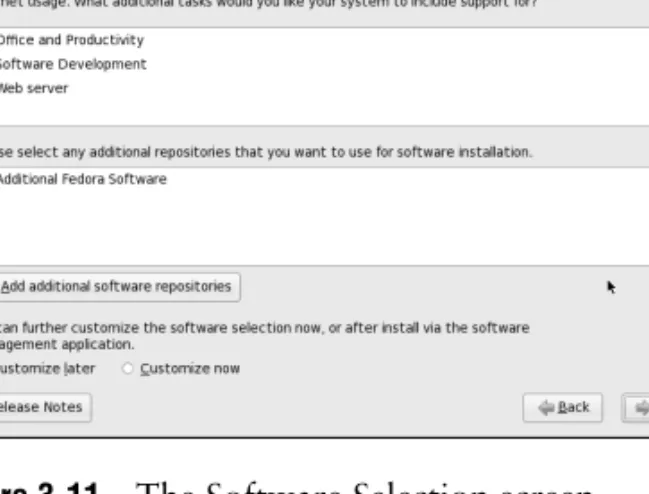
Software selection As the Software Selection screen explains, by default Anaconda installs a basic Fedora system, including software that allows you to use the Internet. See Figure 3-11. Near the top of the screen are three boxes that you can put check marks in to select categories of software to install: OfficeandProductivity (selected by default), SoftwareDevelopment, and Webserver.
Figure 3-10 Network Configuration: Edit Interface window
Install KDE to follow the examples in Chapter 4
tip
Chapter 4 uses examples from KDE to introduce the graphical desktop. Install KDE if you want to follow these examples. You can remove KDE later if you like. To install KDE, click the radio button next to Customizenow on the Software Selection screen and follow the instructions in the text. You can install both KDE and GNOME or just one of them.Installing Fedora/RHEL Linux 59
Fedora/RHEL software is kept in repositories (see Chapter 13). In the middle of the screen is a box you can put a check mark in to select a repository that holds Additional Fedora Software (FEDORA). Below that box is a button labeled Add addi-tional software repositories. See Chapter 13 for more information on software repositories.
Toward the bottom of the screen are two radio buttons:
• Customizelater—Installs the default packages plus those required to per-form the tasks selected from the list at the top of this screen.
• Customizenow—Calls pirut (next section) after you click Next on this screen so you can select specific categories of software and package groups you want to install. If you want to set up servers as described in Part V of this book, select Customizenow and install them in the next step.
In most cases it is a good idea to customize the software selection before installa-tion. The examples in Chapter 4 are based on KDE. If you want to follow these examples, click the radio button labeled Customizenow and follow the instructions in the next step.
Regardless of which software groups and packages you select now, you can use
pirut to change which software groups and packages are installed on a system any time after the system is up and running (as long as the system can connect to the Internet).
Figure 3-11 The Software Selection screen 000.book Page 59 Friday, April 4, 2008 9:22 AM
60 Chapter 3 Step-by-Step Installation
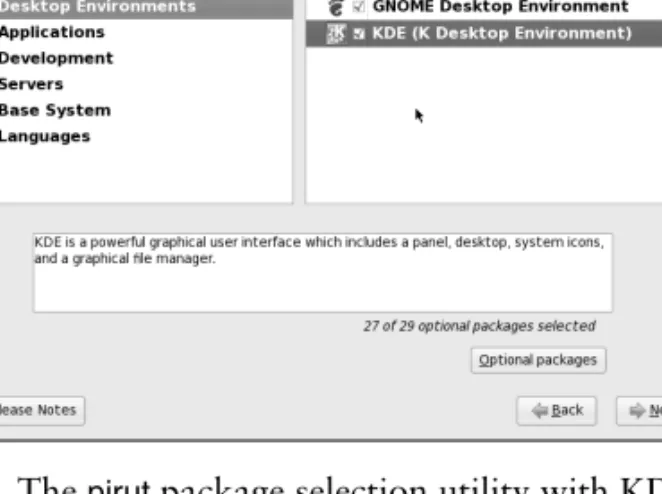
pirut utility The pirut utility (page 497) displays two adjacent frames toward the top of the screen (Figure 3-12). Select a software category from the frame on the left and pack-age groups from the frame on the right.
For example, to install KDE, which is not installed by default, click Desktop Envi-ronments on the left. The pirut utility highlights your selection and displays a list of desktop environments you can install on the right. Click the box next to KDE (K Desktop Environment) so there is a check mark in it; pirut highlights KDE, displays information about KDE in the text frame toward the bottom of the window, dis-plays the number of optional packages that are selected, and activates the Optional packages button. To get started, accept the default optional packages. See page 498 for information about installing other optional packages. If you will be running servers on the system, click Servers on the left and select the servers you want to install from the list on the right. Select other package categories in the same manner. When you are done, click Next.
Begin Installation Clicking Next on the Begin Installation screen (Figure 3-13) begins the process of
writing to the hard disk. First Anaconda partitions and formats the disk as neces-sary; next it installs Fedora/RHEL based on what you have specified in the preced-ing screens, placpreced-ing a log of the installation in /root/install.log and a Kickstart file (page 78) in /root/anaconda-ks.cfg. Clicking Back allows you to step back through the installation screens and make changes. To completely change the way you set up Fedora/RHEL, you can press CONTROL-ALT-DEL to reboot the system and start over. If you
reboot the system, you will lose all the work you did up to this point. Click Next to install Fedora/RHEL.
Figure 3-12 The pirut package selection utility with KDE selected
This is when Anaconda writes to the hard disk
caution
You can abort the installation by pressing CONTROL-ALT-DEL at any point up to and including the BeginInstallation screen (Figure 3-13) without making any changes to the system. Once you click Next in this screen, Anaconda writes to the hard disk. As mentioned earlier, if Anaconda displayed the Initialize Warning dialog box (page 54), it wrote to the hard disk when you clicked Yes.
Installing Fedora/RHEL Linux 61
Installing Fedora/RHEL can take a while. The amount of time depends on the hardware you are installing the operating system on and the number of software packages you are installing.
Installation Complete
When Anaconda is finished, it tells you that the installation is complete. Remove the CD/DVD (if that is the medium you installed from) and click Reboot.
Firstboot: When You Reboot
When the system reboots, it is running Fedora/RHEL. The first time it boots, Fedora/RHEL runs Firstboot, which asks a few questions before allowing you to log in.
Welcome There is nothing for you to do on the Welcome screen (Figure 3-14). Click Forward. License Information After the Welcome screen, Firstboot displays the License Information screen. If you
understand the license information, click Forward. Figure 3-13 The Begin Installation screen
Figure 3-14 The Welcome screen 000.book Page 61 Friday, April 4, 2008 9:22 AM
62 Chapter 3 Step-by-Step Installation
Firewall Next you are given the opportunity to set up a very basic firewall (page 1058). First
select Enabled or Disabled from the drop-down list labeled Firewall (Figure 3-15). If you enable the firewall, select which services the firewall will to pass through to the system. These services are the ones that the system is providing by means of servers you set up. For example, you do not need to enable WWW to browse the Web using Firefox; you need to enable WWW only if you want to set up an Apache (HTTP) Web server. Select Secure WWW (HTTPS), which is used for secure browser connections, to allow secure HTTP to pass through the firewall. Click the triangle to the left of Other ports to open a frame in which you can add and remove additional protocols and ports that the firewall will pass. Use the buttons labeled Add and Remove to manipulate this list.
For more information on setting up a firewall, refer to “JumpStart: Building a Firewall Using system-config-firewall” on page 794. Chapter 25 on iptables has information on how to build a more complete and functional firewall. Click Forward.
SELinux SELinux (Security Enhanced Linux) enforces security policies that limit what a
user or program can do. On this screen you can choose one of two policies, Enforcing or Permissive, or you can disable SELinux. If you enable SELinux, you can modify its policy. The policy defaults to Enforcing, which prevents any user or program from doing anything that is not permitted by the policy. If you will never want to use SELinux, disable it. If you do not want to use it now but may want to do so in the future, establish a Permissive policy—it issues warnings but does not enforce the policy. It can take a lot of time to turn on SELinux on a system where it has been disabled. For more information refer to “SELinux” on page 414. Click Forward.
Date and Time The next screen allows you to set the system date and time. Running the Network Time Protocol (NTP) causes the system clock to reset itself periodically from a clock on the Internet. If the system is connected to the Internet, you may want to enable NTP by clicking the Network Time Protocol tab and putting a check mark in the box next to Enable Network Time Protocol. Click Forward.
Figure 3-15 The Firewall screen 03.install.main.fm Page 62 Wednesday, April 16, 2008 12:31 PM
Installation Tasks 63
Hardware Profile When you select the radio button labeled Send Profile, the smolt hardware profiler sends a monthly update of the system’s hardware profile to smolts.org. Select the radio button labeled Do not send profile if you do not want smolt to send the sys-tem’s profile to the Fedora Project. Click Forward.
Create User The next screen allows you to set up a user account. You can set up a user account
now or after the system is fully operational. For more information refer to “Config-uring User and Group Accounts” on page 550.
When the Create User screen closes, you are done with the installation. You can now use the system and set it up as you desire. You may want to customize the desktop as explained in Chapters 4 and 8 or set up servers as discussed in Part V of this book.
Initializing Databases and Updating the System
Update the whatis database so that whatis (page 158) and apropos (page 157) work properly. Next update the locate database so that locate works properly. (The locate
utility indexes and allows you to search for files on the system quickly and securely.) Instead of updating these databases when you install the system, you can wait for
cron (page 559) to run them overnight, but be aware that whatis, apropos, and locate
will not work until the next day. The best way to update these databases is via the cron scripts that run daily. Working as root, give the following commands:
# /etc/cron.daily/makewhatis.cron
# /etc/cron.daily/mlocate.cron
These utilities run for several minutes and may complain about not being able to find a file or two. When the system displays a prompt, the whatis and locate data-bases are up-to-date.
Installation Tasks
This section details some common tasks you may need to perform during or after installation. It covers modifying the boot parameters, using Disk Druid to partition the disk during installation, using gparted to modify partitions, using logical volumes (LVs) to facilitate disk partitioning, using Kickstart to automate installation, and set-ting up a system that will boot either Windows or Linux (a dual-boot system).
Modifying Boot Parameters (Options)
FEDORA To modify boot parameters, you must interrupt the automatic boot process by pressing a key such as the SPACE BAR while Fedora is counting down when you first
boot from a the Live CD (page 48) or Install DVD (page 51). When you press a key, Fedora displays the Welcome menu (Figure 3-2 on page 49 or Figure 3-4 on page 52). Use the ARROW keys to highlight the selection you want before proceeding
(page 51). With the desired selection highlighted, press the TAB key to display the
boot command line parameters (Figure 3-16, next page).
RHEL RHEL presents a boot: prompt in place of the boot parameters line that FEDORA displays
when you press TAB. You can enter any of the parameters described in this section in
64 Chapter 3 Step-by-Step Installation
response to the boot: prompt; however, you must precede these parameters with the word linux. (See the examples in the next paragraphs.)
RHEL+FEDORA Type a SPACE before you enter any parameters. You can specify multiple parameters
separated by SPACEs. Press RETURN to boot the system. For more information on boot
parameters, refer to www.kernel.org/doc/Documentation/kernel-parameters.txt and www.kernel.org/pub/linux/kernel/people/gregkh/lkn/lkn_pdf/ch09.pdf.
Following are some of the parameters you can add to the boot command line. If you encounter problems with the display during installation, supply the nofb parameter, which turns off video memory. If you are installing from a medium other than a DVD—that is, if you are installing from files on the local hard disk or from files on another system using FTP, NFS, or HTTP—supply the askmethod or method parameter. Many of these parameters can be combined. For example, to install Linux in text mode using a terminal running at 115,200 baud, no parity, 8 bits, connected to the first serial device, supply the following parameters (the ,115200n8 is optional). The first line shows the parameters you enter while booting FEDORA. The second line shows the param-eters, including linux, you enter in response to the boot: prompt while booting RHEL.
Figure 3-16 The Welcome screen displaying boot parameters (options)
Boot parameters
(displayed after you press the TAB key)
What to do if the installation does not work
tip
On some hardware, the installation may pause for up to ten minutes. Before experimenting with other fixes, try waiting for a while. If the installation hangs, try booting with one or more of the boot parameters described in this section. Try running the installer in pseudographical (textual) mode. If these techniques fail, force the bootloader (syslinux) to run in textual mode by holding down theSHIFT key while the system boots from the DVD. (Do not depress the SHIFT key until after the BIOS fin-ishes displaying information about the system.) Doing so does not affect the rest of the installation. 03.install.main.fm Page 64 Wednesday, April 16, 2008 12:31 PM
Installation Tasks 65 text console=ttyS0,115200n8 FEDORA
boot: linux text console=ttyS0,115200n8 RHEL
The next set of parameters installs Fedora/RHEL on a monitor with a resolution of 1024 × 768, without probing for any devices. The installation program asks you to specify the source of the installation data (CD, DVD, FTP site, or other) and requests a video driver.
resolution=1024x768 noprobe askmethod FEDORA
boot: linux resolution=1024x768 noprobe askmethod RHEL
noacpi Disables ACPI (Advanced Configuration and Power Interface). Useful for systems
that do not support ACPI or that have problems with their ACPI implementation. The default is to enable ACPI. Also acpi=off.
noapic Disables APIC (Advanced Programmable Interrupt Controller). The default is to enable APIC.
noapm Disables APM (Advanced Power Management). The default is to enable APM. Also
apm=off.
askmethod Presents a choice of installation sources: local CD/DVD or hard disk, or over a net-work using NFS, FTP, or HTTP. (Install DVD only.)
•Local CDROM—Displays the CD Found screen, which allows you to test the installation media (the same as if you had not entered any boot parameters). • Harddrive—Prompts for the partition and directory that contains the
installation tree or the ISO image of the Install DVD. Do not include the name of the mount point when you specify the name of the directory. For example, if the ISO images are in the /home/sam/FC8 directory and /dev/hda6 holds the partition that is normally mounted on /home, you would specify the partition as /dev/hda6 and the directory as sam/FC8 (no leading slash).
• NFS, FTP, or HTTP—Displays the Configure TCP/IP screen from which you can select DHCP or enter the system’s IP address and netmask, and the IP addresses of the default gateway and primary nameserver.
When using NFS, the remote (server) system must export (page 709) the directory hierarchy that holds the installation tree or the ISO image of the Install DVD. The NFS Setup screen requires you to enter the NFS server name and name of the Fedora/RHEL directory. Enter the server’s IP address and the name of the exported directory, not its device name.
nodma Turns off direct memory access (DMA) for all disk controllers, which may make buggy
controllers (or controllers with buggy drivers) more reliable, but also causes them to perform very slowly because the connected devices have to run in PIO mode instead of DMA mode. This parameter may facilitate testing CD/DVDs that were not written correctly. For more information refer to “The Disc Found Screen” on page 52.
nofb no framebuffer Turns off the framebuffer (video memory). This option is useful when problems arise when the graphical phase of the installation starts. It is partic-ularly useful for systems with LCD displays.
66 Chapter 3 Step-by-Step Installation
irqpoll Changes the way the kernel handles interrupts.
ks=URI Specifies the location of a Kickstart (page 78) file to use to control installation. The URI is the pathname or network location of the Kickstart file.
nolapic Disables local APIC. The default is to enable local APIC.
lowres Runs the installation program at a resolution of 640 × 480 pixels. See also resolution.
mem=xxxM Overrides the detected memory size. Replace xxx with the number of megabytes of RAM in the computer.
method=URI Specifies an installation method and location without prompting as askmethod does. For example, you can use the following parameter to start installing from the specified server:
method=ftp://download.fedora.redhat.com/pub/fedora/linux/releases/8/Fedora/x86_64/os noprobe Disables hardware probing for all devices, including network interface cards
(NICs), graphics cards, and the monitor. This option forces you to select devices from a list. You must know exactly which cards or chips the system uses when you use this parameter. Use noprobe when probing causes the installation to hang or otherwise fail. This parameter allows you to supply arguments for each device driver you specify.
rescue Puts the system in rescue mode; see page 411 for details.
resolution=WxH Specifies the resolution of the monitor you are using for a graphical installation. For example, resolution=1024x768 specifies a monitor with a resolution of 1024 × 768 pixels.
text Installs Linux in pseudographical (page 26) mode. Although the images on the
screen appear to be graphical, they are composed entirely of text characters.
vnc Installs over a VNC (virtual network computing) remote desktop session. After pro-viding an IP address, you can control the installation remotely using a VNC client from a remote computer. You can download the VNC client, which runs on several platforms, from www.realvnc.com. Use yum (page 492) to install the vnc software package to run a VNC client on a Fedora/RHEL system.
Partitioning the Disk
See page 29 for a discussion of partitions and set up of the hard disk.
Using Disk Druid to Partition the Disk
Disk Druid, a graphical disk-partitioning program that can add, delete, and modify partitions on a hard disk, is part of the Fedora/RHEL installation system. You can use Disk Druid only while you are installing a system; it cannot be run on its own. You can use gparted (page 69), parted (page 72), or fdisk to manipulate partitions and
system-config-lvm to work with LVs after you install Fedora/RHEL. As explained ear-lier, if you want a basic set of partitions, you can allow Anaconda to partition the hard disk automatically.
Anaconda runs Disk Druid when you put a check mark in the box labeled Review and modify partitioning layout or when you select Createcustomlayout in the Disk Partitioning screen (Figure 3-7, page 55).
Installation Tasks 67
Clone and RAID Disk Druid includes Clone, a tool that copies the partitioning scheme from a sin-gle drive to other drives. Clone is useful for making multiple copies of a RAID partition/drive when you are creating a large RAID array of identical partitions or identically partitioned drives. Click the RAID button to access the Clone tool, which is active only when at least one unallocated RAID partition exists. For more information on RAID, see page 33.
Default layout Figure 3-17 shows the Disk Druid main screen as it appears when you have chosen the default layout for the hard disk (see “Disk Partitioning” on page 55). This screen has three sections (going from top to bottom): a graphical representation of the disk drives showing how each is partitioned, a row of buttons, and a table list-ing one partition or LV per line.
The following buttons appear near the top of the screen: • New—Adds a new partition to the disk (page 68)
• Edit—Edits the highlighted partition or LV (both on page 75) • Delete—Deletes the highlighted partition or LV
• Reset—Cancels the changes you have made and causes the Disk Druid table to revert so it matches the layout of the disk
• RAID—Enables you to create software RAID partitions and to join two or more RAID partitions into a RAID device (page 33)
• LVM—Enables you to create physical volumes (PVs), which you can then use to create LVs (page 35)
Figure 3-17 Disk Druid: main screen, default layout 000.book Page 67 Friday, April 4, 2008 9:22 AM
68 Chapter 3 Step-by-Step Installation
The Disk Druid table contains the following columns:
• Device—The name of the device in the /dev directory (for example, /dev/sda1 or the name of the LV).
• Label—The device label.
• MountPoint/RAID/Volume—Specifies where the partition will be mounted when the system is brought up (for example, /usr). It is also used to specify the RAID device or LVM volume the partition is part of. • Type—The type of partition, such as ext3, swap, or LVM PV.
• Format—A check mark in this column indicates the partition will be format-ted as part of the installation procedure. All data on the partition will be lost. • Size (MB)—The size of the partition or LV in megabytes.
• Start—The number of the block the partition starts on. • End—The number of the block the partition ends on.
At the bottom of the screen is a box that allows you to hide RAID device and LVM volume group members. Do not put a check mark in this box if you want to see all information about the disk drives.
Add a new partition To add a new partition to a hard disk, the hard disk must have enough free space
to accommodate the partition. Click the New button to add a partition; Disk Druid displays the Add Partition window (Figure 3-18). Specify the mount point (the name of the directory that the partition will be mounted over; page 30) and the filesystem type; use the arrow buttons at the right ends of these boxes to dis-play drop-down lists.
If there is more than one drive, put a check mark in the box next to the drive you want the partition to be created on in the Allowable Drives frame. Specify the size of the partition and, in the Additional Size Options frame, mark Fixedsize to create the partition close to the size you specify. Because of block-size constraints, parti-tions are not usually exactly the size you specify. Mark Fillallspaceupto (MB) and fill in the maximum size you want the partition to be to create a partition that takes up the existing free space, up to the maximum size you specify. In other words, Disk Druid will not complain if it cannot create the partition as large as you would like. Mark the third choice, Fill to maximum allowable size, to cause the partition to occupy all the remaining free space on the disk, regardless of size. (If you create another partition after creating a Filltomaximumallowablesize partition, the new partition will pull blocks from the existing maximum size partition.)
Put a check mark in the box labeled Force to be a primary partition to create a pri-mary partition (page 30). Click OK, and Disk Druid adds the partition to its table (but does not write to the hard disk).
Edit an existing partition
To modify an existing partition, highlight the partition in the Disk Druid table or the graphical representation of the hard disk and click the Edit button; Disk Druid 000.book Page 68 Friday, April 4, 2008 9:22 AM
Installation Tasks 69
displays the Edit Partition window. From this window, you can change the mount point of a partition or format the partition as another type (ext3, vfat, swap, and so on). You cannot change the size of a partition from this window. To do so you must delete the partition and create a new partition of the desired size.
gparted
: The GNOME Partition Editor
Unless you are certain the hard disk you are installing Fedora/RHEL on has nothing on it (it is a new disk) or you are sure the disk holds no information of value, it is a good idea to examine the contents of the disk before you start the installation. The GNOME Partition Editor (gparted), which is available from a live session, is a good tool for this job. (You can also examine the partition by mounting it from a live ses-sion using Konqueror [page 106] or Nautilus [page 255].)
Open the Partition Editor window under GNOME by selecting Applications: System ToolsDGParted as shown in Figure 3-19 on the next page. Under KDE, use Main menu: SystemDGParted (open the Main menu by clicking the K at the lower-left corner of the screen).
The Partition Editor displays the layout of a hard disk and can resize partitions, such as when you are setting up a dual-boot system by adding Fedora/RHEL to a Windows system (page 79). Although you can create partitions using the Partition Editor, you cannot specify the mount point (page 30) for a partition—this step must wait until you are installing Fedora/RHEL and using the Disk Druid partitioner. You can save time if you use the Partition Manager to examine a hard disk and Disk Druid to set up the partitions you install Fedora/RHEL on.
Figure 3-18 Disk Druid: Add Partition window, ext3 filesystem 000.book Page 69 Friday, April 4, 2008 9:22 AM
70 Chapter 3 Step-by-Step Installation
An Empty Hard Disk
The Partition Editor shows one large unallocated space for a new hard disk (empty, with no partition table). If you have more than one hard disk, use the list box in the upper-right corner of the screen to select the disk for which the Partition Editor dis-plays information. Figure 3-20 shows an empty 200-gigabyte hard disk on the device named /dev/sda.
Deleting a Partition
Before deleting a partition, make sure it does not contain any data you need. To use the Partition Editor to delete a partition, highlight the partition you want to delete, click Delete, and then click Apply on the toolbar.
Figure 3-19 Selecting the GNOME Partition Editor from the Main menu
Figure 3-20 The GNOME Partition Editor displaying an empty disk drive 000.book Page 70 Friday, April 4, 2008 9:22 AM
Installation Tasks 71
Resizing a Partition
Figure 3-21 shows the Partition Editor displaying information about a hard disk with a single partition that occupies the entire disk. It shows a single 200-gigabyte NTFS filesystem. The process of resizing a partition is the same regardless of the type of partition: You can use the following technique to resize Windows, Linux, or other types of partitions.
To install Fedora/RHEL on this system, you must resize (shrink) the partition to make room for Fedora/RHEL. Before you resize a Windows partition, you must boot Windows and defragment the partition using the Windows defragmenter; see the tip on page 80. To resize the partition, right-click to highlight the line that describes the partition and select Resize/Move on the toolbar. The Partition Editor opens a small Resize/Move window, as shown in Figure 3-21.
At the top of the Resize/Move window is a graphical representation of the partition. Initially the partition occupies the whole disk. The spin box labeled New Size (MiB) Figure 3-21 The Partition Editor displaying a disk drive holding a Windows system
Always back up the data on a hard disk
caution
If you are installing Fedora/RHEL on a disk that holds data that is important to you, always back up the data before you start the installation. Things can and do go wrong. The power might go out in the middle of an installation, corrupting the data on the hard disk. A bug in the partitioning soft-ware might destroy a filesystem. Although it is unlikely, you might make a mistake and format a partition holding data you want to keep.72 Chapter 3 Step-by-Step Installation
shows the number of megabytes occupied by the partition—in this case the whole disk. The two spin boxes labeled Free Space show no free space.
Back up the partition before you begin resizing. You can specify how you want to resize the partition by (right-clicking and) dragging one of the triangles at the ends of the graphical representation of the partition or by entering the number of mega-bytes you want to shrink the Windows partition to in the spin box labeled New Size. In response, the value in one of the spin boxes labeled Free Space increases. Click Resize/Move to add the resize operation to the list of pending operations at the bottom of the window. Click Apply on the toolbar to resize the partition. Although you can use the Partition Editor to create partitions to install Fedora/RHEL on, it may be easier to create partitions using Disk Druid while you are installing Fedora/RHEL. Disk Druid allows you to specify mount points for the partitions; the Partition Editor does not.
parted
: Reports on and Partitions a Hard Disk
The parted (partition editor) utility reports on and manipulates hard disk partitions. The following example shows how to use parted from the command line (see “Run-ning Commands from the Terminal Emulator/Shell” on page 105). It uses the print command to display information about the partitions on the /dev/hda drive:
# parted /dev/hda print
Disk geometry for /dev/hda: 0kB - 165GB Disk label type: msdos
Number Start End Size Type File system Flags 1 32kB 1045MB 1045MB primary ext3 boot 2 1045MB 12GB 10GB primary ext3 3 12GB 22GB 10GB primary ext3 4 22GB 165GB 143GB extended 5 22GB 23GB 1045MB logical linux-swap 6 23GB 41GB 18GB logical ext3 7 41GB 82GB 41GB logical ext3
Information: Don't forget to update /etc/fstab, if necessary.
Figure 3-22 The primary and extended partitions from the example
/dev/hda /dev/hda4 Primary 2 /dev/hda2 Primary 3 Primary 4 (Extended) /dev/hda3 Logical 5 /dev/hda5 Logical 6 /dev/hda6 Logical 7 /dev/hda7 Primary 1 /dev/hda1 . . . 000.book Page 72 Friday, April 4, 2008 9:22 AM
Installation Tasks 73 Figure 3-22 graphically depicts the partitions shown in this example. The first line that parted displays specifies the device being reported on (/dev/hda) and its size (165 gigabytes). The print command displays the following columns:
• Number—The minor device number (page 477) of the device holding the partition. This number is the same as the last number in the device name. In the example, 5 corresponds to /dev/hda5.
• Start—The location on the disk where the partition starts. The parted
utility specifies a location on the disk as the distance (in bytes) from the beginning of the disk. Thus partition 3 starts 12 gigabytes from the beginning of the disk.
• End—The location on the disk where the partition stops. Although parti-tion 2 ends 12 gigabytes from the beginning of the disk and partiparti-tion 3 starts at the same location, parted takes care that the partitions do not overlap at this single byte.
• Size—The size of the partition in kilobytes (kB), megabytes (MB), or gigabytes (GB).
• Type—The partition type: primary, extended, or logical. See Figure 3-22 and page 30 for information on partition types.
• File system—The filesystem type: ext2, ext3, fat32, linux-swap, and so on. See Table 12-1 on page 478 for a list of filesystem types.
• Flags—The flags that are turned on for the partition, including boot, raid, and lvm. In the example, partition 1 is bootable.
In the preceding example, partition 4 defines an extended partition that includes 143 gigabytes of the 165-gigabyte disk (Figure 3-22). You cannot make changes to an extended partition without affecting all logical partitions within it.
In addition to reporting on the layout and size of a hard disk, you can use parted
interactively to modify the disk layout. Be extremely careful when using parted in this manner, and always back up the system before you work with this utility. Changing the partition information (the partition table) on a disk can destroy the information on the disk. Read the partedinfo page before you attempt to modify a partition table.
parted
can destroy everything
caution
Be as careful with parted as you would be with a utility that formats a hard disk. Changes you make with parted can easily result in the loss of large amounts of data. If you are using parted and have any question about what you are doing, quit with a q command before mak-ing any changes. Once you give parted a command, it immediately makes the change you requested.74 Chapter 3 Step-by-Step Installation
To partition a disk, give the command parted followed by the name of the device you want to work with. In the following example, after starting parted, the user gives a help (or just h) command, which displays a list of parted commands:
# parted /dev/hdb
GNU Parted 1.8.6 Using /dev/hdb
Welcome to GNU Parted! Type 'help' to view a list of commands. (parted) help
check NUMBER do a simple check on the file system
cp [FROM-DEVICE] FROM-NUMBER TO-NUMBER copy file system to another partition help [COMMAND] prints general help, or help on COMMAND
mklabel LABEL-TYPE create a new disklabel (partition table) mkfs NUMBER FS-TYPE make a FS-TYPE file system on partititon NUMBER mkpart PART-TYPE [FS-TYPE] START END make a partition
mkpartfs PART-TYPE FS-TYPE START END make a partition with a file system move NUMBER START END move partition NUMBER
name NUMBER NAME name partition NUMBER as NAME
print [NUMBER] display the partition table, or a partition quit exit program
rescue START END rescue a lost partition near START and END resize NUMBER START END resize partition NUMBER and its file system rm NUMBER delete partition NUMBER
select DEVICE choose the device to edit
set NUMBER FLAG STATE change a flag on partition NUMBER
toggle [NUMBER [FLAG]] toggle the state of FLAG on partition NUMBER unit UNIT set the default unit to UNIT
version displays the version of GNU Parted and copyright info (parted)
In response to the (parted) prompt, you can give the command help followed by the name of the command you want more information about. When you give a print (or just p) command, parted displays current partition information, just as a print com-mand on the comcom-mand line does.
The parted utility will not allow you to set up overlapping partitions (except for log-ical partitions that overlap the extended partition that contains them). Similarly it will not allow you to create a partition that starts at the very beginning of the disk (cylinder 0). Both of these situations can cause loss of data.
Following are guidelines to remember when defining a partition table for a disk. For more information refer to “Partitioning a Disk” on page 31.
• Do not delete or modify the partition that defines the extended partition unless you are willing to lose all data on all logical partitions within the extended partition.
• If you put /boot on a separate partition, it is a good idea to put it at the beginning of the drive (partition 1) so there is no issue of Linux having to boot from a partition located too far into the drive. When you can afford the disk space, it is desirable to put each major filesystem on a separate partition. Many people choose to combine / (root), /var, and /usr into a single partition, which generally results in less wasted space but can, on rare occasions, cause problems.
Installation Tasks 75 • Although parted can create some types of filesystems, it is typically easiest
to use this utility to create partitions and then use mkfs and mkswap to cre-ate filesystems on the partitions.
The following sequence of commands defines a 300-megabyte, bootable, Linux partition as partition 1 on a clean disk:
# parted /dev/hdb
...
Using /dev/hdb
(parted) mkpart (create new partition)
Partition type? primary/extended? primary (select primary partition)
File system type? [ext2]? (default to an ext2 filesystem)
Start? 1 (start at the beginning of the disk)
End? 300m (specify a 300-megabyte partition)
(parted) help set (use help to check the syntax of the set command)
set NUMBER FLAG STATE change a flag on partition NUMBER
NUMBER is the partition number used by Linux. On msdos disk labels, the primary partitions number from 1 to 4, logical partitions from 5 onwards.
FLAG is one of: boot, root, swap, hidden, raid, lvm, lba, hp-service, palo, prep, msftres
STATE is one of: on, off
(parted) set 1 boot on (turn on the boot flag on partition 1)
(parted) print (verify that the partition is correct)
Disk geometry for /dev/hdb: 0kB - 250GB Disk label type: msdos
Number Start End Size Type File system Flags 1 1kB 300MB 300MB primary ext2 boot (parted) quit
Information: Don't forget to update /etc/fstab, if necessary.
When you specify a size within parted, you can use a suffix of k (kilobytes), m (mega-bytes), or g (gigabytes). After creating a partition, give a print command to see where the partition ends. Perform this task before you define the next contiguous partition to make sure you do not waste space. After setting up all the partitions, exit from
parted with a quit command.
Next make a filesystem (mkfs; page 432) on each partition that is to hold a file-system (not swap). Make all partitions, except swap and /boot, of type ext3, unless you have a reason to do otherwise. Make the /boot partition of type ext2. Use
mkswap (page 472) to set up a swap area on a partition. You can use e2label
(page 432) to label partitions.
LVs: Logical Volumes
When you ask Anaconda to partition the hard disk with a default layout (see “Disk Partitioning” on page 55), it uses LVM (page 35) to set up most of the hard disk, creating LVs instead of partitions. It places /boot on the first partition on the drive, not under the control of LVM. LVM creates a volume group (VG) named VolGroup00. Within this VG it creates two LVs: root (/, LogVol00) and swap (LogVol01). The swap LV occupies up to a few gigabytes; the root LV takes up the rest of the drive. This section explains how to make the root LV smaller so you can add additional LVs to VolGroup00.
76 Chapter 3 Step-by-Step Installation
If you click the Disk Druid LVM button with the default setup (with the root LV occupying all of the disk that is not occupied by the swap LV and the /boot parti-tion), Disk Druid displays a dialog box that advises you that there are not enough physical volumes and suggests that you create a new partition. Because the existing partitions occupy the whole disk, you cannot create a new partition.
To make the root LV smaller and make room for additional partitions, first high-light the root partition (LogVol00) and then click Edit. Disk Druid displays the Edit LVM Volume Group window (Figure 3-23). The figure shows that VolGroup00 has no free space (see the line in the middle of the window). It shows two LVs: swap, which does not have a mount point, and root, with a mount point of /.
Highlight root (LogVol00) in the frame labeled Logical Volumes and click Edit. Disk Druid displays the Edit Logical Volume window (Figure 3-24), which allows you to change the size of the root LV. Replace the numbers in the text box labeled Size (MB) with the number of megabytes you want to assign to the root LV. Figure 3-24 shows the size of the root partition being changed to 100 gigabytes (100,000 megabytes). Click OK.
Once you decrease the size of the root partition, the Edit LVM Volume Group win-dow shows that the VG has free space. You can now add another LV to the VG. Click Add in the Edit LVM Volume Group window to display the Make Logical Volume window (Figure 3-25). Select a mount point, filesystem type, and size for the LV. You can change the LV name if you like, although Disk Druid assigns logical, sequential names that are easy to use. Figure 3-25 shows a /home LV being created with a size of 80 gigabytes. Click OK when the LV is set up the way you want.
Figure 3-23 Disk Druid: Edit LVM Volume Group window 000.book Page 76 Friday, April 4, 2008 9:22 AM
Installation Tasks 77
Figure 3-24 Disk Druid: Edit Logical Volume window
Figure 3-25 Disk Druid: Make Logical Volume window 000.book Page 77 Friday, April 4, 2008 9:22 AM
78 Chapter 3 Step-by-Step Installation
Figure 3-26 shows the modified Disk Druid main screen with the new /home LV.
Using the Kickstart Configurator
Kickstart is a Fedora/RHEL program that completely or partially automates the same installation and postinstallation configuration on one or more machines. To use Kickstart, you create a single file that answers all the questions that are normally asked during an installation. Anaconda then refers to this file instead of asking you questions during installation. See the ks boot parameter on page 66. Using Kickstart, you can automate language selection, network configuration, keyboard selection, boot loader installation, disk partitioning, X Window System configuration, and more.
The system-config-kickstart utility (part of the system-config-kickstart package that you can install using yum; page 492) displays the Kickstart Configurator window (Figure 3-27), which creates a Kickstart installation script.
Figure 3-27 shows the first window the Kickstart Configurator displays. To gener-ate a Kickstart file (ks.cfg by default), go through each section of this window (the items along the left side) and fill in the answers and put check marks in the appro-priate boxes. It may be helpful to start with the Kickstart installation script that Anaconda generated when you installed the system (/root/anaconda.cfg). Click Help on the menubar for instructions on completing these tasks. When you are fin-ished, click FileDSave. The Kickstart Configurator gives you a chance to review the generated script before it saves the file.
Figure 3-26 Disk Druid: main screen with the new /home LV 000.book Page 78 Friday, April 4, 2008 9:22 AM
Installation Tasks 79
Setting Up a Dual-Boot System
A dual-boot system is one that can boot one of two (or more) operating systems. This section describes how to add Fedora/RHEL to a system that can boot Win-dows, thereby creating a system that can boot Windows or Linux. You can use the same technique for adding Fedora/RHEL to a system that runs a different version or distribution of Linux.
One issue that arises when you are setting up a dual-boot system is the need to find disk space for the new Fedora/RHEL system. The next section discusses several ways to create the needed space.
Creating Free Space on a Windows System
Typically you install Fedora/RHEL in free space on a hard disk. To add Fedora/RHEL to a Windows system, you must have enough free space on a hard disk that already holds Windows. There are several ways to provide or create this free space. The fol-lowing paragraphs discuss these options in order from easiest to most difficult.
Add a new hard disk
Add another hard disk to the system and install Linux on the new disk, which contains only free space. This technique is very easy and clean but requires a new hard disk.
Use existing free space
If there is sufficient free space on the Windows disk, you can install Linux there. This technique is the optimal choice, but there is rarely enough free space on an installed hard disk.
Resize Windows partitions
Windows partitions often occupy the entire disk, making resizing a Windows parti-tion the most commonly used technique to free up space. Windows systems typically use NTFS, FAT32, and/or FAT16 filesystems. You can use the GNOME Partition Editor to examine and resize an existing Windows partition to open up free space in which to install Linux (page 71).
Figure 3-27 Kickstart Configurator window 000.book Page 79 Friday, April 4, 2008 9:22 AM
80 Chapter 3 Step-by-Step Installation
Remove a Windows partition
If you can delete a big enough Windows partition, you can install Linux in its place. To delete a Windows partition, you must have multiple partitions under Windows and be willing to lose the data in the partition you delete. In many cases, you can save this data by moving it from the partition you will delete to another Windows partition. Once you are sure a partition contains no useful information, you can use the GNOME Partition Editor to delete it (page 70). After deleting the partition, you can install Fedora/RHEL in the free space formerly occupied by the partition you removed.
Installing Fedora/RHEL as the Second Operating System
After you have created enough free space on a Windows system (see the previous sec-tion), you can begin installing Fedora/RHEL. When you get to the Disk Partitioning screen (Figure 3-7, page 55), choose Use free space on selected drives and create default layout to have Anaconda partition the free space on the hard disk automati-cally. If you need to delete a Windows partition, you must choose Createcustom lay-out; this selection calls Disk Druid (page 66) so you can delete the appropriate Windows partition and create Linux partitions in the free space. When you boot the system, you will be able to choose which operating system you want to run.
The X Window System
If you specified a graphical desktop environment such as GNOME or KDE, you installed the X.org (x.org) implementation of the X Window System when you installed Linux. The X Window System release X11R7.2 comprises almost 50 soft-ware packages. The X configuration files are kept in /etc/X11; the configuration file that guides the initial setup is /etc/X11/xorg.conf.
system-config-display
: Configures the Display
The system-config-display utility displays the Display settings window (Figure 3-28), which allows you to configure X.org, including the monitor type and video card. Most users never need to run this utility: In almost all cases, Fedora/RHEL autoconfigura-tion sets up X.org to work properly. To run this utility, enter system-config-display on
Always defragment before resizing
caution
You must boot Windows and defragment a Windows partition before you resize it. Sometimes you may need to run the Windows defragmenter several times to consolidate most file fragments. Not only will defragmenting give you more space for a Linux partition, but it may also keep the process of setting up a dual-boot system from failing.Make a copy of
xorg.conf
tip
Make a copy of the /etc/X11/xorg.conf file when you install or upgrade a system and each time the file is modified, such as when you install a new monitor or graphics card. The copy makes it a simple job to restore a system with a nonfunctional xorg.conf file.The X Window System 81
a command line. From KDE, select Main menu: SystemDDisplay; from GNOME, select System: AdministrationDDisplay.
Figure 3-28 shows the Settings tab of the Display settings window, which allows you to specify the resolution and color depth for the monitor. Normally the system probes the monitor and fills in these values. If these values are missing, check the specifications for the monitor and select the appropriate values from the drop-down lists. No harm is done if you specify a lower resolution than the monitor is capable of displaying, but you can damage an older monitor by specifying a resolution that is higher than the monitor is capable of displaying. A color depth of 8 bits equates to 256 colors, 16 bits to thousands of colors, and 24 or 32 bits to millions of colors. Next click the Hardware tab. The system normally probes for the monitor type and brand as well as the model of video card; these values appear next to the words Monitor Type and VideoCard. You can manually select a monitor or video card. Figure 3-29 shows the Monitor window on top of the Hardware tab of the Display settings window.
Figure 3-28 The Display Settings window, Settings tab
Figure 3-29 The Display Settings window, Hardware tab, Monitor window 000.book Page 81 Friday, April 4, 2008 9:22 AM