Page 1 of 40
AccountMate 12.x for SQL/Express
Conversion from
AccountMate/LAN 10.x
CONVERSION INSTRUCTIONS
As of January 27, 2021
IMPORTANT!! READ THIS DOCUMENT FIRST.
Do not run the AccountMate 12.x for SQL/Express (AM 12.x) conversion until you read and thoroughly understand all pages of this document. If you have any questions about the conversion process after reading this material, please contact our Product Support team at (707) 774-7599 or via e-mail at [email protected]before you attempt the conversion.
This document has been designed to address your conversion needs. This is made up of three parts:
•What’s New – new information added in the conversion instruction
•Checklist – step-by-step list of the procedures to be performed
•Installation & Conversion Details – detailed discussion of the procedures specified in the checklist
WHAT’S NEW
The latest conversion program now supports conversion through AccountMate 12.1 for SQL/Express.
Starting in AM12.1 for SQL/Express, you can configure the signature settings in the Bank Account Maintenance function based on a range of check amounts. A list of International Organization for Standardization (ISO)-based states and countries to choose from is also provided in the maintenance and transaction records; however, the state list will only be available if the country selected is either United States (US) or Canada (CA). If the upgraded data has no assigned country, the system will get the value from the Unassigned Country As value in the Setup ► Company Setup function of the administrator program. You can find more information in the Post-Conversion Process ► Run Company Setup and Access
Maintenance Records section below.
Starting in AM11.1 for SQL/Express, the default Ship Via and F.O.B. when creating vendor related transactions will now come from the vendor record. After upgrade, the values assigned to PO Module Setup from the source build will be assigned to each vendor record. Refer to Section D. Post-Upgrade Process ► Item # 10 (Access Maintenance Records) for more details. Starting in AM10.4 for SQL/Express, new positive pay formats (i.e. Suntrust Bank, Umpqua Bank, Wells Fargo Bank) are available for selection in Bank Account Maintenance.
Starting in AM10.3 for SQL/Express, the employee’s salary history of all regular earning codes assigned to a particular state is now tracked. A Delete button is also made available so you can
Page 2 of 40
remove the unnecessary salary information. Pay attention to Section D. Post-Conversion Process ► Item # 10 (Access Maintenance Records) for additional information.
Starting in AM10.2 for SQL/Express, the reports To and Cc fields will be auto-populated with the customers’ e-mail addresses set in the Customer Maintenance and Customer Address Maintenance functions. Sending e-mails with e-mail addresses that are separated with commas is not allowed; thus, these commas are converted to semi-colons after upgrade. Those e-mail addresses that has comma (e.g. john,[email protected]) will also be included in the conversion, so you need to verify and amend them after upgrade. See Section D. Post-Conversion Process ► Item # 10 (Access Maintenance Records).
Starting in AM10.1 for SQL/Express, the Multi-Level Pricing options that is in the SO/AR Module Setup ► General (2) tab is no longer available; however, you can still set up multi-level pricing records in the Inventory Multi-Level Price Maintenance function either by Price Code or Order Quantity only. With this change, pay close attention to the instruction in Section A. Pre-installation Steps ► Item # 11 (Verify Multi-Level Pricing Used).
The Payroll module also now supports application of payroll and printing of one payroll check for employees with payroll transactions for multiple states. If you have employees who have payroll transactions recorded for multiple states in AM9, read the instruction in Section D. Post Upgrade Process ► Item # 9 (Recalculate Employee Data) and Item # 10 (Access Maintenance Records).
The Bank Account Maintenance function is also enhanced to provide users with the capability to print one or two signature lines on AP or PR checks. With this enhancement, the signature image height was increased from 1.010 to 1.250 inches. It is recommended that you verify the check signature alignment immediately after the upgrade before printing valid checks. See Section D. Post-Upgrade Process ► Item # 12 (Verify AP and/or PR Check Alignment) for more details.
CHECKLIST
Note: Please refer to the Installation & Conversion Details section for a detailed discussion of the specific steps in the checklist below.
A. Pre-installation Steps ______ 1. Correct Version
______ 2. Conversion Limitations ______ 3. Do Modifications Exists?
______ 4. Set SQL Server to Use Mixed Mode Authentication ______ 5. Set SQL Server’s Full Text-Search Component ______ 6. Choose Computer
______ 7. Check Disk Space
______ 8. Select and Map a Common Files Directory ______ 9. Back Up
______ 10. Perform Data Validation Procedures ______ 11. Verify Multi-Level Pricing Used ______ 12. Payroll Module Preparations ______ 13. Cash Flow Category Assignment ______ 14. Close PO/AP
Page 3 of 40
______ 16. Consolidated Ledger Module Preparation ______ 17. Download Pre-Conversion Utility
______ 18. Run Pre-Conversion Utility
______ 19. Run the Inventory Adjustments Transfer to GL Update Utility
______ 20. Run Reports
B. AccountMate 12 for SQL/Express Installation ______ 1. Run Setup.exe as Administrator ______ 2. Select Destination Location
______ 3. Select the “Custom” Installation Option ______ 4. AccountMate Product Key
______ 5. Select Components to Install ______ 6. Launch the Administrator Program ______ 7. Back up AM 12 for SQL/Express C. Converting Data
______ 1. Verify Exclusive Access
______ 2. Download and Extract Latest Conversion Utility ______ 3. Verify Data Set Size
______ 4. Run Amconvert.exe ______ 5. Conversion Setup
______ 6. Validation/Conversion Setup ______ 7. Run the Conversion
D. Post-Conversion Process
______ 1. Verify Converted Database Recovery Model Setting in SQL Server ______ 2. Activate Modules
______ 3. Install License File
______ 4. Input PR Tax Subscription Key ______ 5. Run Company Setup
______ 6. Assign Group and User Access Rights ______ 7. Run Credit Card/SNN Update Utility
______ 8. Initialize Modules and Install Latest PR Tax Update ______ 9. Recalculate Employee Data
______ 10. Access Maintenance Records ______ 11. Update Transactions’ Attachments ______ 12. Verify AP and/or PR Check Alignment
______ 13. Recalculate Inventory Data and Inventory Beginning Balances ______ 14. Run Transfer Data GL
______ 15. Consolidate Account Balances and Budgets
______ 16. Compare GL Transfer Reports and Financial Statements ______ 17. Review Converted Data (by running reports)
______ 18. Perform “Typical” or “Compact” Installation on Workstations ______ 19. Recreate Report Macros and Custom Reports
______ 20. Post AP Invoices for PO Receipts
Page 4 of 40 E. Troubleshooting Errors and Messages
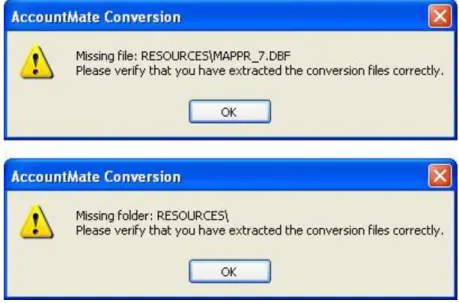
______ 1. “Missing file/folder. Please verify that you have extracted the conversion files correctly.”
______ 2. “Cannot detect the SQL Server instance. Be sure that the AccountMate application has already been run to create the amwsys and sample databases.”
______ 3. “Server name should not contain [ln10/ln9/ln8/ln7/ln6].” ______ 4. “Database name should not start with a number.”
______ 5. “Database name should not contain space(s).” ______ 6. Foreign Key Violation Error
--- Checklist Ends (Detailed Discussion Follows) ---
INSTALLATION & CONVERSION DETAILS
A.
Pre-installation Steps
1. Correct VersionUse these instructions when converting:
o Databases on AccountMate/LAN Version 10 (LAN 10), Build LN1001 or higher to either of the following:
• AccountMate 12.1 for SQL (or higher); or • AccountMate 12.1 for Express (or higher)
Check the version number of your current installation by accessing the “About
AccountMate” function under the Help menu. If your current installation is a version that is lower than those mentioned above, you must use a different set of instructions. Verify that the version number on the new AccountMate installer is either AM 12.1 (or higher). Contact AccountMate Product Support at (707) 774-7599,
[email protected] or call Customer Service at 1-800-877-8896 ext 520 if you want to convert to any other version.
2. Conversion Limitations
Please take note of these conversion limitations that affect the following modules and features:
a. Various Modules: The next computer and handwritten check #, transaction #, and deposit # fields in Bank Account Maintenance are configured differently in AccountMate 9 for LAN and AccountMate 12 for SQL/Express. These fields are assigned a numeric data type in AM/LAN while they are integers in AM 12. The SQL integer data type has a
maximum value of 2147483647 while the LAN numeric data type has a higher maximum value. If the next check, transaction or deposit number for any of your bank accounts in LAN is greater than the maximum SQL integer value, the conversion will fail; so be sure to change the field value before running this conversion.
Page 5 of 40
records) will be excluded from the conversion. After the conversion you must run the Transfer Data to GL function for all subsidiary modules to get up-to-date GL account balances.
c. CL Module:
• Consolidated Account Balances: Current and prior year consolidation entries from subsidiary account balances are stored in the parent’s GLTFER table. Since GLTFER records are excluded from the conversion, in essence the conversion un-consolidates current and prior year subsidiary account balances. After the conversion you must consolidate account balances for all subsidiary companies to get up-to-date consolidated account balances in the parent company.
• Consolidated Budgets: LAN 10 stores consolidated budget data in the application directory. AM 12 stores this data in the database; consequently, the conversion will un-consolidate budget data. After the conversion you must un-consolidate budgets for each subsidiary company to get consolidated budgets in the parent company.
d. IC Module: LAN 10 inventory images are not converted. You must add the images to the Inventory Maintenance record after converting to AM 12.
e. PO Module: Accrued received goods records are not converted. Refer to steps 14 through 17 of this section for more information.
f. AP Module: There are data structure differences between AM 12 and LAN 10 that affect the AP electronic payment feature. Because of these differences, any electronic payments voided in LAN 10 will be excluded from AM 12 reports.
g. SM Module:
• Company and Reseller Logos: LAN 10 company logos and the AccountMate Solution Provider’s logo are not converted. You must add the logos after converting to AM 12.
• Shortcut Pane and User Grid Settings: LAN 10 shortcut pane and user grid
settings are not converted. Your users must re-configure their shortcut pane and user grid settings after the conversion.
• Report Macros: None of the user-defined report macros will be converted. Your
users must recreate the report macros for all affected reports after converting to AM 12.• Custom Reports: None of the custom reports will be included in the conversion. You must recreate the custom reports after converting to AM 12.
• Group and User Access Rights: Only the group and user records will be converted. Group and user access rights will not be converted. You must set up the group and user access rights after converting to AM 12.
3. Do Modifications Exist?
Your current AccountMate system and data structure must be unmodified for the generic conversion program to work. You must have a programmer apply your customizations into
Page 6 of 40 your new version if you still need them.
Please do not proceed if you modified the data structure or system. Instead, e-mail our Development Consulting Service, [email protected], to ask how you can modify the generic conversion program to work with your modified AccountMate data or system. Regular consulting charges will apply.
4. Set SQL Server with Mixed Mode Authentication
Verify that SQL Server or Express is properly installed and set up for use with AccountMate. a. Make sure that SQL Server/Express is installed under Mixed Mode to support both SQL
and NT Authentication.
b. Be sure to assign a non-blank password to the ‘sa’ SQL login ID. Take note of the password as you will need it to configure the SQL server connection.
c. Be sure not to use a SQL Server/Express Instance name that contains ln10, ln9, ln8, ln7 or ln6 as this will cause problems during the conversion.
d. Take note of the SQL Server/Express Instance name as you will also need it to configure the SQL server connection and to create the AccountMate databases in the target database server.
Note: Be sure to install a SQL Server version that is supported by AccountMate 12.x for SQL/Express. Check our website for the most up to date AM 12 System Requirements. Take note that AccountMate does not sell SQL Server. For assistance on installing your SQL Server or Express, refer to your IT Professional.
5. Set SQL Server’s Full-Text Search Component
Note: Please skip this step if you are converting to AccountMate 12 forExpress or if you will be running AccountMate 12 for SQL on SQL Server Express Edition. The Full-Text Search Component is not available in SQL Server Express Edition.
AM 12 has the ability to do a full text search (i.e. search all character fields included in a catalogue) to locate a specific record such as an inventory item. To activate this feature, be sure to install SQL Server’s Full-Text Search component. For assistance on installing this component, refer to your IT Professional.
6. Choose Computer
We recommend that you run the conversion at the computer that holds the SQL Server/Express. The SQL Client Tools must be installed in the computer where the conversion is to be performed if, for any reason, you cannot perform the conversion at the server.
7. Check Disk Space
The physical hard drive that houses your SQL server and data should have free disk space of at least 5 times the size of your current AccountMate data.
Page 7 of 40 8. Select and Map a Common Files Directory
AM 12 stores the database containers, System Tables, Patches, Modifications, SptgUpdate and Custom Report files along with all other common files it uses in a new directory that is referred to as the Common Files Folder (refer to Section B ► Item 6). To ensure that all AccountMate workstations can access these common files, be sure to map this directory in all workstations using the same drive letter (e.g. X) and grant read-write access to this folder to all users.
9. Backup
Back up all live company databases in preparation for performing Data Validation Procedures and Period-End Closing. In case of problems, you can restore the databases from your backup and try again. DO NOT SKIP
THIS STEP!
10. Perform Data Validation Procedures
Run the Validate Database and Rebuild Table Indexes functions for each company to be converted. If you encounter any error, correct the problem; then, make another backup of the affected database before proceeding with the conversion.
11. Verify Multi-Level Pricing Used
Note: Please skip this if you donot have the Sales Order and Accounts Receivable
modules.
Starting in AM10.1 for SQL/Express, the Multi-Level Pricing options that is in the SO/AR Module Setup ► General (2) tab is no longer available; however, you can still set up multi-level pricing records in the Inventory Multi-Level Price Maintenance function. If you are using the Price Control module, you can set up either of the following multi-level pricing options: (1) by Price Code, (2) by Order Quantity, and/or (3) by Price Code and Order Quantity. Users that do not use the Pricing Control module can set up either by Price Code or Order Quantity only.
In LAN 10, though you can only use one multi-level pricing option at a time, you can set up record for both the by Price Code and by Quantity option in the Inventory Multi-Level Price Maintenance function. If this is your case, where you have the by Price Code and by Quantity multi-level pricing records, only one of this record will be carried over in AM12 after the upgrade. The record that will be carried over in AM12 is only the record for multi-level pricing option that is used before the upgrade.
Examples: Scenario 1
Source Build (LAN10): Records exist in the Inventory Multi-Level Price Maintenance function; however, the option selected in the SO/AR Module Setup > General 2 > Multi-level Pricing area is Not Used.
Target Build (AM12): The Inventory Multi-Level Price Maintenance function will be empty.
Page 8 of 40 Scenario 2
Source Build (LAN10): Records exist in the Inventory Multi-Level Price Maintenance function for both By Price Code and By Quantity options; however, the option selected in the SO/AR Module Setup > General 2 > Multi-level Pricing area is By Quantity.
Target Build (AM12): The Inventory Multi-Level Price Maintenance function will only contain the By Quantity record.
With this, it is important that you determine the desired inventory multi-level pricing record that you want use after the upgrade and make the necessary changes in the option selected in the SO/AR Module Setup > General 2 > Multi-level Pricing area before upgrading the data.
12. Payroll Module Preparations
Note: Please skip this if you donothave the Payroll module.
To avoid inaccurate balances, user must print/record a check for all applied payroll/payment transactions before the upgrade.
13. Cash Flow Category Assignment
Review the cash flow category assigned to each GL Account ID. Each GL Account ID must be assigned only one cash flow category in the Chart of Account Maintenance function. 14. Close PO/AP
You must perform Period-End Closing for your PO/AP modules. These modules must be closed through the period that has transactions that have yet to be posted to GL. For example, if you have recorded PO/AP transactions dated up to January 31, 2019 you must close PO/AP through January 2019. Closing the period in PO/AP is necessary to generate the correct information for the succeeding steps.
15. Generate and Export Accrued Received Goods Report
Run the Accrued Received Goods Report sorted by Vendor#. This must be performed in your current AccountMate installation as you will no longer be able to generate this report in AM 12 for PO receipts recorded prior to the conversion.
Be sure to keep a copy of the said report. You will need it after the conversion to identify which PO receipts have accrued liabilities. When you post an AP invoice for your PO receipts in AM 12, you can check the receipts against this report and charge the AP invoice against the Accrued Received Goods Liability, if applicable.
Note: You must keep a copy of this report for as long as accrued receipts recorded in your previous AccountMate version are not reversed in your AP invoices. Do not dispose them after the conversion until all of the PO receipts in the report have been fully reversed in AP.
Page 9 of 40 16. Consolidated Ledger Module Preparation
Note: Please skip this step if you do not have the Consolidated Ledger module or you have the module but your parent company and all its subsidiaries use the same home currency code.
In AM 12, subsidiary companies with the same home currency code are consolidated using only one exchange rate per fiscal period. Moreover, exchange rates used to consolidate GL account balances in the prior fiscal year cannot be changed. This control mechanism was not yet in place in LAN 10. To ensure that consolidated data is properly converted, you must do the following before performing the conversion:
a. Access the parent company and print the Consolidated Account Balance Analysis Report. Set the report to sort by “Account ID” and mark the “Show Multi-Currencies” checkbox. Take note of the values under the Home Consolidated Amt column for the periods that belong to the prior fiscal year.
b.Run the Currency Code Maintenance function in the parent company.
i.Select each currency code record that matches the subsidiaries’ home currency codes. ii.Enter the exchange rate that must be used to consolidate the prior fiscal year’s account
balances. Be careful when entering this value as the prior year’s consolidation exchange rates cannot be changed after the conversion.
iii.Save the changes made.
c. Run the Consolidate Account Balances function in each subsidiary company. The consolidation will use the exchange rates you entered in the parent company in step b
above.
d. Print the Consolidated Account Balance Analysis Report once again in the parent company. Set the report to sort by “Account ID” and mark the “Show Multi-Currencies” checkbox. Take note of the values under the Home Consolidated Amt column for the periods that belong to the prior fiscal year.
e. If the exchange rate you entered in step b is different from the exchange rate that was used during previous consolidations, the values you see under the Home Consolidated Amt column when you run the report in step d will differ from the ones you saw in step a. Run the Journal Entry Transactions function in the parent company to create a prior year-end adjustment that will adjust the prior fiscal year’s GL account balances for the variance caused by the different exchange rates used in the previous and current consolidations. This is necessary to bring the prior fiscal year’s consolidated home currency account balances back to what they were before consolidation using the exchange rate entered in step b. Since the prior year-end adjustment will hit period 13 of the prior fiscal year (if you are using a 12-period fiscal year), you need to create just one adjusting journal entry batch to adjust all the prior fiscal year consolidation variances. After reviewing the entries in the batch, run the Post JE Batch to GL function to post the adjustment.
17. Download Pre-Conversion Utility
You can obtain the Pre-Conversion Utility (accrual_ln.zip) from the Conversion & Upgrade Tools section of the AccountMate website. If you are an AccountMate End User, you must ask your AccountMate Solution Provider to download this file for you. You will need this file if you have Accrued Received Goods transactions in your PO module.
Page 10 of 40 18. Run Pre-Conversion Utility
The Accrued Received Goods Report does not show which accruals have been posted to GL, which is why you need to run the Pre-Conversion Utility as an additional step. Follow the steps defined below:
a. Extract the content (accrual_ln.exe) of the Pre-Conversion Utility you downloaded in step 16 to the data directory of the AccountMate LAN company database you are converting.
b. Run the file extracted against the database that you are converting. This will generate a special report showing the accruals made for PO receipts that have been transferred to GL but have not yet been reversed or invoiced in AP. When used with the Accrued Received Goods Report, the special report will provide you with the information you need to facilitate the posting of AP invoices in AM 12 for the accruals recorded in your previous AccountMate version.
c. Click the close button (marked “X”). The system will automatically generate an excel file showing the same information as the utility you just ran. This excel file will be called ACCRUAL.XLS by default and will be stored in your company database directory. If you have previously run the utility and have kept the excel file under its default name, the system will prompt you to overwrite the existing file with the new output.
Save the results from running this file into a directory that can only be accessed by authorized personnel to minimize the risk of deletion. You can print the excel file for a hard copy that you can use when posting AP invoices for these accruals.
Caution: This must be performed on the correct database, for all databases that you need to convert. Moreover, you must not delete or dispose of these files/printouts for as long as the corresponding PO receipts are not yet invoiced / reversed in AM 12.
19. Run the Inventory Adjustments Transfer to GL Update Utility
Run the Inventory Adjustments Transfer to GL Update pre-conversion utility if you want to mark the inventory adjustment records (e.g., CADJ, VKIT, etc.) from the Sales Order (SO) module as transferred to General Ledger (i.e., iciadj.ctogl=x). The utility will show all the SO inventory adjustment transactions grouped by transaction type, year and month. Once marked, the inventory adjustment entries will no longer be displayed in the GL Transfer Report and Transfer Data to GL will ignore these transactions.
You can find the utility (amiadj.exe) in the utilities ► amiadj folder of the conversion utility package with the instructions on how to use the program.
20. Run Reports
Run the GL Transfer Report from each of the non-GL modules that you use. Also generate the GL financial reports (e.g. Balance Sheet, Income Statement, GL Listing, etc.). If you encounter any error (e.g. Out of balance, Transfer date is not defined, etc.), resolve the data problem before proceeding with the conversion.
Page 11 of 40
B. AccountMate 12 for SQL/Express Installation
1. Run Setup.exe as Administrator
Extract the AM 12 for SQL/Express installer files to your desired location then run Setup.exe as administrator. You will be shown the AccountMate 12.x for SQL or the AccountMate 11.x for Express Setup screen.
Note: If you are an AccountMate End User, you must ask your AccountMate Solution Provider to download AccountMate 12.x for SQL/Express from the Software Update
Download page of the AccountMate website.
2. Select Destination Location
On the Choose Destination Location screen, accept the default Destination Folder by clicking the Next> button; or click the Browse… button to change to the desired path. This should be the folder in which you will find it most convenient to run AM 12.
o You must install AM 12 in a different folder than the one that holds your current
AccountMate for LAN installation. In case the conversion fails and you decide to postpone it for another time, you will be able to easily go back to your LAN version.
o If the file server where you intend to install AM 12 is running on Windows Server 2008, Windows Server 2008 R2 or Windows Server 2012, we strongly recommend that you do NOT install the application in the C:\Program Files directory.
3. Select the “Custom” Installation Option
Click the Next button to proceed to the Setup Type screen. Since you are installing on the server where you will perform the conversion, make sure that you choose the Custom installation option.
4. AccountMate Product Key
In the Product Key window, enter the 25-character AccountMate Product Key that was given to you for your new AM 12 for SQL/Express package. Should you encounter problems with your Product Key, contact AccountMate Customer Service at 1-800-877-8896 ext 520. Note: The Product Key is version specific, which means that the product key for version AM 10 for LAN will not work for AM 12 for SQL/Express.
5. Select Components to Install
In the Select Components window, you will see three Components to install. These are: o Program Files => these are the executable files, which will allow you to run the main
AccountMate 12 for SQL/Express program and all its functions and reports.
o Administrator Program => installs the Administrator program, which will allow you to activate modules, install your license file, create companies, and manage group and user access rights among other functions.
o Run-time Files => will install the Crystal Reports and Visual FoxPro run-time libraries (DLL’s) necessary for running various AccountMate 12 for SQL/Express
Page 12 of 40 functions and reports.
Be sure to select the Program Files and Run-time Files checkboxes in this window so that the executable program as well as the Crystal Reports and Visual FoxPro run-time libraries (DLL’s) will be installed.
For the server, the computer where the conversion will be performed (if other than the server), and those workstations that need to run the Administrator program be sure to mark all three checkboxes, including the one for the Administrator Program. The Administrator program is required to complete the AccountMate 12 for SQL/Express installation.
Continue with the rest of the installation screens until you see the InstallShield Wizard Complete window.
6. Launch the Administrator Program
Run the AccountMate 12 Administrator program either from your desktop or the AccountMate 12 application folder.
a. You should be prompted for the SQL Server or Express instance where your AccountMate 12 data will be stored (Figure 1). Enter in the SQL Server Name field the computer name and the SQL Server or Express instance name (e.g. COMP1\SQL1NSTC); then, press OK.
Figure 1. Select Server Dialogue Box
b. Next, you should be asked for the location of your Common Files Folder (Figure 2). This folder will store the database containers, System Tables, Patches, Modifications, SptgUpdate and Custom Report files along with all other common files used by AM 12. You can enter either a UNC path (e.g. \\ComputerName\SharedFolder\FileName) or a mapped network drive (e.g. X:\Filename). If you enter a mapped network drive, be sure to map all workstations using the same drive letter (e.g. X). Since all AccountMate workstations will use the same common files folder, they must all have read-write access to the said folder (refer to Section A ► Item 8).
NOTE: If the folder you specify does not yet exist, you will be asked if you want the installer to create the folder. Click “Yes” to proceed.
c. At this point, you will be asked for the Default Password; enter go.
d. In the Select Country Tax for Sample Company window, select from the list box the desired country tax for the sample company.
Page 13 of 40
e. Specify the SQL Server data directory where you want to store the AccountMate 12 databases. Accept the default or select a different SQL Data Directory.
f. If the SQL server is installed in another computer, specify in the Mapped as Directory field the drive letter and the shared network folder to which you mapped the physical location on the database server where the AccountMate 12 databases will be stored. If you are physically running AccountMate at the same computer where the SQL server data directory is located, the Mapped as Directory should be the same as the SQL Data Directory.
Figure 2. Select Common Files Folder
g. Click the Install button; then, when you see a message asking you to confirm whether you are ready to proceed with the installation, click Yes to start the creation of the system database and sample company database for AccountMate 12.
h. When shown a message stating that the installation of the system and sample company databases is complete, click OK.
i. Click Exit to close the Administrator program. 7. Back up AM 12 for SQL/Express
Back up the AM 12 AMWSYS and sample databases. In case of failure, you can restore the backup and resume the conversion without having to reinstall the system. DO NOT SKIP THIS STEP!
C. Converting Data
1. Verify Exclusive Access
Check that no one accesses the source LAN 10 company you are converting and the AM 12 system while you perform the conversion. You can verify this by selecting the Current Login User List function; make sure you are the only user currently logged in. Exit the AccountMate LAN 10 and AM 12 programs; then, continue with the conversion.
Page 14 of 40 2. Download and Extract Latest Conversion Utility
Make sure you have the latest conversion utility (i.e. Conversion File for AM 12). The latest version of this file is available for download from the Conversion & Upgrade Tools section of the AccountMate website. If you are an AccountMate End User, you must ask your AccountMate Solution Provider to download the file for you.
Extract the contents of the download file (AMCONVERT.zip) into a Convert folder that is accessible from the server where you will perform the conversion. Verify that the “use folder names” checkbox is marked when extracting the contents of the zip file. Make sure that the Convert folder is shared on your network.
3. Verify Data Set Size
By default, our conversion program is designed to handle AccountMate LAN Data sets with a maximum combined file size (i.e. combined size of the DBF + CDX + FPT) of 1.5 GB. If your AccountMate LAN Data folder contains files with a combined file size that exceeds 1.5 GB per data set, you must do the following:
a. Access the CVCNFG.DBF file from the Convert folder where you extracted the conversion files you downloaded from the AccountMate website.
b. Add a record containing the following values in these fields: o CCONFIGID = enter the value MAXDBFSIZE
o CVALUE = enter any valid positive whole number with no commas, periods or any other separators. The value entered in this field is expressed in bytes and must be less than 1.5 GB.
o CKEY1 = leave this field blank
The conversion utility will use the file size you defined in CVCNFG.DBF to split the AccountMate LAN Data files to be used in the data migration. Using the file CVCNFG.DBF allows the conversion program to convert data sets with up to 145 GB combined file size. Note: A data set is a combination of the DBF, CDX and FPT files that store a particular type of data in AccountMate LAN. For example, APVEND.DBF, APVEND.CDX and APVEND.FPT all store AP Vendor File information and constitute one data set. It is the combined size of the three APVEND.* files that is compared against the default 1.5 GB data set size limitation.
4. Run Amconvert.exe
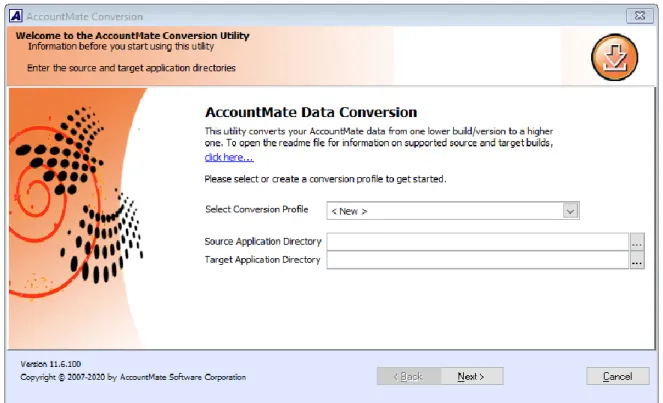
Run Amconvert.exe from the Convert folder where you extracted the conversion file you downloaded from the AccountMate website. You should see the screen shown in Figure 3:
a. Select Conversion Profile => choose <New> to create a new profile; otherwise, click the list box to choose one of the profiles you previously set up.
b. Source Application Directory => enter the path where your source AccountMate LAN application folder (i.e. previous version) is located. Alternatively, you can click the ellipsis button to browse for the correct location.
c. Target Application Directory => enter the path where your target AccountMate 12 application folder (i.e. new version) is located. Alternatively, you can click the ellipsis button to browse for the correct location.
Page 15 of 40
After filling in the required information, click the Next button.
Figure 3. Conversion Profile and Application Directory Selection If you chose to create a new profile, you should see the following window:
Figure 4a. Save New Conversion Profile
Enter the name you want to assign to the new conversion profile; then, click the Save button.
If you selected an existing profile and made changes to the Source and/or Target Application Directory fields, you should see the following message:
Page 16 of 40
Figure 4b. Update Existing Conversion Profile 5. Conversion Setup
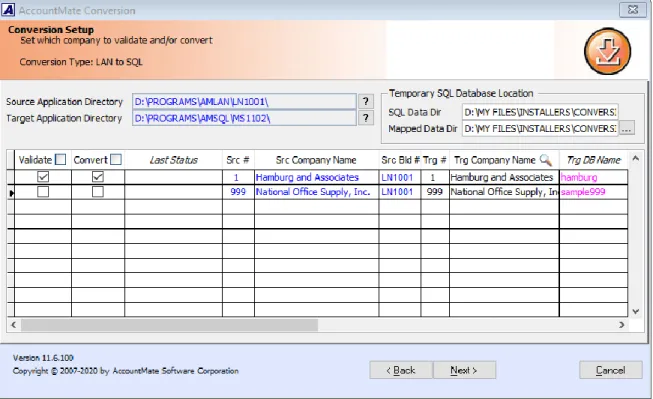
At this point the utility will display the Conversion Setup screen (Figure 5).
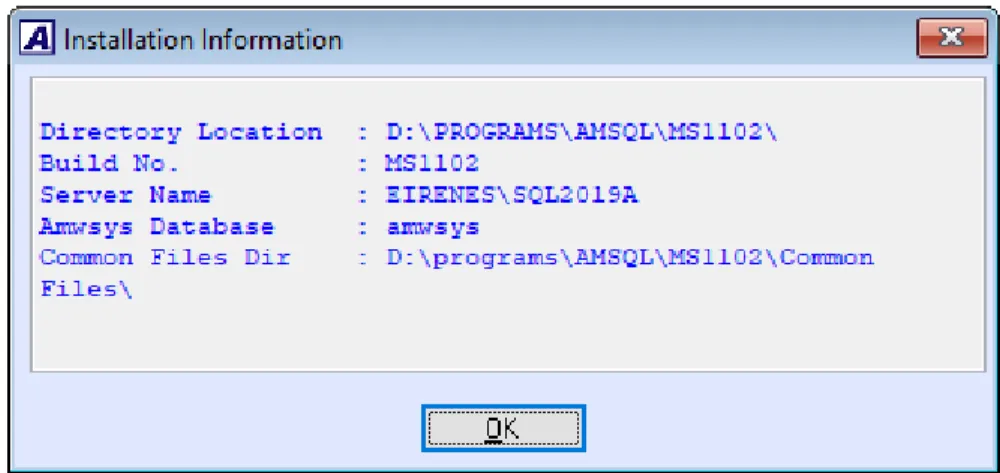
Above the grid, the utility displays the source and target application directories. Click the Properties button beside each field to display the Installation Information window (Figure 6) where you can verify that you selected the correct application.
Page 17 of 40
Figure 6. Source or Target Application Properties
In the Temporary SQL Database Location section above the grid, enter the path where you want the utility to store the temporary SQL database that will be created during the conversion.
a. SQL Data Dir => specify the folder on the server where Microsoft SQL Server is installed. b. Mapped Data Dir => specify the path that represents the mapping you made to the SQL
Data Directory on the computer from where you are running the conversion utility. The grid displays the companies that are in your Source Application Directory (i.e. previous version) including the sample company:
a. Validate => mark this checkbox to validate the company data before performing the conversion. This checkbox is marked by default. This sets the utility to run various types of data validation; however, if any issues are found, no data fixing will be performed. You must fix the AccountMate LAN data using Visual FoxPro and then create another backup before proceeding with the conversion.
b. Convert => mark this checkbox to convert the company data. This checkbox is marked by default.
c. Last Status => this field displays the status from the last time you attempted to convert the company data. If this is the first time you convert the company, this field will be blank. For subsequent attempts to convert the company, you may find the following information:
o Started – validation or conversion has been started but was abnormally stopped by power outages or computer crashes thereby causing the conversion to improperly shut down.
o Validation Completed – the source company was selected for validation only and the validation completed without error.
o Validation Failed – errors were encountered during validation of the source company. o Conversion Completed – the source company was selected for conversion which
completed without error.
o Conversion Failed – errors were encountered during conversion of the source company.
Page 18 of 40
o Cancelled – conversion was manually aborted by the user clicking the Cancel button while the conversion was in progress. The Cancel button is only enabled if the conversion process is not set to run automatically.
Notes:
▪ You can double-click the Last Status field to display the Conversion History window (Figure 7a). This window shows a separate entry for each time you validate or convert a source company data.
▪ Click the Cleanup button in the Conversion History window to delete the conversion log files. Be sure to do this only if you no longer need the conversion logs (i.e.
conversion completed successfully and data has been reviewed) as there is no way to retrieve them.
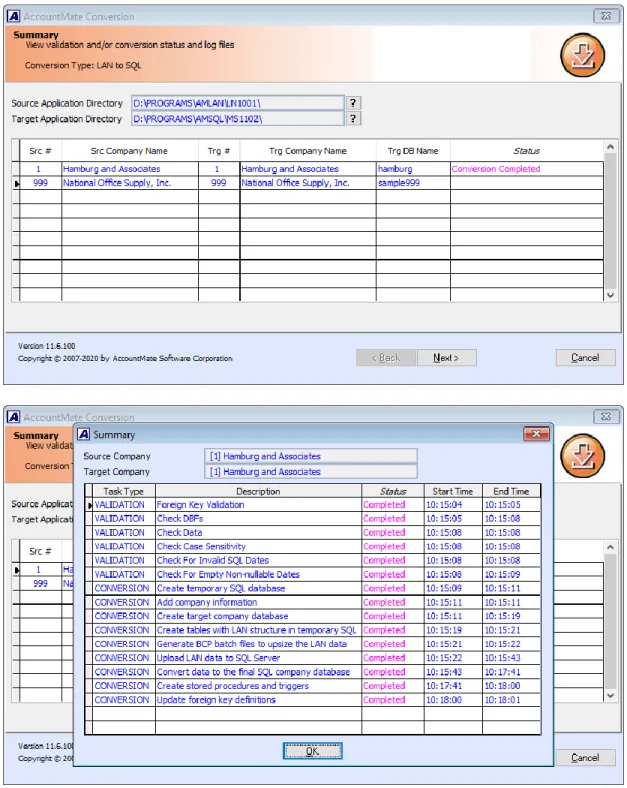
▪ Double click the Status field or click the View Log Files button in the Conversion
History window to display the Summary window (Figure 7b). This window shows the status of each task that was performed as part of the validation and/or conversion process.
▪ Double click the Status field in the Summary window to view the related conversion log (Figure 7c).
Page 19 of 40 Figure 7b. Summary
Page 20 of 40
d. Src #, Src Company Name and Src Bld # => these fields are read-only. They display the company IDs, names and company database build # from the source AccountMate LAN application (i.e. previous version).
e. Trg #, Trg Company Name and Trg DB Name => these fields display what will be the company IDs, names and database names in the target AccountMate 12 application (i.e. new version).
All three fields are available for user input. The Trg # and Trg Company Name fields take their default values from the Src # and Src Company Name fields. To overwrite the default target database name, double click the Trg DB Name field. The utility displays the Overwrite Target Database Location window (Figure 8) where you can enter the location where you want to store the company data that will be created by the conversion process.
Notes:
▪ You can double-click the Trg Company Name column caption to view a list of companies already set up in the target AccountMate 12 application.
▪ The utility will not allow you to use a target company that already exists in the target AccountMate 12 application (i.e. new build). Instead, the utility will create the target company database for you during the conversion.
▪ The target database name must not contain ln6, ln7, ln8, ln9 or ln10. It must not start with a number (e.g. 1COMP) and it must not contain spaces (e.g. COMP X). Also, it must not contain the system-generated LNTEMP database name (lntemp_+database name of source database, e.g. lntemp_sample).
Page 21 of 40
Click Next to proceed. At this point, the utility will validate the target company ID and database names to make sure that they do not have duplicates. When this is done, the utility will display the following message in the upper right-hand section of the screen:
Figure 9a. Message
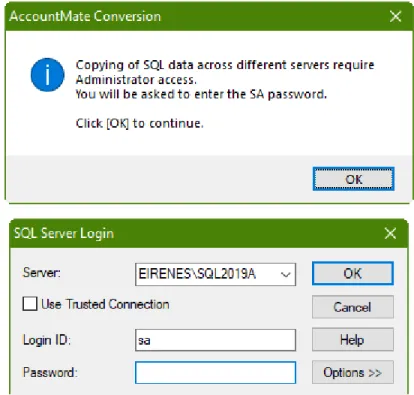
If you are converting from LAN 10 with Installed PR, the utility will display the following screens:
Figure 9b. SQL Server Login
Enter the ‘sa’ password and click OK to continue.
During this time, the utility will create a dummy database in the temporary SQL database location you specified. If this is successful, the Validation/Conversion Setup screen will be displayed.
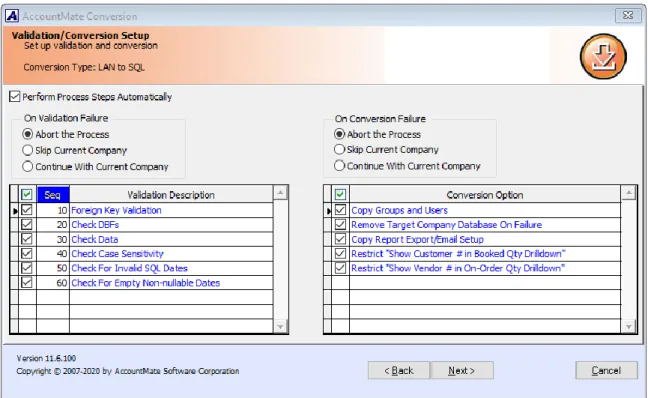
Page 22 of 40 6. Validation/Conversion Setup
This is where you configure the settings that will determine what actions the utility will take during the data validation and/or conversion process:
a. Perform Process Steps Automatically => mark this checkbox to execute the validation and/or conversion processes automatically. This checkbox is marked by default.
b. On Validation Failure => this section defines the action that will be taken if errors are encountered during validation of the selected company data. The options are:
o Abort the Process – choose this option if you want the validation to stop completely the moment errors are encountered. The remaining steps will not be performed for the company that fails the validation nor will they be performed for any of the other selected companies.
o Skip Current Company – choose this option if you want the process to stop just for the company that encounters the validation errors. The utility will stop validating a company’s data the moment the first error occurs but will proceed to validate the other selected companies.
o Continue With Current Company – choose this option if you want the utility to continue validating a company even if errors occur. This sets the utility to run through the entire validation process for each selected company and capture more than just the first error.
c. On Conversion Failure => this section defines the action that will be taken if errors are encountered during conversion of the selected company data. The options are:
o Abort the Process – choose this option if you want the conversion to stop completely the moment errors are encountered. The remaining steps will not be performed for the company that fails during
conversion nor will they be performed for any of the other selected companies.
o Skip Current Company – choose this option if you want the process to stop just for the company that encounters the conversion errors. The utility will stop converting a company’s data the moment the first error occurs but will proceed to convert the other selected companies. o Continue With Current Company – choose this option if you want the
utility to continue converting a company even if errors occur. This sets the utility to run through the entire conversion process for each
Page 23 of 40
Figure 10. Validation/Conversion Setup
d. Validation options => this section (Figure 10) lists the available validation steps you can choose to perform for the selected companies. Take note that the options are assigned Seq numbers. This means that you can also choose the order in which the validation steps are performed. The options are:
o Foreign Key Validation – select this option to check the GL Account ID fields for possible foreign key violation errors. This validation must be
performed for all AccountMate LAN company databases, including the sample company. If any issues are found, the conversion program will NOT fix your data. If any issues are found during this step of the conversion process, use the Foreign Key Checker utility (AMFKCHKL.EXE) to fix the data. You will find this file in the Utilities\AMFKCHK_LAN subfolder in the Convert folder where you extracted the conversion files you downloaded from the website. The utility comes with a User Guide; be sure to read it thoroughly before using the utility to fix the data.
o Check DBFs – select this option to validate the structural integrity of the AccountMate LAN tables. The utility will access each table and verify whether its records can be read. This validation must be performed for all AccountMate LAN company databases, including the sample company.
o Check Data – select this option to check for possible primary key violations in the source AccountMate LAN data. This validation must be performed for all AccountMate LAN company databases, including the sample company.
Page 24 of 40
key values in select tables (e.g. APCHCK). This step is especially important when the target SQL server is set to case-insensitive. This validation must be performed for all AccountMate LAN company databases, including the sample company.
o Check For Invalid SQL Dates – select this option to check for date values that are less than 01/01/1753. Such dates will result in an “invalid date format” error when the utility uploads the LAN data to the company databases, including the sample company.
o Check For Empty Non-nullable Dates – select this option to check for empty dates in the source AccountMate LAN data that are non-nullable in AccountMate 12 for SQL/Express. Such dates will become 01/01/1900 when the data is converted to AM 12. This validation must be performed for all AccountMate LAN company databases, including the sample company.
e. Conversion options => this section (Figure 10) lists the additional steps that you can choose to perform along with the main data conversion:
o Copy Groups and Users – when this checkbox is marked, the utility will copy group and/or user records from the source AccountMate LAN company that do not exist in the target AccountMate 12 company.
Notes: The utility will observe the following behavior if the Copy Groups and Users checkbox is marked:
▪ If a group already exists in both the source and target companies but one of its users does not exist in the target company, the utility will copy the user into the same group in the target company.
▪ If a user already exists in both the source and target companies but its group in the source company does not exist in the target company, the utility will copy the group. However, the utility will not reassign the existing user into the newly copied group.
▪ The utility does not copy access rights to functions and features.
o Remove Target Company Database On Failure – when this checkbox is marked:
▪ The utility will delete the target AccountMate 12 company database that was used in the failed conversion. Conversion logs will not be deleted until you perform the cleanup process.
▪ If you cancel the process in the middle of the conversion, the utility will also delete the target AccountMate 12 company database used in the interrupted conversion.
o Restrict “Show Customer # in Booked Qty Drilldown” – when this
checkbox is marked, all users will be restricted from viewing the Customer # in the Booked Qty Detail Analysis window. This is just a default setting that you can change when you configure user access rights after the data conversion.
Page 25 of 40
o Restrict “Show Vendor # in On-Order Qty Drilldown” – when this checkbox is marked, all users will be restricted from viewing the Vendor # in the On-Order Qty Detail Analysis window. This is just a default setting that you can change when you configure user access rights after the data conversion.
7. Run the Conversion
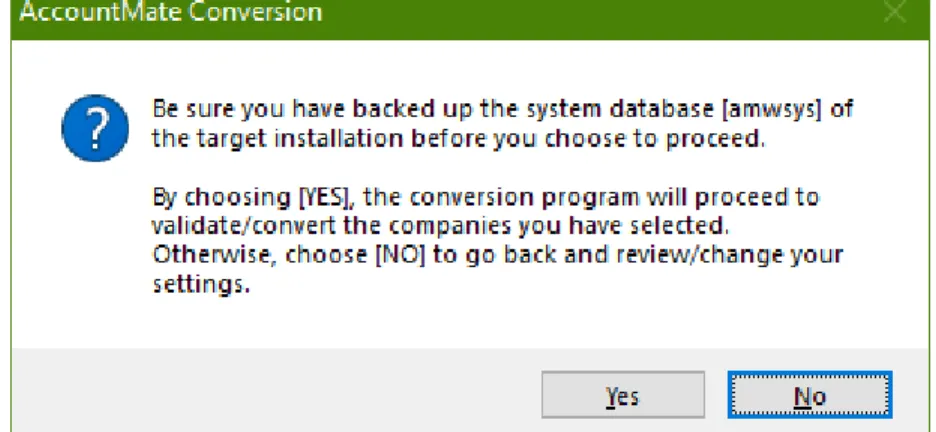
When you have made your selections, click the Next button.
The following message will be displayed reminding you to back up the AMWSYS database of the target AccountMate 12 application folder before proceeding with the conversion:
Figure 11. Backup Reminder
Click Yes to proceed. At this point the system will display the Processing Data Validation and Conversion window (Figure 12a). This lists the steps that will be performed based on the selections you made in the Validation/Conversion Setup screen (Figure 10).
Click the Run Next Step button to run the process one step at a time. If you want to run the steps one after the other, click the Run Up To The Last Step button. Click Cancel to terminate the process.
Note: The Run Next Step, Run Up To The Last Step and Cancel buttons are disabledif you mark the Perform Process Steps Automatically checkbox in the Validation/Conversion Setup screen (Figure 10).
Page 26 of 40
Figure 12. Manual Conversion Process
At this stage, you will note that the selected companies are being converted one database at a time. This can be a prolonged process depending on the number of companies to be converted and the size of each company’s data. Please be patient!
When all the selected databases have been converted, the utility will display the Summary screen (Figure 13). You can double-click the Status field to display the Summary window where you can view the status of each step in the conversion process and drill down to the conversion logs.
Page 27 of 40
Figure 13. Summary Screen and Summary Window In the Cleanup screen (Figure 14), mark the checkbox of the company which conversion logs you want to delete. Take note that there is no way to retrieve the conversion logs once they are deleted. It is advisable to keep the logs until you’ve verified the converted data.
Page 28 of 40 Figure 14. Cleanup Screen
D. Post-Conversion Process
1. Verify Converted Database Recovery Model Setting in SQL Server During conversion the database recovery model is automatically set to
BULK-LOGGED to optimize performance; however, after conversion the database recovery model is automatically reset to FULL recovery. If you want to use the SIMPLE recovery model, you will need to change this setting using the SQL Server Management Studio. If you are not sure how to do this, please consult your SQL Server administrator or whoever takes charge of the AccountMate installation’s SQL Server backup/recovery strategy.
2. Activate Modules
Activate all your modules.
a. In the Administrator program, select Setup > Licensing > Activate Module. The system will display the Important Notice window that contains the AccountMate License and Copyright Notice. Click on “I Agree” to proceed.
b. Verify the value entered in the space provided for the AccountMate Product Key. If the Product Key supplied is valid, the system will list all the modules that you acquired with a check mark on the Purchase column.
Page 29 of 40
c. To activate a module, click the box in the Activate column beside the module you
want to be able to use.Note: If you entered the AccountMate Product Key upon installation, you will see the same information upon accessing the Activate Module function window. If you
purchased any new modules since the new version was installed, you will be issued another Product Key. You must enter the new Product Key in the space provided in the Activate Module window to activate the new modules purchased.
3. Install License File
The AccountMate 12 license is available for download from the Software Update Download page of the AccountMate website. If you are an AccountMate End User, you must ask your AccountMate Solution Provider to download it for you.
To install the License File:
a. Verify that the license file is in a location that can be accessed by the AM 12 Administrator program.
b. Run the AM 12 Administrator program (click on Amsqladm.exe in the AccountMate root directory).
c. Select the Install License File option under the Licensing function on the Setup menu. This will display the Important Notice window. Click “I Agree” to be shown the Install License File dialogue box.
d. Click the ellipsis button beside the License File field and select the path that points to the location of the license file.
e. Click the Install button on the dialogue box to initiate installation of the license. Notes:
▪ You have 90 days from the installation of your new AM 12 version to install the license file. After 90 days, the unregistered copy will expire and you will be locked out of the main AccountMate program until the license is installed.
▪ You will also be limited to a database size of approximately 0.25 gigabytes. If your converted data has a size that is greater than 0.25 gigabytes, you will be locked out of the main AccountMate program even if you have not exceeded the 90-day grace period; you will only be able to use the program once you have installed your license file.
▪ If you are having problems with your license file, please contact Customer Service at 1-800-877-8896 ext. 520.
Page 30 of 40 4. Input PR Tax Subscription Key
Note: If you do not have the Payroll module, please skip this step.
If you have the Payroll module and an active Payroll Tax Subscription, you will be issued a PR Tax Subscription Key. This key controls the states that you will be able to activate in the Payroll module. It also includes information about the tax year covered by your subscription, which in turn determines your ability to manually update the federal and state tax tables for the current tax year.
To input the PR Tax Subscription Key:
a. In the AM 12 Administrator program, select Setup > Licensing > Input PR Tax Subscription Key.
b. In the space provided, enter the 20-character PR Tax Subscription Key. If the Subscription Key supplied is valid, the system will display the tax year and tax states covered by your subscription.
If you notice any discrepancy with the subscribed tax year or states or if you receive an error message when you enter the Subscription Key, please contact Customer Service at 1-800-877-8896 ext. 520.
5. Run Company Setup
For each company that was converted, you must run Company Setup to configure these settings:
a.If you used a company logo in your previous version, add the image again. b.Set the Status to Active.
c.Select the Error Log Folder and Attachment Folder. Verify that the path you specify is properly shared and accessible from all AccountMate workstations. Note: The conversion process does not copy the attachments from the source company to the target company. After conversion, either you attach the files to each appropriate transaction or maintenance record in the target company or perform the following steps:
1)Note the target company’s Attachment Folder physical location. For example, Z:\MS1201\CommonFiles\Attachments\6 where “6” is the target company ID.
2)Copy the entire folder (e.g., ARCUST, ARINVC, etc.) containing the attachment
files from the source company’s Attachment Dir physical location (e.g., Y:\LN1001\Attachments\2 where “2” is the source company ID) to the target company’s Attachment Folder physical location (e.g.,
Page 31 of 40
d. Mark the Enable Full-Text Indexing checkbox to activate the full-text search feature in Inventory Maintenance lookup.
Note: This checkbox isnotaccessible if you are using AccountMate 12 for Express or if you are running AccountMate 12 for SQL on SQL Server Express Edition. The Full-Text Search Component is required to activate the full-text search feature but it is not available in the SQL Server Express Edition.
e. Assign a country in the Unassigned Country As field. The system will use this value for all maintenance and transaction records with no assigned country. This is for address validation, state validation, or TaxJar sales tax integration purpose.
f. Subsidiary companies are set to “No Consolidation” during conversion. Be sure to change their Consolidation setting back to Subsidiary Company and assign a parent company after the parent and subsidiary companies are converted.
6. Assign Group and User Access Rights
Access the Group/User Setup function. For each company that was converted, you must assign access rights to each qualified group and user. 7. Run Credit Card/SSN Update Utility
Note: If you do not have the Accounts Receivable, Accounts Payable, Sales Order or Payroll module, please skip this step.
Credit card numbers and social security numbers entered in AM12 are encrypted in the database using a different encryption method than the one used in LAN 10. Data coming from LAN 10 must be encrypted using a utility that comes with the conversion utility.
The Credit Card/SSN Update Utility (creditcardssn.exe) can be found in the folder where you extracted the conversion files. It is under the
Utilities\creditcardssn folder.
8. Initialize Modules and Install Latest PR Tax Update
For each activated module that you use, you must access the Housekeeping menu and perform Module Setup. Verify that all required fields are set up or assigned the desired values (e.g., Current 1099 Year in AP Module Setup\1099 Info tab, Open Credit Write-off in AR Module Setup\GL Accounts (2) tab). This is especially necessary to activate the new features introduced in AccountMate 12 for
SQL/Express.
If you are using the Payroll module and have a PR Tax Subscription for the current tax year, perform one of the following whichever is convenient:
a) Run the Check for Payroll Subscription Updates from the Utilities menu in the AccountMate main program. This will automatically download and install the latest payroll tax update/s.
Page 32 of 40
b) Manually download the latest PR Tax Subscription program from the AccountMate Payroll Subscription page and install it in your updated system. Do this if there are payroll tax updates issued since the release of the new AccountMate version. If you are an AccountMate End User, you must ask your AccountMate Solution Provider to download the program for you.
9. Recalculate Employee Data
Note: Skip this step if you do not have the Payroll module or if you do have
Payroll module but do not have employees with payroll transactions recorded for multiple states.
The Payroll module is now equipped to handle application of payroll and printing of one payroll check for employees with payroll transactions for multiple states. With this enhancement, the earnings displayed in the Employee Maintenance function may vastly vary from LAN 10 particularly for employees with payroll transactions recorded for multiple states. With this, to ensure that data is correctly updated per applicable state, recalculate the employee data through the Data Manager function.
Example:
Employee EBB1 has a year-to-date earnings of 56,000.00 for the SALARY earning code. 20,000.00 is earned in state NV (Nevada) while the rest is earned in state CA (California). The tax state assigned for the employee in the employee record right before the upgrade is CA. The year-to-date earnings that is displayed in the Employee Maintenance ► Earning Code tab are as follows:
LAN 10 (source build): The year-to-date earnings for the SALARY earning code that is displayed in the Employee Maintenance ► Earning Code tab is 56,000.00.
AM12 (target build): You will now see a Tax State selection list grid that lists all the states for which the employee has a recorded payroll transaction. The default tax state is the employee’s assigned tax state before the upgrade.
Before recalculating employee data
The year-to-date earnings for the SALARY earning code that is displayed in the Employee Maintenance ► Earning Code tab is 56,000.00 for the state CA. If you will select the state NV, the year-to-date earnings for the SALARY earning code is 0.00.
After recalculating employee data
The year-to-date earnings for the SALARY earning code that is displayed in the Employee Maintenance ► Earning Code tab is 36,000.00 for the state CA (California) and 20,000.00 for the state NV (Nevada).
10. Access Maintenance Records
Go through the different Maintenance functions and verify that all required fields are set up or assigned the desired values. This must be performed for each module you have activated and initialized. Pay particular attention to the following
Page 33 of 40
o Inventory Maintenance => if you used inventory images in LAN 10, you must re-attach those images to the Inventory Maintenance records.
o Chart of Accounts Maintenance => Review the cash flow account category assigned to each GL Account ID record. All GL Account ID records must be assigned a cash flow category.
Note: Starting with AM8.3 for SQL/Express there are changes to the cash flow captions. New captions are also added.
o Deduction Maintenance => verify the settings of the Subject Wages checkboxes in the State Taxes Reduction tab. Mark the checkbox if taxable income will be reduced by the deduction amount for the purpose of calculating the employees’ payroll taxes. This setting must be reviewed for every state that you have activated. This is especially true of states that do not have all the pre-tax deductions that the federal government allows. For example, California does not treat employer contributions to Health Savings Accounts as a pre-tax deduction; thus, the Subject Wages checkbox for the State Code [CA] must be unmarked for the said deduction record. If you are uncertain about how your state treats certain payroll deductions, please consult your tax accountant.
o
Bank Account Maintenance = > You must assign a value in the Next E-PaymentCheck # field for all bank account records that are used to process electronic payments in AP and PR. The value in this field will be used as default check # when printing AP/PR e-payment checks.
= > Review the assigned signature images and signature lines in the Signature tab for the indicated check amount the signatures will apply. You may check the signature preview if the signature/s looks good and amend as necessary.
o Warehouse Maintenance = > Review the Inventory and Inventory
Adjustments GL accounts assigned to existing warehouse records. These values come from the corresponding fields in IC Module Setup, only if the IC module is set up. The Inventory and Inventory Adjustments GL accounts used during creation of inventory records and posting of inventory adjustments will come from your warehouse records.
o Revenue Code Maintenance = > Review the Cost Variances GL account assigned to each revenue code record. You can either assign an asset or income statement account depending on how you treat the inventory cost variance. See On-Line Help for more details.
o Employee Maintenance => If you have employees with payroll transactions recorded for multiple states in AM10, verify and amend as necessary the employee information set up in the Employee Maintenance function, particularly the information in the W-4 Info and Earning Code tabs.
=> Review all the employees’ salary history in the Earning Code tab and amend as necessary. Pay particular attention to the earning codes assigned for each state, its corresponding default Pay Amount and Effective Date.
Page 34 of 40
o Customer Maintenance => Commas in e-mail addresses or in between e-mail addresses will be converted to semi-colons after upgrade. Verify and amend those e-mail addresses that are supposed to have commas (e.g.
john,[email protected]) in the Customer Maintenance ► Information ► E-mail field.
o Vendor Maintenance => Review the Ship Via and F.O.B. values assigned to each vendor record and amend as necessary. These values will become the default when creating vendor related transactions.
o All maintenance records that have State and Country fields => Review the assigned value in the State field if the assigned country is either US (United States) or CA (Canada), and amend as necessary. A list of states to choose from is provided if the country is either of the two.
11. Update Transactions’ Attachments
The folder naming convention for vendor/customer related transaction attachments has been changed from Transaction # only to Vendor #/Customer # + Transaction #. With this change, the transactions attachment(s) should either be reattached to the transaction record or copy the subfolder(s) in the source build’s Attachments folder to the MS1201 Attachments folder; then, rename the attachment’s folder name to conform to the new attachment’s folder naming convention.
12. Verify AP and/or PR Check Alignment
Note: Skip this step if you do not have the Accounts Payable and Payroll
module.
The Bank Account Maintenance function is enhanced to provide users with the capability to print one or two signature lines on AP or PR checks. With this
enhancement, the signature image height was increased from 1.010 to 1.250 inches. Logically and theoretically, this change should not have any effect in the check signature alignment; however, it is recommended that you verify the check signature alignment immediately after the upgrade to ensure that there is no misalignment prior to printing of valid checks.
In case of misalignment, you must update the signature image set up in
AccountMate. Refer to Article # 1295 (How to Set Up and Use a Signature Image in
AccountMate) for guidance.
13. Recalculate Inventory Data and Inventory Beginning Balance
You must recalculate the inventory data and the inventory beginning balances to update the upgraded inventory records. You can recalculate the data through the Data Manager utility. Cost and quantity adjustments may be created after the recalculation.
Generate the Inventory As-of Report and the Inventory Transaction Log reports to verify the accuracy of the cost and quantity adjustments. To identify the adjustments, look for RCAL transaction types that are generated on the date (Entry Date) you recalculated the data. Inventory beginning balance adjustments