CHAPTER
16
Managing Network
Services on Linux
In this chapter, you will learn about • Configuring printing with CUPS • Maintaining system time • Managing an MTA • Managing SQL data
This is going to be a fantastic chapter! Get ready for a wild ride! I’m going to teach you how to configure a variety of network services on your Linux system. In my opinion, this is where Linux really shines. You can take just about any Linux distribution and enable network services on it to configure it to fill a variety of powerful roles in your network. Do you need a web server? No problem! Linux can do that. Do you need a Windows domain controller? Linux can do that as well. How about a network firewall? Again, Linux can fill that role. Need a database server? You got it!
These roles are made possible using Linux daemons. To enable a service on your sys-tem, you need to first install the appropriate daemon from your distribution’s installation media using the installation utility of your choice, such as yum or rpm. Once it is in-stalled, you can then use a text editor to modify the daemon’s configuration file, usually saved in /etc/, to configure how it behaves. You can start, stop, or reload the service using the appropriate init script in the /etc/init.d or /etc/rc.d/init.d directory on your system.
Be warned that we need to cover a lot of topics in this chapter. Therefore, I’m not going to go into great depth on any one of them. Most of the network services I’m going to cover in this chapter are quite complex. Entire books have been written about most of them. We don’t have time or space to do that here. To get you ready for your Linux+/ LPIC-1 exam, I’m going to introduce you to each topic and then teach you how to per-form a basic configuration.
EXAM TIP Try not to be overwhelmed by this chapter! We’re going to
cover a lot of network services, but you don’t have to be an expert with them. Just familiarize yourself with the basics of each of the services covered here (printing, time, e-mail, and SQL databases).
Configuring Printing with CUPS
No matter what operating system you’re using, one of the most important services it offers is the ability to send print jobs to a printer. If you don’t believe me, just unplug your office’s printer for an hour and observe the mayhem that results. Okay, don’t re-ally unplug your office’s printer. Your coworkers may inflict bodily harm upon you.
The point is that printing is vital to most users. Because of this, you need to be very familiar with Linux printing. In this part of this chapter, we’re going to cover the follow-ing topics:
• How Linux printing works • Installing CUPS
• Configuring CUPS
• Using the Line Printer Daemon (LPD) • Troubleshooting printing issues
Let’s begin by discussing how Linux printing works.
How Linux Printing Works
The most common Linux printing system in use today is the Common UNIX Printing System (CUPS). CUPS was designed from the ground up to make Linux printing as easy as possible, whether printing to a locally attached printer or to a remote network print-er. The CUPS service is provided by the cupsd daemon, which automatically announces the availability of its print queues on the local network. CUPS client systems listen to these announcements, allowing the user to select the printer he or she wants with little networking knowledge. In addition, CUPS supports network printing over the Internet Printing Protocol (IPP) on port 631.
The CUPS system is composed of several component parts.
The first is the CUPS scheduler. The CUPS scheduler is a web server that is used solely to handle IPP printing requests from CUPS clients. Because the CUPS scheduler runs on IP port 631, it can coexist with the Apache web server running on the same system. In fact, the CUPS configuration file even looks like the Apache web server’s configuration file. In addition to processing print jobs, the CUPS scheduler also func-tions as a typical web server, providing documentation as well as a CUPS administra-tion tool in a browser interface.
The next components you need to be familiar with are the CUPS filters. Modern printers use a variety of different page description languages (PDLs). In a Linux system, most applications generate print jobs using Adobe’s PostScript PDL. This works well if you have a PostScript-compatible printer. However, not all printers include PostScript support due to the fact that the printer manufacturer must pay licensing fees to Adobe, which can dramatically increase the price of the unit. Instead, many printer manufac-turers, such as Hewlett-Packard, use the Printer Control Language (PCL) PDL. Other manufacturers, such as Epson, use the ESC/P PDL.
If your printer isn’t PostScript compatible, you use CUPS filters to convert print jobs from PostScript into the appropriate format using the PDL of the printer to which they are being sent. These filters are located in /usr/lib/cups/filter.
The next components you need to know about are the CUPS backends. Backends are responsible for providing the interface between the scheduler and the actual printer hardware. The CUPS backends are located in /usr/lib/cups/backend. CUPS provides backends for a variety of different printer interfaces, including parallel, serial, USB, and so on. Each time cupsd starts, it queries each backend installed on the system. The back-ends respond to the daemon, reporting whether or not a printer is connected. If a print-er is connected, they report information about the printprint-er, such as the make and model. The next CUPS components you need to be familiar with are the PPD (PostScript Printer Description) files. PPDs are used by cupsd to determine the capabilities of your printer. These PPD files are stored in /etc/cups/ppd.
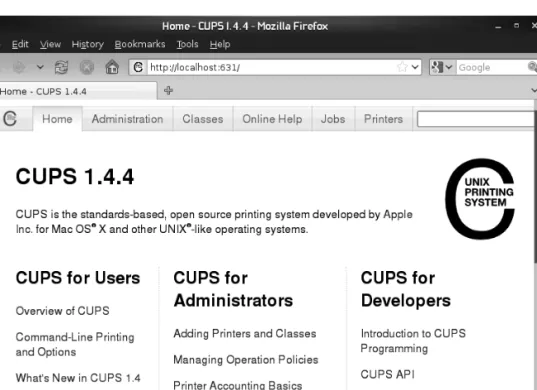
The last CUPS component you need to be familiar with is the web-based administra-tion utility. The CUPS scheduler provides the web-based administrative interface. The CUPS administration utility can be used to set up printers and manage print jobs. To access the CUPS web-based administration utility, just open a web browser and navigate to http://your_server_address:631. When you do, the screen in Figure 16-1 is displayed.
When a print job is submitted to a CUPS server, the process depicted in Figure 16-2 occurs.
First, an application on the client system generates a print job and sends it to the cupsd daemon on the server. The daemon saves the job in the spooling directory. Print queue and filter information from the print job are saved in /var/spool/cups. The file is named with a c, concatenated with a print job number assigned by cupsd. The docu-ment to be printed is also saved in /var/spool/cups. This time, however, the file is named with a d, concatenated with the print job number assigned by cupsd.
Next, the print job is sent to the filter for conversion to the appropriate PDL. Once that’s done, the converted print job is sent from the filter to the backend, which for-wards the job to its connected printer. After sending the job to the printer, the backend notifies the cupsd daemon and the print job is deleted from the print queue.
Now that you know how CUPS printing works, I need to discuss how to install the service on your Linux system. Let’s do that next.
Installing CUPS
Unlike the services we reviewed earlier in this chapter, there’s a pretty good chance that your Linux distribution installed the packages required to provide CUPS printing by default. As we said earlier, CUPS is the default printing system used by most modern Linux distributions.
If your distribution didn’t install CUPS for some reason, use the package installa-tion utility of your choice to install the following packages (along with any dependent packages):
• cups
• cups-client (optional) • cups-drivers
Figure 16-2
• cups-libs
• libgnomecups (optional)
NOTE The actual list of packages you end up installing may vary depending
upon your distribution.
After the packages are installed, the binary that provides the CUPS service is the cupsd executable located in /usr/sbin. The service is started and stopped using the cups init script in /etc/init.d or /etc/rc.d/init.d, shown in Figure 16-3.
Once the CUPS packages are installed on your system, you’re ready to configure and start the CUPS service on your server. Let’s learn how to do that next.
Configuring CUPS
The CUPS service appears complicated, and under the hood, it is. Fortunately, the de-velopers who wrote CUPS made it very easy for you and me to configure and manage. In this part of this chapter, we’re going learn how to configure CUPS by learning about the following topics:
• Configuring the CUPS service • Configuring a CUPS printer
• Using command-line tools to manage CUPS
Let’s begin by learning how to configure the cupsd daemon.
Configuring the CUPS Service
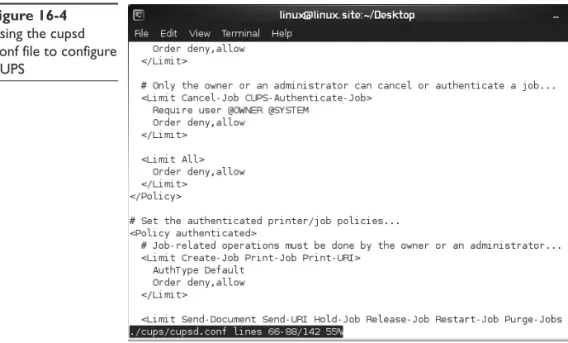
The CUPS service is configured using several text files within the /etc/cups directory. The /etc/cups/cupsd.conf file is the main configuration file you will use to configure the cupsd daemon (called the scheduler). Remember that cupsd is also an HTTP server, like Apache. Accordingly, the cupsd.conf file is very similar to the Apache web server con-figuration file. A sample cupsd.conf file is shown in Figure 16-4.
Figure 16-4 only shows a very small portion of the cupsd.conf file, which is quite long. The cupsd.conf file is composed of many server directives, which specify how cupsd operates. We don’t have time or space in this book to cover all the configuration
Figure 16-3
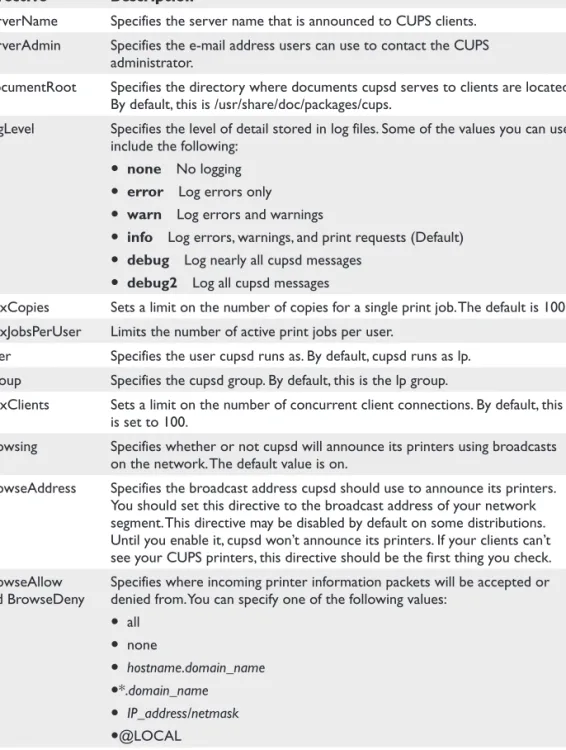
options in cupsd.conf. I’m just going to cover the most important ones here. For more information, see the man page for cupsd.conf. You can also open http://local-host:631/help/ in a browser on your Linux system to see an extensive list of cupsd.conf directives or visit http://www.cups.org/documentation.php/ref-cupsd-conf.html. Some of the more useful cupsd.conf directives include those shown in Table 16-1.
The way you configure cupsd.conf will largely depend on the particular network you are implementing the system in. The good news is that you don’t need to do much with cupsd.conf to configure a basic implementation that provides local printing.
However, if you want other Linux systems to be able to print through your CUPS printer, you must enable BrowseAddress or else CUPS won’t announce its printers on the network. This directive is not enabled by default on many distributions. Sample configurations for this directive include the following:
BrowseAddress 255.255.255.255:631 BrowseAddress 192.168.1.255:631 BrowseAddress mydom.com:631 BrowseAddress @LOCAL
The BrowseAddress directive is usually set to a value of @LOCAL. This causes CUPS to send printer announcement broadcasts to all local network interfaces in the system. You can set this directive to @IF(interface_name) to limit broadcasts to a specific net-work interface.
After making any changes to cupds.conf, be sure to restart the cupsd daemon using its init script. After configuring your cupsd.conf file, you next need to set up a Linux user account that will be used as the CUPS administrator. CUPS does not use the same user accounts that your Linux system uses. Instead, CUPS is configured to use the /etc/ cups/passwd.md5 file to store user accounts. To create an administrative user in the passwd.md5 file named root that is a member of the CUPS administration group named sys, you would enter lppasswd –g sys –a root.
Figure 16-4
Using the cupsd .conf file to configure CUPS
Directive Description
ServerName Specifies the server name that is announced to CUPS clients. ServerAdmin Specifies the e-mail address users can use to contact the CUPS
administrator.
DocumentRoot Specifies the directory where documents cupsd serves to clients are located. By default, this is /usr/share/doc/packages/cups.
LogLevel Specifies the level of detail stored in log files. Some of the values you can use include the following:
• none No logging
• error Log errors only
• warn Log errors and warnings
• info Log errors, warnings, and print requests (Default)
• debug Log nearly all cupsd messages
• debug2 Log all cupsd messages
MaxCopies Sets a limit on the number of copies for a single print job. The default is 100. MaxJobsPerUser Limits the number of active print jobs per user.
User Specifies the user cupsd runs as. By default, cupsd runs as lp. Group Specifies the cupsd group. By default, this is the lp group.
MaxClients Sets a limit on the number of concurrent client connections. By default, this is set to 100.
Browsing Specifies whether or not cupsd will announce its printers using broadcasts on the network. The default value is on.
BrowseAddress Specifies the broadcast address cupsd should use to announce its printers. You should set this directive to the broadcast address of your network segment. This directive may be disabled by default on some distributions. Until you enable it, cupsd won’t announce its printers. If your clients can’t see your CUPS printers, this directive should be the first thing you check. BrowseAllow
and BrowseDeny Specifies where incoming printer information packets will be accepted or denied from. You can specify one of the following values:
• all • none • hostname.domain_name •*.domain_name • IP_address/netmask •@LOCAL
BrowseInterval Specifies the interval between printer announcements. The default is 30 seconds.
Table 16-1 cupsd.conf Configuration Directives
Now that you’ve configured an administrative user, your next task is to configure a CUPS printer and queue. Let’s discuss how to do that next.
Configuring a CUPS Printer
All CUPS printers are defined in the /etc/cups/printers.conf file. While you can manu-ally edit this file, you remanu-ally should use the CUPS web-based administration utility in-stead. Configuring a CUPS printer is a snap with it. You can either configure CUPS to service a locally attached printer (and optionally make it available to other network users) or connect to a CUPS printer over the network. For example, to configure CUPS to use a locally-attached printer, do the following:
1. On your Linux system, start a web browser and navigate to http://localhost:631.
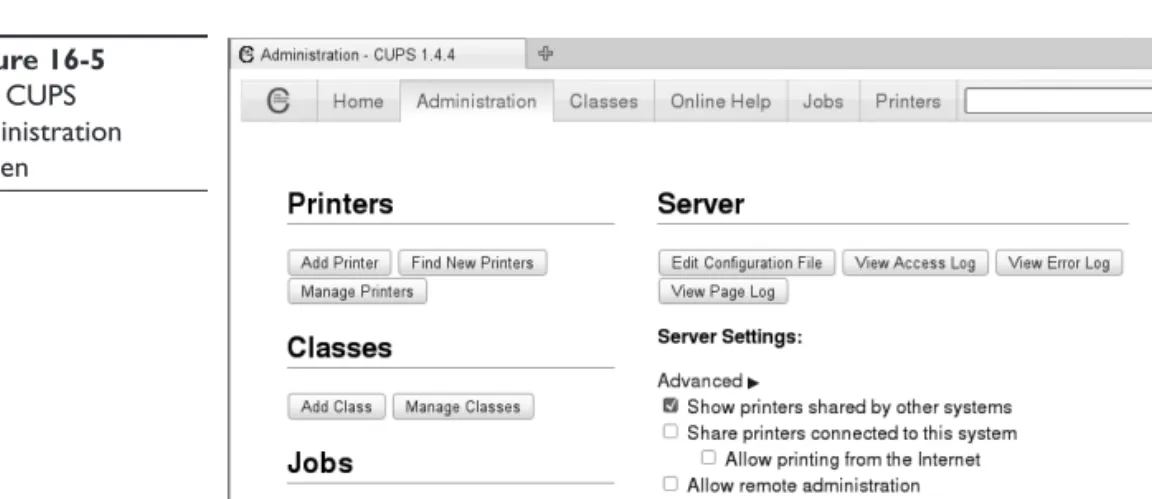
2. Select Administration. The screen in Figure 16-5 is displayed.
3. Under Printers, select Add Printer.
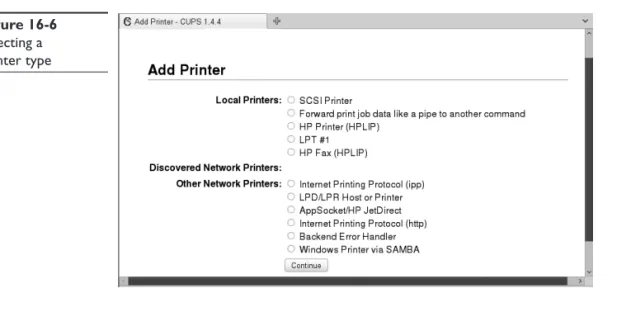
4. When prompted, log in as the administrative user you created previously. The screen in Figure 16-6 is displayed.
5. Select a locally attached printer type under Local Printers and then select Continue. A screen similar to that shown in Figure 16-7 is displayed.
TIP You could also select a network printer in this screen. All broadcasting
CUPS printers on other network hosts are listed under Discovered Network Printers. To send print jobs to one of these printers, just select it.
6. In the Name field, enter a name for the printer.
7. In the Description field, enter a description of the printer.
Figure 16-5
The CUPS administration screen
8. In the Location field, enter a location for the printer.
9. If you want to share the printer with other network users, mark Share This Printer.
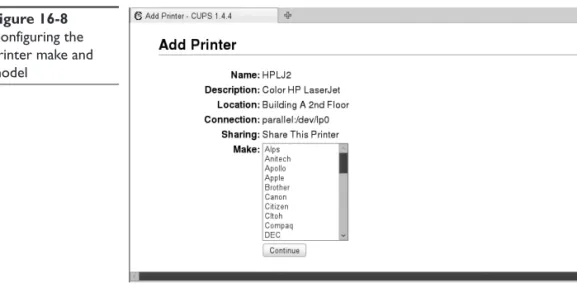
10. Select Continue. The screen in Figure 16-8 is displayed.
11. Select the printer manufacturer; then select Continue.
12. In the Model field, select your printer model; then select Add Printer.
Figure 16-6 Selecting a printer type Figure 16-7 Adding a new CUPS printer
13. Configure your Default Options for the printer, such as paper size, color model, media source, print quality, 2-sided printing, and so on. When complete, select Set Default Options.
At this point, a page is displayed indicating your printer has been added. The cur-rent status of your printer is displayed, similar to that shown in Figure 16-9.
From the Printer Status page, you can manage your CUPS printer. You can send a test page, stop the printer, kill a print job, modify the printer configuration, or delete the printer altogether.
At this point, you can send print jobs to the printer. If you’re using a graphical X ap-plication, you can simply select File | Print; then select the printer and click OK. You can also send print jobs from the command line to the printer. This is done using the lp command, which will send a specified file to the printer. The syntax for using lp is lp –d
printer_name filename. For example, if I wanted to print the myfiles file in the current
Figure 16-8
Configuring the printer make and model
Figure 16-9
Viewing the printer status
directory to the HPLJ2 printer I just created, I would enter lp –d HPLJ5 ./myfiles at the shell prompt, as shown here:
ws1:~ # lp -d HPLJ2 ./myfiles request id is HPLJ2-2 (1 file(s)) ws1:~ #
As you can see in this example, the job is created and assigned an ID, in this case HPLJ2-2. The job is added to the print queue and sent to the printer. The lp utility in-cludes a variety of options besides –d that you can use to create print jobs, including the following:
• –n x Prints x number of copies
• –m E-mails a confirmation message to my local user account when the job is finished printing
• –q Sets the priority of the print job
• –o landscape Prints the file landscape instead of portrait
• –o sides=2 Prints the file double-sided on a printer that supports duplexing You can also configure other Linux systems to print to the CUPS printer. Simply configure a new printer, but specify that it listen for CUPS announcements. The CUPS printer you configured should be displayed within 30 seconds. After selecting it, all print jobs sent to that printer will be redirected over the network connection to your CUPS printer.
In addition, if you’ve installed Samba on your system, then your CUPS printers are automatically shared. You can connect to them from Windows workstations and sub-mit print jobs. Now that’s cool!
Let’s next discuss how to use command-line tools to manage your CUPS printers.
Using Command-Line Tools to Manage CUPS
In addition to the CUPS web-based administration utility, you can also use a variety of command-line tools to configure CUPS. To view CUPS printer information, you can use the lpstat utility. One of the most useful options you can use with lpstat is –t.
This will cause lpstat to display all information about all CUPS printers on the sys-tem, as this next example shows:
ws1:~ # lpstat is –t scheduler running
no system default destination device for HPLJ2: parallel:/dev/lp0
HPLJ2 accepting requests since Fri 13 May 2011 10:57:13 AM MDT printer HPLJ2 is idle. enabled since Fri 13 May 2011 10:57:13 AM MDT
Printer is now online. ws1:~ #
This shows the default CUPS printer (HPLJ2), how it’s connected (/dev/lp0), the print job currently being processed (if any), and a list of pending print jobs.
To cancel a pending print job, you can use the cancel command. The syntax is cancel
job_ID. For example, suppose I sent a huge print job (a Linux user manual from /usr/ share/doc/manual/) and it was assigned a print ID of HPLJ2-4. While printing, I de-cided that this was a real waste of paper. I could kill the job and remove it from the print queue by entering cancel HPLJ2-4 at the shell prompt. This can also be done from within the CUPS web-based administration utility. Just go to the Jobs tab and select Show Active Jobs. Locate the job that needs to be canceled and select Cancel Job, as shown in Figure 16-10.
If you have more than one CUPS printer connected, you can use the lpoptions –d
printer command to specify the default printer. For example, to set the HPLJ5 printer as the default, I would enter lpoptions –d HPLJ5. This sets the default printer for all users on the system. Individual users can override this setting, however, by creating a file named .lpoptions in his or her home directory and adding the following directive: default printer_name
If you want to view your printer’s configuration settings, you can enter lpoptions –l
at the shell prompt.
In addition to the lpoptions command, you can also use the cupsaccept printer_
name and cupsreject printer_name commands to enable or disable a printer’s print queue. For example, I could enter cupsreject HPLJ2 at the shell prompt to disable the printer’s print queue, as shown in this example:
ws1:~ # cupsreject HPLJ2 ws1:~ # lpstat is –t scheduler is running
system default destination: HPLJ2 device for HPLJ2: parallel:/dev/lp0
HPLJ2 not accepting requests since Fri 13 May 2011 11:03:07 AM MDT - Rejecting Jobs
printer HPLJ2 is idle. enabled since Fri 13 May 2011 11:03:07 AM MDT Rejecting Jobs
ws1:~ #
Figure 16-10
Canceling a print job from within the CUPS administration tool
The printer itself will continue processing queued print jobs, but cupsd will not al-low any new jobs to enter the queue. In the latest release of CUPS, the cupsdisable command now includes the --hold option, which stops printing after the current job is complete. To enable the queue again, I would enter cupsaccept HPLJ2 at the shell prompt.
To disable the printer itself, not the queue, I could enter cupsdisable HPLJ2 at the shell prompt, as this example shows:
ws1:~ # cupsdisable HPLJ2 ws1:~ # lpstat is –t scheduler is running
system default destination: HPLJ2 device for HPLJ2: parallel:/dev/lp0
HPLJ2 accepting requests since Fri 13 May 2011 11:15:28 AM MDT printer HPLJ2 disabled since Fri 13 May 2011 11:15:28 AM MDT - Paused
ws1:~ #
The print queue will continue to accept jobs, but none of them will be printed until I enter cupsenable HPLJ2 at the shell prompt. In the latest release of CUPS, the cupsen-able command now includes the --release option to release pending jobs for printing.
Using the Line Printer Daemon (lpd)
By far, CUPS is the preferred printing system for modern Linux distributions. Many years ago, however, the preferred printing system was the Line Printer Daemon (lpd). You probably won’t work much with lpd, but the LPIC-1/CompTIA Linux+ exam still ex-pects you to know some of the commands used to manage this daemon. Most of the lpd commands have functionality similar to that offered by a CUPS command, as shown in Table 16-2.
As an interesting side note, these commands will also work with cupsd. For exam-ple, you can enter lpc status at the shell prompt and it will return the status of your CUPS printers, if CUPS is installed instead of lpd.
Troubleshooting Printing Issues
Ask any system administrator what type of user complaints they receive most often and I’ll bet 90 percent of them will list two main issues:
• I can’t log in. • I can’t print.
Task lpd Command-Line Utility
Print a document. lpr –P printer_name filename View printer status. lpc status
View pending print jobs. lpq
Delete a pending print job from the queue. lprm job_number
To manage Linux systems, you need to be able to troubleshoot a wide variety of printing issues. Obviously, we don’t have the time or space to cover all possible printing problems here. Instead, I’m going to give you some key learnings that I have gained over the years supporting users and their print jobs. My experience is that these learn-ings will cover 80–90% of the issues you will encounter. Let’s take a look:
• Always use the standardized troubleshooting model presented in the previous chapter. Yes, it applies to printing as well as to networking. Don’t go off half-cocked trying multiple resolutions before you have a solid understanding of what is wrong and what the scope of the problem is. Recall that the model I suggested you use consists of the following steps:
• Step 1: Gather information. This is a critical step. You need to determine exactly what has happened. What are the symptoms? Were any error messages displayed? What did they say? How extensive is the problem? Is it isolated to a single system, or are many systems experiencing the same problem? • Step 2: Identify what has changed. In this step, you should identify what has
changed in the system. Has new software been installed? Has new hardware been installed? Did a user change something? Did you change something? • Step 3: Create a hypothesis. With the information gathered in the preceding steps, develop several hypotheses that could explain the problem. To do this, you may need to do some research. You should check FAQs and knowledgebases available on the Internet. You should also consult with peers to validate your hypotheses. Using the information you gain, narrow your results down to the one or two most likely causes.
• Step 4: Determine the appropriate fix. The next step is to use peers, FAQs, knowledgebases, and your own experience to identify the steps needed to fix the problem. As you do this, be sure to identify the possible ramifications of implementing the fix and account for them. Many times, the fix may have side effects that are as bad as or worse than the original problem.
• Step 5: Implement the fix. At this point, you’re ready to implement the fix. Notice that in this troubleshooting model, we did a ton of research before implementing a fix! Doing so greatly increases the likelihood of success. After implementing the fix, be sure to verify that the fix actually repaired the problem and that the issue doesn’t reappear.
• Step 6: Ensure user satisfaction. You need to communicate the nature of the problem with users and make sure they are aware that it has been fixed. You should also educate them as to how to keep the problem from occurring in the future. You should also communicate with your users’ supervisors and ensure they know that the problem has been fixed.
• Step 7: Document the solution. Finally, you need to document the solution to your problem. That way, when it occurs again a year or two down the road, you or other system administrators can quickly identify the problem and how to fix it.
• Document the flow of print jobs. Where do they originate from? Are they sent over a network connection, or are they sent locally? How do they eventually arrive at the printer?
• Check the obvious first:
• Is the printer out of paper? (Yes, this happens all of the time!) • Is the printer turned on?
• If it’s a networked printer, is it connected to the network? Is the network up? Can you ping the printer from the user’s workstation?
• Did the user select the correct printer when sending the print job? This is actually the number one cause of user printing problems in my experience. If a user has multiple printers configured, they may not understand the difference between them or simply not pay attention to which printer they are sending the job to. When the job doesn’t show up on their printer, they call you. You’ll likely discover that they just sent 80 duplicate copies of a 100-page document to someone else’s printer.
• Has the correct printer driver been configured for the printer? Using the wrong driver will result in hundreds of pages of gibberish being sent to the printer.
With this in mind, let’s practice configuring CUPS in the following exercise.
Exercise 16-1: Configuring Cups
VIDEO For more information watch Exercise 16-1.
In this exercise, you will install and configure CUPS on your Linux system. This exercise assumes you have an Ethernet network board installed and configured in your system. It also assumes you have a printer available to connect to a USB or parallel port in the system. Complete the following:
1. Power down your Linux system and physically connect your printer.
2. Boot your Linux system and log in as a standard user.
3. Open a terminal session.
4. Switch to your root user account by entering su – followed by your root user’s password.
5. Use the rpm –q command to verify that the cups packages appropriate for your distribution have been installed on your system.
6. Create a CUPS administrative user named boss by completing the following:
a. At the shell prompt, enter lppasswd –g sys –a root.
7. Create a CUPS printer by completing the following:
a. Open a web browser and navigate to http://localhost:631.
b. Select Administration.
c. Under Printers, select Add Printer.
d. When prompted to authenticate, log in as root with a password of
M3linux273.
e. Under Local Printers, select your printer type; then select Continue.
f. In the Name field, enter a name for your printer.
g. In the Location field, enter a location for your printer.
h. In the Description field, enter a description of your printer.
i. Share the printer on your network by marking Share This Printer; then select Continue.
j. In the Make field, select your printer’s manufacturer; then select Continue.
k. In the Model field, select your printer’s model; then select Continue. Your printer should be created at this point.
8. Send a print job to the printer by doing the following:
a. Open a terminal session and generate a list of files in your user’s home directory.
b. Select a text file for printing.
c. At the shell prompt, enter lp –d printer_name filename.
d. Verify that the document is printed on your printer.
Now that you know how to set up printing on your Linux system, we need to shift gears and talk about keeping your system time in sync. Let’s do that next.
Maintaining System Time
Recall that when you initially set up your Linux system, you were prompted to config-ure your system time and your time zone. You may have not considered these settings as terribly critical to the overall functioning of the system. I work with many system administrators who feel they same way. The time on their systems is always out of whack and it drives me nuts!
However, when working with Linux, it is actually quite important that you maintain the correct system time, especially if the system is providing network services. You need to ensure that file timestamps are accurate. If your system is participating in some type of directory service (such as Novell’s eDirectory), then maintaining the correct system time is absolutely critical.
In Chapter 5 of this book, we discussed how to set your time zone when we looked at managing locale settings. In this chapter, we’ll address the following topics:
• Setting the hardware clock with hwclock • Synchronizing time with netdate • Synchronizing time with NTP
Let’s begin by discussing how to manage time with hwclock.
Setting the Hardware Clock with hwclock
Recall from Chapter 5 that there are two time sources used on a Linux system: • Hardware clock This clock is integrated into the CMOS chip on your Linux
system’s motherboard. It runs all the time, even when the system is powered off. • System time This clock runs via software inside the Linux kernel itself. It is
driven by an ISA timer interrupt. System time is measured as the number of seconds since 00:00:00 January 1, 1970, UTC.
The key thing to remember is that the hardware clock and the system time may not be the same. When managing a Linux system, we are more concerned with the system time than the time reported by the hardware clock. The role of the hardware clock is pretty basic. Its job is to keep time when the system is powered off. The system time is synchronized to the hardware clock time when the Linux operating system starts. After booting, Linux only uses system time. The hardware clock is ignored.
To manage the hardware clock on your system, you can use the hwclock command at the shell prompt. It can do the following:
• Display the current time • Set the hardware clock time
• Synchronize the hardware clock to the system time • Synchronize the system time to the hardware clock
NOTE You can also view the current time of the hardware clock on some
Linux distributions by viewing the contents of the /proc/driver/rtc file.
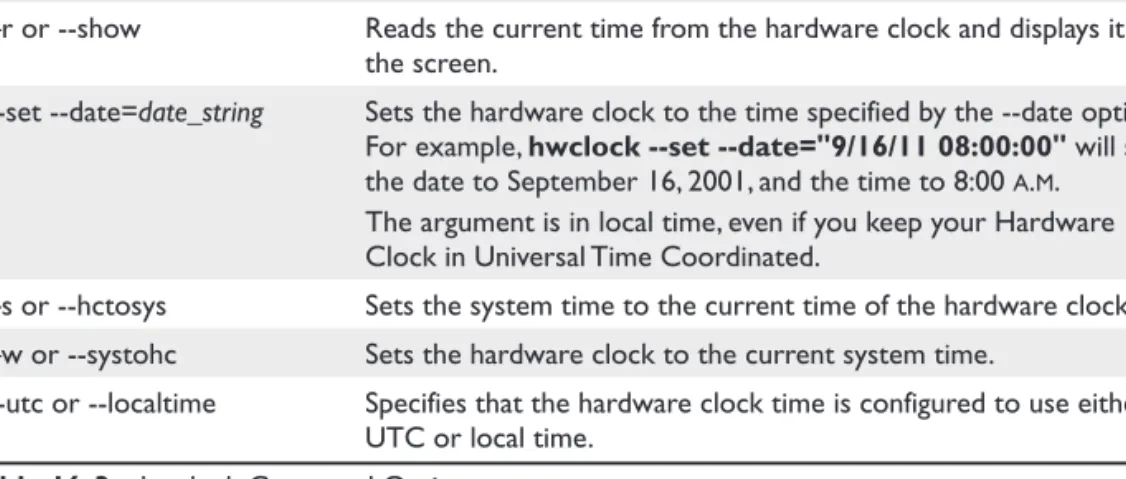
You can use the options shown in Table 16-3 with hwclock on most Linux dis-tributions:
As you can see, the scope of hwclock’s functionality is limited to the local computer system. On a network, you may need to ensure that the system time on your Linux sys-tems is synchronized. One tool you can use to do this is netdate. Let’s look at how this is done next.
Synchronizing Time with netdate
You can use the netdate command to synchronize time on the local system with the time on a time server over the network. The syntax is netdate time_server, where time_ server is the IP address or DNS name of another Linux system on the network that is running the time service, which is configured to listen on UDP port 37 by default for time requests. The time server could be an internal provider on your local LAN, or it could be an Internet-based time provider.
NOTE You can actually specify multiple time servers with the netdate
command. If you do, the time returned from the various time servers will be compared. The time value most commonly returned will be considered to be the most accurate and the one applied to the system time.
After syncing the system time with netdate, you may want to synchronize the system time with your hardware clock using the hwclock --systohc command discussed earlier.
It’s important to note that netdate only syncs time once. If your system time drifts (and it will), then you may need to run netdate (and possibly hwclock --systohc) on a regular schedule to keep time in sync. This can be done automatically using a cron job. However, it’s really not the best option. A better way to keep time synchronized on a regular schedule is to use the Network Time Protocol (NTP). Let’s review how NTP works next.
Synchronizing Time with NTP
The key problem with using netdate in a cron job to keep time synchronized is the fact that netdate adjusts the time abruptly. It doesn’t gradually adjust time to reach a point of synchronization. Whatever time it is on the time server is the time the system time on the local system is set to. In addition, netdate may adjust the time backward and forward, depending upon how your local system clock has drifted. This can really mess-es up time stamps on your local filmess-es and can cause some Linux servicmess-es to completely
hwclock Option Description
–r or --show Reads the current time from the hardware clock and displays it on the screen.
--set --date=date_string Sets the hardware clock to the time specified by the --date option. For example, hwclock --set --date="9/16/11 08:00:00" will set the date to September 16, 2001, and the time to 8:00 a.m. The argument is in local time, even if you keep your Hardware Clock in Universal Time Coordinated.
–s or --hctosys Sets the system time to the current time of the hardware clock. –w or --systohc Sets the hardware clock to the current system time.
--utc or --localtime Specifies that the hardware clock time is configured to use either UTC or local time.
A better option for network time synchronization is to use the Network Time Pro-tocol (NTP) to sync time with a network time provider. NTP manages time in a much cleaner fashion than netdate. NTP adjusts time in a much gentler manner. If there is a time differential between the time provider and the time consumer (your local system), it adjusts time gradually in small increments until time is eventually synchronized.
NTP is also widely supported by most operating systems. The netdate option only works with the time service on a Linux/UNIX time provider. NTP, on the other hand, allows time to be synchronized among systems in a heterogeneous network environ-ment. It’s supported by
• Linux • Windows • NetWare • UNIX • Etc.
NTP is a little more complex than netdate. Therefore, to implement NTP, you need to be familiar with the following:
• How NTP works
• Configuring the ntpd daemon • Monitoring NTP operations
Let’s begin by discussing how NTP works.
How NTP Works
You can use the ntpd daemon on Linux to synchronize time with another NTP time provider. In fact, a system running ntpd can function as both a time consumer and a time provider at the same time. The NTP protocol operates over IP port 123. The time con-sumer sends a time synchronization request to the time provider on port 123. The time provider sends its time to the consumer, and the system time on the consumer is ad-justed according to the NTP algorithm.
TIP Because NTP is designed to synchronize time across global networks, it
assumes all systems involved are configured to use UTP time.
Several key NTP concepts that you need to be familiar with include the following: • Stratum NTP uses the concept of stratum to define a hierarchy of NTP
servers:
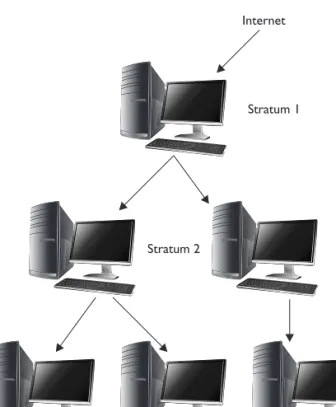
• Stratum 1 Stratum 1 time servers get their time from a reference time source, such as the Naval atomic clock. (See tycho.usno.navy.mil for more information.)
• Stratum 3 Get their time from stratum 2 servers
• Stratumn NTP servers can continue to a depth of 256 strata.
Although they are available on the Internet, you probably won’t be allowed access to a Stratum 1 server. However, there are many Stratum 2 servers that are publicly available. To reduce the load on these public time sources, you should configure a very limited number of systems on your internal network to sync time with the public time provider. In fact, many organizations configure only a single Stratum 3 server on their network that gets its time from a public Stratum 2 server on the Internet. They then configure all of their internal hosts to get their time from that server. On a larger network, you may need to configure several Stratum 4 servers and configure them to get time from your Stratum 3 server and then configure the rest of your network hosts to get time from the Stratum 4 servers. This is shown in Figure 16-11.
• Stepping and Slewing The NTP protocol initially syncs time between the time consumer and the time provider about once per minute. However, the interval increases gradually to once every 17 minutes once time is closely synced between the provider and consumer. Essentially, large adjustments occur relatively quickly, but then only small adjustments are made across a longer time interval.
Figure 16-11
If the time difference between the provider and the consumer is small (less than 128 milliseconds), then NTP adjusts the time on the consumer gradually. This is called slewing. If, on the other hand, the time difference between provider and consumer is relatively large, then time adjustments are made more quickly on the consumer. This is called stepping.
• Insane Time If the time difference between the provider and consumer is more than 17 minutes off, the NTP daemon (ntpd) considers time to be “insane” and will not adjust time.
• Drift NTP measures and corrects for incidental clock frequency errors (called
drift). It writes the current frequency value to the ntp.drift file in the /var/lib/ ntp/drift/ directory. If you stop and then restart the NTP daemon, it initializes the clock frequency using the value in this file. This prevents ntpd from having to relearn the frequency error associated with the system clock on your system. Here is a sample ntp.drift file:
ws1:/var/lib/ntp/drift # cat ./ntp.drift 0.000
ws1:/var/lib/ntp/drift #
• Jitter Jitter is the estimated time difference between the consumer and the provider since the last time poll.
With this background in mind, let’s discuss how you configure a system to use NTP to get time from a time provider.
Configuring NTP
In order to use NTP to configure system time with an NTP time provider, you must first install the ntpd daemon on your Linux system. You can use the rpm –q ntp command at the shell prompt to do this, like so:
ws1:~/ # rpm -q ntp ntp-4.2.4p8-7.2.x86_64 ws1:~/ #
NTP is usually installed by default on most Linux systems. If it hasn’t been, you can use the software package management utility of your choice to install it. Once done, you need to next edit the /etc/ntp.conf file in a text editor. The first thing you need to do is ensure that the following entries exist for the local clock, which is used if the time server is not available:
server 127.127.1.0 # local clock (LCL)
fudge 127.127.1.0 stratum 10 # LCL is unsynchronized
These directives tell the ntpd daemon to get time from the local clock in the event it can’t reach any of the configured NTP time providers.
Next, you need to add entries to the file for network time providers you want your system to sync time with. Here is the syntax:
You can specify the IP address or DNS name of any NTP time provider you want to use. It could be any of the following:
• An NTP time provider on your network
• A public NTP time provider on the Internet. You can visit http://support.ntp .org/bin/view/Servers/WebHome to view a list of publicly available NTP time providers on the Internet. If you wish, you can use an NTP pool time server. The pool.ntp.org domain uses DNS round robin to make a random selection from a pool of time providers who have volunteered to be in the pool. That way, no one public NTP server is overloaded with time synchronization requests. To use this, simply add the following server directive in addition to the local clock server directive just discussed:
server pool.ntp.org
When you’re done, save your changes and then close the file. Before you actually start the ntpd daemon, however, you need to do a quick, one-time synchronization with your NTP time provider. The issue here is insane time. If your system time is al-ready more than 17 minutes off from the time on the NTP time provider, you must get the two systems within this time window before NTP will work.
TIP In my experience, insane time is the number one problem Linux admins
have when configuring NTP. They install the NTP software and configure it correctly, but then they can’t figure out why time never synchronizes when they start the daemon.
You can eliminate insane time issues by entering ntpdate address_of_time_provider
at the shell prompt. This will perform an initial synchronization to get time close be-fore you start the daemon. You may actually need to run the command multiple times if the times are really far apart between your system and the NTP time provider.
TIP The ntpd daemon must be stopped before running the ntpdate
command!
Newer versions of NTP on newer Linux distributions also allow you to use the ntptimeset option with the ntpd daemon itself to accomplish the same thing. Instead of specifying start, stop, or restart with the daemon init script, you enter (on an openSUSE system) /etc/init.d/ntp ntptimeset or rcntp ntptimeset at the shell prompt. When you do, a quick time sync takes place with the time provider, as in this example:
ws1:/ # rcntp ntptimeset
Time synchronized with pool.ntp.org ws1:/ #
Once done, you can then start the ntpd daemon using its init script in the appropri-ate init script directory used by your distribution. If your system uses rc scripts, you can simply enter rcntp start at the shell prompt, like this:
ws1:/ # rcntp start
Time synchronized with pool.ntp.org
Starting network time protocol daemon (NTPD) done ws1:/ #
You should configure the ntpd daemon to start every time the system boots using the insserv ntp command. After starting the daemon, you can check the ntp log file with the tail command to verify that no errors occurred.
Once the NTP daemon has been started, you can use two commands to keep track of how the ntpd daemon is working:
• ntpq –p This command queries the status of the ntpd daemon. Here is an example:
ws1:/ # ntpq –p
remote refid st t when poll reach delay offset jitter ============================================================================== *LOCAL(0) .LOCL. 10 l 30 64 77 0.000 0.000 0.001 199.249.223.123 129.7.1.66 2 u 26 64 77 105.307 -29.759 4.627 ws1:/ #
The columns in the output include the following:
• remote Specifies the hostname or IP address of the time provider • refid Specifies the type of the reference source
• st Specifies the stratum of the time provider
• when Specifies the number of seconds since the last time poll • poll Specifies the number of seconds between two time polls
• reach Displays whether or not the time server was reached in the last poll. Each successful poll increments this field by 1.
• delay Specifies the time (in milliseconds) that it took for the time provider to respond to the request
• offset Specifies the time difference between the local system clock and the time provider (in milliseconds)
• jitter Specifies the size of time discrepancies (in milliseconds)
• ntptrace The ntptrace utility traces how the time consumer is receiving time from the provider. It lists the time provider’s name, its stratum, and its time offset from the system clock on the local system.
Exercise 16-2: Configuring NTP
VIDEO For more information watch Exercise 16-2.
In this exercise, you will practice configuring NTP to get time from us.pool.ntp.org. For this exercise to work, your Linux system must have Internet access. Complete the following:
1. Open a terminal session and su – to your root user account.
2. At the shell prompt, use the appropriate package management utility for your distribution to verify that the ntp package has been installed on your system. If it hasn’t, use the appropriate steps to install the ntp package from your distribution DVD or web site.
3. At the shell prompt, enter vi /etc/ntp.conf.
4. Scroll down to the lines that read
server 127.127.1.0 #local clock (LCL)
fudge 127.127.1.0 stratum 10 #LCL is unsynchronized
5. Press insert.
6. Add a new line below the fudge line.
7. Add the following directive on the new line: server us.pool.ntp.org
This directive is used to configure the ntp service to synchronize your local computer’s time with the time on a public ntp server on the Internet.
8. Press esc; then enter :exit.
9. Perform a one-time synchronization by entering ntpdate us.pool.ntp.org
at the shell prompt. If ntpdate isn’t supported on your distribution, run the ntp init script in your init script directory with the ntptimeset parameter. For example, rcntpntptimeset.
10. Start the ntp service by entering /etc/init.d/ntp restart, /etc/rc.d/init.d/ntp restart, or rcntp restart at the shell prompt. You should see messages that the daemon is starting and that it’s getting its time from us.pool.ntp.org.
11. Configure the ntp daemon to automatically start at runlevels 3 and 5 by entering chkconfig –s ntp 35 at the shell prompt.
12. Check the status of the ntp daemon by entering chkconfig –l ntp at the shell prompt. You should see runlevels 3 and 5 set to ON.
Managing an MTA
In most modern organizations, e-mail has become the backbone of communications. If you have any doubt, just visit any organization where the mail server has gone down. All productive work grinds to a halt.
Because e-mail has become such an integral component of most networks, you need to know how to manage a mail server. In addition, many Linux services, such as cron, rely on a local mail server to send messages to local users. Accordingly, you need to be familiar with managing a Mail Transfer Agent (MTA) on Linux systems for your Linux+/LPIC-1 exam. In this part of this chapter, we’ll look at the following topics:
• How e-mail works
• Using MTA management commands on Linux Let’s begin by discussing how e-mail works.
How E-Mail Works
To understand how an MTA works and how to deploy it, you must first understand how the e-mail process itself works.
The first thing you must understand is the fact that an e-mail system is composed of several modular components. Each component plays a different role in delivering mes-sages from the sender to the recipient. The following steps occur as an e-mail message is sent from the sender to the recipient. These are shown in Figure 16-12.
1. First, the user composes a message using an e-mail client. The e-mail client software is called the Mail User Agent (MUA). Common MUAs include Evolution, Mozilla Thunderbird, and Mutt. The key thing to remember is that the MUA has no idea how to get the message to the final recipient. Instead, it’s configured to send outgoing messages to a mail server.
2. When the user selects Send, the MUA sends outgoing messages to a configured e-mail mail server using the Simple Mail Transfer Protocol (SMTP). SMTP is an upper-layer, IP-based protocol that runs on port 25. The sole purpose of SMTP is to transfer e-mail messages between e-mail agents.
3. The message is transferred from the MUA to the Mail Transfer Agent (MTA)
on the mail server. The MTA then decides what to do with the message. If it’s intended for another user in your same organization, the message is held by the local MTA for delivery to the recipient’s MUA. However, if it’s intended for a recipient in a different domain, the MTA forwards the message via SMTP through the Internet to the MTA used by the message’s recipient.
4. The destination MTA transfers the e-mail message to the Message Delivery Agent
(MDA, also called the Message Store) for the system where the recipient resides. The MDA’s job is to stores the message until the MUA of the recipient requests it.
5. The recipient uses e-mail client software (another MUA) to connect to the Message Store and pulls down the message. To do this, it can can use either the Post Office Protocol (POP) version 3 or the Internet Message Access Protocol (IMAP). Both protocols are supported by most MDAs and MUAs. POP3 downloads the message using port 110 and the message is deleted from the Message Store. IMAP does the same thing over port 143. However, IMAP has several advantages over POP3. First, IMAP allows you to download the entire message or only the message headers. IMAP also allows you to keep a copy of your messages in the Message Store. It also allows you to create custom folders in the Message Store for organizing messages.
NOTE Most Linux MTAs do not include any POP3 or IMAP functionality. To
use most Linux MTAs with end-user MUAs, you must install and configure a POP3/IMAP daemon that grabs messages from the MTA and delivers them via the appropriate protocol to the MUA.
All Linux distributions include an MTA that runs by default on the system. Several MTAs are commonly implemented on Linux:
• sendmail The sendmail daemon is the oldest MTA used on Linux, but it’s still the default MTA used by many distributions. It’s been widely used for many years. The key thing to remember about sendmail is the fact that it’s non-componentized; instead, it’s a single executable. However, when compared with other Linux MTAs, sendmail can be somewhat difficult to configure.
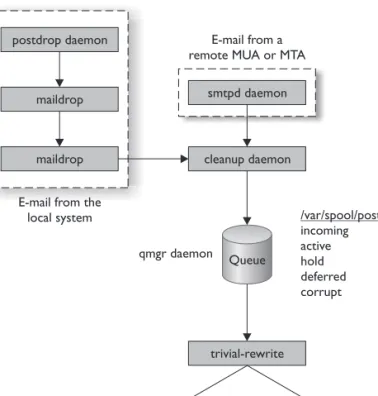
• postfix The postfix daemon is a popular MTA that has replaced sendmail on many Linux distributions (such as openSUSE). One of the key advantages of postfix over sendmail is the fact that it is modular, meaning that it is composed of multiple programs instead of one single executable. Each program has its own tasks that it is responsible for. It uses the master daemon in conjunction with multiple worker daemons that are only started when they are needed. When their tasks are complete, the master daemon automatically shuts them down. In effect, the master daemon and the worker daemons function together as a unit to process e-mail messages through the MTA. The process is shown in Figure 16-13.
1. If an e-mail message is sent to the Postfix MTA by a remote MTA or remote MUA, it is accepted into the system by the smtpd worker daemon. The smtpd daemon forwards the message to the cleanup daemon.
2. If an e-mail message is sent to the Postfix MTA by a user using the shell prompt on the local system, the following occurs:
a. It is accepted into the system by the postdrop daemon, which is also a postfix worker daemon.
b. The postdrop daemon places the e-mail message in the maildrop directory in /var/spool/postfix.
Figure 16-13
Processing messages through postfix
c. The pickup daemon transfers the message from the maildrop directory and forwards it to the cleanup daemon.
3. The e-mail message, regardless of whether it originated remotely or on the local system, is then processed by the cleanup daemon.
4. The cleanup daemon places the e-mail message in the incoming queue, which is also /var/spool/postfix.
5. The cleanup daemon notifies the Queue Manager daemon (qmgr) that a message has been added to the incoming queue.
6. The qmgr daemon moves the e-mail message to one of five message queues, all of which are located in /var/spool/postfix:
a. incoming This queue contains incoming messages that have been processed by the cleanup daemon.
b. active This queue contains messages that arrived intact, were processed correctly, and are ready to be forwarded on to the next MTA or MDA.
c. hold This queue contains messages whose delivery, for some reason, has been put on hold.
d. deferred This queue contains messages that could not be delivered on the first attempt. The qmgr daemon will wait a while; then it will make several more delivery attempts.
e. corrupt This queue contains messages that were damaged somewhere in transit and are no longer readable.
7. The qmgr daemon then invokes the trivial-rewrite daemon, which identifies the next MTA or MDA to which the message should be sent.
8. The qmgr daemon then passes the message to the appropriate delivery agent. If the message is intended for a local user account, the local agent is used. If the message intended for another MTA or an MDA, the smtp agent is used.
9. The selected agent transfers the e-mail message to the appropriate system. • qmail The qmail MTA is also a modular MTA daemon that is frequently
used as a replacement for sendmail. The qmail MTA is unique in that it was designed from the ground up with security in mind. Essentially, its modular architecture is composed of mutually untrusting components. This means each module in the MTA (such as the SMTP listener) will use a set of credentials that are unique to it. No two modules use the same credentials. Many administrators consider qmail, like postfix, easier to manage than sendmail. However, it’s not the default MTA used by any Linux distribution because it has components that are covered by a proprietary licensing agreement. In spite of this, qmail is greatly loved by those who use it. My niece is married to a system admin and he swears by qmail. You need to be aware that two additional mail protocols are implemented by qmail:
• Quick Mail Transport Protocol (QMTP) A transmission protocol similar to SMTP, but considered to be faster
• Exim For your LPIC-1/CompTIA Linux+ exam, you also need to be familiar with the Exim MTA. Exim is a non modular MTA, composed of only a single program (similar to sendmail). However, it is considered to be much easier to configure and manage than sendmail.
A limited number of Linux distributions use Exim as the default MTA.
As mentioned earlier, these MTAs can be used to receive sent e-mail messages from MUAs via SMTP. However, they can’t download messages to e-mail clients via POP3 or IMAP. To do this, you must install the imap package on your system using the software management utility of your choice. This package installs IMAP and POP3 daemons that you can use to transfer messages from your MTA to your e-mail client software.
Both of these daemons are managed using the xinetd daemon. You can enable these daemons using the /etc/xinetd.d/imap file. Once done, restart the xinetd daemon.
NOTE We’ll discuss xinetd in more detail in the next chapter.
Whichever MTA you choose to use, each is managed using the appropriate init script in your init directory. For example, the postfix init script is appropriately named
postfix, while the sendmail init script is sendmail.
Now that you understand how e-mail works and the role of the MTA, let’s next look at commands you can use to manage MTAs on Linux.
Using MTA Management Commands on Linux
Let’s first look at reading messages stored in your local MTA. When you log in to a shell session, you will receive a notification if there are mail messages waiting for you. You can read messages for local users from the local MTA directly from the command line using the mail command at the shell prompt. When you do, a list of messages is dis-played. An example is shown in Figure 16-14.
NOTE Some services running on Linux are configured to send notification
messages to the root user.
Figure 16-14
Reading mail from the shell prompt
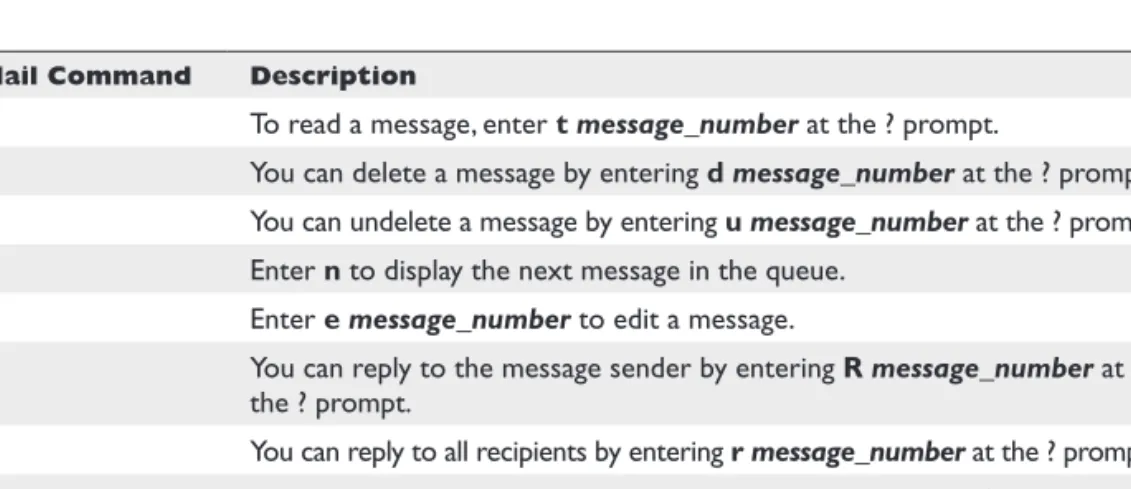
These messages are stored in your user’s mail queue, which is located in the /var/ spool/mail/ directory. The mail utility reads your messages directly out of your user’s queue file. Because you’re running the mail utility on the same system where your queue resides, you don’t need POP3 or IMAP support configured. You can enter the mail commands shown in Table 16-4 at the ? prompt.
An example of viewing a received message with the t command is shown in Figure 16-15.
To send a message, you can also enter mail recipient_address at the shell prompt. You can then enter a subject line and the text of your message. Press ctrl-d when you’re done to actually send the message. When you do, the message is delivered to the other user’s mail queue by your local MTA.
To view a list of unread messages in your mail queue, you can enter mailq at the shell prompt.
In addition to mail, there are many other packages available that you can install to read mail from the shell prompt. The key thing to remember is that the user must run the mail command from the local shell prompt. If the user isn’t using the local com-puter system, then they must ssh into the system to read mail.
NOTE We’ll discuss ssh in the last chapter of this book.
You can also configure aliases for the MTA running on your Linux system. Mail aliases redirect mail addressed to one user to another user’s account. You use the /etc/ aliases file to configure aliases. This file defines one alias per line. The alias you define must point to an existing e-mail address. The syntax for this file follows:
alias: list of real e-mail addresses (separated by commas)
Mail Command Description
t To read a message, enter t message_number at the ? prompt.
d You can delete a message by entering d message_number at the ? prompt. u You can undelete a message by entering u message_number at the ? prompt. n Enter n to display the next message in the queue.
e Enter e message_number to edit a message.
R You can reply to the message sender by entering R message_number at the ? prompt.
r You can reply to all recipients by entering r message_number at the ? prompt. m You can send a new message by entering m recipient at the ? prompt. q Enter q to quit mail.
For example, the following two aliases must be present in this file on most Linux distributions:
postmaster: root
mailer-daemon: postmaster
These aliases cause any e-mail messages sent to the postmaster to be automatically redirected to the root user. Likewise, any e-mail messages sent to mailer-daemon will be redirected to postmaster (which will then be redirected to root). Depending upon your distribution, you will probably find that many aliases are defined for you by default. Here is a sample:
# General redirections for pseudo accounts in /etc/passwd. administrator: root daemon: root lp: root news: root uucp: root games: root man: root at: root postgres: root mdom: root amanda: root ftp: root wwwrun: root squid: root msql: root gnats: root nobody: root
# "bin" used to be in /etc/passwd bin: root
Of course, you can enter your own custom aliases if needed. Just open the aliases file in a text editor and add the appropriate aliases, one per line. When done configur-ing aliases, you must run the newaliases command at the shell prompt as root to en-able them.
You can also use the ~/.forward file in your user’s home directory to configure for-warding. Most Linux MTAs check for the existence of this file in the user’s home direc-tory to configure forwarding of messages. You can open/create the file in a text editor
Figure 16-15
Viewing a message in the mail queue
and enter the e-mail address to which you want to forward e-mail. If you are forwarding to a local user, just enter the username. If you’re forwarding to a remote user account, enter username@domain.com. If you need to forward messages to multiple recipients, separate them with a comma.
NOTE The MTA will treat the addresses you enter in this file as an alias. This
causes all e-mail to be forwarded to the forwarding e-mail address. Messages will not be delivered to the original user’s mailbox.
Now that you are familiar with managing e-mail on a Linux system, let’s finish this chapter by talking about managing SQL server data.
Managing SQL Data
For your Linux+/LPIC-1 exam, you need to be familiar with how to manage data within an SQL database. Implementing and managing an SQL database is a huge topic, much larger than we have time or space to delve into here. However, I will give you some basic installation steps and also show you how to add information to the database as well as how to retrieve information from it. To accomplish this, the following topics will be addressed in this part of this chapter:
• How databases work • Installing MySQL
• Managing data in the SQL server
Let’s begin by discussing how SQL database work.
How Databases Work
A database is a collection of information organized so that data can be quickly selected and retrieved based on a search query that you create. In the past 20 years, databases have become the backbone of commerce, communications, and government around the world. Instead of maintaining huge rooms full of paper documents, databases allow us to store huge amounts of information in an itty-bitty amount of physical space.
Database services run on a client/server model. You usually install the client and server pieces on the database server. You can then install the client software on client systems that will be used to access the information in a database. Two database services are commonly implemented on Linux:
• MySQL • PostgreSQL
By installing one of these database services, you install the software needed to run, operate, and manage the database using SQL (Structured Query Language), which is a standard language for accessing and manipulating databases. SQL defines statements
that can be used to retrieve and update data in a database, such as SELECT, UPDATE, DELETE, INSERT, and WHERE.
Both of these database services are relational databases, which are hierarchical in nature. Relational databases are specialized to organize and store huge amounts of data. They are also designed to be highly scalable, allowing them to grow over time.
A relational database is organized using fields,records, and tables. A field is a single piece of information. A record is one complete set of fields, and a table is collection of records. Each table is identified by a name, such as Customers. Each table contains re-cords (each one a single row) that contain one or more fields that in turn contain the actual database data. For example, suppose were to define a table called Customers and create the following three records:
Last First Address City State Zip Tracy Leah 1234 W. Longfellow Bone Idaho 83401 Morgan Ken 3456 W. 100 S. Rigby Idaho 83442
Using the SQL language, you could create queries that select and retrieve specific data from the database. For example, suppose you were to compose the following query: SELECT Last FROM Customers
The database would return the following data: Last
Tracy Morgan
You can use the following commands to manage data in an SQL database: • SELECT Retrieves information from a table
• UPDATE Modifies information in a table • DELETE Removes information from a table • INSERT INTO Adds new data to a table • CREATE TABLE Creates a new table • ALTER TABLE Modifies an existing table • DROP TABLE Deletes and existing table
A key feature of relational databases is the fact that you can create relationships be-tween tables, which allows you to create interrelated data sets.
With this in mind, let’s look at how you install an SQL database on your Linux system.
Installing MySQL
While there are several different SQL database services you can install on Linux, we’re going to focus on using MySQL in this chapter. MySQL is an open source SQL database server that’s included on the installation media of most distributions. It’s also relatively easy to install and to get started creating databases with.
MySQL may or may not be installed by default on your Linux distribution. If it’s not installed on your system, use the package management utility of your choice to install the following packages:
• mysql • mysql-client • mysql-shared
NOTE The actual packages you install depend on which Linux distribution
you are using and which version of MySQL you are installing.
After installing your MySQL packages, you next need to set up your MySQL server’s grant tables. All MySQL access controls are managed from within the MySQL service itself. It’s important to understand that MySQL has its own unique set of user accounts defined in its grant tables; it doesn’t use the accounts defined on your Linux system. Five tables are implemented within the MySQL database to do this:
• user Specifies whether a user is allowed to connect to the MySQL server • db Defines which databases a user is allowed to access.
• host Specifies which hosts are allowed to access a particular database • tables_priv Defines access privileges for a given table.
• columns_priv Specifies access privileges for specific columns of data for a given table
These tables must be initialized before you can use MySQL. This is done by chang-ing to the /usr/bin directory and runnchang-ing the mysql_install_db command at the shell prompt. The grant tables are ready to go after you do so. You only need to run mysql_ install_db once after you initially install MySQL. The command creates two MySQL user accounts named root and anonymous-user.
With the grant tables created, you next need to start the database service using the mysql init script located in your init script directory. You can use the insserv or chkcon-fig commands to ensure the database service starts every time the system boots. To verify that the server is running, you can enter the mysqladmin version command at the shell prompt. You should see output similar to the following:
WS3:~ # mysqladmin version
mysqladmin Ver 8.41 Distrib 5.0.26, for suse-linux on i686
Copyright (C) 2000 MySQL AB & MySQL Finland AB & TCX DataKonsult AB This software comes with ABSOLUTELY NO WARRANTY. This is free software, and you are welcome to modify and redistribute it under the GPL license Server version 5.0.26
Protocol version 10
Connection Localhost via UNIX socket UNIX socket /var/lib/mysql/mysql.sock Uptime: 15 sec