Gesture Controlled Mouse
https://doi.org/10.3991/ijoe.v13i04.6898
Pallavi
SRM University, NCR Campus, India
Vinod Kumar
SRM University, NCR Campus, India
Praveen Kumar
SRM University, NCR Campus, India [email protected]
Anurag Singh
SRM University, NCR Campus, India
Abstract—Gesture controlled mouse is a device in which we can move the mouse by giving the direction from our wrist and turn the direction of mouse through it. After using a accelerometer we can able to move and change the di-rection of our mouse and by the help of accelerometer we can also change the speed of the mouse. This is a new technology for controlling any device through our wrist movement. After upgrading it we can make many type of other devices which can be very useful for the human being can create a turn in our life. It can be used at many places and also be the part of the future. The gesture will be main part as the movements of our body will play the important role for operations. A stationary point will be taken as the directions will be in x-axis, y-axis and as well as the z-axis. An accelerometer will be used as the di-rection indicators.
Keywords—Gesture , Accelerometer
1
Introduction
device which has the PIC 16F877A as the central system. The other components are basically rectifier , filter , transformers , LEDs , capacitors , resistors and Voltage regulator. Here the gestures are recognized by the accelerometer. The directions namely the X- axis , Y -axis and the Z – axis are used. The movements of the hands controls the movements of the cursor of the computer.
2
Gesture Controlled Technique
Often gestures are in two forms: 1. Static i.e. which may require less computational complexity or 2. Dynamic i.e. which may require or may be more complex but are suitable for the real time environment. As we know are several other methods which have been proposed for the gesture recognisation. But here we are using the hand gesture method for the movement of the cursor without the traditional use of the opti-cal mouse.
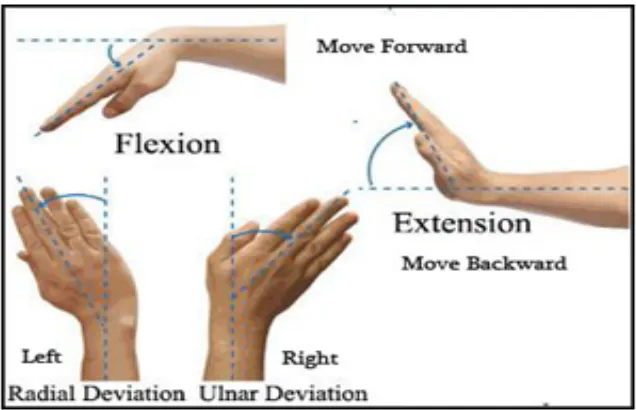
Fig. 1.
The detail about its working is given below.
Step 1:During the stationary position the changes along the x, y and z direction will be zero so during stationary position mouse will not move.
Step 2:During the tilt of our wrist in the up state. The x-axis of the accelerometer will change in positive direction so our mouse will start moving backwards.
Step 3: During the tilt our wrist in the down state. The x-axis of the accelerometer will change in negative direction so our mouse will start moving in the forward direc-tion.
Step 5: During the tilt our wrist in the right direction. The y-axis of the accelerom-eter will be change in positive direction so our mouse will move in the right direction.
3
Hardware Implementation
To interface our project with computers, we realized that we would be required to implement a USB HID class device. During the planning stages of our design, we researched different ways implementing a USB HID and discovered that we could either proceed by doing this through software or hardware support. We came to the conclusion that our design would require a micro-controller in our base station in order to receive wireless messages and process the information. With this in mind, we decided it would be a more practical and simple to purchase a single hardware board that could perform both these functions. So we purchased a micro controller with which we used transmitters for receiving as well as sending. The microcontroller which we are using is the PIC series microcontroller i.e. PIC 16F877A. The other components used are the transistors for sending and receiving signals i.e. BC547 . The LCDs and LEDs are also used. The voltage regulator 7805 is also used. The resistors, capacitors, diodes and accelerometer is also used .
4
Software Implementation
The software used for this project is Keil C cross compiler as it has a microcontrol-ler. This compiler is basically used for the conversion of the high level language to the object code. The embedded C language is used for the programs which are given to the microcontroller. The embedded C language used is for giving instructions.
5
Application
6
Advantages
• Portable
• Cost effective • Open source software
• Data access directly from the machine to the real time • Support multi touch and multiple user interaction
• Mind map the idea anywhere.
7
Disadvantages
• Post processing can occur.
• Hardware limitation on carrying everywhere
• Many phones and laptop doesn’t allow to use their camera in the real time space.
8
Costing
In this project we are using two microcontrollers of PIC series which will cost 400 each thus the total will be of 12 US dollars. The circuit diagram printing on the PCB board will be for both microcontrollers, so for each it will take 1200, so for both it will be a total of 36.54 US dollars. The components used such as LEDs, capacitors, resistors and other components will cost 200. The cost of the transformer 1.54 US Dollars and transistor is 2.4 US Dollars. For connecting the laptop to the microcon-troller we need a TTL USB which will cost us 4-5 US Dollars. The battery is used will costs us approximately 2-3 US Dollars. So the overall total costing for the project will be of 68-70 US Dollars.
9
Conclusions
10
References
[1]“The PIC Microcontroller and Embedded systems” by Muhammad Ali Mazidi and Janice Gillespie Mazidi , Pearson Education.
[2]PIC16F877A Data Sheets. [3]www.microchip.com [4]www.beyondlogic.org [5]www.wikipedia.org [6]www.howstuffworks.com
11
Authors
Pallavi is student at the Department of Electronics and Communication Engineer-ing, SRM University, NCR Campus, India.
Vinod Kumar is student at the Department of Electronics and Communication Engineering, SRM University, NCR Campus, India.
Praveen Kumar (corresponding author) is student at the Department of Electron-ics and Communication Engineering, SRM University, NCR Campus, India ([email protected])
Anurag Singh is Assistant Professor at the Department of Electronics and Com-munication Engineering, SRM University, NCR Campus, India.