Novell
w w w . n o v e l l . c o m
(e
n)
6 Ap
ril 20
07
GroupWise
®7
A p r i l 1 6 , 2 0 0 7
(e
n)
6 Ap
ril 20
07
Legal Notices
Novell, Inc. makes no representations or warranties with respect to the contents or use of this documentation, and specifically disclaims any express or implied warranties of merchantability or fitness for any particular purpose. Further, Novell, Inc. reserves the right to revise this publication and to make changes to its content, at any time, without obligation to notify any person or entity of such revisions or changes.
Further, Novell, Inc. makes no representations or warranties with respect to any software, and specifically disclaims any express or implied warranties of merchantability or fitness for any particular purpose. Further, Novell, Inc. reserves the right to make changes to any and all parts of Novell software, at any time, without any obligation to notify any person or entity of such changes.
Any products or technical information provided under this Agreement may be subject to U.S. export controls and the trade laws of other countries. You agree to comply with all export control regulations and to obtain any required licenses or classification to export, re-export, or import deliverables. You agree not to export or re-export to entities on the current U.S. export exclusion lists or to any embargoed or terrorist countries as specified in the U.S. export laws. You agree to not use deliverables for prohibited nuclear, missile, or chemical biological weaponry end uses. Please refer to www.novell.com/info/exports/ for more information on exporting Novell software. Novell assumes no responsibility for your failure to obtain any necessary export approvals.
Copyright © 2007 Novell, Inc. All rights reserved. No part of this publication may be reproduced, photocopied, stored on a retrieval system, or transmitted without the express written consent of the publisher.
Novell, Inc. has intellectual property rights relating to technology embodied in the product that is described in this document. In particular, and without limitation, these intellectual property rights may include one or more of the U.S. patents listed at http://www.novell.com/company/legal/patents/ and one or more additional patents or pending patent applications in the U.S. and in other countries.
Novell, Inc.
404 Wyman Street, Suite 500 Waltham, MA 02451
U.S.A.
www.novell.com
(e
n)
6 Ap
ril 20
07
Novell Trademarks
For Novell trademarks, see the Novell Trademark and Service Mark list (http://www.novell.com/company/legal/ trademarks/tmlist.html).
Third-Party Materials
(e
n)
6 Ap
ril 20
Contents
(en)6 Ap
ril 20
07
About This Guide 11
1 Getting Started 13
1.1 Installing the GroupWise Cross-Platform Client. . . 13
1.1.1 Installing the GroupWise Cross-Platform Client on Linux . . . 13
1.1.2 Installing the GroupWise Cross-Platform Client on a Macintosh. . . 13
1.2 Getting Acquainted with the Main GroupWise Window . . . 14
1.2.1 Toolbar . . . 15
1.2.2 Folder and Item List Header . . . 15
1.2.3 Folder List . . . 15
1.2.4 Item List. . . 18
1.2.5 QuickViewer . . . 18
1.3 Using Different GroupWise Modes . . . 18
1.3.1 Online Mode . . . 19
1.3.2 Caching Mode . . . 19
1.4 Understanding Your Mailbox . . . 19
1.4.1 Bolded Items in Your Mailbox . . . 19
1.4.2 Icons Appearing Next to Items in Your Mailbox and Calendar . . . 20
1.4.3 Viewing Options in Your Mailbox. . . 21
1.5 Using the Toolbar . . . 23
1.6 Using Shortcut Keys . . . 23
1.7 Learning More . . . 25
1.7.1 Online Help . . . 25
1.7.2 GroupWise 7 Documentation Web Page . . . 25
1.7.3 GroupWise Cool Solutions Web Community. . . 25
2 Logging In to GroupWise 27 2.1 Logging In to GroupWise . . . 27
2.1.1 Logging In to Your Mailbox . . . 27
2.1.2 Logging In to Your Mailbox from Another User’s Workstation. . . 28
2.1.3 Logging in to Your Mailbox from a Shared Workstation . . . 28
2.2 Assigning Passwords to Your Mailbox. . . 28
2.2.1 Adding a Password . . . 29
2.2.2 Changing Your Password . . . 29
2.2.3 Removing Your Password. . . 29
3 Working with Items in Your Mailbox 31 3.1 Understanding GroupWise Item Types . . . 31
3.2 Sending and Receiving Items . . . 32
3.2.1 Sending Mail Messages . . . 32
3.2.2 Sending Phone Messages . . . 33
3.2.3 Changing the Font of Items You Send . . . 33
3.2.4 Adding a Signature or vCard to Items You Send . . . 34
3.2.5 Spell-Checking Items You Send . . . 35
3.3 Attaching Files . . . 38
3.3.1 Attaching a File to an Item. . . 38
3.3.2 Viewing Attached Files . . . 38
(e n) 6 Ap ril 20 07
3.4 Managing Sent Items . . . 39
3.4.1 Confirming Delivery of Items You’ve Sent . . . 39
3.4.2 Displaying Sent Items . . . 39
3.4.3 Resending Items . . . 40
3.4.4 Retracting Items You’ve Sent. . . 40
3.4.5 Checking the Status of Your Items. . . 40
3.4.6 Requesting a Reply for Items You Send . . . 41
3.5 Managing Received Items . . . 41
3.5.1 Reading Items You Receive. . . 42
3.5.2 Replying to Items You Receive . . . 44
3.5.3 Forwarding Items to Other Users . . . 45
3.5.4 Creating a Checklist . . . 45
3.5.5 Delegating Items . . . 46
3.5.6 Handling Unwanted Mail . . . 47
3.5.7 Viewing and Composing Items in HTML . . . 55
3.6 Changing the Encoding of an Item . . . 56
3.6.1 Changing the Encoding for All Items You Send . . . 56
3.6.2 Changing the Encoding for One Item You are Sending . . . 56
3.6.3 Changing the Encoding for an HTML Item You are Reading. . . 57
4 Scheduling Group and Posted Items 59 4.1 Scheduling Appointments. . . 59
4.1.1 Scheduling an Appointment for Other Users . . . 59
4.1.2 Rescheduling an Appointment . . . 60
4.1.3 Rescheduling Recurring Appointments . . . 60
4.1.4 Canceling an Appointment . . . 61
4.1.5 Scheduling an Appointment for Yourself . . . 61
4.1.6 Scheduling a Recurring Item by Dates. . . 62
4.1.7 Checking When Everyone Is Available . . . 62
4.2 Sending Tasks . . . 63
4.2.1 Assigning a Task to Other Users . . . 63
4.2.2 Assigning a Task to Yourself . . . 64
4.2.3 Marking Tasks Completed . . . 64
4.3 Sending Reminder Notes . . . 65
4.3.1 Scheduling a Reminder Note for Yourself . . . 65
4.3.2 Scheduling a Reminder Note for Other Users . . . 65
4.4 Accepting or Declining Scheduled Items . . . 66
4.4.1 Accepting and Declining Resource Requests . . . 66
5 Using Your Calendar 69 5.1 Viewing Your Calendar. . . 69
5.1.1 Opening the Calendar Folder or a Calendar View . . . 69
5.1.2 Understanding the Icons Appearing Next to Items in Your Calendar. . . 70
5.1.3 Understanding the Shading on Calendar Appointments . . . 70
5.2 Reading an Item in Your Calendar . . . 70
5.3 Saving an Item in Your Calendar . . . 70
5.4 Printing Your Calendar, Task List, or Reminder Note List . . . 70
5.5 Viewing a Different Date in the Calendar . . . 71
5.6 Viewing All Day Events in the Calendar . . . 71
6 Managing Your Mailbox 73 6.1 Using the Folder List. . . 73
(e n) 6 Ap ril 20 07
6.1.2 Renaming Folders . . . 74
6.1.3 Deleting Folders . . . 74
6.1.4 Creating a Personal Folder . . . 75
6.2 Using Shared Folders . . . 75
6.2.1 Creating a Shared Folder . . . 75
6.2.2 Sharing an Existing Folder with Other Users . . . 75
6.2.3 Posting a Message to a Shared Folder . . . 76
6.3 Managing Contacts Through Your Mailbox . . . 76
6.3.1 Managing Contacts . . . 77
6.3.2 Managing Groups . . . 77
6.3.3 Managing Resources . . . 78
6.3.4 Managing Organizations . . . 78
6.3.5 Changing the Display Name of a Contact . . . 79
6.4 Archiving the Items in Your Mailbox . . . 79
6.4.1 Archiving an Item in Your Mailbox. . . 80
6.4.2 Viewing Archived Items . . . 80
6.4.3 Unarchiving Items . . . 80
6.4.4 Archiving Items Automatically . . . 80
6.5 Printing Items in Your Mailbox . . . 81
6.5.1 Printing GroupWise Items . . . 81
6.5.2 Printing Your GroupWise Calendar . . . 82
6.6 Creating Rules . . . 82
6.6.1 Actions a Rule Can Perform . . . 83
6.6.2 Events That Trigger a Rule . . . 84
6.6.3 Creating a Rule . . . 85
6.6.4 Creating a Vacation Rule . . . 86
6.6.5 Creating a Rule to Forward All Mail to a Private Mail Account . . . 87
6.6.6 Copying a Rule to Make a New Rule . . . 87
6.6.7 Editing a Rule . . . 87
6.6.8 Deleting a Rule . . . 87
6.6.9 Limiting Items Affected by a Rule . . . 87
6.6.10 Running a Rule Manually . . . 88
6.6.11 Enabling or Disabling a Rule . . . 88
6.6.12 Using Rule Operators . . . 89
6.6.13 Understanding Rule Fields . . . 90
6.7 Giving Other People Access to Your Mailbox . . . 94
6.7.1 Receiving Proxy Rights . . . 94
6.7.2 Assigning Proxy Rights to Another User . . . 94
6.7.3 Adding and Removing Proxy Names and Rights in Your Access List. . . 95
6.7.4 Managing Someone Else’s Mailbox or Calendar . . . 95
6.7.5 Adding and Removing Users in Your Proxy List . . . 96
6.8 Saving Items in Your Mailbox . . . 96
6.9 Owning Resources . . . 97
6.9.1 Accepting and Declining Resource Requests . . . 97
6.9.2 Creating a Rule for a Resource. . . 97
6.10 Opening and Emptying the Trash . . . 98
6.10.1 Opening Your Trash . . . 98
6.10.2 Undeleting an Item in the Trash . . . 98
6.10.3 Saving an Item That Is in Your Trash . . . 99
6.10.4 Emptying the Trash . . . 99
6.10.5 Emptying Selected Items from the Trash . . . 99
6.10.6 Emptying the Trash Automatically. . . 99
6.11 Deleting Items from Your Mailbox . . . 100
6.11.1 Deleting an Item from Your Mailbox . . . 100
6.11.2 Deleting and Emptying Items from Your Mailbox . . . 100
6.12 Backing Up Your Mailbox . . . 100
(e n) 6 Ap ril 20 07
6.12.2 Restoring Items from Backup. . . 101
6.13 Repairing Your Mailbox . . . 101
6.14 Finding Items . . . 101
6.14.1 Finding an Item Using Search Criteria . . . 102
6.14.2 Narrowing a Find . . . 102
6.15 Filtering Items . . . 102
6.16 Using the Columns in Your Mailbox . . . 102
7 Using the Address Book 103 7.1 Understanding Address Books . . . 103
7.1.1 Using the Address Book, the Address Selector, and the Contacts Folder . . . 103
7.1.2 System Address Book . . . 105
7.1.3 Frequent Contacts Address Book . . . 105
7.1.4 Personal Address Books . . . 106
7.1.5 Shared Address Books . . . 106
7.2 Searching for Users and Resources. . . 106
7.2.1 Searching for User, Resource, Organization, and Group Addresses . . . 107
7.3 Using Groups to Address Items . . . 107
7.3.1 Creating and Saving a Personal Group . . . 108
7.3.2 Addressing Items to a Group . . . 108
7.3.3 Adding and Removing Contacts from a Personal Group . . . 109
7.3.4 Viewing Group Information. . . 109
7.3.5 Deleting a Group from a Personal Address Book . . . 109
7.4 Printing Lists from the Address Book . . . 110
7.5 Using the Address Selector and Address Book to Send Messages. . . 110
7.5.1 Using the Address Selector to Address an Item . . . 110
7.5.2 Sending Mail from the Address Book. . . 111
7.6 Using Frequent Contacts . . . 111
7.7 Managing Personal Address Books . . . 111
7.7.1 Creating a Personal Address Book . . . 112
7.7.2 Deleting a Personal Address Book . . . 112
7.7.3 Editing a Personal Address Book. . . 112
7.8 Sharing an Address Book with Another User . . . 113
8 Using Caching Mode 115 8.1 Setting Up Your Caching Mailbox. . . 115
8.2 Synchronizing Your Caching Mailbox with Your Online Mailbox . . . 116
8.3 Deleting Items in Your Caching Mailbox. . . 116
8.4 Connection Status . . . 116
9 Working with Documents 117 10 Customizing GroupWise 119 10.1 Requesting a Reply for All Items You Send . . . 119
10.2 Setting the Key Used to Delete Items. . . 120
10.3 Confirming Deletion of Items . . . 120
10.4 Show Hidden Files . . . 120
10.5 Specifying Where Archived Items Are Stored . . . 120
10.6 Seeing Time Zones of Other Locales . . . 121
10.7 Calculating a Start or End Date . . . 121
(e
n)
6 Ap
ril 20
07
10.9 Setting Printing Options . . . 122
10.10 Changing the GroupWise Interface Language . . . 122
10.11 Setting Your Default Plain Text Reply Format . . . 122
10.12 Setting Your Default HTML Reply Format . . . 123
10.13 Toolbar Display/Hide Options . . . 123
10.14 Changing Your Display Name . . . 124
10.15 Using Startup Options . . . 124
10.15.1 GroupWise Startup Options on Linux . . . 124
10.15.2 GroupWise Language Codes . . . 125
10.15.3 Using GroupWise Startup Options on Linux . . . 125
10.15.4 Using GroupWise Startup Options on a Macintosh. . . 126
11 GroupWise Frequently Asked Questions 127 A Documentation Updates 129 A.1 February 27, 2007 (Support Pack 2) . . . 129
A.2 May 31, 2006 (Support Pack 1) . . . 129
(e
n)
6 Ap
ril 20
(e
n)
6 Ap
ril 20
07
About This Guide
This Novell®GroupWise® 7 Cross-Platform Client User Guide explains how to use GroupWise on a Linux* or Macintosh* computer. The guide is divided into the following sections:
“Getting Started” on page 13
“Logging In to GroupWise” on page 27
“Working with Items in Your Mailbox” on page 31 “Scheduling Group and Posted Items” on page 59 “Using Your Calendar” on page 69
“Managing Your Mailbox” on page 73 “Using the Address Book” on page 103 “Using Caching Mode” on page 115 “Customizing GroupWise” on page 119
“GroupWise Frequently Asked Questions” on page 127
Audience
This guide is intended for GroupWise users.
Feedback
We want to hear your comments and suggestions about this manual and the other documentation included with this product. Please use the User Comments feature at the bottom of each page of the online documentation, or go to www.novell.com/documentation/feedback.html and enter your comments there.
Documentation Updates
For the most recent version of the GroupWise 7 Cross-Platform Client User Guide, visit the Novell GroupWise 7 documentation Web site (http://www.novell.com/documentation/gw7).
Additional Documentation
For additional GroupWise documentation, see the following guides at the Novell GroupWise 7 documentation Web site (http://www.novell.com/documentation/gw7):
Installation Guide Administration Guide
Multi-System Administration Guide Interoperability Guide
Troubleshooting Guides
(e
n)
6 Ap
ril 20
07
GroupWise Client Frequently Asked Questions (FAQ)
Documentation Conventions
In Novell documentation, a greater-than symbol (>) is used to separate actions within a step and items in a cross-reference path.
A trademark symbol (®, TM, etc.) denotes a Novell trademark. An asterisk (*) denotes a third-party
trademark.
1
(en)6 Ap
ril 20
07
1
Getting Started
GroupWise® is a robust, dependable messaging and collaboration system that connects you to your universal mailbox anytime and anywhere. This section provides an introductory overview to help you start using the GroupWise Cross-Platform client.
Section 1.1, “Installing the GroupWise Cross-Platform Client,” on page 13 Section 1.2, “Getting Acquainted with the Main GroupWise Window,” on page 14 Section 1.3, “Using Different GroupWise Modes,” on page 18
Section 1.4, “Understanding Your Mailbox,” on page 19 Section 1.5, “Using the Toolbar,” on page 23
Section 1.6, “Using Shortcut Keys,” on page 23 Section 1.7, “Learning More,” on page 25
1.1 Installing the GroupWise Cross-Platform
Client
To begin using the GroupWise Cross-Platform client, you or your system administrator must install GroupWise on your Linux or Macintosh computer.
Section 1.1.1, “Installing the GroupWise Cross-Platform Client on Linux,” on page 13 Section 1.1.2, “Installing the GroupWise Cross-Platform Client on a Macintosh,” on page 13
1.1.1 Installing the GroupWise Cross-Platform Client on Linux
1 In a terminal window, become root by entering su and the root password.
2 Change to the root of the GroupWise 7 for Linux Cross-Platform Client CD.
3 Enter ./install.
4 Select the language in which you want to run the Installation Advisor and install the Cross-Platform client software, then click OK.
5 In the Installation Advisor, click Install Products > Install GroupWise Client.
6 When the installation is complete, click OK.
For your convenience, a GroupWise icon is automatically created on your desktop.
7 To start GroupWise, click the GroupWise icon.
8 Specify the username, password, and server information, then click OK.
For more information about logging in to GroupWise, see Chapter 2, “Logging In to GroupWise,” on page 27.
1.1.2 Installing the GroupWise Cross-Platform Client on a
Macintosh
(e
n)
6 Ap
ril 20
07
2 Double-click the GroupWise.dmg file to install the Cross-Platform client software. The installation process adds a GroupWise icon to your desktop.
3 To start GroupWise, double-click the GroupWise icon .
4 Specify the username, password, and server information, then click OK.
For more information about logging in to GroupWise, see Chapter 2, “Logging In to GroupWise,” on page 27.
1.2 Getting Acquainted with the Main GroupWise
Window
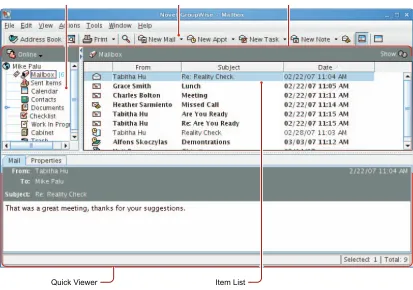
The Main Window is your primary work area in GroupWise. From the Main Window, you can read your messages, schedule appointments, view your Calendar, manage contacts, change the
GroupWise mode you’re running in, open folders, open documents, and much more.
Figure 1-1 Groupwise Main Window
You can open more than one Main Window by clicking Window, then clicking New Main Window. This is useful if you proxy for another user. You can look at your own Main Window and the Main Window belonging to the person you are proxying for. (For more information about proxies, see
Section 6.7, “Giving Other People Access to Your Mailbox,” on page 94.) You might also want to open a certain folder in one window and look at your Calendar in another. You can open as many Main Windows as your computer’s memory allows.
The basic components of the Main Window are explained below.
(e
n)
6 Ap
ril 20
07
1.2.1 Toolbar
The toolbar lets you quickly accomplish common GroupWise tasks, such as opening the Address Book, sending mail messages, and finding an item. For information about the toolbar, see
Section 1.5, “Using the Toolbar,” on page 23.
1.2.2 Folder and Item List Header
The Folder and Item List header provides a drop-down list where you can select the GroupWise mode you want to run (Online or Caching), open your archive, and select a proxy mailbox. For information about these features, see Section 1.3, “Using Different GroupWise Modes,” on page 18,
Section 6.4, “Archiving the Items in Your Mailbox,” on page 79, and Section 6.7, “Giving Other People Access to Your Mailbox,” on page 94.
1.2.3 Folder List
The Folder List at the left of the Main Window lets you organize your GroupWise items by creating folders to store your items in. Next to any folder (except for shared folders), the number of unread items is shown in square brackets. Next to the Sent Items folder, the number in square brackets shows how many items are pending to be sent from Caching mode. For information about the different GroupWise folders, see Section 6.1, “Using the Folder List,” on page 73.
Here is what you’ll find in each of the default folders:
“User Folder” on page 15 “Mailbox Folder” on page 15 “Sent Items Folder” on page 16 “Calendar Folder” on page 16 “Contacts Folder” on page 16 “Checklist Folder” on page 16 “Documents Folder” on page 17 “Cabinet Folder” on page 17 “Junk Mail Folder” on page 17 “Trash Folder” on page 18 “Shared Folders” on page 18
User Folder
Your user folder (indicated by your name) represents your GroupWise database. All folders in your Main Window are subfolders of your user folder.
Mailbox Folder
(e
n)
6 Ap
ril 20
07
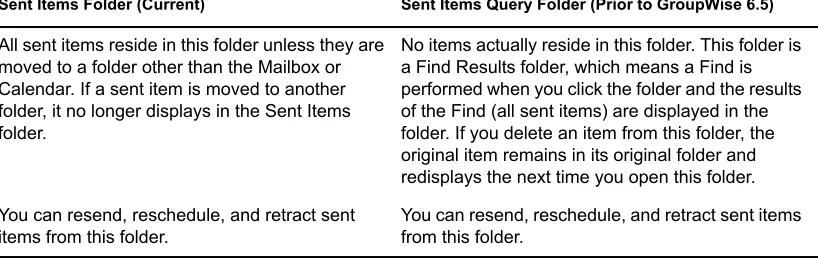
Sent Items Folder
The Sent Items folder displays the items you have sent from the Mailbox and Calendar.
The Sent Items folder has changed since versions prior to GroupWise 6.5. The following table compares the previous Sent Items query folder and the current Sent Items folder.
Table 1-1 Comparison Between Sent Items Query Folder and Sent Items Folder
Calendar Folder
The Calendar folder shows several calendar view options.
Contacts Folder
The Contacts folder , by default, represents the Frequent Contacts address book in the Address Book. Any modification you make in the Contacts Folder is also made in the Frequent Contacts address book.
From this folder, you can view, create and modify contacts, resources, organizations and groups.
Your proxies never see your Contacts folder. (For more information about proxies, see Section 6.7, “Giving Other People Access to Your Mailbox,” on page 94.)
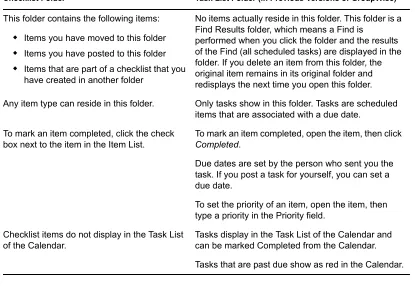
Checklist Folder
Use the Checklist folder to create a task list. You can move any items (mail messages, phone messages, reminder notes, tasks, or appointments) to this folder and arrange them in the order you want. Each item is marked with a check box so that you can check items off as you complete them.
The following is a comparison between the Checklist folder and the Task List query folder (found in previous versions of GroupWise).
Sent Items Folder (Current) Sent Items Query Folder (Prior to GroupWise 6.5)
All sent items reside in this folder unless they are moved to a folder other than the Mailbox or Calendar. If a sent item is moved to another folder, it no longer displays in the Sent Items folder.
No items actually reside in this folder. This folder is a Find Results folder, which means a Find is performed when you click the folder and the results of the Find (all sent items) are displayed in the folder. If you delete an item from this folder, the original item remains in its original folder and redisplays the next time you open this folder. You can resend, reschedule, and retract sent
items from this folder.
(e n) 6 Ap ril 20 07
Table 1-2 Comparison Between Checklist Folder and Task List Folder
Documents Folder
Your document references are organized in the Documents folder so you can locate them easily.
The Documents folder can contain only documents. If any other type of item is moved to this folder by a GroupWise client older than version 5.5, the item is deleted.
Cabinet Folder
The Cabinet contains all your personal folders. You can rearrange and nest folders by clicking
Edit > Folders. You can change how the folders are sorted by right-clicking the Cabinet folder, clicking Properties, then selecting what you want to sort by.
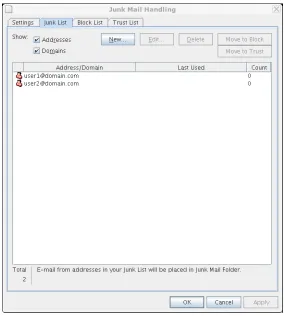
Junk Mail Folder
All e-mail items from addresses and Internet domains that are junked through Junk Mail Handling are placed in the Junk Mail folder . This folder is not created in the folder list unless a Junk Mail option is enabled.
While Junk Mail options are enabled, this folder cannot be deleted. However, the folder can be renamed or moved to a different location in the folder list. If all Junk Mail options are disabled, the folder can be deleted. The folder can also be deleted if the Junk Mail Handling feature is disabled by the system administrator.
To delete items from the Junk Mail Folder, right-click the folder, click Empty Junk Mail Folder, then click Yes.
Checklist Folder Task List Folder (in Previous Versions of GroupWise)
This folder contains the following items: Items you have moved to this folder Items you have posted to this folder Items that are part of a checklist that you
have created in another folder
No items actually reside in this folder. This folder is a Find Results folder, which means a Find is
performed when you click the folder and the results of the Find (all scheduled tasks) are displayed in the folder. If you delete an item from this folder, the original item remains in its original folder and redisplays the next time you open this folder. Any item type can reside in this folder. Only tasks show in this folder. Tasks are scheduled
items that are associated with a due date. To mark an item completed, click the check
box next to the item in the Item List.
To mark an item completed, open the item, then click Completed.
Due dates are set by the person who sent you the task. If you post a task for yourself, you can set a due date.
To set the priority of an item, open the item, then type a priority in the Priority field.
Checklist items do not display in the Task List of the Calendar.
(e
n)
6 Ap
ril 20
07
For more information about Junk Mail Handling, see “Handling Unwanted Mail” on page 47.
Trash Folder
All deleted mail and phone messages, appointments, tasks, documents, and reminder notes are stored in the Trash folder . Items in the Trash can be viewed, opened, or returned to your Mailbox before the Trash is emptied. (Emptying the Trash removes items in the Trash from the system.)
You can empty your entire Trash, or empty only selected items. Items in the Trash are automatically emptied according to the number of days entered in the Cleanup tab in Environment Options, or you can empty the Trash manually. The system administrator might specify that your Trash is emptied automatically on a regular basis.
Shared Folders
A shared folder is like any other folder in your Cabinet, except other people have access to it. You can create shared folders or share existing personal folders in your Cabinet. You choose whom to share the folder with, and what rights to grant each user. Then, users can post messages to the shared folder, drag existing items into the folder, and create discussion threads. You can’t share system folders, which include the Cabinet, Trash, and Work In Progress folders.
1.2.4 Item List
The Item List on the right side of the Main Window displays your mail and phone messages, appointments, reminder notes, tasks, and document references. You can sort the Item List by clicking a column heading. To reverse the sort order, click the column heading a second time. For information about the icons used with different items, see “Icons Appearing Next to Items in Your Mailbox and Calendar” on page 20.
1.2.5 QuickViewer
The QuickViewer opens below the Folder and Item List. You can quickly scan items and their attachments in the QuickViewer rather than open each item in another window. For information about the QuickViewer, see “Reading Items in the QuickViewer” on page 42.
1.3 Using Different GroupWise Modes
GroupWise provides two different ways to run the GroupWise client: Section 1.3.1, “Online Mode,” on page 19 Section 1.3.2, “Caching Mode,” on page 19
You might be able to run GroupWise in either mode, or your system administrator might require that you use only a certain mode.
(e
n)
6 Ap
ril 20
07
1.3.1 Online Mode
When you use Online mode, you are connected to your post office on the network. Your mailbox displays the messages and information stored in your network mailbox (also called your Online Mailbox). Online mode is connected to your network mailbox continuously. In Online mode, if your Post Office Agent shuts down or you lose your network connection, you temporarily lose your connection to your mailbox.
You should use this mode if you do not have a lot of network traffic, or if you use several different workstations and do not want to download a local mailbox to each one.
1.3.2 Caching Mode
Caching mode stores a copy of your network mailbox, including your messages and other
information, on your local drive. This allows you to use GroupWise whether or not your network or Post Office Agent is available. Because you are not connected to the network all the time, this mode cuts down on network traffic and has the best performance. A connection is made automatically to retrieve and send new messages. All updates are performed in the background so your work is not interrupted.
To use Caching mode, the client installation must be a standard installation, not a workstation installation.
You should use this mode if you have enough disk space on your local drive to store your mailbox.
Several users can set up their Caching Mailboxes on a single shared computer.
For more information about setting up Caching Mode, see Chapter 8, “Using Caching Mode,” on page 115.
1.4 Understanding Your Mailbox
All of your items, whether you send or receive them, are stored in your GroupWise Mailbox. You can quickly display only received items, sent items, posted items, or draft items by clicking a setting on the Display drop-down list. You can further restrict which items display in your Mailbox by using filters. See Chapter 6, “Managing Your Mailbox,” on page 73 for more information.
You can organize your messages by moving them into folders within your Cabinet, and you can create new folders as necessary. See Section 6.1, “Using the Folder List,” on page 73 for more information.
1.4.1 Bolded Items in Your Mailbox
All unopened items in your Mailbox are bolded to help you easily identify which items and
documents you have not yet read. The icon appearing next to an item also indicates if it is unopened.
(e
n)
6 Ap
ril 20
07
1.4.2 Icons Appearing Next to Items in Your Mailbox and
Calendar
The icons that appear next to items in your Mailbox and Calendar show information about the items. The following table explains what each icon means.
Table 1-3 Icon Descriptions
Icon Description
Next to an item you have sent in Caching mode, the icon indicates that the item has been queued, but the queue has not been uploaded. After the item has been uploaded, this icon indicates that status information has not been received about the item being delivered to the destination post office or transferred to the Internet. Next to the Sent Items folder, the icon indicates that there is at least one item that has been queued but has not been uploaded.
Appears next to an item you have sent. If the item has been opened by at least one person, this icon appears until all recipients have 1) opened the mail, phone message, or reminder note; 2) accepted the appointment; or 3) completed the task. Appears next to an item you have sent. The item couldn’t be delivered to the destination post office or it failed to transfer to the Internet.
Appears next to an item you have sent. Next to an appointment or task, this icon indicates that at least one person has declined/deleted the item. Next to a mail message, phone message, or reminder note, this icon indicates that at least one person has deleted the item without opening it.
One or more attachments are included with the item.
One or more sound annotations are included with the item, or the item is a voice mail message.
Draft item.
Appears next to an item you have sent. Appears next to an item you have replied to. Appears next to an item you have forwarded. Appears next to an item you have delegated.
Appears next to an item you have replied to and forwarded Appears next to an item you have replied to and delegated. Appears next to an item you have forwarded and delegated.
Appears next to an item you have replied to, forwarded, and delegated Posted item.
Specific version of a document. Official version of a document.
(e
n)
6 Ap
ril 20
07
1.4.3 Viewing Options in Your Mailbox
You can view the items in your Mailbox five different ways, depending on how you want the information organized. Details, As Calendar, and As Checklist are all found on the View menu.
You can choose to have the display settings be temporary or permanent depending how you set them.
To permanently set your display setting:
1 Right-click the folder you want to change the display settings for, then click Properties.
2 Click the Display tab.
3 Select the display setting from the View By drop-down list.
4 Click OK.
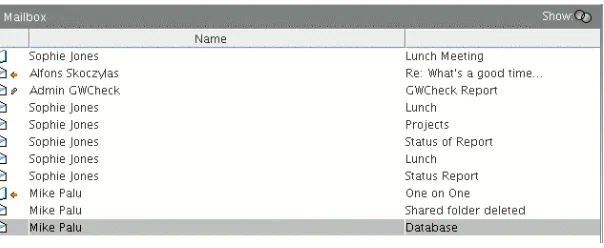
Details
Details displays a list of your items and information about them in columns, including Subject, Date, CC, Priority, Document Type, Due Date, Size, Version#, and many other categories. Details is the default Mailbox view if you have not changed your Mailbox properties. For information about
Opened mail message with a low, standard, or high priority. Unopened appointment with a low, standard, or high priority. Opened appointment with a low, standard, or high priority. Unopened task with a low, standard, or high priority. Opened task with a low, standard, or high priority.
Unopened reminder note with a low, standard, or high priority. Opened reminder note with a low, standard, or high priority. Unopened phone message with a low, standard, or high priority. Opened phone message with a low, standard, or high priority.
The sender has requested that you reply to this item. The item can be a low, standard, or high priority.
Appears in a Busy Search. If it appears to the left of a username or resource, you can click a scheduled time across from the username or resource on the Individual Schedules tab to display more information about the appointment in the box below. However, the user or resource owner must give you appointment Read rights in the Access List before this icon appears. See “Adding and Removing Proxy Names and Rights in Your Access List” on page 95.
Appears on your Calendar, indicates the item is a group appointment, reminder note, or task.
Appears on your Calendar, indicates the item is marked private.
Appears on your Calendar, indicates that you declined the item but didn’t delete it.
(e
n)
6 Ap
ril 20
07
adding or rearranging columns, see Section 6.16, “Using the Columns in Your Mailbox,” on page 102.
Figure 1-2 Details View
As Calendar
As Calendar displays all scheduled items saved in a particular folder. This is useful if you organize all your appointments and other items for a specific project in one folder.
Figure 1-3 Calendar View
As Checklist
As Checklist displays a checklist area at the top of your Item List where you can create a checklist using the items in your Item List. Each item that is dragged to the checklist area displays with a check box so that you can mark it completed. You can assign due dates, priorities, and more to checklist items. Any items you move to the checklist area also displays in the Checklist folder in the Folder List.
(e
n)
6 Ap
ril 20
07
Figure 1-4 Checklist View
1.5 Using the Toolbar
Use the toolbar to access many of the features and options found in GroupWise. The toolbar at the top of a folder or item is context sensitive; it changes to provide the options you need most in that location.
1.6 Using Shortcut Keys
You can use a number of shortcut keys in GroupWise for accessibility or to save time when you perform various operations. The table below lists some of these keystrokes, what they do, and the context where they work.
Table 1-4 Shortcut Keys
Keystroke Action Where It Works
F1 Open online help Main Window, Calendar, item, dialog box
F2 Search for text. In an item
F5 Refresh the view Main Window, Calendar
F7 Opens the Spell Checker In an item
F8 Mark the selected item private Item List
F9 Open the font dialog box In an item
Ctrl+A Select all items; select all text Item List; text
Ctrl+B Bold text In text
Ctrl+C Copy selected text In text
Ctrl+F Open the Find dialog box Main Window, Calendar, item, dialog box
Ctrl+G Go to today’s date Calendar
Ctrl+I Italicize text In text
Ctrl+L Attach a file to a message In an item
Ctrl+M Open a new mail message Main Window, Calendar, item, dialog box
Ctrl+O Open the selected message Item List
Ctrl+P Open the Print dialog box Main Window, item
Ctrl+Q Turn the QuickViewer on and off Main Window, Calendar
(e
n)
6 Ap
ril 20
07
Ctrl+S Save a draft in the Work in
Progress folder
In an item
Ctrl+U Underline text In text
Ctrl+V Paste selected text In text
Ctrl+X Cut selected text In text
Ctrl+Z Undo the last action In text
Ctrl+Up-arrow or
Ctrl+Down-arrow
Opens the previous or next item In an item
Ctrl+Shift+Left-arrow or
Ctrl+Shift+Right-arrow
Select text one word at a time In text
Ctrl+Shift+A Open a new appointment Main Window, Calendar, item, dialog box
Ctrl+Shift+T Open a new task Main Window, Calendar, item, dialog box
Ctrl+Shift+R Open a new reminder note Main Window, Calendar, item, dialog box Ctrl+Shift+P Open a new phone message Main Window, Calendar, item, dialog box
Alt+F4 From the Main Window or
Calendar, exit GroupWise. From an item, exit the item. From a dialog box, exit the dialog box.
Main Window, Calendar, item, dialog box
Alt + [letter] Activate the menu bar (Use the underlined letters in the menu names)
Main Window, Calendar, item
Alt+D Send item In a new item
Alt+S Send item In a new item
Alt+Enter Display the properties of the selected item
Item List
Alt+Del Delete an item In an item
Shift+Left-arrow or
Shift+Right-arrow
Select text one character at a time In text
(e
n)
6 Ap
ril 20
07
1.7 Learning More
You can learn more about GroupWise from the following resources:
Section 1.7.1, “Online Help,” on page 25
Section 1.7.2, “GroupWise 7 Documentation Web Page,” on page 25 Section 1.7.3, “GroupWise Cool Solutions Web Community,” on page 25
1.7.1 Online Help
Complete user documentation is available in Help. In the Main Window, click Help > Help Topics, then use the Contents tab, Index tab, or Search tab to locate the help topics you want.
1.7.2 GroupWise 7 Documentation Web Page
For the latest version of this user guide and for extensive GroupWise administration documentation, go to the GroupWise 7 area on the Novell Documentation Web site (http://www.novell.com/ documentation/gw7).
This user guide is also available from the GroupWise client by clicking Help > User Guide.
1.7.3 GroupWise Cool Solutions Web Community
At GroupWise Cool Solutions, you’ll find tips, tricks, feature articles, and answers to frequent questions. In the Main Window, click Help > Cool Solutions Web Community or go to http:// www.novell.com/coolsolutions/gwmag (http://www.novell.com/coolsolutions/gwmag). Shift+End
or
Shift+Home
Select text to the end or beginning of a line
In text
Shift + [letter] In the Folder List, Shift + the first letter of a subfolder name goes to the subfolder.
Folder list
Tab Cycle through fields, buttons, and
areas
Main Window, Calendar, dialog box, item
Shift+Tab Reverse the order of cycling through fields, buttons, and areas
Main Window, Calendar, dialog box, item
Ctrl+Tab In text, indent the text.
In a tabbed dialog box, open the next tab.
In text, dialog box
Alt+Up Arrow Zooms in the message body of an item.
In an item
Alt+Down Arrow Zooms out the message body of an item.
In an item
(e
n)
6 Ap
ril 20
2
(en)6 Ap
ril 20
07
2
Logging In to GroupWise
This section tells you about GroupWise® login options and passwords.
Section 2.1, “Logging In to GroupWise,” on page 27
Section 2.2, “Assigning Passwords to Your Mailbox,” on page 28
2.1 Logging In to GroupWise
When you start GroupWise, you might be prompted to type information such as your password, the TCP/IP address of your post office agent, and so forth. This Startup dialog box changes, depending on the information GroupWise needs to be able to open your Mailbox, and the GroupWise mode that you log in to.
NOTE: Your system administrator might restrict the GroupWise modes you can log in to.
Section 2.1.1, “Logging In to Your Mailbox,” on page 27
Section 2.1.2, “Logging In to Your Mailbox from Another User’s Workstation,” on page 28 Section 2.1.3, “Logging in to Your Mailbox from a Shared Workstation,” on page 28
2.1.1 Logging In to Your Mailbox
1 Start GroupWise.
If you have not specified a password for your Mailbox and GroupWise needs no additional information, you bypass the Startup dialog box and GroupWise opens.
To force the GroupWise Startup dialog box to display on Linux, right-click the GroupWise icon on the desktop, click Properties, then click the Execute tab. In the Command field after the GroupWise executable name, type a space, type -@u ?, then click OK.
For information about other startup options, see Section 10.15, “Using Startup Options,” on page 124.
2 If you are prompted for a password, type the password in the Password field.
3 Click the mode of GroupWise you are logging in to and type additional necessary information, such as the path to the post office, the TCP/IP address and port of the post office agent, and the path to your Caching mailbox.
If you do not know the required information, contact your system administrator.
(e
n)
6 Ap
ril 20
07
2.1.2 Logging In to Your Mailbox from Another User’s
Workstation
You must be on the same post office as the other user to log into your own Mailbox from his or her workstation.
1 Log in to the network with your own user ID. or
To force the GroupWise Startup dialog box to display on Linux, right-click the GroupWise icon on the desktop, click Properties, then click the Execute tab. In the Command field after the GroupWise executable name, type a space, type -@u ?, then click OK.
2 Start GroupWise.
3 Type your user ID in the User ID field.
4 Click the Password field, type your password, then click OK.
2.1.3 Logging in to Your Mailbox from a Shared Workstation
If you use the same workstation for multiple people, it is highly recommended that each user have a seperate log in for the workstation. When GroupWise saves the display settings for a user they are saved to the current user's registry. This allows GroupWise to display the settings for the user that is currently logged in to the workstation. This allows you to customize GroupWise the way you want it to look without changing the look for other users.
When a user is done using the workstation, that user should log out of the workstation completely. This allows the next user to log on to the system with their own GroupWise settings.
However, there is special circumstances when having a different log on for each user on the workstation is not a viable option. In these cases there is a step you should perform to setup GroupWise properly.
“Using the Login Screen Startup Switch” on page 28
Using the Login Screen Startup Switch
For the login screen startup switch to work properly, you must be on the same post office as the other user to log in to your own Mailbox from his or her workstation.
1 Right-click the GroupWise icon on the desktop, click Properties, click the Shortcut tab, in the
Target field, after the GroupWise executable, type a space, type /@u-?, then click OK.
2 Start GroupWise.
3 Type your user ID in the User ID field.
4 Click the Password field, type your password, then click OK.
2.2 Assigning Passwords to Your Mailbox
(e
n)
6 Ap
ril 20
07
IMPORTANT: If you forget your password, you cannot access any of your items.
Section 2.2.1, “Adding a Password,” on page 29 Section 2.2.2, “Changing Your Password,” on page 29 Section 2.2.3, “Removing Your Password,” on page 29
2.2.1 Adding a Password
1 In the Main Window, click Tools > Options.
2 Click Security, then click the Password tab.
3 Click Change password.
4 In the New password field, type the password.
5 In the Confirm new password field, type the password, click OK, then click Close.
2.2.2 Changing Your Password
1 In the Main Window, click Tools > Options.
2 Click Security, then click the Password tab.
3 Click Change password.
4 In the Old password field, type the password you want to change, then press the Tab key.
5 In the New password field, type the new password.
6 In the Confirm new password field, type the new password again, click OK, then click Close.
2.2.3 Removing Your Password
1 Click Tools > Options.
2 Click Security, then click the Password tab.
3 Click Change password.
4 Type your old password, then click OK.
5 Click Clear Password.
(e
n)
6 Ap
ril 20
3
(en)6 Ap
ril 20
07
3
Working with Items in Your
Mailbox
GroupWise® provides many options for sending and receiving different kinds of e-mail.
Section 3.1, “Understanding GroupWise Item Types,” on page 31 Section 3.2, “Sending and Receiving Items,” on page 32
Section 3.3, “Attaching Files,” on page 38 Section 3.4, “Managing Sent Items,” on page 39 Section 3.5, “Managing Received Items,” on page 41
Section 3.6, “Changing the Encoding of an Item,” on page 56
3.1 Understanding GroupWise Item Types
Every day you communicate in a variety of ways. To accommodate these needs, GroupWise delivers your items using a variety of item types. Each item type is explained below.
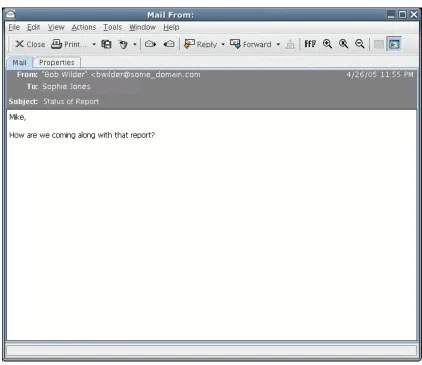
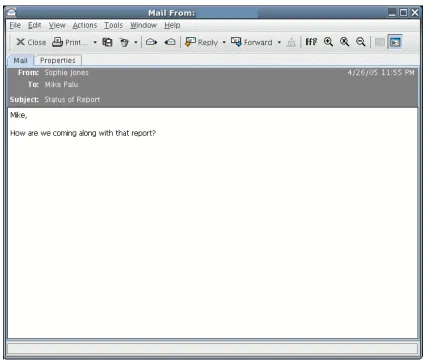
A mail message is for basic correspondence, such as a memorandum or letter.
Appointment
An appointment lets you invite people to and schedule resources for meetings or events. You can schedule the date, time, and location for the meeting. You can use posted appointments to schedule personal events such as a doctor’s appointment, a reminder to make a phone call at a certain time, and so forth. Appointments display on the Calendar. See Section 4.1, “Scheduling Appointments,” on page 59.
Task
A task lets you place a to-do item on your own or on another person’s Calendar after it has has been accepted. You can schedule a due date for the task and include a priority (such as A1). Uncompleted tasks are carried forward to the next day. See Section 4.2, “Sending Tasks,” on page 63.
TIP: You can also create a checklist that is not associated with your Calendar. In this type of checklist, any item type (mail, appointment, task, reminder note, phone message) can be used. For information, see “Creating a Checklist” on page 45.
Reminder Note
(e
n)
6 Ap
ril 20
07
Phone Message
A phone message helps you inform someone of a phone call or visitor. You can include such information as caller, phone number, company, urgency of the call, and so forth. You cannot answer your phone from a phone message. See “Sending Phone Messages” on page 33.
3.2 Sending and Receiving Items
This section contains the following topics: Section 3.2.1, “Sending Mail Messages,” on page 32 Section 3.2.2, “Sending Phone Messages,” on page 33
Section 3.2.3, “Changing the Font of Items You Send,” on page 33
Section 3.2.4, “Adding a Signature or vCard to Items You Send,” on page 34 Section 3.2.5, “Spell-Checking Items You Send,” on page 35
3.2.1 Sending Mail Messages
A mail message has a primary recipient, subject line, date, and can be carbon copied and blind copied to other users. You can also attach files, document references, sounds, movies, and OLE objects to your mail messages.
CC (Carbon Copy)
Carbon copy recipients (CC) receive a copy of an item. CC recipients are users who would benefit from the information in an item, but are not affected by or directly responsible for it. All recipients can see that a carbon copy was sent. They can also see the names of the CC recipients.
BC (Blind Copy)
Blind copy recipients (BC) receive a copy of an item. Other recipients receive no information about blind copies. Only the sender and the blind copy recipient know that a blind copy was sent. If a recipient replies and chooses Reply to All, the blind copy recipient does not receive the reply.
1 Click on the toolbar.
You can select a different mail view by clicking the down-arrow in .
2 In the To field, type a username, then press Enter. Repeat for additional users. If necessary, type usernames in the CC and BC fields.
or
To select usernames from a list, click Address on the toolbar, double-click each user, then click
OK.
3 To change the From name (to another account or proxy), click , then click a name.
4 Type a subject.
5 Type a message.
(e
n)
6 Ap
ril 20
07
If you want, you can change the font of the message text. For information, see “Changing the Font of Items You Send” on page 33.
6 Include any attachments by clicking on the toolbar.
7 Click Send on the toolbar.
3.2.2 Sending Phone Messages
A phone message is a note you can send to notify other GroupWise users of calls they received while they were out of the office or unavailable. Phone messages are stored in the recipient’s Mailbox. You cannot answer your phone from a phone message.
You can change the phone messages you receive into tasks, reminder notes, or other posted item views. This way, you can leave a record of the conversation on the date it was held (reminder note) or create a to-do item to complete at a later date (task).
1 Click File > New > Phone.
2 In the To field, type a username, then press Enter. Repeat for additional users. If necessary, type usernames in the CC and BC fields.
or
To select usernames from a list, click Address on the toolbar, double-click each user, then click
OK.
3 Type the name, company, and phone number of the caller.
4 Select the check boxes that apply to this phone message.
5 Type the message in the Message field.
If you want, change the font of the message text. For information, see “Changing the Font of Items You Send” on page 33.
6 To change the From name (to another account or proxy), click , then click a name.
7 Click Send on the toolbar.
NOTE: You can place a New Phone Message button on the toolbar.
3.2.3 Changing the Font of Items You Send
The recipient of an item sees the changes you make in Plain Text view if he or she views the item in Plain Text view. The recipient of an item sees the changes you make in HTML view if he or she views the item in HTML view. You might want to let the recipient know which view you composed the item in.
This section contains the following topics:
“Changing the Font in Plain Text View” on page 33 “Changing the Font in HTML View” on page 34
Changing the Font in Plain Text View
1 In an open item you are composing, click View > Plain Text.
(e
n)
6 Ap
ril 20
07
3 Click Edit > Font, then click Font again.
4 Select a font and a font style.
5 Select a size.
6 Select any other options you want to change, then click OK.
You can also bold, italicize, or underline portions of text using toolbar buttons.
Changing the Font in HTML View
1 In an open item you are composing, click View > HTML.
2 Use the HTML toolbar to change the font, add background colors, add images, and more. You might need to re-size the item view horizontally to see all the buttons on the HTML toolbar.
You can set a default font for items you compose in HTML view. For information, see “Viewing and Composing Items in HTML” on page 55.
3.2.4 Adding a Signature or vCard to Items You Send
Use Signatures to insert a signature or tag-line at the end of items you send. For example, you can have GroupWise automatically list your name, phone number, and e-mail address at the bottom of every item you send.
You can also have GroupWise automatically add a vCard*, or virtual business card, to the end of messages. GroupWise searches the Address Book for your user information and places it at the end of any messages you send.
This section contains the following topics:
“Understanding vCard Files” on page 34
“Adding a Signature or vCard to Items” on page 34
Understanding vCard Files
vCards are electronic business cards formatted according to standards set by the Internet Mail Consortium. A vCard file has a .vcf extension, and you can add the file to your outgoing e-mail items. Third-party companies create software you can use to create vCards that include text, graphics, and sound. When you use GroupWise to generate your vCard, it uses the information from the fields in your Address Book listing.
To view a vCard that has been attached to an item, right-click it, then click View Attachment.
Adding a Signature or vCard to Items
1 To specify a general signature for all items, click Tools > Options, then click Send. or
On a Macintosh, click GroupWise > Preferences, then click Send.
2 Click the Signature tab.
3 Click Electronic business card (vCard) or Signature.
(e
n)
6 Ap
ril 20
07
or
If you selected vCard, either specify a .vcf file or leave the field empty to have the vCard use information from your listing in the Address Book.
5 Click a signature option.
6 Click OK.
You can have both a signature and a vCard at the same time. If you choose both the signature is used by default.
3.2.5 Spell-Checking Items You Send
There are two ways to spell-check the items you send. Quick Speller checks the spelling as you type, and underlines the words that are spelled wrong. You run Spell Checker separately, either manually or by selecting to have it run when you click Send.
Both features check for misspelled words, duplicate words, and irregular capitalization in items you are creating.
When Quick Speller finds a misspelled word, you can replace it with a word Quick Speller suggests or skip the word whenever it appears in that message. You can also add the word to a user word list.
When Spell Checker finds a misspelled word, you can replace it with a word Spell Checker suggests, edit the word manually, or skip the word.
You use Environment Options to set up Spell Checker to automatically spell check your messages before you send them.
This section contains the following topics:
“Spell-Checking an Item with Quick Speller” on page 35 “Disabling Quick Speller” on page 35
“Spell-Checking an Item with Spell Checker” on page 36
“Spell-Checking Items Automatically with Spell Checker” on page 37 “Configuring Spell Checker” on page 37
“Configuring Spell Checker Language” on page 37
Spell-Checking an Item with Quick Speller
1 Right-click the misspelled word in the Subject or Message field.
2 Click the correctly spelled word. or
Click Ignore Word to skip the word. or
Click Learn Word to add the word to your dictionary.
Disabling Quick Speller
1 Right-click the misspelled word in the Subject or Message field.
(e
n)
6 Ap
ril 20
07
To re-enable Quick Speller, right-click in the Subject or Message field, then select Check Spelling as You Type.
Spell-Checking an Item with Spell Checker 1 Click the Subject field or the Message field.
or
Select the text to spell-check.
2 Click Tools > Spell Checker.
3 To specify a dictionary, select a dictionary in the Dictionary drop-down list.
4 When Spell Checker stops on a word, click any of the available options, or edit the word manually.
You can choose from the following options:
Replace: Replaces a misspelled word with a word Spell Checker suggests. To replace a misspelled word, double-click the word, or click the word and click Replace. To make your own corrections, edit the word in the Replace With box, then click Replace.
Replace All: Replaces all instances of the same misspelled word with a word Spell Checker suggests. To replace the misspelled word, double-click the word, or click the word and then click Replace All. To make your own corrections, edit the word in the Replace With box, then click Replace All.
Ignore: Ignores the word one time. Spell Checker stops the next time it encounters the word.
Ignore All: Ignores every occurrence of the word throughout the document. Spell Checker ignores the word until the next time you spell-check.
Learn: Adds the word to the current user word list, which stores supplemental words so that Spell Checker can recognize the word in future spell-checks.
(e
n)
6 Ap
ril 20
07
Spell-Checking Items Automatically with Spell Checker
You can spell-check items automatically every time you click Send.
1 Click Tools > Options, then click General. or
On a Macintosh*, click GroupWise > Preferences, then click General.
2 Select Spell check before send, then click OK.
Configuring Spell Checker
1 Click the Subject field or the Message field. or
Select the text to spell-check.
2 Click Tools > Spell Checker.
3 Click Options. The following options are available:
Ignore Case: Ignores the case of words.
Ignore Mixed-Case Words Capitalization: Ignores words with capital letters that do not begin a word, such as “THe”.
Ignore Words with Numbers: Ignores words containing both letters and numbers, such as “2nd”.
Ignore Duplicate Words: Ignores duplicate words, such as “the the”.
Ignore URL-Like Words: Ignores words that look like URLs.
Check Punctuation: Checks the punctuation of sentences for mistakes.
Enable Auto-Replace: Auto-replaces words that are commonly misspelled.
Enable Compound Words: Checks the spelling of compound words.
Enable General Prefixes: Checks the spelling of prefixes.
Suggestions: Use this setting to specify if you want to favor speed over quality, normal, or favor quality over speed. All these settings effect the length of the suggestion list.
Configuring Spell Checker Language 1 Click the Subject field or the Message field.
or
Select the text to spell-check.
2 Click Tools > Spell Checker.
(e
n)
6 Ap
ril 20
07
3.3 Attaching Files
Use Attach File to send one or more files to other users. You can attach a file that exists on your hard disk, diskette, or network drive. The recipients can open the attached file, save it, view it, or print it. If you change the attached file after you have sent it, the recipients do not see the changes.
If you attach a file that is password-protected, the recipient cannot open or view the attachment without entering the password.
This section contains the following topics:
Section 3.3.1, “Attaching a File to an Item,” on page 38 Section 3.3.2, “Viewing Attached Files,” on page 38 Section 3.3.3, “Opening Attached Files,” on page 38
3.3.1 Attaching a File to an Item
1 Open a new item.
2 Fill in the To, Subject, and Message fields.
3 Click File > Attach File and select the file or files you want to send. To remove an attached file, right-click the attachment, then click Delete.
4 Click OK.
5 Click Send on the toolbar.
Moving or deleting a file on a disk or network drive does not affect a file you’ve attached to an item and sent.
If you delete an attached file, it is not erased from disk or network drive; it is simply removed from the attachment list.
3.3.2 Viewing Attached Files
When you click an attached file, the attachment is displayed in the message pane with a viewer. This is usually faster than opening the attachment; however, the attachment might not be formatted properly. If the attachment type is not supported, you receive an error.
1 Open the item containing the attachment.
2 Click the attachment.
If you receive a message indicating that “ The attachment can only be viewed with an external application”, then you must open the file. For information on opening an attachment, see
“Opening Attached Files” on page 38.
3.3.3 Opening Attached Files
When you open an attached file by double-clicking it, GroupWise determines the correct application to open the file in. You can accept the suggested application, or you can type the path and filename to another application.
(e
n)
6 Ap
ril 20
07
2 Double-click the attachment. or
Right-click on the attachment then click Open Attachment.
3.4 Managing Sent Items
This section contains the following topics: Section 3.4.1, “Confirming Delivery of Items You’ve Sent,” on page 39 Section 3.4.2, “Displaying Sent Items,” on page 39
Section 3.4.3, “Resending Items,” on page 40
Section 3.4.4, “Retracting Items You’ve Sent,” on page 40 Section 3.4.5, “Checking the Status of Your Items,” on page 40 Section 3.4.6, “Requesting a Reply for Items You Send,” on page 41
3.4.1 Confirming Delivery of Items You’ve Sent
GroupWise provides several ways to confirm that your item was delivered.
Tracking an Item You Sent
You can check the status in the Properties window of any item you’ve sent. For information, see
“Checking the Status of Your Items” on page 40.
Receiving Notification When the Item is Opened or Deleted
You can receive notification when the recipient opens or deletes a message, declines an appointment, or completes a task.
Requesting a Reply
You can inform the recipient of an item that you need a reply. GroupWise adds a sentence to the item stating that a reply is requested and changes the icon in the recipient’s Mailbox to a double arrow. For information, see “Requesting a Reply for Items You Send” on page 41.
3.4.2 Displaying Sent Items
You might want to display items you previously sent. For example, you can read a sent item, resend it with or without corrections, and in some cases, retract it (if it has not already been opened by the recipient).
1 Click the Sent Items folder in the Folder List.
(e
n)
6 Ap
ril 20
07
3.4.3 Resending Items
Use Resend to send an item a second time, perhaps with corrections.
1 Click the Sent Items folder in the Folder List.
2 Right-click the item you want to resend, then click Resend.
3 If the item was an auto-date item, click This Instance or All Instances.
4 Make any changes to the item, if necessary, then click Send on the toolbar.
5 Click Yes to retract the original item. or
Click No to leave the original item.
You can check the Properties of the original item to see if GroupWise was able to retract it. Right-click the item in the Mailbox, then Right-click Properties. Mail and phone messages cannot be retracted if they have already been opened.
3.4.4 Retracting Items You’ve Sent
Use Delete to retract a sent item from the recipient’s Mailbox. You can retract a mail or phone message from those recipients who haven’t yet opened the item. You can retract an appointment, reminder note, or task at any time.
1 Click the Sent Items folder in the Folder List.
2 Right-click the item you want to retract, then click Delete.
3 Select the appropriate option.
4 If you have selected to retract this item from other recipients’ mailboxes, you can type a comment to the recipients, explaining why the item was retracted.
5 Click OK.
To see which recipients have opened your message, right-click the item, then click Properties.
3.4.5 Checking the Status of Your Items
Properties lets you check the status of any item you’ve sent. For example, you can see when an item was delivered and when the recipient opened or deleted the item. If a recipient accepted or declined an appointment and included a comment, you’ll see the comment in the Properties window. You’ll also see if a recipient marked a task Completed.
Properties also shows information about items you receive. You can see who else received the item (except for blind copy recipients), the size and creation date of attached files, and more.
You can save and print status information for an item.
This section contains the following topics:
“Checking the Status of an Item” on page 41
(e
n)
6 Ap
ril 20
07
Checking the Status of an Item
1 Right-click an item in your Mailbox or Calendar, then click Properties.
The icons next to an item can also give you helpful status information. See “Icons Appearing Next to Items in Your Mailbox and Calendar” on page 20.
Saving the Status Information of an Item 1 Right-click an item, then click Properties.
2 Click File > Save As.
GroupWise gives the item a temporary filename. You can change the filename and default folder to save the file.
3 Click Save.
Printing the Status Information of an Item 1 Right-click an item, then click Properties.
2 Right-click in the Properties window, then click Print.
3.4.6 Requesting a Reply for Items You Send
1 To request a reply for one item, open an item view, click the Send Options tab, then click
General.
or
To request a reply for all items you send, click Tools > Options, then click Send