University of New Orleans Theses and
Dissertations Dissertations and Theses
8-7-2003
An Automated Data Warehouse
An Automated Data Warehouse
Sudhindra Sharathkumar University of New Orleans
Follow this and additional works at: https://scholarworks.uno.edu/td
Recommended Citation Recommended Citation
Sharathkumar, Sudhindra, "An Automated Data Warehouse" (2003). University of New Orleans Theses and Dissertations. 36.
https://scholarworks.uno.edu/td/36
This Thesis is protected by copyright and/or related rights. It has been brought to you by ScholarWorks@UNO with permission from the rights-holder(s). You are free to use this Thesis in any way that is permitted by the copyright and related rights legislation that applies to your use. For other uses you need to obtain permission from the rights-holder(s) directly, unless additional rights are indicated by a Creative Commons license in the record and/or on the work itself.
A Thesis
Submitted to the Graduate Faculty of the University of New Orleans in partial fulfillment of the requirements for the degree of
Master of Science in
The Department of Computer Science
by
Sudhindra Sharathkumar
B.E, Bangalore University, India, 1997
LIST OF FIGURES ... v
Abstract... vii
Chapter 1. Introduction ... 1
1.1. Objectives ... 1
1.2. Overview... 2
Chapter 2. Concepts of an Automated Data Warehouse... 4
2.1. Data Warehouses ... 4
2.2. Schema Mapping ... 6
2.3. Automated data update in Data Warehouse... 6
2.4. Problem Definition... 7
2.5. SagaMap solution to the problem ... 10
Chapter 3. Architecture and Design... 11
3.1. Technical Architecture... 11
3.2. Basic Technology... 13
3.3. Functional Architecture ... 15
Chapter 4. Database Creation ... 16
4.1. Introduction... 16
4.2. Background... 16
4.3. User Interface Design ... 16
4.4. Implementation ... 19
Chapter 5. Semi Automatic Generation of Warehouse Schema ... 21
5.1. Introduction... 21
5.2. Implementing a Data warehouse... 21
5.3. Schema Mapping ... 22
5.4. Concepts of the Metadata API ... 25
5.4.1. Why do we need to use the Metadata API?... 25
5.4.2. What is DBMS_METADATA?... 26
5.4.3. How does SagaMap convert XML to DDL?... 26
5.5. User Interface Design ... 27
5.6. Implementation ... 34
5.7. XML Transformation... 40
Chapter 6. Database Switching... 47
6.1. Introduction... 47
7.1. Introduction... 51
7.2. Background... 52
7.3. Concepts and Assumptions ... 54
7.4. Implementation ... 56
Chapter 8. Security... 60
8.1. Introduction... 60
8.2. Background... 60
8.3. Concepts of Security... 61
8.4. Implementation ... 64
Chapter 9. Configuration Files... 65
Chapter 10. Conclusion and Future work ... 68
10.1. Conclusion ... 68
10.2. Future Work ... 69
Appendix A... 70
Appendix B ... 73
References... 75
I would like to express my deepest appreciation and gratitude towards my thesis advisor Dr. Markus Montigel, for sharing his knowledge and providing me with many helpful comments in the formation and completion of this project.
I would like to thank Dr. Golden Richard III and Dr. Adlai DePano for being on my thesis committee. It was a great honor having them both. I would like to give my special thanks to Dr. Golden Richard III for his guidance in all the courses that I have taken under him.
I would like to thank my family members for being patient, for all their support and love.
I would also like to thank my friend and colleague Ms. Sudha Joish for the support and understanding during my work on the Thesis.
Figure 2.1. Data warehouse architecture... 5
Figure 2.2. Attribute Selection from Source Table... 8
Figure 2.3. Tables Selection from Source Database ... 9
Figure 3.1. Relationship between model, view and controller objects ... 12
Figure 3.2. Functional architecture of the SagaMap tool... 15
Figure 4.1. Snapshot of the main screen ... 17
Figure 4.2. Snapshot of the Tools menu ... 17
Figure 4.3. Snapshot of the database creation screen ... 18
Figure 4.4. Class diagram representing the different classes used in creation of a new database... 20
Figure 5.1. Parent-Child relationship between ‘Equipment’ and ‘Equipment Hours’ table ... 23
Figure 5.2. Mapping tables between source and target database... 24
Figure 5.3. Mapping attributes between source and target table ... 24
Figure 5.4. Syntax to extract metadata in XML format... 26
Figure 5.5. Conversion of XML to DDL ... 27
Figure 5.6. Snapshot of SagaMap main screen... 28
Figure 5.7. Snapshot of SagaMap ‘Tools’ menu. ... 28
Figure 5.8. Snapshot of the Screen 1 of ‘Table Creation Wizard’... 29
Figure 5.9. Snapshot of Screen 2 of ‘Table Creation Wizard’... 30
Figure 5.10. Snapshot of Screen 3 of ‘Table Creation Wizard’... 32
Figure 5.11. Snapshot of ‘Add New Attribute’ screen ... 32
Figure 5.12. Sequence diagram involved in creating new warehouse schema... 33
Figure 5.13. Class diagram of the classes involved ... 36
Figure 5.14. Interaction diagram of source database connection... 37
Figure 5.15. Interaction Diagram for selecting tables from the master tables list ... 37
Figure 5.16. Interaction Diagram for displaying attributes of a selected table... 38
Figure 5.17. Interaction Diagram for saving the selected table details... 39
Figure 5.18. Main schema of the XML file used for creation of DDL... 40
Figure 5.19. Expansion of col_list element ... 41
Figure 5.20. Expansion of con1_list element... 41
Figure 5.21. Expansion of con2_list element... 42
Figure 5.22. XML Schema of Relations.xml... 43
Figure 5.23. Sample Relations.xml... 43
Figure 5.24. XML Schema of Src-Tgt.xml... 44
Figure 5.25. Sample Src-Tgt.xml... 44
Figure 5.26. Schema of NewAttributes.xml ... 45
Figure 7.1. Technical architecture of the application ... 53
Figure 7.2. A sample format for new service creation... 55
Figure 7.3. A sample format for the experience submission case ... 56
Figure 7.4. Sample code to load servlet at start-up of web server ... 56
Figure 7.5. New service creation sequence diagram... 58
Figure 7.6. Sample code to load servlet at start-up of web server ... 58
Figure 7.7. Experience submission case sequence diagram ... 59
Figure 8.1. Working schema of public key cryptography. ... 62
Figure 8.2. Working Schema of SSL. ... 63
Figure 9.1. Sample configuration file for New Service Creation ... 66
An increasing number of organizations are implementing data warehouses to strengthen their decision support systems. This comes with the challenges of the population and the periodic update of data warehouses. In this thesis, we present a tool that provides users with features to create a warehouse database and transform structures of the source database into structures for the warehouse database. It is highly interactive, easy to use, and hides the underlying complexity of manual SQL code generation from its users. Attributes from source tables can be mapped into new attributes in the warehouse database tables using aggregate functions. Then, relevant data is automatically transported from the source database to the newly created warehouse. The tool thus integrates warehouse creation, schema mapping and data population into a single general-purpose tool.
This tool has been designed as a component of the framework for an automated data warehouse being developed at the Computer Science Department, University of New Orleans. Users of this framework are the database administrators, who will also be able to synchronize updates of multiple copies of the data warehouse. Warehouse images that need to be updated are taken offline and applications that need to access the data warehouse can now access any of the other image warehouses. The Switching Application built into this framework switches between databases in a way that is totally transparent to applications so that they do not realize existence of multiple copies of the data warehouse.
Chapter 1. Introduction
Database creation is a complex task and involves tuning many parameters and can be done using Oracle’s database creation wizard [15]. If many databases need to be created, the database creation wizard will need to be used repeatedly for each new database. This can be cumbersome especially when only a minimum number of essential parameters differ for each database.
Data warehouses [8] are databases that are loaded with subsets of relevant data from a source database. These warehouses may contain informational data extracted from operational data in the source database. The tables in warehouse databases are based on the tables from the source database. Hence, it is essential to transform structures of the source database into structures for the warehouse. Nowadays, this is done by manually exploring and creating such a mapping. This process is both tedious and time-consuming. Also, users need to be technically trained to perform this task.
There are a few other shortcomings in the present system. In the warehouse schema users may add new attributes to tables, these new attributes are the aggregates of the attributes of the master database. As a result, when data is copied from the master database to the warehouse database, data for these aggregate functions need to be computed at run-time during update, causing more delay. When this update is in progress, applications accessing the warehouse will not get access to accurate data, leading to lack of synchronization.
1.1. Objectives
generate a new database and creates an empty data warehouse. For a given source database, the tool aims at arriving at an appropriate mapping to create a structurally related warehouse. After a mapping has been formalized, tables for the new warehouse are created. Then, relevant data is automatically transported from the source database to the newly created warehouse.
A framework has been built to facilitate automatic updates of data warehouses. It has been designed in a way that the there can be multiple copies of the warehouse database, where each copy is an image of the warehouse database. Copies that need to be updated are taken offline and applications that need to access the warehouse database can now access any of the other image warehouses. SagaMap’s Switching Application – Image Switcher, switches between databases in a way that is totally transparent to applications so that they do not realize existence of multiple warehouse databases.
As a result, using SagaMap, the end user can directly create the desired warehouse schema. A major advantage in using this tool is the automation of SQL script generation for schema creation and data management. The use of such a tool gives the user more time to design his schema more accurately and efficiently rather than developing the code itself.
1.2. Overview
The remaining chapters are organized as follows:
Chapter 2. Concepts of an Automated Data Warehouse
SagaMap is a tool that works towards providing an interface to accept from users the required information to generate a new database and creates an empty data warehouse. For a given source database, the tool aims at arriving at an appropriate mapping to create a structurally related warehouse. After a mapping has been formalized, tables for the new warehouse are created. Then, relevant data is automatically transported from the source database to the newly created warehouse.
This chapter explains the fundamental concepts behind building an automated data warehouse. We also present an interesting problem with creation and update of a data warehouse and discuss how this tool solves them.
2.1. Data Warehouses
Data warehousing [8] is a collection of technologies that support management decision-making. They can be broadly classified as decision support systems. Decision support is a methodology designed to extract information from data and to use this information as a basis for decision-making.
For example, ChartVisio [20] is a component of the Web-based Benchmark data engine [4]. It is a decision-supporting application that extracts data from a warehouse and presents it in visual form. An advantage of manufacturing data in the form of a visual may lead to detection of trends, relationships, exceptions and patterns in the data, if any. Thus, these observations may be key in the future decision making processes.
operational data in the source database and is transformed for end- user decision-making [8].
The development of a data warehouse includes development of systems to extract data from operational systems and the installation of a warehouse database system that provides managers with flexible access to the data. It is aimed at reducing complexity and improving efficiency of data querying. Data warehouses are based on open systems and relational databases.
Data warehouses offer organizations the ability to gather and store enterprise information in a single conceptual enterprise repository. Basic data modeling techniques are applied to create relationship associations between individual data elements or data element groups. These associations, or models, often take the form of entity relationship mapping.
Figure 2.1. presents the basic architecture of a Data warehouse.
Source DB Target DB Decision Support ApplicationsQuery/Analysis, Reporting, Integrate &
Transform Queries
Figure 2.1. Data warehouse architecture
The major components in Figure 2.1. are as follows:
Source databases – In this project, data from a source database is migrated to a newly created data warehouse. The master database acts as the source database.
desktop applications such as query and analysis, decision support applications and data mining tools.
Decision Support Applications – Decision support applications will use data from the data warehouse. In this project, an application such as ChartVisio may act as a Decision Support Application.
2.2. Schema Mapping
Data warehousing involves mapping subsets of relevant data from the source database to the target database. The target database schema is designed based on the data that is being transported from the source database. Hence, there is a mapping between the structure of the source database and that of the target database. This mapping is termed as Schema Mapping.
A data warehouse is created autonomously, based on the schema of source database. Schema Mapping is an essential means to transform structures of the source database into structures for the warehouse. This can be done manually, where users can manually explore on creating such a mapping, which can be both tedious and time-consuming. This also assumes that users are technically trained to perform this task.
2.3. Automated data update in Data Warehouse
Transforming data from the source database to the data warehouse is a slow process. The tables in the warehouse schema may have new attributes, which may be aggregates of the attributes of the master database. During data transfer from the master database to the warehouse database, data for these aggregate functions need to be computed at run-time, causing more delay. At this run-time, the data warehouse will be unavailable to applications accessing it and this results in lack of synchronization [9].
2.4. Problem Definition
Let us consider the following scenario: Users have a large database and need to store a sub-set of data in a warehouse. The process involved in doing that is:
• Explore the source database and decide what data needs to be represented in the warehouse
• Create data warehouse by tuning parameters using Oracle’s database creation wizard [15]
• Form SQL queries to create schema for the newly created data warehouse
• Form SQL queries to transfer appropriate data from the source database to the data warehouse
• Periodically manage the update of the data warehouse so that changes in the source database are reflected in the data warehouse
• Manage multiple images of the data warehouse in order to ensure availability of data warehouse at all times
• Provide applications with transparent access to multiple images of data warehouse
Let us consider an example from a sample maritime industry database to explain the problem better. (Note: The maritime industry database is referred to as the ‘source database’ in this discussion.) In this scenario, users need to store performance related information of equipments in a data warehouse. Several tasks need to be performed to successfully create such a data warehouse.
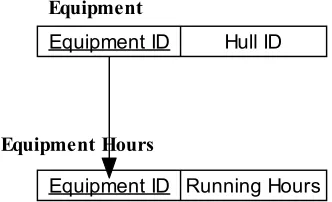
In the source database, users need to select performance-related data stored in the Equipment Hours table, in attributes - Running Hours, Uptime, MTBF Predicted and MTBF Required. Also, it is essential that the primary key of the Equipment Hours table is a part of the data warehouse. This is presented in Figure 2.2.
Equipment_Hours ---Equipment_Unique_ID Hull_ID Alert Note Last_Updated Running_Hours Uptime MT BF_Predicted MT BF_Required Equipment_Hours ---Equipment_Unique_ID Hull_ID Running_Hours Uptime MTBF_Ratio
Table Structure in Source Schema Table Structure in Target Schema Aggregate
Figure 2.2. Attribute Selection from Source Table
It has to be noted that the Equipment Hours table has several referential integrity constraints, due to which all the parent tables need to be a part of the data warehouse schema. Parent tables of Equipment Hours table are presented in Figure 2.3.
Equipment_Hours ---Equipment Manufacturer_Info Ships Ships_System Model_No_Info Next_Higher_Assembly ---Vessel_Group Vessel_Group_Vessel Equipment_Hours Equipment Manufacturer_Info Ships Ships_System Model_No_Info Next_Higher_Assembly
Source DB Target DB
Table Selected
All referential Tables Automatically selected
Figure 2.3. Tables Selection from Source Database
Users may also want to include a new attribute ‘MTBF Ratio’ that calculates the ratio as an aggregate of MTBF Predicted and MTBF Required.
Appendix A presents the extensive SQL code that needs to be written to implement the above mapping.
In this example, we have considered mapping only one table from the source database to the data warehouse. The problem grows as the number of tables and attributes to be mapped increases.
of the data warehouse in order to ensure availability of data warehouse at all times. Applications need to be provided with transparent access to multiple images of data warehouse. This is a procedure involving advanced database management techniques [1].
2.5. SagaMap solution to the problem
As a solution to the problems posed above, we present SagaMap – a tool that generates a new data warehouse, performs schema mapping and builds a framework for automatic update of the data warehouse. SagaMap has been developed to allow users to select, extract, clean, and convert data from source system structures into consistent target warehouse data structures. Also, the data from the source database is populated into the target database. The data warehouse can be populated on a frequency that meets the organization’s needs.
The tool navigates users in a sequence of interactive steps and accepts the parameters to
Chapter 3. Architecture and Design
Design decisions and functional architecture of the Semi automatic generation of warehouse schema has been explained in this section.
3.1. Technical Architecture
System architecture is a vital component of an application design. Architecture translates the logical design of the application to a structure that defines the interaction of entities in the system. SagaMap architecture is based upon a Model-View-Controller (MVC) design pattern. The goal of the MVC design pattern is to separate the application object (model) from the way it is represented to the user (view) from the way in which the user controls it (controller) [7]. Following is a small description of each of the components in MVC design pattern:
• Model: The model represents the data of an application. Anything that an application will persist becomes a part of model. The model also defines the way of accessing this data (the business logic of application) for manipulation. It knows nothing about the way the data will be displayed by the application. It just provides service to access the data and modify it.
• View: The view represents the presentation of the application. The view queries the model for its content and renders it. The way the model will be rendered is defined by the view. The view is not dependent on data or application logic changes and remains same even if the business logic undergoes modification.
appropriate action. Based on the result of the action on data, the controller directs the user to the subsequent view.
In SagaMap, the classes which handle the data in XML format and other data structures form the model. The classes used to display the information to the user form the view. The classes which are used to extract the DDL information from the database, update the view with the data from XML files and again update the XML files from the view form the controller. Figure 3.1. presents the relationship between model, view and controller objects.
Figure 3.1. Relationship between model, view and controller objects
Advantages
The MVC architecture has the following benefits [7]:
are easier to implement, test, and maintain, since all access to the model goes through these components.
2) Easier support for new types of clients: To support a new type of client, you simply write a view and controller for it and wire them into the existing model.
3) Clarity of design: By glancing at the model's public method list, it should be easy to understand how to control the model's behavior. When designing the application, this trait makes the entire program easier to implement and maintain.
4) Efficient modularity: of the design allows any of the components to be swapped in and out as the user or programmer desires. Changes to one aspect of the program aren't coupled to other aspects, eliminating many debugging situations. Also, development of the various components can progress in parallel, once the interface between the components is clearly defined.
SagaMap benefits from the above advantages that:
• The view of the application can be easily changed to display the information in multiple formats
• Multiple types of databases can be added by writing the controller classes specific to that database
• Design is clear and implementation becomes easy
• Has high modularity as the database connection, data extraction module can be easily replaced by other classes in order to connect to different databases
3.2. Basic Technology
easily. Also, resources (such as Java API [12]) and help available on the Internet make learning and implementing new concepts in Java simple [14].
The components and technology involved in this project include:
• Java Swing [14] has been used to display the GUI. The application provides a wizard based GUI, which eases the schema mapping process.
• Metadata API [17] (Available in Oracle9i) has been used to provide a simple and flexible to do the following:
o Extract complete definitions of database objects (metadata) as XML
o Generate SQL DDL [18] to recreate the database objects by transforming
the metadata using XSL-T [2]
• Oracle 9i [15] has been used as the source and target databases. The application makes uses of Metadata API to conveniently manage retrieving of DDL information.
• XML (eXtensible Markup Language) [2] has been used to achieve interoperability and to store data using a standardized format. The application saves user charts as XML files. The cohesive integration of Java and XML adds flexibility and eases communication between heterogeneous systems [6].
• XSLT (eXtensible Stylesheet Language Transformer) [2] has been used to transform XML data from one form to another. XSLT is also written in XML. This is vital to handle data interchange when two applications process data with different structures.
• XSL (eXtensible Stylesheet Language) stylesheets have been used for presentation of the XML data to different clients and trimming down of XML files.
3.3. Functional Architecture
Figure 3.1 shows where the components are deployed in the architecture and which functional block sustains each component. Figure 3.2 demonstrates the relation and interaction amongst all the components involved in the system.
Figure 3.2 presents a comprehensive view of interaction of all the components in the application. Users may select to view saved schema mapping or create a new schema mapping. Components presented in Figure 3.2 explain these concepts as a functional diagram.
TablesSwingFrame.java AttributesSwingFrame.java
TablesView.java DBHandler.java
TablesValidator.java
TablesGenerator.java
TablesController.java ScriptGenerator.java
XmlDataHandler.java
XmlExtractor.java
NewAttributesHandler.java
XmlLoader.java
Database Server
Chapter 4. Database Creation
4.1. Introduction
Database creation is a complex task and involves tuning many parameters. This chapter describes how SagaMap provides a graphical interface to accept the essential parameters to generate script files, which can be executed from the command prompt to create a new database.
4.2. Background
One of the overall goals of this project it to be able to create and populate databases for data warehouses. This involves creating a blank database, in which data may be filled in [1]. In this chapter, we discuss how our tool helps towards reaching the first step of the goal.
4.3. User Interface Design
This section describes how scripts are generated and executed to create a new warehouse database.
All references to ‘Users’ in this section imply the system administrator.
Step 1: Load Application
Figure 4.1. Snapshot of the main screen
Step 2: Create Database
In the previous step, users loaded the tool. In this step, users may select the ‘Create Database’ option from the ‘Tools’ menu to proceed to the next stage. A snapshot of this screen is presented in Figure 4.2.
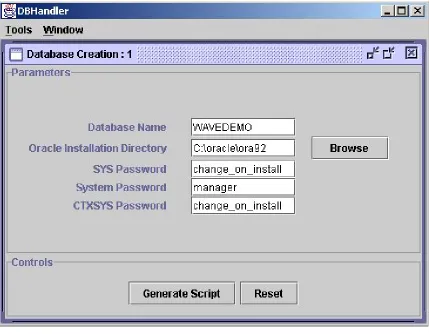
Step 3: Edit Parameters
In the previous step, users selected the ‘Create Database’ option. In this step, users are presented with the database creation screen with the default initial values for essential parameters. Users may edit these fields and customize parameters to create a new database. Users may click on ‘Generate Script’ to generate the scripts for database creation. A snapshot of this screen is presented in Figure 4.3.
4.4. Implementation
Component: DBHandler.java
Processing Detail: This is the class that loads the tool. DBHandler creates the desktop with the JDesktopPane and the menu bar using JMenuBar. This desktop displays the internal frames created with JInternalFrame. The menu bar is displayed with ‘Tools’ and ‘Windows’ menu. The ‘Tools’ menu contains options for creating a new database and creating new tables. The ‘Windows’ menu contain the cascading and tiling options for the different internal frames displayed in the desktop.
Users may select one of the options from the ‘Tools’ menu to proceed to the next stage.
Component: DBSwingFrame.java
Processing Detail: This component is called when users select the ‘Create Database’ option in DBHandler.java.
This component displays the form that users may fill up to generate scripts to create a new database. It uses the Generator_CreateDBFile.java to read from the skeleton files stored in the Skeletons directory and generates the required scripts. The output scripts are written to the output directory specified in the configuration file.
Users may click on the ‘Generate Script’ button to generate the scripts for database creation. Users may execute the newly created batch file to create the new database.
Chapter 5. Semi Automatic Generation of Warehouse Schema
5.1. Introduction
As stated previously, the goal of this project it to be able to create and populate databases for data warehouses.
This also involves creating a data warehouse schema and loading the warehouse with subsets of relevant data from the source database. In this chapter, we discuss how SagaMap helps towards reaching this goal.
How is source database data transformed to target Database data?
SagaMap has been developed to allow users to select, extract, clean, and convert data from source system structures into consistent target warehouse data structures. Also, the data from the source database is populated into the target database. The data warehouse can be populated on a frequency that meets the organization’s needs.
5.2. Implementing a Data warehouse
The three stages in implementing a data warehouse: 1. Establish the warehouse.
The warehouse technology needs to be put in place and the warehouse database structured to mirror the source database schema. This tool aims at making this task a semi-automatic process.
A data warehouse depends totally on its ability draw information from across the organization. SagaMap provides users with the ability to connect to any source database to draw the required information.
3. Consolidate and populate
Information is drawn into the warehouse by consolidating and cleansing data before populating the warehouse database. This is done automatically after users finalize the target database schema and the mapping with the source database schema.
5.3. Schema Mapping
Data warehousing involves mapping subsets of relevant data from the source database to the target database. The target database schema is designed based on the data that is being transported from the source database. Hence, there is a mapping between the structure of the source database and the target database. This mapping is termed as Schema Mapping.
For a given source database, the tool helps users in arriving at an appropriate mapping to create a semantically related warehouse. After a mapping has been formalized, a new warehouse is created. Then, relevant data is automatically transported from the source database to the newly created warehouse.
Each mapping created for a source and target database is stored in XML files. This ensures that users can make further changes to the mapping by loading them at a later time.
This tool provides users with a graphical interface to perform Schema Mapping.
• Select tables: Users may select only relevant tables from the source database to be a part of the target database. Figure 5.2. presents a mapping diagram to show an example.
• Enforce referential integrity: If child tables are selected to be a part of the target database, the corresponding master tables need to be selected too. The master tables are internally computed by the tool and are selected automatically.
Figure 5.1. presents the tables that are being employed to explain this.
Equipment ID Hull ID Equipment
Equipment ID Running Hours Equipment Hours
Figure 5.1. Parent-Child relationship between ‘Equipment’ and ‘Equipment Hours’ table
If users select the ‘Equipment Hours’ table to be a part of the target database, then, the ‘Equipment’ table (which is a parent of the ‘Equipment Hours’ table) is also selected by the tool.
• Rename tables: The tool allows renaming tables for the target database
Figure 5.2. Mapping tables between source and target database
• Rename attributes: The tool allows renaming tables for the target database
• Create new attributes: Users may want to add new attributes to a table. The new attributes may be based on aggregate values of existing attributes of the table in the source database. 5.3. presents a mapping diagram to show an example.
Figure 5.3. Mapping attributes between source and target table
• Generate scripts for data insertion: Scripts are generated to insert data into the target database, based on the mapping.
5.4. Concepts of the Metadata API
The Metadata API [17] is available on Oracle9i and has been used to provide a simple and flexible to do the following:
• Extract complete definitions of database objects (metadata) as XML
• Generate SQL DDL [18] to recreate the database objects by transforming the metadata using XSL-T [2]
5.4.1. Why do we need to use the Metadata API?
The prior method used to extract metadata involved:
• Know how and where the database object’s metadata was represented in the Dictionary
• Issuing multiple queries to extract the object's full representation
• Condensing information extracted from multiple queries to form required metadata
5.4.2. What is DBMS_METADATA?
DBMS_METADATA is the PL/SQL package that implements the Metadata API [18]. This permits applications to retrieve metadata in XML and DDL format.
In this tool, this package has been used to extract metadata of tables in XML format. Figure 5.4. presents the syntax to do this.
Select dbms_metadata.get_xml(‘TABLE’,table_name) FROM user_tables;
Figure 5.4. Syntax to extract metadata in XML format
When applications request DDL output, the Metadata API uses the Oracle9i server's integral XML Parser and XSL Processor to convert the XML documents into creation DDL.
5.4.3. How does SagaMap convert XML to DDL?
Using the syntax provided in Figure 5.4., XML files are generated for required tables. These XML files have comprehensive information about storage, indexes, version major and analyze information along with the table attribute detail. Most of this information is not needed by SagaMap to recreate tables in the new data warehouse. Hence, an XSL-T is used to transform the original XML file into a condensed form. Users of this tool may wish to make changes to the structure of tables. These changes are incorporated into the condensed XML file.
Figure 5.5. presents a sequence diagram that describes how XML is converted to DDL.
Figure 5.5. Conversion of XML to DDL
5.5. User Interface Design
This section describes the steps users need to perform to achieve the following:
• Load the configuration details of the warehouse schema saved
• Save configuration details of new warehouse schema
• Generate scripts for creation of warehouse schema
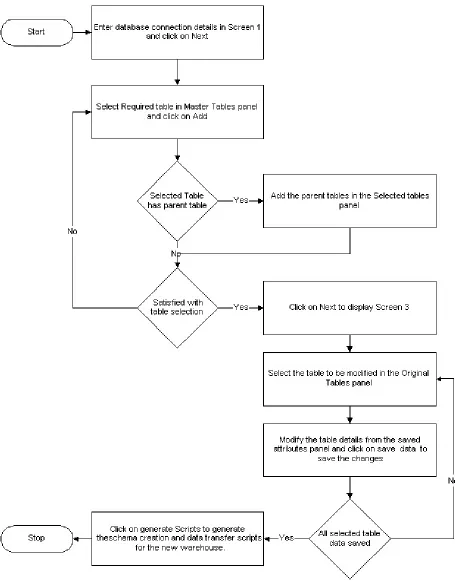
Step 1: Load Application
Users may load the tool by entering “java DBHandler” in the command line in the deployed application directory. The main screen of the tool is displayed to users. A snapshot of this screen is presented in Figure 5.6.
Step 2: Create a Warehouse Schema
Figure 5.6. Snapshot of SagaMap main screen
Step 3: Connect to Master database
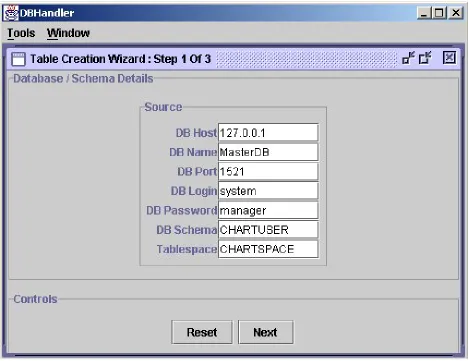
In the previous step, users selected the ‘Create Table’ option to create a new warehouse schema. In this step, users are presented with the screen corresponding to Screen 1 of the table creation wizard. This screen is presented with the default initial values for essential parameters. Users may edit these fields and customize parameters to connect to the master database. Users may click on ‘Next’ to proceed to Screen 2 of the table creation wizard. A snapshot of this Screen 1 is presented in Figure 5.8.
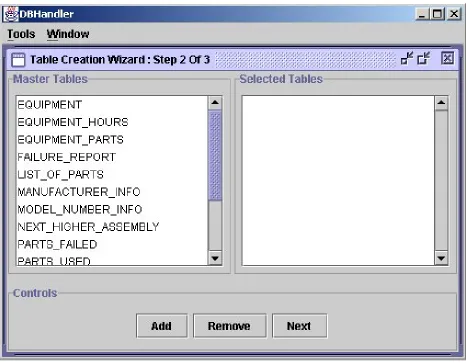
Step 4: Select tables from Master database
In the previous step, users connected to the master database. In this step, users are presented with a list of tables in the master database in the ‘Master Tables’ panel - on the left hand side of the screen. Users may select the required tables and click on ‘Add’ button to add the tables in the ‘Selected Tables’ panel – on the right hand side of the screen. When users have completed selecting the required tables, they may click on the ‘Next’ button to proceed to Screen 3 of the table creation wizard. A snapshot of Screen 2 is presented in Figure 5.9.
Step 5: Select attributes from selected tables
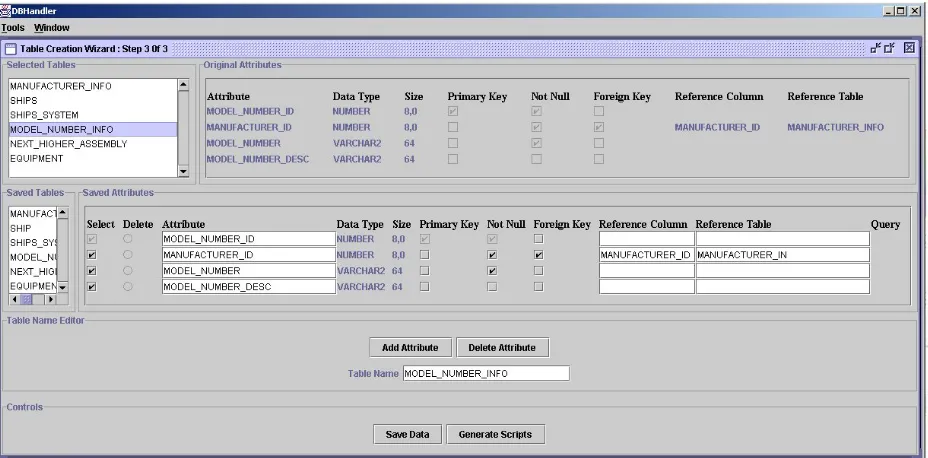
In the previous step, users selected a list of tables from the master database to be included in the warehouse database. In this step, users may select attributes from their respective tables, which may be a part of the corresponding table in the warehouse database. Users are presented with the list of tables selected in Step 4 of creation of a new warehouse schema - in the ‘Selected Tables’ panel. When users may select a table from this panel, it results in the following:
• The table’s original attributes and constraints are displayed on the ‘Original Attributes’ panel
• The saved table name (i.e., the equivalent table name) in the warehouse schema is displayed in the ‘Saved Tables’ panel
• The saved attributes (i.e., the equivalent attribute names) for the corresponding table are displayed in the ‘Saved Attributes’ panel. In this panel, users are presented with the list of attributes in the table originally. Users have the option of selecting required attributes and editing the attribute names.
• The saved table name is displayed in the ‘Table Name Editor’ panel. In this panel, users may rename the table. Also, users are presented with an ‘Add Attribute’ button, which users may click on to add a new attribute as an aggregate of existing attributes. Users are also presented with a ‘Remove Attribute’ button, which users may click on to remove any newly added attributes.
Figure 5.10. Snapshot of Screen 3 of ‘Table Creation Wizard’
Figure 5.11. Snapshot of ‘Add New Attribute’ screen
When users are satisfied with the new table structure, they may click on the ‘Save Data’ button to save the changes. Users may repeat Step 5 (the current step) to process all tables in the ‘Selected Table’ panel.
5.6. Implementation
Component: DBHandler.java
Processing Detail: This is the class that loads the tool. DBHandler creates the desktop with the JDesktopPane and the menu bar using JMenuBar. This desktop displays the internal frames created with JInternalFrame. The menu bar is displayed with ‘Tools’ and ‘Windows’ menu. The ‘Tools’ menu contains options for creating a new database and creating new tables. The ‘Windows’ menu contain the cascading and tiling options for the different internal frames displayed in the desktop.
TablesSwingFrame.java
Processing Detail: This class is called when users click on ‘Create Tables’ option from the ‘Tools’ menu.
This class creates the internal frame to display the table creation wizard. It uses the following helper classes to display components and event handling:
TablesView.java - All GUI components including Jpanels and JTextFields are added to the internal frame by this class. This creates a card panel layout on the internal frame component.
TablesController.java - This controller class queries table names & attributes from the database and updates the View of the tool.
TablesValidator.java – This class helps in validating screens and all their fields.
TablesGenerator.java – This class writes the generated XML in an output file [5].
AttributeSwingFrame.java – This class displays the ‘Add New Attribute’ dialog box.
XmlDataLoader.java – This class loads data from XML files into java data structure, so that they can be used for further processing by the tool.
XmlExtractor.java – This class extracts DDL information [18] of a table in XML format & does XSL processing to trim down unwanted information.
XmlDataHandler.java – This class has utility functions to select, insert, update & delete data from XML files [5].
Figure 5.13. Class diagram of the classes involved
Figure 5.14. Interaction diagram of source database connection
Figure 5.15 shows the interaction diagram for selecting tables from the master tables list in Screen 2.
Figure 5.16. shows the interaction diagram for displaying attributes of a selected table in Screen 3 of the tool.
Figure 5.16. Interaction Diagram for displaying attributes of a selected table
Figure 5.17. Interaction Diagram for saving the selected table details
In this tool, XML files are created to store DDL information. These files are converted to DDL and processed to create new tables. Script file templates are needed to create files dynamically. Also, the generated files transfer data from the master database to the newly created warehouse. Since there are several files for different purposes, the files needed to be logically segregated. They are stored in the following directory structure under the ‘Installed Dir’:
• Config – This directory stores the ‘DbConfig.properties’ file, which stores the parameters required by the tool. A sample ‘DbConfig.properties’ file has been presented in Figure 6.7.
• LoadInfo – This directory stores XML files that contain mapping between the master database schema and the newly created warehouse database
• OutputXml - This directory contains XML files written by the tool that contain information to recreate the DDL for the saved tables
• Skeleton - This directory contains files, which form templates to generate script files used in creation of new warehouse database
• TableScript - This directory contains the ‘CreateTables.sql’ script file which is generated by the tool to create the new warehouse database schemas and transfer the data from the master database into this newly created database
• Xsl - This directory contains stylesheets to convert XML to DDL information and to trim the original XML generated by the oracle DBMS_METADATA package.
5.7. XML Transformation
The original XML file is trimmed to cut down unwanted parameters. This is done using XSLT with ‘XmlTrim.xsl’ as the style sheet. Figure 5.18. presents the main schema of the XML file used for creation of DDL.
Figure 5.19. presents the expansion of the col_list element of Figure 5.18. The col_list element is used to store attribute information of a table.
Figure 5.19. Expansion of col_list element
Figure 5.20. presents the expansion of con1_list element. This element stores the primary key constraint information of a table.
Figure 5.21. presents the expansion of con2_list element. This element stores the foreign key constraint information of a table.
Figure 5.21. Expansion of con2_list element
Figure 5.22. XML Schema of Relations.xml
<?xml version="1.0" encoding="UTF-8" ?> <ROWSET>
<M_TABLES> <ROW>
<MASTER_NAME>SHIPS</MASTER_NAME> <CHILD_LIST>
<CHILD_LIST_ITEM>
<NAME>SHIPS_SYSTEM</NAME> </CHILD_LIST_ITEM>
</CHILD_LIST> </ROW>
</M_TABLES> <C_TABLES>
<ROW>
<CHILD_NAME>SHIPS_SYSTEM</CHILD_NAME> <MASTER_LIST>
<MASTER_LIST_ITEM> <NAME>SHIPS</NAME> </MASTER_LIST_ITEM> </MASTER_LIST>
</ROW> </C_TABLES> </ROWSET>
Figure 5.24. XML Schema of Src-Tgt.xml
<?xml version="1.0" encoding="UTF-8" ?> <ROWSET>
<TABLES>
<TABLE_ITEM>
<NAME>SHIPS_SYSTEM</NAME>
<ORIGINAL_NAME>SHIPS_SYSTEM</ORIGINAL_NAME> <SRC_COL_LIST>
<SRC_COL_LIST_ITEM> <NAME>HULL_ID</NAME> </SRC_COL_LIST_ITEM> <SRC_COL_LIST_ITEM>
<NAME>SYSTEM_HSC</NAME> </SRC_COL_LIST_ITEM>
<SRC_COL_LIST_ITEM>
<NAME>SYSTEM_DESC</NAME> </SRC_COL_LIST_ITEM>
</SRC_COL_LIST> <TGT_COL_LIST>
<TGT_COL_LIST_ITEM>
<SELECTED>true</SELECTED> <NAME>HULL_ID</NAME> </TGT_COL_LIST_ITEM> <TGT_COL_LIST_ITEM>
<SELECTED>true</SELECTED> <NAME>SYSTEM_HSC</NAME> </TGT_COL_LIST_ITEM>
<TGT_COL_LIST_ITEM>
<SELECTED>true</SELECTED> <NAME>SYSTEM_DESC</NAME> </TGT_COL_LIST_ITEM>
</TGT_COL_LIST> </TABLE_ITEM> </TABLES>
</ROWSET>
A mapping of the original attribute names and the edited attribute names is stored in ‘Src-Tgt.xml’. This XML file also contains information about what attributes have been selected. XML Schema of Tgt.xml’ is presented in Figure 5.24. A sample ‘Src-Tgt.xml’ file for the table ‘Ships_System ‘is presented in Figure 5.25. The purpose of each element in the schema is explained below:
• TABLE_ITEM - Each element represents a different table
o NAME - New name for the table in the warehouse
schema
o ORIGINAL_NAME - Original name for the table in the source
database
o SRC_COL_LIST - List of attribute names of the table in source
database
NAME - Attribute name in the source database
o TGT_COL_LIST - List of attribute names of the table in target
database
NAME - Attribute name in the target database
SELECTED - If the attribute is selected to be included in the target database
Both ‘Relations.xml’ and ‘Src-Tgt.xml’ are stored in the ‘loadInfo’ directory.
Figure 5.26. Schema of NewAttributes.xml
This information is stored in ‘NewAttributes.xml’. Schema of this file has been presented in Figure 5.26. For each new attribute added in a particular table, the attribute details are stored in the ‘NAME’, ‘TYPE’, ‘SIZE’ and ‘QUERY’ elements stored under the corresponding ‘TABLE_ITEM’ element.
For each table, table metadata and constraints are stored in an individual XML file. The contents of this file are based on attributes selected by users. These XML files are stored in ‘outputXml’ directory. The information in the XML files is converted into DDL statements, by means of XSLT using ‘Kutable.xsl’. (Note: This stylesheet is provided by Oracle for XML to DDL conversions [17])
To sum up what has been discussed in this chapter. SagaMap was designed to incorporate the following abilities:
• Implement a data warehouse
• Map the source and target schemas
• Transform source database data to target database data
• Have an efficient user interface
• Store the mapping information, so that they can be loaded at a later point of time
SagaMap achieves these goals by
• Generating scripts for creating a warehouse
• Providing visual means to map the source and target schemas
• Generating scripts to transfer relevant data from source database into target database
• Providing a wizard based user interface for convenient usage of tool
Chapter 6. Database Switching
6.1. Introduction
Data warehouses contain a wide variety of data that present a coherent picture of business conditions at a single point in time. Informational data is extracted from operational data in the source database, transformed for end-user decision-making and stored in the data warehouse [8]. Since the data in the source database is continuously changing, it is almost impossible to have real-time replication while maintaining a data warehouse. The process of transforming data from the source database to the data warehouse is time consuming. Users of SagaMap may add new attributes to tables in the warehouse schema. These new attributes are the aggregates of the attributes of the master database. As a result, when data is copied from the master database to warehouse database, data for these aggregate functions need to be computed at run-time during update. This causes more delay in the update process. When this update is in progress, applications accessing the warehouse will not get access to accurate data and this results in lack of synchronization.
How does the Image Switcher solve this problem?
To resolve this issue, there needs to be a mechanism by which switching databases is totally transparent to applications so that they do not realize existence of multiple warehouse databases.
Image Switcher has been designed to address this. A setup has been built that manages database switching in such a way that even if one of the databases go down, applications will be able to access data from one of the other image databases. The setup updates each of the mirror images at regular intervals.
Figure 6.1. Image Switcher setup
The tasks performed to update a database are as follows:
• The database to be updated is taken offline
• Schema of the warehouse is recreated by executing scripts (Note: These scripts were generated by SagaMap during the creation of warehouse scheme. This has been discussed in Chapter 5.)
• Data is migrated from the source database to this newly created schema
This procedure is completely automated and is repeated at regular intervals for each warehouse image. Image Switcher has also been designed not to disrupt the ongoing transactions. When the database is about to be shutdown, it is shutdown in a way that all the ongoing transactions are completed. During this interval no new connections or transactions are accepted. Figure 6.1. describes the working model of Image Switcher setup.
6.2. Implementation
Component: DBSwitch.java Processing Detail:
DBSwitch.java has an interface that returns a connection statement to the currently connected database. Whenever applications need to connect to the warehouse database, they use this component’s getStatement() API.
Figure 6.2. Sequence of events leading to data retrieval by an application seeking data from warehouse
To sum up what has been discussed in this chapter and highlight the achievements, the tool facilitates the following:
• Transparent access of image databases by the data mining applications
• Periodic update of image databases
Chapter 7. Email Handler
Chapter 7, 8 and 9 describe the additional components developed for Automated Site Generation for the Benchmarking Engine. The highlight of the website generator is its ability to dynamically generate new websites, based on a number of parameters given by the creator of the website. At present, the user has to provide the Website generator with the parameters related to the new service to benchmark. He has the choice between filling the provided HTML forms and directly submitting his XML document containing the parameters to consider. The interaction with the user is done through a couple of HTML pages, JSP and Servlets. Once the generator has been provided with all the information, it first creates the table into the database server. Second, it creates the required directories where the generated applications will be stored in the Tomcat server. Then the generator dynamically generates the HTML, JSP, XSL and Java files required and compiles the Java files: the Servlets and JavaBeans into class files. The created files are placed directly in the appropriate directory of the Tomcat directory hierarchy. So the new Website has just been dynamically generated and can be accessed at run-time by the user.
To further enhance the features of the Benchmarking Engine, there was a strong need to provide the users the ability to create benchmarking services based on existing database schema. The users may select the required tables and attributes and create Benchmarking services based on this. SagaMap was initially developed as a first step in this process. Since SagaMap is a standalone application, integration of SagaMap and Benchmarking Engine will allow us this flexibility of creating benchmarking services based on existing schemas.
7.1. Introduction
Benchmarking Engine v.1.2 [4] supported the following methods to create a new service or add an experience submission case, where users had the following options:
• Fill up parameter form online
• Upload XML file online
When the objective was information upload for processing, there was a strong need to be able to email a file with the requisite information. With this new feature, users can simply send an email to the Engine’s appropriate email address to create a new service or add a new experience submission case. In the case of experience submission, the client can share his experience about a specific service provider either by filling an HTML form or by directly submitting an XML document.
7.2. Background
This section describes the technical architecture of Benchmarking Engine. It has been implemented using the Client/ Server architecture [3]. The advantages of this architecture are:
• User queries can be processed with ease, without actual file transfer [13]
• Graphical user interfaces are supported [13]
• High performance and scalability [13]
• Provide flexible and robust infrastructures [13]
• Multiple users can access the same application data [13]
The architecture is based on a three-tier model in which business rules are segregated from the client [3]. Each component has its own assigned specific purpose as explained below:
Client - Web-based clients like Web browsers
Application Server - Servlet engine Apache-Tomcat 4.1.18 [19] This business-services tier integrates business rules and processes.
Tomcat was chosen as the middle tier server but it could have been any other Servlet container that supports Java Servlets and Java Server Pages (JSP) specification. All Servlets and JSPs are deployed to the Tomcat server, which was configured to work as a standalone Web server.
Database Server - Oracle 9i database server [15]
Clients may access the database server using the application server interface.
Oracle was chosen for the database server as Oracle is a reference, but it could have been any other relational database server.
Web browser
Database
JDBC
Middle Tier
Client Tier Server Tier
Java Generator Database
Server 152 1 create HTML E-Mail Submission Servlet Email Handler JavaBean Email Handler XML Attachment HTML form to login
Apache - Tomcat 4.1.18
8443
HT T PS
LoginServlet
JDBC
Figure 7.1. Technical architecture of the application
rectangles. Clients are represented by rectangles with rounded corners and double-headed arrows denote the Client-Server relation [3]. The Middle Tier components are clients and servers, while the Client Tier components are pure clients and the Server Tier components are pure servers. Also, the set of building blocks of the architecture include Web Server, Database Server, and the Web browser. The triangles represent the sustainment relation, which can be defined as the relationship between two individual building blocks. As an example from figure 7.1, the Web Server sustains Servlets and JSPs.
7.3. Concepts and Assumptions
The Benchmarking Engine has a dedicated email address to receive requests for new service creation. Each new service that has been created has its own unique email ID to receive experience submission cases.
XML files to be uploaded have the same format used by the Engine version 1.2. A sample XML file format for new service creation is presented in Figure 7.2. A sample XML file format for the experience submission case is presented in Figure 7.3.
For new service creations, users need to create a new XML with the appropriate format (Note: A sample format has been presented in Figure 7.2.). The XML file needs to be attached to an email (Note: Any email account may be used for this purpose) and sent to the Engine’s new service creation email ID. The assumption is that each email has only one attachment, while the remaining content of the email is ignored. An error message is sent back to users if proper protocol was not followed.
its own unique email address. Also, each email has only one attachment, while the remaining content of the email is ignored. An error message is sent back to users if proper protocol was not followed.
<?xml version="1.0" encoding="UTF-8"?> <!DOCTYPE SERVICE[
<!ELEMENT SERVICE (SERVICE_NAME+, FIELD+)> <!ELEMENT SERVICE_NAME (#PCDATA)>
<!ELEMENT FIELD (NAME+, DNAME+, TYPE+, PRES+)> <!ELEMENT NAME (#PCDATA)>
<!ELEMENT DNAME (#PCDATA)> <!ELEMENT TYPE (#PCDATA)> <!ELEMENT PRES (#PCDATA)>
<!ATTLIST PRES value CDATA #REQUIRED> ]>
<SERVICE>
<SERVICE_NAME>OREILLY</SERVICE_NAME> <FIELD>
<NAME>NAME</NAME>
<DNAME>Book Name</DNAME> <TYPE>VARCHAR2(40)</TYPE>
<PRES value="40">textField</PRES> </FIELD>
<FIELD>
<NAME>AUTHOR</NAME>
<DNAME>Author Name</DNAME> <TYPE>VARCHAR2(25)</TYPE>
<PRES value="25">textField</PRES> </FIELD>
<FIELD>
<NAME>PRICE</NAME> <DNAME>Price</DNAME> <TYPE>NUMBER</TYPE>
<PRES value="5">textField</PRES> </FIELD>
<FIELD>
<NAME>RATING</NAME>
<DNAME>Company Rating</DNAME> <TYPE>VARCHAR(20)</TYPE> <PRES value="Poor,Good,Very Good,Excellent">ratingButton</PRES> </FIELD>
</SERVICE>
Figure 7.2. A sample format for new service creation
<?xml version="1.0" encoding="UTF-8"?>
<!DOCTYPE SERVICE_PROVIDER[
RATING)>
<!ELEMENT NAME (#PCDATA)> <!ELEMENT AUTHOR (#PCDATA)> <!ELEMENT PRICE (#PCDATA)> <!ELEMENT RATING (#PCDATA)> ]>
<SERVICE_PROVIDER>
<NAME>Java Security</NAME>
<AUTHOR>Sudhindra Sharatkumar</AUTHOR> <PRICE>120</PRICE>
<RATING>Excellent</RATING> </SERVICE_PROVIDER>
Figure 7.3. A sample format for the experience submission case
7.4. Implementation
Component Name: SubmitEmailHandler Processing Detail:
This component is a servlet and is loaded at the start-up of the Web server by appending the code in Figure 7.4. to the ‘web.xml’ file of the web server.
<servlet>
<servlet-name>NewServiceEmailHandler</servlet-name> <servlet-class>SubmitEmailHandler</servlet-class> <load-on-startup>15</load-on-startup>
</servlet>
Figure 7.4. Sample code to load servlet at start-up of web server
This servlet keeps checking the mail server for new email at periodic intervals. The mail server, mail account, and the password are loaded from configuration files and can be easily modified without changing the code. This detail is provided in Chapter 6. This email account is dedicated to receive the Engine’s new service creation requests.
‘Generator.java’ processes the XML file, generates the supporting Java files required by the new service, and compiles them. [4]). If the entire process of extracting the XML file and generating the new service was successful, a reply is sent back to the sender about the success of the operation. Else a failure message is sent back in the reply. The email message is then deleted from the Inbox.
The email messaging has been implemented using the Java Mail API [12]. The installation and configuration details of the Java mail API on the server are explained in Appendix B.
Figure 7.5. presents a sequential diagram that describes the entire process of new service creation by sending an XML attachment in an email.
Component Name: EmailHandler_%service% Processing Detail:
(Note: For every service, this java servlet is created during the creation of the service. The ‘%service%’ in the name of the component is replaced by the “name” of the service.)
Figure 7.5. New service creation sequence diagram
<servlet>
<servlet-name>EmailHandlerDENTAL</servlet-name> <servlet-class>
DENTAL_Servlets.EmailHandler_DENTAL </servlet-class>
<load-on-startup>15</load-on-startup> </servlet>
The functionality of this component is similar to that of the previous component, namely, SubmitEmailHandler, with regards to checking for new email and processing it. But the difference lies in the fact that the EmailHandler_%service% component is dedicated to receive experience submission cases for the ‘%service%’, while the SubmitEmailHandler component is dedicated to receive new service creation requests.
Thus, this component also checks for new email and sends back replies depending upon the success or failure of the XML attachment processing. If the XML document was a well-formed one, then, control is transferred to XML2DB_%service%_bean.java, where the XML file is parsed, processed and the relevant information is uploaded to the database. [4]
How this happens is beyond the scope of this discussion.
Figure 7.7. presents a sequential diagram that describes the entire process of an experience submission case by sending an XML attachment in an email.
Chapter 8. Security
8.1. Introduction
Security aims at protecting a system from unauthorized intruders who may try to access, modify or delete information “illegally” [10]. This shield is absolutely vital in the case of web-based applications, where the system is readily accessible by millions of Internet users everyday. Thus, security is not merely an add-on feature to a system, but an indispensable component of any software system [11].
The important issues in Security are [10]:
• Authentication: This involves verifying the identity of users trying to access the system
• Confidentiality: This ensures that only the users involved can understand the communication
• Integrity: This ensures that the content of communication is not changed during the transmission
This chapter describes how each of these issues has been resolved in the Benchmarking Engine.
8.2. Background
The Benchmarking Engine v.1.2 [4] supported the following methods to create a new service or add an experience submission case, where users had the following options:
• Upload XML file online
The Engine is purely web-based. With the millions of people accessing the Internet, there was a strong need to safeguard information and the owners of the information. Hence, a security feature had to be built-in to the Engine, so that it allowed only users with valid access to perform crucial operations on the Engine’s website.
8.3. Concepts of Security
In this section, we explain the issues in implementing Security to a system.
Authentication is a means to verify that users are indeed who they claim to be. In a software system, this can be implemented by providing all legal users with a unique login name and a password. This mapping is stored in the system. When users logon to the system, they are mandated to enter their login name and password, so that the system can verify if legal users are trying to gain entry. Thus, this restricted access management feature allows only legal users to access the safeguarded system resources. It needs to be noted that authentication may function successfully only if users keep their password secure and private. It is the responsibility of users to protect their passwords.
Confidentiality and Integrity are necessary to ensure that only two users involved have access to communication. In this case, users of the Benchmarking Engine access the system. Hence, data exchange between the Engine’s web server and the Engine user’s web browsers needs to be protected.
How does SSL work?
The Secure Sockets Layer protocol sits between the HTTP and the TCP/IP. It handles the details of security management using public key cryptography to encrypt all client / server communication. In this scheme, each participant has two keys to encrypt or decrypt information. One of the keys is the public key, which is made publicly available. The other is a private key, which is held privately by its owner. The working schema of public key cryptography is shown in Figure 8.1.
Figure 8.1. Working schema of public key cryptography.
The working schema of SSL is presented in Figure 8.2.
Authentication:
Certificates are digital certificates. They are electronic identification card that establishes one’s credentials during transactions on the Web. A certification authority issues certificates. Popular certificate authorities include Verisign and Thawte.
8.4. Implementation
Authentication has been implemented by custom authorization using HTML forms and session tracking.
Component: Login.html
Processing Detail: This is the first screen of the Benchmarking Engine website where users may enter their login name and password. Next, users may press on the ‘Continue’ button and the form is submitted to ‘LoginServlet.java’. The entire process has been implemented over the HTTS protocol. This ensures secure connection and integrity.
Component: LoginServlet.java
Processing Detail: This is an internal servlet and does not form a part of user screen. This servlet is called from ‘Login.html’. This component extracts user login and password from HTTP Request and validates this with the login-password mapping stored in the database.
For authorized users, this component invokes session tracking by setting the ‘logon’ variable in HTTP Session. From here, control is transferred to the ‘New Service Integration’ page.
Confidentiality and Integrity:
Chapter 9. Configuration Files
This section describes configuration files and their requirement and syntax.
Configuration files lend portability to the application. They are text files that can be changed depending upon user’s requirement. They contain elements, which are logical data structures that set configuration information.
In a configuration file, tags can be used to mark the beginning and end of an element or plain name value pairs can be used for different properties. For example, the Install directory property can be stored as:
<InstallDirectory>value</InstallDirectory>, using the tag format. InstallDirectory = value, using the name, value pair format.
In either case, the format of the files need to consistent for the application to read from it.
Why are configuration files required?
Before using this approach, parameters were hard coded in the application. This reduces flexibility and configurability. Changes in parameters required the code to be modified and recompiled. This is obviously a bad design idea, when there are many pieces of code that hard-coded several parameters.