LAB - Perch
Dissection
Introduction:
The fish in the class Osteichthyes have bony skeletons. There are three groups of the bony fish --- ray-finned fish, lobe-finned fish, and the lung fish. The perch is an example of a ray-finned fish. Its fins have spiny rays of cartilage &/or bone to
support them. Fins help the perch to move quickly through the water and steer without rolling. The perch also has a streamline body shape that makes it well adapted for movement in the water. All ray-finned fish have a swim bladder that gives the fish buoyancy allowing them to sink or rise in the water. The swim bladder also regulates the concentration of gases in the blood of the fish. Perch have powerful jaws and strong teeth for catching and eating prey. Yellow perch are primarily bottom feeders with a slow deliberate bite. They eat almost anything, but prefer minnows, insect larvae, plankton, and worms. Perch move about in schools, often numbering in the hundreds.
The scientific name for the yellow perch, most often used in dissection, is Perca flavescens (Perca means "dusky"; flavescens means "becoming gold colored"). The sides of the yellow perch are golden yellow to brassy green with six to eight dark vertical saddles and a white to yellow belly. Yellow perch have many small teeth, but no large canines. Yellow perch spawn from mid-April to early May by depositing their eggs over vegetation or the water bottom, with no care given. The eggs are laid in large
gelatinous adhesive masses.
** Do the pre-lab questions on your answer sheet.
Materials:
Preserved perch, dissecting pan, scalpel, scissors, forceps, magnifying glass, probe(s), dissecting pins, gloves (optional), tape measure (string & ruler)
Procedure
Part 1: External
Anatomy-1. Obtain a perch & rinse off the excess preservative. Place the perch in your dissecting pan.
2. Use your tape measure (string and ruler) to determine the total length, fork length, and girth of your fish. These are shown in the diagram below.
Record these values in Table 1 on your data sheet.
4. Open the perch's mouth and observe its bony jaws. Locate the
maxilla (upper
jaw)
and themandible (lower jaw).
Notice which one is movable and which one is fixed.5.
Feel the inside of the mouth for theteeth
. Notice their position.7.
Open the mouth wider yet and use a wide probe to reach back to thegill
chamber.
8. Locate the
nostrils.
9.
Locate theeyes.
10.Find the bony covering on each side of the fish's head called the
operculum
. The opercula cover & protect the gills.11.Use a probe to lift the operculum and observe the
gills.
12.Use scissors to cut away one operculum to view the gills. Lift the gills up and try to separate them to see their structure. Find the
gill slits
or spaces between the gills.13.Use your scalpel to carefully cut out one gill. Find the cartilage support called the
gill arch
which holds thegill rakers
and the softgill filaments
that make up each gill.
14.
Observe the different fins on the perch. Locate thepectoral,
anterior dorsal, posterior dorsal, pelvic, anal, and caudal fins
. Note whether the fin has spines or not. Complete Table 2 on fins.
15.Locate the
anus
on the perch anterior to the anal fin. In the female, there are two pores (openings). The anus is in front of thegenital pore
, and theurinary pore
is located behind the genital pore. The male has only one pore(urogenital pore)
behind the anus.Determine the sex of your perch
and record on your data sheet
.16.Find the
lateral line
on the side(s) of your perch.Part 2: Internal Anatomy -
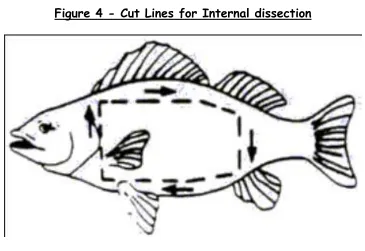
1. CAUTION: The scalpel may be very sharp. Use carefully and hold as shown in the picture below:
2. Use the scalpel to scrape away some of the scales in the area of the cut lines shown in Figure 4 below. Removing some of these scales will make it easier to cut into the body tissue below them.
3. Use the scalpel to make the cuts through the skin and muscle, following the lines shown in Figure 4 (where you removed the scales). Apply gentle pressure with the scalpel to get through the skin. Once you are through that tissue, it may be easier to switch to scissors for cutting through the rest of the muscle. Be careful not to damage or move any organs while cutting. Remove this section of the body wall to expose the internal organs in the body cavity.
Once open, your fish should look similar to the pictures below. Use the pictures as a reference to find the structures in your fish, noting things like shape, size, and location to help you.
As you find structures, label them on Figure 5 in your data sheet
4. Locate the creamy-colored
liver
in the front of the body cavity. 5. Also locate thegall bladder
between the lobes of the liver.6. Remove the gall bladder & liver to observe the short
esophagus
(tube) attached to thestomach
. The stomach is a pouch-like chamber used for storing food. The stomach will have finger-like projections calledpyloric
ceca
.7. At the posterior end of the stomach is the beginning of the
intestine
. This will be a long, continuous, coiled tube (like a hose) and should connect the stomach to thevent / anus
.8. Wastes exit the body through the
vent/anus
located on the ventral side of the perch.9. Find the small reddish brown
spleen
near the stomach.10.In the upper part of the body, below the lateral line, is the
swim bladder
. This sac has a thin wall and gives the fish buoyancy by inflating or deflating as necessary. It will have a long balloon shape and the appearance of scotch tape.11. Below the swim bladder are the
gonads
, testes or ovaries. In a female, thesemay be filled with eggs
.
Do not rupture the gonads as it will make a mess 12.Find the 2 long, dark
kidneys
in the posterior end of the perch. These structures are used to filter wastes from the blood.13.Return to the operculum. Below the operculum, are the bony gill rakers. 14.Using your scissors, carefully remove the gills from the gill chamber.