Xerox Multifunction Devices
Customer Tips
… for the user
dc06cc0410 January 27, 2009
How to Upgrade, Patch or Clone
Xerox Multifunction Devices
Purpose
This document applies to the Xerox products indicated in the table below. For some products, it is assumed that your device is equipped with the appropriate option to support this document.
x WC 232/238/245/255/ 265/275
The audiences for this document are system administrators and IT professionals who manage Xerox Document Centre, WorkCentre, and WorkCentre Pro devices. It describes how to:
• Upgrade: Perform a remote upgrade to a newer software level for one or more devices.
• Patch: Apply a patch to one or more devices to fix a minor issue.
• Clone: Send a clone file to one or more devices to match a group of configuration options to those of another device.
x WC 4150
Upgrade / Patch / Clone Process Overview
X WC 56xx Series x WC 7655/7665/7675
The upgrade / patch / clone process involves a .dlm (downloadable module) file that is submitted to a Xerox device.
x WC Pro 165/175 x WC M35/M45/M55
Note: WC 4150 upgrade / patch / clone files use an .hd extension.
x WC M165/M175
When it is received, the Xerox device verifies the file is valid then proceeds with one of the following:
x WC Pro 32/40 Color x WC Pro 35/45/55
• In a remote upgrade process, the device checks to see if the software it contains is different from its current system software. If so, the device temporarily goes off-line, begins to install the new software and then restarts the device when the install is complete. When new system software is submitted and the install process begins, a print job in progress and all jobs in the print queue are deleted. The device’s Web interface is not available during an upgrade install (approximately ½ hour). Table 2 shows which devices support remote upgrades.
x WC Pro 65/75/90 x WC Pro 232/238/245/
255/265/275
x WC Pro C2128/C2636/ C3545
x DC 555/545/535
• When a patch or clone file is received it is immediately installed. The device does not reboot following a clone file install. A patch may cause a reboot. Jobs remain in the queue until a patch or clone is complete, then continue processing. Table 2 shows which devices support patch and clone installation.
x DC 490/480/470/460 x DC 440/432/430/425
/420 X DC 332/340
You can monitor the upgrade / patch / clone progress on the device’s touch screen.
X DC 240/255/265 X DC 220/230
Obtaining An Upgrade / Patch / Clone File
Upgrade and patch files are downloaded from Xerox.com or provided by Xerox support.
A clone file is generated from a multifunction device by a system administrator. The clone file creates a “snap shot” of configuration settings the system administrator can upload on other devices.
Different Methods for Different Environments
You can choose from several methods to upgrade / patch / clone one or more devices. This document helps you choose the best method for your environment, generally based on the number of devices that require an upgrade / patch / clone.
The following methods are available:
1. Use a manual process to send an upgrade / patch / clone file to the device using the device’s Web page (see “Method 1” later in this document).
2. Send an upgrade / patch / clone file to a single device using an LPR command (see “Method 2” later in this document).
3. Send an upgrade / patch / clone file to multiple devices using a batch file of LPR commands (see “Method 3” later in this document).
4. Use Xerox Device Manager (XDM) or CentreWare Web (CWW) to send upgrade / patch / clone files to multiple devices (see “Method 4” later in this document).
5. Use the device Auto-Upgrade feature to automatically retrieve upgrade files from a local FTP server and install the upgrade (see “Method 5” later in this document). This method is only available to perform device upgrades, not patches or clones.
Table 1
Methods How many
devices?
Web Page (see Method 1)
LPR (see Method 2)
LPR batch (see Method 3)
XDM / CWW (see Method 4)
Auto-Upgrade (see Method 5) 1 Easy, simple Easy, simple More complex
than needed.
Reasonably easy
More complex than needed for 1 device.
2-50 Easy, simple, takes a bit of time for full upgrade.
Easy, simple Easy and convenient, runs with little attention required.
Easy task for a number of devices.
Helpful for multiple machines.
51-200 Simple but somewhat tedious, takes a long time for full upgrades.
Simple, a bit repetitive
Easy and convenient, runs with little attention required.
Easy task for a number of devices.
Helpful for multiple machines.
201 + Simple but tedious, takes a
Simple, but repetitive
Easy and convenient, with
Easy task for a number of
Helpful for multiple machines.
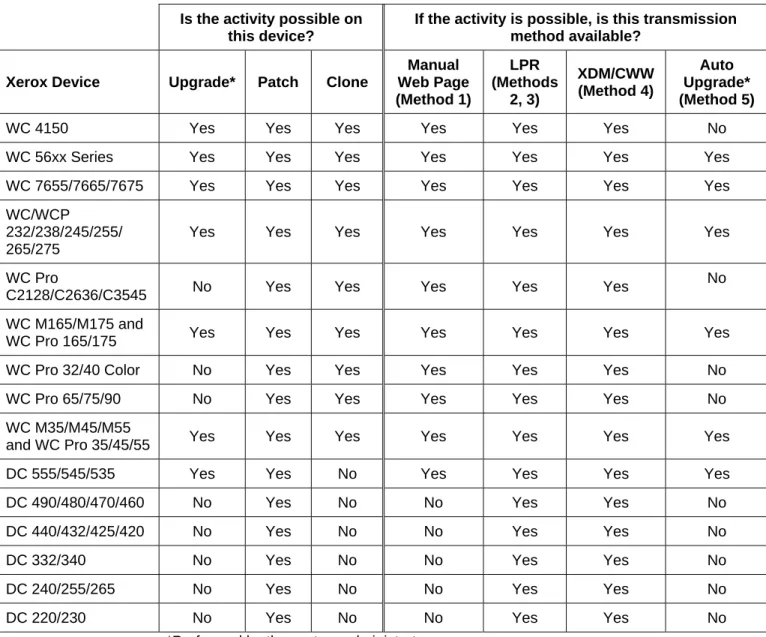
Table 2 shows the upgrade / patch / clone activities and methods the Xerox devices support.
Table 2 Is the activity possible on
this device?
If the activity is possible, is this transmission method available?
Xerox Device Upgrade* Patch Clone
Manual Web Page (Method 1)
LPR (Methods
2, 3)
XDM/CWW (Method 4)
Auto Upgrade* (Method 5)
WC 4150 Yes Yes Yes Yes Yes Yes No
WC 56xx Series Yes Yes Yes Yes Yes Yes Yes WC 7655/7665/7675 Yes Yes Yes Yes Yes Yes Yes WC/WCP
232/238/245/255/ 265/275
Yes Yes Yes Yes Yes Yes Yes
WC Pro
C2128/C2636/C3545 No Yes Yes Yes Yes Yes
No
WC M165/M175 and
WC Pro 165/175 Yes Yes Yes Yes Yes Yes Yes WC Pro 32/40 Color No Yes Yes Yes Yes Yes No WC Pro 65/75/90 No Yes Yes Yes Yes Yes No WC M35/M45/M55
and WC Pro 35/45/55 Yes Yes Yes Yes Yes Yes Yes DC 555/545/535 Yes Yes No Yes Yes Yes Yes DC 490/480/470/460 No Yes No No Yes Yes No DC 440/432/425/420 No Yes No No Yes Yes No
DC 332/340 No Yes No No Yes Yes No
DC 240/255/265 No Yes No No Yes Yes No
DC 220/230 No Yes No No Yes Yes No
Method 1 – Using the Device Web Page for a Manual Upgrade /
Patch / Clone
Prerequisite
The device’s IP address or hostname is required to access its Web page.
Process
Note: Do not navigate away from or refresh the page while upgrade / patch / clone file is transmitted, or the file is deleted.
1. Download and store the upgrade / patch / clone file to a convenient location on your PC (for example, C:\temp).
2. If the file has a .zip extension, extract the files from it.
3. Open a Web browser and enter the IP address of a Xerox device in the Address field. 4. Select Index in the upper right portion of the screen.
5. Select Manual Upgrade.
6. Click the Browse button to find and select the upgrade / patch / clone file, (example: P29_WC2xx-Only_HTTP.dlm.
7. Click Install Software.
8. Enter the User Name (default = Admin) and the Password (default = 1111) of the device. The WorkCentre automatically begins the install process.
To verify the upgrade / patch / clone occurred, see “Verifying a Successful Upgrade, Patch or Clone,” later in this document.
Method 2 – Sending an LPR Command to a Single Device
Prerequisite
LPR protocol must be enabled (the default).
Process
To install an upgrade / patch / clone using an LPR command:
1. Download and store the patch or upgrade file to a convenient location on your PC (for example, C:\temp).
2. If the file has a .zip extension, extract the files from it. 3. Open a DOS window.
4. Change to the folder where you downloaded the file (for example, cd \temp) 5. Run the command to send the file to the device:
LPR –Plp –S{ip-address-of-the-device} filename for example: LPR –Plp –S13.1.2.3 04003250869_00_0.dlm
To verify the upgrade / patch / clone occurred, see “Verifying a Successful Upgrade, Patch or Clone,” later in this document.
Method 3 – Sending LPR Commands to Multiple Devices in a
Batch File
Prerequisite
The LPR protocol must be enabled (the default).
Process
The LPR batch file consists of a series of single LPR commands grouped so that only one command is required to install an upgrade / patch / clone to multiple devices.
1. Download and store the patch or upgrade file to a convenient location on your PC (for example, C:\temp).
3. In the same location as the upgrade / patch / clone file you downloaded, create a batch file, similar to the following example, listing the IP addresses of the device you are upgrading.
Example:
---SendFile.BAT ----
LPR –Plp –S13.1.2.3 04003250869_00_0.dlm LPR –Plp –S13.2.4.6 04003250869_00_0.dlm LPR –Plp –S13.3.6.9 04003250869_00_0.dlm …
LPR –Plp –S13.97.98.99 04003250869_00_0.dlm
4. Open a DOS window.
5. Change directory to the location of the file you downloaded (for example, cd \temp). 6. Run the batch file of commands to send the file to the devices: Sendfile.bat
To verify the upgrade / patch / clone occurred, see “Verifying a Successful Upgrade, Patch or Clone,” later in this document.
Suggested Practice
If upgrading approximately 20 or more devices, it is usually best to send an upgrade / patch / clone file to a few devices at a time so that you can monitor the results. An easy way to control the upgrade / patch / clone process is to insert the PAUSE command after every 10 lines of the batch file, so that you can review its progress and check the results before letting it continue.
LPR –Plp –S13.1.2.3 04003250869_00_0.dlm LPR –Plp –S13.2.4.6 04003250869_00_0.dlm LPR –Plp –S13.3.6.9 04003250869_00_0.dlm
pause
LPR –Plp –S13.4.8.12 04003250869_00_0.dlm …
LPR –Plp –S13.97.98.99 04003250869_00_0.dlm
Method 4 – Using Xerox Device Manager or CentreWare Web to
Upgrade / Patch / Clone Multiple Devices
Prerequisites
• Install XDM or CWW and add the devices. CWW is available free on Xerox.com and runs on a workstation with XP or above.
Process
Use the XDM / CWW Upgrade Wizard to send the upgrade / patch / clone file to multiple devices. 1. On the CWW home page, select Wizard>Upgrade Printers.
2. On the first page of the Wizard click Add/Delete Files.
3. Browse to the upgrade / patch / clone file, select it and click Back. The wizard’s second page is displayed.
4. Select the Group of devices to upgrade / patch / clone and click Continue. The Wizard’s third page is displayed.
5. Select the model of the device(s) to receive the upgrade / patch / clone and click Continue. The last Wizard page appears.
6. A list of the devices you identified appears. Check the box of each device to upgrade / patch / clone or check Select All. Click Finish to complete the Wizard and begin the process.
Suggested Practice
Use CWW to create filters that identify the devices needing an upgrade / patch / clone based on the firmware level or a configuration value.
2. Select Group Actions>Configuration>Membership Filter and choose Firmware Level Not Equal to {the device’s software level following the upgrade}.
Note: This group contains devices with firmware levels higher than the newly upgraded level, if any. 3. Create another new Group called Has been upgraded.
4. Select Group Actions>Configuration>Membership Filter and choose Firmware Level is Equal to {the target software level }.
5. Run a Rediscovery (Sweep Refresh) so that the server updates the Firmware Level listed for each device.
Method 5 – Using Auto Upgrade
Prerequisites
• Retrieve a system software file from Xerox.com and move it to an FTP server. To ensure your devices maintain the most current software, check Xerox.com regularly for new system software versions.
• Software upgrade capability enabled on the device. By default this setting is enabled. Refer to the documentation that shipped with your device if you wish to check the setting.
Process
This method configures the device to check a local server for a system software file. If a file is available, the device checks the file version and compares it to its own. If the server contains a system software version the same (or older) than that on the device, no download occurs. Otherwise, the file is transferred and the upgrade takes place.
1. Open a Web browser and enter the IP address of the device in the Address field, then press
Enter.
3. Check the Enabled box to enable the auto upgrade feature.
4. In the Refresh Start Time section, select Hourly or Daily to indicate the frequency the device checks the server for an upgrade. If Daily is selected, enter the Hour and Minute and select AM or PM. 5. In File Server IP Address enter the IP address of the FTP server where the system software
upgrade file is located.
6. In Directory Path enter the path to the upgrade file on the server. 7. Enter the Login Name and Password for the FTP server.
8. Click Apply.
The device automatically checks the FTP server for a system software file at the time specified. If an upgrade process starts, network connectivity is unavailable, including access from Internet Services. To verify the upgrade / patch / clone occurred, see “Verify Your System Software Version,” later in this document.
Suggested Practice
To avoid a surge in network traffic auto upgrade devices in groups.
1. Create 10 sub-folders on the FTP site (example: ftp-server/upgrades/batch1,
ftp-server/upgrades/batch2,…)
2. Enter the …batch1 folder as the Directory Path on the Auto Upgrade Web page of several devices. 3. Enter the other folders, evenly distributed, as the Directory Path of the rest of the devices.
4. When a new system software upgrade file is retrieved from Xerox, place it in the …batch1 folder only. When complete, check to see that the upgrade occurred and no problems are reported. 5. Copy the system software file from …batch1 to the …batch2 folder. Verify the upgrade is successful
then move the file to the next folder until all devices are upgraded.
Verifying a Successful Upgrade / Patch / Clone
Upgrade / Patch
To determine your System Software version, you can either print a Configuration Report or view the version on the device’s Web page.
To print a configuration report from the local user interface at the machine: 1. Press Machine Status on the device’s Control Panel.
2. Touch Print Configuration Reports. 3. Touch Print System Configuration Report.
4. Verify the System Software Version number is the same as the version you installed. To view the version from the device’s Web interface:
1. Open a Web browser and enter the IP address of the device in the Address field, then press Enter. 2. Select the Index icon in the upper middle portion of the screen.
3. Select Configuration.
Clone
To determine if a clone file installed correctly:
1. Open a Web browser and enter the IP address of the device in the Address field, then press
Enter.
2. Navigate to a page that displays a configuration setting the clone file contained. Verify the setting matches that of the clone file.
Suggested Practices
When you create multiple clone files rename the file so that it is easily identified, for example,
Clone_Lab_WC238.dlm.
Additional Information
Xerox Customer Support welcomes feedback on all documentation - send feedback via e-mail to:
You can reach Xerox Customer Support at 1-800-821-2797 (USA), TTY 1-800-855-2880 or at http://www.xerox.com.
Other Tips about Xerox multifunction devices are available at the following URL:
http://www.office.xerox.com/support/dctips/dctips.html.