This document describes how to recover backed up data using your vmPRO and contains the following sections:
• Introduction
• vmPRO Recover Virtual Machines Wizard • Recover VMs Backed up using SmartMotion
• Manually Register an Imported VM
• Manually Recover a VM Backed up using a Third-Party Application
• Recovering Individual Files • Limitations
Note: After recovering a VSS enabled VM with Active Directory installed, the VM will be automatically rebooted twice during the VSS restore process. These reboots can take several minutes. During this time, you should not attempt to use the VM.
For the fastest access to file level recovery, configure the Mount options
setting on the appliance to point directly to the location of the SmartMotion backups; see Using Additional Storage in the vmPRO User’s Guide. This setting is preserved through reboots of the appliance and provides file level access to the backups at the \
\<vmPRO-Host_IP>\recover\files CIFS share.
vmPRO Recover Virtual Machines Wizard
Using the vmPRO Recover Virtual Machines Wizard, you can recover VMs backed up by SmartMotion or manually recover a VM backed up using a third-party application.
To access the vmPRO Recover Virtual Machines Wizard, select Recover
from the SmartMotion Backup drop-down list (see Figure 1). The
Recover Virtual Machines Wizard dialog box displays, (see Figure 2).
Figure 1 Accessing the Recovery Wizard
Recover VMs Backed up
using SmartMotion
1 Access the Recover Virtual Machines Wizard dialog box.
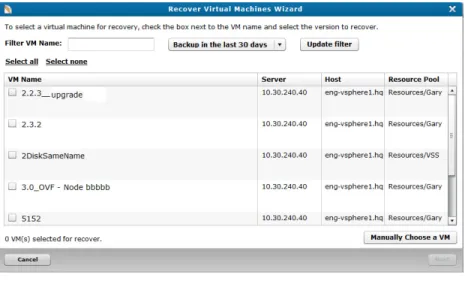
2 From the Recover Virtual Machines Wizard, use the wizard’s options to select the VMs you want to recover (see Figure 2).
Figure 2 Recover Virtual Machines Wizard
a Use the filter option to refine the list of VMs to recover.
i Enter any part of the VM’s name in Filter VM Name.
ii Make the appropriate selection from the Backup in last XX days drop-down list.
iii Select Update filter to display the VMs.
b Select the VMs you want to recover.
Note: At anytime you can select Select none to clear all pervious selections.
i To select all VMs, select Select all to recover all VMs.
ii To select specific VMs, select the check box of the VMs you want to recover.
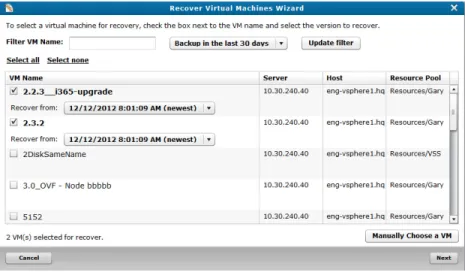
iii For each VM you select, select the appropriate entry from the VM’s Recover from drop-down list (see Figure 3).
Figure 3 Select Recover from
c You can use the Manually Choose a VM option to recover a VM backed up using SmartMotion; however, it is mainly intended for recovering VMs that have been backed up using a
third-party backup applications.
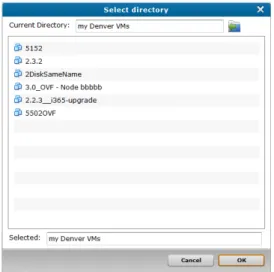
i Select Manually Choose a VM. The Select Directory
(storage view) dialog box displays.
ii Double click the appropriate storage (Figure 4), the Select Directory (folder view) dialog box displays.
Figure 4 Select Directory-storage view
iii Double click the appropriate folder (see Figure 5), the Select Directory (VMs view) dialog box displays. If there are more levels of folders, continue to drill down until you reach the VMs.
Figure 5 Select Directory-folder view
iv Select the VM you want to recover (see Figure 6), and then select OK.
Figure 6 Select Directory-VMs view
3 When you have selected all the VMs (and their appropriate Recover from entry) select Next.
a If you have selected more than one VM to recover, the Recover Virtual Machine Wizard (Select a policy for recovering your virtual machines.) dialog box displays. Proceed to step Step 4.
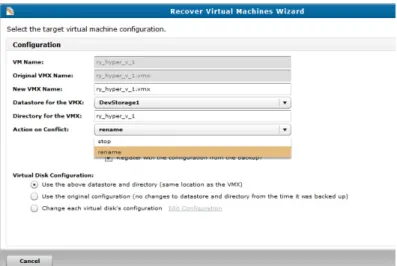
b If you have selected only one VM to recover, the Recover Virtual Machine Wizard (Select the target virtual machine configuration) dialog box displays (see Figure 7).
i On the Recover Virtual Machine Wizard (Select the target virtual machine configuration)dialog box, make the appropriate selections.
• Select rename for the Action on conflict option to avoid any interruptions during the restore due to VM name conflicts on the datastore.
The rename option will register the VM with the VM name and append the next one-up number enclosed in parenthesize. Example: <VM_name> (1), if
<VM_name> (1) exists, it will be named
<VM_name> (2), etc. The rename option also renames
the directory in which you are importing the VM using the same convention.
• Select Add the VM to vSphere/ESX inventory after restore? to automatically add the VM to the vSphere client.
• If the VM came from a vCenter or ESX server on the vmPRO, selecting Register with the configuration from the backup? will return the VM to the same location from which it was backed up.
• If the VM did not come from a vCenter or ESX server, or you want to restore it to a different location on the server, clear Register with the configuration from the backup?. This will let you choose where the VM will be registered.
• Under Virtual Disk Configuration:
Use the above datastore and directory - allows you to recover using the selections that you have just made on Recover Virtual Machines Wizard.
Use the original configuration - allows you to recover with the same configuration that exists for the VM at the time of the backup.
Change each virtual disk's configuration - allows you to customize each disk's name, target location, and provision type.
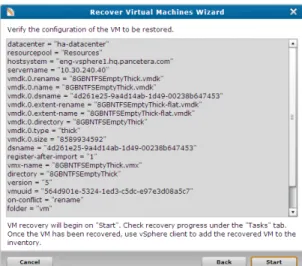
ii Select Next. The Recover Virtual Machine Wizard (Verify the configuration of the VM to be restored) dialog box displays (see Figure 8). Proceed to Step 5.
Figure 7 Select Target Virtual Machine
Figure 8 Starting a Recovery for a VM
4 On the Recover Virtual Machine Wizard (see Figure 9) select the policy that you want to use to recover the VMs, and then select
Next. The Recover Virtual Machine Wizard confirmation dialog box displays (see Figure 10).
• If you select Attempt to add the VMs to vSphere/ESX inventory after restore (using the original configuration)?, keep in mind that when recovering multiple VMs, there is no rename option; therefore, the VMs must be removed before they can recovered.
Figure 9 Select Recovery Policy
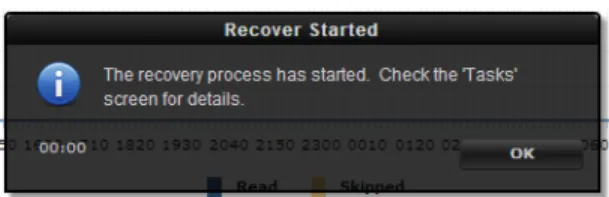
5 On the Recover Virtual Machine Wizard confirmation dialog box (either Figure 8 or Figure 10), select Start. The Recovery Started
alert box displays (see Figure 11). Figure 10 Recovery
Figure 11 Recovery Started
To view the progress of the recovery or to see the list of VMs that were recovered, do the following:
1 From the vmPRO GUI, select the Tasks tab.
2 From the Tasks screen, select the Recovery tab (see Figure 12).
Note: If you need to stop the recovery, select Abort recovery
Figure 12 Recovery of VMs
Manually Register an Imported VM
In the event of errors that prevent VMs from being registered or if you did not select Add the VM to vSphere/ESX inventory after restore?, you will need to manually register an imported VM.
To manually register an imported VM, do the following:
1 Using a vSphere client, log in to the server (ESX or vCenter) where the VM resides. select the server tree in the left panel, and then select the Summary tab.
2 Right click the Storage location of the recovered VM and select
Browse Datastore.
3 Find the VM directory (newly created recovery process) and open it.
5 Select the location where you want to put the VM. The VM will automatically be Discovered. The VM will only be automatically exported if you have Automatically export new VMs
enabled.
Manually Recover a VM
Backed up using a
Third-Party Application
Before you can manually recover a VM that was backed up using a third-party backup application, you must perform the following steps that will allow your vmPRO to access the VM:
1 Restore the VM using your third-party application. (If the location where the VM has been recovered can be accessed by your vmPRO, this location can be your staging area.)
2 If the location where your third-party application has located the restored VM is not accessible to your vmPRO, create a staging area on a host other than your vmPRO. This area can be on any NAS device that is accessible to both the system where the third-party backup software is installed and your vmPRO appliance.
3 In the location where your third-party application restored the VM, you will see a directory with the same name as the VM that you want to recover. Make sure that directory and all of its contents are in the staging area.
Note: The following files should be in that directory:
<VM name>-flat.vmdk - This is the full base disk image.
<VM name>-pancbt.vmdk - Needed if using Changed Block Tracking.This is the file containing the changed blocks since the last reset <VM name>-flat.vmdk file was written. You should have one <VM name>-pancbt.vmdk
file per flat file; you need only the latest
<VM name>-pancbt.vmdk file for each flat file.
Note: The filter options are currently not available for the manual recovery option.
6 Proceed to Step c on page 4 of Recover VMs Backed up using SmartMotion.
Note: After performing a manual recovery, you must return to your staging area and delete the files. The vmPRO will not removing any of the files.
Recovering Individual Files
Individual files in backed-up virtual machines are available without running the recovery process. File-level recovery allows you to use the vmPRO appliance to access the files within the virtual disks that are backed up. Using Windows Explorer (not a browser) on your local computer, enter the UNC path \\<vmPRO-Host_IP>\recover\files, and then drill down the directory structure to the file (see Figure 13).
Note: File-level recovery for dynamic volumes that span multiple disks is currently not supported.
The vmPRO SmartView feature supports the following file system types: • EXT2, EXT3, and EXT4
• NTFS • FAT
The vmPRO SmartView feature supports the following partition types: • MBR (Master Boot Record) partitions.
• GPT (GUID Partition Table) partitions.
The vmPRO SmartView feature also works with supported file systems that are embedded in LVM2 volumes that do not span multiple virtual disks.
Limitations
The vmPRO SmartView feature has limited support for Windows dynamic disks. For Windows 2003, only a simple Windows dynamic disks with a single partition is supported. If there are multiple partitions on a Windows 2003 dynamic disk, file-level access will only be available for the first partition.The vmPRO SmartView feature does not support the following: • Windows dynamic disks that span multiple drives
• Windows dynamic disks that are striped • Windows dynamic disks that use RAID • Windows 2008 dynamic disks file level access • volumes that span multiple virtual disks • Solaris UFS file systems
• file systems on raw (un-partitioned disks)
• physical/logical LVM partitions that have been created on raw (un-partitioned) disks
• any file system types that are not explicitly listed as supported
Note: When a third-party backup application is in use, you must use the third-party backup application to recover the entire virtual machine to a network share and then mount that share onto vmPRO using the vmPRO Recover Wizard; see Manually Recover a VM Backed up using a Third-Party Application on page 11. (When using SmartMotion, only the target backup storage needs to be mounted using the vmPRO Recover Wizard.) In general, the drill-down process will proceed as follows:
Note: The same procedure applies for NFS, just NFS mount to
When you cd into a VM directory it will contain a .volume directory for each disk.
4 cd into the .volume directory. There you will see directories named
0, 1, 2,... etc. for each partition on the disk. You can cd into each numbered directory to access the files for the respective partition.
Note: The partitions will be automatically mounted; however, there could be a short delay during the automatic mount process.
Under /recover/files, the hierarchy is: storage-target
yyyy-mm (month of backup)
yyyy-mm-dd-tttt (date and time of backup) folder-name (such as ESX server)
VM-name disk-name
partition-number (such as 0, 1, …) files-and-directories
Figure 13 Recovering an Individual File