User Guide
bv-Control
®COPYRIGHT
Copyright © 2002–2004 BindView Corporation. All rights reserved. BindView Corporation is a business name of BindView Development Corporation. Information in this document is subject to change and revision without notice. The software described herein may only be used and copied as outlined in the Software License Agreement. No part of this manual may be reproduced by any means, electronic or mechanical, for any purpose other than the purchaser’s personal use, without prior written permission from BindView Corporation. BINDVIEW CORPORATION PROVIDES THIS DOCUMENTATION “AS IS” WITHOUT WARRANTY OF ANY KIND, EITHER EXPRESS OR IMPLIED, INCLUDING BUT NOT LIMITED TO THE IMPLIED WARRANTIES OR CONDITIONS OF MERCHANTABILITY OR FITNESS FOR A PARTICULAR PURPOSE. IN NO EVENT SHALL BINDVIEW CORPORATION BE LIABLE FOR ANY LOSS OF PROFITS, LOSS OF BUSINESS, LOSS OF USE OR DATA, INTERRUPTION OF BUSINESS, OR FOR DAMAGES OF ANY KIND, EVEN IF BINDVIEW CORPORATION HAS BEEN ADVISED OF THE
POSSIBILITY OF SUCH DAMAGES ARISING FROM ANY DEFECT OR ERROR IN THIS DOCUMENTATION.
BindView Corporation may revise this publication from time to time without notice. Because some jurisdictions do not allow the exclusion or limitation of liability for consequential or incidental damages, the above limitations may not apply. BindView
Corporation's liability for actual damages from any cause
whatsoever, and regardless of the form of the action (whether in contract, tort (including negligence), product liability or otherwise) will be limited to $50.00 U.S.
TRADEMARK NOTES
BindView, the BindView logo, and the BindView product names used in this document are trademarks of BindView Corporation and may be registered in one or more jurisdictions.
The names of products of other companies mentioned in this document, if any, may be the registered or unregistered trademarks of the owners of the products.
Contents
Information Resources . . . 9
About BindView Corporation . . . 10
Online Documents . . . 10
Using PDF Files . . . 10
User Guides . . . 10
Release Notes . . . 11
Online Help . . . 11
Typestyle Conventions . . . 11
Alert Statements . . . 11
Contacting BindView . . . 12
1 Overview . . . 13
BindView RMS Console . . . 14
Understanding bv-Control for Active Directory . . . 15
bv-Control for Active Directory Architecture . . . 16
Client . . . 16
Information Server . . . 17
Key Features of bv-Control for Active Directory . . . 17
2 Setting Up the Product . . . 19
System Requirements . . . 20
Pre-installation . . . 20
Upgrading from a Previous Version . . . 20
Installing
bv-Control for Active Directory . . . 21
Adding Product Licenses . . . 26
Configuration Wizard . . . 30
Credential Database . . . 35
Credential Requirements . . . 35
Assign a Credential Database to a User . . . 39
Uninstalling
bv-Control for Active Directory . . . 42
Defining a Query . . . 46
Saving a Query Definition . . . 54
Multiple Forest Support . . . 55
Requirements . . . 55
Running a Query . . . 66
Task Status Monitoring . . . 66
Accessing a Previously Saved Query . . . 67
Displaying Query Results . . . 68
Grid . . . 68
Chart . . . 68
Report . . . 69
Baselining . . . 69
Creating a Baseline . . . 69
Task Lists . . . 70
Building Task Lists . . . 70
Generating a Field List . . . 71
Effective Trustees Functionality . . . 73
Available Permissions . . . 73
Credential Requirements . . . 74
Limitations . . . 75
Group Policy Objects (GPOs) Functionality . . . 75
Descriptor: <Available Fields to Group Policies> Dialog . . . 75
4 Advanced Use Scenarios . . . 77
Introduction . . . 78
Scenario 1: Reporting on Multiple Forests . . . 78
Scenario 2: Verifying Credentials Across Forests . . . 79
Scenario 3: Using Generic Scopes . . . 84
Appendix A Troubleshooting . . . 87
Information Resources
In This Section
About BindView Corporation ... 10Online Documents ... 10
Typestyle Conventions... 11
Alert Statements ... 11
About BindView Corporation
About BindView
Corporation
BindView Corporation is a leading provider of proactive business policy, IT security and directory management software worldwide. BindView solutions and services enable customers to centralize and automate policy compliance, vulnerability management, directory administration and migration across the entire organization. With BindView insight at work™, customers benefit from reduced risk and improved operational efficiencies with a verifiable return on investment. More than 20 million licenses have shipped to 5,000 companies worldwide, spanning all major business segments and the public sector.Online Documents
Documentation is provided in the following electronic formats on the BindView product CD:• Adobe® Acrobat® PDF files • HTML Release Notes files • Online help
Using PDF Files With Adobe Acrobat PDF files, you can navigate through a document quickly and perform full-text searches. In addition, the PDF files can be viewed online, distributed to multiple users electronically, or printed.
You must have Adobe® Reader® installed to read the PDF files.
To view PDF files, double-click PDF files to open them, and then move through the document by clicking topic headings in the left pane or green hypertext links in the text. To print copies, click Print from the File menu.
Installing Adobe Reader Adobe Reader installation programs for common operating systems are available for a free download from the Adobe Web site at
www.adobe.com.
User Guides The Docs directory on the BindView product CD contains copies of the user guides and other documentation in the PDF format.
The bv-Control for Active Directory User Guide contains information about bv-Control for Active Directory v8.0 and about the BindView RMS Console and Information Server v8.0. If you upgrade the BindView RMS Console and Information Server, the BindView RMS Console and Information Server User Guide included with the update will contain information about the new version of the Console.
Release Notes
Release Notes If the autorun function is enabled, a Readme HTML file for your BindView product is accessible under the Documentation menu of the BindView setup menu when you insert your CD. You also can select to view this file after the installation is completed, or by browsing to the Release Notes directory in the root directory for your program:
C:\Program Files\BindView\RMS\Release Notes\bv-Control for Active Directory
Online Help Comprehensive help is available from the Help menu on the BindView RMS Console and the BindView RMS Web Console.
Additionally, you can access help by clicking the Help button in any dialog, by right-clicking an item and selecting Help from the action menu, or by pressing F1 in any dialog.
Typestyle
Conventions
The following conventions are observed throughout this guide:• Bold text is used to designate file and folder names, dialog titles, names of buttons, icons, and menus, and terms that are objects of a user selection.• Italic text is used for word emphasis, defined terms, and manual titles.
• Monospace text (Courier) is used to show literal text as you would enter it, or as it would appear onscreen.
Alert Statements
The alerting statements are Notes, Cautions, and Warnings. These statements are formatted in the following style:Note: Information that is incidental to the main text flow, or to an important point or tip provided in addition to the previous
statement or instruction.
Caution: Advises of machine or data error that could occur should the user fail to take or avoid a specified action.
Warning: Requires immediate action by the user to prevent actual loss of data or where an action is irreversible, or when physical damage to the machine or devices is possible.
Contacting BindView
Contacting
BindView
BindView has sales and support offices around the world. For information on contacting BindView, please refer to the information below or to the BindView Web site: www.bindview.comFor Technical Support: www.bindview.com/support Technical Support is available Monday through Friday from
7:00 a.m. to 7:00 p.m. Central Time. Normal working hours for all other departments are 9:00 a.m. to 6:00 p.m.
Phone
Sales and Customer Service
U.S. and Canada 800-813-5869 Outside N. America 713-561-4000 Technical Support U.S. and Canada 800-813-5867 Outside N. America 713-561-4000 Training/Professional
Service
U.S. and Canada 800-749-8439 Outside N. America 713-561-4000
Fax All Areas 713-561-1000
Sales [email protected]
Training [email protected]
Documentation [email protected] Other
FTP Site ftp://ftp.bindview.com
Internet www.bindview.com
Postal Mail BindView
5151 San Felipe, Suite 2500 Houston, TX 77056
1
Overview
In This Chapter
BindView RMS Console ... 14Understanding bv-Control for Active Directory ... 15
bv-Control for Active Directory Architecture... 16
BindView RMS Console
BindView RMS
Console
Management Console (MMC). The MMC is a host application that The BindView RMS®Console installs as a snap-in to the Microsoft provides a common user interface enabling you to navigate the BindView RMS Console application. The BindView RMS Console, along with bv-Control® for Active Directory®, is a powerful tooldesigned to help you manage your Microsoft® Windows® 2000 and
Microsoft Windows Server™ 2003 environment. The BindView RMS Console serves as a host application to other BindView products, including bv-Control for Active Directory, bv-Control® IntelliPACS®,
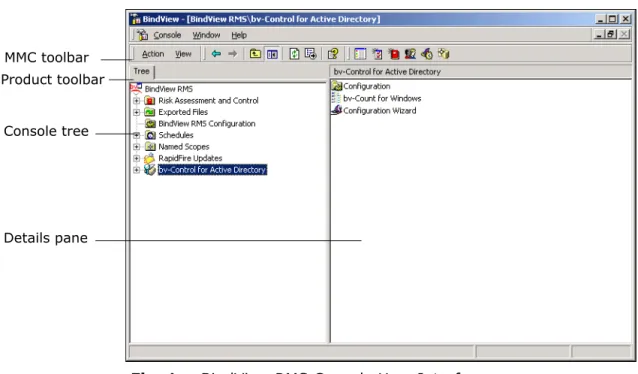
bv-Control for Microsoft Exchange, and other BindView products. Figure 1 shows the BindView RMS Console and the major
components of its user interface.
Fig. 1 BindView RMS Console User Interface
The BindView RMS Console provides query-based data retrieval to gather information from your Active Directory service. When a query is processed, the BindView RMS Console queries Active Directory to gather information about the Active Directory objects and properties. Once the data is collected, it is returned to the BindView RMS Console and displayed as either a grid, chart, or a report. You can find more complete instructions on how to use the BindView RMS Console in the BindView RMS Console and
Information Server v8.0 User Guide. Console tree
MMC toolbar Product toolbar
Understanding bv-Control for Active Directory
Understanding
bv-Control for
Active Directory
The bv-Control for Active Directory snap-in is a BindView product that provides comprehensive administrative reporting capabilities for Active Directory service objects and properties. This product provides broad querying capabilities. The bv-Control for Active Directory product focuses on automating the task of collecting and reporting information about an Active Directory service relative to containers and OUs, domains, groups, group policies (GPO) and users. The bv-Control for Active Directory product can query information in multiple trees and domains across an enterprise, as well as specific objects in these trees and domains. Multi-forest support has been added in this release.
From BindView’s centralized RMS Console, you can document and report on virtually every aspect of Active Directory and Group Policies. bv-Control for Active Directory provides IT personnel with key abilities to perform security checks across the enterprise for possible security or configuration breaches. bv-Control for Active Directory also provides hundreds of detailed fields for reporting on the configuration of Active Directory and Group Policies, saving administrators time and money over native or third-party tools. These key and unique capabilities of bv-Control for Active Directory allow administrators to communicate the current state of Active Directory, along with the ability to easily highlight configuration and security issues for immediate resolution.
bv-Control for Active Directory also allows for easy report modification and a vast amount of exporting venues for further analysis. This product leverages BindView’s leadership in the vulnerability assessment market, which has allowed BindView to provide industry-leading technology for assessing, auditing, and administering Microsoft®, Novell®, and UNIX® enterprises.
bv-Control for Active Directory contains several new features contained in Windows Server 2003 such as:
• Reports on the new permissions and new delegated tasks offered by the Delegation Control Wizard.
• Reports on the new Group Policy settings for Terminal Services, Network Management, and Computer Management.
• Domain and Forest functional levels have been introduced in Windows Server 2003, which provide a way to enable features in a domain or forest throughout an organization. bv-Control for Active Directory reports on the different levels.
• Support for Forests Trusts – Effective Permissions, Effective Permissions Analysis, and Effective Trustees take into account the permissions obtained through security principals and
memberships in groups across the forest.
• InetOrgPerson is a new object offered. This object is similar to the user object. bv-Control for Active Directory will report on this through the user’s data source. This object is also a security
bv-Control for Active Directory Architecture
• Reports on attributes available to Active Directory objects through Auxiliary classes.
bv-Control for
Active Directory
Architecture
bv-Control for Active Directory consists of two BindView RMS Console components:
• Client
• Information Server
The Information Server component provides the BindView RMS Console with a source of data for reporting, and the Client component provides the user interface extensions.
Figure 2 shows the architecture for bv-Control for Active Directory and how it interfaces with the Client and Server component.
Fig. 2 bv-Control for Active Directory Architecture
Client The Client component provides the user interface extensions to the
BindView RMS Console. This component enables you to configure the bv-Control for Active Directory product. It extends the BindView RMS Console shell to facilitate utilities that do not fit within the query model.
Microsoft Management Console BindView RMS Console
bv-Control for Active Directory Client Information Server Microsoft Active Directory
BindView Information Server Task Processing
bv-Control for Active Directory Data Storage
Data Sources
-Containers and OUs -Domains -Groups -Group Policies -Connections -Servers -Sites -Site Links -Contacts -Effective Trustees
-Group Policies Administrative Template Settings
-Group Policy Software Settings -Group Policy Windows Settings
-Users -Computers
Information Server
Information Server The Information Server is primarily used to perform the following services:
• Task processing • Data storage
There are two types of Information Servers: local and remote. A local Information Server exists on the same machine as the Console you are using. A remote Information Server exists on a different machine than the one where your Console resides.
The Information Server component provides data collection facilities for the BindView RMS Console. This component exposes the user schema to the BindView RMS Console. The user schema constitutes the data sources and fields that the user may select for creating reports, and provides User Interface components, such as dialog pages that are specific to the data sources and fields of the bv-Control for Active Directory product. This component is responsible for combining information in a way that recognizes requests from the BindView RMS Console.
Data Sources Within bv-Control for Active Directory are categories of information called data sources. A data source is a collection of multiple related fields you select when defining a query, and is a key component of the product. By using bv-Control for Active Directory,
administrators can analyze virtually every aspect of Active Directory. The first step in determining exactly what information you want to gather is to select a data source to query. For information on how to select a data source, refer to “Defining a Query” on page 46.
Key Features of
bv-Control for
Active Directory
System administrators who are responsible for administering and securing their Active Directory can rely on bv-Control for Active Directory for systems solutions.
The following key features of bv-Control for Active Directory will aid in administering and configuring Microsoft Active Directory. These key features are:
• Pre-defined Query Binder and Task List
• Full query-based interface to easily perform custom queries • Advanced Report, Graph, and Export capability
Pre-defined Query
Binder and Task List The bv-Control for Active Directory snap-in comes with hundreds of pre-defined Query Binders that identify key issues. With a simple point-and-click interface that can get the system up and running in a matter of minutes, bv-Control for Active Directory will allow you to quickly and proactively determine the state of Active Directory.
Key Features of bv-Control for Active Directory
Custom Queries In addition to providing sample reports for out-of-the-box use, bv-Control for Active Directory also provides a full query-based interface allowing Active Directory administrators to easily build custom queries for information specific to their environment. Results from the queries can be saved for trend analysis and capability planning at a later time.
Advanced Report, Graph, and Export Capability
bv-Control for Active Directory provides flexible, comprehensive reporting and graphing that produces reports aimed at a variety of audiences. This allows an Active Directory administrator to quickly identify and document a specific problem. The ultimate in flexibility is achieved by advanced capabilities which allow report information to be graphed, compared to an established baseline, and exported into a variety of data formats such as Microsoft Excel, Microsoft Word, dBase, PDF, and Microsoft Access.
2
Setting Up the Product
In This Chapter
System Requirements ... 20Pre-installation ... 20
Upgrading from a Previous Version... 20
Installing bv-Control for Active Directory... 21
Configuration Wizard... 30
Credential Database... 35
System Requirements
System
Requirements
For complete system requirements for the BindView RMS Console, please see the BindView RMS Console and Information Server v8.00 User Guide.Before you install bv-Control for Active Directory, make sure that your workstation and network environment meet the following minimum bv-Control for Active Directory hardware and software requirements:
• 512 MB RAM in addition to Microsoft Windows 2000 minimum requirement
• 500 MB of free disk space
• Virtual memory size three times the size of RAM • Microsoft XML parser v3.0 or higher
• Microsoft Windows Installer
• The RMS Console and Information Server requires one of the following OS versions:
- Windows Server™ 2003 (Standard, Enterprise, Web Edition) or later
- Windows® 2000 SP3 (Professional, Server, Advanced)
- Windows XP® Professional SP1
Vast amounts of data can be gathered from Active Directory. This data is stored on the hard drive of the machine that the Information Server was installed on. Although 90 MB is sufficient storage space for the application, space is also needed for the data retrieved. The amount of space needed is dependent on multiple factors such as the size of your operational environment, the information you retrieve, and how often its data is refreshed and saved.
Pre-installation
bv-Control for Active Directory is shipped on a CD. You must install the BindView RMS Console v8.0 CD before installing the bv-Control for Active Directory product. When you install bv-Control for Active Directory, it will either install into an existing BindView RMSConsole, or it will install the BindView RMS Console if not already present. For more information on installing the BindView RMS Console, see the BindView RMS Console and Information Server v8.00 User Guide.
Upgrading from a
Previous Version
If your computer has a previously installed version of bv-Control for Active Directory, you do not need to perform any additional steps for an upgrade installation. It is a silent upgrade install.Installing bv-Control for Active Directory
Installing
bv-Control for
Active Directory
After you have reviewed the pre-installation information, you can use the Install panel to install the bv-Control for Active Directory product. We recommend that you review the Release Notes files for the Console and Information Server and the bv-Control for Active Directory product.
X To install bv-Control for Active Dirctory
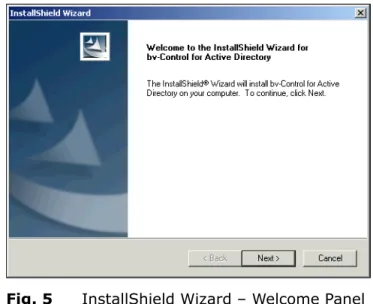
1 Insert your bv-Control for Active Directory v8.00 CD into the CD-ROM drive for your machine and the Welcome Panel appears.
Fig. 3 Welcome Panel
2 Select Install to install and configure bv-Control for Active Directory.
The InstallShield Wizard – Preparing to Install panel appears.
Installing bv-Control for Active Directory
The InstallShield Wizard – Welcome panel appears.
Fig. 5 InstallShield Wizard – Welcome Panel 3 Read the information on the panel and click Next.
The Software License Agreement panel appears.
Fig. 6 License Agreement Panel
Installing bv-Control for Active Directory
The Start Copying Files panel appears.
Fig. 7 Start Copying Files Panel
5 Review the information in the Current Settings area and click Next.
The InstallShield Wizard – Setup Complete panel appears once the BindView RMS Console has been installed.
Fig. 8 InstallShield Wizard – Setup Complete Panel 6 Select one or both options in the Setup Complete panel.
If you selected Launch BindView RMS Console, the BindView product installation screens appear while bv-Control for Active Directory is installed on your machine.
Installing bv-Control for Active Directory
The Product Installation panel appears, showing which products have been installed.
Fig. 9 Product Installation Panel
The BindView RMS Console Configuration Wizard – Welcome panel appears.
Fig. 10 BindView RMS Console Configuration Wizard – Welcome Panel
7 Click Next to continue.
Installing bv-Control for Active Directory
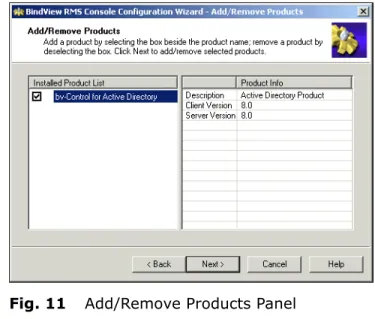
Fig. 11 Add/Remove Products Panel
8 Check bv-Control for Active Directory to add to the BindView RMS Console and click Next.
The Add Licenses panel appears.
Fig. 12 Adding Licenses
License Type - List of the type of licenses currently installed. Add - Allows you to add a new license manually.
Remove - Displays the Delete License dialog.
Browse - Allows you to install licenses from a different location.
Adding Product Licenses
Adding Product
Licenses To use the products, you must have the required licenses for both the Console and bv-Control for Active Directory.
X To add licenses
1 From the Add Licenses panel (Fig. 12), you can add license codes in the following ways:
- Enter license keys in the text box and click Add.
- Click Browse to browse to the location of the license file and select the file.
- Drag a license file to the license type list.
Note: A license.txt file can be dragged and dropped into the Add Licenses dialog.
2 Repeat the process you choose until you have entered all your BindView product license codes and click Next.
The License Summary panel appears.
Fig. 13 Add License Summary Panel 3 Click Next.
Adding Product Licenses
Fig. 14 Add Licenses Completed 4 Click Next to continue.
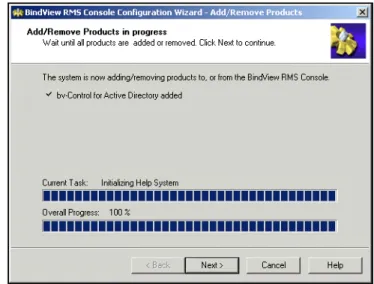
The Add/Remove Products in progress panel appears.
Fig. 15 Add/Remove Products in Progress Panel 5 When the process has finished, click Next.
Adding Product Licenses
The Add Users panel opens.
Fig. 16 Add Users Panel
6 Add users by typing their fully qualified path in the Users frame, or by using the browse (...) button to open a dialog for selecting the desired user.
7 Assign the desired user properties for each added user, click Next.
The Add Users Summary panel appears, displaying a summary of the users who were added.
Fig. 17 Add Users Summary Panel 8 To continue, click Next.
The BindView RMS Console Configuration Wizard – Completed panel appears.
Adding Product Licenses
Fig. 18 BindView RMS Console Configuration Wizard – Completed Panel
9 Click Finish to close this panel.
After you have completed the installation process, the MMC console with the BindView RMS Console snap-in opens (Fig. 19).
Fig. 19 BindView RMS Console
The first time the BindView RMS Console opens with bv-Control for Active Directory installed, the bv-Control for Active Directory product is not configured. Configuring the bv-Control for Active Directory is explained next.
Configuration Wizard
Configuration
Wizard
Prior to using bv-Control for Active Directory, you must configure the bv-Control for Active Directory product.X To configure bv-Control for Active Directory
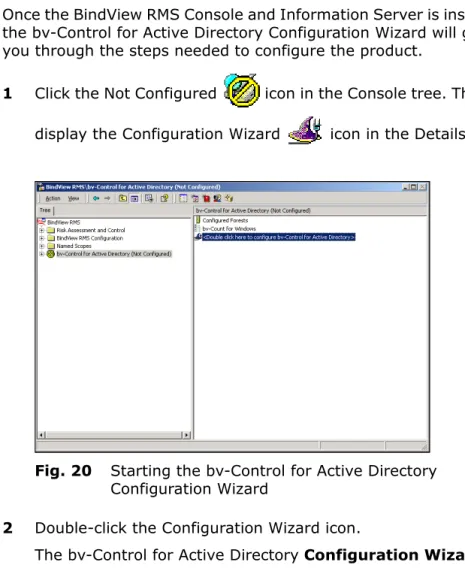
Once the BindView RMS Console and Information Server is installed, the bv-Control for Active Directory Configuration Wizard will guide you through the steps needed to configure the product.
1 Click the Not Configured icon in the Console tree. This will display the Configuration Wizard icon in the Details pane.
Fig. 20 Starting the bv-Control for Active Directory Configuration Wizard
2 Double-click the Configuration Wizard icon.
The bv-Control for Active Directory Configuration Wizard appears.
Configuration Wizard
Fig. 21 bv-Control for Active Directory Configuration Wizard –Welcome Panel
3 Click Next.
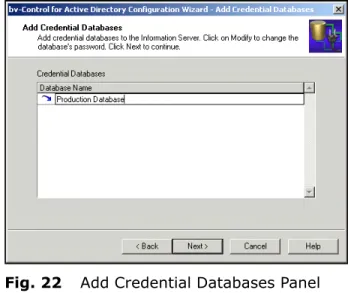
The Add Credential Databases panel appears.
Fig. 22 Add Credential Databases Panel 4 Enter a Database Name.
5 Click Next.
Configuration Wizard
Fig. 23 Create New Database Dialog
X To add a database
6 Enter a password and verify this password for this database. 7 Click OK and then click Next to load the credentials.
The Select Credentials panel appears.
Fig. 24 Add Credentials
X To add credentials and apply a credential database to a user
1 Select a domain under Resource Objects to open the Additional Settings dialog.
Configuration Wizard
Fig. 25 Additional Settings 2 Click OK.
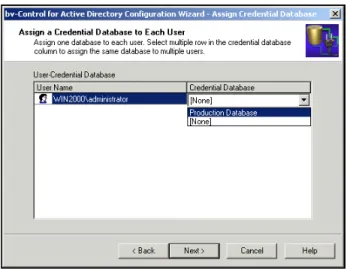
The bv-Control for Active Directory Configuration Wizard – Assign a Credential Database to Each User panel appears.
Fig. 26 Assign a Credential Database to Each User Panel 3 Click the drop-down list box and select a database.
Configuration Wizard
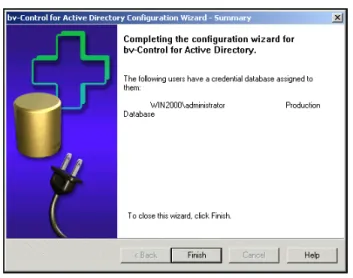
The bv-Control for Active Directory Configuration Wizard – Summary panel appears.
Fig. 27 bv-Control for Active Directory Configuration Wizard – Summary Panel
Credential Database
Credential
Database
The BindView RMS Console Job Processor is running as a local system account. Because the Job Processor is running locally, it has no network credentials. To collect information from the resource objects you are querying, the Information Server must have rights to those objects. A credential database provides the Information Server with the necessary credentials to authenticate the user of those resources. The Console uses the credential data so that the Information Server can logon to the resources during queryprocessing and obtain information it needs to generate the results. Once a credential database is created, you must add that credential database to the user’s account.
Credential
Requirements To configure the Console with the credential databases, you must perform the following tasks: • Create a credential database
• Add a database
• Add credentials to the credential database • Assign a credential database to a user
X To create a credential database
You can create and configure credential databases for each user to meet their requirements.
1 From the console, click the BindView RMS Configuration folder.
Fig. 28 Console Setup
2 Double-click the Credentials Manager icon in the details pane.
Credential Requirements
The Credentials Manager dialog appears for creating a credential database.
Fig. 29 Credentials Manager Dialog
X To add a database
3 Click Add under Database Operations.
The Create New Database dialog appears for creating a credential database.
Fig. 30 Create New Database Dialog 4 Enter a Database Name.
5 Enter a password and verify the password for this database. 6 Click OK.
X To add credentials
7 Click Add under Credential Operations. The Add Credentials dialog appears (Fig. 31).
Credential Requirements
Fig. 31 Add Credentials Dialog
Note: For information on Available Item(s), which includes Specify Credentials, Microsoft Network, and Enterprise Directories see “Multiple Forest Support” on page 55.
8 Select the Domain Controller (DC) from the main forest you want to add credentials for and click Add.
The Domain and Credential tab appears.
Fig. 32 Domain and Credential Tab
9 On the Domain and Credential tab, enter the Domain Name\User Name and Password. Click OK.
Credential Requirements
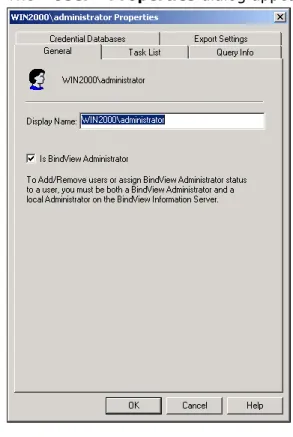
The domain name\user name may be entered by either using a backslash \ to separate domain name and user name or by entering the user logon name. For example,
WIN2000\Administrator
10 The Add Credentials dialog reappears. The domain is listed under Selected Item(s).
Fig. 33 Adding Credentials
Note: “Local” refers to the Information Server being installed in this forest
11 To add credentials to multiple databases, repeat Steps 8 through 10.
Assign a Credential Database to a User
The Credentials Manager dialog reappears showing the credential you added (Fig. 34).
Fig. 34 Credentials Manager Dialog 13 Click Close.
Assign a Credential
Database to a User Once a credential database is created, you must add the credential database to the user’s account. You can attach users to the machine in the local domain where the currently selected Information Server is running or they can be attached to a domain trusted by the local domain.
X To assign a credential databaseto a user
1 Double-click the User Manager icon in the details pane to show the User Manager dialog.
Assign a Credential Database to a User
The <User> Properties dialog appears (Fig. 36).
Fig. 36 <User> Properties Dialog 3 Select the Credential Databases tab.
Assign a Credential Database to a User
4 Select the database name from the Credential Database drop-down list.
5 Enter the password that is assigned to the database. 6 Click OK to return to the User Manager dialog.
The User Manager dialog reappears (Fig. 38).
Fig. 38 User Manager Dialog
You can add, modify, or delete users by selecting the
appropriate buttons. For more information on how to add or modify users, refer to the BindView RMS Console and Information Server v8.00 User Guide.
7 When you have completed this process, click Close.
Uninstalling bv-Control for Active Directory
Uninstalling
bv-Control for
Active Directory
Removing bv-Control for Active Directory can be accomplished in the following process:
X To uninstall bv-Control for Active Directory 1 Close all applications running under Windows. 2 Click Start from the task bar.
3 Select Settings, and click Control Panel.
4 From the Control Panel, double-click Add/Remove Programs.
Fig. 39 Control Panel Window
5 From the Add/Remove Programs properties dialog, select bv-Control for Active Directory, and click Change/Remove.
Uninstalling bv-Control for Active Directory
The InstallShield Wizard appears and will guide you through the steps for repair or removal of programs.
Fig. 41 InstallShield Wizard – Repair or Remove the Program 6 To remove bv-Control for Active Directory, select Remove and
click Next. You will be prompted to confirm that you wish to remove the product.
7 Click OK to completely remove bv-Control for Active Directory. The InstallShield Wizard appears with the Maintenance Complete panel.
Fig. 42 Maintenance Complete Panel 8 Click Finish to close the wizard.
3
Using the Product
In This Chapter
Query-Related Features ... 46 Query Building Process ... 46 Multiple Forest Support ... 55 Running a Query ... 66 Displaying Query Results ... 68 Baselining... 69 Task Lists ... 70 Effective Trustees Functionality... 73 Group Policy Objects (GPOs) Functionality... 75Query-Related Features
Query-Related
Features
bv-Control for Active Directory provides the following features to help administrators gather and manage their Active Directory environment:• Building a query • Saving a query • Running a query
• Displaying query results • Baselining
• Building a task list Understanding a
Query A query is a series of structured questions posed to obtain specific information about the Active Directory structure. The query results are returned in the form of a Grid, Chart, or Report that can be viewed on-screen or printed.
Creating a Query System administrators use various administrative tools, such as Active Directory Users and Computers, to monitor system, security and application issues. This task can be a difficult process
depending on how much data you have to query.
By querying with bv-Control for Active Directory, administrators can centrally view objects without having to manually scan through Active Directory. Using the Query Builder process, administrators can create a report that is specific to the data sources and fields of the query.
Query Building
Process
Query Building is a tool used to create a query. To create a new query, you must select the appropriate data source, field specification, filter specification, sort specification, and the scope of the query. Once the specifications have been made, you can run the query. To accomplish this process, selections must be made from two dialogs: theData Source dialog and theQuery Builder dialog. For more information on the Query Building process, refer to theBindView RMS Console and Information Server v8.0 User Guide. Defining a Query The first step in defining a query is determining what information
you want to gather about your Active Directory environment. When defining a query, you use the Data Source dialog and Query Builder dialog to specify the information you want and the manner in which you want it collected. The dialogs used to create a new query are accessed from the New Query icon on the BindView product toolbar.
Defining a Query
X To create a query
1 From the BindView RMS Console, click the New Query icon on the BindView product toolbar.
The Select Data Source dialog appears (Fig. 43).
Note: To view the Internal Data Source module, you must check the Show Advanced Data Sources option.
2 Click the plus (+) sign to expand the list of available data sources.
Fig. 43 Select Data Source Dialog
3 Select the data source to be queried, and click OK. The Query Builder dialog appears (Fig. 44).
Defining a Query
Field Specification Tab The Query Builder dialog allows you to select the specific information you need to generate a query. By adding fields to a query, you define which fields of information bv-Control for Active Directory will collect when a query is executed.
Fig. 44 Query Builder Dialog – Field Specification Tab
X To add a field to a query
4 On the Field Specification tab of the Query Builder dialog, select the desired field from the Available Fields list. Click Add or double-click the field.
The fields you select will appear in the Selected Fields box. Fields appear in the dataset in the order they appear in the Selected Fields list. You change the field order by dragging fields to the desired position. You can also select multiple fields by pressing the Ctrl key and clicking on each field you want to select.
Defining a Query
Filter Specification Tab When defining a query to include a specific field or fields, bv-Control for Active Directory will examine every available occurrence of that field or fields. However, you can define a filter to instruct bv-Control for Active Directory not to display all occurrences. You can filter the fields by using the Filter Specification tab. Multiple filters can be grouped using the Add or Remove buttons, and further grouped through the use of parentheses.
For more information on filters, refer to the BindView RMS Console and Information Server v8.00 User Guide.
Fig. 45 Filter Specification Tab
X To define a filter
5 Use the Available Fields list to select the field where you want to apply a filter.
6 Click Add.
Defining a Query
7 Select the desired filter option. For more information on filter options, refer to the BindView RMS Console and Information Server v8.00 User Guide.
8 In the Specify a value text box, enter a specific value for the filter and click OK.
The Query Builder dialog reappears showing the filter that was just added, as shown in Fig. 45 on page 49.
Sort Specification Tab The Sort Specification tab allows you to change the way information is sorted. Using the Toggle Sort button, a sort can be set to either ascending or descending order. Another feature is the ability to determine how the product will handle records with duplicate sort keys, by selecting an option button from the Select Duplicate Key Options.
Fig. 47 Sort Specification Tab
9 From the Sort Specification tab, use the Available Fields list to apply a sort specification.
10 Highlight and Add the field to the Selected Fields list. 11 Click OK to save the order.
Defining a Query
Scope Tab The last component of a query is Scope. Using the Scope tab, you can select the items you want to query, and limit the area of the report. This will reduce the amount of time it takes to receive query results.
A scope consists of user-selected scope items. Since the
Information Server only queries the resource objects indicated by the scope, you can use scopes to significantly reduce the time it takes to retrieve a dataset.
The Add Scope button adds the resource object selected in the
Available Item(s) box to the Selected Item(s) box and to the scope. Using Configure Dynamic Indexing reduces the display time of the scope items on the Scope tab and quickly finds selected scope items.
Fig. 48 Scope Tab
Note: The default scope is the contents of the current credential database.
The Scope tab requires you to select a Named Scope. The Named Scope determines which files, folders, or servers the Query Builder will use to obtain information. You have a choice to either define and save a Named Scope or select from a previously saved Named Scope to query.
To select from a previously saved and existing Named Scope, see “To select an existing Named Scope” on page 53.
Defining a Query
you want the query to begin its search and select the appropriate items.
Fig. 49 Scope Tab – Defining the Scope Area 2 Click Add Scope.
The Additional Settings dialog appears (Fig. 50).
Additional Settings Depending on which data source you selected, the Additional Settings dialog is displayed to give you additional advanced scope filter options.
Fig. 50 Additional Settings Dialog – Adsi Scope Tab 3 Select a level you would like to scope.
- Base applies scoping to a selected folder.
- One Level Only applies scoping to a selected folder and the contents of the selected folder.
Defining a Query
4 Click OK. The Query Builder dialog of the Scope tab reappears (Fig. 49). The Named Scope you added appears in the
Selected Item(s) box.
X To save the Named Scope
5 From the Selected Item(s) box, select the Named Scope you want to save.
6 Click the Save as Named Scope button. The Named Scope dialog appears.
Fig. 51 Named Scope Dialog 7 Enter a name for the Named Scope. 8 Click OK.
The Named Scope is saved in the Named Scopes folder.
Fig. 52 Named Scopes Folder
X To select an existing Named Scope
1 From the Named Scopes folder (Fig. 52), select the Named Scope you want to query.
The Named Scope you selected appears in the Selected Item(s) box.
Saving a Query Definition
Saving a Query
Definition A query’s definition is referred to as the Query Binder by the BindView RMS Console. By default, the Query Binder file will be saved in the My Items folder, a subfolder found in the Risk Assessment and Control folder of the BindView RMS Console. If you wish to save your Query Binder in a different location, you may do so by browsing for the location and selecting it.
X To save a New or Modified Query
1 Choose the Save option when the Query Options dialog appears. Then click the Save button.
Fig. 53 Query Options Dialog – Selecting a View As Option The Save Query dialog appears (Fig. 54).
Fig. 54 Save Query Dialog
2 Enter the name of your Query Binder in the Selection Name field and click Save.
The Query Options dialog reappears. Select a View As type option to run, modify, or save another query, or click Cancel to close this dialog.
Multiple Forest Support
Multiple Forest
Support
This feature allows you to report on different WindowsWindows Server™ 2003 forests. You can install your BindView ® 2000 and Information Server in one forest and report on that forest and other forests on your network without physically installing the BindView Information Server in other forests. You can also install the BindView Information Server on a Windows 2000 or Windows Server 2003 machine within an NT4 domain and report on other Windows 2000 and Windows Server 2003 forests on your network. Requirements Multiple forest support relies on your DNS configuration. The DNSmust be configured properly and the BindView Information Server must be installed on the machine where the DNS name resolution is working properly. The Global Catalog server and at least one Domain Controller in the domain must be reachable from the BindView Information Server.
Three options for using the multi-forest feature are: • Specify Credentials
• Microsoft Network • Enterprise Directories
The option you choose depends on your network configuration.
X Using Specify Credentials
This feature allows you to enter credentials for the domains that are not seen in the Microsoft Network folder. The Specify Credentials option assumes that the domain can be reached from your BindView Information Server. This feature requires the DNS name of the domain that you want to use.
1 In the BindView RMS Configuration folder, open the Credentials Manager icon in the details pane.
Requirements
2 Click Add under Credential Operations. The password prompt appears.
Fig. 56 Password Dialog
3 Enter the database password and click OK. The Add Credentials dialog appears.
Fig. 57 Add Credentials Dialog
4 Double-click Specify Credentials or click the Add button to open the Specify Domain.
Requirements
5 Double-click Specify Domain. The Domain and Credential tab will open in the Credentials dialog.
Fig. 58 Domain and Credential Tab Dialog
6 Enter the Domain DNS Name, Domain Name\User Name, and Password.
The domain name\user name may be entered by either using a backslash \ to separate domain name and user name. For example,
WIN2000\Administrator 7 Click OK.
The added credential will be listed as a Generic Credential under Selected Item(s).
Requirements
X Using Microsoft Network
Use this option to select available domains listed in your Microsoft Windows network or Network Neighborhood. This typically is the list of domains seen by your network browser.
1 Follow steps 1 through 3 in “Using Specify Credentials” on page 55.
2 Double-click Microsoft Network when the Add Credentials dialog is open.
Fig. 59 Add Credentials Dialog With Microsoft Network Selected
The list of available domains within the Microsoft Network appear in the Available Item(s) panel.
3 Double-click on a domain from the Available Item(s) to open the Credentials dialog.
Requirements
Fig. 60 Domain Credential Dialog
4 Enter the Domain Name\User Name and Password.
The domain name\user name may be entered by either using a backslash \ to separate domain name and user name. For example,
WIN2000\Administrator
5 Click OK in the Credentials dialog. The credential is added under Selected Item(s).
Requirements
Fig. 61 Add Credentials Dialog – Complete 6 Click OK to close this dialog.
Requirements
X Using Enterprise Directories
This feature allows you to select a domain from your forest domain tree. This tree is created using the information entered in the credential database. It does not automatically browse your network to find all the forests. By default, your local or native forest will be seen. If you added another domain that resides in a different forest, the additional forest will be seen.
1 Follow steps 1 through 3 in “Using Specify Credentials” on page 55.
2 Double-click on Enterprise Directories to open the available directories from the Available Item(s).
Requirements
Fig. 63 Add Credentials Dialog – Directories
3 Double-click on a directory to open the available domains (Fig. 64).
Requirements
4 Double-click on a domain, or select a domain and click Add to open the Domain Credential tab of the Credentials dialog.
Fig. 65 Credentials Dialog
5 Enter the Domain Name\User Name and Password. The user name is “sAMAccountName”, which is the user logon name format.
Note: The sAMAccountName property is a single-valued property that is the logon name used to support clients and servers from a previous version of Windows (such as Windows NT 4.0 and earlier, Windows 95, Windows 98, and LAN Manager.
6 Click OK in the Credentials dialog.
Requirements
Fig. 66 Add Credentials Dialog – Complete 7 Click OK to close this dialog.
X Using Configured Forests
This is the list of forests that bv-Control for Active Directory will display in the Enterprise Directories folder in the Credential Manager dialog. This list is generated as you continue entering the credentials for different domains in your credential database. Every new domain added to the credential database is verified and its forest information is recorded in Configured Forests. This domain need not always be the root of your forest. Any child domain will also cause the forest information to be entered in this folder. Removing the credentials from the credential database does not remove the recorded forest information and it will continue to appear in the Enterprise Directories.
To stop a forest from being displayed in the Enterprise Directories, you must delete it from the Configured Forests folder.
1 In the details pane of the bv-Control for Active Directory Configuration folder in the BindView RMS Console, open the Configured Forests folder.
Requirements
Fig. 67 Configured Forests
2 Select the forest you want to delete and click Delete. If you wish to delete all forests, click Delete All.
3 To complete the delete process, click OK. The selected forest is deleted and the Configured Forests dialog closes.
If you wish to cancel the delete process, click Cancel. The Configured Forests dialog closes but when it is reopened, the forest you previously selected to delete remains in the list. Credential Verification After you enter the credentials, bv-Control for Active Directory
verifies the credentials before they can be used to run a query. This verification process does not verify the account password. It only verifies that the account name exists in the domain.
The Refresh button in the Credentials Manager dialog can be used to update the account properties if the user is moved between domains in a forest. The bv-Control for Active Directory product indicates the verification results by displaying the appropriate icon for that credential. A credential with a question mark icon indicates that the account could not be verified. The bv-Control for Active Directory product can use this credential to run a query on objects in the specified domain. A credential with a red line across the icon indicates that the account is invalid and that the bv-Control for Active Directory product will not use this account to run a query. A credential without any such overlays indicates that the account was verified and can be tracked.
Note: The credential verification process does not use the password entered in the credentials. This process uses the BindView
Running a Query
If your remote domain or forest does not grant anonymous access rights to the domain object, the credential verification will not succeed. You will see a question mark icon in the credential entry. This means that there is no certainty of the accuracy of the account name entered.
Running a Query
When you run a query, the settings you defined in your query definition are polled for the information you requested. The results are returned in the selected view type: Grid, Chart, or Report. Queries can be launched from two places:• A new Query Options dialog • An existing Query Binder
The Query Options dialog appears after you click OK on the Query Builder dialog. The following is an example of a query being run from the Query Options dialog. For detailed information on how to run a query from an existing Query Binder, refer to the
BindView RMS Console and Information Server v8.0 User Guide.
X To run a query
1 In the View As option box of the Query Options dialog, select the view type you want for the query results.
Fig. 68 Query Options Dialog 2 Click Run to execute the query.
The results of the query will be displayed in the view type you selected: Grid, Chart, or Report.
Task Status
Monitoring The easy way to monitor and manage your tasks while they are running. Task Status message, shown in Fig. 69, offers you a quick and The Task Status message displays the status of Error, Successful, Incomplete, Waiting, or Running.
The Task Status message can be accessed by clicking on the Task Status icon.
Accessing a Previously Saved Query
The message will tell you if the query is still processing, or if it did not process due to an error (see Fig. 69).
Fig. 69 Task Status Message
The lower end of the Task Status message displays an example of each task status symbol and its meaning.
Accessing a Previously Saved Query
bv-Control for Active Directory provides a comprehensive reporting capability, which allows the administrator to view a previously saved query for purposes such as trend analysis and capacity planning. During the query definition process, you have the option to create and save a Query Binder. A Query Binder contains the query’s definition. By default, the Query Binder files are saved in the BindView RMS under the Risk Assessment and Control folder. Click the My Items subfolder to locate queries that have been saved.
X To access a previously saved query
1 From the BindView RMS Console container, open the Risk Assessment and Control folder.
Displaying Query Results
3 Highlight and right-click on the query you want to access. 4 From the Run option list, select the And View as type option
to run the query. You can choose to view the results in the Grid or Chart format.
Displaying Query
Results
The results obtained from the query will be displayed in the format that you selected as the View As option. These formats are Grid, Chart, or Report. An example of the results displayed in a Grid format is shown in Fig. 71.Fig. 71 Grid Results
Note: After running a query, always check for messages that have been returned with the query results. Click the Messages button at the lower right side of the results window. View any messages in this window.
Grid A grid is a tool used to analyze and display information about resources in your Active Directory environment, displayed in the form of a spreadsheet interface. The grid toolbar (Fig. 71), also includes options to create charts and print reports of your query results.
Chart A chart displays the results of a query in a graphic format (column,
pie, or histogram). Charts are created and modified using the Chart Builder Wizard. The wizard guides you through the process of building a custom chart for your query. During the building process, you will have the option to determine the type of chart you want to build, and how you want your chart to be labeled.
For complete instructions on how to build a chart using the Chart Building Wizard, refer to the BindView RMS Console and
Report
There are two basic types of chart style:
• Series Chart, which displays the relative values for each record depicted on the chart, using column or pie style.
• Histogram Chart, which displays the record frequencies for a single field in a dataset.
For more complete information on how to create the different chart styles, refer to the BindView RMS Console and Information Server v8.00 User Guide.
Report The reporting feature allows you to create a variety of customized
reports for your query results, and to print a report of the data results from your query. The appearance of your report is dictated by the print settings defined on the Print Setup dialog.
The BindView RMS Console is installed with default settings. If you wish to customize the default settings, you can do so from the Global Print Setup item in the Console Setup folder.
For more information about the print settings, refer to the BindView RMS Console and Information Server v8.00 User Guide.
Baselining
Another key feature that bv-Control for Active Directory provides to assist administrators is baselining. Baselining is a comparison of two historical datasets from the Query Binder. Baselining can help administrators perform risk management by allowing them to view exceptions and monitor changes in the Active Directoryenvironment. Administrators can then analyze the differences to determine how the Active Directory environment has changed over a particular time period.
You can baseline any two historical datasets in a query binder. You can also select the type of records that you want compared between the two historical datasets.
Creating a Baseline Before running a baseline, you must select any two historical datasets for a selected query binder to compare.
X To create a baseline
1 Select the query binder that contains the historical datasets you want to baseline.
2 Right-click on the query binder to display the shortcut menu. 3 From the Manage option select Historical Data options.
The Manage Historical Data dialog appears.
Task Lists
6 Click OK to run the baseline.
For more complete information on the functionality of baselining, refer to the BindView RMS Console and Information Server v8.00 User Guide.
Task Lists
bv-Control for Active Directory provides a task list capability to help you administer your Active Directory environment by allowing you to organize and run multiple tasks as a single task unit. When you run the task list file, all of the queries and baselines defined in the file will automatically run.A task list is an organized collection of individual tasks which can be managed and run as a single unit. A task list file can contain the following items:
• Query tasks • Baseline tasks
• Post process commands for added tasks • Summary file commands
For detailed information on each individual item listed above, refer to the BindView RMS Console and Information Server v8.00 User Guide.
Building Task Lists Task Lists are created from the Task List dialog. The following steps explain how to create and run a task list.
X To create a new task list
1 From the product toolbar, click on the New Task List icon. The Task List message will appear.
2 Click Add.
The Select a Task Type message will appear.
3 Select the baseline or query you want to add to the task list. For detailed steps on how to add a baseline or query to a task list, refer to the BindView RMS Console and Information Server v8.00 User Guide.
4 Click Add.
The Task List message reappears after you have created the task list.
X To run a new task list
5 From the Task List message, click Run Task List. 6 Close the Task List message.
Generating a Field List
For more complete information on how to create or modify a task list, refer to the BindView RMS Console and Information Server v8.00 User Guide.
Generating a Field List The first requirement for reporting on a specific area in your Active Directory is to know what fields are available to filter when running a query. bv-Control for Active Directory offers a quick way to gather a list of all available fields.
X To generate a field list
1 From the BindView RMS Console toolbar, click the New Query icon.
2 Select the Show Advanced Data Sources option.
Fig. 72 Show Advanced Data Sources Option
3 Double-click the BindView Internal Data Sources folder. 4 Highlight the BindView Fields data source, and click OK. The Query Builder dialog appears, as shown in Fig. 73.
Generating a Field List
5 Double-click on a field from the Available Fields box to cause the field to appear in the Selected Fields box (Fig. 73).
6 Click OK.
The Query Options dialog appears.
Fig. 74 Query Options Dialog
7 Select the type of view (grid, chart, or report) and click Run to launch the query.
Fig. 75 Results of a Generated Field List
• Database Name - Displays the name of the Data Source in the query.
• Field Name - Displays the fields associated with the data source.
• Field Glossary - Displays the definition of that particular field.
Effective Trustees Functionality
Effective Trustees
Functionality
The Effective Trustee field indicates whether a security principal gains the specified permissions on the specified Active Directory object. The permissions and the Active Directory object should be specified in the descriptor of this field. The security principal(s) should be specified through the scope. The ‘Default’ scope of this query will scan all the security principals in the domains available in the credential database.Available Permissions The following permissions are supported in the descriptor. • Create, delete, and manage user accounts - Same as the
permissions delegated by the task "Create, delete and manage user accounts" on an OU object through the Delegation of Control wizard of the Active Directory Users and Computers snap-in. This is the permission to create, delete, and manage user accounts in the specified object and all of its container child objects.
• Reset user passwords and force password change at next logon (Windows 2003) - Same as the permissions delegated by the task "Reset user passwords" on an OU object through the Delegation of Control wizard of the Active Directory Users and Computers snap-in. This is the permission to reset passwords and force password change on next logon of user accounts in the specified object and all of its container child objects.
• Read All User Information - Same as the permissions delegated by the task "Reset All User Information" on an OU object through the Delegation of Control wizard of the Active Directory Users and Computers snap-in. This is the permission to read all information of user accounts in the specified object and all of its container child objects.
• Create, Delete and Manage groups - Same as the permissions delegated by the task "Create, delete and manage group
accounts" on an OU object through the Delegation of Control wizard of the Active Directory Users and Computers snap-in. This is the permission to create, delete, and manage group accounts in the specified object and all of its container child objects.
• Modify the membership of a group - Same as the permissions delegated by the task "Modify the membership of a group" on an OU object through the Delegation of Control wizard of the Active Directory Users and Computers snap-in. This is the permission to modify the membership of group accounts in the specified object and all of its container child objects.
• Manage Group Policy Links - Same as the permissions delegated by the task "Manage Group Policy Links" on an OU object through the Delegation of Control wizard of the Active Directory Users and Computers snap-in. This is the permission to manage group policy links of container, OUs and sites in the specified object and all of its container child objects.