Getting Started with
ConceptDraw PROJECT v7
for OS X
Contents
GETTING STARTED WITH CONCEPTDRAW PROJECT ...3
CREATING PROJECTS ...5
ASSIGNING RESOURCES ...7
SETTING THE CALENDAR ...9
ADDING DETAILS ...10
MANAGING MULTIPLE PROJECTS ...11
PROJECT REPORTS ...12
PRESENTING YOUR PROJECT ...13
INTEGRATING WITH OTHER ConceptDraw Office APPLICATIONS ...14
WORKING WITH OTHER APPLICATIONS ...16
SOLUTION PARK ...16
VIDEO ROOM ...16
SAMPLES ...16
NO-CHARGE SUPPORT ...16
CROSS-PLATFORM LICENSING ...17
MULTI-DISPLAY SUPPORT ...17
1. Navigate your web browser to www.ConceptDraw.com and click Sign In.
Figure 1: Creating a new account on ConceptDraw.com 2. Fill in the form with your information, and then click Submit.
3. Check your email for the message from [email protected] that contains
your confirmation link. (Spam filters may catch this message. If you don’t see
the email within a few minutes, check your “Junk” or “Spam” folders.) 4. Follow the link to confirm your account, and then click “Download”. GETTING STARTED WITH CONCEPTDRAW PROJECT
Thank you for your interest in ConceptDraw® PROJECT v7! To begin with, let’s install
Figure 2: Downloading ConceptDraw Office Trial
5. Once the download is complete, run the installation file.
6. Follow all the on-screen instructions to complete the installation.
7. Once the installation is completed, ConceptDraw Solution Browser runs automatically. The trial licenses listed in your account will be delivered to your computer
automatically through your internet connection.
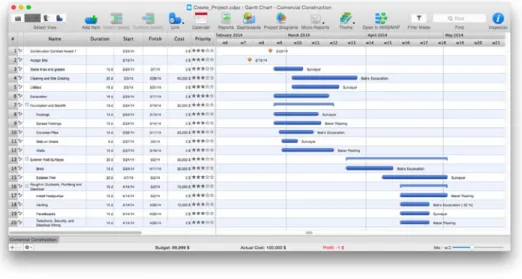
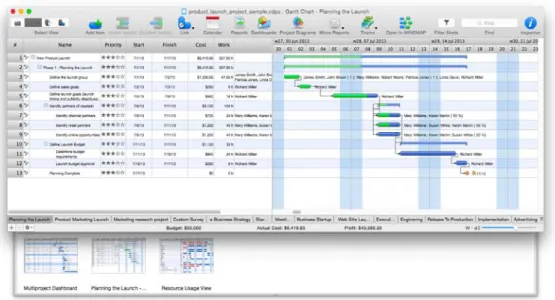
The left pane of this chart displays a list of Tasks. The right pane displays a calendar and timeline of those tasks.
Figure 3: Gantt Chart
To begin managing a new project, you will need to define the individual Tasks that must
be completed to deliver it. Click the Add button on the Home toolbar to create a new Task.
Then name the Task, and assign its duration. You can do so by double-clicking on the
fields in the left pane of the Gantt chart, and then typing on your keyboard.
You can also select a Task on the Gantt chart, and then edit its details in the Task Inspector. Press Cmd+2 on your keyboard to toggle visibility of this Inspector. CREATING PROJECTS
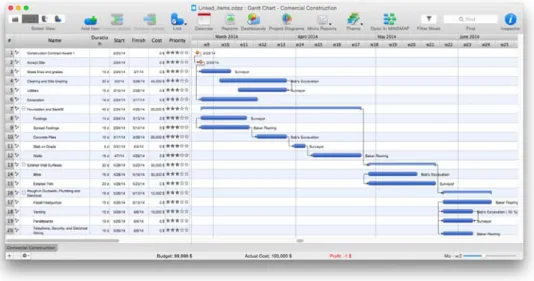
Tasks are usually grouped into larger Phases. Use the Indent button on the Home toolbar to subordinate a Task, thereby making the dominant item into a Phase.
You cannot edit a Phase’s duration. The duration of a Phase is determined by the duration
of all the Tasks within it.
Often, one Task must be completed before another can begin. To establish a relationship between Tasks, select two or more Tasks on the Gantt chart, and then click
the Link button on the toolbar. Editing the duration of linked Tasks will automatically adjust their position on the Gantt chart.
ASSIGNING RESOURCES
Once you have outlined the Tasks that comprise your project, the next step is to assign Resources to those Tasks.
Once you have outlined the Tasks that comprise your project, the next step is to assign Resources to those Tasks. Press Cdm+3 on your keyboard to toggle the Resource Assignment Inspector.
Click the check box next to a Resource to assign it to the selected Task.
Figure 5: Resource Assignment Inspector
Figure 7: Resource Sheet
There are five kinds of Resources:
Work,; Material; Cost; Equipment and Company. Work resources are those with a cost over time. Other resource types
have a fixed cost per unit.
You can quickly add Resources to your project by clicking the buttons in the Assign
Resources tab. For more detailed information on your project’s Resources, click the
Resources button on the main toolbar to view the Resource Sheet.
Once you have detailed and assigned your Resources, the Resource Usage View will tell
you at a glance if your Work Resources (i.e., employees) are over taxed.
This dashboard displays the amount of work assigned each day to each Work Resource. Overworked Resources appear as red bars on the timeline.
Click the + next to each Resource to view the Tasks it is assigned to.
SETTING THE CALENDAR
By default, ConceptDraw PROJECT assumes working hours are between 8am and 5pm, Monday through Friday. However, creating exceptions to this policy is easy.
Figure 9: Calendar
Click Calendar button on the toolbar. This will open the Document Properties window.
From the Calendar tab of this window, you can designate non-default working hours
for specific days, as well as non-working days.
You can also select a specific Work Resource from the drop down menu above
MILESTONE
You can set a Milestone in your Gantt chart by selecting a Task, and then clicking the “Milestone” checkbox in the Task pane. Milestones do not have duration, but they can be marked Completed by clicking the “Complete” checkbox.
You can also add Notes to a Task, Phase, Resource or Project by selecting the item, and
then typing in the Notes inspector (Cmd+6 to toggle visibility).
ADDING DETAILS
HYPERLINK
To make referencing information
outside the project file effortless,
you can add Hyperlinks to a Task, Phase, Resource or Project. Select the item in question, and then select the Hyperlinks inspector by pressing Cmd+5. The buttons at the bottom of the Hyperlinks pane allow you to quickly link to a website,
a file or folder on your computer,
an email address, or other object
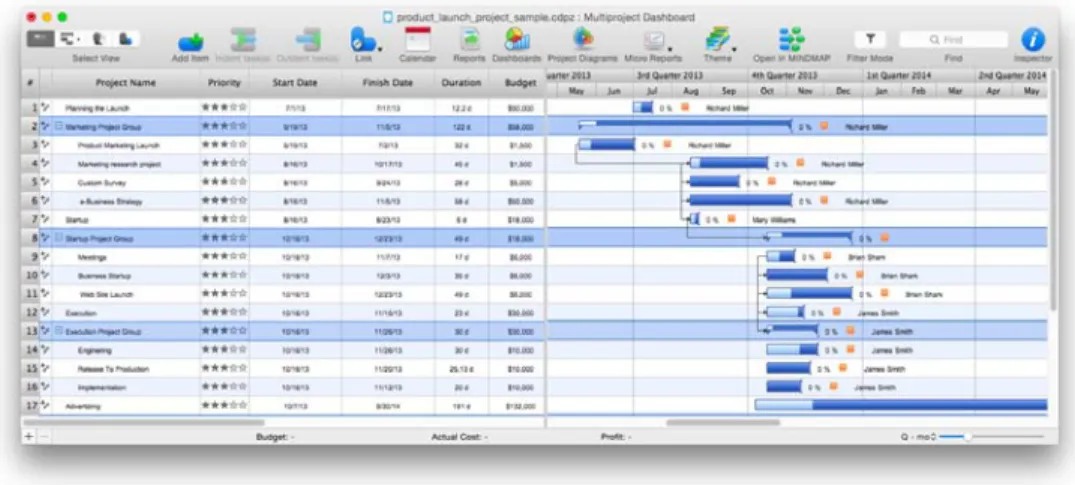
MANAGING MULTIPLE PROJECTS
ConceptDraw PROJECT allows you to manage multiple Projects in a single file.
Select the Multiproject Dashboard view on the toolbar. Multiproject Dashboard view is similar to the Gantt chart, but the timeline is on a larger scale.
Most of the controls on the toolbar work similarly to the Gantt chart,
such as Add (to create new Projects) and Link (to create relationships between
Projects).
However, you cannot edit the duration of a Project. You must return to the Gantt chart and edit the timeline of the individual Project.
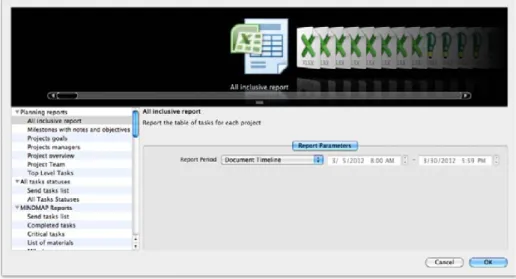
These can be viewed by clicking the Reports button on the toolbar. You can then select from an array of choices for reporting on your project
in spreadsheet (MS Excel®) format.
PROJECT REPORTS
ConceptDraw PROJECT offers a variety of ways to report the status of your project.
To capture slides of your project, scroll to an area of the Gantt Chart or Resources Sheet, and use the Zoom controls in the View menu to focus on the area you wish
to capture, then click the File menu, select the Create Presentation submenu, and then click Capture slide.
Thumbnail images of your slides will appear in a tray below the main window.
When you have all the slides you want, select the Create Presentation submenu again.
You can save your slides as Portable Network Graphics files by selecting
Save All Slides as PNG. PRESENTING YOUR PROJECT
You can capture slides of specific views within your project.
CONCEPTDRAW PRO
If you have ConceptDraw PRO installed, the Dashboards button on the toolbar can be used to generate drawings for tracking the status of your project at a glance. Also, the Project Diagrams button on the toolbar can be used to draw a variety
of diagrams, such as PERT charts and WBS (Work Breakdown Structure), suitable
for printing and display.
INTEGRATING WITH OTHER ConceptDraw Office APPLICATIONS
Using all three programs in the ConceptDraw Office suite in this way unlocks their true potential for increasing your productivity and facilitating your workflow.
CONCEPTDRAW MINDMAP
If you also have ConceptDraw MINDMAP installed, you can instantly create a mind map from your Gantt chart by clicking Open in MINDMAP button on the toolbar.
This allows you to take full advantage of ConceptDraw MINDMAP’s visual, non-linear
organization capabilities for reorganizing your project, and add content via Brainstorming mode.
You can then send the mind map back to PROJECT to use its more detailed resource and task management capabilities.
WORKING WITH OTHER APPLICATIONS
ConceptDraw PROJECT has the ability to export to a number of usable file formats, giving ConceptDraw users powerful flexibility in working with others. Expand the File tab to view all of ConceptDraw PROJECT’s import and export options.
Exporting to MS Project® is one of the best ways to share your project. ConceptDraw
PROJECT 7 is thoroughly compatible with MS Project’s, and can import from native .mpp format and export to MS Project XML files to make working across operating platforms
not only possible, but effortless. SOLUTION PARK
ConceptDraw Solution Park is an ever-growing collection of business-specific solutions
and product add-ons that are available to add continued value after the initial purchase of a ConceptDraw product. For more information, visit
http://www.conceptdraw.com/solution-park VIDEO ROOM
CS Odessa offers a series of instructional videos for ConceptDraw Products. Users of all
proficiency levels will find here new insights into the product’s functionality, as well as helpful tips to expedite their workflow.
http://www.conceptdraw.com/video/ SAMPLES
CS Odessa offers an online collection of professional samples designed to help ConceptDraw users achieve their best. ConceptDraw Samples shows many of the varieties of tasks and possibilities that the ConceptDraw Product Line can achieve. http://www.conceptdraw.com/samples/about-samples
MULTI-DISPLAY SUPPORT
ConceptDraw PROJECT v7 supports working across multiple computer screens. You can open separate mind maps on different screens and copy-and-paste from one to the other.
ABOUT CS ODESSA
Founded in 1993, Computer Systems Odessa supplies cross-platform productivity tools and graphics technologies to professional and corporate users around the world.
From their headquarters in Odessa, Ukraine, and U.S. office in San Jose, CA, CS Odessa
sells internationally in over 30 countries, both directly and through resellers.
The ConceptDraw Productivity Line has won numerous awards, and is used by hundreds of thousands all over the world. For more information, visit
www.conceptdraw.com CROSS-PLATFORM LICENSING
CS Odessa is one of the only companies in the world that offers a cross-platform license. This means that if you want to install your product on a Mac and a PC for your use, you can do so with our license. Most companies require that you purchase a separate license for each platform.
OS X SUPPORT
FREQUENTLY ASKED QUESTIONS
What is the difference between Technical Support and Maintenance Assurance P1? Technical support is a no charge item provided to our customers and individuals
trialing or products. Our Tech Support team is there to help you with installing, product activation, and product issues. Technical support is available by submitting a ticket via our web site, and by phone and email. Minor product upgrades are at no additional cost. When purchased at the same time of you ConceptDraw Product purchase, Maintenance Assurance P1 provides you the next major release of your product at no additional cost. When the next major upgrade of the product becomes available you will be notified of its availability for download and installation.
Why is ConceptDraw Solution Browser part of the product I purchased?
When you activate a purchased license for your product, that authorization is stored in the cloud, and then synchronized with your desktop product(s) using ConceptDraw Solution Browser. We do this so if the unthinkable occurs and you have a catastrophic event with your computer such as a hard disk failure, you can log into your account on ConceptDraw.com and retrieve your license, saving you time and headaches.
The ConceptDraw Solution Browser also manages the versioning of all of your products, and give you access to all of the additional business solutions found in the ConceptDraw Solution Park.
I am with a large organization; do you support other methods of installation besides the one I experienced from my trial?
TABLE OF FIGURES SUPPORT
Figure 1: Creating a new account on ConceptDraw.com...3
Figure 2: Downloading ConceptDraw Office Trial...4
Figure 3: Gantt Chart...5
Figure 4: Linked Items on the Gantt Chart...6
Figure 5: Assign Resources Inspector...7
Figure 6: List of Resource Types...7
Figure 7: Resource Sheet...7
Figure 8: Resource Usage View...8
Figure 9: Calendar...9
Figure 10: Hyperlink Inspector... ...10
Figure 11: Milestone on the Gantt chart...10
Figure 12: Multiproject Dashboard View...11
Figure 13: Project Report in Spreadsheet (MS Excel®) Format...12
Figure 14: Project Slide Preview...13
Figure 15: Project Dashboard...14
KEYBOARD SHORTCUTS
Following is an abbreviated list of the most commonly used keyboard shortcuts.
See the in-program Help file for the comprehensive list.
Keystroke Operation
Cmd + N Create a New Document
Cmd + O Open a Document
Cmd + S Save the active document
Cmd + Shift + S Save the active document under a new file name
Cmd + P Print Preview
Cmd + W Close active document Cmd + Right Indent task
Cmd + Left Outdent task
Cmd + Down Move item to the next position (one line down)
Cmd + Up Move item to the previous position (one line up)
Cmd + L Link selected tasks Cmd + Shift + L Unlink selected tasks Cmd + Opt + G Gantt Chart View Cmd + Opt + R Resource List View Cmd + Opt + J Projects Dashboard
Cmd + Opt + U Move to Resource Usage View Cmd + R Call Reports dialog
Cmd +1 Projects Inspector
Cmd +2 Tasks Inspector
Cmd +3 Resource Assignments Inspector Cmd +4 Resources Inspector
Cmd +5 Hyperlinks Inspector
CS Odessa
Technical Support/Sales Phone Numbers US/Canada/Mexico:
Technical Support (Toll Free): +1 (877) 441-1150 x4
Sales (Toll Free): +1 (877) 441-1150 x3
[email protected] Europe:
+38 0487601963