Replication Agent
™
15.7.1
SP200
Copyright © 2014 by SAP AG or an SAP affiliate company. All rights reserved.
No part of this publication may be reproduced or transmitted in any form or for any purpose without the express permission of SAP AG. The information contained herein may be changed without prior notice.
Some software products marketed by SAP AG and its distributors contain proprietary software components of other software vendors. National product specifications may vary.
These materials are provided by SAP AG and its affiliated companies ("SAP Group") for informational purposes only, without representation or warranty of any kind, and SAP Group shall not be liable for errors or omissions with respect to the materials. The only warranties for SAP Group products and services are those that are set forth in the express warranty statements accompanying such products and services, if any. Nothing herein should be construed as constituting an additional warranty.
SAP and other SAP products and services mentioned herein as well as their respective logos are trademarks or registered trademarks of SAP AG in Germany and other countries. Please see http://www.sap.com/corporate-en/legal/copyright/ index.epx#trademark for additional trademark information and notices.
Conventions ...1
About Replication Agent ...5
Basic Replication System Concepts ...5
Transaction Replication ...5
Replication System Components ...6
Replication Agent Functionality ...7
Replication Agent Instances ...8
Replication Agent Communications ...8
Replication Agent Components ...9
Multiple Replication Agents ...10
Setup and Configuration ...11
Replication Agent Instance Creation ...11
Replication Agent Instance Directories ...11
Replication Agent Utilities ...12
Preparing to Use the Utilities ...13
The Command Line Interface ...14
Replication Agent Start-Up ...33
Preparing for Start-Up ...33
Character Settings ...33
Starting Replication Agent Using the ra Utility ...36
Starting a Replication Agent Instance with the
RUN Script ...37
Starting Replication Agent Using agt_service ...38
Starting Replication Agent from the Windows
Services Tool ...38
The Replication Agent Administration Port ...39
Interfaces File Entries ...39
Logging in to a Replication Agent Instance Using
isql ...40
Creating or Changing the Replication Agent
Administrator Login ...40
Replication Agent Connectivity Setup ...41
Creating a Primary Database User Login for
Replication Agent ...41
Creating a Replication Server User Login for
Replication Agent ...42
The RSSD User Login Name ...43
Connection Configuration Parameter Settings ...44
Network Connectivity Test ...49
Verifying Replication Agent Connections ...50
Replication Agent Initialization ...50
Object Name Prefix ...50
Initializing Replication Agent ...51
Primary Database Object Marking ...52
Marking a Table in the Primary Database ...53
Marking a Stored Procedure in the Primary
Database ...54
Enabling Replication for a LOB Column in the
Primary Database ...55
DDL Replication ...56
Secure Socket Layer ...56
Setting Up SSL Services ...57
Replication Agent Configuration Requirements ...61
Supplemental Logging ...63
Turning on Supplemental Logging at Table Level
and Turning off Supplemental Logging at
Database Level ...63
Turning on Supplemental Logging at Database
Level and Turning off Supplemental Logging
at Table Level ...64
Administration ...65
Determining the Status of a Replication Agent
Instance ...65
Replication Agent States ...65
Replication Agent State Changes ...68
Replication Agent Instance Shutdown ...69
Shutting Down a Replication Agent Instance ...69
Starting Replication ... 70
Stopping Replication in Replication Agent ...71
Quiescing a Replication Agent Instance ...71
Suspending a Replication Agent Instance ...72
Moving Replication System Components ...73
Moving a Replication Agent Instance to the
Same Platform ...73
Replication Agent Management ...75
Initializing a Replication Agent Instance ...76
Deinitializing a Replication Agent Instance ...78
Transaction Log Truncation ...80
Primary Database Backup ...82
Replication Agent System Database (RASD)
Management ... 82
RASD ...82
Updating the RASD ... 84
Updating the Log Device Repository ...85
Backing Up the RASD ... 86
Resetting the RASD Administrator Password ...87
Restoring the RASD ... 87
RASD Truncation ...88
Default Host and Port Number Configuration ... 89
Replicated Transactions and Procedure Identification ..89
Marking and Unmarking Tables ...90
Enabling and Disabling DDL Replication ...95
Enabling and Disabling Replication for Marked
Tables ...95
Enabling and Disabling Replication for LOB
Columns ...97
Marking and Unmarking Stored Procedures ... 98
Enabling and Disabling Replication for Stored
Procedures ...102
Enabling and Disabling Replication for
Sequences ...106
Replication Agent Tuning ...107
Tuning Customization ...107
Parameters and Variables ...108
Optimal Performance Tuning ...110
End-to-End Tuning ...112
Replication Agent Security ...115
User Authentication ...115
Configurable Password Policy ...115
Dynamic Password Encryption ...116
Maximum-Strength Password Encryption ...116
Installing Java Cryptography Extension (JCE)
Unlimited Strength Jurisdiction Policy Files 7
...116
Secure Sockets Layer ...117
Auditing ...117
Best Practices for Replication Agent Security ...118
Troubleshooting ...119
Command Errors ...119
Replication Agent Failure ...120
Verifying that a Primary Database Object Is
Marked for Replication ...120
Replication Agent Instance Availability
Monitoring ...121
Checking the Current Replication Agent Status
...122
Primary Database Log Access ...123
Replication Agent System Logs ...124
Using ra_statistics to Check Replication Agent
Operations and Performance ...125
Available Memory ...126
Debugging LTL ...129
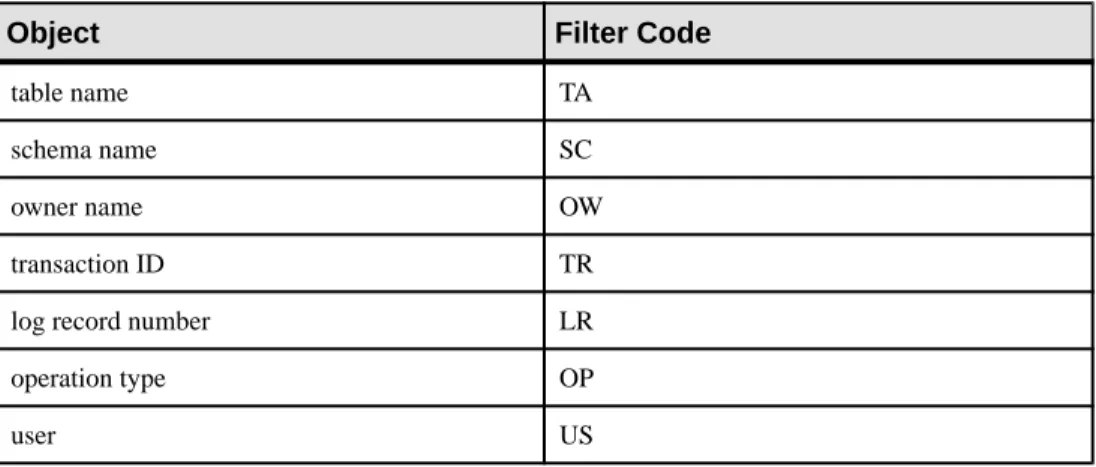
Using Trace Filters ...130
JVM Thread Dump ...133
Troubleshooting DDL Replication Failure in
Replication Agent for UDB ...134
Replication Server Troubleshooting Issues ...136
Replication Definitions and Subscriptions Check
... 136
Checking the Status and Operation of the
Replication Server ... 136
Verifying that rs_username Login has
Appropriate Permissions ... 137
Verifying Stable Queues ... 137
Performance Monitoring ...138
Materializing Subscriptions to Primary Data ...139
Materialization ... 139
Bulk Materialization ...139
Data Unloading and Loading ... 140
Atomic Bulk Materialization ...140
Prepare for Atomic Bulk Materialization ...140
Performing Atomic Bulk Materialization ... 141
Nonatomic Bulk Materialization ... 142
Prepare for Nonatomic Bulk Materialization ... 143
Performing Nonatomic Bulk Materialization ... 143
Glossary ...147
Conventions
These style and syntax conventions are used in SAP® documentation.
Style conventions
Key Definition
monospaced
(fixed-width) •• SQL and program codeCommands to be entered exactly as shown
• File names • Directory names
italic monospaced In SQL or program code snippets, placeholders for user-specified values (see example below).
italic • File and variable names
• Cross-references to other topics or documents
• In text, placeholders for user-specified values (see example be-low)
• Glossary terms in text
bold sans serif • Command, function, stored procedure, utility, class, and
meth-od names
• Glossary entries (in the Glossary) • Menu option paths
• In numbered task or procedure steps, user-interface (UI) ele-ments that you click, such as buttons, check boxes, icons, and so on
If necessary, an explanation for a placeholder (system- or setup-specific values) follows in text. For example:
Run:
installation directory\start.bat
Syntax conventions
Key Definition
{ } Curly braces indicate that you must choose at least one of the enclosed options. Do not type the braces when you enter the command.
[ ] Brackets mean that choosing one or more of the enclosed options is optional. Do not type the brackets when you enter the command.
( ) Parentheses are to be typed as part of the command.
| The vertical bar means you can select only one of the options shown. , The comma means you can choose as many of the options shown as you like,
separating your choices with commas that you type as part of the command. ... An ellipsis (three dots) means you may repeat the last unit as many times as you
need. Do not include ellipses in the command.
Case-sensitivity
• All command syntax and command examples are shown in lowercase. However, replication command names are not case-sensitive. For example, RA_CONFIG,
Ra_Config, and ra_config are equivalent.
• Names of configuration parameters are case-sensitive. For example, Scan_Sleep_Max is not the same as scan_sleep_max, and the former would be interpreted as an invalid parameter name.
• Database object names are not case-sensitive in replication commands. However, to use a mixed-case object name in a replication command (to match a mixed-case object name in the primary database), delimit the object name with double quote characters. For example:
pdb_get_tables "TableName"
• Identifiers and character data may be case-sensitive, depending on the sort order that is in effect.
• If you are using a case-sensitive sort order, such as “binary,” you must enter identifiers and character data with the correct combination of uppercase and lowercase letters. • If you are using a sort order that is not case-sensitive, such as “nocase,” you can enter
identifiers and character data with any combination of uppercase or lowercase letters. Terminology
Replication Agent™ is a generic term used to describe the Replication Agents for SAP® Adaptive Server® Enterprise (SAP® ASE), Oracle, Microsoft SQL Server, and IBM DB2 for Linux, Unix and Windows. The specific names are:
• RepAgent – Replication Agent thread for SAP Adaptive Server Enterprise • Replication Agent for Oracle
• Replication Agent for Microsoft SQL Server • Replication Agent for IBM DB2 UDB
About Replication Agent
Replication Agent™ extends the capabilities of SAP® Replication Server® by allowing non-SAP (heterogeneous) data servers to act as primary data servers in a replication system based on SAP replication technology.
Basic Replication System Concepts
Use transaction replication to maintain data in separate databases called replicate databases. Replicate databases contain accurate, current copies or subsets of data from a primary database.
When a table in the primary database is marked for replication, transactions that change the data in that table are captured for replication. The primary database processes the transaction, and a copy of the transaction (including all its operations) is stored in the transaction log. In the case of a stored procedure marked for replication, when the stored procedure is invoked in the primary database, all parameter values provided with the procedure invocation are captured and recorded in the transaction log. When a marked stored procedure generates a transaction that affects data in marked tables in the primary database, the transaction generated by the stored procedure is ignored, so only the procedure invocation is replicated.
Transaction Replication
The events captured for replication from an SAP replication system are referred to as transactions, even if they do not directly correspond to an actual transaction in the primary database. For example, if a transaction affects both marked tables and unmarked tables, only the operations that affect the marked tables are captured for replication. Operations on unmarked tables are ignored.
All data-change operations captured for replication exist within a transaction context, that is, only committed transaction operations are replicated; transactions that are rolled back are not replicated.
Even if the data-change events replicated through an SAP replication system are really operations, those operations are grouped in an atomic collection, and they represent the results of a committed transaction in the primary database.
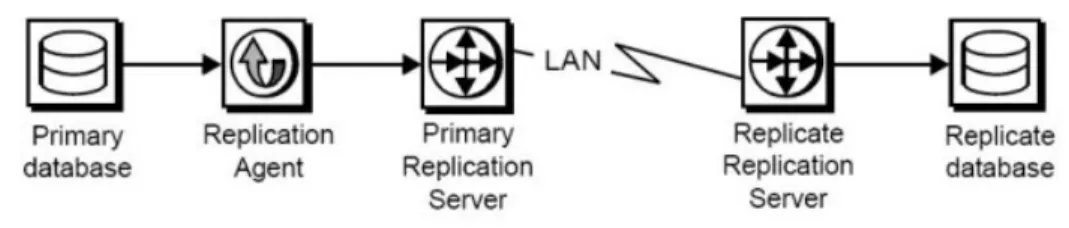
Replication System Components
The basic components of a replication system are the primary database, the replicate database, and Replication Server.
Figure 1: Typical SAP Replication System
Primary Databases
A primary database is the source of transactions that modify data in the replicate databases. Transactions are replicated by table or by procedure.
Tables marked for replication in a primary database are called primary tables. A primary table must be marked for replication so that the Replication Agent can identify and replicate the transactions that affect the data in that table. By default, Large-object (LOB) columns within a primary table are marked for replication.
To replicate invocations of a stored procedure, the procedure must be marked for replication so that the Replication Agent can identify and replicate invocations of that procedure in the primary database.
Replication Agents
A Replication Agent is the SAP replication system component that captures the replicated transactions in a primary database and sends those transactions to a Replication Server for distribution to replicate databases.
Replication Agent reads a transaction log in the primary database and generates Log Transfer Language (LTL) output. LTL is the language that Replication Server uses to process and distribute replicated transactions throughout a replication system.
To provide more sophisticated replication features and generate more efficient LTL, you can configure Replication Agent to use information stored in the Replication Server System Database (RSSD) of the primary Replication Server.
Replication Agent retrieves the information it needs for transaction replication from the native transaction log maintained by the primary data server.
Replication Agent uses the log-based solution for primary databases in these primary database types:
• Oracle
• Microsoft SQL Server
• IBM DB2 for Linux, UNIX, and Windows
Note: Procedure and DDL replication is not available for IBM DB2.
Replication Servers
The Replication Server that receives replicated transactions from a primary database (that is, directly from a Replication Agent) is called the primary Replication Server. The Replication Server that sends replicated transactions to a replicate database is called the replicate Replication Server.
Note: In a simple replication system, a single Replication Server can act as both the primary
Replication Server and the replicate Replication Server.
After it receives LTL from a Replication Agent, the primary Replication Server sends the replicated transaction to a replicate database, either directly or through a replicate Replication Server. The replicate Replication Server converts the replicated transaction from the LTL it receives to the native language of the replicate database, and then it sends the replicated transaction to the replicate data server for processing. When the replicated transaction is processed successfully by the replicate database, the replicate database is synchronized with the primary database.
Each Replication Server holds transaction operations in a stable queue and delivers them as soon as possible to other Replication Servers or replicate databases. By doing this, Replication Server guarantees that every transaction successfully received from a Replication Agent is guaranteed to be delivered to appropriately subscribing replicate databases.
Each Replication Server uses a database called the Replication Server System Database (RSSD) to store replication system data and metadata. Replication Agent can use some of the information stored in the RSSD to provide advanced replication features.
Replication Agent Functionality
Replication Agent supports transaction replication from a primary database through Replication Server.
Note: See the Replication Server Options Release Bulletin for information about the specific versions of Oracle, Microsoft SQL Server, and IBM DB2 that Replication Agent supports. Replication Agent runs as a standalone application, independent of the primary data server, the primary Replication Server, and any other replication system components.
Replication Agents can reside on the same host machine as the primary database or any other replication system component, or they can reside on a machine separate from any other replication system components that has network access to the primary database. Replication
Agents must execute on a machine that has access to the transaction logs for the primary database. For Replication Agent for UDB, this is accomplished using the IBM DB2 client. For Replication Agent for Oracle, this is accomplished using Oracle Log Miner or Oracle XStream. Replication Agent for Microsoft reads the Microsoft SQL Server transaction log file.
You can completely configure, manage, and monitor a Replication Agent instance using any Open Client™ application that is capable of communicating with the Tabular Data Stream™ (TDS) protocol (such as isql).
Replication Agent Instances
You must create an instance of Replication Agent for each primary database from which you want to replicate transactions. Each Replication Agent instance is an independent application with its own configuration and log files, administration port, and connections to the primary database and the primary Replication Server.
Replication Agent instances created for a specific primary database type are referred to in this book as:
• Oracle Database Server – Replication Agent for Oracle
• Microsoft SQL Server – Replication Agent for Microsoft SQL Server • IBM DB2 for Linux, UNIX, and Windows – Replication Agent for UDB
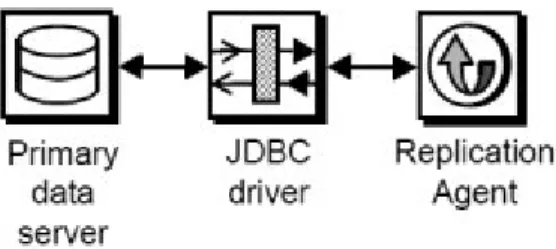
Replication Agent Communications
Replication Agent uses the Java Database Connectivity (JDBC™) protocol for all communications. However, some supported databases require the Open Database
Connectivity (ODBC) protocol. When connecting to a primary database, Replication Agent connects to either the JDBC driver or the JDBC/ODBC bridge provided by the database vendor.
Figure 2: Replication Agent Primary Database Communication Using a JDBC driver
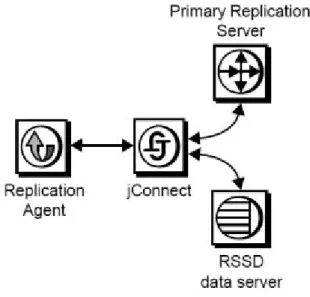
Replication Agent uses SAP JDBC driver (SAP® jConnect™ for JDBC) to communicate with all SAP Open Client and Open Server™ applications, such as Adaptive Server Enterprise and Replication Server. Each Replication Agent instance uses a single instance of jConnect.
While replicating transactions, the Replication Agent maintains connections with both the primary database and the primary Replication Server, and it may occasionally connect to the RSSD of the primary Replication Server to retrieve replication definition data.
Figure 3: Replication Agent Communication with Replication Server and its RSSD
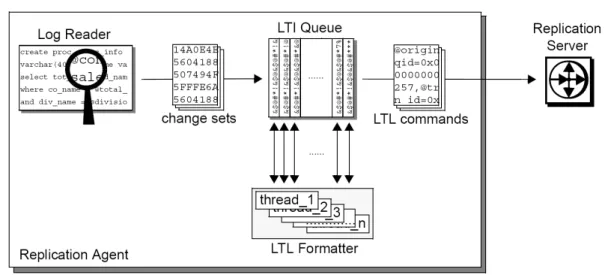
Replication Agent Components
Replication Agent consists of a set of components that work together to perform all the operations required to propagate transactions from a primary database for replication. These are the main Replication Agent components:
• Log Reader – reads the transaction log in the primary database to retrieve transactions for replication.
• Log Transfer Interface (LTI) – generates Log Transfer Language (LTL) and sends it to the primary Replication Server.
• Log Administrator – administers the Replication Agent transaction log and manages transaction log objects.
• Log Transfer Manager (LTM) – manages all the other components and coordinates their operations and interactions.
In this process:
1. The Log Reader component retrieves transaction data from the transaction log in the
primary database.
3. The LTI component processes the change set data from the Log Reader and generates the
LTL to send to the primary Replication Server.
The LTI component also receives messages from the primary Replication Server. Although the LTM component is not involved in the flow of data from the primary database to the primary Replication Server, it coordinates the activities of the other Replication Agent components and processes any errors generated by those components.
Administration Port
Replication Agent provides an administrative user interface through its administration port. The administration port allows an Open Client application to log in to a Replication Agent instance as if the Replication Agent were an SAP® Open Server™ application. After it is logged in, the administrative client can issue commands to control, administer, and monitor the Replication Agent instance.
The administration port communicates with the client through the SAP JDBC driver (SAP jConnect for JDBC).
The administration port passes commands from the administrative client to the Replication Agent components. The administration port also processes the messages from Replication Agent components, and passes those messages out to the client.
Java Requirement
Replication Agent includes a Java Runtime Environment (JRE), so the computer that acts as the Replication Agent host machine must meet JRE requirements.
For more information on installing and setting up a JRE, see: • Replication Agent Installation Guide
• Replication Server Options Release Bulletin
Multiple Replication Agents
Replication Agent for Oracle supports the use of multiple Replication Agent instances with Replication Server Multi-Path™ Replication.
Multiple Replication Agent instances allow transactions to be replicated in parallel along multiple independent paths, increasing replication throughput and performance and reducing resource contention. See the Replication Agent Primary Database Guide.
Setup and Configuration
Set up Replication Agent after installation, verify that your replication system is ready to replicate data, and start replication.
Note: The procedures described here assume you have already installed the Replication Agent
software and Replication Server software, as described in the Replication Agent Installation Guide and the Replication Server installation and configuration guides for your platform.
Replication Agent Instance Creation
After you install the Replication Agent software, you must create one instance of the Replication Agent for each primary database that you want to replicate transactions from. Each Replication Agent instance is an independent process, with its own instance directories to contain its configuration file, system log files, and script files. In addition, each Replication Agent instance creates some tables and stored procedures in the primary database. Replication Agents for Oracle, IBM DB2 UDB, and Microsoft SQL Server also create objects in the Replication Agent System Database (RASD). Each Replication Agent instance manages its own connections to the primary data server, primary Replication Server, and RSSD. When you create a Replication Agent instance, you must specify:
• A unique instance (server) name
• A unique client socket port number for its administration port • The type of primary database the instance supports
• A Replication Agent administrator login name for the Replication Agent instance • A password for the new administrator login
You can create and run more than one Replication Agent instance on a single host machine, but each instance must have a unique name and a unique port number.
See also
• ra_admin on page 16
• Creating a Replication Agent Instance Using the Command Line on page 29 • Creating an Instance with a Resource File on page 23
Replication Agent Instance Directories
Replication Agent instance directories are created under the Replication Agent base directory when you create a Replication Agent instance.
The Replication Agent base directory (RAX-15_5) and the installation directory (sybase) are created when you install the Replication Agent software.
Note: A single installation (on a single host machine) can support multiple Replication Agent
instances. Each instance directory resides under the Replication Agent base directory created when you install the software.
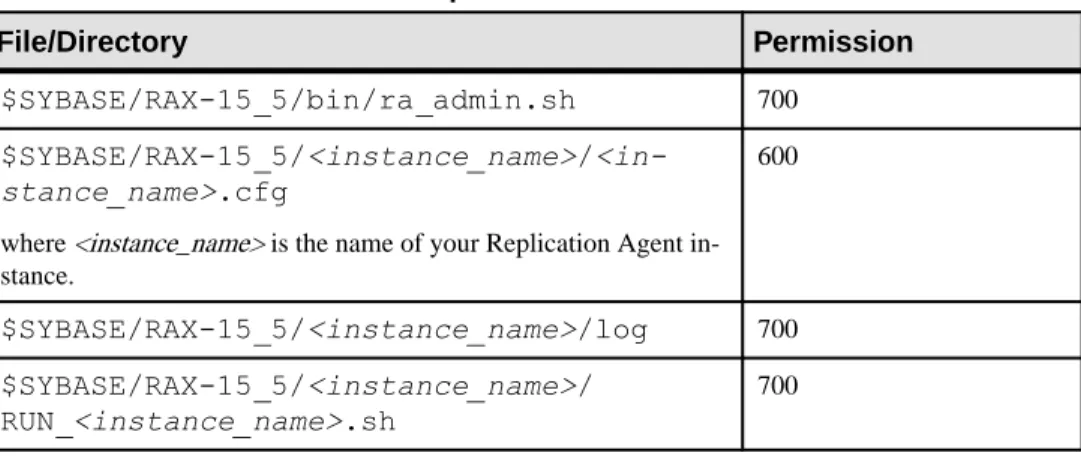
The permissions on all files and directories in the RAX-15_5 installation directory are set to 600 (read/write for user, no permissions for group and other) or 700 (read/write/execute for user, no permissions for group and other) respectively, to improve security.
Table 1. Permissions on Replication Instance Files and Directories
File/Directory Permission
$SYBASE/RAX-15_5/bin/ra_admin.sh 700
$SYBASE/RAX-15_5/<instance_name>/ <in-stance_name>.cfg
where <instance_name> is the name of your Replication Agent in-stance.
600
$SYBASE/RAX-15_5/<instance_name>/log 700
$SYBASE/RAX-15_5/<instance_name>/ RUN_<instance_name>.sh
700
Replication Agent Utilities
The utilities provided with Replication Agent are agt_service, ra, and ra_admin. • agt_service – runs a Replication Agent instance as a Windows service.
• ra – starts a Replication Agent instance, or returns the Replication Agent software version number.
• ra_admin – creates, copies, verifies, and deletes Replication Agent instances, or lists all verifiable, installed Replication Agent instances on a machine.
Replication Agent utilities are supplied as batch files for Windows platforms and as shell scripts for UNIX platforms. The utility files reside in the bin subdirectory, under the Replication Agent base directory.
Note: On Windows platforms, when you execute a run script, you can omit the extension: ra -i my_ra. However, on UNIX, you must always include the extension: ra.sh -i my_ra. You can use the -help option with either ra_admin or ra to obtain information about that utility.
See also
Preparing to Use the Utilities
Perform these tasks before using the Replication Agent utilities. Prerequisites
• Log in to the operating system on the Replication Agent host machine with a user login that has execute permission in the Replication Agent installation directory and all
subdirectories (for example, the “sybase” user)
• Set the SYBASE environment before you invoke any utilities
The SYBASE environment script is supplied as a batch file for Microsoft Windows platforms (SYBASE.bat) and as a shell script for UNIX platforms (SYBASE.sh or SYBASE.csh). Task
1. Log in to the operating system on the Replication Agent host machine with a user login that
has the appropriate permissions.
2. Open an operating system command window.
3. At the operating system prompt, navigate to the Replication Agent installation directory:
• On Microsoft Windows: cd c:\sybase
where c:\sybase is the path to the Replication Agent installation directory. • On UNIX:
cd /opt/sybase
where /opt/sybase is the path to the Replication Agent installation directory.
4. In the Replication Agent installation directory, invoke the SYBASE environment script:
• On Microsoft Windows: SYBASE
• On UNIX, for Bourne and Korn shells: . SYBASE.sh
• On UNIX, for C-shell: source SYBASE.csh
Note: On UNIX platforms, you can insert the source command line in the .login file for the Replication Agent administrator (or “sybase” user), so that the SYBASE environment is set automatically when you log in to the Replication Agent host machine.
The Command Line Interface
Use the command line interface to administer Replication Agent from the Windows or UNIX command line.
agt_service
Runs Replication Agent as a Windows Service.
Syntax
agt_service[.cmd]
[-install inst_name [-startup state] [-charset charset] [-maxmem
mem] ] |
[-remove inst_name ] |
[-start inst_name ] |
[-stop inst_name ] |
[-h] Parameters
• -install inst_name – Specifies a Replication Agent instance for which to create a Windows
service, where inst_name is the name of an existing Replication Agent instance. • -startup state – (Optional) Specifies a start-up state for the Replication Agent instance.
Valid -startup state values are:
• -admin – (Default) starts the Replication Agent instance in Admin state. • -replicate – starts the Replication Agent instance in Replicating state.
• -charset charset – (Optional) Java character that the JVM uses. This option corresponds
to the RA_JAVA_DFLT_CHARSET environment variable.
• -maxmem mem – (Optional) maximum amount of memory that this Replication Agent
instance uses. This option corresponds to the RA_JAVA_MAX_MEM environment variable.
• -remove inst_name – Specifies a Replication Agent instance for which to remove a
Windows service, where inst_name is the name of an existing Replication Agent instance. • -start inst_name – Specifies a Replication Agent instance for which to start a Windows
service, where inst_name is the name of an existing Replication Agent instance. • -stop inst_name – Specifies a Replication Agent instance for which to stop a Windows
service, where inst_name is the name of an existing Replication Agent instance. • -h inst_name – Returns command usage information.
Examples
• Example 1 – Creates a Windows service for a Replication Agent instance named “my_ra”
agt_service -install my_ra -startup replicate
• Example 2 – Removes a Windows service for a Replication Agent instance named
“my_ra”:
agt_service -remove my_ra
• Example 3 – Starts a Windows service for a Replication Agent instance named “my_ra”:
agt_service -start my_ra
• Example 4 – Stops a Windows service for a Replication Agent instance named “my_ra”:
agt_service -stop my_ra Usage
Use agt_service:
• Create a Windows Service to run a specified Replication Agent instance • Remove a Windows Service instance running a Replication Agent instance
• Start a Windows service, thereby starting the corresponding Replication Agent instance • Stop a Windows service, thereby stopping the corresponding Replication Agent instance To run agt_service, invoke it as a command at the operating system prompt.
See also
• Replication Agent Instance Shutdown on page 69 • Replication Agent Start-Up on page 33
ra
Starts Replication Agent.
Syntax
ra [-help | -i inst_name [-state] | -v]
Parameters
• -help – Returns command usage information.
Note: You can also invoke ra with no option specified to return command usage information.
• -i inst_name – Specifies a Replication Agent instance to start, where inst_name is the name of an existing Replication Agent instance.
• - state – Keyword that specifies a start-up state for the Replication Agent instance.
• -admin – (Default) starts the Replication Agent instance in Admin state. • -replicate – starts the Replication Agent instance in Replicating state. • -v – Returns the Replication Agent software version number.
Examples
• Example – Starts a Replication Agent instance named “my_ra” in Replicating state:
ra -i my_ra -replicate Usage
The Replication Agent ra utility:
• Starts a specified Replication Agent instance
• Returns the Replication Agent software version string
To run ra, invoke it as a command at the operating system prompt.
See also
• Replication Agent Start-Up on page 33 • ra_admin on page 16
Start-Up Errors
A Replication Agent instance may encounter errors on start-up.
• On Microsoft Windows platforms, start-up errors appear in the operating system command window.
• On UNIX platforms, start-up errors appear in the operating system command window and recorded in the Replication Agent system log.
See also
• Troubleshooting on page 119 ra_admin
Administers Replication Agent instances.
Syntax
ra_admin [option [create options]] [inst_name]
Parameters
• -b – Returns the complete path of the Replication Agent installation directory.
• -c inst_name – Creates a new Replication Agent instance using the specified name
The inst_name string must be a valid server name, and unique on the host machine. When you use the -c option, one of these options is required:
• -p and -t, or
-p , -t, -uid, and -pwd. • -p and -f.
When you use the -f option to copy an existing Replication Agent configuration, you need not specify the -t option. The primary database type specified for the existing Replication Agent instance is copied to the configuration of the new Replication Agent instance when you specify the -f option.
• -e – Indicates whether the default user name and password are allowed when you create a
Replication Agent instance.
• -h – Returns command usage information.
• -p port_num – Specifies a client socket port number for the administration port of the
Replication Agent instance.
The port_num must be a valid port number and unique on the Replication Agent host machine. Replication Agent also requires that a second port, port_num+1, must be available for the RASD.
• -reset inst_name -uid username -pwd new_pwd – Resets the Replication Agent
administrator password to a new value. where:
• inst_name is the name of the Replication Agent instance. • username is the Replication Agent administrator user name.
• new_pwd is a new password that complies with the password security requirements. • -t database – Identifies the type of data server that the primary database resides in.
The database string must be one of: • oracle – Oracle database server
• oraclexs – Oracle database server with XStream API Log Reader • mssql – Microsoft SQL Server
• ibmudb – IBM DB2 for Linux, UNIX, and Windows
Note: The database value is not case-sensitive.
When you use -c, you can specify the configuration of the new Replication Agent instance to be based on the configuration file for an existing Replication Agent instance. To do this, use the -f option.
• -f old_inst – Copies the configuration of an existing Replication Agent instance for a new
Replication Agent instance.
The old_inst string is the name of the existing Replication Agent instance whose configuration you want to copy for the new Replication Agent instance.
When you use the -f option to copy an existing Replication Agent configuration, you need not specify the -t option. The primary database type specified for the existing Replication
Agent instance is copied to the configuration of the new Replication Agent instance when you specify the -f option.
Note: When you use the -f option, some configuration parameters are set to default values. • -d inst_name – Deletes a specified Replication Agent instance.
The inst_name string must be the name of an existing Replication Agent instance. When you invoke ra_admin with the -d option, the utility deletes all of the subdirectories associated with the specified instance from the Replication Agent installation directory.
Note: On Windows platforms, if any application is accessing a file or directory associated
with a Replication Agent instance when you delete the instance, the open file or directory is not deleted. An error message informs you of the file or directory not deleted. To finish deleting a Replication Agent instance after a file or directory access conflict on a Microsoft Windows platform, you must:
• Verify that the file or directory is not open in any application • Manually delete the file or directory
• -l (lowercase L) – Lists all verifiable Replication Agent instances.
• -v inst_name – Verifies the complete directory structure for a specified Replication Agent
instance. The inst_name string must be the name of an existing Replication Agent instance.
• -vr res_file – Validates the specified resource file (res_file), without creating a Replication Agent instance or making any change in the environment.
• -r res_file – Creates a Replication Agent instance, based on the contents of the specified
resource file (res_file).
• -u upgrade_option – Upgrades a Replication Agent instance based on the specified
upgrade option (upgrade_option):
• source_installation_dir – upgrade all instances of Replication Agent in the specified source installation directory from the current product installation directory.
• source_instance_dir – upgrade one instance of Replication Agent in the specified source instance directory from the current product installation directory. The instance is first copied to and then updated within the current product installation directory. • all – upgrade all instances of Replication Agent within the current product installation
directory. The configuration files are backed up before the upgrade for use in error recovery, if required. If an error occurs, the upgrade is rolled back.
The all option requires relatively less space because upgrades are performed directly on instances within the current product installation directory, not to copies. However, reversing an upgrade is more difficult for the same reason.
• instance_name |instance= instance_name – upgrade only the specified instance in the current product installation directory. The upgrade is performed directly on the specified instance, not to a copy. The configuration file is backed up before the upgrade for use in error recovery, if required. If an error occurs, the upgrade is rolled back.
• -uid ra_username – Creates a new administrator login name you want to use for this
Replication Agent instance.
• -pwd ra_password – Sets the password for the new administrator login.
• -i instance_name -k – Clears the ra_random configuration property value. The
Replication Agent generates a new ra_random value and a new instance-encryption-key
entry after a restart. Usage
Note: Set the SYBASE environment before you invoke the Replication Agent ra_admin
utility.
The Replication Agent ra_admin utility:
• Creates, copies, deletes, and verifies Replication Agent instances.
• Lists all valid Replication Agent instances on the Replication Agent host machine. • Returns the path of the Replication Agent installation directory.
• Creates an output file in the $SYBASE/RAX-15_5/admin_logs directory. The format of the file name is adminmmddyyyy_hhmmss.log, where mmddyyy and hhmmss are the current date and time.
• Upgrades Replication Agent instances.
To reset the Replication Agent administrator login password with the reset keyword, you must stop the Replication Agent instance, and it may be necessary to kill the process.
To run ra_admin, invoke it as a command at the operating system prompt.
Note: You can also invoke ra_admin with no option specified to return command usage information.
See also
• Replication Agent Instance Creation on page 11 • Creating a Resource File on page 21
• Editing a Resource File on page 22 • Validating a Resource File on page 22
• Creating an Instance with a Resource File on page 23 • Preparing to Use the Utilities on page 13
Creating a Replication Agent Instance
Create a Replication Agent instance after the Replication Agent software is installed. At any time after the Replication Agent software is installed, invoke ra_admin with the -c
option:
ra_admin -c new_inst -p port_num {-t database|-f old_inst} [-uid
ra_username] [-pwd ra_password] where:
• new_inst is the name of the new Replication Agent instance you are creating. • port_num is the client socket port number for the administration port of the new
Replication Agent instance. Make sure that a second port, port_num+1, is available for the RASD.
• database is the type of data server that contains the primary database.
• port_num is the client socket port number for the administration port of the new Replication Agent instance. Make sure that a second port, port_num+1, is available for the RASD.
• old_inst is the name of an existing Replication Agent instance whose configuration you want to duplicate for the new Replication Agent instance.
• ra_username is the Replication Agent administrator user name. If you do not provide this option on the command line, you will be prompted for a value.
• ra_password is the Replication Agent administrator password. If you do not provide this option on the command line, you will be prompted for a value.
Creating a Replication Agent Instance Using Resource Files Create a Replication Agent instance with a resource file.
Invoke ra_admin with the command line parameters that support creating and validating a Replication Agent instance using a resource file:
ra_admin {-vr res_file | -r res_file}
where: • -vr res_file
validates the specified resource file (res_file), without creating a Replication Agent instance or making any change in the environment.
• -r res_file
creates a Replication Agent instance, based on the contents of the specified resource file (res_file).
A resource file is an ASCII text file that contains configuration information for the Replication Agent instance to be created by ra_admin.
The ra_admin parameters in the resource file allow you to specify these options, in addition to creating a Replication Agent instance:
• Create the instance user login in the primary data server, and grant all required permissions.
• Start the new instance after it is created. • Initialize the new instance after it starts.
Note: When you validate a resource file with ra_admin -vr, no other action is taken, and no Replication Agent instance is created.
• The asa_password configuration parameter value must not contain single quotes, double quotes, or a semicolon.
• The pds_username and pds_password configuration parameter values must not contain single or double quotes if the create_pds_username parameter is set to yes.
Creating a Resource File
Create a resource file from one of the provided templates. Prerequisites
Locate your resource file templates, mssql.rs (for Microsoft SQL Server), oracle.rs (for Oracle), oraclexs.rs (for Oracle XStream), and ibmudb.rs (for IBM DB2 for Linux, UNIX, and Windows) in the init subdirectory of the Replication Agent installation directory. For example:
C:\sybase\RAX-15_5\init\oracle.rs or
C:\sybase\RAX-15_5\init\mssql.rs or
C:\sybase\RAX-15_5\init\ibmudb.rs
The resource file template contains comments that describe each configuration parameter and its value.
Note: SAP recommends that you validate each resource file before you create a Replication
Agent instance using that resource file. Task
1. Copy the resource file template to another file that you edit to create the new resource file.
For example:
cp oracle.rs pubs2.rs
where pubs2.rs is the name of the new resource file you want to create.
If you have an existing resource file, you can copy that file to create a new resource file, instead of copying the template.
2. Use your preferred text editor to edit the resource file copy that you created.
After you create a new resource file, you should validate it. See also
Editing a Resource File
The ra_admin resource file is an ASCII text file that you can edit using any standard text editor.
• Make sure that configuration parameters for both the Replication Agent and ra_admin use this format:
param=value
where:
• param is the name of the configuration parameter. • value is the value of the configuration parameter.
Note: Spaces are not allowed before or after the = symbol, or within the value string. • Make sure that each param=value statement occurs on a separate line.
• If a default value exists for a configuration parameter, use:
param=USE_DEFAULT
where param is the name of the configuration parameter.
• Make sure that these ra_admin configuration parameters have a value of yes or no: • create_pds_username
• start_instance
• initialize_instance
The yes value is case-insensitive. Any string other than {y|Y}{e|E}{s|S} is interpreted as no.
Note: Blank lines and lines that begin with the # symbol are ignored in the resource file.
Validating a Resource File
Use ra_admin to validate your resource file.
When you invoke ra_admin with the -vr option, the utility validates the specified resource file and returns information about the validation process.
ra_admin verifies:
• Uniqueness of the Replication Agent administration port number and instance name • Access to the primary data server, Replication Server, and RSSD
• The host name, port number, database name, user login, and password on each server • The Replication Server database connection for the primary database
• That the pds_username user has all the required permissions at the primary database If any validation fails, ra_admin returns an error message and information about the failure. You can repeat the validation process as many times as necessary. No entities are changed or created as a result of this process.
Note: We recommend you to validate the new resource file before you create a Replication
Agent instance using the new resource file.
1. Invoke ra_admin, specifying the -vr option and the name of the resource file:
ra_admin -vr res_file
where res_file is the name of the resource file you want to validate.
For example, if the resource file is named pubs2.rs, enter this at the command prompt: ra_admin -vr pubs2.rs
Validation results are returned as either:
• Response-file processing completed. or
• Response-file processing completed with errors.
If the validation is successful, skip step 2, and use the resource file to create a Replication Agent instance.
If the validation encounters errors, continue to step 2.
2. Use this procedure to correct validation errors:
a) Review the error messages to determine the cause of the failure. b) Edit the resource file to correct the appropriate values.
c) Invoke ra_admin -vr again, specifying the name of the resource file. Repeat this step until the resource file is successfully validated. See also
• Creating an Instance with a Resource File on page 23 Creating an Instance with a Resource File
Create a Replication Agent instance and specify a resource file at the same time.
When you invoke ra_admin with the -r option, the utility first validates the specified resource file except:
• If the Replication Agent for Microsoft SQL Server or Replication Agent for Oracle primary database user login does not exist in the primary data server, the utility creates it, if specified in the resource file (create_pds_username=yes). If the user login does exist in the primary data server but does not have all the required privileges, set create to yes, to have the utility grant all required permissions.
If the Replication Agent for Microsoft SQL Server or Replication Agent for Oracle primary database user login does exist in the primary data server, has all the required privileges, and the resource file specifies that it should be created, the utility returns an error message and does not create the instance.
• If the resource file specifies that the new Replication Agent instance should be initialized (initialize_instance=yes), then:
• The Replication Agent primary database user login must either exist in the primary data server, or be created by ra_admin (create_pds_username=yes). • The resource file must specify that the Replication Agent instance should be started
(start_instance=yes).
Otherwise, the utility returns an error message and does not create the instance. After validating the resource file successfully, ra_admin:
• Creates and configures a Replication Agent instance, based on the contents of the specified resource file.
• Creates or grants all required privileges for the instance user, if specified in the resource file.
• Starts the new Replication Agent instance, if specified in the resource file. • Initializes the new Replication Agent instance, if specified in the resource file. The utility also returns information about the instance created and the result.
If instance creation fails, ra_admin returns an error message and information about the failure.
Note: We recommend you to validate the new resource file before you create a Replication
Agent instance using the new resource file.
Invoke ra_admin, specifying the -r option and the name of the resource file:
ra_admin -r res_file
where res_file is the name of the resource file.
For example, if the resource file is named pubs2.rs, enter this at the command prompt: ra_admin -r pubs2.rs
Results are returned as either:
• Response-file processing completed. or
• Response-file processing completed with errors.
If the instance creation is successful, you can begin using the new Replication Agent instance. If the instance creation fails, you may have to:
• Delete all files and subdirectories in the instance directory, and delete the instance directory from the Replication Agent installation directory.
• Edit the resource file to correct the appropriate values.
Note: If the instance creation fails, use the error-recovery procedure before you attempt to
See also
• Validating a Resource File on page 22 Recovering from Instance Creation Errors
You may need to recover from errors resulting from an instance creation.
1. If the resource file does not specify that the instance user login be created in the primary
data server, skip this step and continue with step 2.
If the resource file specifies that the instance user login be created in the primary data server (that is, create_pds_username=yes), then:
a) Check the primary database to determine if the instance user was added.
b) Check that the pds_sa_username has sufficient privileges to create the instance login at the primary database.
c) Edit the resource file to specify that the instance user login should not be created in the primary data server (create_pds_username=no).
Note: If the Replication Agent primary database user login is successfully created before
the instance creation fails, you must either:
• Edit the resource file to set the value of the create_pds_username parameter to no, or,
• Log in to the primary data server and drop the instance login.
2. Check the Replication Agent base directory on the Replication Agent host to determine if a
new instance directory was created. The Replication Agent base directory is:
%SYBASE%\RAX-15_5
where %SYBASE% is the Replication Agent installation directory.
If you do not find a new instance directory in the Replication Agent base directory, skip to step 4.
If you find a new instance directory in the Replication Agent base directory, continue with step 3.
3. To delete the new instance directory, you have two options:
• Use ra_admin to delete the instance:
ra_admin -d inst_name
where inst_name is the name of the instance you want to delete, or
• Use operating system commands to delete all of the files and subdirectories in the new instance directory, and then delete the new instance directory.
4. Review the error messages to find the cause of the instance creation failure, and if
necessary, edit the resource file to correct the appropriate values. After editing the resource file, validate it:
where res_file is the name of the resource file.
After you complete the recovery procedure, retry creating the Replication Agent instance. See also
• Validating a Resource File on page 22 Copying a Replication Agent Configuration
You can copy a Replication Agent configuration with ra_admin.
When you create a new Replication Agent instance, copy the configuration of an existing instance by invoking ra_admin with the -c option and -f option:
ra_admin -c new_inst -p port_num -f old_inst
where:
• new_inst is the name of the new Replication Agent instance you are creating. • port_num is the client socket port number for the administration port of the new
Replication Agent instance. Make sure that a second port, port_num+1, is available for the RASD.
• old_inst is the name of an existing Replication Agent instance whose configuration you want to duplicate for the new Replication Agent instance.
See also
• Replication Agent Instance Creation on page 11
Copying an Existing Replication Agent Instance Configuration to a New Instance Create a new Replication Agent instance based on the configuration of an existing instance.
1. On the Replication Agent host machine, open an operating system command window. 2. Navigate to the Replication Agent bin directory:
• On Windows platforms: cd %SYBASE%\RAX-15_5\bin
where %SYBASE% is the path to the Replication Agent installation directory. • On UNIX platforms:
cd $SYBASE/RAX-15_5/bin
where $SYBASE is the path to the Replication Agent installation directory.
3. In the Replication Agent bin directory, invoke ra_admin to create a new Replication Agent instance whose configuration is based on the configuration of an existing instance:
ra_admin -c new_inst -p port_num -f old_inst
where:
• port_num is the client socket port number for the administration port of the new instance.
• old_inst is an existing Replication Agent instance whose configuration you want to copy for the new instance.
After you invoke ra_admin, the operating system prompt returns when the new Replication Agent instance is created.
4. Verify that the Replication Agent instance was created properly using one of these
methods:
• Invoke ra_admin with the -v option, and specify the name of the Replication Agent instance:
ra_admin -v new_inst
where new_inst is the name of the Replication Agent instance.
When you verify a Replication Agent instance with the -v option, the utility verifies the instance by checking for an instance directory with the specified instance name under the Replication Agent base directory, and checking all of the subdirectories under the Replication Agent instance directory.
• Invoke ra_admin with the -l option: ra_admin -l
The -l option lists all verifiable Replication Agent instances, which should include the new one you just created.
• As an alternative to using ra_admin, you can use operating system commands to verify that the Replication Agent instance directories were created correctly.
Note: When you create a new Replication Agent instance and copy the configuration of an
existing instance, some configuration parameters are set to default values, and they are not copied from the existing configuration.
The values of these configuration parameters are not copied from an existing configuration: • admin_port
• log_directory
• pds_database_name
• pds_datasource_name
• pds_host_name
• pds_password
• pds_port_number
• pds_retry_count
• pds_retry_timeout
• pds_server_name
• pds_username
• rs_source_ds
• function_password
• rs_password
• rssd_password
• ssl_identity_password
• ra_admin_owner_password
• ddl_password
• rasd_backup_dir
• rasd_database
• rasd_trace_log_dir
• rasd_tran_log
• asa_port
• asm_password
• rman_password
See the Replication Agent Reference Manual for more information about Replication Agent configuration parameters.
After you create a Replication Agent instance, you can use ra to start the instance so that you administer and configure it.
Note: A new user login name and password are required when creating a Replication Agent
instance. You have the option to change the password. See also
• Preparing to Use the Utilities on page 13
• Creating or Changing the Replication Agent Administrator Login on page 40 Resetting the Replication Agent Administrator Password
Reset the Replication Agent administrator password to a new value.
1. Stop the Replication Agent instance, and it may be necessary to kill the process. 2. Log in to the Replication Agent administration port.
3. Reset the password for administrator:
ra_admin –reset inst_name [,-uid username, -pwd new_pwd]
where:
• inst_name is the name of the Replication Agent instance. • username is the Replication Agent administrator user name.
• new_pwd is a new password that complies with the password security requirements.
Note: The parameter -uid and -pwd are optional on the command-line. You will be prompted to provide them if they are not included in the command.
4. Restart the Replication Agent instance.
5. Check the Replication Agent log file to verify that the Replication Agent instance has
started successfully: • (UNIX or Linux)
$SYBASE/RAX-15_x/<instance_name>/log/<instance_name>.log • (Windows)
%SYBASE%\RAX-15_x\<instance_name>\log\<instance_name>.log Creating a Replication Agent Instance Using the Command Line
Create a Replication Agent instance from the Windows or UNIX command line. Prerequisites
Set the SYBASE environment before you invoke ra_admin.
Task
1. On the Replication Agent host machine, open an operating system command window. 2. Navigate to the Replication Agent bin directory:
• On Windows platforms: cd %SYBASE%\RAX-15_5\bin
where %SYBASE% is the path to the Replication Agent installation directory. • On UNIX platforms:
cd $SYBASE/RAX-15_5/bin
where $SYBASE is the path to the Replication Agent installation directory.
3. In the Replication Agent bin directory, invoke ra_admin to create a new Replication Agent instance:
ra_admin -c new_inst -p port_num -t database [-uid ra_username]
[-pwd ra_password]
where:
• new_inst is the name of the new Replication Agent instance.
• port_num is the client socket port number for the administration port of the new instance. Make sure that a second port, port_num+1, is available for the RASD. • database identifies the type of data server that the primary database resides in:
• oracle – Oracle database server
• mssql – Microsoft SQL Server (valid only on Microsoft Windows platforms) • ibmudb – IBM DB2 for Linux, UNIX, and Windows
• ra_username
is the administrator login name you want to use for this Replication Agent instance. If you do not provide this option on the command line, you will be prompted for a value.
• ra_password is the password for the administrator login. If you do not provide this option on the command line, you will be prompted for a value.
After you invoke ra_admin, the operating system prompt returns when the new Replication Agent instance is created.
4. Verify that the Replication Agent instance was created properly using one of these
methods:
• Invoke ra_admin with the -v option, and specify the name of the Replication Agent instance:
ra_admin -v new_inst
where new_inst is the name of the Replication Agent instance.
When you verify a Replication Agent instance with the -v option, the utility verifies the instance by checking for an instance directory with the specified instance name under the Replication Agent base directory, and checking all of the subdirectories under the Replication Agent instance directory.
• Invoke ra_admin with the -l option: ra_admin -l
The -l option lists all verifiable Replication Agent instances, which should include the new one you just created.
• As an alternative to using ra_admin, you can use operating system commands to verify that the Replication Agent instance directories were created correctly.
After you create a Replication Agent instance, you can use ra to start the instance so that you can administer and configure it.
See also
• Replication Agent Start-Up on page 33 • Preparing to Use the Utilities on page 13
• Creating or Changing the Replication Agent Administrator Login on page 40 Deleting a Replication Agent Instance
Delete a Replication Agent instance with ra_admin.
Prerequisites
• Shut down the Replication Agent instance, if it is running.
• If the Replication Agent software is installed on a Microsoft Windows platform, verify that none of the files in the instance subdirectories are open, and that no application or window is accessing the instance subdirectories.
Note: Set the SYBASE environment before you invoke the ra_admin utility.
Note: If you delete a Replication Agent instance, Replication Agent does not unmark any
Before you shut down and delete a Replication Agent instance, unmark primary database objects and deinitialize the Replication Agent so that it removes the objects it created in the primary database.
Task
1. On the Replication Agent host machine, open an operating system command window. 2. Navigate to the Replication Agent bin directory:
• On Windows platforms: cd %SYBASE%\RAX-15_5\bin
where %SYBASE% is the path to the Replication Agent installation directory. • On UNIX platforms:
cd $SYBASE/RAX-15_5/bin
where $SYBASE is the path to the Replication Agent installation directory.
3. In the Replication Agent bin directory, invoke ra_admin with the -d option to delete a Replication Agent instance:
ra_admin -d inst_name
where inst_name is the name of the Replication Agent instance you want to delete. After you invoke ra_admin with the -d option, you see:
Are you sure you want to delete the Replication Agent instance
inst_name? [y/n]
4. Enter y to delete the Replication Agent instance.
After the instance is deleted, the operating system prompt returns.
If the instance is running when you invoke ra_admin with the -d option, the utility returns: Cannot delete Replication Agent instance 'inst_name' because it is currently running.
To shut down a Replication Agent instance, log in to its administrative port, and use the
shutdown command.
5. Verify that the Replication Agent instance was deleted properly using one of these
methods:
• Invoke ra_admin with the -v option, and specify the name of the Replication Agent instance:
ra_admin -v new_inst
where new_inst is the name of the Replication Agent instance.
When you verify a Replication Agent instance with the -v option, the utility verifies the instance by checking for an instance directory with the specified instance name under
the Replication Agent base directory, and checking all of the subdirectories under the Replication Agent instance directory.
• Invoke ra_admin with the -l option: ra_admin -l
The -l option lists all verifiable Replication Agent instances, which should include the new one you just deleted.
• As an alternative to using ra_admin, you can use operating system commands to verify that the Replication Agent instance directories were deleted correctly.
Note: On Microsoft Windows platforms, if any application is accessing a file or directory
associated with a Replication Agent instance when you delete the instance, the open file or directory is not deleted. An error message informs you of the file or directory not deleted. To finish deleting a Replication Agent instance after a file or directory access conflict occurs on a Microsoft Windows platform, you must:
• Verify that the file or directory is not open in any application • Manually delete the file or directory
6. Verify that the Replication Agent instance was deleted properly using one of these
methods: See also
• Replication Agent Instance Shutdown on page 69 • Preparing to Use the Utilities on page 13
Replication Agent Instance Upgrades
You can upgrade a Replication Agent instance from the command line interface Upgrades for Instances at the Same Release Level
Use ra_admin -u source_installation_dir to upgrade instances of Replication Agent earlier than version 15.5 in the specified directory from the current installation directory.
For instances of Replication Agent of version 15.5 or later, use ra_admin -u all or ra_admin -u
instance_name |instance= instance_name to upgrade an instance or instances.
See also • ra on page 15
Replication Agent Instance Downgrades
Use the downgrade API to downgrade instances of Replication Agent.
Use the ra_downgrade, ra_migrate, and resume purge commands to downgrade an instance of Replication Agent. See the sections on upgrading and downgrading Replication Agent in the Replication Agent Primary Database Guide for instructions on using these commands.