BIG-IP
®
Network Firewall: Policies and
Implementations
Version 11.5
Table of Contents
Legal Notices...7
Acknowledgments...9
Chapter 1: About the Network Firewall...13
What is the BIG-IP Network Firewall?...14
About firewall modes...14
Configuring the Network Firewall in ADC mode...14
Configuring the Network Firewall to drop traffic that is not specifically allowed...15
Chapter 2: About Firewall Rules and Rule Lists...17
About firewall rules...18
Firewall actions...18
About Network Firewall contexts...19
Creating a network firewall inline rule...21
About firewall rule lists...23
Creating a network firewall rule list...24
Chapter 3: About Firewall Rule Addresses and Ports...29
About firewall rule addresses and ports...30
About address lists...30
Creating an address list...30
About port lists...31
Creating a port list...31
Chapter 4: About Network Firewall Schedules...33
About Network Firewall schedules...34
Creating a schedule...34
Chapter 5: About IP Address Intelligence in the Network Firewall...35
About IP intelligence policies in the network firewall...36
Enabling IP address intelligence...36
IP address intelligence categories...37
About IP intelligence blacklist classes...38
Creating a blacklist class...38
About IP intelligence feed lists...39
Feed list settings...39
Creating a feed list...40
Configuring a policy to check addresses against IP intelligence...41
3 Table of Contents
Assigning a global IP Intelligence policy...42
Assigning an IP Intelligence policy to a virtual server...42
Assigning an IP Intelligence policy to a route domain...42
Chapter 6: About Local Logging with the Network Firewall...43
Overview: Configuring local Network Firewall event logging...44
Task summary...44
Creating a local Network Firewall Logging profile ...44
Configuring an LTM virtual server for Network Firewall event logging...45
Viewing Network Firewall event logs locally on the BIG-IP system...45
Creating a Network Firewall rule from a firewall log entry...46
Disabling logging ...48
Implementation result...49
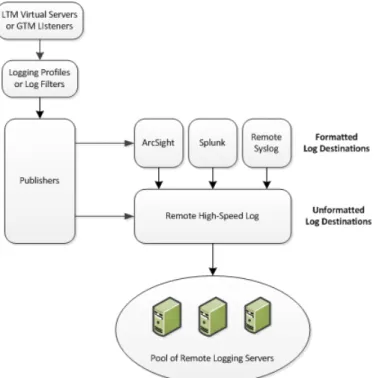
Chapter 7: About Remote High-Speed Logging with the Network Firewall...51
Overview: Configuring remote high-speed Network Firewall event logging...52
Creating a pool of remote logging servers...53
Creating a remote high-speed log destination...54
Creating a formatted remote high-speed log destination...54
Creating a publisher ...55
Creating a custom Network Firewall Logging profile ...55
Configuring an LTM virtual server for Network Firewall event logging...56
Disabling logging ...57
Implementation result...57
Chapter 8: About Logging Network Firewall Events to IPFIX Collectors...59
Overview: Configuring IPFIX logging for AFM...60
Creating a pool of IPFIX collectors...60
Creating an IPFIX log destination...61
Creating a publisher ...61
Creating a custom Network Firewall Logging profile ...62
Configuring an LTM virtual server for Network Firewall event logging with IPFIX...63
Implementation result...63
Chapter 9: Deploying the BIG-IP Network Firewall in ADC Mode...65
About deploying the network firewall in ADC mode...66
Configuring the Network Firewall in ADC mode...67
Creating a VLAN for the network firewall...68
Configuring an LTM virtual server with a VLAN for Network Firewall...68
Adding a firewall rule to deny ICMP...69
Creating an address list...69
Denying access with firewall rules on the network virtual server...70
4
Denying access with firewall rules on the application virtual server...71
Chapter 10: Deploying the BIG-IP Network Firewall in Firewall Mode...73
About Firewall mode in the Network Firewall...74
Configuring the Network Firewall to drop traffic that is not specifically allowed...75
Creating a VLAN for the network firewall...76
Configuring an LTM virtual server with a VLAN for Network Firewall...76
Creating an address list...77
Allowing access from networks on an address list with a firewall rule...77
Allowing access from a network to a virtual server with a firewall rule...78
Chapter 11: Configuring BIG-IP Network Firewall Policies...79
About firewall policies...80
Creating a Network Firewall policy...80
Setting a global firewall policy...83
Configuring a route domain with a firewall policy...83
Setting network firewall policies for a self IP address...83
Creating a virtual server with a firewall policy...84
About firewall policy compilation...85
Viewing compilation statistics for a firewall rule or policy...85
Viewing enforced and staged policy rule logs...85
Viewing Network Firewall enforced policy events on the local BIG-IP system ...8 6 Viewing Network Firewall staged policy events on the local BIG-IP system ...86
Chapter 12: About HTTP Protocol Security...87
Overview: Securing HTTP traffic...88
Creating an HTTP service profile with security enabled...88
Creating an HTTP virtual server with protocol security...88
Reviewing violation statistics for security profiles...89
Overview: Creating a custom HTTP security profile...89
Creating a custom HTTP profile...90
Creating a security profile for HTTP traffic...90
Configuring an HTTP virtual server...91
Modifying associations between service profiles and security profiles...91
Reviewing violation statistics for security profiles...92
Overview: Increasing HTTP traffic security...92
About RFC compliance and validation checks...92
Modifying HTTP protocol compliance checks...93
About evasion techniques checks...93
Configuring HTTP protocol evasion techniques blocking policy...94
About the types of HTTP request checks...94
Configuring length checks for HTTP traffic...95
Specifying which HTTP methods to allow...95
5 Table of Contents
Including or excluding files by type in HTTP security profiles...96
Configuring a mandatory header for an HTTP security profile...97
Configuring the blocking response page for HTTP security profiles...97
Overview: Configuring Local Protocol Security Event Logging...98
Task summary...98
Creating a local Protocol Security Logging profile ...99
Configuring a virtual server for Protocol Security event logging...99
Viewing Protocol Security event logs locally on the BIG-IP system...100
Disabling logging ...100
Implementation result...100
Overview: Configuring Remote Protocol Security Event Logging...101
Creating a pool of remote logging servers...102
Creating a remote high-speed log destination...103
Creating a formatted remote high-speed log destination...103
Creating a publisher ...104
Creating a custom Protocol Security Logging profile ...104
Configuring a virtual server for Protocol Security event logging...105
Disabling logging ...106
Implementation result...106
Appendix A: IPFIX Templates for AFM Events...107
Overview: IPFIX Templates for AFM Events...108
About IPFIX Information Elements for AFM events...108
IANA-defined IPFIX Information Elements...108
IPFIX enterprise Information Elements...108
About individual IPFIX templates for each event...110
Network accept or deny...110
DoS device...111
IP intelligence...112
6
Legal Notices
Publication Date
This document was published on January 27, 2014. Publication Number
MAN-0439-02 Copyright
Copyright©2013-2015, F5 Networks, Inc. All rights reserved.
F5 Networks, Inc. (F5) believes the information it furnishes to be accurate and reliable. However, F5 assumes no responsibility for the use of this information, nor any infringement of patents or other rights of third parties which may result from its use. No license is granted by implication or otherwise under any patent, copyright, or other intellectual property right of F5 except as specifically described by applicable user licenses. F5 reserves the right to change specifications at any time without notice.
Trademarks
AAM, Access Policy Manager, Advanced Client Authentication, Advanced Firewall Manager, Advanced Routing, AFM, APM, Application Acceleration Manager, Application Security Manager, ARX, AskF5, ASM, BIG-IP, BIG-IQ, Cloud Extender, CloudFucious, Cloud Manager, Clustered Multiprocessing, CMP, COHESION, Data Manager, DevCentral, DevCentral [DESIGN], DNS Express, DSC, DSI, Edge Client, Edge Gateway, Edge Portal, ELEVATE, EM, Enterprise Manager, ENGAGE, F5, F5 [DESIGN], F5 Certified [DESIGN], F5 Networks, F5 SalesXchange [DESIGN], F5 Synthesis, f5 Synthesis, F5 Synthesis [DESIGN], F5 TechXchange [DESIGN], Fast Application Proxy, Fast Cache, FirePass, Global Traffic Manager, GTM, GUARDIAN, iApps, IBR, Intelligent Browser Referencing, Intelligent Compression, IPv6 Gateway, iControl, iHealth, iQuery, iRules, iRules OnDemand, iSession, L7 Rate Shaping, LC, Link Controller, Local Traffic Manager, LTM, LineRate, LineRate Systems [DESIGN], LROS, LTM, Message Security Manager, MSM, OneConnect, Packet Velocity, PEM, Policy Enforcement Manager, Protocol Security Manager, PSM, Real Traffic Policy Builder, SalesXchange, ScaleN, Signalling Delivery Controller, SDC, SSL Acceleration, software designed applications services, SDAC (except in Japan), StrongBox, SuperVIP, SYN Check, TCP Express, TDR, TechXchange, TMOS, TotALL, Traffic Management Operating System, Traffix Systems, Traffix Systems (DESIGN), Transparent Data Reduction, UNITY, VAULT, vCMP, VE F5 [DESIGN], Versafe, Versafe [DESIGN], VIPRION, Virtual Clustered Multiprocessing, WebSafe, and ZoneRunner, are trademarks or service marks of F5 Networks, Inc., in the U.S. and other countries, and may not be used without F5's express written consent.
All other product and company names herein may be trademarks of their respective owners. Patents
This product may be protected by one or more patents indicated at: http://www.f5.com/about/guidelines-policies/patents
Export Regulation Notice
This product may include cryptographic software. Under the Export Administration Act, the United States government may consider it a criminal offense to export this product from the United States.
RF Interference Warning
This is a Class A product. In a domestic environment this product may cause radio interference, in which case the user may be required to take adequate measures.
FCC Compliance
This equipment has been tested and found to comply with the limits for a Class A digital device pursuant to Part 15 of FCC rules. These limits are designed to provide reasonable protection against harmful interference when the equipment is operated in a commercial environment. This unit generates, uses, and can radiate radio frequency energy and, if not installed and used in accordance with the instruction manual, may cause harmful interference to radio communications. Operation of this equipment in a residential area is likely to cause harmful interference, in which case the user, at his own expense, will be required to take whatever measures may be required to correct the interference.
Any modifications to this device, unless expressly approved by the manufacturer, can void the user's authority to operate this equipment under part 15 of the FCC rules.
Canadian Regulatory Compliance
This Class A digital apparatus complies with Canadian ICES-003. Standards Compliance
This product conforms to the IEC, European Union, ANSI/UL and Canadian CSA standards applicable to Information Technology products at the time of manufacture.
8
Acknowledgments
This product includes software developed by Bill Paul. This product includes software developed by Jonathan Stone. This product includes software developed by Manuel Bouyer. This product includes software developed by Paul Richards.
This product includes software developed by the NetBSD Foundation, Inc. and its contributors. This product includes software developed by the Politecnico di Torino, and its contributors.
This product includes software developed by the Swedish Institute of Computer Science and its contributors. This product includes software developed by the University of California, Berkeley and its contributors. This product includes software developed by the Computer Systems Engineering Group at the Lawrence Berkeley Laboratory.
This product includes software developed by Christopher G. Demetriou for the NetBSD Project. This product includes software developed by Adam Glass.
This product includes software developed by Christian E. Hopps. This product includes software developed by Dean Huxley. This product includes software developed by John Kohl. This product includes software developed by Paul Kranenburg. This product includes software developed by Terrence R. Lambert. This product includes software developed by Philip A. Nelson. This product includes software developed by Herb Peyerl.
This product includes software developed by Jochen Pohl for the NetBSD Project. This product includes software developed by Chris Provenzano.
This product includes software developed by Theo de Raadt. This product includes software developed by David Muir Sharnoff. This product includes software developed by SigmaSoft, Th. Lockert.
This product includes software developed for the NetBSD Project by Jason R. Thorpe.
This product includes software developed by Jason R. Thorpe for And Communications, http://www.and.com. This product includes software developed for the NetBSD Project by Frank Van der Linden.
This product includes software developed for the NetBSD Project by John M. Vinopal. This product includes software developed by Christos Zoulas.
This product includes software developed by the University of Vermont and State Agricultural College and Garrett A. Wollman.
This product includes software developed by Balazs Scheidler ([email protected]), which is protected under the GNU Public License.
This product includes software developed by Niels Mueller ([email protected]), which is protected under the GNU Public License.
In the following statement,This softwarerefers to the Mitsumi CD-ROM driver: This software was developed by Holger Veit and Brian Moore for use with 386BSD and similar operating systems.Similar operating systemsincludes mainly non-profit oriented systems for research and education, including but not restricted to NetBSD, FreeBSD, Mach (by CMU).
This product includes software developed by the Apache Group for use in the Apache HTTP server project (http://www.apache.org/).
This product includes software licensed from Richard H. Porter under the GNU Library General Public License (©1998, Red Hat Software), www.gnu.org/copyleft/lgpl.html.
This product includes the standard version of Perl software licensed under the Perl Artistic License (©1997,
1998 Tom Christiansen and Nathan Torkington). All rights reserved. You may find the most current standard version of Perl at http://www.perl.com.
This product includes software developed by Jared Minch.
This product includes software developed by the OpenSSL Project for use in the OpenSSL Toolkit (http://www.openssl.org/).
This product includes cryptographic software written by Eric Young ([email protected]).
This product contains software based on oprofile, which is protected under the GNU Public License. This product includes RRDtool software developed by Tobi Oetiker (http://www.rrdtool.com/index.html) and licensed under the GNU General Public License.
This product contains software licensed from Dr. Brian Gladman under the GNU General Public License (GPL).
This product includes software developed by the Apache Software Foundation (http://www.apache.org/). This product includes Hypersonic SQL.
This product contains software developed by the Regents of the University of California, Sun Microsystems, Inc., Scriptics Corporation, and others.
This product includes software developed by the Internet Software Consortium.
This product includes software developed by Nominum, Inc. (http://www.nominum.com).
This product contains software developed by Broadcom Corporation, which is protected under the GNU Public License.
This product contains software developed by MaxMind LLC, and is protected under the GNU Lesser General Public License, as published by the Free Software Foundation.
This product includes Intel QuickAssist kernel module, library, and headers software licensed under the GNU General Public License (GPL).
This product includes software licensed from Gerald Combs ([email protected]) under the GNU General Public License as published by the Free Software Foundation; either version 2 of the License, or any later version. Copyright©1998 Gerald Combs.
Permission is hereby granted, free of charge, to any person obtaining a copy of this software and associated documentation files (the "Software"), to deal in the Software without restriction, including without limitation the rights to use, copy, modify, merge, publish, distribute, sublicense, and/or sell copies of the Software, and to permit persons to whom the Software is furnished to do so, subject to the following conditions: The above copyright notice and this permission notice shall be included in all copies or substantial portions of the Software.
THE SOFTWARE IS PROVIDED "AS IS", WITHOUT WARRANTY OF ANY KIND, EXPRESS OR IMPLIED, INCLUDING BUT NOT LIMITED TO THE WARRANTIES OF MERCHANTABILITY, FITNESS FOR A PARTICULAR PURPOSE AND NONINFRINGEMENT. IN NO EVENT SHALL THE AUTHORS OR COPYRIGHT HOLDERS BE LIABLE FOR ANY CLAIM, DAMAGES OR OTHER LIABILITY, WHETHER IN AN ACTION OF CONTRACT, TORT OR OTHERWISE, ARISING FROM,
10
OUT OF OR IN CONNECTION WITH THE SOFTWARE OR THE USE OR OTHER DEALINGS IN THE SOFTWARE.
This product includes software developed by Thomas Williams and Colin Kelley. Copyright©1986 - 1993,
1998, 2004, 2007
Permission to use, copy, and distribute this software and its documentation for any purpose with or without fee is hereby granted, provided that the above copyright notice appear in all copies and that both that copyright notice and this permission notice appear in supporting documentation. Permission to modify the software is granted, but not the right to distribute the complete modified source code. Modifications are to be distributed as patches to the released version. Permission to distribute binaries produced by compiling modified sources is granted, provided you
1. distribute the corresponding source modifications from the released version in the form of a patch file along with the binaries,
2. add special version identification to distinguish your version in addition to the base release version number,
3. provide your name and address as the primary contact for the support of your modified version, and 4. retain our contact information in regard to use of the base software.
Permission to distribute the released version of the source code along with corresponding source modifications in the form of a patch file is granted with same provisions 2 through 4 for binary distributions. This software is provided "as is" without express or implied warranty to the extent permitted by applicable law.
This product contains software developed by Google, Inc. Copyright©2011 Google, Inc.
Permission is hereby granted, free of charge, to any person obtaining a copy of this software and associated documentation files (the "Software"), to deal in the Software without restriction, including without limitation the rights to use, copy, modify, merge, publish, distribute, sublicense, and/or sell copies of the Software, and to permit persons to whom the Software is furnished to do so, subject to the following conditions: The above copyright notice and this permission notice shall be included in all copies or substantial portions of the Software.
THE SOFTWARE IS PROVIDED "AS IS", WITHOUT WARRANTY OF ANY KIND, EXPRESS OR IMPLIED, INCLUDING BUT NOT LIMITED TO THE WARRANTIES OF MERCHANTABILITY, FITNESS FOR A PARTICULAR PURPOSE AND NONINFRINGEMENT. IN NO EVENT SHALL THE AUTHORS OR COPYRIGHT HOLDERS BE LIABLE FOR ANY CLAIM, DAMAGES OR OTHER LIABILITY, WHETHER IN AN ACTION OF CONTRACT, TORT OR OTHERWISE, ARISING FROM, OUT OF OR IN CONNECTION WITH THE SOFTWARE OR THE USE OR OTHER DEALINGS IN THE SOFTWARE.
This product includes software developed by Jeremy Ashkenas and DocumentCloud, and distributed under the MIT license. Copyright©2010-2013 Jeremy Ashkenas, DocumentCloud.
This product includes gson software, distributed under the Apache License version 2.0. Copyright©
2008-2011 Google Inc.
This product includes software developed by Douglas Crockford, [email protected].
11 BIG-IP® Network Firewall: Policies and Implementations
Chapter
1
About the Network Firewall
What is the BIG-IP Network Firewall?
The BIG-IP®Network Firewall provides policy-based access control to and from address and port pairs, inside and outside of your network. Using a combination of contexts, the network firewall can apply rules in a number of different ways, including: at a global level, on a per-virtual server level, for a self IP address, or for the management port. Firewall rules can be combined in a firewall policy, which can contain multiple context and address pairs, and is applied directly to a virtual server.
By default, the Network Firewall is configured inADC mode, a default allow configuration, in which all traffic is allowed through the firewall, and any traffic you want to block must be explicitly specified. The system is configured in this mode by default so all traffic on your system continues to pass after you provision the Advanced Firewall Manager™. You should create appropriate firewall rules to allow necessary traffic to pass before you switch the Advanced Firewall Manager to Firewall mode. InFirewall mode, a default deny configuration, all traffic is blocked through the firewall, and any traffic you want to allow through the firewall must be explicitly specified.
About firewall modes
The BIG-IP®Network Firewall provides policy-based access control to and from address and port pairs, inside and outside of your network. By default, the network firewall is configured in ADC mode, which is adefault allowconfiguration, in which all traffic is allowed to virtual servers and self IPs on the system, and any traffic you want to block must be explicitly specified. This applies only to the virtual server and self IP levels on the system.
Important: Even though the system is in a default allow configuration, if a packet does not match any rule
in any context on the firewall, the Global Reject rule drops the traffic and sends the appropriate reject message.
Note: The Global Reject rule does not reject traffic to the management port. Management port rules must
be specifically configured and applied.
Configuring the Network Firewall in ADC mode
If you have changed the firewall setting to Firewall mode, you can configure the BIG-IP®Network Firewall back to ADC mode.
Note: The firewall is configured in ADC mode, by default.
1. On the Main tab, clickSecurity>Options>Network Firewall. The Firewall Options screen opens.
2. From theVirtual Server & Self IP Contextslist, select the default actionAcceptfor the self IP and virtual server contexts.
3. ClickUpdate.
The virtual server and self IP contexts for the firewall are changed.
14
Configuring the Network Firewall to drop traffic that is not specifically allowed
You can configure the BIG-IP®Network Firewall to deny all traffic not explicitly allowed. In Advanced Firewall Manager™this is calledFirewall mode, and this is also referred to as adefault denypolicy. Firewall mode applies a default deny policy to all self IPs and virtual servers.
1. On the Main tab, clickSecurity>Options>Network Firewall. The Firewall Options screen opens.
2. From theVirtual Server & Self IP Contextslist, select the default actionDropfor the self IP and virtual server contexts.
3. ClickUpdate.
The default virtual server and self IP firewall context is changed.
If you are using ConfigSync to synchronize two or more devices, and you set the default action to Drop or Reject, you must apply the built-in firewall rules_sys_self_allow_defaultsor
_sys_self_allow_managementto the specific self IPs that are used to support those services. To do this, add a new rule with theSelf IPcontext, select the self IP, and select theRule Listrule type. Finally, select the preconfigured rules from the list of rule lists.
15 BIG-IP® Network Firewall: Policies and Implementations
Chapter
2
About Firewall Rules and Rule Lists
• About firewall rules • About firewall rule lists
About firewall rules
The BIG-IP®Network Firewall uses rules to specify traffic handling actions. A rule includes: Context
The category of object to which the rule applies. Rules can be global and apply to all addresses on the BIG-IP that match the rule, or they can be specific, applying only to a specific virtual server, self IP address, route domain, or the management port.
Rule or Rule List
Specifies whether the configuration applies to this specific rule, or to a group of rules. Source Address
One or more addresses, geographic locations, or address lists to which the rule applies. The source address refers to the packet's source.
Source Port
The ports or lists of ports on the system to which the rule applies. The source packet refers to the packet's source.
VLAN
Specifies VLANs to which the rule applies. The VLAN source refers to the packet's source. Destination Address
One or more addresses, geographic locations, or address lists to which the rule applies. The destination address refers to the packet's destination.
Destination Port
The ports or lists of ports to which the rule applies. The destination port refers to the packet's destination. Protocol
The protocol to which the rule applies. The firewall configuration allows you to select one specific protocol from a list of more than 250 protocols. The list is separated into a set of common protocols, and a longer set of other protocols. To apply a rule to more than one protocol, selectAny.
Schedule
Specifies a schedule for the firewall rule. You configure schedules to define days and times when the firewall rule is made active.
Action
Specifies the action (accept, accept decisively, drop, or reject) for the firewall rule. Logging
Specifies whether logging is enabled or disabled for the firewall rule.
Firewall actions
These listed actions are available in a firewall rule.
Firewall actions are processed within a context. If traffic matches a firewall rule within a given context, that action is applied to the traffic, and the traffic is processed again at the next context.
18
Description Firewall
action
Allows packets with the specified source, destination, and protocol to pass through the current firewall context. Packets that match the rule, and areaccepted, traverse the system as if the firewall is not present.
Accept
Allows packets with the specified source, destination, and protocol to pass through the firewall. Packets that match the rule, and areaccepted decisively, traverse the system as if the Accept
Decisively
firewall is not present, and are not processed by rules in any further context after theaccept decisivelyaction applies. If you want a packet to be accepted in one context, and not to be processed in any remaining context or by the default firewall rules, specify theaccept decisivelyaction. For example, if you want to allow all packets from Network A to reach every server behind your firewall, you can specify a rule that accepts decisively at the global context, from that Network A, to any port and address. Then, you can specify that all traffic is blocked at a specific virtual server, using the virtual server context. Because traffic from Network A is accepted decisively at the global context, that traffic still traverses the virtual server.
Drops packets with the specified source, destination, and protocol. Dropping a packet is a silent action with no notification to the source or destination systems. Dropping the packet causes the connection to be retried until the retry threshold is reached.
Drop
Rejects packets with the specified source, destination, and protocol. Rejecting a packet is a more graceful way to deny a packet, as it sends a destination unreachable message to the Reject
sender. For example, if the protocol is TCP, a TCP RST message is sent. One benefit of using Reject is that the sending application is notified, after only one attempt, that the connection cannot be established.
About Network Firewall contexts
With the BIG-IP®Network Firewall, you use a context to configure the level of specificity of a firewall rule or policy. For example, you might make a global context rule to block ICMP ping messages, and you might make a virtual server context rule to allow only a specific network to access an application.
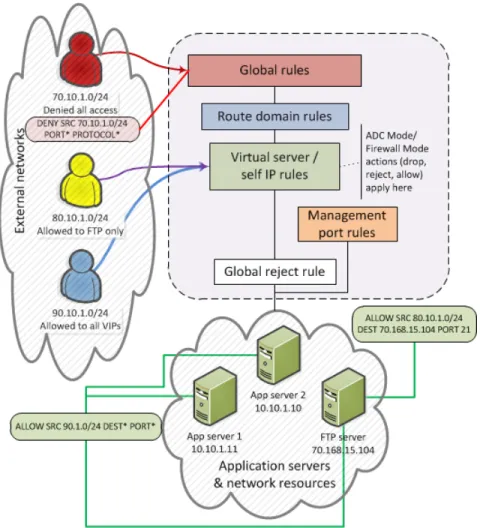
Context is processed in this order: 1. Global
2. Route domain 3. Virtual server/self IP 4. Management port* 5. Global reject*
The firewall processes policies and rules in order, progressing from the global context, to the route domain context, and then to either the virtual server or self IP context. Management port rules are processed separately, and are not processed after previous rules. Rules can be viewed in one list, and viewed and reorganized separately within each context. You can enforce a firewall policy on any context except the management port. You can also stage a firewall policy in any context except management.
Important: You cannot configure or change the Global Reject context. The Global Reject context is the
final context for all traffic, except Management port traffic. Note that even though it is a global context, it is not processed first, like the main global context, but last. If a packet matches no rule in any previous context, the Global Reject rule rejects the traffic. Management port traffic is not affected by the Global Reject rule, or by global rules in general. Management port rules must be specifically configured and applied.
19 BIG-IP® Network Firewall: Policies and Implementations
Figure 1: Firewall context processing hierarchy example
Firewall context descriptions
When you create a firewall rule, you can select one of these listed contexts. Rules for each context form their own list and are processed both in the context hierarchy, and in the order within each context list.
Description Firewall
context
A global policy or global inline rules are collected in this firewall context. Global rules apply to all traffic that traverses the firewall, and global rules are checked first. Global
A route domain policy or route domain inline rules are collected in this context. Route domain rules apply to a specific route domain defined on the server. Route domain rules Route Domain
are checked after global rules. If you have not configured a route domain, you can apply route domain rules to Route Domain 0, which is effectively the same as the global rule context; however, if you configure another route domain after this, Route Domain 0 is no longer usable as a global context.
A virtual server policy or virtual server inline rules are collected in this context. Virtual server rules apply to the selected existing virtual server only. Virtual server rules are checked after route domain rules.
Virtual Server
A self IP policy or self IP inline rules apply to a specified self IP address on the device. Self IP rules are checked after route domain rules.
Self IP
20
Description Firewall
context
The management port context collects firewall rules that apply to the management port on the BIG-IP®device. Management port rules are checked independently of any other
rules. Management Port
The Global Reject rule rejects all traffic that does not match any rule in a previous context, excluding Management Port traffic, which is processed independently.
Global Reject
Creating a network firewall inline rule
If you are going to specify address lists or port lists with this rule, you must create these lists before creating the firewall rule, or add them after you save the rule.
Create a network firewall rule to manage access from an IP or web network address to a specified network location, server, or address behind a BIG-IP®system.
Note: You cannot add rules created with this task to a rule list at a later time. You must create rules for a
rule list from within the rule list.
1. On the Main tab, clickSecurity>Network Firewall>Active Rules. The Active Rules screen opens.
2. In the Rules area, clickAddto add a firewall rule to the list. 3. From theContextlist, select the context for the firewall rule.
For a firewall rule in a rule list, or a firewall rule or rule list in a policy, the context is predefined and cannot be changed.
4. In theNameandDescriptionfields, type the name and an optional description.
5. From theTypelist, select whether you are creating a standalone network firewall rule or creating the rule from a predefined rule list.
If you create a firewall rule from a predefined rule list, only theName,Description, andStateoptions apply, and you must select or create a rule list to include.
6. From theStatelist, select the rule state.
• SelectEnabledto apply the firewall rule to the given context and addresses. • SelectDisabledto set the firewall rule to not apply at all.
• SelectScheduledto apply the firewall rule according to the selected schedule. 7. From theSchedulelist, select the schedule for the firewall rule.
This schedule is applied when the firewall rule state is set toScheduled. 8. From theProtocollist, select the protocol to which the firewall rule applies.
• SelectAnyto apply the firewall rule to any protocol.
• Select the protocol name to apply the rule to a single protocol.
Important: ICMP is handled by the BIG-IP system at the global or route domain level. Because of this,
ICMP messages receive a response before they reach the virtual server context. You cannot create an inline rule for ICMP or ICMPv6 on a Self IP context. You can apply a rule list to a self IP that includes a rule for ICMP or ICMPv6; however, such a rule will be ignored. To apply firewall actions to the ICMP protocol, create a rule with theglobalorroute domaincontext. ICMP rules are evaluated only for ICMP forwarding requests, and not for the IP addresses of the BIG-IP system itself.
21 BIG-IP® Network Firewall: Policies and Implementations
Note: Note that you must select a protocol if you specify ports.
9. From the SourceAddresslist, select the type of source address to which this rule applies. • SelectAnyto have the rule apply to any packet source IP address.
• SelectSpecifyand clickAddressto specify one or more packet source IP addresses to which the rule applies. When selected, you can type single IP addresses into theAddressfield, then clickAdd to add them to the address list.
• SelectSpecifyand clickAddress Listto select a predefined list of packet source addresses to which the rule applies. To use an address list with this rule, select the address list and click theAddbutton. Similarly, to remove the list from this rule, select the list and click theDeletebutton.
• SelectSpecifyand clickAddress Rangeto specify a contiguous range of packet source IP addresses to which the rule applies. When selected, you can type a start and end IP address in the fields, then clickAddto add the IP address range to the address list.
• SelectSpecifyand clickCountry/Regionto identify the geographic origin of packet sources, and to apply rules based on selected geographic locations. When selected, a field appears in which you can select a country. For many countries, an extra field appears after you select the country, in which you can select a state or province. If you do not select a specific state or province, the entire country is selected. After you select a geographic location, clickAddto add it to the Source address list. 10.From the SourcePortlist, select the type of packet source ports to which this rule applies.
• SelectAnyto have the rule apply to any packet source port.
• SelectSpecifyand clickPortto specify one or more packet source ports to which the rule applies. When selected, you can type single port numbers into thePortfield, then clickAddto add them to the port list.
• SelectSpecifyand clickPort Rangeto specify a list of contiguous packet source port numbers to which the rule applies. When selected, you can type the start and end ports into the fields, then click Addto add the ports to the port list.
• SelectSpecifyand clickPort Listto select a predefined list of packet source ports to which the rule applies. To use a port list with this rule, select the port list and click theAddbutton. Similarly, to remove the list from this rule, select the list and click theDeletebutton.
11.From the SourceVLANlist, select the VLAN on which this rule applies.
• SelectAnyto have the rule apply to traffic on any VLAN through which traffic enters the firewall. • SelectSpecifyto specify one or more VLANs on the firewall to which the rule applies. To use a
VLAN with this rule, move the VLAN from theAvailablelist to theSelectedlist by clicking the <<button. Similarly, to remove the VLAN from this rule, click the>>button to move the VLAN from theSelectedlist to theAvailablelist.
12.From the DestinationAddresslist, select the type of packet destination address to which this rule applies. • SelectAnyto have the rule apply to any IP packet destination address.
• SelectSpecifyand clickAddressto specify one or more packet destination IP addresses to which the rule applies. When selected, you can type single IP addresses into theAddressfield, then click Addto add them to the address list.
• SelectSpecifyand clickAddress Listto select a predefined list of packet destination addresses to which the rule applies. To use an address list with this rule, select the address list and click theAdd button. Similarly, to remove the list from this rule, select the list and click theDeletebutton. • SelectSpecifyand clickAddress Rangeto specify a contiguous range of packet destination IP
addresses to which the rule applies. When selected, you can type a start and end IP address in the fields, then clickAddto add the IP address range to the address list.
• SelectSpecifyand clickCountry/Regionto identify the geographic packet destination, and to apply rules based on specific geographic locations. When selected, a field appears in which you can select a country. For many countries, an extra field appears after you select the country, in which you can
22
select a state or province. If you do not select a specific state or province, the entire country is selected. After you select a geographic location, clickAddto add it to the Destination address list.
13.From the DestinationPortlist, select the type of packet destination ports to which this rule applies. • SelectAnyto have the rule apply to any port inside the firewall.
• SelectSpecifyand clickPortto specify one or more packet destination ports to which the rule applies. When selected, you can type single port numbers into thePortfield, then clickAddto add them to the port list.
• SelectSpecifyand clickPort Rangeto specify a list of contiguous packet destination port numbers to which the rule applies. When selected, you can type the start and end ports into the fields, then clickAddto add the ports to the port list.
• SelectSpecifyand clickPort Listto select a predefined list of packet destination ports to which the rule applies. To use a port list with this rule, select the port list and click theAddbutton. Similarly, to remove the list from this rule, select the list and click theDeletebutton.
14.Optionally, from theiRulelist, select an iRule to start if the rule matches traffic.
15.From theActionlist, select the firewall action for traffic originating from the specified source address on the specified protocol. Choose from one of the these actions:
Description Option
Allows packets with the specified source, destination, and protocol to pass through the firewall. Packets that match the rule, and are accepted, traverse the system as if the firewall is not present.
Accept
Allows packets with the specified source, destination, and protocol to pass through the firewall, and does not require any further processing by any of the further Accept
Decisively
firewalls. Packets that match the rule, and are accepted, traverse the system as if the firewall is not present.
Drops packets with the specified source, destination, and protocol. Dropping a packet is a silent action with no notification to the source or destination systems. Drop
Dropping the packet causes the connection to be retried until the retry threshold is reached.
Rejects packets with the specified source, destination, and protocol. When a packet is rejected the firewall sends a destination unreachable message to the sender. Reject
16.From theLogginglist, enable or disable logging for the firewall rule. 17.ClickFinished.
The list screen and the new item are displayed. The new firewall rule is created.
About firewall rule lists
The BIG-IP®Network Firewall uses rule lists to collect multiple rules. Rule lists function differently depending on how you create them with Advanced Firewall Manager™(AFM™).
If you create a rule list with Security > Network Firewall > Rule Lists > Create:
This type of rule list is defined with a name and optional description. Once you create a rule list of this type, you can create and add one or more individual firewall rules to it. You can only add firewall rules by creating them from within the rule list. This type of rule list cannot be used on its own, but must be selected in an Active Rules list, or in a Policy Rules list.
23 BIG-IP® Network Firewall: Policies and Implementations
If you create a rule list with Security > Network Firewall > Active Rules > Add and select the Type as Rule List:
This type of rule list is defined with a name and optional description. You can specify a context (Global, Route Domain, Virtual Server, or Self IP). However, you cannot add individual rules to this rule list. Instead, you select a single rule list you have already created, or one of the predefined rule lists. This type of rule list is used to activate a rule list in the configuration.
If you create a rule list with Security > Network Firewall > Policies > policy_name > Add and select the Type as Rule List:
This type of rule list is defined with a name and optional description. You cannot specify a context as the context is determined by the policy. You cannot add individual rules to this rule list. Instead, you select a single rule list you have already created, or one of the predefined rule lists. This type of rule list is used to activate a rule list in a policy.
Creating a network firewall rule list
Create a network firewall rule list, to which you can add firewall rules. 1. On the Main tab, clickSecurity>Network Firewall>Rule Lists.
The Rule Lists screen opens.
2. Click theCreatebutton to create a new rule list.
3. In theNameandDescriptionfields, type the name and an optional description. 4. ClickFinished.
The list screen and the new item are displayed. The firewall rule list appears in the list.
Add firewall rules to the rule list to define source, destination, and firewall actions.
Adding a network firewall rule to a rule list
Before you add a firewall rule to a rule list, you must create a rule list. Use this procedure to add a firewall rule to a rule list.
1. On the Main tab, clickSecurity>Network Firewall>Rule Lists. The Rule Lists screen opens.
2. In the list, click the name of a rule list you previously created. The Rule List properties screen opens.
3. In the Rules area, clickAddto add a firewall rule to the list.
4. In theNameandDescriptionfields, type the name and an optional description. 5. From theStatelist, select the rule state.
• SelectEnabledto apply the firewall rule to the given context and addresses. • SelectDisabledto set the firewall rule to not apply at all.
• SelectScheduledto apply the firewall rule according to the selected schedule. 6. From theSchedulelist, select the schedule for the firewall rule.
This schedule is applied when the firewall rule state is set toScheduled.
7. From the SourceAddresslist, select the type of source address to which this rule applies. • SelectAnyto have the rule apply to any packet source IP address.
24
• SelectSpecifyand clickAddressto specify one or more packet source IP addresses to which the rule applies. When selected, you can type single IP addresses into theAddressfield, then clickAdd to add them to the address list.
• SelectSpecifyand clickAddress Listto select a predefined list of packet source addresses to which the rule applies. To use an address list with this rule, select the address list and click theAddbutton. Similarly, to remove the list from this rule, select the list and click theDeletebutton.
• SelectSpecifyand clickAddress Rangeto specify a contiguous range of packet source IP addresses to which the rule applies. When selected, you can type a start and end IP address in the fields, then clickAddto add the IP address range to the address list.
• SelectSpecifyand clickCountry/Regionto identify the geographic origin of packet sources, and to apply rules based on selected geographic locations. When selected, a field appears in which you can select a country. For many countries, an extra field appears after you select the country, in which you can select a state or province. If you do not select a specific state or province, the entire country is selected. After you select a geographic location, clickAddto add it to the Source address list. 8. From the SourcePortlist, select the type of packet source ports to which this rule applies.
• SelectAnyto have the rule apply to any packet source port.
• SelectSpecifyand clickPortto specify one or more packet source ports to which the rule applies. When selected, you can type single port numbers into thePortfield, then clickAddto add them to the port list.
• SelectSpecifyand clickPort Rangeto specify a list of contiguous packet source port numbers to which the rule applies. When selected, you can type the start and end ports into the fields, then click Addto add the ports to the port list.
• SelectSpecifyand clickPort Listto select a predefined list of packet source ports to which the rule applies. To use a port list with this rule, select the port list and click theAddbutton. Similarly, to remove the list from this rule, select the list and click theDeletebutton.
9. From the SourceVLANlist, select the VLAN on which this rule applies.
• SelectAnyto have the rule apply to traffic on any VLAN through which traffic enters the firewall. • SelectSpecifyto specify one or more VLANs on the firewall to which the rule applies. To use a
VLAN with this rule, move the VLAN from theAvailablelist to theSelectedlist by clicking the <<button. Similarly, to remove the VLAN from this rule, click the>>button to move the VLAN from theSelectedlist to theAvailablelist.
10.From the DestinationAddresslist, select the type of packet destination address to which this rule applies. • SelectAnyto have the rule apply to any IP packet destination address.
• SelectSpecifyand clickAddressto specify one or more packet destination IP addresses to which the rule applies. When selected, you can type single IP addresses into theAddressfield, then click Addto add them to the address list.
• SelectSpecifyand clickAddress Listto select a predefined list of packet destination addresses to which the rule applies. To use an address list with this rule, select the address list and click theAdd button. Similarly, to remove the list from this rule, select the list and click theDeletebutton. • SelectSpecifyand clickAddress Rangeto specify a contiguous range of packet destination IP
addresses to which the rule applies. When selected, you can type a start and end IP address in the fields, then clickAddto add the IP address range to the address list.
• SelectSpecifyand clickCountry/Regionto identify the geographic packet destination, and to apply rules based on specific geographic locations. When selected, a field appears in which you can select a country. For many countries, an extra field appears after you select the country, in which you can select a state or province. If you do not select a specific state or province, the entire country is selected. After you select a geographic location, clickAddto add it to the Destination address list.
11.From the DestinationPortlist, select the type of packet destination ports to which this rule applies. • SelectAnyto have the rule apply to any port inside the firewall.
25 BIG-IP® Network Firewall: Policies and Implementations
• SelectSpecifyand clickPortto specify one or more packet destination ports to which the rule applies. When selected, you can type single port numbers into thePortfield, then clickAddto add them to the port list.
• SelectSpecifyand clickPort Rangeto specify a list of contiguous packet destination port numbers to which the rule applies. When selected, you can type the start and end ports into the fields, then clickAddto add the ports to the port list.
• SelectSpecifyand clickPort Listto select a predefined list of packet destination ports to which the rule applies. To use a port list with this rule, select the port list and click theAddbutton. Similarly, to remove the list from this rule, select the list and click theDeletebutton.
12.From theProtocollist, select the protocol to which the firewall rule applies. • SelectAnyto apply the firewall rule to any protocol.
• Select the protocol name to apply the rule to a single protocol.
Important: ICMP is handled by the BIG-IP system at the global or route domain level. Because of this,
ICMP messages receive a response before they reach the virtual server context. You cannot create an inline rule for ICMP or ICMPv6 on a Self IP context. You can apply a rule list to a self IP that includes a rule for ICMP or ICMPv6; however, such a rule will be ignored. To apply firewall actions to the ICMP protocol, create a rule with theglobalorroute domaincontext. ICMP rules are evaluated only for ICMP forwarding requests, and not for the IP addresses of the BIG-IP system itself.
Note: Note that you must select a protocol if you specify ports.
13.Optionally, from theiRulelist, select an iRule to start if the rule matches traffic.
14.From theActionlist, select the firewall action for traffic originating from the specified source address on the specified protocol. Choose from one of the these actions:
Description Option
Allows packets with the specified source, destination, and protocol to pass through the firewall. Packets that match the rule, and are accepted, traverse the system as if the firewall is not present.
Accept
Allows packets with the specified source, destination, and protocol to pass through the firewall, and does not require any further processing by any of the further Accept
Decisively
firewalls. Packets that match the rule, and are accepted, traverse the system as if the firewall is not present.
Drops packets with the specified source, destination, and protocol. Dropping a packet is a silent action with no notification to the source or destination systems. Drop
Dropping the packet causes the connection to be retried until the retry threshold is reached.
Rejects packets with the specified source, destination, and protocol. When a packet is rejected the firewall sends a destination unreachable message to the sender. Reject
15.From theLogginglist, enable or disable logging for the firewall rule. 16.ClickFinished.
The list screen and the new item are displayed.
A new firewall rule is created, and appears in the Rules list.
26
Activating a rule list in active rules or in a policy
The rule list created from the active rules page, or from a policy, is a container in which you can select and activate one of the rule lists that you created withSecurity>Network Firewall>Rule Lists>Create, or one of the predefined system rule lists.
1. From theContextlist, select the context for the firewall rule.
For a firewall rule in a rule list, or a firewall rule or rule list in a policy, the context is predefined and cannot be changed.
2. In theNameandDescriptionfields, type the name and an optional description. 3. From theRule Listlist, select a rule list to activate in the policy or configuration. 4. From theStatelist, select the rule state.
• SelectEnabledto apply the firewall rule to the given context and addresses. • SelectDisabledto set the firewall rule to not apply at all.
• SelectScheduledto apply the firewall rule according to the selected schedule. 5. ClickFinished.
The list screen and the new item are displayed.
The firewall rule list you selected is activated in the Active Rules list or policy.
27 BIG-IP® Network Firewall: Policies and Implementations
Chapter
3
About Firewall Rule Addresses and Ports
• About firewall rule addresses and ports • About address lists
About firewall rule addresses and ports
In a network firewall rule, you have several options for defining addresses and ports. You can use one or more of these options to configure the ports and addresses to which a firewall rule applies.
Note: You can use any combination of inline addresses, ports, address lists, and port lists in a firewall
rule.
Any (address or port)
In bothSourceandDestinationaddress and port fields, you can selectAny. This specifies that the firewall rule applies to any address or port.
Inline addresses
An inline address is an IP address that you add directly to the network firewall rule, in either theSource orDestination Addressfield. You can specify a single IP address, multiple IP addresses, a contiguous range of IP addresses, or you can identify addresses based on their geographic location. IP addresses can be either IPv4 or IPv6, depending on your network configuration.
Address Lists
An address list is a preconfigured list of IP addresses that you add directly to the BIG-IP®system. You
can then select this list of addresses to use in either theSourceorDestination Addressfield. An address list can also contain other address lists, and geographic locations.
Inline ports
An inline port is a port that you add directly to the network firewall rule, in either theSourceor Destination Portfield. You can add a single port, or a contiguous port range.
Port lists
A port list is a preconfigured list of ports that you add directly to the BIG-IP system. You can then select this list of ports to use in either theSourceorDestination Portfield. You can also add port lists to other port lists.
About address lists
An address list is simply a collection of addresses saved on the server, including IP addresses, IP address ranges, geographic locations, and other (nested) address lists. You can define one or more address lists, and you can select one or more address lists in a firewall rule. Firewall address lists can be used in addition to inline addresses that are specified within a particular rule.
Creating an address list
Create an address list to apply to a firewall rule, in order to match IP addresses. 1. On the Main tab, clickSecurity>Network Firewall>Address Lists.
The Address Lists screen opens.
2. ClickCreateto create a new address list.
3. In theNameandDescriptionfields, type the name and an optional description. 4. In the Addresses area, add and remove addresses.
30
• To add an address, type the address and clickAdd.
• To remove an address, select the address in the Addresses list and clickDelete.
• To edit an address, select the address in the list and clickEdit. The address is removed from the Addresses list and appears in the editing field. Make your changes to the address, and clickAdd. Addresses can be IP addresses, IP address ranges, geographic locations, other address lists, or any combination of these.
5. ClickFinished.
The list screen and the new item are displayed.
About port lists
Aport listis simply a collection of ports saved on the server. A port list can also contain other port lists. You can define one or more port lists, and you can specify one or more port lists in a firewall rule. Firewall port lists can be used in addition to inline ports, specified within a particular firewall rule or policy.
Creating a port list
Create a port list to apply to a firewall rule, in order to match ports. 1. On the Main tab, clickSecurity>Network Firewall>Port Lists.
The Port Lists screen opens.
2. ClickCreateto create a new port list.
3. In theNameandDescriptionfields, type the name and an optional description. 4. In the Ports area, add and remove ports.
• To add a single port, selectSingle Port, then type the port number, and clickAdd.
• To add a contiguous range of ports, selectPort Range, then type the start and end port in the fields. ClickAddto add the range of ports to the port list.
• To add an existing port list to the current port list, selectPort List, then select the predefined port list. ClickAddto add the existing port list to the current port list.
• To remove a port or port list, select the port or port list in the Ports area and clickDelete.
• To edit a port entry, select the port or port range in the list and clickEdit. The port or port range is removed from the Ports list and appears in the editing field. Make your changes to the port or port range, and clickAdd.
5. ClickFinished.
The list screen and the new item are displayed.
31 BIG-IP® Network Firewall: Policies and Implementations
Chapter
4
About Network Firewall Schedules
About Network Firewall schedules
With a Network Firewall schedule, you can configure date ranges, days of the week, and time ranges for when a firewall rule is applied.
A schedule must be selected in a firewall rule or rule list, to apply to that firewall rule or rule list. The firewall rule or rule list must also be set to the Scheduled state.
When you configure a schedule for a rule list, the rules within the rule list can only be enabled when the rule list is enabled by the schedule. This means that even if the individual rules in a rule list have schedules, the rules are not enabled by their schedules unless the rule list is also enabled by the rule list schedule.
Creating a schedule
Create a schedule to define the times, dates, and days of the week for when a firewall rule is applied. 1. On the Main tab, clickSecurity>Network Firewall>Schedules.
The Schedules screen opens.
2. ClickCreateto create a new firewall schedule.
3. In theNameandDescriptionfields, type the name and an optional description. 4. In theDate Rangearea, define the range of dates over which the schedule applies.
• SelectIndefiniteto have the schedule apply immediately, and run indefinitely. This makes the schedule active until you change the date range, or delete the schedule.
• SelectUntilto have the schedule apply immediately, and define an end date and ending time. This makes the schedule active now, and disables it when the end date and ending time is reached. Click in the field to choose an end date from a popup calendar, and set the ending time with the sliders. • SelectAfterto have the schedule apply after the specified date and starting time, and run indefinitely.
This makes the schedule active starting on the selected date and time, until you change the start date, or delete the schedule. Click in the field to choose a start date from a pop-up calendar, and set the starting time with the sliders.
• SelectBetweento apply the schedule starting on the specified start date and starting time, and ending on the specified end date and ending time. Click in the fields to choose the start and end dates from a pop-up calendar, and set the starting and ending time with the sliders.
5. In the Time Range area, define the times over which the firewall rule applies.
• SelectAll Dayto have the schedule apply all day, for every day specified in the date range. • SelectBetweento apply the schedule starting at the specified time, and ending at the specified time
each day. Select the start and end hours and minutes from the popup screen, or clickNowto set the current time.
Note: Specify the hours according to a 24-hour clock. For example, you can specify 3:00 PM with
the setting15.
6. In the Days Valid area, select the days of the week when the schedule is valid. Select check boxes for days of the week when the rule applies, and clear check boxes for days of the week when the schedule does not apply.
7. ClickFinished.
The list screen and the new item are displayed.
34
Chapter
5
About IP Address Intelligence in the Network Firewall
• About IP intelligence policies in the network firewall
• About IP intelligence blacklist classes • About IP intelligence feed lists
• Configuring a policy to check addresses against IP intelligence
About IP intelligence policies in the network firewall
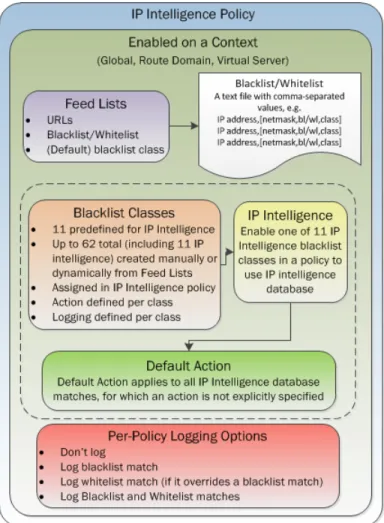
In the network firewall, you can configure policies to check traffic against an IP intelligence database. Such traffic can be handled automatically if it originates from known-bad or questionable IP addresses. In addition, you can configure policies to automatically queryfeed liststhat specify blacklist and whitelist IP address entries, and configure actions for those entries. You can control the actions for each IP intelligence category by specifying such actions in a policy. Furthermore, you can configure policies to apply default actions to feed lists, and apply such policies at the global context, to a virtual server, or on a route domain.
Figure 2: IP Intelligence Policy container, and included elements
Enabling IP address intelligence
The requirements for using IP address intelligence are: • The system must have an IP Intelligence license.
• The system must have an Internet connection either directly or through an HTTP proxy server. • The system must have DNS configured (go toSystem>Configuration>Device>DNS).
Important: IP address intelligence is enabled by default. You only need to enable it if it was previously
disabled.
36
To enable IP address intelligence on the BIG-IP®system, you enable auto-update to connect the system to the IP intelligence database.
1. Log in to the command line for the BIG-IP®system.
2. To determine whether IP intelligence is enabled, type the following command:tmsh list sys db iprep.autoupdate
If the value of theiprep.autoupdatevariable isdisable, IP intelligence is not enabled. If it is enable, your task is complete.
3. At the prompt, typetmsh modify sys db iprep.autoupdate value enable The system downloads the IP intelligence database and stores it in the binary file, /var/IpRep/F5IpRep.dat. It is updated every 5 minutes.
4. If the BIG-IP system is behind a firewall, make sure that the BIG-IP system has external access to vector.brightcloud.comusing port443.
That is the IP Intelligence server from which the system gets IP Intelligence information.
5. (Optional) If the BIG-IP system connects to the Internet using a forward proxy server, set these system database variables.
a) Typetmsh modify sys db proxy.host value hostnameto specify the host name of the proxy server.
b) Typetmsh modify sys db proxy.port value port_numberto specify the port number of the proxy server.
c) Typetmsh modify sys db proxy.username value usernameto specify the user name to log in to the proxy server.
d) Typetmsh modify sys db proxy.password value passwordto specify the password to log in to the proxy server.
The IP address intelligence feature remains enabled unless you disable it with the commandtmsh modify sys db iprep.autoupdate value disable.
You can configure IP intelligence for Advanced Firewall Manager by assigning IP intelligence policies to the global, route domain, or virtual server context.
IP address intelligence categories
Along with the IP address, the IP intelligence database stores the category that explains the reason that the IP address is considered untrustworthy.
Description Category Name
IP addresses of computers that are infected with malicious software (Botnet Command and Control channels, and infected zombie machines) and are controlled as a group Botnets
by a Bot master, and are now part of a botnet. Hackers can exploit botnets to send spam messages, launch various attacks, or cause target systems to behave in other unpredictable ways.
IP addresses and networks that are used by cloud providers. Cloud Provider
Networks
IP addresses that have launched denial-of-service (DoS) attacks, distributed denial-of-service (DDoS) attacks, anomalous SYN flood attacks, or anomalous traffic Denial-of-Service
detection. These attacks are usually requests for legitimate services, but occur at such a fast rate that targeted systems cannot respond quickly enough and become bogged down or unable to service legitimate clients.
37 BIG-IP® Network Firewall: Policies and Implementations