Soaps and Saponification
Rashmita Acharya
Suchita Verma
Nest+M High School
AP Chemistry
Mr. Swenson
Periods 7-8
Abstract
Since medieval periods, soaps were made using ash, animal or plant fat. People were totally unaware of the fact that it was actually a chemical reaction they were performing known as
Introduction
Soap is something that we use everyday in order to clean us off the dirt and dust accumulated through the day. Humans have been using soap since times immemorial and yet most do not realize how it is a purely chemical process called saponification. In this process oil or fat reacts with a strong base (usually sodium hydroxide or “lye”) to produce a crude soap. After refining what remains is the soap that we can use. Despite being a chemical process, soap making is simple enough to be done at home and the results can be such more interesting than any soap in the marketplace.
The first recorded use of soap is from Ancient Babylon and Egypt, where soap was used to treat sores and skin diseases. Even back then animal or vegetable fat was mixed with alkaline salts to make the soap. Since then the process of soap making has not strayed from this basic method. It was the Arabs who first came up with fragrant soaps and they even made soaps for shaving. Marseilles and Savona in France and Italy respectively became soap making cities in Europe and made various soaps for shaving,
shampooing, and laundry. French chemists- Nicholas Leblanc and Michael Chevreul revolutionized soap making when they patented a method of making sodium carbonate or soda ash from commonly available salt and discovered the relationship and chemical nature of fatty acids, glycerin, and fats.
Despite being the only soaps available for a long time, homemade soaps have a reputation of being harsh on skin. This is due to the fact that previously the base used procured from burning of wood and was not of even concentration causing the processes of saponification to not occur evenly throughout the bar. Today homemade soaps are made with chemical bases of uniform concentration resulting in smooth and soft soaps which are in no way harmful to the skin. Along with that one can experiment with different base oils that lead to different texture of soap. The softest soaps are made using avocado and olive oil, while regular ones use coconut. Depending on the oil one can experiment with the essential oils one adds to produce fragrant soaps that can be completely unique.
Literature Review
Literature Review
Hygiene is one sign of a civilized society and in order to have sanitation humans have adopted a variety of methods- from public restrooms to proper sewage systems. But one of the most significant landmarks in personal hygiene has to be the development and usage of soaps. It is one of the only ways that humans can properly rid themselves of dirt on their bodies, apart from simply washing themselves with water. Soaps have been is use since a long time, but it was only during the 16th century was soap manufactured commercially. Prior to that soap was made at home using ash and lard. Ash (obtained from burnt wood) contains high amounts of potassium hydroxide that acts as the caustic soda and it reacts with lard, an animal fat, to produce soap. Homemade soap has a reputation of being harsh on skin, and the reason for this heterogenic composition of the ash, wherein the potassium hydroxide is not uniformly distributed. Since the molarity of the lye (common name for the strong base used in soap making) is not constant, the soap made also has an inconsistent distribution of the strong base. This causes the soap to be harsh and harmful to the skin.
Soap is a salt of a fatty acid that is produced by the reaction between a vegetable or animal fat with a caustic soda (such as sodium hydroxide or potassium hydroxide.) The process of reaction called saponification produce soap and yields the salts of a carboxylic acid (the soap) along with glycerine and water. Soap is unique in siphoning off dirt with water because one end of its chain is water soluble (hydrophilic) and the other end is not (hydrophobic). While washing, grease is surrounded by the molecules of soap, and the hydrophobic end attached to the grease particle and the hydrophilic end, attracts water molecules. This allows the grease particle to freely move around in the water and, therefore, be washed away. (McClain, 2013)
The fats or oils used in soap making are made up of triglycerides which are composed of three fatty acid molecules attached to a glycerol molecule. These can be more or less saturated depending on whether it is
a fat or oil respectively. The fatty acid in a triglyceride consists of a carbon chain terminated with an ester group. This group
contains a carbon bonded to two oxygen atoms where one
has a single bond and the other is a double bond. The R-group consists of a carbon atom bonded to three other carbon atoms (refer to Figure 1), hence the name “tri” glyceride. (McClain, 2013)
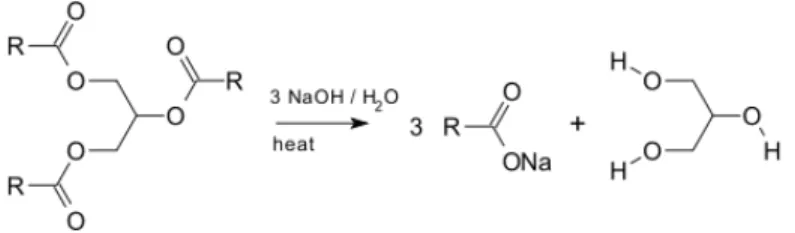
Below is the reaction that takes place during saponification. On the reactants side triglyceride reacts with a strong alkali (eg. NaOH) to produce a salt (or “soap”) and glycerine.
Figure 1 A Triglyceride
Though this seems to be a fairly basic reaction, the triglyceride has to undergo a variety of intermediate steps to reach the final product.
Figure 3 The reaction taking place in Saponification
Steps involved in Base Hydrolysis:
1. When NaOH is added to water the molecule ionizes and splits into Na+ and OH-. The negatively charged anion OH- “attacks” the slightly positive carbon atom of the ester, breaking the double bond with the oxygen and forming a “tetrahedral intermediate.”
2. The intermediate collapses and forms a double bond with the oxygen again. Now dispelling an alkoxide and forming a carboxylic acid.
3. Since the alkoxide is more basic than the conjugate base the previous step exists only for a short amount of time before the alkoxide acts as a base, deprotonating the carboxylic acid. This yields the final products for saponification- a soap and glycerine. (Note: Since the oxygen atom on the soap has an unpaired electron it bonds with the Na in the solution from the alkali originally added) (Carey, 2000)
and then a highly saturated solution of salt water is added. After stirring the solution, strain it with a cheesecloth so the only solids are left. The solid is the soap, while the glycerine is washed away with the salt water. The reason is that glycerine is more soluble in a salt solution than soap, which remains solid.
Using either animal or vegetable based fats can also affect the end result of the type of soap produced. Vegetable oil has more unsaturated fatty acids, while animal fats contain more saturated fatty acids. Saturated fats have a more linear molecular structure which allows them to be stacked together. These are usually in “trans-” configuration where the R-groups of the molecule are on the same side. When molecules are stacked thus, strong intermolecular forces result in higher melting points.
Alternately, in unsaturated fats there is a bend in the molecular structure due to the presence of a double bond. These are usually in “cis-” configuration, which is typical of most natural fats. Due to the bend in their structure they do not stack very well, thus leading to weaker intermolecular forces. This results in a lower melting point for vegetable oils. (Raheem, 2011). These observations are important for they give an indication of the texture of the soap depending on what type of oil is used.
Another difference in the final result of the soap is the type of alkali used. Usually either potassium hydroxide or sodium hydroxide is used to make soaps or detergents. Potassium hydroxide (KOH) or caustic potash is generally produces soft soaps and is used to make liquid soaps and detergents. These tend to be more soluble in water. On the other hand, soaps made using sodium hydroxide tend to be harder and make for solid soaps, which are less soluble in water.
Both types of soap have a polar and nonpolar end, which makes them so effective at removing dirt and grease. The carbon and hydrogen end is polar and attracts polar water molecules, while the hydrocarbon end attracts nonpolar, grease or fat. The following spherical structure has its polar ends on the surface and nonpolar ends in the centre and carries non-water soluble materials. Such a spherical unit of soap and grime is called a micelle.
Cold Process Soaps
making, the oils are heated but the lye and water used during the reaction are not. These are now mixed until emulsification, which is the time when a “trace” appears in the soap solution. This trace is the point where the mixture thickens and it is usually at this time when soap makers add their extra ingredients such as essential oils, oatmeal, tea, etc. After mixing well after the trace the mixture should have about the consistency of thin pudding. Then, the mixture is poured into a soap mould for 12-48 hours to cure. This is where most of the saponification takes place. It is then let out of the mould where it is left to cure for 3-4 weeks. Soap must be kept in a place where this is constant supply of air, but it is not in direct line of a draft. Cold process soaps generally take more time to cure that hot process soaps. Another important aspect of cold process soaps is that not all of the oil used is saponified producing a softer soap, which leaves more oil on the skin when used. That is a reason why some soap makers prefer this process for its smoothness on the skin.
Hot Process Soaps
The major difference between cold process and hot process soaps is that in the hot process heat is added to the mixing of the solution so that the process of saponification is faster. This means that most of the saponification is done before putting the soap mixture into the mold. The lye solution with the oils is heated to almost 100°C until saponification is completed. Many soap makers use the “zap” test to find out whether the process is complete or not. One takes a bit of the soap onto their finger and touch to their tongue. A distinctive zap feeling through their tongue indicates the presence of the alkali meaning the process is not yet complete. After the entire process is done the soap is precipitated with a saturated salt solution to wash away the excess fats and glycerine. The final product is a “neat soap” which has practically no glycerine and extra fat. Some advantages of this process is that the exact amount of lye needed is not necessary since the saponification process actually takes place in front of the soapmakers’ eyes. Another advantage is the time factor. Because saponification takes place earlier, these soaps are “ready to use” after 12-48 hours of curing, though it is a good idea to let them cure for around two weeks before usage.
• Kettle boiled batch process:
This process is carried out in large, heated, pressurized steel containers called kettles. The fats and oils are first mixed with concentrated sodium hydroxide in the kettles. The mixture is boiled using pressure and high-temperature steam (from injectors in the kettle). Additional hot brine and steam are added at the end of
saponification to salt out the soap and wash it free of glycerol. The mixture settles for several days and the soap curd eventually collects at the surface. The brine, glycerol and soap curds are separated from one another and individually collected.
The soap is washed with water and then sprayed and vacuum dried. It is converted into small pellets with fragrances and colors before re-blending and reprocessing into the desired form (liquid, powder or bars).
The key differences between the Kettle Boiled Batch Process and the saponification reactions performed in the school laboratory are:
• the industrial process uses a blend of fats and oils in the reactor • heating and stirring is achieved using steam
• salt is added to control the way the soap solidifies • glycerol is removed from the product
• Fatty acid neutralization process:
This process occurs in two steps. In the first step, high pressures (5 MPa) and temperatures (250oC) are used to break down fatty esters, with steam, into fatty acids and glycerol. The reaction is carried out in long steel tubes (20m long x 1m diameter) in the presence of a zinc oxide catalyst. These are fractionally distilled
and various mixtures of these are used in the second step (hydrolysis). In the second step, the
fractions are stoichiometrically neutralized with hydroxides to produce soap. The soap is recovered by salting out as usual, and processed (neutralization).
The key differences between the Fatty Acid Neutralization Process and the saponification reactions performed in the school laboratory are:
• the industrial process uses a blend of fats and oils in the reactor • heating and stirring is achieved using steam
• the reaction performed is two step process (this can also be done in the school laboratory but is
not usually)
• the hydrolysis reaction is undertaken at elevated temperatures and pressures • the hydrolysis reaction uses water as the hydrolyzing agent
• salt is added to control the way the soap solidifies • glycerol is removed from the product
The similarities between these two processes are:
• Fats and oils are mixed with concentrated alkali and heated. • The crude soap is then washed.
The differences between these two processes are:
• A blend of fats and oils is used in industry rather than one fat or oil used in the laboratory. • Concentrated brine is used to separate the soap from the aqueous phase in the industry.
• High-pressure steam is used to heat and stir the mixture in industry; in the laboratory a glass rod
and a hot plate is used to simulate these effects.
• The glycerol is removed and purified in the industry; in the laboratory some glycerol remains in
the soap.
• In industry, settling of the soap occurs over several days; in the laboratory the soap is relatively
crude.
• No fragrances and color were added to the soap produced in the laboratory.
Province of Chemical Engineers, and requires the skillful trade-off between the throughput of the reactor and the purity of the output.
It is important to note that the scale of many industrial operations is immense. On the industrial scale, a 10 tonne reactor is considered quite small - some of the kettles used in the Kettle Boiled Batch Process can hold 130 tonne. The chemistry used in synthetic industrial processes is also quite different to that used in the school or university laboratory. Typically, elevated temperatures and pressures are used in conjunction with specially designed metal-based catalysts to perform the reactions. The size, shape and internal roughness of the reaction vessel must all be accounted for when operating at this scale.
Chemistry at the industrial level is something that is quite different to what is experienced in the teaching laboratory, and is often outside the experience of most research chemists. It is traditionally the Province of Chemical Engineers and Industrial Chemists.
Recently in Britain, they have come up with Continuous “JET” Saponification process in which they use Saponification Jet. It is a instant
saponification device which is used for continuous saponification. A Jet has no moving parts and uses motive steam as the energy source. Only 100kg of steam per ton of soap is required. A Jet can be adjusted for soap outputs from 1 to 10 tons/hr.
The Jet operates by driving 5 bar motive steam through an internal venture jet to create a vacuum. The steam venture jet is fitted with a needle valve, to control the flow rate, hence suction volume, hence output.
In a basic installation the flows of mixed fats and caustic liquor are normally delivered to the Jet from overhead constant level tanks, through manually operated ball valves. A first valve acts as shut-off and a second is set during commissioning, to provide fixed flow control. Startup and shutdown are then very simple procedures.
At the end of the production day, the fat and caustic shut-off valves are closed and steam is allowed to clean the jet, for a few minutes. A small steam purge line may be fitted to the fats line, to clean this out prior to shut-down. Once the Jet has self- cleaned for a short while, the steam is turned off.
At the beginning of the day steam is turned on to warm the jet and produce the vacuum. The overhead tanks are confirmed full, and then the fat and caustic shut-off valves opened. Soap forms immediately and is then continuously delivered, as long as required.
The use of a Jet permits soap water content to be as low as the Soap Maker wishes to use. There is no need to have an excess of water, to assist saponification boiling, which then has to be removed in the spray drying plant. Some Jet users are making neat soap at near finished water content, then simply cooling by vacuum spraying or using the drum cooling method. This gives a further and substantial saving of energy.
Soap is prepared by mixing a fatty acid ester of a lower monohydric alcohol with an alkaline or saponifying agent, the ensuing reaction being carried out at reduced pressures to remove alcohol from the product as the alcohol is liberated in the reaction. Various means may be employed for facilitating the reaction of the saponifying agent with the ester. Thus, it has been found convenient to get the alkaline solution into the liquid ester and to employ a size and shape of reaction vessel which provides a high degree of turbulence for contacting the materials. The vessel may be in the form of a conduit and may be equipped with a screw conveyor to displace solid material formed when using plastic or viscous mixtures.
To make the variations and modifications in soaps, the equivalents can be substituted therefore without departing from the principles and true spirit of the invention. Some of them could be:
• The process for producing soap which comprises reacting a fatty acid ester of a lower alkyl
monohydric alcohol with a saponifying agent under sub atmospheric pressure while maintaining the temperature above the vaporization point at said pressure of the free monohydric alcohol.
• The process for producing soap which comprises preheating at least one of a fatty acid ester of a
Methods and Materials
The purpose of the experiment is to find the difference in pH of soaps depending on the base oils used and the number of washes the soap undergoes. We made a total of four soaps to test this. We first made a generic soap using coconut oil in the laboratory. The reason for using coconut oil is that it is a common oil used in soap making, easy to obtain, and is known to produce fairly consistent results. For this we first mixed a three molar solution of sodium hydroxide (NaOH) with coconut oil over a burner so that the process of saponification takes place. The heat is required to allow the reaction to reach it’s activation energy, though care had to be taken to keep the heat of reaction under control and not to overheat the reactants, since saponification is an exothermic (heat producing) process. While stirring constantly we wait until the process is completed. This is indicated by the formation of a thick solid. At this point we noted the pH of the soap and recorded it. We then wash the “crude” soap by mixing in a highly saturated solution of sodium chloride. By doing so the glycerine in the soap mixture is dissolved in the salt solution. By draining out this solution using a cheesecloth we are left with a “neat” soap. Again we checked the pH of the soap after the wash. We repeated the washing process with sodium chloride one more time to ensure that all the glycerine had left the soap. Then we left the solid soap to dry in a mold.
For our second soap we made a pumpkin soap, using a mixture of olive, palm, sunflower, castor, and coconut oil, along with shea butter. To make the lye solution we mixed pure pumpkin puree with sodium hydroxide and water. We then added the lye solution to the mixture of oil in a crock-pot, which is made to cook food at very high temperatures. After mixing in the lye well, we took a blender stick and blended the mixture until trace. Trace is the point when the solution because thicker and any movement leave a mark on the face of the soap. This is the point where we added cardamom and orange essential oil, along with oatmeal to give the soap a scrubby texture. We continued blending it until the mixture reached a gel stage, at which point we left the soap to continue gelling. After the soap had gelled until the center, we gave it a quick stir and poured it into a mold and let it cure.
The third soap we made was a lemongrass, green tea, and oatmeal soap. This soap was made using the cold process of soap making and in this the gelling stage is not seen. Instead the saponification process is completed after the soap has been poured into the mold. This is why this soap took longer to cure. This time we used olive and soybean oil, with vegetable shortening. The lye solution was made using sodium hydroxide and green tea made using distilled water. After adding the lye to the oils, we blended the mixture, as before until we reached trace. At trace we added oatmeal, lemon tealeaves, and lemongrass essential oil. After mixing them in well, we poured them into molds and let them cure for two weeks.
sodium hydroxide and mixed that along with the melted oils and butter. Using a blending stick again we kept blending the mixture until we reached a light trace. At that point we added cucumber puree and lemongrass essential oil. We took the pot off heat and waited until the mixture stopped bubbling. After 30 minutes we strained out the solid soap from the mixture because the soap had undergone a major
separation. We then put the strained solids into a mold at waited for them to cure. After 24 hour we took the pH of each of the last three homemade soaps.
Since, two of the three soaps that we had made at home we cold process soaps we decided to check the pH after one week. This is because the process of saponification takes place while the soap is in the mold. During the process, the oil and the lye continue to reaction and this could potentially bring down the pH of the soap. Thus, we checked the pH of the surface of all three soaps once again after a week.
Results
Following are tables noting the pH of the soaps- i) After washes with NaCl
ii) After one week of curing
• Coconut Soap
Number of Washes pH
0 “crude soap” >11
1 >11
2 >11
There was no change in the pH of the soap after two washes.
• Pumpkin Soap
Time of curing pH
1 day 9
1 week 9
There was no change in the pH of the hot process Pumpkin Soap after a week of curing.
• Lemongrass Soap
Time of curing pH
1 day >11
1 week 11
There was a slight decrease in the pH of the cold process Lemongrass Soap.
• Cucumber Soap
Time of curing pH
1 day 10
1 week 9
Discussion
• Coconut Soap
We first made the coconut soap and for that we mixed lye and coconut oil together and started heating it to a gentle boil. We waited till the trace, a point where the solution would look like a pudding. According to the procedure, we called it a crude soap and started the washes by using cotton cloth. After our first wash, we measured it’s pH. The pH turned out to be 11. The range of the pH for soap is 6-10 which means that our soap is not usable. We thought that maybe pH depends on the number of washes the soap goes through so we washed it another time and measured the pH. But there was no change. The pH still remained the same, at a high 11.
Since the pH did not change we realized that there might have been some error when we performed the procedure. After going through the process we came to the conclusion that the reason might have been the amount of time we heated the solution of the lye and the oil. While performing the experiment we may have heated the solution longer than was required. We had kept it on the heat for approximately 30 minutes. While we tried to maintain the right temperature for the solution this proved to be difficult given the small amount of soap that we had. Towards the end we had have overcooked the soap and that may have led to the hard soap that we were left with and chances are that because of the lumps the process of washing the soap was not as effective in reducing the pH of the soap.
The other reason why our soap had a higher pH might be the amount of lye we used. We might have used more lye than required, or we did not react the NaOH with enough of the coconut oil for all of it to be used up in the process of saponification. It was the presence of NaOH, a strong alkali, that increased the pH of the soap. We probably used less oil than was required. Everything about making soap is concerned with pH. If the pH of the soap doesn’t fall in the range it is supposed to, then it will be very corrosive to skin and will do exact opposite of what soaps are really supposed to do. Another reason that the lye did not completely react may have been because the coconut oil used was not completely melted and the clumps decreased the surface area for the lye to saponify.
usable. Therefore, the coconut oil soap experiment was a fail.After the disappointment of the failure, we headed on to make another flavor of soap.
• Pumpkin Soap
It is a hot process saponification where you have to heat the solutions. For this experiment, we were supposed to mix Palm oil, Coconut oil, Olive oil, Sunflower oil, Mango butter and Castor oil. But we just mixed Palm oil, Coconut oil, Olive oil, Sunflower oil and replaced Mango butter with Shea butter because we didn’t find mango butter at stores and we didn’t use castor oil because we didn’t find that either. That may have changed the amount of lye we should have used, but in the end this turned out to be the safest soap we made.
We heated the oil for the right amount of time so that there won’t be any errors. We mixed everything up and heated and mixed it until trace. This time we kept track of the temperature which might play good role in keeping pH in control. We added the oatmeal and essential oils, and the presence of oatmeal makes the soap more scrubby and can exfoliate the skin. After gelling the soap was a dark orange color due to the pumpkin and the palm oil. We were not sure if the pH was going to be between the range and when we measured it, the pH turned out to be 9 which mean it is usable. It lathered very well too and after we washed our hands we felt the softness. Pumpkin soap is said to be good for skin too because it contains vitamin C, K, E and mineral like magnesium, potassium, etc. which are extremely good for you skin.
The reason why our experiment worked was because we were very careful this time. We kept track of time, measured the temperature from time to time, and also used the right amount of the ingredients which we believe played role in keeping the pH within the range. Apart from that while making the soap we noted that we had extra oil in the pot which looked as if it had not reacted. This meant that the lye had completely reacted making the soap safe. The extra oil also added smoothness to the soap without making it greasy.
• Lemongrass, green tea, and oatmeal soap
The third soap we made was a more interesting soap. We employed the use of the cold process of soapmaking, where the ingredients are not heated up to the gelling stage but are taken off the heat and put in the mould for the entire process of saponification to complete there. That is why cold process soaps take longer to cure. Like the previous experiment we made a lye solution only this time we used green tea to make it. While pouring in the NaOH to the tea, we did not pour it in slowly enough causing the solution to bubble and slightly overflow. This reduced the amount of lye solution we had but didn’t stop the soap from becoming too basic to use.
Also, because of the distraction while cleaning up we couldn’t spend too much time mixing the alkali into the tea so it did not dissolve completely. In hindsight this may have been the reason the soap had a basicity with a pH of over 11. We also think that the way the tea reacted with the NaOH might have led to the lye becoming hard to saponify, even though green tea is used in many homemade soaps. After reading over a few sources, we came to the conclusion that apart from not having the lye solution mixed properly the temperature might have been high, even though we took care that it would not be. Other procedures recommended chilling the tea solution before adding the NaOH, something that our procedure had not mentioned. Having too high temperatures in a cold process soap can lead to disaster.
Since this is a cold process soap, the saponification process takes place inside the mold. Thus, there was a chance that the pH of the soap would lower after a week. When we tested it again, we found not much difference in that the pH was still 11. This is presumably because the soap was already so basic that any lowering could not be measured using the scale we used. This soap was the one which we were least proud of and it really did not turn out well. To extend this experiment we would let the soap cure for another two weeks to see if it bring down the pH at all, though we do not have high hopes.
• Cucumber Soap
it in the mould. The lye solution this time was simple in that we made it simply with water and NaOH. After blending the lye and oil we had to add cucumber puree to the soap after the trace, and we did so. After doing so the soap kept bubbling on its own record, even after we took it off heat. It bubbled for about 30 minutes when we started straining out the solid from the liquid portions. Since the hot soap was bubbling it was too dangerous to keep blending the solution. We thought maybe the lye reacted with cucumber which caused it to boil.
Another plausible reason for this could have been the extra heat in the solution, because though we let the oils and lye cool down we didn’t chill them. Again, this we came to know only after we were done with the experiment after researching reasons why the soap began to heat. The unexpected reaction that took place clearly showed that saponification is an exothermic reaction and it is extremely important to keep the temperatures while making soap under check. Though this was a worrying experiment, the soap ended up having a pH of 10 which is still within the range of usable soaps despite being on the high side.
Appendices
Safety Procedure:
1. This experiment uses Sodium Hydroxide that can burn the skin and the eyes. Use gloves while handling.
2. Remove contact lenses before performing experiment. 3. Wear safety goggles and a lab coat or apron.
4. If sodium hydroxide splashes into your skin or eyes rinse thoroughly with water.
Materials Needed: 1. Coconut oil 2. Castor Oil 3. Palm Oil 4. Sunflower Oil 5. Olive oil 6. Soybean Oil 7. Canola Oil. 8. Mango butter 9. Cocoa Butter
10. Vegetable Shortening 11. Canned Pumpkin 12. Green Tea 13. Oatmeal 14. Cucumber 15. Essential Oils
16. 3-M Sodium hydroxide solution pH paper 17. Distilled water
18. Stirring rod 19. Sodium chloride 20. Cheesecloth 21. Filter paper 22. Soap mold
23. Pyrex beakers, 100-mL (2)
25. Hot pad or oven mitts 26. Hot plate
27. Timer
28. Scale capable of measuring in grams; needed if the Sodium chloride is in solid rather than liquid form
29. Clear plastic cups (3)
Demo Procedure: For Coconut Soap
1. Put on your lab coat, gloves, and safety goggles.
2. Place 10 mL of coconut oil and 15 mL of 3-M sodium hydroxide solution into a 100-mL beaker. 3. Using a hotplate or a low-flame Bunsen burner, heat the mixture to a gentle boil constantly
stirring the solution.
4. Boil until all of the water has evaporated.
5. Remove the beaker from the heat and allow it to cool.
6. Using the pH paper, test and record the pH of the crude soap. (Note: Swirl or mix a solution well before measuring.)
7. Add 15 mL of distilled water to the soap mixture and stir it with a stirring rod.
8. Heat 50 mL of saturated sodium chloride solution in a 100-mL beaker until it is almost boiling. 9. Add the hot sodium chloride solution to the soap mixture.
10. Break up lumps of soap with a clean stirring rod.
11. Cover the beaker containing the soap mixture with cheesecloth and pour the liquid into a clear plastic cup. Keep the material left in the beaker after decanting the liquid. Those solids are the soap.
12. Measure and record the pH of the soap as “Washed 1 time”. 13. Repeat steps 7–142one more time.
14. Record the pH after each wash.
15. Add three drops of peppermint oil to the soap.
16. Press the soap between two pieces of filter paper to remove as much liquid as possible. 17. Press the soap into the soap mold and dry it overnight.
18. Measure and record the pH reading of the dried soap.
For Pumpkin Soap
2. Mix Palm oil, Coconut oil, Olive oil, Sunflower oil, Mango butter, Castor oil. 3. Add lye solution to oil mixture.
4. Add oatmeals at trace. 5. Repeat steps 17-18.
*Adapted from: Learn how to make soap!
For Cucumber Soap
1. Mix NaOH and water.
2. Mix 7.5 oz. Olive Oil, 7.5 oz. Coconut Oil, 7 oz. Palm Oil, 1.5 oz. Castor Oil. 3. Add lye solution to the oil mixture.
4. Add pureed cucumber at trace. 5. Repeat Steps 17-18.
*Adapted from: Soapmaking Resource: Soapnuts Library, Free Recipes,instructions, tools.
For Lemongrass, Green Tea and Oatmeal Soap 1. Make lye solution using green tea.
2. Mix Olive Oil Vegetable Shortening, and Soybean oil. 3. Add lye solution to the oil mixture.
4. Add lemon and green tea, along with lemon essential oil and oatmeal at trace. 5. Repeat steps 17-18
References
A., R. (2009, March 12). Lemongrass, Green Tea + Oatmeal Soap – Cold Process Recipe. Soap Deli News — Handmade Bath and Beauty Recipes and DIY Craft Projects. Retrieved June 1, 2013, from http://soapdelinews.com/2009/03/lemongrass-green-tea-oatmeal-soap-cold-process-recipe.html
Carey, F. A. (2000). Carboxylic Acid Derivatives. Nucleophilic Acyl Substitution.Organic chemistry (4. ed., p. 774). Boston: McGraw-Hill.
Charles Sturt University (n.d.). Industrial Chemistry. Retrieved My 22, 2013, from http://hsc.csu.edu.au/chemistry/options/industrial/2764/Ch955.htm
Dunn, K. M. (2003). Bath (soap).Caveman Chemistry (p. 19.3). United States: Universal Pub.. Dunn, K. M. (2010). Scientific soapmaking: the chemistry of the cold process. Farmville, VA: Clavicula Press.
Griffin, A. (2011, October 11). Hot Process Soap Series: The Great Pumpkin Loaf | Learn how to make soap!. Learn how to make soap! | Lovin' Soap: Soap making blog and E-Zine. Retrieved June 1, 2013, from http://www.lovinsoap.com/2011/10/hot-process-soap-series-the-great-pumpkin-loaf/
Key Center for Polymer Colloids, The Saponification Reaction. Retrieved June 2, 2013, from http://discovery.kcpc.usyd.edu.au/9.5.5-short/9.5.5_processes.html
McClain, Dr. Mark Chemical Reactions: Soap Making. (n.d) retrieved May 22 2013, from Chemical Reactions: Soap Making, from http://people.cedarville.edu/employee/goll
Nsb Notes (n.d.). Wiki.dot: Saponifiation in the Lab and Industry. Retrieved May 22, 2013, from http://nsb.wikidot.com/c-9-5-5-2
Pratt, C. (n.d.). Soapnuts-Cold Process Soap Recipes Page One. Soapmaking Resource: Soapnuts Library, Free Recipes,instructions, tools. Retrieved June 1, 2013, from
http://www.soapnuts.com/indexcp.html
Quality Laboratory Oil Experiments Procedures and Practices. (n.d.). AOCS (American Oil Chemists' Society). Retrieved June 1, 2013, from http://www.aocs.org/index.cfm
Raheem, D. J. (2011). Saponification.University of Salahadin, 1. Retrieved May 23, 2013, from http://www.scribd.com/doc/55462716/Saponification
Soap Production (1995). Saponification: Full Boiled Process. Retrieved June 2, 2013, from http://www.nzdl.org/gsdlmod?e=d-00000-00---off-0cdl--00-0----0-10-0---0---0direct-10---4---0-1l--
11-en-50---20-help---00-0-1-00-0-0-11-1-0utfZz-8-00&cl=CL2.19&d=HASH015bbb10c6f5cb2249d93782.27>=2
Streamline-Exports (2012). Saponification. Retrieved June 2, 2013, from http://www.streamline-exports.com/italian-soap/plant-equipment/plant-equipment-products.asp
The Chemistry of Soaps . (n.d.). Science @ Stanislaus. Retrieved May 23, 2013, from http://science.csustan.edu/nhuy/chem1002/soapexp.htm