COMSPHERE
6700 SERIES NETWORK
MANAGEMENT SYSTEM
NETWORK CONFIGURATION GUIDE
Document No. 6700-A2-GB22-20
Printed on recycled paper
A February 1998 6700-A2-GB22-20
Copyright 1998 Paradyne Corporation. All rights reserved.
Printed in U.S.A.
Notice
This publication is protected by federal copyright law. No part of this publication may be copied or distributed, transmitted, transcribed, stored in a retrieval system, or translated into any human or computer language in any form or by any means, electronic, mechanical, magnetic, manual or otherwise, or disclosed to third parties without the express written permission of Paradyne Corporation, 8545 126th Ave. N., Largo, FL 33773.
Paradyne Corporation makes no representation or warranties with respect to the contents hereof and specifically disclaims any implied warranties of merchantability or fitness for a particular purpose. Further, Paradyne Corporation reserves the right to revise this publication and to make changes from time to time in the contents hereof without obligation of Paradyne Corporation to notify any person of such revision or changes.
Changes and enhancements to the product and to the information herein will be documented and issued as a new release to this manual.
Warranty, Sales, and Service Information
Contact your local sales representative, service representative, or distributor directly for any help needed. For additional information concerning warranty, sales, service, repair, installation, documentation, training, distributor locations, or Paradyne worldwide office locations, use one of the following methods:
Via the Internet: Visit the Paradyne World Wide Web site at http://www.paradyne.com
Via Telephone: Call our automated call system to receive current information via fax or to speak with a
company representative.
— Within the U.S.A., call 1-800-870-2221 — Outside the U.S.A., call 1-727-530-2340
Trademarks
All products and services mentioned herein are the trademarks, service marks, registered trademarks or registered service marks of their respective owners.
Contents
About This Guide
Document Purpose and Intended Audience. . . iii
Document Summary. . . iii
Product-Related Documents. . . iv
1
Introduction
What is the Network Configuration Feature? . . . 1-1
Preparing for Network Configuration . . . 1-1
Accessing the Network Configuration Feature . . . 1-3
Main Menu Options . . . 1-3
2
Workstation Settings
Workstation Setup . . . 2-1
Adding Names and IP Addresses. . . 2-1
Modifying or Deleting Names and IP Addresses . . . 2-2
Choosing the Active Server. . . 2-3
Entering Administrative Data . . . 2-4
3
Configuration Files and Interfaces
Configuration Files Overview . . . 3-1
Interfaces . . . 3-2
Adding an Interface . . . 3-2
Duplicating an Interface . . . 3-2
Deleting an Interface . . . 3-3
Contents
ii February 1998 6700-A2-GB22-20
4
SNMP Settings
Configuring SNMP . . . 4-1
SNMP . . . 4-1
Configuring Authorized SNMP Managers. . . 4-3
Modifying or Deleting Authorized Manager Information . . . 4-4
5
Custom Network Interface Settings
Overview . . . 5-1
Viewing Network Settings . . . 5-1
Configuring LAN Hardware Parameters . . . 5-2
Selecting the IP Address of a Workstation . . . 5-4
Setting the Number of Subnet Mask Bits . . . 5-4
Choosing Port Settings . . . 5-4
Choosing Modem Settings . . . 5-6
Specifying Dial Settings . . . 5-7
Designating the Default Gateway. . . 5-8
Glossary
About This Guide
Document Purpose and Intended Audience
This guide describes how to use the COMSPHERE 6700 Series Network Management System (NMS) Network Configuration Guide.
It is assumed that you have a basic understanding of LAN, networks and their adapters, modems and their operation, are knowledgeable about data
communications, and are familiar with Windows terminology and conventions. You or your LAN administrator should also have knowledge of TCP/IP.
Document Summary
Section Description
Chapter 1 Introduction. Provides an introduction to the network configuration features and how to access them.
Chapter 2 Workstation Settings. Describes procedures for adding, modifying, and deleting IP addresses and selection of an active server.
Chapter 3 Configuration Files and Interfaces. Provides procedures for entering interfaces, modifying interfaces, and connecting to interfaces automatically.
Chapter 4 SNMP Settings. Describes procedures for the use of community names and SNMP managers.
About This Guide
iv February 1998 6700-A2-GB22-20
Product-Related Documents
Document Number Document Title
3000-A2-GA31 COMSPHERE 3000 Series Carrier, Installation
Manual
3610-A2-GB46 COMSPHERE 3600 Series Data Service Units,
Models 3610 and 3611, User’s Guide
3610-A2-GB48 COMSPHERE 3600 Series Data Service Units,
Models 3610 and 3611, Time Division Multiplexer, Multichannel Multipoint, and Digital Bridge Options Supplement
3610-A2-GB49 COMSPHERE 3600 Series Data Service Units,
Models 3610 and 3611, Dial Backup Module Options Supplement
3810-A2-GB30 COMSPHERE 3800 Series Modems, Models 3810,
3811, and 3820, User’s Guide
3910-A2-GN32 COMSPHERE 3900 Series Modems, Models 3910
and 3911, Point-to-Point/Multipoint, Installation and Operation Manual
6700-A2-GB20 COMSPHERE 6700 Series Network Management
System SNMP Proxy Agent User’s Guide
6700-A2-GB21 COMSPHERE 6700 Series Network Management
System Multiuser Feature User’s Guide
6700-A2-GB23 COMSPHERE 6700 Series Network Management
System Remote Monitor Feature User’s Guide
6700-A2-GB41 COMSPHERE 6700 Series Network Management
System Security Manager Feature Supplement
6700-A2-GY31 COMSPHERE 6700 Series Network Management
System User’s Guide
1001-40-1940 NEWT TCP/IP for Windows Installation and User’s
Guide
Contact your sales or service representative to order additional product documentation.
Paradyne documents are also available on the World Wide Web at: http://www.paradyne.com
Introduction
1
What is the Network Configuration Feature?
The Network Configuration feature allows you to customize your COMSPHERE 6700 Series NMS base software, client, and/or SNMP Proxy Agent features. This chapter describes the Network Configuration feature, explains how to access this feature, and provides a diagram of its menu structure.
Preparing for Network Configuration
Before network configuration, you need some system and network information. Use the following form to collect the necessary information before you start the installation process. Retain this form as a record of this information. Examples are shown in brackets [ ].
Additional network installation requirements are based on the software installed: With COMSPHERE 6700 Series NMS Release 5.0.0 or higher, it is expected that the user has installed the TCP/IP stack and has a functioning network. With COMSPHERE 6700 Series NMS Release 4.0.0 or higher, NetManage software is supplied to meet licensing requirements. Do not separately install the NetManage software. During the Installing the Multiuser Feature
procedure, the NetManage software is installed automatically. Refer to COMSPHERE 6700 Series Network Management System Multiuser Feature User’s Guide for details.
Introduction
1-2 February 1998 6700-A2-GB22-20
Network Configuration Information General
Where to install the software [c:\pcnms]: Location of network drivers [c:\pcnms]: Software Serial Number [1493018]: Software Key Number [dkjslmo]: Network Interface Name [Ethernet0]: Network Interface Type [Ethernet]:
Workstation
Internet Address of Workstation [192.0.2.2]: Unique Node Name [Largo Bldg. J]:
NMS Server(s) IP Address [192.0.2.1]:
LAN/Hardware Interface
Adapter Vendor Name [Western Digital]: Board Type [Ether Card Plus]:
Interrupt Level [5]:
I/O Base Address [0x300]:
SLIP Interface
Baud Rate [9600]: Flow Control [Hardware]:
Modem Type [Hayes compatible]: Port [COM 1]:
Telephone Number [9,1,813–530–2671]:
Optional
Subnet Mask [255.255.255.0]: Default Gateway [192.0.2.254]:
Introduction
Accessing the Network Configuration Feature
To access the Network Configuration feature, access the Windows Program Manager and choose the icon shown below from the COMSPHERE 6700 Program Group.
The Network Configuration Main Menu appears.
Main Menu Options
The following menu options are available from the Main Menu.
Use the procedures in the following chapters to customize your configuration using these menu options.
2-1
6700-A2-GB22-20 February 1998
Workstation Settings
2
Workstation Setup
This chapter provides procedures for configuring a workstation’s server-related settings.
For each NMS multiuser client, you must designate a server, and each NMS server must have a name and Internet Protocol (IP) address.
Adding Names and IP Addresses
Use NMS Servers... to build a database of NMS server names and IP addresses. You can then use this database to select the NMS server for a multiuser client.
Procedure
1. Select Workstation from the Main Menu.
2. Choose NMS Servers... The NMS Servers dialog box appears.
3. In the Name field, enter the name of the NMS server (maximum 15 characters).
4. In the IP Address field, enter the NMS server IP address.
5. Choose Add. The new name and IP address appear in the Available NMS Servers list box.
6. Repeat Steps 3–5 for each IP address you need to add.
Workstation Settings
Modifying or Deleting Names and IP Addresses
Use NMS Servers... to maintain the NMS server name and IP address database.
Procedure
1. Select Workstation from the Main Menu.
2. Choose NMS Servers.... The NMS Servers dialog box appears, as shown on page 2-1.
3. Choose the name of the server you wish to modify or delete from the Available NMS Servers list box. That name and address appears in the
Name and IP Address fields.
4. Change the name and/or IP address and choose Modify or Delete, as appropriate.
5. Repeat Steps 3 and 4 for each server name and IP address you need to modify or delete.
Workstation Settings
2-3
6700-A2-GB22-20 February 1998
Choosing the Active Server
Use Active Server... to choose the active server for the NMS client. After you choose an active server with this command, the NMS client uses the IP address you set up using NMS Servers... to communicate with that server.
Procedure
1. Select Workstation from the Main Menu.
2. Choose Active Server... The Active Server dialog box appears.
3. Select a server from the Available NMS Servers listbox. 4. Choose OK. The Main Menu appears.
NOTE:
If you change the NMS server while the NMS is active, you must restart NMS.
Workstation Settings
Entering Administrative Data
Use Administration to enter information about who to contact should the workstation require human interaction.
Procedure
1. Select Workstation from the Main Menu.
2. Choose Administration. The Station Administration dialog box appears.
The Station Name appears at the top of the dialog box. This is the name entered for this workstation during the installation process.
3. Use the Location, Contact 1, and Contact 2 fields to enter administrative information about this workstation. Each field contains a maximum of 40 characters.
3-1
6700-A2-GB22-20 February 1998
Configuration Files and Interfaces
3
Configuration Files Overview
This chapter provides procedures for configuration file and interface manipulation.
NOTE:
The chapter is optional and applies to NetManage software with 6700 NMS Release 4.0.x only.
Use the File menu on the Custom window menu bar to save and exit a configuration file. To access the Custom window, choose Settings... from the Network menu.
To save a configuration file, choose Save from the File menu on the Custom window menu bar.
To exit a configuration file, choose Exit on the File menu on the Custom window menu bar. This closes the configuration file and exits the Custom window.
Configuration Files and Interfaces
Interfaces
Use the Interface menu on the Custom window to add, duplicate, or delete an interface. You must configure at least one interface.
Adding an Interface
Use Add on the Custom window’s Interface menu to add an interface to a configuration file.
Procedure
1. Choose Settings from the Network menu. The Custom window appears. 2. Choose Interface from the Custom window menu bar.
3. Choose Add from the Interface menu. The Add Interface window appears.
4. Select the type of interface using the selection list button to the right of the
Type field.
5. Enter the name of the interface in the Name field. The default is Ethernet0. 6. Choose OK.
Duplicating an Interface
Use Duplicate on the Custom window’s Interface menu to create copies of an interface that differ only slightly. For example, use Duplicate for the same IP, subnet, and port where each interface has its own telephone number.
Procedure
Configuration Files and Interfaces
3-3
6700-A2-GB22-20 February 1998
4. Choose Duplicate from the Interface menu. The Interface Name dialog box appears.
5. Enter a unique name for the interface in the Name field. 6. Choose OK.
Deleting an Interface
Use Delete on the Custom window’s Interface menu to delete an interface.
Procedure
1. Choose Settings from the Network menu. The Custom window appears. 2. Select the interface from the bottom of the Custom window.
3. Choose Interface from the Custom window menu bar.
4. Choose Delete from the Interface menu. The Delete Interface dialog box appears.
Configuration Files and Interfaces
Automatically Connecting Interfaces
Use Interface on the Network Configuration main menu to set up serial interfaces to automatically connect at system startup. Also use this command to remove interfaces from the automatic connection list.
NOTE:
You must configure the devices and the COMSPHERE 6700 Series NMS interfaces before you can use this procedure to automatically connect those interfaces. Also, the COMSPHERE 6700 NMS must be running.
To set up automatically connecting interfaces, choose Interface from the Network pull-down menu. The Auto Connect Interfaces dialog box appears.
This dialog box shows all available interfaces not set up for automatic connection in the left list box, and all interfaces previously set up for automatic connection in the right list box.
To add an interface to the auto connect list, highlight the desired interface in the Available Interfaces list box, then select Add.
To remove an interface from the auto connect list, highlight the desired interface in the Connected Interfaces list box, then select Remove.
4-1
6700-A2-GB22-20 February 1998
SNMP Settings
4
Configuring SNMP
This chapter provides procedures for SNMP-specific settings.
Use Community Names... on the SNMP menu to configure SNMP community names for use by the COMSPHERE 6700 Series SNMP Proxy Agent.
Use Authorized Managers... in conjunction with Community Names... to determine which SNMP messages to process.
SNMP
The SNMP Proxy Agent uses the community names to: Determine which SNMP messages to process
Determine how to identify itself when issuing SNMP Trap messages to an SNMP Manager
Provide a limited security function, when used in conjunction with the Authorized Managers table
The NMS Read and Write Community names control access to the 6700 Series NMS MIB. The Base Read and Write Community names control access to the 6700 Series Device MIB.
SNMP Settings
Procedure
To create Community Names:
1. Choose Community Names... from the SNMP menu. The Community Names dialog box appears.
2. Make the required entries. Table 4-1 describes the fields in the Community Names dialog box.
Table 4-1. Community Names Dialog Box Fields
Field
Character
Length Default Description NMS Read
Community
0–32 public Name for issuing Read (GET) commands for NMS. A null entry causes the agent to accept any community name.
NMS Write Community
0–32 public Name for issuing Write (SET) commands for NMS. A null entry causes the agent to accept any community name.
Base Read 0–16 (Blank) Name for issuing Read (GET) commands for NMS devices. The device name (within 6700 Series NMS) is appended to this name to form the specific device read community name. Base Write 0–16 (Blank) Name for issuing Write (SET) commands for
SNMP Settings
4-3
6700-A2-GB22-20 February 1998
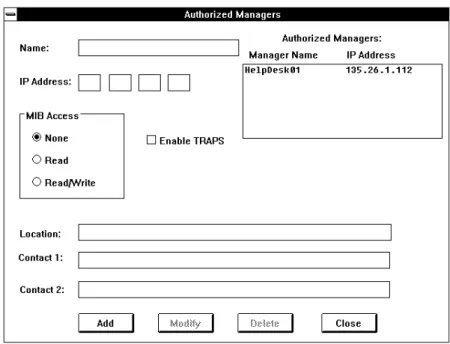
Configuring Authorized SNMP Managers
Procedure1. Choose Authorized Managers... from the SNMP menu. The Authorized Managers dialog box appears.
2. Make the required entries. Table 4-2 describes the fields on the Authorized Managers dialog box.
Table 4-2. Authorized Managers Dialog Box Fields Field
Character
Length Description
Name 1–15 SNMP manager’s name
IP Address – SNMP manager’s Internet Protocol address MIB Access – SNMP manager’s access to MIBs
Enable TRAPS – Enable trap forwarding to the SNMP manager Location 0–40 SNMP manager’s location
Contact 1 0–40 Contact person’s name Contact 2 0–40 Contact person’s name
3. Choose Add. The name of the new authorized manager appears in the Authorized Managers list box.
4. Repeat Steps 2 and 3 for each authorized manager you need to add. 5. Choose Close to return to the Main Menu.
SNMP Settings
Modifying or Deleting Authorized Manager Information
Procedure1. Choose Authorized Managers... from the SNMP menu. The Authorized Managers dialog box appears, as shown in the screen on page 4-3.
2. Choose the name of the authorized manager you wish to modify or delete in the Authorized Managers list box. The settings for that manager appear in the fields of the dialog box.
3. Press Tab to move to the fields you need to change and make changes as appropriate. The field descriptions are listed in the Configuring Authorized SNMP Managers procedure on page 4-3.
4. Choose Modify or Delete, as appropriate.
5. Repeat Steps 2–4 for each manager you need to modify or delete. 6. Choose Close to return to the Main Menu.
NOTE:
To change the IP address of a manager, you must delete the current entry and then add the modified IP address.
5-1
6700-A2-GB22-20 February 1998
Custom Network Interface
Settings
5
Overview
This chapter provides procedures for required interface-specific settings. Refer to the NEWT TCP/IP for Windows Installation and User’s Guide for details about other configuration options.
NOTE:
The chapter is optional and applies to NetManage software with 6700 NMS Release 4.0.x only.
Viewing Network Settings
Use Settings... on the Network menu to view or customize your communications environment. Choose Settings... to access the Custom window.
Custom Network Interface Settings
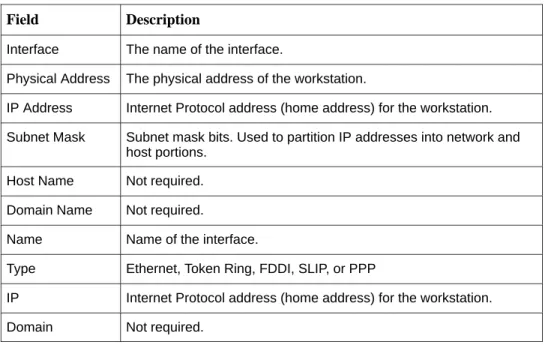
Table 5-1 describes the fields on the Custom window.
Table 5-1. Custom Window Fields Field Description
Interface The name of the interface.
Physical Address The physical address of the workstation.
IP Address Internet Protocol address (home address) for the workstation. Subnet Mask Subnet mask bits. Used to partition IP addresses into network and
host portions. Host Name Not required. Domain Name Not required.
Name Name of the interface.
Type Ethernet, Token Ring, FDDI, SLIP, or PPP
IP Internet Protocol address (home address) for the workstation. Domain Not required.
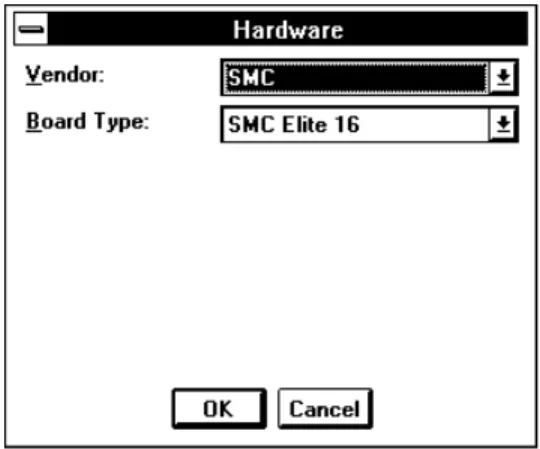
Configuring LAN Hardware Parameters
Use Hardware... to select and configure the following hardware-related parameters for Ethernet, Token Ring, or FDDI networks:
H Vendor
H Board Type
"
Procedure1. Choose Settings... from the Network menu. The Custom window appears, as shown on page 5-1.
Custom Network Interface Settings
5-3
6700-A2-GB22-20 February 1998
3. Choose Hardware... from the Setup menu. The Hardware dialog box appears.
Table 5-2 describes the fields in the Hardware dialog box.
4. Use the drop-down list boxes to select and configure the hardware parameters as needed.
5. Choose OK.
Table 5-2. Hardware Dialog Box Fields Field Description
Vendor Supplier of the LAN card.
Board Type Model. Defaults to one of chosen vendor’s cards.
NOTE:
If the network driver is not installed in the C:\PCNMS.EXE directory, you are prompted to enter the directory where the driver resides.
Custom Network Interface Settings
Selecting the IP Address of a Workstation
Use IP Address... to select the Internet Protocol (home) address of a workstation.
Procedure
1. Choose Settings... from the Network menu. The Custom window appears, as shown on page 5-1.
2. Choose Setup from the Custom window menu bar. 3. Choose IP Address... from the
Setup menu. The Internet Address dialog box appears.
4. Enter the IP address. Click on the radial button to reset the fields to zero. 5. Choose OK.
Setting the Number of Subnet Mask Bits
Use Subnet Mask... to specify the number of subnet mask bits. These bits are used to partition IP addresses into a network and host portion, if needed.
Procedure
1. Choose Settings... from the Network menu. The Custom window appears, as shown on page 5-1.
2. Choose Setup from the Custom window menu bar. 3. Choose Subnet Mask... from the
Setup menu. The Subnet Mask dialog box appears.
4. Click and drag the Subnet Mask slide bar to the correct location, or type the number of subnet mask bits. 5. Choose OK.
Custom Network Interface Settings
5-5
6700-A2-GB22-20 February 1998
Procedure
1. Choose Settings... from the Network menu. The Custom window appears, as shown on page 5-1.
2. Choose Setup from the Custom window menu bar.
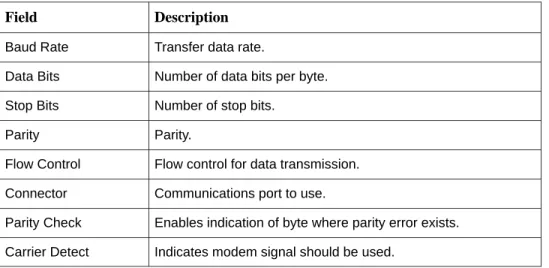
3. Choose Port... from the Setup menu. The Port Settings dialog box appears.
Table 5-3 describes the fields on the Port Settings dialog box.
NOTE:
SLIP, CSLIP, and PPP are 8 bit protocols and must have the following settings: 8 Data Bits, 1 Stop Bit, and None Parity.
4. Change the port settings, as needed. 5. Choose OK.
Table 5-3. Port Settings Dialog Box Fields Field Description Baud Rate Transfer data rate.
Data Bits Number of data bits per byte. Stop Bits Number of stop bits.
Parity Parity.
Flow Control Flow control for data transmission. Connector Communications port to use.
Parity Check Enables indication of byte where parity error exists. Carrier Detect Indicates modem signal should be used.
Custom Network Interface Settings
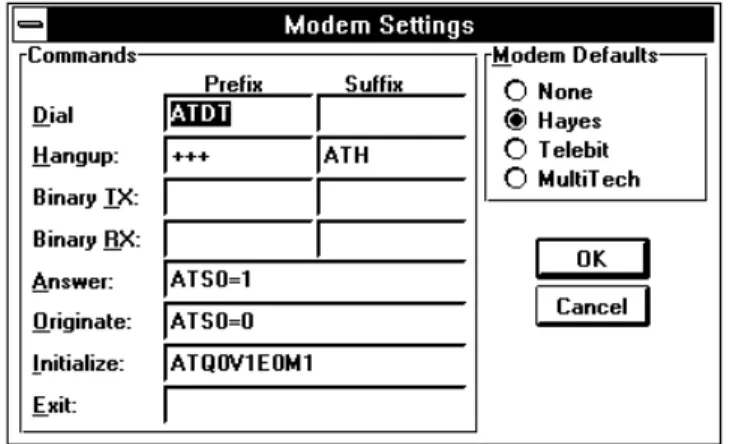
Choosing Modem Settings
Use Modem... to specify modem interaction commands and modes for SLIP interfaces.
Procedure
1. Choose Settings... from the Network menu. The Custom window appears, as shown on page 5-1.
2. Choose Setup from the Custom window menu bar.
3. Choose Modem... from the Setup menu. The Modem Settings dialog box appears.
Table 5-4 describes the fields on the Modem Settings dialog box.
4. Select the appropriate modem from those listed under Modem Defaults. The Network Configuration feature then uses default commands based on your choice.
If your modem is not listed, select Hayes which works across almost all modem types. Select None to indicate a direct null-modem connection, which does not require any dial.
NOTE:
If your modem requires special settings, refer to Table 5-4 and the manual provided by your modem vendor.
Custom Network Interface Settings
5-7
6700-A2-GB22-20 February 1998
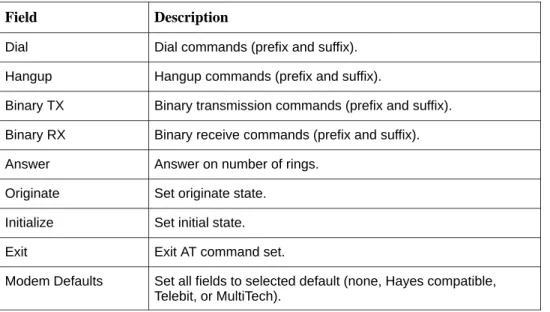
Table 5-4. Modem Settings Dialog Box Fields Field Description
Dial Dial commands (prefix and suffix). Hangup Hangup commands (prefix and suffix).
Binary TX Binary transmission commands (prefix and suffix). Binary RX Binary receive commands (prefix and suffix). Answer Answer on number of rings.
Originate Set originate state. Initialize Set initial state. Exit Exit AT command set.
Modem Defaults Set all fields to selected default (none, Hayes compatible, Telebit, or MultiTech).
Specifying Dial Settings
Use Dial... to specify dial parameters for SLIP interfaces.
Procedure
1. Choose Settings... from the Network menu. The Custom window appears, as shown on page 5-1.
2. Choose Setup from the Custom window menu bar.
3. Choose Dial... from the Setup menu. The Dial Settings dialog box appears.
Custom Network Interface Settings
4. Enter the appropriate dial settings.
NOTE:
Leave the Dial field blank to indicate Answer mode when connected. 5. Choose OK.
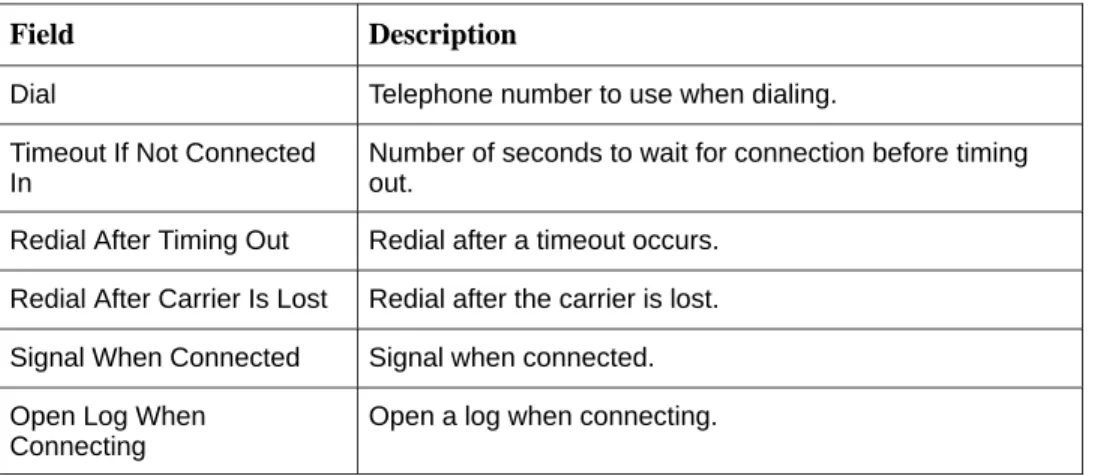
Table 5-5. Dial Settings Dialog Box Fields Field Description
Dial Telephone number to use when dialing. Timeout If Not Connected
In
Number of seconds to wait for connection before timing out.
Redial After Timing Out Redial after a timeout occurs. Redial After Carrier Is Lost Redial after the carrier is lost. Signal When Connected Signal when connected. Open Log When
Connecting
Open a log when connecting.
Designating the Default Gateway
Use Default Gateway... to specify which gateway (router) should receive
communication destined for addresses in an unknown subnet. Refer to the NEWT TCP/IP for Windows Installation and User’s Guide.
GL-1
6700-A2-GB22-20 February 1998
Glossary
A 32-bit mask used to identify the network and local portions of an IP address.
A software program housed within a managed network device, such as a host, gateway, or terminal server. An agent stores management data and responds to the manager’s data requests.
American National Standards Institute. A member of ISO, ANSI accredits and implements standards.
Address Resolution Protocol. Part of the TCP/IP suite, ARP dynamically links an IP address with a physical hardware address.
American Standard Code for Information Interchange. The standard for data transmission over telephone lines. A 7-bit code establishes compatibility between data services. The ASCII code consists of 32 control characters (nondisplayed) and 96 displayed characters. The process of preserving copies of files on a different drive, directory, or media to protect against the destruction or loss of the original files in the event of hardware or system failure.
A unit of signaling speed that is equal to the number of symbols per second. This is not necessarily the same as bits per second, although the terms are frequently interchanged. The Bootstrap Protocol. Described in RFCs 951 and 1084, it is used for booting diskless nodes.
A temporary storage area used to compensate for differences in data flow rate when transmitting data from one device to another.
A device that receives a specific service, such as database management, from a server. An agent program that runs continuously on a server system in a UNIX environment and provides resources to client systems on the network.
A factory-preset value that is assumed to be correct unless changed by the user. A unique label that identifies the device. The device name must be unique to all other network element names (sites, carriers, devices, device groups, cabinets, and models). Can also be a logical name equated to a physical device name.
A temporary, as opposed to dedicated, connection between machines established over a standard phone line.
Dynamic Link Library. Unlike Terminate and Stay Resident applications, DLLs are automatically loaded into memory when required and unloaded when space is needed for other applications.
Domain Name System. An online distributed database that maps machine names into IP addresses.
A named group of machines on the network. A domain name consists of a sequence of names (labels) separated by periods (dots).
A software module that controls an input/output port or external device such as a keyboard or a monitor. TCP/IP uses a driver to control the network interface cards.
address mask agent ANSI ARP ASCII backup baud BOOTP buffer client daemon default device name dial-up DLL DNS domain driver
Glossary
Data Service Unit. Data communications equipment that transmits digital data over a private line. Also used for limited distance communications over the PSTN when a high-speed modem is not needed.
Electronic Industries Association. This organization provides standards for the data communications industry to ensure uniformity of interface between DTEs and DCEs. A type of network that supports high-speed communication among systems. It is a 10 Mbps standard for LANs. All hosts are connected to a coaxial cable where they contend for network access using a Carrier Sense Multiple Access with Collision Detection
(CSMA/CD) paradigm.
A six-part hexadecimal number in which a colon separates each part (for example, 8:0:20:1:2f:0). This number identifies the Ethernet communications board installed in a PC and is used to identify the PC as a member of the network.
Export is the process that makes a file available so that other systems can access it. File access allows users to work with a remote file as if the file is local.
A process running on a computer that provides access to files on that computer to programs running on remote machines.
File Transfer Protocol. A TCP/IP standard protocol that allows a user on one host to access and transfer files to and from another host over a network, provided that the client supplies a login identifier and password to the server.
A communications device/program that passes data between networks having similar functions but dissimilar implementations.
A unique number associated with each group name on the server.
A computer attached to a network that shares its information and devices with the rest of the network.
Internet Control Message Protocol. Internet protocol that allows for the generation of error messages, test packets, and information messages related to IP.
Worldwide interconnected networks that predominantly use the TCP/IP protocol. The Internet is a three level hierarchy composed of backbone networks, mid-level networks, and stub networks.
An Internet protocol address that uniquely identifies a node on an internet. Internet Protocol. An open networking protocol used for Internet packet delivery. Internet Protocol address. The address assigned to an Internet host.
Local Area Network. A privately owned and administered data communications network limited to a small geographic area.
A software program housed within a network management station. The manager has the ability to query agents, receive agent responses, and set specific variables using various SNMP commands. DSU EIA Ethernet Ethernet address export file access file server FTP gateway group id host ICMP Internet Internet address IP IP address LAN manager
Glossary
GL-3
6700-A2-GB22-20 February 1998
A unique user-assigned identification number associated with a host that identifies a particular device to other hosts during network transactions.
NEWT is a TCP/IP communication stack for Microsoft Windows. NEWT provides users a degree of network access previously only available to workstation and mainframe users. Network File System. An application of IP developed by SUN Microsystems that permits one computer to access another computer’s file system as if it were local.
Network Information Center. Assigns IP addresses and network numbers per request submitted by an organization. The number assigned is appropriate to the number of host devices on the network.
Packet Internet Groper. A program that is useful for testing and debugging networks. It sends an Echo packet to the specified host, and waits for a response. It reports success or failure and statistics about its operation.
Point-to-Point Protocol. Serial protocol used for operation in a TCP/IP network, as specified by Internet RFC 1661.
A set of rules that determines the behavior of devices in achieving and maintaining communication.
Random Access Memory. Read/write memory that is volatile and loses its contents when power is removed.
Files, devices, and users not attached to your local DTE. The computer receiving the network command.
Request For Comment. The set of documents published by the Internet Engineering Task Force that describes Internet protocol and policies.
A device that connects LANs by dynamically routing data according to destination and available routes.
A device that offers a specific service, such as database management, to a client. Serial Link Internet Protocol. Protocol for serial operation in an Internet network. Structure of Management Information. The rules used to define the objects that can be accessed via a network management protocol.
Simple Network Management Protocol. Protocol for open networking management. A group of drives that work together to span the layers in the network protocol hierarchy. An IP addressing standard in which a portion of the host address can be used to create multiple network addresses that are logically a subdivision of the network address. The subnet portion of an IP address. In a subnetted network, the host portion of an IP address is split into a subnet portion and a host portion using an address (subnet) mask. This allows a site to use a single IP network address for multiple physical networks. Identifies the subnet field of a network address. The subnet mask is a 32-bit Internet address written in dotted-decimal notation with all the 1s in the network and subnet portions of the address.
Transmission Control Protocol. An Internet standard transport layer protocol defined in STD 7, RFC 793. It is connection-oriented and stream-oriented.
Transmission Control Protocol/Internet Protocol. The dominant protocol suite in the worldwide Internet, TCP allows a process on one machine to send data to a process on another machine using the IP. TCP can be used as a full-duplex or one-way simplex connection. network address NEWT NFS NIC PING PPP protocol RAM remote remote host RFC router server SLIP SMI SNMP stack subnet subnet address subnet mask TCP TCP/IP
Glossary
Trivial File Transfer Protocol. A standard TCP/IP protocol that allows simple file transfer to and from a remote system without a directory or file listing. TFTP is used where FTP is not available.
A type of ring-shaped network that supports high-speed communications between computers.
TFTP
IN-1
6700-A2-GB22-20 February 1998
Index
A
active server, 2-3 administrative data, 2-4 authorized managers
deleting, 4-4 modifying, 4-4
C
community names, 4-1
H
hardware parameters, LAN, 5-2
I
installation, preparation, 1-1 interfaces
adding, 3-2
automatically connecting, 3-4 deleting, 3-3
duplicating, 3-2 IP addresses, 5-4
M
menu options, 1-3
N
Network Configuration feature access procedure, 1-3 description, 1-1 Network Settings, view, 5-1
S
server, active, 2-3 settings
dial, 5-7 modem, 5-6 port, 5-4
SNMP, community names, 4-1 subnet mask bits, 5-4